1
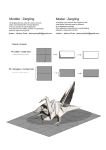
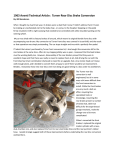
USER’S MANUAL
Rear Support Wheelchair
For Sizes L/XL
TABLE OF CONTENTS
INTRODUCTION ........................................................................
1
PRODUCT INFORMATION ...........................................................
3
Measure Your Pet ...........................................................
3
ASSEMBLY ................................................................................
5
Breakdown of Pre-assembled Parts .................................
7
Assembling the Wheelchair .............................................
9
WHEELCHAIR USE .....................................................................
16
Fitting Your Pet into the Wheelchair .................................
18
Troubleshooting ..............................................................
23
CARE AND MAINTENANCE ..........................................................
25
CONTACT US ............................................................................
25
INTRODUCTION
Best Friend Mobility® Rehabilitation Aids
Dear Pet Owner and Valued Customer:
The following guidelines, along with the attached assembly and fitting
instructions, will help you get the best use of your dog wheelchair.
Please read and follow the Assembly instructions before making any
attempt to place your pet in the wheelchair. Should you encounter any
problems with assembly and fitting, please call Best Friend Mobility
directly through our hotline (843) 492-5283.
If you think you need a different size, we can process the exchange for
you easily. Just contact us at [email protected] or
call our hotline.
NOTE: With regard to the front harness, it is possible that your pet may
need to go either one size bigger or smaller than you originally thought.
If for some reason the front harness does not fit, please contact us
immediately so we can send you the next size according to your pet’s
requirement.
If your pet is fully NON-weight-bearing on its hind legs, we recommend
that you gradually condition your pet to wheelchair use before prolonged
periods are attempted. It generally takes about two (2) weeks for your
pet to develop satisfactory foreleg strength to compensate for the
non-weight bearing state of the hind legs in the wheelchair.
We suggest that you start your pet on a 10-minute exercise regimen,
walking over a hard surface. We advise using a leash that is attached
either to your pet’s collar or to the wheelchair’s front harness. Repeat
twice daily for the first few days then increase to thrice daily thereafter.
Once your pet adapts to the 10-minute exercise sessions, the length of
time can be extended to match your pet’s stamina. For pets that are
coming back to walking on their own, we recommend daily use of their
wheelchair in order to get sufficient exercise. Time on the wheelchair will
NOT prevent them from walking, it will instead encourage them to do so
and aid in their rehabilitation.
PETS SHOULD NEVER BE LEFT UNSUPERVISED IN THEIR WHEELCHAIRS.
This is a learning process and can take time. We realize that both you
and your pet are most likely unfamiliar with the use of a dog wheelchair
so do not hesitate to contact us for help. Please be advised that most
dogs do not intuitively know how to use a wheelchair, they will require
training and practice.
1
Some dogs may be afraid in the beginning so it is important to give
positive reinforcement when placing them in the chair, especially for the
first time.
Use treats. Treats held in front of your pet will encourage it to take steps
and move forward; this will teach them to ambulate while in the chair. It
may take several training sessions before a dog is able to
actually use the wheelchair. It is okay and normal if your dog
does not take to it right away.
It is very important, especially with skittish animals, that they come into
physical contact with the wheelchair in some way every day. This should
always be coupled with positive reinforcement like praise, pets, and
treats. This will help to create a positive association with the wheelchair
and help the animal to eventually to love the wheelchair and be able to
learn to use it. This process may take from days to months, so please
don’t lose hope, persistence will pay off. Contact us for any help or
questions.
Thank you for purchasing a Best Friend Mobilty dog wheelchair.
Again, we love receiving feedback, stories, photos, and videos of how
your pets are doing in their wheelchairs. We can feature them on our site
and share your pet’s stories with other pet owners.
Sincerely,
Tim Cantrell
Vice President
Best Friend Mobility
Phone: 843.492.5283
Fax:
503.296.2865
2
PRODUCT INFORMATION
The Best Friend Mobility Rear Support Wheelchair is another way of
saying we’ve got our four-legged friend’s back. With a little help from
their friends, our furry pals can do more than get by; they can continue
to enjoy life.
Made from lightweight aluminum non-rust alloy with all terrain pneumatic
wheels, this dog wheelchair also features padded shoulder support,
double-thronged adjustable neoprene shoulder harness, and a built-in
adjustable double rear padded harness. Both male and female dogs will
have no trouble relieving themselves comfortably even while on their Rear
Support pet wheelchair.
This Best Friend Mobility Rear Support wheelchair is made to fit dogs
according to height. If you find that the wheelchair you received is too big
or too small for your pet, again, please call us immediately so that we can
make sure you have the correct size.
MEASURE YOUR PET
Measure your pet to confirm that you have the correct size Best Friend
Mobility Rear Support Wheelchair for your pet.
The only information you truly need to get the right size is the
measurement from the floor to your pet’s back—at its hindquarters. It’s
that simple!
Depending on your pet’s current capabilities and its willingness to
cooperate, this can be a 1-person or 2-person job.
If your pet has very little or no rear-limb strength, one person can
be the support while the other does the measuring.
Depending on your pet’s current capabilities and its willingness to
cooperate, this can be a 1-person or 2-person job.
3
If your pet has very little or no rear-limb strength, one person can be the
support while the other does the measuring.
Specifications:
• Lightweight, adjustable non-rust aluminum frame
• Stainless steel hardware
• Deluxe neoprene front and rear harness for complete comfort
• Designed and tested by a canine orthopaedic surgeon
• Easy hex wrench adjustment of height, length, and width
• Great for pets needing assisted walking or full weight support (zero
weight-bearing) for hind legs
• Allows pets to go to the bathroom even while in the wheelchair
• All terrain polyurethane wheels with precision-sealed ball bearings
• Easy clip-on front harness system
• Durable and easy-to-clean rear harness
The Rear Support Wheelchair is good for:
• Hip Dysplasia
• Arthritis
• Neurological problems such as osteomyelitis or degenerative myelopathy
• Fracture of the spine/back
• Rear limb amputation
• Ligamentous injuries such as PCL or ACL
• Thoracic or lumbar disc injuries
• Rehabilitation
• Any other condition that results in rear leg or joint pain, or weakness and
discomfort from any weight-bearing activities
4
ASSEMBLY
upper rear crossbar
left and right wheels
rear harness
leg straps
lower rear crossbar
left and right
side arms
left and right
front harness bars
front harness
FRAME ASSEMBLY
5
WHEEL ASSEMBLY
FRAME & WHEEL PARTS
6
FRAME PARTS:
WHEEL PARTS:
1. DC01A Left Sidearm
2. DC02A Left Front Harness Bar
3. DC01B Right Sidearm
4. DC02B Right Front Harness Bar
5. Front Harness Female Clips
6. DC09 Clip Connectors
7. Clip Connector Screws
8. DC07 Frame Connectors
9. Sidearm Bolts
10. Washers
11. DC04 Frame Supports
12. DC08 Upper Crossbar Connectors
13. DC03 Upper Rear Crossbar
14. SFT Connector
15. DC05 Lower Rear Crossbar
16. DC06A Right Wheel Connector
17. DC06B Left Wheel Connector
18. DC10 Rear Harness Support
1.
2.
3.
4.
5.
6.
7.
8.
9.
Wheel
Treads
Tire
Valve
Valve Cap
Bolt Head
Wheel Bolt
Washer
Nut
Breakdown of Pre-Assembled Parts and Tools
C
B
D
A
A. Left and Right Side Arm Assembly
B. Upper Rear Crossbar
C. Lower Rear Crossbar
D. Left and Right Front Harness Bar
E
F
G
H
7
E. Left and Right Wheels
F. Comfort Rear Harness
G. Front Harness
H. Leg Straps
I
J
K
L
I. Big Open-End Wrench
J. Small Open-End Wrench
K. Big Hex Wrench
L. Small Hex Wrench
M. Sports Rear Harness
8
Assembling the Wheelchair
1. Connecting the upper rear crossbar (B) to the side arm assemblies (A)
1.2 Fit the upper rear
crossbar (B) to the left
side arm assembly (A).
1.3 Place the connector
block screw and the clip
connector screw
together inside the
upper crossbar
connector block.
1.4 Hold the connector
block screw steady with
an open-end wrench
while securing the clip
connector screw with a
hex wrench.
9
1.5 Repeat steps 1.1 to 1.3 to connect the upper rear crossbar to the
right side arm assembly.
2. Connecting the lower rear crossbar (C) to the side arm assemblies (A)
2.1 Fit the lower rear
crossbar (C) to the left
and right side arm
assemblies (A).
2.2 Place the connector
block screw and the clip
connector screw
together inside the clip
connector.
10
2.3 Hold the connector
block screw steady with
an open-end wrench
while securing the clip
connector screw with a
hex wrench.
2.4 Using an open-end
wrench and a hex wrench,
tighten connector block
screws for upper rear
crossbar (B) and lower
rear crossbar (C) to
secure connection to the
side arm assemblies (A).
3. Installing the left and right front harness bars (D)
3.1 Insert the left front
harness bar (D) to the
left side arm (A).
3.2 Adjust to desired length.
Make sure the holes on
the left front harness bar
(D) are aligned with the
holes on the left side arm
assembly (A).
3.3 Insert metal lock in
aligned hole until it comes
out the other side.
3.4 Repeat 3.1 to 3.3 to
install the right front
harness bar (D) to the
right side arm assembly
(A).
11
Your progress so far
Figure 1
Please note that the
upper rear crossbar is
shorter than the lower
rear crossbar; this makes
the lower portion of the
cart wider than the top.
4. Attaching the left and right wheels (E)
4.1 Use the big open-end
wrench (I) to unscrew
the wheel bolt from the
right wheel connector
found on the lower right
arm assembly (A).
4.2 Insert a metal washer
thru the bolt then insert
thru the wheel hole.
Insert another metal
washer thru the bolt on
the other side of the
wheel.
12
4.3 Screw the bolt back to the right wheel connector on the right side
arm assembly (A). Tighten using the big open-end wrench (I).
4.4 Inflate wheels to recommended 35 psi, if necessary, with any
standard pump.
5. Connecting the rear harness (F)
IMPORTANT NOTE: Start with the sports harness first. Do NOT
use the comfort harness until after sports harness has been
mastered.
Plastic
Plastic Clamp
5.1 Align each plastic
O-connector clamp near
a corresponding side arm
bolt. Holding it by the
plastic ring, position
strap with O-connector
clamp to go up and over
the side arm assembly.
Side Arm Bolt
13
5.2 Fasten O-connector
clamp to the side arm
bolt by pushing it
upward.
5.3 Repeat steps 5.1 to 5.2
to connect the remaining
clamps.
5.4 Adjust the rear
harness straps to a
comfortable weightbearing position for your
pet. Make it longer or
shorter using the
adjuster buckle.
14
6. Attaching the front harness (G)
6.1 Attach the front harness
(G) to the front harness
bar simply by connecting
the side release buckles.
6.2 Adjust front harness
straps for snug yet com
fortable fit using the ad
juster buckle.
7. Attaching the leg straps (H)
7.1 Clip the leg straps (H) to
the metal eyelets on the
upper rear crossbar.
You are done with the assembly!
15
WHEELCHAIR USE
If your pet’s hind legs are completely non-weight bearing and will need
the use of the leg straps, the forelegs will require some conditioning
time; it will need additional strength in order to compensate for weight
the hind legs and for added comfort while in the Best Friend Mobility
Rear Support Wheelchair. Please allow about two weeks for full
strengthening of the forelegs before using the pet wheelchair for
prolonged periods.
Again, to develop foreleg strength, we recommend 10-minute exercise
sessions, with your pet walking over a hard surface. Begin with two
10-minute exercise sessions a day for the first few days and go up to
three times daily afterwards. When your pet adapts to the 10-minute
exercise sessions, you can extend the time to conform to your pet’s
stamina.
Is your pet is too weak to stay on its forelegs while in the Best Friend
Mobility Rear Support wheelchair due to being inactive or overweight?
Attaching a leash on your pet’s collar or to the wheelchair’s front
harness will help encourage your pet to walk or move and eventually
work up to completing the conditioning regimen.
If your pet’s forelegs do not display enough strength within a few weeks,
it may need something other than what Best Friend Mobility wheelchair
can provide. Observe if your pet is always trying to lie down or is still
unable to hold its own weight after a couple of weeks. These are signs
that its forelegs aren’t strong enough—and not improving—to use a
wheelchair.
Your pet may initially move backward instead of forward once in the Best
Friend Mobility wheelchair. No need to worry. Your pet is “backing out”
due to unfamiliarity. He or she will eventually settle down, become
familiar and comfortable, and start moving forward with some assurance
and encouragement.
Get your pet and its Best Friend Mobility wheelchair wet! Best Friend
Mobility wheelchairs are made mostly of aluminum and will not rust.
If the wheelchair is used at the beach and in salt water, just give it a
thorough rinse to get the sand, salt water, and dirt off the moving parts;
otherwise, getting the unit wet will not damage it.
If the wheel traction of your pet’s wheelchair is poor, you may want to
check the tire pressure. Remember to keep the pressure slightly below
the required PSI. Make sure that the wheels can spin freely.
16
If the wheels track to one side more than the other, it may simply be due
to how your pet naturally walks. You may notice your pet’s gait more due
to the new wheelchair, however, he or she will get used to the Rear
Support wheelchair and be able to compensate in due time. Also, check
both sides to make sure that your pet is centered on the wheelchair and
adjust the straps if necessary.
DO NOT LEAVE YOUR PET ALONE IN THE CART!
17
FITTING YOUR PET INTO THE WHEELCHAIR
1. Placing the front harness (G) on your pet
1.1 Detach front harness from the assembled wheelchair.
1.2 Unclip the front harness’ leg strap (red strap). Guide your pet’s
head through the black straps, these two are to go below the
neck, in front of the forelegs; and over the back and shoulder
area.
1.3 The front harness’ red strap should be positioned at the bottom.
It will go behind the forelegs and across the bottom chest to clip
and lock on the other side.
1.4 Adjust the front harness so that it fits your pet snugly yet
comfortably.
2. Placing the rear harness on your pet
You must start with
Sports Harness
18
NOTE: We highly recommend starting with the sports harness
(M). This harness is designed specifically for active dogs and gives
a bit better range of motion. It is fully adjustable, lightweight, and
comfortable. It is great for various activities and we’re found that
many dogs, especially the younger ones, prefer the sports harness
over the comfort harness.
2.1 Unclip the comfort harness (F) from assembled wheelchair.
2.2 Lay the comfort harness down by your pet’s hind legs. Guide your
pet’s paws over the corresponding leg holes rear harness and pull
the harness up through your pet’s legs.
2.3 Pull the straps from the side and place them over your pet’s back
until you can lock the side release buckles. Adjust the straps for
comfort and firmness.
2.4 Bring the wheelchair behind your pet. Move it forward until your
pet is positioned in the middle of the wheelchair.
19
2.5 Connect the comfort harness into the side arm bolts by snapping
on the O-connectors to the side arm bolts.
2.6 Adjust lift or the rear harness to a comfortable weight-bearing
position.
2.7 Snap on the front harness (G) to the front harness bar side
release buckles.
3. If you choose to use the sports harness (M)
3.1 The sports harness must be installed to the main assembly before
placing your pet in it.
3.2 Place the sports harness so that each O-connector clamp is level
with and near a side arm bolt. Attach as directed in step number 5
of the Assembly instructions.
20
3.3 Bring the wheelchair behind your pet. Move it forward until your
pet is positioned in the middle.
3.4 Lift your pet’s rear and gently guide the hind legs down the sports
harness.
3.5 Adjust the length of the sports harness’ straps to a comfortable
weight-bearing position for your pet using the adjuster buckles.
3.6 Fasten the back straps over you pet’s back. Connect the lower left
strap to the upper right and the lower right to the upper left strap
so that both straps cross over your pet’s lower back.
3.7 Snap on the front harness (G) to the front harness bar side
release buckles.
4. Using the leg straps
4.1 For pets that are completely non-weight-bearing on their hind
legs, use the leg straps to protect their hocks and keep them from
dragging.
4.2 Attach leg straps to the rear harness bar.
4.3 Press the cord lock and pull on the cord to loosen the leg strap.
4.4 Insert each leg to a corresponding leg strap. Adjust closure to a
comfortable tightness.
4.5 Make sure that legs can rest at a comfortable angle.
21
NOTES ON FIT
Checking Correct Height Setting
• For pets without the use of their hind legs: while standing still on a
level surface, the height of the wheelchair should be set so that the
shoulders and hips are even.
Please note that when your pet is walking or running, their backs will not
stay even due to their movement.
• For pets with the use of one or both its hind legs, the wheelchair
height needs to be set so that their paws are able to lightly graze the
ground and provide them with enough traction to push off with the rear
paws.
Often, pets experiencing weakness in their rear legs are affected on
one side more than the other. While on their wheelchair, one paw might
knuckle over and lead them to depend on the stronger leg more often or
lean on that side of the wheelchair. This is something to watch out for so
that it can be corrected and countered. A paw that gets knuckled over can
be protected by a bootie. And while we cannot stop some pets from
favoring their stronger leg, we can help them avoid leaning against the
wheelchair and possibly injuring themselves. Do this by placing a piece
of foam or a folded towel to act as padding between the leg and the side
they are leaning against.
The two side arms of the Rear Support Wheelchair’s frame should be
parallel to your pet’s back and generally, a couple of inches below the top
of his or her back. The wheelchair’s height may vary depending on your
pet’s build (e.g. shoulders being lower than the hip). When the harnesses
are positioned properly on the side arms, according to your pet’s length,
the forelegs should in no way rub against them while your pet is walking.
The front harness should rest comfortably under your pet’s forelegs. The
rear harness should also be adjusted with comfort in mind. Do not raise
the rear harness to an angle that is unnatural for your pet.
Make sure to have the front harness’ front strap sit slightly above the
center of the chest. Never allow it to press against the throat of rest
below the center of the chest; such placement may be harmful to your
pet. Adjust all straps so that they are comfortably snug; do not
overtighten.
22
TROUBLESHOOTING
The Best Friend Mobility Rear Support Wheelchair is fully adjustable.
With just a few adjustments, you can ensure proper fit and make it a
safe vehicle for your pet. Avoiding misuse and common errors will allow
your pet to quickly start enjoying the use of this mobility aid.
PROBLEM
SOLUTION
The wheelchair tips backward.
• Make sure that the frame’s side arm
height is a couple of inches below your
pet’s back. Adjust the front posts.
• Make sure the length is appropriate
for your pet. Adjust the side arms
and/or straps.
• Check the front harness. Make sure
that it is centered across your pet’s
chest. Adjust the straps and see if this
keeps the wheelchair from tipping.
The wheelchair tips forward.
• Make sure that the frame’s side arm
height is a couple of inches below your
pet’s back. Adjust the front posts.
• Check the front harness. Make sure
that it is centered across your pet’s
chest. Adjust the straps and see if this
keeps the wheelchair from tipping.
• Check weight balance. Make sure the
wheel is positioned toward the middle
or front of the connector blocks; ad
just if needed. Make sure the side
arms and all the straps are adjusted to
their new positions accordingly,
keeping in mind previous instructions.
Your pet loses breath while
moving using wheelchair.
• Check the front harness. If it is
positioned too high, it will press
against your pet’s throat when
walking. Adjust front harness
height so that your pet can breathe
freely especially while moving.
23
PROBLEM
SOLUTION
Pet’s hind legs not
comfortably resting on the
rear harness and harness
does not extend beyond pet’s
rear.
• The angle of the harness is too high.
Adjust harness height so that your
pet’s legs are at a comfortable and
natural height.
Your pet takes shorter strides.
• A too low front harness is the
usual culprit. Adjust height so as
not to hamper your pet’s natural
stride.
The wheelchair’s side arm bars
are pointing downward.
• Your straps may not be evenly
distributed.
1. Loosen the lower girth strap
(red strap)
2. Tighten the top girth strap
enough to hold the side arm
bars parallel to the ground.
3. Re-tighten the lower girth strap
enough so that both straps are
snug but comfortable.
The wheelchair’s side arm bars
are pointing upward.
• Same problem as above, uneven
distribution of the straps this time
favoring the opposite side.
1. Loosen the top girth strap.
2. Tighten the lower girth strap
(red strap) to pull the side arm
bars down parallel to the ground.
3. Re-tighten top girth strap.
24
CARE AND MAINTENANCE
Keep the Best Friend Mobility wheelchair clean. Your pet will surely
appreciate it and ride with pride. Wipe down aluminum surfaces with
warm, soapy water using a soft cloth such as a microfiber or cotton rag.
Rinse and dry.
Check the bolts and screws frequently; retighten if loose. Adjust or tighten
loose straps as well.
Remember to hose or wipe down tires to keep them from tracking dirt.
Check tire pressure every so often and inflate when needed. To reduce
bounce and increase traction, lessen tire pressure (to just under
recommended PSI) to give the wheelchair a more comfortable ride.
Wash the sling, harness, and straps in cool, soapy water and hang them
to dry. Opting for a perfume-free detergent will help your pet avoid skin
irritation. You may want to try odor neutralizers (homemade or storebought) to counter any smell that may remain in the harness.
CONTACT US
If you find that you have further questions regarding the use of the
Best Friend Mobility wheelchair, please contact us at:
Best Friend Mobility
10838 Kings Rd. Myrtle Beach, SC 29572
Phone: (843) 492-5283
Email: [email protected]
25
Best Friend Mobility
10838 Kings Rd. Myrtle Beach, SC 29572
(843) 492-5283
[email protected]