1
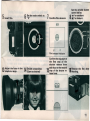
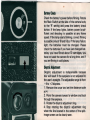
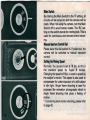
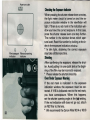
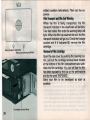
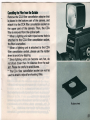
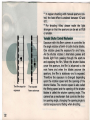
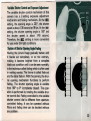
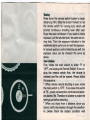
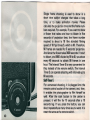
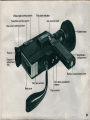
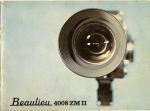
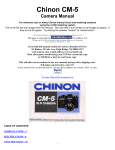
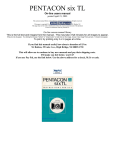
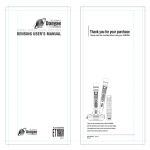
Disclaimer
The information contained in this Adobe PDF file is for general information purposes only.
Due to the age of the information and the difficulty in converting it to computer formats it
may not be up to date or correct, we make no representations or warranties of any kind,
express or implied, about the completeness, accuracy, reliability, suitability or availability
with respect to the Adobe PDF or the information, products, services, or related graphics
contained in the Adobe PDF document for any purpose. Any reliance you place on such
information is therefore strictly at your own risk.
In no event will we be liable for any loss or damage including without limitation, indirect or
consequential loss or damage, or any loss or damage whatsoever arising from loss of data
or profits arising out of, or in connection with, the use of this Adobe PDF.
This document is available free from cineinformation.org.
~
INSTRUCTIONS ·-§[fl§[~~~'t;fl"~ft.'.a.
Exposure adjustment knob
Filming speed dial
Instant slow motion switch
CCA filter cancellation socket (with cover)/--Lighting unit attaching socket
Footage counter .
Battery check window
Battery check button
Distance scale
Exposure adjustment
scale
Zooming scale
Lock button
Zooming ring
. Variable shutter
control dial
Focus ing ring
Sound recording jack
(8'-pin jack)
Shutter release lever
Remote control socket
Flash synchronizing socket
Socket cover
Rubber sheet
3
The 814XL Electronic is a precisron Super 8
movie camera which incorporates a series of improvements to the Canon Auto Zoom 814 Electronic in reply to the requests of photographers
who wish to make higher quality 8mm movies.
Thus, the optical performances of the lens and
viewfinder have been improved t o give you better photographic effects. Mechanisms such as
macro-cinematography and variable shutter
opening angle enable you to make enjoyable and
excellent movies.
Before Use
This camera is designed for easy operation and
includes some special filming devices. Because
this instruction manual contains all necessary instructions for operation of this camera and for
movie filming, please read this manual
thoroughly and become acquainted with the
camera before starting to film in order to avoid
mistakes when operating the camera's many
special shooting mechanisms.
4
Outstanding Features
Variable ~hutter Opening Angle Mechanism
The variable shutter opening angle mechanism sets the angle at 220° for XL filming,
150° for regular shooting and 150° - 0° for
fading effects. Exposure is automatically
set at either 220° or 150° to insure correct
exposure. The variable shutter opening
angle is a unique double-blade mechanism.
Synchronous Domle Sound Recording System
Shooting with synchronous sound recording is possible because of a built-in pulse
generator and by using exclusive adapter,
stereo tape recorder for good quality
sound.
XL echanism Excellent for Indoor Shooting
It is possible to film under dim light conditions, a dark room or at night because of
this camera's features such as its acceptability of highly sensitive film, 220°
shutter opening angle, exceptionally fast
lens, highly sensitive exposure meter. The
bright viewfinder an9 highly accurate
range-finder are additional advantages for
this kind of photography.
Viewfinder with Increased Brightness
An XL camera needs a viewfinder which is
easy to see for easy focusing under dark
conditions. In this camera, the viewfinder's
brightness has been doubled by increasing
the lens' effective aperture and exit pupil to
.allow a greater amount of light to reach the
viewfinder. Aberrations are 'p roperly compensated, the angle of the split-image
prism has been widened for easier viewing
and the accurate metering range ·has· been
increased.
High Quality Lens for Faithful Color Reproduction
This is a new design, large aperture, zoom
lens which gives top performance for both
XL and general shooting. Especially,
aberration in the telephoto range has been
decreased and the ideal light transmission
factor has been attained for high resolution, high contrast and perfect color balance throughout the zooming ranqe, And
the built-in macro-cinematography
mechanism on the wide-angle end gives
you a field-of-view of 33mm x 45rnm.
Changing from macro to zoom is always
.
.
5
possible, a technique that is perfect for
scene changes.
Abundant Viewfinder Information
Aperture and over/under exposure warning
marks, film transport indicator and film end
warning are all indicated by lamps for easy
confirmation under dim light conditions.
And each amp has been installed out of
the visual field so as not to obstruct the
viewfinder.
High Accuracy Servo EE
This is a TIL exposure metering system,
with a servo meter to control the
diaphragm. ·The film drive circuit HC) has
more power for increased reliability. This
makes a diaphragm aperture of f/45
possible and stabilized performance even
with changes of temperature or voltage.
Accessories to Widen Shooting Possibilities
You can use the self-timer and interval
timer coupled to the magnetic shutter
release mechanism. Single frame shooting
with flash is possible by utilizing the flash
synchronizing socket.
6
Others
Exposure compensation system
Instant slow motion
Collapsible grip
Constant voltage regulator
Built-in collapsible hood
Specifications
Type: Super 8 SLR for silent XL filming
with circuit and jack for double sound
(pulse-sync) system shooting.
Picture Size: 5.8 x 4.2mm
Lens: f/1.4 zoom lens with focal length of
7.5mm - 6Omm.
Zooming ratio 8:1.
Lens Construction: 18 elements in 13
groups, Spectra Coating; filter thread
.size: 58mm; lens cap size: 6Omm; built-in
rubber hood.
Macro-cinematography
Mechanism:
Macro-cinematography is possible using
zooming ring in wide angle end of
zooming range. With the distance scale
at 00 , the shooting distance from the
film plane indicator is 165mm. The
minimum field of view is 33 x 45mm.
Focusing Adjustment: Rotating front
component.
Distance Scale:
ft.
4
5
7
10
15
50 00
m
1.2
1.5 2
3
5 10
Zooming: Both power and manual
zooming are possible. Power zooming
speed is about 5 seconds. Manual
zooming is possible by rotating the
zooming ring. Rotating angle is 121°30'.
Viewfinder: Single-lens reflex viewfinder
with split image focusing screen.
Viewfinder Information: Aperture scale,
over/ under exposure -w arninq marks,
film transport indicator (green LED) and
film end warning indicator (red LED).
Dioptric Adjustment: Adjustable from
- 4 to + 2 diopters.
EE Mechanism: Automatic exposure
mechanism coupled to ASA film speed
and filming speed. Through-the-Iens EE
with CdS photocell, coupled to single
frame shooting.
Light Metering Range: From ASA 400,
f/1.4, EBJ (220°),9 fps. to ASA 25, f/45
;oc- (150°), instant slow motion of approx. 36 fps.
Film Speed:
Artificial light: ASA 25 - 400
ASA 16 - 250
Daylight:
7
Film ASA Setting: Automatically set
when cartridge is loaded.
Color Temperature Adjustment Filter:
Manually removed or automatically cancelled when daylight-type film is inserted, or when eCA filter cancellation
adapter or light ing unit is used.
Exposure Compensation: Two possible
compensations of + 0.5 and + 1.5
f/stops (These numbers are actual
f/stops and not multiple exposure factors.)
Manual Exposure Control: Full manual
exposure control is possible by using the
manual aperture control dial.
Filming Speeds; Dial positions for 9, 18
fps., and single frame. Separate switch
for instant SLOW MOTION (approx, 36
fps.)
Angle of Shutter Opening: 220° (effective angle) for XL filming and 150° for
regular filming and these two angles are
provided with ~ safety lock and click
stop.
8
Shutter Angle Compensation: Automatic exposure adjustment at 220° (EBJ)
and 150° ( ioc- ).
Variable Shutter Control: 150° to 0°
continuously by turning the springtensioned fading control downward.
The dial will return automatically to the
position if it is released.
Shutter Release Mechanism: Built-in
electromagnetic release system.
Drive System: High-performance electric
micromotor.
Power Source: Four 1.5V penlight (size
AA) batteries in the grip are used to
power the film drive, power zooming
,and exposure metering.
Battery Check: A red LED lamp lights up
when the battery check button is pressed if the batteries are in good condition.
Battery Life: More than 10 cartridges for
18 fps. shooting or more than one cartridge for single frame shooting.
Remote Control: By use of Remote
Switch 60 or 3.
"0:-
Main Switch: Dial positions for OFF, R
(Running) and RL (Running Lock) on
the main switch.
Footage ' Counter: Counts exposed footage from 0 to 50ft. and automatically
resets itself when cartridge is removed.
There is also a separate frame counter
for 72 frames.
Film End Warning: A .red LED lamp lights
in the viewfinder about 2 ft. before the
end of the film.
.
Recording System: Double sound (pulsesync) system. 8 pronged jack for special
use. Sound Recording .is accomplished
by a stereo tape recorder using a special
cord or the designated cord. The DIN
method of synchronous recording is
possible with one pulse every 4 frames
by using the cord 'SRP ', the adapter
'Synvoton 1-4' and the cord 'SV 2209'
made by Velmut Volland, and the
Philips' '2209AV' tape recorder. Simultaneous starting and stopping of the tape
recorder and camera are possible.
Flash Synchronization: Possible at both
220° and 150° shutter angles. Synchronized with single frame shooting.
Grip: Collapsible, doubles as battery compartment.
Attaching Lighting Unit: Use screw type
socket on the upper surface of the
camera body. CCA filter is automatically
cancelled when lighting unit is attached.
Dimensions and Weight: 265 x 118 x
92.5mm;
(10-7/16" x 4-5/8" x 3-5/8") ,
1520g (3 Ibs. 6 ozs.) (including batteries).
Accessories: Included;
Soft
Case,
Remote Switch 60, Lens Cap 50, Finder
Cover, CCA Filter Cancellation Adapter,
Rubber Sheet, Socket Cover, Optional;
58mm Filters, Close-up Lenses 450C-8-2
and 240C-8, Self-Timer E, Interval Timer
E, Time Lapse Programmer, and
Remote Switch 3.
Subject to change without notice.
9
Preparations
Befor~ Filming
1Unfold the grip.
10
2 Insert batteries.
3 Check
level.
battery
power
4 Adjust eyepiece.
5 Insert film.
Set the main switch to
6 "R".
7 Comfirm film advance.
<p
Set the variable shutter
control dial to:
.,of for outdoors
EBJ for indoors
8
0
Film transport indicator
Adjust the focus in the
Decide composition.
13 telephoto
range.
14 (Zoom
as desired)
15
Confirm the exposure at
the first step of the
shutter release lever
and shoot at the second
step of the shutter release lever.
•
Remoye the film
16 shooting.
after
11
Hand Grip and Strap
- The hand grip is collapsible and doubles as the
battery compartment. When it.is unfolded all the
way, the hand grip will lock in place. It can be
folded again by pushing the grip locking lever upward. When holding the camera, please make
sure to put your hand through the strap for
safety.
Lens Hood
The hood is collapsible. Please extend it before
shotting.
Battery Loading
Both the drive system and the exposure metering
of this camera are powered by the same batteries. Please make sure that the batteries are
loaded before filming. Four penlight (size AA)
batteries are used and are loaded into the grip.
1. Remove the battery compartment -cover by
unscrewing it as shown by the arrow.
2. Follow the diagram on the side of the grip
when loading the batteries.
'
3. Replace the cover and tighten the screw.
When changing batteries; be sure to load new
batteries of the same brand and same kind at the
same time. Please be careful when loading them
because if they are loaded the wrong way, the
reversed polarities may damage ' the camera.
When filming in cold places, battery life will be
shortened so please take extra batteries with
you. The batteries must be kept warm before
shooting in such places. When you shoot in temperatures below QOC, Ni-Cd batteries are highly
recommended. When not using the camera for a
long period of time, take the batteries out to
avoid damage' to the camera from leaky batteries. When not filming please make sure to
switch off the camera to prevent battery waste.
Battery Check
Check the battery's power before filming. Rotate
the Main Switch at the side of the camera body
to the 'R' setting and press the battery check
button. If the lamp lights, battery power is sufficient and shooting is possible at any frame
speed. If the lamp starts blinking, correct filming
is possible only at 18 and 9 fps . If the lamp fails to
light, the batteries must be changed. Please
check the batteries if you have just changed batteries, you have filmed about 10 cartridges, you
have not used the camera for a long time, and if
you are filming in cold places.
Dioptric Adjustment
Dioptric adjustment is indispensable because
blur will result if the eyepiece is not adjusted to
the user's eyesight. The adjustable range is from
- 4 to + 2 diopters.
1. Remove the cover and set the distance scale
at 00.
2. Point the camera toward a window and look
through the eyepiece.
3. Rotate the dioptric adjustment ring.
4. Stop rotating the dioptric adjustment ring
when the line located in the center of the splitimage screen can be clearly seen.
Film Loading
Please use ASA 40 film for outdoor daylight
shooting and ASA 160 film for indoor shooting
at night.
1. The rear cover will open if you press the rear
cover opening button.
2. Insert the film cartridge so that the film label
can be seen through the window.
, 3. Push the rear cover until it snaps shut.
4. When loading the film, the film speed will be
automatically set.
Film Speed
Artificial Light: ASA 25 40 64 100 160 250 400
Daylight:
ASA 16 25 40 64 100 160 250
Footage Count~r
The footage counter indicates exposed footage
and will automatically return to '0' when the cartridge is removed. It will not move unless a cartridge is inserted.
.
Frame Counter
The frame counter can count up to 72 frames (1
ft.) in one full turn and counts two frames per
unit. To confirm exposed frames set the needle
at '0' by rotating the frame counter setting knob.
The counter can also be used for fading and
single-frame shooting.
Main Switch
By rotating the Main Switch to the 'R' setting, all
circuits will be turned on and the camera will be
ready. When not using the camera, turn the Main
Switch off to avoid battery waste. The 'RL' setting on the switch stands for running lock. This is
used for continuous and remote-control shoot,ing.
Manual Aperture Control Dial
Please leave this dial pushed in. If pulled out, the
camera will be switched to manual exposure
control.
Setting the Filming Speed
Normally, the camera is set at 18 fps. as this is
the standard speed for Super 8 movies.
Changing the speed to 9 fps., is used to speed up
the subject's motion. This speed is also used to
compensate for under-exposure of a still subject
in dim light. Single frame shooting is used for
purposes like animation photography which is
single frame shooting that gives a feeling of
motion.
* Concerning slow motion shooting, please refer
to page 42.
Variable Shutter Control Dial Settings
.,oe-
The dial is set on the
setting for normal
daylight or rather bright indoor conditions, and is
set on the indoor EBJ setting for dim light conditions. To select a setting, rotate the variable
shutter control dial while pressing the lock button in.
* When the variable shutter control dial rotates
clockwise while pressing the lock button, the
shutter blades will gradually close. They will be
fully closed when the dial reaches its rotational
limit. If you take your fingers away from the dial,
it will be ·aut omat ically returned to the
settinq by a spring. (Refer to page 32.)
* The .,of setting has a shutter opening angle
of 150° for regular shooting. The opening angle
of 220° ( EBJ ) is for XL shooting in dim light conditions.
* Be sure to set the EBJ setting for filming a TV
screen.
.,oe-
Exposure Adjustment Knob
This is an adjustment knob used for direct-light
shooting. Set it on the white dot for regular
shooting to obtain the correct exposure.
* The 0.5 and 1.5 settings are used for exposure
compensation. (Refer to page 23.)
Film Transport Check
?
o
Film transport indicator
To check the film transport, slowly press the
shutter release lever while looking through the
viewfinder. The shutter release lever has two
steps and only the second step will release the
shutter. If the film transport indicator (green
LED) located in the lower left of the viewfinder
lights, then the film is being correctly transported. This check can be performed very easily.
If the film is not being correctly transported,
remove the cartridge and, using your finger,
slightly wind the film clockwise by rotating the
spool to take up slack. Then reload the cartridge.
How to Hold the Camera
Hold the grip in your right hand placing your index finger on the shutter release lever. For additional safety, put your right hand through the
wrist strap before taking hold of the grip. Your
right elbow should be tight against your body to
avoid blur caused by camera movement. Your
left hand is used to operate the focusing and
zooming, 'and should be kept on the camera
while shooting. Stand with your feet slightly
apart and keep your upper body firm. When you
wish to pan sideways, turn your upper body
along with the camera. It is very important to
hold the camera steady to obtain a clear picture
image. Please pay special attention to this when
zooming or shooting in the telephoto range. On
this occasion, it is best to use a large tripod for
the camera and the Remote Switch 60. When .
using a tripod and not looking directly int01fie
viewfinder for shooting, make sure to attach the
finder cover to stop light from entering through
the eyepiece. Especially when shooting with the
light behind you, too much light can enter and
cause improper exposure. So please be careful.
The same thing can happen with single frames
or title shootinq.
.
Viewfinder Information
Since this camera's viewfinder is a single lens
reflex type, what you see in the viewfinder is
exactly what is being filmed. In the center of the
viewfinder is a split-image focusinq screen and .
at the top of the viewfinder the aperture scale
and over/under exposure warning marks are
located. The film end warning mark (red LED)
is in the lower right and the film transport indicator (green LED) is in the left hand side.
Information, all located outside the viewfinder
screen, only lights during shooting.
Underexposure
warning mark
Exposure
indication window
Aperture scale
Split-image focusing screen
cp
Film transport indicator
o
Film end warning
indicator
19
Zooming
The image in the viewfinder continuously
changes as the zooming ring is rotated although
the focus will remain the same. This is called
"zoorninq", and is used to change the focal
length. It can be also used for special shooting
effects. Both power and manual zooming are
possible with this camera.
Power Zooming
When the power zooming switch is pressed
zooming will automatically start. When 'T' is
pressed, the focal length changes to telephoto
making the image larger. Pressing 'W' will
change to shorter focal length giving a wide
angle view. The former operation is known as
zoom-up and the latter as zoom-back. Zooming
time is about 5 seconds. Power zooming makes
the zooming operation quite smooth. Power
zooming cannot be operated past the limits of
either range.
Manual Zooming
Manual zooming is performed by rotating the
'm anual zooming ring. This can be used to adjust the focal length or change the picture
image and framing, as well as to vary the zoom-
ing time. With practice you will become used to
manual zooming.
* -If you pull up the zooming ring and rotate
past the wide-angle limit (7.5mm), you will get
macro-cinematography range, which is different
from zooming. (Concerning zooming, refer to
page 45)
Focusing
Look through the viewfinder and rotate the
focusing ring. When the images of the splitimage screen match, the subject is in focus. The
focus is now adjusted for any focal length. It is
important to _focus at the telephoto range
(60mm) to insure a sharply focused image. You
can then zoom as much as you wish.
Framing
Since the viewfinder is a single lens reflex type
with no parallax, you can frame using the whole
of the viewfinder. You can change the subject's
size either by moving closer to or away from the
subject or by zooming.
out of focus
in focus
21
Aperture scale
m
Checking the Exposure Indicator
•
Q
Q
Film transport Film end warning
indicator
indicator
When pressing the shutter release lever one step,
the light meter circuit is turned on and the exposure indication window in the viewfinder will
light. If there is no red mark in the indication window you have the correct exposure. In that case,
press the shutter release lever one step further.
The number in the window shows which aperture is set. Read this number by looking at the index in the exposure indication window.
* In dim light, obtaining the correct exposure
may take a little more time.
Shooting
After confirming the exposure, release the shutter. Avoid pulling it in one quick jerk or the beginning of the filhl may be incorrectly exposed.
* Please release the shutter smoothly.
Over/Under Exposure Warning
If the red mark is indicated in the exposure
indication window the exposure must be corrected. If f/45 is indicated next to the red mark,
you have overexposure. When this happens,
set the shutter opening angle at the .;of setting.
If the red indication still does not go out, attach
an NO filter to the lens.
* We recommend the Canon Filter NO 4 or NO 8
Underexposure warning mark
because they optically match Canon lenses.
Please do not use two filters together.
When f/1.4 shows up in red, conditions are too
dim for shooting. Set the shutter control dial at
the EI[] setting and if that is not enough, use additionallight.
* If the wrong kind of film is being used, incorrect exposure will be the result. Using high
speed film for daylight shooting, for instance,
may cause overexposure. Please make sure that
you select the right kind of film.
Exposure Adjustment
When using EE to film a person at a window or
with a blue sky or snow in the background, the
main subject becomes underexposed. To avoid
this, please use the exposure adjustment knob to
adjust exposure. The adjustment of exposure has
two settings of 0.5 and 1.5 fl stop. A person at a
window will need 0.5 f/stop and a person with a
blue sky or snow in the background will need
1.5 f/stop. However, the necessary adjustment
differs depending on the intensity of light. It is
advisable to control the aperture manually when
you need the exact exposure or when shooting
against a specially strong light. In this case,
please meter the exposure of the subject and the
Iu
Overexposure warning mark
~
subject position beforehand. Then set the exposure.
Film Transport and Film End Warning
Film
transp~
f
indicator
Film end warning indicator
When the film is being transported, the film
transport indicator in the viewfinder will be blink.
Two feet before film ends the warning lamp 'w ill
light. When the film has reached the end, the film
transport indicator will go out. Check the footage
counter and if it indicates 50, remove the film
cartridge.
Removal of Rim Cartridge
Open the rear cover by pushing the opening button, pull out the cartridge removal lever located
at the bottom of the film compartment and withdraw the film cartridge. You can tell that the film
has been exposed by the cut on the perforations
and by the word IEXPOSED'.
Send your film to be developed as soon as
possible.
Cartridge removal lever
24
r:
Changing a Half-used Cartridge
Since Super 8 film comes in a cartridge, you can
change to different types of film before one cartridge is totally finished. Footage wasted by
changing cartridges is only about 6 frames including that part exposed to the light and a few
frames before and after.
* Before changing half-used film, please advance it slightly so that light will not fog any exposed portion.
* Upon changing film cartridges, the footage
counter will automatically return' to '0'. Thus, it is
best to write .dow n the amount of exposed '
footage on the removed cartridqe.
* Since the film end warning indicator is
coupled to the footage counter, if you insert a
half-used cartridge, the lamp will not light. You
can tell that the film has ended by looking at
either the footage counter or the film transport
indicator.
25
CCA Filter
A Super 8 type 8mm movie camera is usually
designed for daylight shooting outdoors, using
tungsten type film. Therefore, a CCA filter is built
into the optical path of the lens to provide color
temperature adjustment. When shooting indoors
with artificial light, the CCA filter has to be
removed from the optical path for the correct
color temperature to be obtained. When G-type
film, for both daylight and artificial light, and
when daylight film are loaded in this camera, the
filter is automatically cancelled because it is not
necessary.
Chart for Switching the CCA Filter
~
* Please follow "t he instructions given by the film manufacturer for more details.
26
Cancelling the Filter from the Outside
Remove the CCA filter cancellation adapter that
is placed in the bottom part of the camera, and
attach it to the CCA filter cancellation socket on
the upper part of the camera. Then, the CCA
filter is removed from the optical path.
* When a lighting unit with tripod screw hole is
attached to the CCA filter cancellation socket,
the filter is cancelled.
* When a lighting unit is attached to the CCA
filter cancellation socket, please use the rubber
sheet to avoid any slipping.
* Since lighting units can become very hot, do
not shoot closer than 1m distance from the subject. Please be careful to avoid burns.
* The CCA filter cancellation socket can not be
used to attach a tripod for shooting titles.
Macro-cinematography Shooting
Since this camera is capable of macrocinematography shooting which is close-up
shooting at extremely short distances, and at the
wide-angle end of zooming, it can be very easily
operated to shoot close-ups of small plants or insects. This can also be used for shooting titles. .
1. The zooming knob stops at the -focal length of
7.5mm. If you rotate while pulling the knob, it
will be set for macro-cinematography shooting.
The Close t ·stance and the field-of-view of macrocinematography
Distance
scale (rnl
00
1.2
Distance between
film plane indicator
and subject (em)
Field-ofView (crnl
16.5
16.8
3.3 x 4.5
3.5 x 4.8
2. Focusing in this macro range can be done by .
rotating the zooming .knob.
Focusing is checked through the viewfinder just
as in regular shooting.
* When it is difficult to adjust focusing by means
of the distance scale within the viewfinder,
please use other adjustment available.
* lnrnacro-clnematoqraphv shooting, it is better
to use a copy stand or tripod and the remote
switch because, otherwise, blur can easily occur.
JVhen you shoot without . looking through the
viewfinder, please make sure to cover the
finder cover.
* In macro-cinematography shootinq, since the
depth of field becomes extremely shallow, please
be careful to adjust focusing correctly.. The light
should be strong so that. an aperture smaller than
f/5.6 can be set.
.'
3. To reset from wide angle rnacro-cinematoqraphv, just turn the zooming knob.
Focusing in Macro-cinematography
The focus is adjusted by rotating the macro setting ring for macro-cinematography shooting in
order to be able to shoot from the closest distan- .
ce up to the regular shooting distance (the
distance set on the distance scale of the lens),
without interruption. For example, if you set the
distance scale at 3m to rotate the zooming knob,
the focusing position changes from the closest
distance to 3m. If you zoom further, the macro"cinemat ography mechanism will be turned off,
and the subject will be zoomed with focusing at
3m. This effect · can be used for interest.ing
scene changes which are different from simple
zooming.
* Power zooming can be used for zooming while
focusing in the macro-cinematography range.
Depth of field when the subject is at 16.5 cm from the Film
Plane Indicator
Diaphragm
Depth of
Diaphragm
Aperture
Field (em)
Aperture
1.4
2
2.8
4
5.6
8
16.4 -16.7
16.3 -16.7
16.3 - '16.8
16.2-16.9
16.1-17.0
16.0 -17.2
11
16
22
32
45
Depth of
Field (em)
15.8 -17.5
15.5 -18.0
15.2-18.7
14.8 -20.3
14.3 -23.5
* Please do not use a strobe or movie lighting
unit for macro-cinematogr:aphy.
Manual Aperture Control Shooting
When the manual aperture control dial is pulled
out, the EE mechanism is cancelled and the exposure is manually set by rotating this dial. For
manual aperture control shooting, too, exposure
is checked through the viewfinder when you pull
the shutter release lever one step. Manual aperture control is used when you want a certain exposure setting such as for single frame shooting
or panning, or when you stress an exaggerated
effect such as back lighting, high-key or low-key
effects. When the manual aperture dial is
pressed in, it is set for EEshooting.
* When the manual aperture dial is rotated
clockwise, the aperture becomes wider, and
smaller when turned counterclockwise.
* When the red exposure warning mark is indicated, the aperture does not change even if the
dial is rotated further in the same direction. Doing so will not damage the mechanism.
* When you change the filming speed from
18fps. to slow motion while manually controlling
the aperture, stop shooting once and start
shooting after opening the aperture one f/stop
more.
31
* In regular shooting with manual aperture control, the best effect is attained between f/2 and
f/11.
*: For shooting titles, please make the
light
stronqer so that the aperture can be set at f/5.6
or smaller.
Variable Shutter Control Mechanism
32
The film stops for
The exposed
exposure
frame advances
Exposure with this 8mm camera is controlled by
the angle rotation of semi-circular shutter blades.
One rotation gives the exposure for one frame.
As the shutter rotates it alternately passes and
blocks light from passing through the aperture
and exposing the film. When the shutter blades
cover the aperture, the film is advanced to the
next frame and when the blades uncover the
aperture, the film is stationary and is exposed.
Therefore the exposure is changed depending
upon the rotation speed and the opening of the
shutter blades. The rotation speed is also called
the filming speed and the opening of the shutter
blades is called the shutter opening angle. This
camera has a mechanism that controls the shutter opening angle, changing the opening angle to
control exposure and fading when shooting.
Variable Shutter Control and Exposure Adjustment
The variable shutter control mechanism of this
camera has a 2-setting exposure adjustment
mechanism and fading mechanism. At the EBJ
setting, the opening angle is 220°, the shutter
speed is about 1/30 second .at 18 fps. At the ';o~
setting, the shutter opening angle is 150° and
the shutter speed is about 1/43 second.
Therefore, the EBJ setting is more convenient
for u~e under dim light conditions.
System of Shutter Opening Angle/Fading
Making the picture image gradually darken until
it blacks out completely, or on the contrary,
making it become brighter from a complete
black-out condition until it can ,be seen normally,
is the technique called fading which is often used
in making movies. The former is called fade-out
and the latter fade-in. With this camera, the shutter openinq mechanism functions to perform
fading. The shutter opening angle is variable
from 150° to 0° (completely closed). The operation is performed .bv rotating the variable shuttercontrol dial. Fading controlled by the variable
shutter ' control dial is different from aperturecontrolled fading. It can ~ be operated without
filters and fading time can be decided without
any problem.
33
Fade-out
1. Start shooting after setting the variable shutter control dial while pressing the lock button at
the ioc- setting.
2. Rotate the variable shutter control dial clockwise while pressing the lock button until it stops.
3. Stop shooting. When you remove the finger,
the variable shutter control dial will automatically
return to the .;of setting.
Thus, the picture image will give the fade-out
effect, gradually becoming darker.
* Please do not linger in the closed position in
order to avoid film waste.
Fade-in
1. Start shooting after setting the variable shutter control dial while pressing the lock button in
the closed position.
2. Return the variable shutter control dial to the
-:loe- setting controlling the time with your finger.
3. When it is completely open, shoot as much as
you wish. Thus the normal light amount exposes
the picture image.
* Fading is not possible between the EB:I setting
and the -:loe- setting because the exposure adjustment is made automatically by the meter.
* Fading is an important technique .for movie
making, used for changing scenes, for the introduction or the end. During the movie, fading
is used for big scene changes or to indicate the
passing of time, so it should not be used too
frequently. When fading is used for changing
scenes, it should usually last from 2 to 3 seconds.
At the beginning and the end of the movie, it
should last about 4 to 6 seconds.
35
Running Lock
This is a lock for continuous shooting, used in
remote control and single frame shooting as well
as with the self-timer. Set the main switch at 'RL'
and press the shutter lever to lock it. Then
shooting can be continued even after your finger
is removed. To release the running lock, set the
main switch to 'R'.
* The main switch can be set at 'RL' after pulling
the shutter lever for film drive. When the running
lock is used, the exposure indication window
lamp within the viewfinder goes out in order to
save power. If the f/number has to be checked,
please pull the shutter lever to light the lamp.
Remote Control
This mechanism allows to control the shutter'
from a distance using the remote switch 60 or 3,
with which EE shooting is possible. This operation can be adopted for single frame shooting as
well.
Preparations
1. Set the main switch at IOFF' and insert the
remote switch plug into the remote control
socket of the camera.
2. Set the main switch at 'RL' and pull the shutter lever all the way. (The same position as running lock.)
Shooting
Press down the remote switch button to begin
advancing film. Slide the button forward to set
the remote switch for running lock, which will
provide continuous shooting even after your
finger has been withdrawn. If you want to check
exposure, pull the shutter lever, the same as running lock. Then the exposure indication in the
viewfinder lights up for you to read the exposure.
In manual aperture control shooting as well, the
exposure value can be checked the same as
above.
How toRelease
First, rotate the main switch to either 'R' or
'OFF', and unplug the Remote Switch. If you unplug the remote switch first, the shutter is
released and film will be wasted. Please follow
this sequence.
* When remote control shooting is over, rotate
the main switch to 'OFF'. If you leave the switch
at 'RL', power consumption continues and shortens battery life. Therefore it is better to make the
settings just before shooting.
* When you shoot from a distance, since you
cannot verify the situation through the vieWfinder, please check the subject condition well
beforehand, and set the camera position so that
you don't make mistakes in framing.
* Please mount the finder cover when shooting.
Single Frame Shooting
Since this camera has a magnetic release
mechanism, single frame shooting is possible
with EE. In this case, please use the remote
switch 60. .
1. Set the main switch to 'OFF' and set the
filming speed dial at [1].
2. Plug in the Remote Switch 60 into the remote
control socket.
3. Set the main switch at 'RL' and press the
shutter release lever all the way in.
4. When you press the button of the remote
switch, you can shoot single frames.
5. To reset it, please reset the main switch the
same as when the remote control switch is being
used.
* For single frame shooting, please use the
frame counter.
* If you shoot single frames without using the
remote switch, set the filming speed dial to ITJ
and pull the shutter release lever. Filming should
be done with manual aperture control and not
with E~.
Single frame shooting is used 't o show in a
short time subjtct changes that takes a long
time, or to make animation movies. Please
calculate the projection time and the frame numbers required. For example, if you want to show
a flower that takes one hour to bloom in five
seconds of projection time, the frame number
required to shoot is 18 (the standard filming
speed of 18 fps) times 5, which is 90. Therefore,
90 frames are needed for 5 seconds' projection.
And since the flower takes 3600 seconds (1 hour)
to bloom, and 3600 divided by 90 is 40, you shoot
every 40 seconds to obtain 90 frames in one
hour. The Interval Timer E is very convenient for
this, instead of the remote switch. The Interval
Timer E can operate shooting with intervals up to
60 seconds.
SeH-Timer E
For unmanned shooting, it is plugged into the
remote control socket of the camera, and, then,
it enables the photographer to film himself as
well. After the start button in the center is
pressed, it will film for 10 seconds after a 10
seconds lag. If you press the button, you can
shoot repeatedly as many times as you want. It is
reset the same as the remote switch.
Interval Timer E
This is an electronic timer to shoot single frames
with certain given intervals. Plugged into the
remote control jack located at the side of the
camera body, the interval timer can be set by the
dial located in the center of the timer. This dial
can be adjusted . from 'l second to 60 seconds.
This can be used for synchronized shooting with
a flash as well. To reset, it can be done in the
same way as after single frame shooting with the
remote switch.
Strobe Shooting
Since this camera has a flash synchronizing jack,
you can ' synchronize flash for single frame
shooting for titles or animation. Then, shooting
should be done with manual aperture control and
the exposure is calculated by the guide number
and the shooting distance, the same as regular
strobe shooting. The guide number is read in
either the instructions of the speedlite in use or
the calculation chart.
* Flash can be synchronized with both shutter
angle settings, either the EBJ or the .;oc- . Exposure time coincides with the flash duration.
For strobe shooting, please make sure that exposure is adjusted correctly in order to obtain a
steady picture image in your movies. Because all
frames must have the right exposure for this
purpose, operation is different from. still
photography using a strobe. Regulated power
flash should be used to insure even exposure
from frame to frame. If you are using a strobe
without safety circuit, please set the exposure
every time by metering just before the pilot
lamp turns on or use AC power.
* It is said that strobe flashtubes usually have a
life of about 5000operations, about 1.5 cartridges
of Super 8 film. Keep this in mind in single frame
shooting.
Slow Motion Shooting
• Slow motion is high speed shooting, operated
at about 36 fps. When vou press down the instant slow motion switch while shooting at 18
fps. or 9 fps., it automatically switches to slow
motion. If you remove your finger from the switch, the filming speed returns to the previous
'speed and you can continue shooting. This is
very good to bring out different effects in
movies. If you want to start out the cut in slow
motion, first press down the instant slow motion
switch before pulling the shutter lever. To stop,
first release the shutter lever and remove the
finger from the instant slow motion switch.
* The instant slow motion switch only functions
while you press the switch. It resets itself when
you remove the finger. Please be careful not to
accidently let the switch loose while shooting.
* Operate this switch quickly, otherwise "t he
relation between the exposure and filming speed
does not match correctly.
* When shooting at 9 fps., you may notice a little
unsteadiness when changing to slow motion, but
this is unavoidable because of mechanical
reasons.
* When it is set for single frames, there is no
reason to operate the instant slow motion
switch. If you operate the switch by mistake,
overexposure will result.
* Slow motion makes the movement about
twice slower and exposure time is half the real
time in projection. Please use this for occasions
such as:
• When you want to soften the movement.
• When you want to avoid blur with moving
subjects or when panning.
43
Recording System (DIN System)
For example, the pulse generator 'Synvoton
1-4' should be used with the Volland 'SRP' and
'SV 2209' connecting cords and a Philips'
'2209AV' tape recorder. Press the camera's
shutter release lever after setting the tape recorder to recording mode. When the tape recorder
start switch, which is coupled to the shutter
lever, is set to ON and the tape recorder starts,
voice is recorded on 1 and 2 tracks of the tape.
The one pulse per frame signal from the camera
is converted to a one pulse per four frames signal
by the 'Synvoton 1-4' and recorded on track 4
of the.tape. If you withdraw your hand from the
.shutter . release lever, the tape recorder also
stops.
* The 18 fps. filming speed is used.
The 8 pin (DIN) jack on your
814XL-E
MIC
lipe Recorder
2209AV
D
ITIIJ
Tape recorder
Start Switch
. 0<,- .
-
'----0
Sync Switch
+6V D.C.
00
~
Main Switch
Caution: Do not short pins 3 and 4
44
I.
Filming Techniques
There are various techniques involved in making
movies. Although even the mere pressing of a
shutter release is fun, if zooming or panning are
added with. inventive and creativity, movies turn
out much better. Some examples follow so that
you may consider them and try using these
techniques.
Zooming
This can create a big effect in a movie. Scenes in
which a subject gradually comes from far away
until you can see it right in front of your very
eyes, or inversely, a subject filling the whole
screen and then diminishing into the distance
away. The Canon 814XL Electronic has a power
zoom system which allows free use of zooming
techniques in filming with the greatest ease. By
simply pushing a switch, the zooming effect is all
yours, and since .zoorninq causes no blur, filming
is far more pleasant.
Remarks about Zooming
Zoom effects are great fun on the screen, but
should be used in moderation. If there is too
much of it, when projected on a screen, it can
become a negative effect. When the lens is used
on the telephoto side, the same as the case of a
normal telephoto lens, even a little blur is very
noticeable on the screen, so please use a tripod
for zooming.
1. The first thing to ascertain.
It is recommended to comfirm the most effective
time for zooming before pressing the shutter
release.
2. Filming with various zooming speeds.
Manual zooming is used for short or slow
zooming time. For example, when you zoom
slowly, the change of image magnification is not
too noticeable, but if you zoom quickly, you can
cause a shocking effect. This is manual
zooming's special realm.
3. A moving subject can be easily followed by
zooming. The camera can follow a distant subject even from a stationary position. For example, by means of slow zooming, if magnification
is kept constant to film the movement of a person coming towards you, the effect is that the
image on the screen changes without any
change in the size of the person.
4. Just a little zooming.
It is also rather effective to use zooming short of
Panning
This technique can be used to give a wide view
from a high place or to take in a whole room in
one cut. Fix the camera on a point and move it
sideways horizontally. Fix the camera on a tripod
in order to avoid movement up _or down. If your
hand hold the camera, stand with your legs a little apart and turn the torso of your body only. It
is necessary to adjust the filming speed ad. equately to prevent speeding up the movement.
It takes less time to arrange this technique for important .scenes. Keep panning speed constant
and avoid panning too widely. Together with
48
zooming, it will stir up interest in your movies.
Tilting technique
Panning is a photographic technique consisting
in a horizontal movement of the camera. Movement up and down is called tilting. Filming by
moving the camera downwards is tilting down,
and upwards is tilting up.
FilPling Titles
The Canon 814XL Electronic can perform closeups and copy work easily by means of the
macro-cinematography mechanism. Please use it
for filming .titles. Pleasant titles can be made by
animation and single frame shooting. If you
project a spliced film, it can make the story
boresome. A title is necessary in order to show
the purpose of filming, and for the sake of the
audience as well as to have a concept understood. There can be many titles, for example,
a main title to introduce a concept, a credit title
to introduce a director, a title to explain a concept in writing, and an end title to bring everything to a finish. The main title and the end at
least are needed. It is possible to substitute
producer's mark or product initials for credit
titles and print into a main title. Please study
carefully various ideas before making a title.
Copy stand 4
49
Accessories
Close-up Lens C-B
The viewfinder is a single lens reflex type and has
no parallax so that even in close-ups you can film
just what you see. The Close-up Lens C-8 is
specially designed for this 8mm camera and
completely compensates chromatic aberration. If
you screw this lens into the tip of lens, it increases power for titles, copying literature,
filming plants, insects and so on. It is easy to use
and convenient for the sky, and elusive small
animals, since you can take close-ups from a
distance. Distance adjustment is also easy.
* 58lilm indicates the screw diameter, and 240 or
450 indicate the focal length. A subject that is
240mm (or 45Omm) away from the tip of the lens
will be in focus.
Shooting Distance and Field ofView
50
58mm Close-up C-8
Filters
Exposure in this camera uses a TTL system
which measures light through the lens.
Therefore, when the filter is attached, exposure
compensation is not required. Choose the Canon
filter according to the shooting purpose. The
filter thread diameter is 58mm and it is screwed
on the tip of the lens.
Self-Timer E
Self-timer shooting can be performed with the
timer attached to the remote control jack. Shooting continues for ten seconds after 10-second
interval.
Interval Timer E
By using the Interval Timer E the time .can be
changed freely within one minute.
Copy Stand 4
Copy Stand 4 is convenient for macro-cinematography, title shooting and for copy works.
,
51
Notice
•
•
•
•
•
Warning
take it to a service station immediately.
The viewfinder cover is necessary when • Safety Lock
filming with your eye away from the viewWhen you are not using it, the main switch
finder.
has to be set at 'OFF'.
Cleaning
• Caution with high temperatures
Please periodically clean the film gate with a
The care of the camera demands that it never
soft brush or blower.
be left in a place with high temperatures such
When you store-the camera
as a rear window or a trunk of a car. If you
Please store the camera in places where there
leave a camera at a place with high temis little humidity or dust. Do not place it near
perature, it can be damaged. Avoid such a
camphor or naphthalene. Remove the batcase absolutely. If you leave it exposed
teries. Storing the camera over -long-periods of
.: Without its cap, film may be exposed. Be
time can harm the camera. It is good to use it
careful about it, too.
from time to time. Periodical inspections every • Caution with low temperatures
three years at a Canon service station are
(The battery)
recommended.
The battery's power decreases suddenly
Don't-touch the lens with your fingers
below Ov C, It is recommended that you use
Dust must be removed with a blower or
full charged Ni-Cd batteries when filming
brushed away with a brush. If you leave a
below DOC. It is convenient to have a spare
fingerprint on a lens, wipe it off lightly. It is
battery and keep it warm with bodily heat, and
"possible to cause damage to a lens if you wipe
use them alternately. Do not throwaway a
it too strongly.
battery which did not function well in extreme
When the camera falls in the water
cold. It may be usable at normal room temRepair is practically impossible. Be careful not
peratures. Please check the battery often in
to have such a thing happen. If it does, please
extremely cold places.
. 52
(Am bient tem perature)
In very cold places, if you take a camera into a
warm room coming back from the cold outside, drops of water adhere on the lens or the
viewfinder because of the abrupt temperature
change, so that good filming ·becomes impossible. Be careful about this.
In the light of considerable temperature
changes, please gradually adapt the camera to
the environment's temperature. A way to do
so is to put the camera inside a vinyl bag, seal
it up, and let it gradually adapt to the change
in temperature.
53
Wide angle zooming switch
Film plane indicator
Telephoto zooming switch
Rear cover opening button
Rubber hood
Eyecup
Grip/battery
compartment .
CCA filter cancellation
adapter
Tripod socket
54
(Ambient temperature)
In very cold places, if you take a camera into a
warm room coming back from the cold outside" drops of water adhere on the lens or the
viewfinder because of the abrupt temperature
change, so that good filming "becomes impossible. Be careful about this.
In the light of considerable temperature
changes, please gradually adapt the camera to
the environment's temperature. A way to do
so is to put the camera inside a vinyl bag, seal
it up, and let it gradually adapt to the change
in temperature.
53
,,' ,&'
.
Canon
CANON INC.
11 -28, Mita 3 -chome, Minato-ku, Tokyo 108, Japan
?t\~e<!a~aUD~~~·ll~eCsu~~~,DL~~:~5!nd,
N.Y. 11040, U.S .A.
CANON U.S.A., INC. MANHATTAN OffiCE
~~~~i;;~~S~~~: ~C.fA\L:NYi.~~OE1:V~C~·~TATION
160 Peachtree Street, N,W' i 'A·tlanta, Georgia 30303, U.S .A .
CANON
INC; 'ciH i.c AG O OffiCE
140 Industria l Drive, Eln""',"urSt , Illinois 60126, U.S.A .
CANON
IJtJ~ .
ANGELES OffiCE .
u.s.A.,
u.s.s.,
'los
~~~O~r~:;;~n~rJC:~~Js°~~~~~E~~~~~:~~~6;:i-~o~A .
3407 West 6th Street , I-tt~ .Angeles, California 90020, U.S .A .
CANON U.S.A., INC: , SAN fRANCISCO SERVICE STATION
776 Market Street, San Francisco, California 94102, U.S.A.
CANON U.S.A., INC. HAWAII OffiCE
Bldg . B-2, 1050 Ala Moana Blvd., Honolulu, Hawai i 96814, U.S.A.
CANADA--- CANON OPTICS & BUSINESS MACHINES CANADA, LTD.
HEAD OffiCE
3245 American Drive, Mississauga, Ontario, L4V 1 N4, Canada
CANON OPTICS & BUSINESS MACHINES CANADA, LTD.
MONTREAL OffiCE
3070 Brabant-Marineau Street, St. Laurent, Quebec, H4S 1 K7, Canada
CANON OPTICS & BUSINESS MACHINES CANADA, LTD.
VANCOUVER OffiCE
'
EUROPE AFRICA
5900A, No.2 Road, Richmond, B.C. V7C 4R9 ; Canada
& MIDDLE EAST --CANON AMSTERDAM N.V.
CENTRAL &
Gebouw 70, Schiphol Oost, Holland
.
SOUTH AMERICA--CANON LATIN AMERICA, INC. SALES DEPARTMENT
P.O. Box 7022, Panama 5, Rep . of Panama
.
CANON LATIN AMERICA, INC. REPAIR SERVICE CENTER
P.O. Box 2019, Colon Free Zone, Rep. of Panama
SOUTHEAST ASIA--CANON INC. HONG KONG BRANCH
.
5th Floor 2 -~, Fui Yiu Kok Stree t, Tsuen Wan, New Territories, Hong Kong
067785
PRINTED IN JAPAN