1
Read this first
Minimum required setting screen
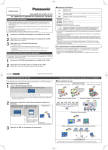
When you start the projection for the first time or after the projector is initialised, the minimum required setting screen
for projection will be displayed.
J LANGUAGE
Select the required language setting.
LANGUAGE
Press I H buttons of the remote control or control
panel on the projector to select the required
installation method. Press G to proceed to the
ALTITUDE setting.
FRONT/DESK
FRONT/CEILING
REAR/DESK
PLEASE SELECT LANGUAGE
SELECT
ENTER
Press F G I H buttons of the remote control or
control panel on the projector to highlight the
required language, and press the ENTER button to
proceed to the next setting.
J OPTION
Select the current projection method and fan speed
setting. If you need return to the previous setting,
press the RETURTN button.
OPTION
INSTALLATION
ALTITUDE
FRONT/DESK
REAR/CEILING
Setting on a desk/floor and
projecting from front
Mounting in the ceiling and
projecting from front
Setting on a desk/floor and
projecting from rear
Mounting in the ceiling and
projecting from rear
Preparation
INSTALLATION
ALTITUDE
If you use the projector at high elevation, the
ALTITUDE setting need to be HIGH to set the fan
speed high. Press I H to select the required
option. If you need to return to the INSTALLATION,
press F.
LOW
HIGH
The fan speed is low.
The fan speed is high.
NOTE:
• At 1 400 - 2 700 m (4 593 - 8 858 ft) sea level, the
setting must be HIGH.
• The loudness of fan noise depends on the ALTITUDE
setting.
LOW
SWITCH TO HIGH ALTITUDE MODE "HIGH" IF OVER 1400m(4593Ft).
RETURN
SELECT
ENTER
Press the ENTER button to start the projection.
Once you finish the minimum requirement setting, it will not be displayed again unless the projector is
initialised. See “INITIALIZE ALL” on page 36.
You can change each settings in the main menu. See “Menu Navigation” on page 27.
ENGLISH - 11