1
Configuration
(continued)
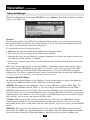
Rear View
1 2
3
5
4
6
Figure 3 NetCommander KVM rear panel
1
Power Socket: The power cord plugs in here from the AC power source.
2
On/Off Switch: Turns the KVM Switch on and off.
3
Firmware Upgrade Port: Plug included firmware upgrade cable into this port to download firmware upgrade data.
4
CPU Port Section: Plug the Cat5e cables from each PC or server into these ports.
5
KVM Console Ports*
6
Integrated Console Ports*
* The B070-016-19 comes with a Jumper Cable connecting the 'Integrated Console Ports' and the 'KVM Console
Ports.' Do not remove the Jumper Cable unless you are installing a Tripp Lite B050-000 IP Remote Access Unit.
See B050-000 Installation Procedure for details.
5