1
BankStep User Manual
BankStep Overview
BankStep v1.0
Overview
Connections
Tool Bar
Main Menu
Options
Composer
Layout
Appendix
Examples
Modules
Clk Clock
Gat Gates
Bio BioSeq
Dat Data
Bnk Bank
Cnt Count
Row Row
NOT
OR
AND
Arp Arpeggio
Flp Flip
LSw LSwitch
Ran Random
Sam Sample
Neg Negate
Add
Scl Scale
Sem Semitone
Oct Octave
Sw Switch
Sel Select
Dly Delay
Lag
Tst Test
MIDI
Btn Button
Knb XK Knob
Lnk Link
BankStep is a software emulation of hardware bank sequencers found in the big analog synthesizers, that produce
control for the sound but not the sound itself. Instead of analog control voltages, BankStep produces MIDI (and can
make standard MIDI music files). Otherwise, BankStep functionally emulates a complete hardware bank of
sequencers and control modules just as it might sit on top of a analog synthesizer - or your softsynth, MIDI module
or sound card.
The Freeware BankStep Player
Until you purchase a Registration for BankStep, it will be configured as the Freeware BankStep Player. The Player
can play any BankStep 2.x patch file, and you are free to interact with the music by adjusting the knobs, etc., but it
can not save. Once you register BankStep's save features will become available.
Difference between BankStep and SoftStep
While both BankStep and SoftStep are similar in many ways, they are fundamentally different programs intended to
be used in different ways. With BankStep you work with an existing module layout rather than creating modules as
you need them. This is less flexible than SoftStep, but it is far easier to get started with; and because you likely will
use the same layout over and over, you become familiar with it. Also there are fewer modules to learn - only a couple
dozen in BankStep vs. nearly 200 in SoftStep. BankStep does not offer the full range of algorithmic music functions
found in SoftStep. BankStep does just one thing: step sequencing. And it does it very well.
Quick Tour
The main module in BankStep is the Bank module, which is a 3 or 4 bank knob sequencer of any number of columns
up to 48. The Bank module is a "smart" module, with the ability to set sequence start and end points, and to
automatically switch direction when the end points are reversed.
file:///C|/vbp/BankStep/Help/index.htm (1 of 4) [9/28/2002 8:56:48 PM]
BankStep User Manual
Just as hardware analog sequencers have two types of signals - control voltages and on/off gates - BankStep also has
the digital equivalent. For control voltages, BankStep has Values. These may range from -9999 to 9999, but as MIDI
is limited to 0-127, this is the Value range you will use most of the time. For on/off switches, BankStep has Logical
or Boolean values. These have two states only, On or True, and Off or False.
Value inputs and Logical inputs are distinguished by different color buttons. While you are free to specify your own
color scheme, here Value inputs are blue and Logical inputs are red.
Use Knobs to directly set the Bank stage values. To change knob values, use an up/down click and drag for large
changes, and a left/right click and drag for small changes. There is also a pop up menu of functions - available by
clicking on the little green button in the upper left - to automatically fill, modify and save bank stage values.
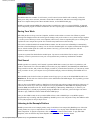
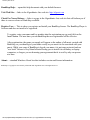
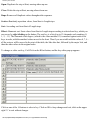
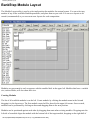
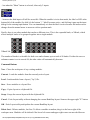
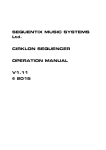
There are no dangling patchcords in BankStep. Instead, module inputs (the red and blue buttons) connect to outputs
by selecting them from a popup menu of all available outputs. When an input is connected to an output, the input
button label indicates the connection. For example:
The two support modules above, Negate and Add, are being used to subtract the output of Bank Sequencer C, Row 1
(Bnk C 1, shown above) from the output of Bank Sequencer B, Row 1 (Bnk B 1, not shown). The Negate module
(Neg A) receives the output from Bnk C 1 and negates it. The Add module (Add A) Receives (apparently) a value of
37 from Bnk B 1, plus a value of -12 from Neg A, plus 0 from the unconnected input; and it produces the sum, 25, as
its output.
Making it Go
Logical values are used mainly to control timing and routing. They may be either Gates or Triggers. Gates are On for
the duration, triggers are On for only one tick (a "tick" is one calculation cycle defined by MIDI as of 1/24th of a
quarter note). Triggers and Gates that are On for some number of ticks then go Off, are collectively referred to as
"pulses." For example the output of a Clock module, which is a gate that cycles between some number of ticks On
then some number of ticks Off, is called a clock pulse.
The basic (if simplified) chain of events is: Bank sequencers are stepped by clock pulses; the values from the Bank
Sequencer may be combined and modified in innumerable ways, and eventually they end up going to the MIDI
module as Note, Velocity, etc., values. The clock pulses that stepped the sequencers are used as timing events to
trigger the MIDI Notes.
Clock pulses are created by a Clock modules, as well as other modules that can generate Logical gate and trigger
outputs such as Bank Sequencers which have settable gate and trigger outputs for each stage in addition to the Value
stage outputs. Clock modules have 4 outputs: regular clock, plus clock/2, /3 and /4 (you can see the LED for each
output flash as the Clock module ticks).
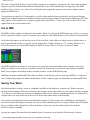
Out to MIDI
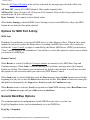
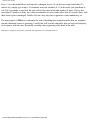
The MIDI module combines 4 channels in one module. When you click on the MIDI button you will see a very large
field of connection buttons set up in 4 columns, one column for each MIDI channel (or for each note in Drum mode).
At first the only inputs you will need to set are Clock, and Note. Other values are either preset to default values, or
may be ignored until you have a specific need to change them. Volume defaults to 127, Velocity defaults to 112.
You will see these levels on the MIDI module as little bar meters. Blue for Velocity, Green for Volume.
file:///C|/vbp/BankStep/Help/index.htm (2 of 4) [9/28/2002 8:56:48 PM]
BankStep User Manual
The MIDI module has a number of cool features you will want to become familiar with eventually, such as the
ability to set delay-on for each note, automatic volume fade in and fade out, and micro tone tunings using Pitch
Bend. For a complete description of these and other features, see the MIDI Module page.
BankStep can make standard MIDI files that can either be used directly such as a web page MIDI file, or imported
into a composition program for further modification. See the Composer page for information on making MIDI files.
Saving Your Work
Individual patches are always saved as a Snapshot, available on the toolbar as a camera icon. Whatever patch is
showing in the Snapshot will be the one that gets the changes, and you do not have to worry about loosing a snapshot
- it is always saved. When you create a new Snapshot (camera icon), whatever snapshot patch you are working on is
copied to the a new snap at the top of the list. The delete snap button removes this last snap.
Files can be saved and loaded in the normal Windows manner; also the current state of BankStep is automatically
saved on exit and loaded again on startup. You can force this unnamed quick save anytime with the menu File/Quick
Save or with the toolbar Quick Save (disk icon) button. Conversely, you can reload a Quick Save with the
File/Revert menu command.
Layouts are separate files that define the module layout. Layouts are saved with the files but may be created
separately. Use the Layout menu to create your own layouts that may contain any combination of modules.
First Sound
BankStep produces no sound by itself. Instead, it generates MIDI data to control your choice of synthesizers, soft
synths or sound cards. This is the same MIDI you hear when you play a MIDI file, but inBankStep the MIDI data is
being created in real time, and you hear the changes you make as you make them. But before you can hear any sound
at all, you need to be sure your computer is set up for MIDI sound play, and to tell SoftStep which MIDI device to
use.
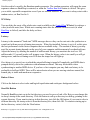
When BankStep runs for the first time, an Options menu will pop up so you can set the default MIDI Out Driver on
MIDI Port A, the first tab. One of the first choices is the default Microsoft MIDI Mapper. This is probably your best
choice to get started with.
After you have set the MIDI Out Driver, Bank Step will most likely start playing a simple melody line right away. If
it does not, the easiest way to tell if your computer is set up to play MIDI is to find a MIDI file (anything with the
extension .mid), and double click on it. Do this when BankStep is not running. Media Player, or whatever your
default MIDI player is, should pop up and start playing the MIDI file. If it does not, you need to figure out what it
will take to play a MIDI file with the default Windows MIDI player.
Once you have MIDI sound, exit all your other MIDI software, such as Media Player or any MIDI sequencer
programs that may be running, and start up BankStep. BankStep can co exist with just about any other MIDI or audio
or soft synth program, but keep it simple at first.
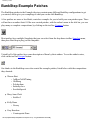
Listening to the Example Patches
BankStep comes with several example patches, many of which have been composed by BankStep users. Most (but
not all) patches are set up as a composition of several Snapshots. You can play either individual Snapshots or the
entire composition. To play the composition, click on the Composer button in the Toolbar. To play individual
Snapshots, select one from the drop down Snapshot menu, then click on the Run/Stop button.
file:///C|/vbp/BankStep/Help/index.htm (3 of 4) [9/28/2002 8:56:48 PM]
BankStep User Manual
Computer System Requirements
BankStep runs on all Windows operating systems from Windows 95 on. This includes Windows 95, 98, ME, XP,
2000, and NT4. While there are no hard limitations on CPU speed, we recommend 300 MHz or faster for best
results. You also need a MIDI compatible sound card or interface. A graphics display of at least 800x600 High Color
(16-bit) or True Color is recommended. For best results, system memory should be at least the minimum
recommended by your version of Windows.
Software Synthesizer Compatibility
BankStep has been tested extensively for compatibility with popular software synthesizers such as Reaktor, VAZ2,
ABox, GigaSampler/GigaStudio, and Pulsar. When using BankStep to control a softsynth, we recommend a
minimum CPU speed of 500 MHz, and at least 64 MB of system memory.
Most soft synths do not have their own MIDI drivers, and therefor require a program called a MIDI Loop Back in
order to run them with SoftStep or any other MIDI generator. This gives you a set of virtual patch cords, where you
can send the output of SoftStep to a Loop Back input, then connect your soft synth to the same Loop Back output.
These programs are available as free downloads, they are easy to install, and once installed they are trouble free.
BankStep works very well with any of the several free MIDI Loop Back drivers, such as Hubi's MidiLoopBack (Win
95/98), MidiYoke (Win98/2K/XP), or Sonic Foundry's Virtual Midi Router (Win98/2K/XP).
BankStep is Copyright © 2001-2002 by John Dunn and Algorithmic Arts. All Rights Reserved.
file:///C|/vbp/BankStep/Help/index.htm (4 of 4) [9/28/2002 8:56:48 PM]
BankStep Overview
BankStep Overview
BankStep is a software emulation of hardware bank sequencers found in the big analog synthesizers, that produce
control for the sound but not the sound itself. Instead of analog control voltages, BankStep produces MIDI (and can
make standard MIDI music files). Otherwise, BankStep functionally emulates a complete hardware bank of
sequencers and control modules just as it might sit on top of a analog synthesizer - or your softsynth, MIDI module
or sound card.
The Freeware BankStep Player
Until you purchase a Registration for BankStep, it will be configured as the Freeware BankStep Player. The Player
can play any BankStep 2.x patch file, and you are free to interact with the music by adjusting the knobs, etc., but it
can not save. Once you register BankStep's save features will become available.
Difference between BankStep and SoftStep
While both BankStep and SoftStep are similar in many ways, they are fundamentally different programs intended to
be used in different ways. With BankStep you work with an existing module layout rather than creating modules as
you need them. This is less flexible than SoftStep, but it is far easier to get started with; and because you likely will
use the same layout over and over, you become familiar with it. Also there are fewer modules to learn - only a couple
dozen in BankStep vs. nearly 200 in SoftStep. BankStep does not offer the full range of algorithmic music functions
found in SoftStep. BankStep does just one thing: step sequencing. And it does it very well.
Quick Tour
file:///C|/vbp/BankStep/Help/alldocs/overview.htm (1 of 5) [9/28/2002 8:56:49 PM]
BankStep Overview
The main module in BankStep is the Bank module, which is a 3 or 4 bank knob sequencer of any number of columns
up to 48. The Bank module is a "smart" module, with the ability to set sequence start and end points, and to
automatically switch direction when the end points are reversed.
Just as hardware analog sequencers have two types of signals - control voltages and on/off gates - BankStep also has
the digital equivalent. For control voltages, BankStep has Values. These may range from -9999 to 9999, but as MIDI
is limited to 0-127, this is the Value range you will use most of the time. For on/off switches, BankStep has Logical
or Boolean values. These have two states only, On or True, and Off or False.
Value inputs and Logical inputs are distinguished by different color buttons. While you are free to specify your own
color scheme, here Value inputs are blue and Logical inputs are red.
Use Knobs to directly set the Bank stage values. To change knob values, use an up/down click and drag for large
changes, and a left/right click and drag for small changes. There is also a pop up menu of functions - available by
clicking on the little green button in the upper left - to automatically fill, modify and save bank stage values.
There are no dangling patchcords in BankStep. Instead, module inputs (the red and blue buttons) connect to outputs
by selecting them from a popup menu of all available outputs. When an input is connected to an output, the input
button label indicates the connection. For example:
The two support modules above, Negate and Add, are being used to subtract the output of Bank Sequencer C, Row 1
(Bnk C 1, shown above) from the output of Bank Sequencer B, Row 1 (Bnk B 1, not shown). The Negate module
(Neg A) receives the output from Bnk C 1 and negates it. The Add module (Add A) Receives (apparently) a value of
37 from Bnk B 1, plus a value of -12 from Neg A, plus 0 from the unconnected input; and it produces the sum, 25, as
its output.
Making it Go
Logical values are used mainly to control timing and routing. They may be either Gates or Triggers. Gates are On for
the duration, triggers are On for only one tick (a "tick" is one calculation cycle defined by MIDI as of 1/24th of a
quarter note). Triggers and Gates that are On for some number of ticks then go Off, are collectively referred to as
"pulses." For example the output of a Clock module, which is a gate that cycles between some number of ticks On
then some number of ticks Off, is called a clock pulse.
file:///C|/vbp/BankStep/Help/alldocs/overview.htm (2 of 5) [9/28/2002 8:56:49 PM]
BankStep Overview
The basic (if simplified) chain of events is: Bank sequencers are stepped by clock pulses; the values from the Bank
Sequencer may be combined and modified in innumerable ways, and eventually they end up going to the MIDI
module as Note, Velocity, etc., values. The clock pulses that stepped the sequencers are used as timing events to
trigger the MIDI Notes.
Clock pulses are created by a Clock modules, as well as other modules that can generate Logical gate and trigger
outputs such as Bank Sequencers which have settable gate and trigger outputs for each stage in addition to the Value
stage outputs. Clock modules have 4 outputs: regular clock, plus clock/2, /3 and /4 (you can see the LED for each
output flash as the Clock module ticks).
Out to MIDI
The MIDI module combines 4 channels in one module. When you click on the MIDI button you will see a very large
field of connection buttons set up in 4 columns, one column for each MIDI channel (or for each note in Drum mode).
At first the only inputs you will need to set are Clock, and Note. Other values are either preset to default values, or
may be ignored until you have a specific need to change them. Volume defaults to 127, Velocity defaults to 112.
You will see these levels on the MIDI module as little bar meters. Blue for Velocity, Green for Volume.
The MIDI module has a number of cool features you will want to become familiar with eventually, such as the
ability to set delay-on for each note, automatic volume fade in and fade out, and micro tone tunings using Pitch
Bend. For a complete description of these and other features, see the MIDI Module page.
BankStep can make standard MIDI files that can either be used directly such as a web page MIDI file, or imported
into a composition program for further modification. See the Composer page for information on making MIDI files.
Saving Your Work
Individual patches are always saved as a Snapshot, available on the toolbar as a camera icon. Whatever patch is
showing in the Snapshot will be the one that gets the changes, and you do not have to worry about loosing a snapshot
- it is always saved. When you create a new Snapshot (camera icon), whatever snapshot patch you are working on is
copied to the a new snap at the top of the list. The delete snap button removes this last snap.
Files can be saved and loaded in the normal Windows manner; also the current state of BankStep is automatically
saved on exit and loaded again on startup. You can force this unnamed quick save anytime with the menu File/Quick
Save or with the toolbar Quick Save (disk icon) button. Conversely, you can reload a Quick Save with the
File/Revert menu command.
Layouts are separate files that define the module layout. Layouts are saved with the files but may be created
file:///C|/vbp/BankStep/Help/alldocs/overview.htm (3 of 5) [9/28/2002 8:56:49 PM]
BankStep Overview
separately. Use the Layout menu to create your own layouts that may contain any combination of modules.
First Sound
BankStep produces no sound by itself. Instead, it generates MIDI data to control your choice of synthesizers, soft
synths or sound cards. This is the same MIDI you hear when you play a MIDI file, but inBankStep the MIDI data is
being created in real time, and you hear the changes you make as you make them. But before you can hear any sound
at all, you need to be sure your computer is set up for MIDI sound play, and to tell SoftStep which MIDI device to
use.
When BankStep runs for the first time, an Options menu will pop up so you can set the default MIDI Out Driver on
MIDI Port A, the first tab. One of the first choices is the default Microsoft MIDI Mapper. This is probably your best
choice to get started with.
After you have set the MIDI Out Driver, Bank Step will most likely start playing a simple melody line right away. If
it does not, the easiest way to tell if your computer is set up to play MIDI is to find a MIDI file (anything with the
extension .mid), and double click on it. Do this when BankStep is not running. Media Player, or whatever your
default MIDI player is, should pop up and start playing the MIDI file. If it does not, you need to figure out what it
will take to play a MIDI file with the default Windows MIDI player.
Once you have MIDI sound, exit all your other MIDI software, such as Media Player or any MIDI sequencer
programs that may be running, and start up BankStep. BankStep can co exist with just about any other MIDI or audio
or soft synth program, but keep it simple at first.
Listening to the Example Patches
BankStep comes with several example patches, many of which have been composed by BankStep users. Most (but
not all) patches are set up as a composition of several Snapshots. You can play either individual Snapshots or the
entire composition. To play the composition, click on the Composer button in the Toolbar. To play individual
Snapshots, select one from the drop down Snapshot menu, then click on the Run/Stop button.
Computer System Requirements
BankStep runs on all Windows operating systems from Windows 95 on. This includes Windows 95, 98, ME, XP,
2000, and NT4. While there are no hard limitations on CPU speed, we recommend 300 MHz or faster for best
results. You also need a MIDI compatible sound card or interface. A graphics display of at least 800x600 High Color
(16-bit) or True Color is recommended. For best results, system memory should be at least the minimum
recommended by your version of Windows.
Software Synthesizer Compatibility
BankStep has been tested extensively for compatibility with popular software synthesizers such as Reaktor, VAZ2,
ABox, GigaSampler/GigaStudio, and Pulsar. When using BankStep to control a softsynth, we recommend a
minimum CPU speed of 500 MHz, and at least 64 MB of system memory.
file:///C|/vbp/BankStep/Help/alldocs/overview.htm (4 of 5) [9/28/2002 8:56:49 PM]
BankStep Overview
Most soft synths do not have their own MIDI drivers, and therefor require a program called a MIDI Loop Back in
order to run them with SoftStep or any other MIDI generator. This gives you a set of virtual patch cords, where you
can send the output of SoftStep to a Loop Back input, then connect your soft synth to the same Loop Back output.
These programs are available as free downloads, they are easy to install, and once installed they are trouble free.
BankStep works very well with any of the several free MIDI Loop Back drivers, such as Hubi's MidiLoopBack (Win
95/98), MidiYoke (Win98/2K/XP), or Sonic Foundry's Virtual Midi Router (Win98/2K/XP).
BankStep is Copyright © 2001-2002 by John Dunn and Algorithmic Arts. All Rights Reserved.
file:///C|/vbp/BankStep/Help/alldocs/overview.htm (5 of 5) [9/28/2002 8:56:49 PM]
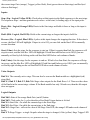
BankStep Main Menu
Main Menu
File Layout Options Help
File Menu
New - erases the BankStep workspace. If there were changes made to the current BankStep workspace
(the File Changed LED will be on) you will first be asked if you want to Save. New discards the current
setup and reloads the last (default) Layout. Note that this may be different from the QuickSave file you
may have been working with because it rebuilds from the Layout file, not the last saved patch file. If you
want to revert to the last saved patch file, use Revert. New is duplicated in the File Control Buttons in
the Toolbar. (Not available in Player.)
Revert - reloads the unnamed QuickSave file. This will revert BankStep to the latest of: 1. the setup that
was automatically loaded when you first started up BankSave; 2. the last BankSave file you Opened; 3.
the last QuickSave.
Open... - invokes a standard Windows dialog box to open a previously created BankStep file. Duplicated
in the File Control Buttons in the Toolbar.
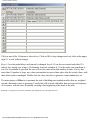
BankStep system files have the extension ".bsp" - they save the state of BankStep,
including Snapshots and all parameter values and connections of all the Snapshots.
There are two auxiliary file types that may be used with BankStep, which are
automatically loaded when the .bsp file is loaded, if any are in the same directory and have
the same filename as the .bsp file. These are:
BioSequencer table files (.bst)
Pitch Bend Tuning table files (.pbt)
Normally, BankStep uses the default versions of these files, which is always loaded
automatically when BankStep is run; if you load an .bsp file that also includes one of the
auxiliary files, and subsequently load another .bsp file that does not include one, then the
default auxiliary file is loaded again.
QuickSave - saves the current setup in an unnamed fast load format; it is the same file that is
automatically saved upon exit and loaded when you first start up BankStep.
Save - Saves the currently opened BankStep (.bsp) file. If no .bsp file has been opened, acts as Save As...
(below). Duplicated in the File Control Buttons in the Toolbar. (Not available in Player.)
file:///C|/vbp/BankStep/Help/alldocs/mainmenu.htm (1 of 3) [9/28/2002 8:56:49 PM]
BankStep Main Menu
SaveAs... - Invokes the standard Windows File Save dialog to save the BankStep workspace. (Not
available in Player.)
Bio Sequence... - Loads a DNA or protein sequence file for use with the Bio Sequencer, as created by
the Bio Editor (available separately from Algorithmic Arts). Does not alter the default Bio Sequence file.
Tuning Table... - Loads a Tuning Table .pbt data file and makes it the current source of tunings for the
MIDI module, when using Pitch Bend Tuning. Does not alter the default tuning table file.
Exit - Exits BankStep.If there were changes made to the current BankStep workspace (the File Changed
LED will be on) you will first be asked if you want to Save. Whether or not you choose to save your
work in a named file, the QuickSave unnamed file is always automatically saved. If you do not want
changes saved to the QuickSave file, use Revert just prior to exiting. Exit is the same as the Windows
Close "X" icon in the upper right of the title bar.
Recently Opened File List - The four most recently opened files are listed here. Select a file name to
open it.
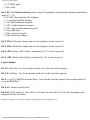
Layout Menu
Layouts are the arrangements of modules that define your BankStep workspace. You are free to create
Layouts from any combination of any number of modules; once the layout is created it becomes the
template for the workspace you have defined.
Layouts have no connections or settings, they are only the unconnected modules. Therefore there is no
need for Layouts in the BankStep Player, and the Layout menu does not appear in the Player.
Load Layout - Load a previously constructed Layout file. The layout file is loaded into BankStep, then
it is converted into an empty BankStep patch, which becomes the current patch, as if you had loaded it
from a patch file. After loading a Layout, you are free to start making settings and connections, and you
can create Snapshots or save the patch just as with any other BankStep patch.
Edit Layout - Opens the Layout utility, where you can edit the current module layout scheme or to
create your own from scratch. When you create a Layout, you choose which modules to work with and
how they are positioned. After a Layout is created, the modules become "fixed" much as if they were
bolted into an equipment rack. While you do have the option of changing a Layout at any time,
modifying a layout resets any saved module connection patches - just as you would have to remove
patchcords from a hardware rack before rearranging or adding to the modules in a rack.
Help Menu
file:///C|/vbp/BankStep/Help/alldocs/mainmenu.htm (2 of 3) [9/28/2002 8:56:49 PM]
BankStep Main Menu
BankStep Help... - opens this help document with your default browser.
Visit Web Site... - links to the Algorithmic Arts web site: http://algoart.com
Check For Newer Release... - links to a page in the Algorithmic Arts web site that will inform you if
there is a newer release of BankStep available.
Register User... - This is where you register and install your BankStep license. The BankStep Player is
freeware and does not need to be registered.
To register, enter your name and key number into the registration pop up, and click on the
Install button. The next time you run BankStep the new registration will be effective.
After registeration, the name you supply will appear as the author of all music created with
BankStep, so you should give your name exactly as you want it to be associated with your
music. While your copy of BankStep is keyed your name, it is not copy protected and our
"as a book" license is very liberal about allowing you to install it in secondary or laptop
computers, as long as you are honoring your agreement that it is used by only one person
at a time.
About... - standard Windows About box that includes version and license information.
BankStep is Copyright © 2001-2002 by John Dunn and Algorithmic Arts. All Rights Reserved.
file:///C|/vbp/BankStep/Help/alldocs/mainmenu.htm (3 of 3) [9/28/2002 8:56:49 PM]
BankStep Options
BankStep Options
The Options menu is accessed from the main menu. This is where you set the MIDI device drivers, MIDI
sync options, and other BankStep options.
MIDI Output & MIDI Input
Although you can run BankStep with no MIDI, to produce sound at least one MIDI output driver must be
selected, and in order to respond to external MIDI messages at least one MIDI input driver must be
selected.
The first time you run BankStep the Options menu will pop up as a reminder that you need to select a
driver. Once selected, BankStep will remember it and will only pop up the Options menu automatically if
the MIDI Port A output driver can not be found or is being used by another device when BankStep loads.
You can have up to 4 MIDI Output and 4 MIDI Input drivers open at once, by selecting Tabs A-D, and
setting the driver on that tab. Most MIDI drivers only allow one connection at a time, so if you select a
driver that is already in use by another port, the other port will reset itself to "None Selected." The
exception to this is the Microsoft MIDI Mapper, which is actually one of the other MIDI Output drivers
(you can select which one in the Windows Control Panel, in the Multimedia section). If you select a
driver that is being used as the MIDI Mapper, you will get an error message telling you the driver is in
use.
Options for Each MIDI Port
The following options are on the MIDI Port Tab area, and are individually set for each port selected.
file:///C|/vbp/BankStep/Help/alldocs/options.htm (1 of 4) [9/28/2002 8:56:49 PM]
BankStep Options
When the All Notes Off button on the tool bar is pressed, the message types checked will be sent:
All Notes Off - sent to all 16 MIDI channels. Most synths respond to this.
All Keys Off - Note Off sent to all 128 keys in all 16 channels. Only use this if your synth does not
respond to the All Notes Off message.
Reset Controls - Sets controls to their default values.
When Active Sensing is checked MIDI Active Sensing is sent on each MIDI tick, only to the MIDI
Output drivers that have this option checked..
Options for MIDI Port A Only:
MIDI Sync
BankStep can synchronize to an external MIDI device as either Master or Slave. When in Slave mode,
modules do not process unless the Master device is sending out MIDI Sync clocks. Slave mode also
disables the Tempo Control, as tempo is controlled by the Master MIDI device. MIDI Sync defaults to
"None," and the setting is not remembered. You will have to select this option for each session in which
you want to use MIDI Sync.
Remote Control
When Receive is selected, SoftStep's Transport buttons are remotely set by MIDI Start, Stop and
Continue messages. When Send is selected BankStep will send these messages when the Transport
buttons are clicked. This control is not remembered; the default is not checked. You will have to select
this option for each session in which you want to use MIDI Remote Control.
When Send mode is selected, BankStep sends the Start message when the Run button is pressed at the
beginning of a play list, or after the Reset button has been clicked. When Run is clicked to resume play
that had been interrupted by the Stop button, BankStep sends the Continue message.
When Receive mode is selected, BankStep responds to a Start MIDI message with a Reset/Run action;
and to a Continue message with just a Run action and no Reset.
General BankStep Options
The remaining options are independent of which MIDI Port you select, or in the case
ProgChg>Snapshots below, can be independently set to any MIDI Port.
ProgChg > Snapshots
file:///C|/vbp/BankStep/Help/alldocs/options.htm (2 of 4) [9/28/2002 8:56:49 PM]
BankStep Options
When this is checked, external MIDI Program Change messages, on the MIDI channel and port selected
in the drop down menu just below, cause BankStep to change Snapshots. When checked, the Composer
button in the Tool Bar is disabled. This control is remembered; and the next time you run BankStep it
will default to the prior session settings. If you can't access the Composer button, it is because this
button has been checked previously - uncheck it and the Composer button will become active
again.
Play Resets Clock
If this is checked, the toolbar Run/Start button will reset and synchronize all internal clocks. If the Reset
Modules option is checked, MIDI module inputs will resend their control settings.
Reset Modules
Upon release of the All Notes Off button, MIDI module inputs will resend their control settings.
High Priority
Check this option to force Windows to always give BankStep enough processing cycles to run smoothly,
even when it is minimized or in the background. This is off by default to avoid conflicts with other time
sensitive programs, but if there are no conflicts on your computer, it should be set on.
Change Warning Off
When checked, you will not receive a warning message to save files when changes have been made to
the BankStep patch. This is useful for performance mode, when you change patches during a
performance but do not want to save the changes. Not available (grayed out) in Player.
SB Banks
SoundBlaster sound cards use a non standard MIDI Bank Change protocol. If your sound card is any of
the SB type cards, including SB Live! and Audigy cards, check this option to enable MIDI Bank Change
to work properly with these cards.
Font Warning Off
When BankStep starts up, if it detects you are using a non standard font size it will give you a warning
that some components may not display properly. Check if you would rather not see this warning. If you
are using standard fonts, this option is grayed out.
Ran Seed
file:///C|/vbp/BankStep/Help/alldocs/options.htm (3 of 4) [9/28/2002 8:56:49 PM]
BankStep Options
Sets the seed to be used by the Random number generator. The random generators will repeat the same
sequence whenever BankStep is restarted, as when the Toolbar Run/Start button is clicked. This gives
you a stable, repeatable composition even if you use random numbers. If you want to always start with a
random series, set Ran Seed to 0.
WN Delay
You can delay the onset of the whole note count (available as the Control Flag WNotes) by setting a a
value (in whole notes) here. Whole note counting starts after the internal clocks are reset (as when
Run/Stop is clicked), and after the delay set here.
Latency
Latency is the amount of "head start" MIDI messages have so they can be sent out to the synthesizer or
sound card with no perceived timing inaccuracies.. When first installed, Latency is set to 0, as this gives
the best performance in the faster computers that are available today . The amount of latency you may
need for accurate timing depends on the speed of your computer and the amount of overhead software.
Adjust the latency by entering the number of milliseconds latency you want into the text box. 200
milliseconds (1/5 second) works well in many cases. When the latency value is too small you will get
timing errors, and the red timing error LED near the tempo bar will light up
Zero latency is a special case in which the output buffering is turned off completely and MIDI data is
pumped directly out to the synthesizer with minimum overhead. This may be desirable when
synchronizing to another MIDI device. If you have a fast computer you may find zero latency to be
preferable to buffered MIDI. There will be missed notes when you are moving windows around, but
normal play is stable and much more responsive.
Button Colors
Click on the button to select value and logical input button and workspace background colors.
Start Dir Button
Normally BankStep starts up in the last directory you used to save or load a file. But you can change this
to always startup in the same directory. Click the button to call up a directory tree dialog, pointing to the
current directory. If you want to start up in this directory, just click the OK button; if you want to select a
different directory for startup select it from the directory tree, then click OK. To return to starting up in
the last directory visited, click the Float button.
BankStep is Copyright © 1999 by John Dunn and Algorithmic Arts. All Rights Reserved.
file:///C|/vbp/BankStep/Help/alldocs/options.htm (4 of 4) [9/28/2002 8:56:49 PM]
file:///C|/vbp/BankStep/Help/alldocs/toolbar.htm
The BankStep Tool Bar
The Toolbar is the control console for BankStep. While it contains some duplicated controls, such as the file
controls, most controls are available nowhere else.
File Control Buttons
The first three buttons are file control operations, New, Open, and Save. New discards the current setup and reloads
the last (default) Layout. Note that this may be different from the patch you may have been working with because it
rebuilds from the Layout file, not the last saved patch file. If you want to revert to the last saved patch file, use the
main menu command, File/Revert. Open is a standard file open, a duplicate of the one in the File menu. Save saves
the currently opened BankStep (.bsp) file. If no .bsp file has been opened, it acts as Save As.
Help Button
Pops up this Help document. Help in BankStep is a standard web type htm document that you can read with most
any web browser. BankStep uses your default web browser to access Help.
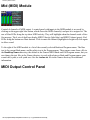
Composer Button
Brings up the Composer utility. This gives the ability to create and edit a playlist of Snapshots that can be made
into a standard MIDI file. See the Composer utility page for details.
The Composer can be expanded to show the playlist, or collapsed to show only the transport controls. When
collapsed (the default), clicking on the Composer button will start it playing, so it becomes a Player button for the
whole composition, not just the currently displayed Snapshot.
If the Composer button appears not to be working, it is because the Composer button is set to Off when you set
Snapshots (below) to respond to MIDI Program Change instead of the Composer play list. To turn the Composer
Button back on, select Options from the main menu, and remove the check from the checkbox that says: ProgChg > Snapshots.
Snapshots
BankStep's Snapshot, or Patch Save, system. As you make changes to BankStep, the changes are saved in the
current Snapshot automatically. Snapshots are automatically numbered from 0 to a maximum of 127. You can
rename a Snapshot anytime by just typing in the new name. The name "takes" and a number is added to it when the
text box focus is lost, so to force the name update you can click on a blank part of the toolbar (or virtually
file:///C|/vbp/BankStep/Help/alldocs/toolbar.htm (1 of 3) [9/28/2002 8:56:50 PM]
file:///C|/vbp/BankStep/Help/alldocs/toolbar.htm
anywhere else).
At any point, you can click on the camera button to create a copy of the current Snapshot, that will be placed at the
end of the Snapshot list, and set the new copy as the active Snapshot.
To revisit a patch you have saved, select it from the list in the drop down menu. If you select the MIDI Program
Change option in the Options pop up, you can change patches with a MIDI Program Change from an external MIDI
device. You can have up to 128 Snapshots, numbered 0-127, per composition.
File Has Changed LED
When you have made a change in BankStep the LED graphic to the right of the Snapshot drop down will go "on,"
indicating there has been a file change; and you will be asked if you want to save the current file when you exit,
open another file, or clear the workspace with New. You can manually turn the LED on or off, and thereby set or
clear the file save warning, by clicking on the LED. If you find this file save warning message annoying you can
disable it in the Options pop up by checking "No Change Warning."
Tempo Controls
Use the Tempo slider bar to change system tempo. Range is from 20 to 240 beats per minute. The four "LED"
indicators to the right of the bar indicate: tempo (lower left, green), timing errors (upper left, red), MIDI input
(upper right, magenta), and MIDI output (lower right, blue). When BankStep is in Slave mode, synchronized to an
external MIDI device (or another instance of BankStep), the Tempo control is disabled, as tempo would be
controlled by the Master MIDI device. See the Options page for information on setting MIDI Sync.
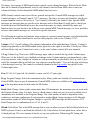
All Notes Off
With MIDI, sometimes you get stuck notes. Press this button to send All Notes Off messages to all MIDI channels almost always this will clear the stuck notes. BankStep is inhibited from sending MIDI while this button is
depressed. Click it a 2nd time to resume normal operation. The MIDI data sent by this switch is configurable. See
the Options page for details.
Run/Stop
Sets the Run/Stop Control Flags so you can start and stop playing from the tool bar. Duplicates the transport
controls in the Composer utility page.
The Run/Stop button does not of itself run the BankStep modules. It can not because BankStep modules are always
running. Every MIDI tick, every module is processed. What the Run/Stop does is set a value that reports to
SoftStep modules what its state is, and it also sends out a message when the transition is from Stop to Run, that tells
certain modules to reset themselves. It is very much up to the composer how the Run/Stop button affects the patch,
file:///C|/vbp/BankStep/Help/alldocs/toolbar.htm (2 of 3) [9/28/2002 8:56:50 PM]
file:///C|/vbp/BankStep/Help/alldocs/toolbar.htm
and some patches do not use it at all.
When changing from Stop (button out) to Run (button in), a 1-tick trigger is sent that is readable as the TStart
Logical module input; additionally some modules (such as Gates and MIDI) will reset upon this transition.
Ball Clock
Pops up or closes the Ball Clock window, which contains a ball that travels across the window, changing direction
when it hits one of the 4 edges. Each time the ball hits an edge, a trigger pulse is generated, which is available as a
Logical output. The Ball clock outputs are listed in the Logical Connection popup as Ball North, Ball South, Ball
East and Ball West. Additionally there is a Ball All output that triggers when the ball hits any of the 4 walls.
Although the Ball moves at a constant speed, you have great rhythmic flexibility by changing the size of the box
the ball bounces around in. Ball Clocks are not synchronized with other clocks, except that it restarts from the
upper left corner on the Stop to Run transition.
Notes
Pops up or closes a Notepad like text editor, where you can make notes on your patch. The text you enter will stay
with your file when you save it. Right click on the text area to pop up a menu of editing controls such as cut &
paste.
BankStep is Copyright © 2001-2002 by John Dunn and Algorithmic Arts. All Rights Reserved.
file:///C|/vbp/BankStep/Help/alldocs/toolbar.htm (3 of 3) [9/28/2002 8:56:50 PM]
BankStep Composer
BankStep Composer
The BankStep Composer utility is basically a play list editor for converting a list of Snapshots into a
standard MIDI file. You access it with the Composer button on the Tool Bar.
The composer can be expanded to show the playlist, or collapsed to show only the transport controls.
When collapsed (the default), clicking on the Composer button in the Tool Bar will start it playing, so it
becomes a Player button for your whole composition, not just the currently displayed Snapshot.
If the Composer button appears not to be working, it is because the Composer button is set to Off
when you set Snapshots to respond to MIDI Program Change instead of the Composer play list. To turn
the Composer Button back on, select Options from the main menu, and remove the check from the
checkbox that says: ProgChg -> Snapshots.
It is very simple to create a MIDI file from the default snapshot. If you want to do this now, jump to the
Transport Controls, below. But the real fun begins when you have multiple Snapshots, and you arrange
them into a playing sequence and then record the whole sequence.
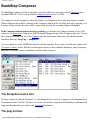
The Snapshot source box:
The box on the left, labeled "Snapshot," is your Snapshot list, exactly as it appears in the Snapshot drop
down menu on the Tool Bar. The idea is to create a list of these snapshots for BankStep to automatically
sequence through when you click on the Transport Run button
The play list box:
file:///C|/vbp/BankStep/Help/alldocs/composer.htm (1 of 4) [9/28/2002 8:56:50 PM]
BankStep Composer
The larger box to the right is the play list. This contains a list of Snapshots that will be played when the
Run button is clicked. They may be in any order, and repeated as often as you like. The play list can be
as large as you like - up to 999 steps.
The first column in the play list box, labeled "Step" is just the sequential step number. Each item you add
to the list gets the next number. This column is always in sequential order.
Between the column labeled "Step" and the one labeled "Msrs" is a one character column starting (in the
example image) with "B." This column is for the beginning and end markers. B for beginning, E for End,
and X if both are on the same step.
The next column, labeled "Msrs," is the number of measures (whole notes, 4/4 time) that will play before
sequencing to the next Snapshot in the play list. To the right of this is the selected Snapshot - number and
label - as it appears in the Snapshot box, and in your original drop-down Snapshot menu on the Tool Bar.
Creating the play list:
To copy a Snapshot from the Snapshot source box to the play list box, first select the Snapshot you want
to copy by clicking on it. The highlight bar will move to your selection. Click on the Add button, the first
in the column of buttons to the right of the play list box. This will add the Snapshot to the end of the play
list. Or you can just double click on the Snapshot source list, on the Snapshot you want to add, and it
will be the same as selecting it, then clicking the Add button.
You can also insert a selection into the play list. First highlight the Snapshot you want to insert into the
play list, then highlight the play list step number where you want the insert to go. Then click on the
Insert button, just under the Add button. The play list will expand and the selection is inserted.
To delete a play list item, highlight it and click on the Delete button.
Editing the play list:
You can move play list items up and down in the list by highlighting them and clicking on the Up and
Down buttons.
Change the Begin and End markers by highlighting the position you want and clicking on the Begin or
End button.
Set the number of measures to play (Msrs column) by highlighting the step and then entering the number
in the text box just under the big blue Measures readout. Click the button to the right of the text box to
enter the number into the play list.
file:///C|/vbp/BankStep/Help/alldocs/composer.htm (2 of 4) [9/28/2002 8:56:50 PM]
BankStep Composer
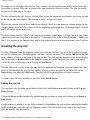
Making a MIDI File:
The Transport Controls make it easy to create a MIDI file of an entire play list of Snapshots, or of just
a single snapshot. A MIDI file created with the transport controls will always be exactly in tempo even
on overloaded or slow computers that might vary tempo slightly when playing in real time as other tasks
(such as moving the display window) are also running.
The images above show the Transport Controls with the play list box closed. Click on the book icon to
open and close the play list. Nothing changes whether the play list is open or closed, just the view.
Closing it just saves on screen space.
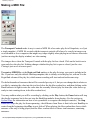
To create a MIDI File, set the Begin and End markers to the play list steps you want to include in the
file. If you have only the default AutoSnap snapshot, this is already set in the play list, with an X in the
Begin/End column of the play list, which means recording will start and end on the same step.
The default number of measures that will be recorded per step is 8, but you can change that to whatever
you like by entering the value into the text box below the big blue readout box, and then clicking on the
blank button to its right to enter the value into the currently selected play list item (the value shows up,
ready to start counting down, in the blue readout box).
You may audition what you will be recording by clicking on the Play button; the Pause button will stop
the playlist sequencer but it does not stop the BankStep modules from playing. (See the section on
System Flags for information on how to set up modules to recognize the transport controls.) The Stop
button also stops the play list from sequencing - the difference from Pause is that it also sets BankStep to
restart from the beginning when Play is next clicked. When playing, the blue readout box shows which
measure of the step is being played; and the Msrs: readout above it shows: total measures, remaining
measures.
file:///C|/vbp/BankStep/Help/alldocs/composer.htm (3 of 4) [9/28/2002 8:56:50 PM]
BankStep Composer
When you are ready to record, click on the Stop button, then click on the Record button, just under
the LED graphic. The dark red dot will turn bright red, but nothing else will happen. Now, click on the
Play button, and recording will commence. While you are actually recording the MIDI file, the red
LED above the Record button will turn on. After the last measure is recorded the transport automatically
sets the Stop button, and the recording LED goes back off.
At this stage, the MIDI File has been recorded to a temporary file. You can save the file in any directory
by clicking on the Save button, just to the right of the Record button. This action simply copies the
temporary file into the location of your choice.
Auditioning the MIDI File:
After you have recorded a MIDI file, you can audition it with the MIDI file player or MIDI sequencer of
your choice. The topmost of the three long buttons just above the Exit button will launch your default
MIDI Player. On most Windows systems, this will be the Microsoft Media Player, but whatever you
have set to be the default player (the one that plays when you click on a MIDI file name), is the one that
is launched. While the MIDI file player is running, BankStep will disappear. It's still there, lurking in
the background, waiting for you to finish auditioning the MIDI file, but you won't be able to see it. Once
you exit the MIDI file player, BankStep pops back up as it was before.
The other two audition buttons will be blank until you use them the first time. These are for specifying
whatever other MIDI file player or sequencer software you want to run. If the button is blank, when you
click on it you will get a dialog box for you to locate the MIDI file program you want to use. This will be
remembered, but you can change it anytime by right-clicking on the button.
Some older programs that were written for Windows 3.1 are unable to read Windows 95 file names if the
directory path has spaces in it. If your audition program has trouble loading the MIDI file, try clicking on
the "?" checkbox just under the audition buttons.
BankStep is Copyright © 2001-2002 by John Dunn and Algorithmic Arts. All Rights Reserved.
file:///C|/vbp/BankStep/Help/alldocs/composer.htm (4 of 4) [9/28/2002 8:56:50 PM]
BankStep Input Pop Up
Module Input Connections
Just as hardware analog sequencers have two types of signals - control voltages and on/off gates BankStep also has the digital equivalent: Values for control voltages, and Logicals for on/off gates.
Blue button is Value input, Red button is Logical input.
Value and Logical connections are distinguished by different color buttons. While you are free to specify
your own color scheme, in the example images Value inputs are blue and Logical inputs are red. When
you click on a button you will see different pop up menus for each of the two input types, and the list of
possible connections will be different.
file:///C|/vbp/BankStep/Help/alldocs/input.htm (1 of 4) [9/28/2002 8:56:51 PM]
BankStep Input Pop Up
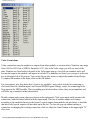
Value Connections
Value connections may be numbers or outputs from other modules or system values. Numbers may range
from -9999 to 9999, but as MIDI is limited to 0-127, this is the Value range you will use most of the
time. Numbers are listed in the left panel of the Value input pop up. Just click on a number and it will
become the input to the module, and appear as its label. For numbers not listed, you can type it in the text
box in the upper left of the pop up. You can use the inc/dec arrows to adjust the number in small steps.
To connect the number to the input, click on the OK button.
For convenience, two drop down lists of values are available - note values in ticks for connecting to
clock and other tick duration inputs, and General MIDI Program Change values, for connecting to the
Prog input in the MIDI module. There is nothing special about these values, they are just numbers and
will show up as numbers in the button labels.
Module outputs and system values are shown on the right panel. Click on an input and it becomes the
connection, with the button labeled with the input name. This list of module outputs will change
according to the modules that are in the layout. Logical outputs from modules are not listed, so modules
that have only logical outputs will not show up in this list. To close the pop up without making a
connection or changing the existing connection, click on either the Cancel button or the upper right "X"
close icon.
file:///C|/vbp/BankStep/Help/alldocs/input.htm (2 of 4) [9/28/2002 8:56:51 PM]
BankStep Input Pop Up
Logical Connections
Logical connections have two states only, On or True, and Off or False. They may be either Gates or
Triggers. Gates are On for the duration, triggers are On for only one tick (a "tick" is one calculation cycle
defined by MIDI as of 1/24th of a quarter note). Triggers and Gates that are On for some number of ticks
then go Off, are collectively referred to as "pulses." For example the output of a Clock module, which is
a gate that cycles between some number of ticks On then some number of ticks Off, is called a clock
pulse.
As there are no numeric values, the Logical pop up has only one panel, which has the logical system
flags and the list module logical outputs. Click on an input and it becomes the connection, with the
button labeled with the input name. This list of module outputs will change according to the modules that
are in the layout. Value outputs from modules are not listed, so modules that have only Value outputs
will not show up in this list. To close the pop up without making a connection or changing the existing
connection, click on the upper right "X" close icon.
System Values and Flags
System Values and Flags give access to some of BankStep's internal events. The most basic use is to
connect Hold inputs to Banks and Clocks to the Stop flag so the modules will be in hold (or reset, if reset
input is used) until the Play button is clicked. In this way, you can set modules to start at in an exact,
known state when you start them or record them to MIDI. System Values/Flags are at the beginning of
the module input connection lists.
Logical System Flags
Off - a constant that is always logical False or Off.
On - a constant that is always logical True or On
Run is True when the Play button is pressed, otherwise it is False. Some modules are internally
connected to the Run Flag. These are the modules that always would want to be reset at the start of a
composition, such as the MIDI modules which send out their initial control settings.
Stop is True when the Play button is not pressed - when Stop or Pause in the Composer is pressed otherwise it is False. The Gates Module is internally connected to the Stop flag, and the module goes into
Hold when during Stop (then Reset and when Run is clicked).
TStart is a Trigger flag that goes to True for one cycle on startup, file load, or when Run button is
pressed, then returns to False.
file:///C|/vbp/BankStep/Help/alldocs/input.htm (3 of 4) [9/28/2002 8:56:51 PM]
BankStep Input Pop Up
System Values
Off (0) - this is a constant that always returns the value 0, but it is also used by several modules (Banks,
Gates, Row) as an Off or disconnect value.
WNotes gives the number of whole notes since the internal clocks are reset (as when Run/Stop is
clicked). This is useful for timing events in a composition such as volume changes, etc. You can delay
the onset of the whole note count by setting the Options window WN Delay value.
BankStep is Copyright © 2001-2002 by John Dunn and Algorithmic Arts. All Rights Reserved.
file:///C|/vbp/BankStep/Help/alldocs/input.htm (4 of 4) [9/28/2002 8:56:51 PM]
BankStep Random Module
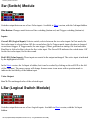
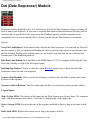
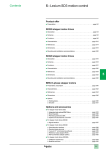
Bnk (Bank) Module
The main module in BankStep is the Bank module, which is a 3 or 4 bank knob sequencer of any number
of columns up to 48. The Bank module is a "smart" module, with the ability to set sequence start and end
points, and to automatically switch direction when the end points are reversed.
Special:
Green Button (Fill Utility): Pops up a menu for filling, copying and saving the stage gates (see below).
Orange Button: Produces an On/Off gate, which is available at the Bnk X bG logical output. This
button is not used for anything within the Bank module, rather it is just a general purpose button to use
any way you like.
Yellow Button: Produce a trigger pulse, which is available at the Bnk X bT output. Not used within the
Bank module, available for anything you like.
Stage Labels: Located across top of Bank module, above knobs. Indicates the currently active stage
column by highlighting to red. Click on a label to make that stage current.
Stage Knobs: Sets the stage value for the sequencer row the knob is on. Set knob values by click and
drag up/down for large value changes, left/right for small value changes. The knob value range is 0-127.
When a stage is selected, the labels at the right of each row of knobs will display the knob value.
Stage LEDs: The triangle of LEDs below each column of knobs show/set the stage Gate (orange LED),
Trigger (yellow), and Start/End (red). Click on Gate or Trigger LEDs to set that stage to fire a Gate (On
for the stage duration), or Trigger (On for one clock tick).
When (and only when) the Start and End inputs are set to Off(0), you can left click on a red Start/End to
set the Start point for the sequencer run, and right click to set the End. If you set the End before the Start
or the Start before the End, the sequencer will run in reverse.
The four larger LEDs in a square at the far right of the stage LEDs, under the output value boxes, show
file:///C|/vbp/BankStep/Help/alldocs/bank.htm (1 of 5) [9/28/2002 8:56:51 PM]
BankStep Random Module
the current stage Gate (orange), Trigger (yellow flash), Start (green when on Start stage) and End (red
when on End stage).
Inputs:
Step: (Stp - Logical, Yellow LED): Clock pulses at this input step the Bank sequencer to the next stage.
The sequencer steps - and thus generates new values - at the start, or leading edge, of the input pulse.
Reset: (Rst - Logical, Orange LED): Resets to the Start stage and holds it there as long as the input is
held On.
Hold: (Hld - Logical, Red LED): Holds at the current stage as long as the input is held On.
Reverse: (Rev - Logical, Blue LED): A pulse at this input changes the stepping direction. If direction is
reverse, the blue LED will highlight. If input is set to Off, you can click on the blue LED to manually
reverse direction.
Start (Value): Sets the stage for the sequence to start on. If Start is greater than End, the sequencer will
step in reverse, and the blue Rev LED will highlight. If both Start and End are set to Off(0) you can
manually set Start by left clicking on the red Start/End LED below each column of knobs.
End (Value): Sets the stage for the sequence to end on. If End is less than Start, the sequencer will step
in reverse, and the blue Rev LED will highlight. If both Start and End are set to Off(0) you can manually
set End by right clicking on the red Start/End LED below each column of knobs.
Value Outputs:
Bnk X #: The currently active stage. This can also be seen on the Bank module as a highlighted (red)
stage label.
Bnk X 1, Bnk X 2, Bnk X 3, Bnk X 4: Stage value outputs for the Bank Rows 1-4. These are the values
of the Knobs in the current stage column. If the Bank module has only 3 Knob rows, then the 4th output
does not appear.
Logical Outputs:
Bnk XbG: State of the orange Bank Gate (on/off) button.
Bnk XbT: Clock pulse for 1 cycle when the yellow Bank Trigger button is clicked.
Bnk X S: Start Gate - On while the current stage is the Start stage.
Bnk X E: End Gate - On while the current stage is the End stage.
Bnk X G: Stage Gate - reflects the value of the Stage Gate LED, the orange LED under each column of
knobs.
Bnk X T: Stage Trigger - a single On pulse when the stage is changed, if the (yellow) Stage Trigger LED
file:///C|/vbp/BankStep/Help/alldocs/bank.htm (2 of 5) [9/28/2002 8:56:51 PM]
BankStep Random Module
is On.
Bnk X Rv: Reverse Gate - On while the sequencer is stepping in reverse (blue Rev LED will also be
highlighted).
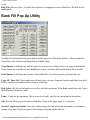
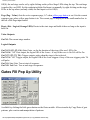
Bank Fill Pop Up Utility
Available by clicking the little green button on the upper left of the Bank module. Allows transfer by
Copy/Paste, plus creation and manipulation of knob values.
Copy Buttons 1-6: Each copy button copies the selected row of knob values to a separate hold buffer.
These copies are remembered after BankStep is exited, or when a different BankStep file is loaded.
Paste Buttons 1-6: Pastes the contents of the hold buffer 1-6 to the currently selected knob row.
Copy All / Paste All: Copies and pastes all knob rows s at once. Separate from the individual row hold
buffers, and also remembered after exiting or reloading.
Row Select 1-4: Selects the knob row to affect with edit operations. If the Bank module has only 3 rows,
the 4th button will not be visible.
Undo: - Undo the last operation. This is a one-level undo, only the last operation can be undone.
OK: Exit the Fill pop up and return to BankStep. Same as the upper right "x" exit button.
Start & Length step buttons: Sets start column (stage) for edit operations and number of columns to
change. Note that Copy/Paste ignores this settings, operating on the full row.
file:///C|/vbp/BankStep/Help/alldocs/bank.htm (3 of 5) [9/28/2002 8:56:51 PM]
BankStep Random Module
Value & Range step buttons: Sets value and range for some edit operations.
Scale quantize buttons: (Major, Minor, Penta, etc.) Forces the selected knob values to the scale denoted
by the button. Right click to create a scale from scratch.
Set: Sets all selected knobs (Start & Length) to the value given in Value.
Add: Adds Value to all selected knobs. Results greater than 127 are set to 127.
Sub: Subtracts Value from all selected knobs. Results less than 0 are set to 0.
Count: Sets selected knobs to an incremental count, by increment set in Value.
Rand: Sets selected knobs to a random value from 0 to Range.
RWalk: Random Walk. Sets selected knobs to a random increment of +/- Value, within limits of 0 to
Range. Walk start point is Range/2.
Invert: Inverts all selected knobs about Range by subtracting them from Range.
Reverse: Reverses the order of selected knobs.
Open: Duplicate the step at Start, moving others up one.
Close: Delete the step at Start, moving others down one.
Dups: Removes all duplicate values throughout the sequence.
Scatter: Randomly reposition values, from Start to Length steps.
Sort: Ascending sort from Start of Length steps.
HSort: Harmonic sort. Sorts values from Start to Length steps according to selected sort key, which you
can access by right clicking on the button. The sort key is a list of up to 12 chromatic scale numbers (0,
1, 2, .. 11). The chromatic scale degree, (which is the value modulus 12) is matched against each of the
keys in order, with the matched values moved to the front. Thus if you use a table with the values 0, 7, 4 all the octaves will be moved to the start of the table, the 5ths after that, followed by the major 3rds, and
then the other values in the original order.
To change or edit a sort key, Ctrl-Click on the HSort button, and the key editor pop up appears..
file:///C|/vbp/BankStep/Help/alldocs/bank.htm (4 of 5) [9/28/2002 8:56:51 PM]
BankStep Random Module
Click on one of the 16 buttons to select a key. Click on OK to keep changes and exit; click on the upper
right "x" to exit without changes.
Keys 1-3 are the prebuilt keys and can not be changed, keys 4-12 can be user created and edited. To
make a key, simply type in up to 12 chromatic intervals (numbers 0-11) in the order you want them to
sort. If a key number is repeated, the sort will use the same values that number of times. If a key has
more than 12 number of steps, any values not matched are moved into place after the sorted values, with
their relative places unchaged. Double click on a key entry line to generate a semi-random key set.
The main purpos of HSort is to automate the task of building note translation tables that are weighted
toward a harmonic center or grouping. Usually this will be used with tables that are based on frequency
of occurance, with the more frequently occuring values appearing at the head of the table.
BankStep is Copyright © 2001-2002 by John Dunn and Algorithmic Arts. All Rights Reserved.
file:///C|/vbp/BankStep/Help/alldocs/bank.htm (5 of 5) [9/28/2002 8:56:51 PM]
BankStep Clock Module
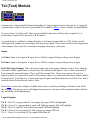
Clk (Clock) Module
Generates Clock pulses.
Sync/Free Run Button: The light blue button switches the clock from Sync mode (button out) to Free
Run (button in). In Sync mode, the clock is hard synchronized to Gates module clocks and other Clock
modules in Sync mode. In Free Run mode, the only time the clock syncs up to other clocks is upon
startup, file load, clicking the Run button in.
Sync mode is best for most purposes, because you can change clock speed without ever loosing
synchronization with other running clocks; however there is one problem with hard sync - when you
control the clock duration on a note by note basis, such as by using one row of a Bank sequencer to
control the Clock module's step rate, the hard sync sometimes will not "let go" fast enough, and the
timing steps can become different from what you set them to. In this case, the Free Run mode is better,
and it will deliver accurate timing steps in a feedback loop where the Clock module steps the Bank
module, which in turn supplies timing information for the Clock module.
Inputs:
(Ticks Value): Value button is to the right of the light blue Sync/Free button. Sets the clock tick rate.
Lower values are faster, except a value of 0 sets 12 ticks (eighth note) and 1 sets 24 ticks (quarter note).
When in Free Run mode, you can set the tick value to any number up to 9999 ticks; in Sync mode values
of 3-100 = given tick value. See tick chart below for input values > 100.
Red LED (Hold Logical): On gate stops (holds) the clock, and clears the clock outputs to Off. Red LED
highlights when Holding.
Logical Outputs:
Clk X /1: The normal clock pulse represented by the first (yellow) of the output LEDs along the top of
the module.
Clk X /2: Clock Pulse at half rate. Represented by 2nd (first orange) output LED.
Clk X /3: Clock Pulse at1/3. Represented by 3rd output LED.
Clk X /4: Clock Pulse at 1/4 rate. Represented by 4th output LED.
Tick Values for Gates modules and Clock modules in Sync mode.
file:///C|/vbp/BankStep/Help/alldocs/clock.htm (1 of 3) [9/28/2002 8:56:51 PM]
BankStep Clock Module
Input
Ticks Note Value
Value
0
1
12 Eighth
24 Quarter
2
3
4
....
95
96
2
3
4
....
95
96
96
97
98
99
100
101
102
103
104
105
106
107
108
109
96
128
144
192
256
288
384
512
576
768
1024
1152
1536
2048
Input = Ticks
(See Note Values
to translate Note Values
to Input Values)
Whole Note
triplet Double
dotted Whole
Double Whole
triplet Quad
dotted Double
Quad Whole
triplet Bar
dotted Quad
Bar (8 x Whole)
triplet Dbl Bar
dotted Bar
Double Bar
BFN
Note Values, Tick Input Values, and Ticks
Note Value
Input
d = dotted
Value
t = triplet
Ticks
file:///C|/vbp/BankStep/Help/alldocs/clock.htm (2 of 3) [9/28/2002 8:56:51 PM]
BankStep Clock Module
t 32nd
32nd
d 32nd
t 16th
16th
d 16th
t 8th
8th
d 8th
t 4th
4th
d 4th
t Half
Half
d Half
t Whole
Whole
d Whole
t Double
Double
d Double
t Quad
Quad
d Quad
t Bar
Bar
d Bar
t 2Bar
2Bar
BFN
2
2
3
3
4 (4.5) 4
4
4
6
6
9
9
8
8
12
12
18
18
16
16
24
24
36
36
32
32
48
48
72
72
64
64
96
96
98
144
97
128
99
192
101
288
100
256
102
384
104
576
103
512
105
768
107
1152
106
1024
108
1536
109
2048
BankStep is Copyright © 2001-2002 by John Dunn and Algorithmic Arts. All Rights Reserved.
file:///C|/vbp/BankStep/Help/alldocs/clock.htm (3 of 3) [9/28/2002 8:56:51 PM]
BankStep Gates Module
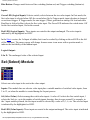
Gates Module
Gate sequencer generates Gate and Trigger pulses. Used as a master control module or a rhythm
generator.
Special:
Green Button (Fill Utility): Pops up a menu for filling, copying and saving the stage gates (see below).
Yellow Button (Page Step): When in, automatically steps to next page upon end of sequence in current
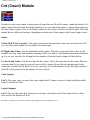
page and Page input button selects last page of sequence; when out, Page input button sets current
sequence page. 8 sequence pages are available, numbered 0-7. The current page is displayed in the small
number box to the left of the Page input button.
Red Button (Stop):When in, the Run/Stop button is automatically set to Stop at the end stage of the last
page.
Yellow Stage LEDs: Indicates the current stage, which is also shown in the blue number box on the
upper left. Left click to set the end stage (turns red). When not running (Clock connection input is set to
Off), right click on to manually select a stage.
Green Gate LEDs: The 4 rows of green LEDs represent the stage gate and trigger values. For each stage
(indicated by the yellow Stage LED), the 4 Gate outputs will be On, and the Trigger outputs will fire, if
the corresponding row LED is highlighted. Left click on the green gate LEDs anytime to set/clear them.
Red Output LEDs: The red LEDs just to the right of the input buttons show the output values of the
current stage. The topmost Orange LED is the "All" output and it is the logical OR of the 4 rows - if any
of the rows is On, the top LED will be On.
Inputs:
Step: (Stp - Logical, Yellow LED): Steps Gates sequencer from one stage to another. Loops back to 1st
stage after end stage (indicated by the top - normally yellow - LED being red); also cycles to the next
page if the yellow Page Step button is pushed in.
End (End - Value): Sets the end stage, at which the sequence will cycle back to the first stage. If set to
file:///C|/vbp/BankStep/Help/alldocs/gates.htm (1 of 3) [9/28/2002 8:56:52 PM]
BankStep Gates Module
Off(0), the end stage can be set by right clicking on the yellow Stage LEDs along the top. The end stage
is marked by a red LED. Set the endpoint with the End input, or manually by right clicking on the stage
LEDs at the top when (and only when) the End input is set to Off(0).
Page (Pag - Value): Sets the active sequence page, 0-7 when yellow page button is out. Sets the current
sequence page when yellow page button is in. The current page is displayed in the small number box to
the left of the Page input button.
Reset: (Rst - Logical, Orange LED): Resets to the start stage and holds it there as long as the input is
held On.
Value Outputs:
Gat X#: The current stage number.
Logical Outputs:
Gat X G1 (G2, G3, G4): State Gates, on for the duration of the stage if the row LED is On.
Gat X GA: "All" Gate output, the logical OR of the 4 rows - if any of the rows is On GA will be On.
Gat X T1 (T2, T3, T4): Trigger outputs, pulse when the stage is first selected.
Gat X TA: "All" Trigger output, the logical OR of the 4 row triggers- if any of the row triggers pulse TA
will pulse.
Gat X S: Start Gate. True at start of sequence.
Gat X E: End Gate. True at end stage of sequence.
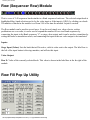
Gates Fill Pop Up Utility
Available by clicking the little green button on the Gates module. Allows transfer by Copy/Paste of gate
patterns, plus creation and manipulation of patterns.
file:///C|/vbp/BankStep/Help/alldocs/gates.htm (2 of 3) [9/28/2002 8:56:52 PM]
BankStep Gates Module
Copy Buttons 1-6: Each copy button copies all 4 rows of the currently visible Gates page to a separate
hold buffer. These copies are remembered after BankStep is exited, or when a different BankStep file is
loaded.
Paste Buttons 1-6: Pastes the contents of the hold buffer 1-6 to the currently visible Gates page.
Copy All / Paste All: Copies and pastes all 8 pages at once. Separate from the individual page hold
buffers, and also remembered after exiting or reloading.
Page Select Buttons 0-7: Selects Gates page to edit. The page selected becomes visible, and all further
changes are made to that pate. When the utility exits, the original Gates page is restored.
Row Select 1-4 & A (All): Selects the row(s) to affect with edit operations. Note that Copy/Paste and
Roll ignore row select buttons and work on all rows at once.
Start & Length step buttons: Sets start column for edit operations and number of columns to change.
Note that Copy/Paste ignores this settings, operating on the full page.
=> & <= (Shift) Buttons: Shifts the pattern one step left or right each time the button is clicked.
Roll Button: Rolls the pattern up one step each time the button is clicked. Row select buttons are
ignored, all 4 rows are affected. Original pattern is restored on the 4th click.
Flip Button: Flips gate On/Off states: Ons becomes Off, Offs becomes On. Flip again to restore.
Pattern Button: Sets the On/Off pattern as set by the 8 On and Off buttons below, which sets the
number of gates turned on followed by the number turned off for each cycle. For example, setting button
2 of the top, On, row and button 3 of the bottom, Off, row results in a pattern of 2 gates on, 3 gates off, 2
on, 3 off, etc.
OK Button: Exit the Fill pop up and return to BankStep. Same as the upper right "x" exit button.
BankStep is Copyright © 2001-2002 by John Dunn and Algorithmic Arts. All Rights Reserved.
file:///C|/vbp/BankStep/Help/alldocs/gates.htm (3 of 3) [9/28/2002 8:56:52 PM]
BankStep Row Module
Row (Sequencer Row) Module
This is a row of 2-48 sequencer knobs similar to a Bank sequencer knob row. The selected output knob is
highlighted blue; knob selection can be by the value input or if the input is Off(0), by clicking on a knob.
The number of knobs in the module is set from 2-48 at the time the module Layout is created.
The Row module can be used in several ways. It can be used simply as a value selector, such as
pushbuttons on a car radio; it can be used to expand the number of rows in a Bank sequencer by
connecting the input to the Bank sequencer "#" or stage value output; and it can be used as a translator by
setting the knobs as translation values, and connecting the input to the raw value output to be translated.
Inputs:
Stage Input (Value): Sets the knob that will be active, with its value sent to the output. The label box to
the left of the input button is the stage number, and reflects this input.
Value Output:
Row X: Value of the currently selected knob. This value is shown in the label box at the far right of the
module.
Row Fill Pop Up Utility
file:///C|/vbp/BankStep/Help/alldocs/row.htm (1 of 4) [9/28/2002 8:56:52 PM]
BankStep Row Module
Available by clicking the little green button on the upper left of the Row module. Allows transfer by
Copy/Paste, plus creation and manipulation of knob values.
Copy Buttons 1-6: Each copy button copies the selected row of knob values to a separate hold buffer.
These copies are remembered after BankStep is exited, or when a different BankStep file is loaded.
Paste Buttons 1-6: Pastes the contents of the hold buffer 1-6 to the currently selected knob row.
Copy All / Paste All: Copies and pastes all knob rows s at once. Separate from the individual row hold
buffers, and also remembered after exiting or reloading.
Undo: - Undo the last operation. This is a one-level undo, only the last operation can be undone.
OK: Exit the Fill pop up and return to BankStep. Same as the upper right "x" exit button.
Start & Length step buttons: Sets start column (stage) for edit operations and number of columns to
change. Note that Copy/Paste ignores this settings, operating on the full row.
Value & Range step buttons: Sets value and range for some edit operations.
Scale quantize buttons: (Major, Minor, Penta, etc.) Forces the selected knob values to the scale denoted
by the button. Right click to create a scale from scratch.
Set: Sets all selected knobs (Start & Length) to the value given in Value.
Add: Adds Value to all selected knobs. Results greater than 127 are set to 127.
Sub: Subtracts Value from all selected knobs. Results less than 0 are set to 0.
Count: Sets selected knobs to an incremental count, by increment set in Value.
Rand: Sets selected knobs to a random value from 0 to Range.
RWalk: Random Walk. Sets selected knobs to a random increment of +/- Value, within limits of 0 to
Range. Walk start point is Range/2.
Invert: Inverts all selected knobs about Range by subtracting them from Range.
Reverse: Reverses the order of selected knobs.
file:///C|/vbp/BankStep/Help/alldocs/row.htm (2 of 4) [9/28/2002 8:56:52 PM]
BankStep Row Module
Open: Duplicate the step at Start, moving others up one.
Close: Delete the step at Start, moving others down one.
Dups: Removes all duplicate values throughout the sequence.
Scatter: Randomly reposition values, from Start to Length steps.
Sort: Ascending sort from Start of Length steps.
HSort: Harmonic sort. Sorts values from Start to Length steps according to selected sort key, which you
can access by right clicking on the button. The sort key is a list of up to 12 chromatic scale numbers (0,
1, 2, .. 11). The chromatic scale degree, (which is the value modulus 12) is matched against each of the
keys in order, with the matched values moved to the front. Thus if you use a table with the values 0, 7, 4 all the octaves will be moved to the start of the table, the 5ths after that, followed by the major 3rds, and
then the other values in the original order.
To change or edit a sort key, Ctrl-Click on the HSort button, and the key editor pop up appears..
Click on one of the 16 buttons to select a key. Click on OK to keep changes and exit; click on the upper
right "x" to exit without changes.
file:///C|/vbp/BankStep/Help/alldocs/row.htm (3 of 4) [9/28/2002 8:56:52 PM]
BankStep Row Module
Keys 1-3 are the prebuilt keys and can not be changed, keys 4-12 can be user created and edited. To
make a key, simply type in up to 12 chromatic intervals (numbers 0-11) in the order you want them to
sort. If a key number is repeated, the sort will use the same values that number of times. If a key has
more than 12 number of steps, any values not matched are moved into place after the sorted values, with
their relative places unchaged. Double click on a key entry line to generate a semi-random key set.
The main purpos of HSort is to automate the task of building note translation tables that are weighted
toward a harmonic center or grouping. Usually this will be used with tables that are based on frequency
of occurance, with the more frequently occuring values appearing at the head of the table.
BankStep is Copyright © 2001-2002 by John Dunn and Algorithmic Arts. All Rights Reserved.
file:///C|/vbp/BankStep/Help/alldocs/row.htm (4 of 4) [9/28/2002 8:56:52 PM]
BankStep MIDI Module
Mid (MIDI) Module
Controls 4 channels of MIDI output. A control panel with inputs to the MIDI module is accessed by
clicking on the upper right blue button, which shows the MIDI channel(s) and port it is assigned to. The
row of blue LEDs along the top show MIDI activity. They will highlight when the channel sends a NoteOn message. The 4 sets of dual bars display MIDI Velocity (light blue) and MIDI Volume (green). Red
LEDs along the bottom are Mute buttons. Click to mute the channel (highlights to bright red) click again
to allow sound.
To the right of the MIDI module is a list of the currently selected Bank and Program names. The blue
text is the current Bank name, and the white text is the Program name. These names come from a file in
the BankStep\Names directory; the default is the General MIDI Bank and GM Program names, but you
can change the text files in the Names directory to work with whatever Bank and Program names your
sound card, synth, or soft synth uses. See the readme.txt file in the Names directory for additional
information.
MIDI Output Control Panel
file:///C|/vbp/BankStep/Help/alldocs/midi.htm (1 of 7) [9/28/2002 8:56:53 PM]
BankStep MIDI Module
The MIDI control panel looks intimidating because there are so many buttons, but most can be ignored
initially as they are either preset to default values or not used at all most of the time. In fact, all you really
need to connect to get sound is Clock and Note. Pulses in the Clock input will cause the Note value to be
sent out as MIDI Note On messages; when the Clock pulse falls to Off, a corresponding Note Off
message is sent.
MIDI Mode Buttons: Selects between Notes (default) and Drum mode. In Notes mode, 4 MIDI
channels are available per simultaneous note (per MIDI module). This gives the ability to send separate
channel messages - such as Volume, Pan, and Program - for each Note channel. In Drum mode, only one
MIDI channel is used for up to 4 simultaneous notes, and you cannot specify channel specific MIDI
parameters such as Volume and Pan for each individual note.
MIDI Channel Buttons: Selects the MIDI channel the module will use for MIDI output. If MIDI Mode
is Notes, this selects the first of the module's 4 channels, with the other channels being assigned
file:///C|/vbp/BankStep/Help/alldocs/midi.htm (2 of 7) [9/28/2002 8:56:53 PM]
BankStep MIDI Module
consecutively. Note that while you may overlap MIDI channels with different MIDI modules, this is not
a good idea as the MIDI channel messages (Volume, Pan, Program, etc.) should be only one set per
MIDI channel.
MIDI Port Buttons: Selects which of the 4 available MIDI ports to use for sending MIDI messages.
MIDI Ports are selected by choosing among your computer's available MIDI drivers, with the Options
pop up.
Use PB Tuning Checkbox: When this option is checked, BankStep will use MIDI Pitch Bend along
with Note messages to allow microtone tuning, not normally allowed in MIDI. When checked, a drop
down menu will become visible that shows the available alternate tuning tables. Additionally, the Note
input parameters are changed somewhat. For details see the discussion of Alternate Tunings using MIDI
Pitch Bend, below.
OK Button: Exit the MIDI control panel and return to BankStep. Same as the upper right "x" exit
button. Note that you do not need to exit to adjust inputs to other MIDI modules. You can simply click
on the blue button of the MIDI module you want to work on - the active MIDI module is indicated by its
blue button turning red.
Input Buttons: These are the same input buttons found throughout BankStep, as module inputs. The
MIDI panel has one set of Logical inputs (Clock); all others are Value inputs. In order to keep from
clogging your MIDI channels with unnecessary MIDI traffic, MIDI messages are only sent when the
value at the MIDI input button changes, or upon startup, file load, and Run/Stop set to Run.
Note Control Inputs
The MIDI Input buttons are in two groups. The top group controls the Note messages, and is essentially
the algorithmic equivalent of a keyboard. There are always four channels of these inputs - when in Notes
mode, they are the actual 4 MIDI channels, when in Drum mode they are 4 sets of polyphonic notes on
the same channel.
MIDI values are 0-127. Any values that are outside of this range are trimmed to the legal range. Values <
0 are set to 0; values > 127 are set to 127.
Mute (Logical): When True the MIDI channel is Muted, and no notes will pass out to MIDI. If the blue
button to the left of the Mute label is depressed, then a False input will cause the channel to Mute. When
channels are muted by these outputs, the MIDI module Mute LED turns orange instead of red as when it
is muted by clicking on the LEDs.
Clock (Logical): A pulse in this input starts the next MIDI note by sending a Note-On message. The
action of the Clock input is modified by the Width setting:
file:///C|/vbp/BankStep/Help/alldocs/midi.htm (3 of 7) [9/28/2002 8:56:53 PM]
BankStep MIDI Module
Width: The Width input controls how the Note On works, as well as its duration. When set to any
number > 0, it will cause the note to play for that number of ticks. If the duration runs over to the next
clock cycle, the note will go off for 1 tick, then go on with the next clock tick. In this mode, with Width
> 0, you can use Delay to delay note onset by the number of ticks set. Makes nice arpeggios.
With Width set to 0 (the default), the note On and note Off is set by the Clock input gate. The On edge of
the clock sends a Note On, and the Off edge of the clock sends a Note Off.
With Width set to -1 (any <0), the Clock input is ignored, and a new note is generated when the note
value changes. This is the legato mode in SoftStep. You can set the Delay input to turn the note off
before the note changes, which is most useful for killing that last Note-On.
Delay: When Width is 1 or greater, Delay sets the delay in ticks between the start of a new Clock pulse,
and the actual sending of the MIDI Note On message; when Width is -1 or less, if Delay is greater than 0
it sets the maximum time in ticks the note will remain on.
Note: The MIDI note value, 0-127. The actual value sent to MIDI is the sum of the Note input and the
two Transp inputs (or when in PB Tuning mode, the Note, Root and Octave inputs (see below for
details).
Transp: Two identical inputs. They simply add to the note value. Negative values are allowed. If the
total of the two Transp inputs is -9999 (such as one set to -9999 and the other set to 0), Note Off
messages will be inhibited. This is a special mode intended mainly for use with MIDI control equipment
such as light bars, that blink when receiving Note Off messages.
When in PB Tuning mode, the two Transp inputs are changed to Root and Octave. For details see the
discussion of Alternate Tunings using MIDI Pitch Bend, below.
Veloc: Velocity. This is the part of the MIDI Note On message that determines how forceful the note will
sound. On most synths and sound cards it is essentially a note by note loudness control.
MIDI gives two ways to control loudness, the note by note Velocity, and the channel specific Volume.
Typically, the Velocity is used for note dynamics, and the Volume is used for fade in and fade out. The
Velocity value is graphically displayed on the MIDI module as a four light blue bars, one for each
channel; Volume is displayed as the green bar to the right of each Velocity bar.
The MIDI protocol specifies that a Note On message with a Velocity of 0 is the same as a Note Off
message. In BankStep, when Velocity is set to 0, no Note messages will be sent.
Channel Control Inputs
file:///C|/vbp/BankStep/Help/alldocs/midi.htm (4 of 7) [9/28/2002 8:56:53 PM]
BankStep MIDI Module
The larger, lower group of MIDI input buttons control various channel messages. When in Notes Mode,
there are 4 columns of input buttons, one for each channel; when in Drum Mode, there is only one
column of buttons, for the channel the MIDI module has been set to.
MIDI channel controls come in two flavors, general and specific. General MIDI messages are called
Control messages, or Channel Control ("CC") messages. They have two parts, the identifier, which is an
assigned number (such as 10 for Pan, or 7 for Volume), followed by the control value. Specific MIDI
messages are messages that are specific to the function, such as Pitch Bend. Usually this is a detail you
do not need to track in BankStep because the control messages are simply identified by name and
function, however you also have the ability to create custom MIDI Control messages, so it is a good idea
to know what control messages are reserved for specific functions.
The following descriptions will indicate when an input is a general control message, and which identifier
is assigned to it and thus should not be used for other purposes, with (as for Volume): CC#7.
Volume: CC#7. Overall volume of the channel, independent of the individual note Velocity. Volume is
displayed graphically on the MIDI module with a green bar to the right of each blue Velocity bar. When
in Drum Mode, only one Volume bar is active, as the same Volume controls all 4 note channels.
V Lag: Volume Lag. This is not a MIDI message input, rather it controls the lag of the Volume input.
When set to 0, the default, Lag is disabled and changes in the Volume input are sent immediately; when
set to any positive value, changes in Volume are sent incrementally as specified by the Lag value. Lag is
useful for automatic fade in and fade out. Lag values are in milliseconds * 5 for each lag step, with larger
values having slower lag. This control is essentially identical to the Lag module, but specific to the
Volume input value.
Pan: CC#10. 0-63 pans left, 64 (default) is center, and 65-127 pans right.
Prog: Program Change. Selects the instrument to play. Many synths and virtually all sound cards use
General MIDI values to specify instruments. General MIDI values are available on the value input pop
up, as the drop down menu located under the OK button.
Bank: Bank Change. Some synths contain more than 128 instruments, the maximum you can reach with
the Program Change alone. For these, there is a Bank change, which sets one of several available sets of
instruments to be available to the Program Change. The exact number of banks is dependent of the
synthesizer, and some synthesizers do not respond to standard Bank change messages at all, although
most modern synths do. While Program Change is a specific MIDI message and does not use a CC#,
Bank Change uses a combination of two CC#'s, 0 and 32.
PBend: Pitch Bend. This is the MIDI message that is sent out when you move the Pitch Bend wheel on a
MIDI keyboard. Center, or no Bend (the default) is 64. Values below 64 bend pitch down, values above
64 bend pitch up. The exact amount of bend is set on your synthesizer. When using PB Tuning, the
file:///C|/vbp/BankStep/Help/alldocs/midi.htm (5 of 7) [9/28/2002 8:56:53 PM]
BankStep MIDI Module
PBend input is ignored.
ModWh: Modulation Wheel, CC#1. Usually adds tremolo to the sound, although this varies greatly with
the synth and with the instrument selected.
Porta: Portamento, CC#5 & CC#65. Synths that support portamento usually have a switch that enables it
plus a value that determines the amount. When the portamento value goes above 0, BankStep will
automatically set the enable switch on by sending CC#65 with a value of 127 , followed by the
portamento value on CC#5. When the amount goes from non zero to 0, the enable switch is automatically
turned off again (CC#65 sent with a value of 0).
Touch: Channel Aftertouch. After touch is generally used to determine how quickly a key is released,
but is supported differently on different synths, if at all. MIDI defines two types of after touch, Channel
and Key, with Channel Aftertouch having one value per channel, and Key Aftertouch having a separate
value for each key.
User Defined Control Channel Inputs: The 4 inputs with text input boxes labeled "CC" are available
for you to set your own custom MIDI Control messages. Type the CC# into the text box, and use the
input button for the control value, just as with the preset CC buttons.
Key AfterTouch: The 4 inputs with text input boxes labeled "KA" may be used to send Key Aftertouch
messages. Use the text box to set the key number, and the input button for the value.
Alternate Tunings using MIDI Pitch Bend
The MIDI module has the ability to use MIDI Pitch Bend messages in conjunction with the normal Note
messages to achieve microtonal tuning. When you check Use PB Tuning, the module switches to
microtone tuning, and you will see a drop down list of the tunings that are available. If you are using
more than one MIDI module the PB Tuning setting will be the same for all modules. PB Tuning is
disabled for any MIDI modules using Drum Mode, however it works fine to mix your atonal drums with
microtone tuned instruments.
The PB Tuning mode works by separating the scale step and octave from the Note input, and then
translating the scale step for the particular scale selected into MIDI Note and Pitch Bend messages.
A default tone table that contains the scale information is loaded automatically when BankStep first runs.
Click here to view a descriptive listing of the default tone table.
You can create custom tone tables with the MIDI MicroTone program, which is available separately on
the Algorithmic Arts web site. This program gives you the ability to modify the tuning tables and to
create new ones, without having to deal with how the tuning data is formatted. However for those who
file:///C|/vbp/BankStep/Help/alldocs/midi.htm (6 of 7) [9/28/2002 8:56:53 PM]
BankStep MIDI Module
want to know the details, here they are:
For each of the 128 tables: Steps 0-62 are the MIDI Key value for each of the up to 63
scale steps starting from 0; Step 63 is reserved and should not be changed; Steps 64-126
are the Pitch Bend value for each scale step (but 64 must be added to make the signed 128bit MIDI Pitch Bend value positive); and Step 127 is the number of the highest scale step
used (scale steps -1).
When PB Tuning has been selected the two Transp inputs are changed to Root and Octave inputs. Note,
Root, and Octav all work together to select the note to be played, and the octave to play it in.
Since MIDI Notes are set at 12 equal tone steps per octave, a little extra care must be taken to place an
arbitrary micro tone scale in its pitch environment. Instead of simply adding any value to a Transpose
input, you set the Octave the scale is to start on separately from the Root input, which is the scale step of
the root. You may also move to higher and lower octaves by simple transposition of the note by octaves
(scale steps * octave + note = note in new octave), but some scales - most notably the ones that span
greater than the acoustic octave, or 1200 cents - give unpredictable results. However by modulating
octaves with the Octave input, and root with the Root input, the scales work and you can change key
signatures in real time.
To summarize: Note takes the scale step of the note you want to play. You can transpose this by octaves
( x 5 or x 12 or x 19 or whatever the number of scale steps for the scale); Root takes an offset into the
scale. It should only be in the range of 0 to scale steps-1. And Octave takes the octave to play in. This is
in the MIDI octave range of 0-9. Setting Octave to 5, for example, will always produce a pitch of
standard middle C if Note and Root are 0. The Octave module can be set to extract octave numbers from
MIDI note numbers.
The drop down menu listbox that appears when PB Tuning mode is selected selects which of the 128
possible tune tables to use. The number of scale steps is indicated in the list just before the scale name.
One important factor in successful use of PB Tuning is that your synth's Pitch Bend Range must be
properly set up. This is done automatically by BankStep whenever it restarts (as when the toolbar Run
module is clicked, or when a file is first loads), but it is a good idea to check a synth when using PB
Tuning for the first time to see if it responded properly to the range setup messages. You can usually tell
by selecting a harmonic table such as Basic Just Intonation, and playing a scale on it. If in doubt you can
download SoftStep and run the included test patch file called TestTone.ssp.
BankStep is Copyright © 2001-2002 by John Dunn and Algorithmic Arts. All Rights Reserved.
file:///C|/vbp/BankStep/Help/alldocs/midi.htm (7 of 7) [9/28/2002 8:56:53 PM]
BankStep Lag Module
Lag Module
Lag causes the output to change slowly from one step to the next, with intermediate steps along the way.
It is useful for making gradual changes in MIDI parameters such as Pan. MIDI module Volume inputs
have this same Lag function built in.
The top, In, input takes the value to be lagged, the bottom input is the lag time in steps of 5 milliseconds.
Higher lag times change more slowly, and 0 is an instant change with the input going directly to the
output. Lag works equally well with a value change at the input, or a value change from a Snapshot
change.
Inputs:
In (Input Value): The value to be lagged. The output effectively "chases" this input, lagging by an
amount set by the Lag input
Lag (Lag Value): The amount of lag to apply.
Value Output:
Lag X: Result of the lag function applied to the In input.
BankStep is Copyright © 2001-2002 by John Dunn and Algorithmic Arts. All Rights Reserved.
file:///C|/vbp/BankStep/Help/alldocs/lag.htm [9/28/2002 8:56:53 PM]
file:///C|/vbp/BankStep/Help/alldocs/tuningtable.txt
Scales starting from #6 are compiled from the Scala library, available from:
http://www.xs4all.nl/~huygensf/scala/
# Label Name
Scale size
0 12-Tone
12
1 Basic Just Intonation
12
15:8
2 Augmented Just
12
225:128 15:8
3 Kepler's Just Scale
12
9:5 15:8
4 Pythagorean
12
6561:4096 27:16 59049:32768 243:128
5 19-Tone
19
6 AEOLIC.SCL
7
triad
7 ARABIC.SCL
17
8 CARLOS_HARM.SCL
12
13,17,19,21,27
9 HARRISON_8.SCL
8
10 INDIAN_12.SCL
12
more shrutis
11 OLYMPOS.SCL
5
reported by Partch
Description
The standard 12-tone equal tempered chromatic scale
Ratios: 1:1 16:15 9:8 6:5 5:4 4:3 45:32 3:2 8:5 5:3 9:5
Ratios: 1:1 135:128 9:8 75:64 5:4 4:3 45:32 3:2 25:16 5:3
Ratios: 1:1 135:128 9:8 6:5 5:4 4:3 45:32 3:2 405:256 27:16
Ratios: 1:1 2187:2048 9:8 19683:16384 81:64 4:3 729:512 3:2
19-tone equal tempered scale
Ancient Greek Aeolic, also tritriadic scale of the 54:64:81
Arabic 17-tone Pythagorean mode, Safi al-Din
Carlos Harmonic, also Dan Schmidt Slendro-Pelog with
Harrison 8-tone from Serenade for Guitar
North Indian Gamut, modern Hindustani gamut out of 22 or
Scale of ancient Greek flutist Olympos, 6th century BC as
file:///C|/vbp/BankStep/Help/alldocs/tuningtable.txt [9/28/2002 8:56:53 PM]
BankStep Semitone Modules
Sem (Semitone) Module
Produces the semitone component of a MIDI note value. Normally this is the modulus or remainder
function of the input divided by 12, as in the example image, an input of 44 produces a semitone value of
8. That is, 44 / 12 gives a remainder of 8. When a MIDI module is set to use microtone scales, the divisor
is changed from 12 to whatever the microtone scale steps are.
Inputs:
In (Input Values): The value to have its semitone extracted from.
Value Output:
Sem X: The semitone of the input value.
Oct (Octave) Module
Produces the octave component of the input value. Normally this is an integer division by 12, with the
remainder discarded. When a MIDI module is set to use microtone scales, the divisor is changed from 12
to whatever the microtone scale steps are.
Special:
Blue Mode button: Click in for octave numbers 0-9, out for MIDI values. Octave numbers may be
connected to the Octave input of the MIDI module when it is set to microtone scales.
Input:
In (Input Values): The value to have its octave extracted from.
Value Output:
Oct X: The octave of the input value.
file:///C|/vbp/BankStep/Help/alldocs/semitone.htm (1 of 2) [9/28/2002 8:56:53 PM]
BankStep Semitone Modules
BankStep is Copyright © 2001-2002 by John Dunn and Algorithmic Arts. All Rights Reserved.
file:///C|/vbp/BankStep/Help/alldocs/semitone.htm (2 of 2) [9/28/2002 8:56:53 PM]
BankStep Arpeggio Module
Bio (Bio Sequencer) Module
The Bio Sequencer module reads DNA or protein sequences prepared by the Bio Editor, which is
available from Algorithmic Arts as a separate program. The bio seqences are stored as a .bst file by the
Bio Editor. However BankStep includes a default bio sequence file preloaded with several example
DNA and protein sequences, so the Bio Editor is not necessary in order to use the Bio Sequencer.
Special Controls
The drop down menu at the top of the module selects the bio sequence to play. You can select one of up
to 24 sequences in the Bio Sequence table that has been processed by the Bio Editor. This table is a
system file that is automatically loaded when BankStep starts up, or when you load a BankStep file of the
same name in the same directory. You can also load a bio sequence file directly, from the Files menu.
Each entery on the drop down menu shows the slot number (0-23) of the sequence being addressed, the
number of proteins or codons in the sequence [in brackets], and the file name of the sequence at the time
it was encoded. If there is no sequence data in a particular slot, the item will display "<no data>" and the
sequencer will not step.
The red button on the top left of the module, if in, sets the Bio Sequncer to stop at the end of its
sequence; leaving the button out (the default), causes the sequencer to endlessly repeat.
The blue button just below, to the left of the Clock input, if in, causes the sequence to step to a new
amino acid every 3 clock ticks. This is the default, and it is the more scientifically correct setting of 3
DNA steps for each amino acid step. When the button is out, there are 4 DNA steps for each amino acid
step, with the 4th tick repeating the 3rd DNA codon base. While less scientifically accurate, this setting
file:///C|/vbp/BankStep/Help/alldocs/bioseq.htm (1 of 4) [9/28/2002 8:56:54 PM]
BankStep Arpeggio Module
is often more musically useful.
The amino acids of the bio sequence are displayed in the large gray text area, with the current step
highlighted; the DNA codon bases are displayed in the readout just to the top right of the text area, as the
3-letter code, and the current codon step is displayed just above that as both the letter code (A, C, T, G),
and the number (0-3) associated with it. The numerical values for the DNA codon bases are: G=0, C=1,
T=2, and A=3.
Technically, if the original data was encoded from a protein sequence instesd of from a DNA sequence,
the backtranslated DNA sequence will not be entirely accurate, although the musical pattern will still
hold, somewhat simplified. Read this for a detailed explanation.
The readout for the sequence step address is to the upper left of the gray text area, just above the
column of readout LEDs. The LEDs show the start and end of the sequence, plus the 6 available
structure flags, that you may optionally insert during the editing process with the Bio Editor. See the
Bio Editor documentation (available online at the Algorithmic Arts web site) for information about
setting and using structure flags.
The amino acid number (0-20) readout is at the upper right of the module, with the label "AA#." Values
assigned to the amino acids (in water solubility order), are:
I
F
V
L
W
A
G
M
C
Y
P
T
S
H
N
Q
D
E
K
R
?
=
=
=
=
=
=
=
=
=
=
=
=
=
=
=
=
=
=
=
=
=
0
1
2
3
4
5
6
7
8
9
10
11
12
13
14
15
16
17
18
19
20
=
=
=
=
=
=
=
=
=
=
=
=
=
=
=
=
=
=
=
=
=
ILE
PHE
VAL
LEU
TRP
ALA
GLY
MET
CYS
TYR
PRO
THR
SER
HIS
ASN
GLN
ASP
GLU
LYS
ARG
ZOT
Isoleucine (nonpolar)
Phenylalanine (nonpolar)
Valine
(nonpolar)
Leucine
(nonpolar)
Tryptophan (nonpolar)
Alanine
(nonpolar)
Glycine
(nonpolar)
Methionine (nonpolar)
Cysteine
(polar)
Tyrosine
(polar)
Proline
(nonpolar)
Threonine (polar)
Serine
(polar)
Histidine (basic)
Asparagine (polar)
Glutamine (polar)
Aspartate (acidic)
Glutamate (acidic)
Lysine
(basic)
Arginine
(basic)
End Marker or invalid
file:///C|/vbp/BankStep/Help/alldocs/bioseq.htm (2 of 4) [9/28/2002 8:56:54 PM]
BankStep Arpeggio Module
Just below the AA# readout is the readout for the sorted AA numbers. Amino acid sorting remaps the
amino acid numbers so that the most frequently occurring value is given the first table position, the
second most frequently occurring value the second position, and so on - so it works musically with a
pitch table that is weighted for more harmonic intervals to be at the start of the table. This harmonic
sorting of pitches is easily done using the harmonic sort option in the sequencer fill utilities. Using the
sorted amino acid output gives each protein sequence a different amino acid mapping, which is less
useful for scientific work but often can be more musical.
Inputs
Clock (Clk - Value, Yellow LED) sets the rate the sequencer steps to the next DNA codon base.
Depending on the setting of the blue button to the left of the clock input, a new amino acid is sequenced
upon every 3rd (button out) or 4th (button in) clock tick. When the sequence reaches its end, it rolls over
to the start again. Or, if the red button above the Clk label has been clicked in, it will stop at the end of
the sequence.
Reset: (Rst - Logical, Orange LED): Resets to the start of the sequence and holds it there as long as the
input is held On.
Hold: (Hld - Logical, Red LED): Holds at the current step as long as the input is held On.
Antisense: (Anti - Logical, Blue LED): An On value at this input changes the stepping direction. The
blue LED will highlight when the direction is reverse, which steps the sequence backward, reversing the
codon and giving its antisense. This is similar to reverse playback on other sequencers, except the DNA
codon is spelled reciprocally (A and T are switched, as are G and C), which in turn results in a different
amino acid being translated.
Value Outputs
Bio X Adr: The sequence address of the current amino acid. Note that there are 3 or 4 (depending on
blue Clk button setting) clock ticks for each amino step in the sequence.
Bio X AA#: The current Amino Acid Number, 0-20.
Bio X AAs: The current Sorted Amino Acid number, 0-20.
Bio X DNA: The current DNA number, 0-3.
Bio X E4: The 4 element ordering of the current AA (maps to 0-3, ?=4):
0 = IFVLWAGMP: nonpolar
1 = HKR: basic
file:///C|/vbp/BankStep/Help/alldocs/bioseq.htm (3 of 4) [9/28/2002 8:56:54 PM]
BankStep Arpeggio Module
2 = CYTSNQ: polar
3 = DE: acidic
Bio X E8: The 8 element ordering of the current AA grouped by chemical and substitution similarities
(maps 0-7, ?=8):
0 = ILVMF: large nonpolar (ILV aliphatic)
1 = C: nonpolar disulfide-forming
2 = GP: small moderately nonpolar
3 = AST: small moderately nonpolar
4 = YW: large aromatic moderately polar
5 = NQ: small polar
6 = DE: negatively charged
7 = HKR: positively charged
Bio X MVo: Molecular volume order, lowest to highest, for the current AA.
Bio X MWo: Molecular weight order, lowest to highest, for the current AA.
Bio X sMV: Relative Mol Volume - normalized (0-127), for the current AA.
Bio X sMW: Relative Mol Weight, normalized (0-127) for the current AA.
Logical Outputs
Bio X S: Start Flag. True for the duration of the AA, at the start of the sequence.
Bio X E: End Flag. True for the duration of the AA, at the end of the sequence.
Bio X <> () [] {} |! @# $%: Structure Flags. True from the start flag marker to the end flag marker, as
set by the Bio Editor.
Bio X aC: Amino Acid clock tick.
Bio X dC: DNA clock tick. This will be 3 to 4 times the rate of the AA clock tick, depending on the
setting of the blue Clk button.
BankStep is Copyright © 2001-2002 by John Dunn and Algorithmic Arts. All Rights Reserved.
file:///C|/vbp/BankStep/Help/alldocs/bioseq.htm (4 of 4) [9/28/2002 8:56:54 PM]
Amino Acid and Codon Table
20 Amino acids, their single-letter data-base codes
(SLC), and their corresponding DNA codons
Amino Acid
SLC
DNA codons
Isoleucine
I
ATT, ATC, ATA
Leucine
L
CTT, CTC, CTA, CTG, TTA, TTG
Valine
V
GTT, GTC, GTA, GTG
Phenylalanine
F
TTT, TTC
Methionine
M
ATG
Cysteine
C
TGT, TGC
Alanine
A
GCT, GCC, GCA, GCG
Glycine
G
GGT, GGC, GGA, GGG
Proline
P
CCT, CCC, CCA, CCG
Threonine
T
ACT, ACC, ACA, ACG
Serine
S
TCT, TCC, TCA, TCG, AGT, AGC
Tyrosine
Y
TAT, TAC
Tryptophan
W
TGG
Glutamine
Q
CAA, CAG
Asparagine
N
AAT, AAC
Histidine
H
CAT, CAC
Glutamic acid
E
GAA, GAG
Aspartic acid
D
GAT, GAC
Lysine
K
AAA, AAG
Arginine
R
CGT, CGC, CGA, CGG, AGA, AGG
Stop codons
Stop
TAA, TAG, TGA
In this table, the twenty amino acids found in proteins are listed, along
with the single-letter code used to represent these amino acids in protein
data bases. The DNA codons representing each amino acid are also listed.
All 64 possible 3-letter combinations of the DNA coding units T, C, A and
G are used either to encode one of these amino acids or as one of the
three stop codons that signals the end of a sequence. While DNA can be
decoded unambiguously, it is not possible to predict a DNA sequence from
its protein sequence. Because most amino acids have multiple codons, a
number of possible DNA sequences might represent the same protein
sequence.
file:///C|/vbp/BankStep/Help/alldocs/aatable.htm [9/28/2002 8:56:54 PM]
BankStep Module Layout
BankStep Module Layout
The Module Layout utility is used to select and position the modules for custom layouts. You can select any
number of any of the available BankStep modules, and place them as you wish. You can save layouts to be
reused (recommended) or you can create new layouts for each composition.
Modules are represented to scale as squares with the module label in the upper left. Modules that have a variable
size, such as Banks, will also show their size.
Creating Modules
The list of all available modules is on the left. Create modules by clicking the module name in the list and
dragging it to the layout area. The first module created will be placed in the upper left corner. Once created,
modules can be positioned by clicking on them and dragging them to the new position.
Modules can be positioned against each other by dragging them onto other existing modules. Dropping onto the
left side of a module aligns the module with the bottom left of the target module, dropping on the right half of
file:///C|/vbp/BankStep/Help/alldocs/layout.htm (1 of 4) [9/28/2002 8:56:55 PM]
BankStep Module Layout
the target aligns the module with the top right of the target. The same method can be used when first creating a
module, by placing the drag cursor of the module to be created on to the left (to align with bottom left) or right
(to align with top right) side of an existing module.
You can also place modules anywhere in the grid workspace. Modules wil snap to the grid or to the half grid.
Deleting Modules
Delete modules by dragging them into the lower right corner of the layout area. Release the mouse button when
the lower left and upper right corners are out of view. You can also use the Delete Last button to remove the last
module created.
Screen Size
The pull down menu in the upper left sets the screen size. The actual screen size will be determined by the
module layout: BankStep will size itself to fit the modules. Setting the layout screen size only sets the
workspace size and gives some indication of the screen size the module layout will occupy.
Modules
All modules available to BankStep are listed in the selection box along the left of the workspace. Modules are
listed in a particular order, which is the order the modules will be calculated when BankStep runs. In general,
timing and control modules are calculated first, and MIDI output calculated last. This order will work properly
in nearly all cases. In the rare case where a timing glitch arises because of execution order, you can refer to the
module list to determine where the problem originates. While the calculation order cannot be changed, you will
be able to affect it by the module connections you make.
Module Size
Some modules have variable sizes. These are Bank, Row, Gates, and Select ("Sel"). Sizes must be set before the
module is created. Set the size for these modules with the up/down buttons along the top of the workspace. Row
modules share the same size setting as Bank modules. Bank modules also may be set to have 3 or 4 rows with
the button following the size setting. Click the button in for 4 rows, out for 3 rows.
Short Modules
Other modules are available in "Short" sizes. These are Switch, LSwitch, Test, Rand, Scale, Add, and OR. Click
the "Short" button in for the short versions of these modules, leave it out (the default) for the normal size.
Shortened modules have the last input hidden. For example the Add module normally has 3 inputs:
file:///C|/vbp/BankStep/Help/alldocs/layout.htm (2 of 4) [9/28/2002 8:56:55 PM]
BankStep Module Layout
...but when the "Short" button is selected, it has only 2 inputs:
...however the third input will still be accessible. When the module is in its short mode, the label or LED at the
bottom left of the module (for Add, it's the bottom "+" label) becomes active, and clicking it pops up the input
dialog for the missing input button. You can immediately see that the label is active because the mouse cursor
changes from the normal arrow to an arrow with a question mark.
Finally, there is one other module that can have different sizes. This is the expanded knob, or XKnob, which
allows multiple knobs to be grouped together into a single module:
XKnob 2x4:
6x3:
The number of knobs is selectable for both rows and columns, up to a total of 48 knobs. If either the rows or
columns counter is set to exceed 48, the other value will automatically decrease.
Command Buttons
New - Clears the workspace of any existing modules.
Current - Loads the modules from the currently active layout.
Load - Loads modules from a layout (".lay") file.
Save - Saves modules to a layout files.
Copy - Copies layout to a clipboard file.
Swap - Swaps the current layout with the clipboard file.
Cancel - Exits Layout utility without changing the current BankStep layout. Same as the upper right "X" button.
OK - Exits Layout utility and updates the current BankStep layout.
Delete Last - Deletes modules, last first. To delete a module at random, drag it to the lower right of the
workspace area. Modules will be deleted if the lower left corner and upper right corner are moved offscreen.
file:///C|/vbp/BankStep/Help/alldocs/layout.htm (3 of 4) [9/28/2002 8:56:55 PM]
BankStep Module Layout
BankStep is Copyright © 2001-2002 by John Dunn and Algorithmic Arts. All Rights Reserved.
file:///C|/vbp/BankStep/Help/alldocs/layout.htm (4 of 4) [9/28/2002 8:56:55 PM]
BankStep Random Modules
Sw (Switch) Module
Switches output between one of two Value inputs. Available in Short version, with the 3rd input hidden.
Blue Button: Changes mode between Gate switching (button out) and Trigger switching (button in).
Inputs:
Green LED (Logical Input): Selector switch, selects between the two value inputs. In Gate mode, the
first value input is selected when Off, the second when On. In Trigger mode, input selection is changed
on each new trigger. If Trigger mode, the start trigger (TStart, generated on startup, file load and when
Run/Start is clicked to Run) selects the first value input. The Green LED indicates the switch status: Off
for the first value input, On for the second.
Red LED (Value Inputs): These inputs are routed to the output unchanged. The active input is indicated
by the highlighted red LED.
In the Short version, the 3rd input is hidden, but it can be reached by clicking on the red LED to the left
of the 2nd input. The mouse cursor will change from an arrow to an arrow with a question mark to
indicate the availability of the hidden input.
Value Output:
Swc X: The unchanged value of the selected input.
LSw (Logical Switch Module)
Switches output between one of two Logical inputs. Available in Short version, with the 3rd input
hidden.
file:///C|/vbp/BankStep/Help/alldocs/switch.htm (1 of 3) [9/28/2002 8:56:55 PM]
BankStep Random Modules
Blue Button: Changes mode between Gate switching (button out) and Trigger switching (button in).
Inputs:
Green LED (Logical Input): Selector switch, selects between the two value inputs. In Gate mode, the
first value input is selected when Off, the second when On. In Trigger mode, input selection is changed
on each new trigger. If Trigger mode, the start trigger (TStart, generated on startup, file load and when
Run/Start is clicked to Run) selects the first value input. The Green LED indicates the switch status: Off
for the first switched input, On for the second.
Red LED (Logical Inputs): These inputs are routed to the output unchanged. The active input is
indicated by the highlighted red LED.
In the Short version, the 3rd input is hidden, but it can be reached by clicking on the red LED to the left
of the 2nd input. The mouse cursor will change from an arrow to an arrow with a question mark to
indicate the availability of the hidden input.
Logical Output:
LSw X: The unchanged value of the selected input.
Sel (Select) Module
Selects one value input to be sent to the value output.
Inputs: This module has one selector value input plus a variable number of switched value inputs, from
2 to 12, set when the module is created during the Layout process.
Sel (Select Value): Selects among the switch value inputs. A value of 0 selects the first switch input, 1
selects the 2nd, etc., up to the number of switch inputs showing, then it wraps around. For example, in
the 3 input module pictured, the first input would be selected by a value of 0, 3, 6, etc. The selected input
is indicated by the highlighted red LED.
Red LED (Value Inputs): These inputs are routed to the output unchanged. The active input is indicated
by the highlighted red LED.
file:///C|/vbp/BankStep/Help/alldocs/switch.htm (2 of 3) [9/28/2002 8:56:55 PM]
BankStep Random Modules
Value Output:
Sel X: The unchanged value of the selected input.
BankStep is Copyright © 2001-2002 by John Dunn and Algorithmic Arts. All Rights Reserved.
file:///C|/vbp/BankStep/Help/alldocs/switch.htm (3 of 3) [9/28/2002 8:56:55 PM]
BankStep Random Module
Tst (Test) Module
Compares the A input with the B input and produces 3 logical outputs based on the test of: A equal to B,
A greater than or equal to B, and A greater than B. Available in Short version, with the 3rd input hidden.
Tests are always A relative to B. Thus A greater than B is the same as B less than or equal to A; A
greater than or equal to B is the same as B less than A.
A special mode is available by setting either the A or B input (but not both) to -9999. In this case the
other input will compare its current input with its previous input. This is most useful for detecting when a
value changes. Also useful for converting a changing value into a clock pulse.
Inputs:
A (Value): Input to test against B input. Set to -9999 to compare B input with previous B input.
B (Value): Input to test against A input. Set to -9999 to compare A input with previous A input.
Red LED (Logical Input): This is the logical value sent to the output when the result is True; when the
test result is False, logical False is always sent. The default for this Input is True, so that a test result of
True returns the expected output of True, and False returns False. However it can also be used as a
logical switch+test, so that a test result of True returns whatever is connected to the input, which could be
an on/off clock. Used this way, a clock at the logical input would tick when the test result is True, and it
would be shut off when the test result is False.
In the Short version, the 3rd input is hidden, but it can be reached by clicking on the label to the left of
the 2nd input. The mouse cursor will change from an arrow to an arrow with a question mark to indicate
the availability of the hidden input.
Logical Outputs:
Tst X> True if A is greater than B. 1st (orange) top output LED will highlight.
Tst X>= True if A is greater than or equal to B. Both top output LEDs will highlight.
Tst X= True if A equal B. 2nd (yellow) top output LED will highlight.
Tst X<> True if A is not equal to B. 2nd (yellow) top output LED off.
Tst X < True if A is less than B. Top output LEDs both off.
file:///C|/vbp/BankStep/Help/alldocs/test.htm (1 of 2) [9/28/2002 8:56:55 PM]
BankStep Random Module
BankStep is Copyright © 2001-2002 by John Dunn and Algorithmic Arts. All Rights Reserved.
file:///C|/vbp/BankStep/Help/alldocs/test.htm (2 of 2) [9/28/2002 8:56:55 PM]
BankStep Random Module
Ran (Random) Module
Generates Random value outputs and random logical clock pulse outputs.
Inputs:
Yellow LED (Logical): Clock pulses at this input generate a new set of random value outputs and
random clock pulse outputs. All values are generated at the start of the input pulse (leading edge of On
pulse).
Rn (Range Value): Random numbers will be generated between 0 and this value.
+ (Offset Value): Added to the generated random number.
Value Outputs:
Ran X1, Ran X2, Ran X3: The random values, each using the same Range and Offset, but each is a
different random number. Additionally, Ran X2 will always be less than or equal to Ran X3, and
therefore statistically, Ran X1 will more often but not always be greater than Ran X2, and less than Ran
X3.
Logical Outputs:
Ran c/2: clock pulse with the probability of being On at 1:2 (50%) for each input clock pulse.
Ran c/4: clock pulse of probability 1:4 (25%).
Ran c/8: clock pulse of probability of 1:8 (12.5%).
BankStep is Copyright © 2001-2002 by John Dunn and Algorithmic Arts. All Rights Reserved.
file:///C|/vbp/BankStep/Help/alldocs/random.htm [9/28/2002 8:56:55 PM]
BankStep Scale Module
Scl (Scale) Module
Scales the In input by a percentage set by the % input, adding an offset set by the + input. Available in
Short version, with the 3rd input hidden.
Inputs:
In (Input Value): The value to be scaled. This may be any value, -9999 to 9999.
% (Scale Value): The amount in percent to scale the output. Values greater than 100% are allowed. For
example a value of 200 effectively multiplies the input value by 2.
+ (Offset Value): Added to the scale operation. Negative values allowed.
In the Short version, the 3rd input is hidden, but it can be reached by clicking on the label to the left of
the 2nd input. The mouse cursor will change from an arrow to an arrow with a question mark to indicate
the availability of the hidden input.
Value Output:
Scl X: Result of the scale + offset.
BankStep is Copyright © 2001-2002 by John Dunn and Algorithmic Arts. All Rights Reserved.
file:///C|/vbp/BankStep/Help/alldocs/scale.htm [9/28/2002 8:56:55 PM]
BankStep Math Modules
Add Module
Produces sum of the three inputs. Available in Short version, with the 3rd input hidden.
Inputs:
+ (Add Values): All three inputs are identical, and are added to produce the sum output.
In the Short version, the 3rd input is hidden, but it can be reached by clicking on the label to the left of
the 2nd input. The mouse cursor will change from an arrow to an arrow with a question mark to indicate
the availability of the hidden input.
Value Output:
Add X: Sum of the three inputs.
Neg (Negate) Module
Produces negate (minus) of input at the Value output; Logical output is True when input is 0.
Input:
In (Input Value): Any value.
Value Output:
Neg X: Same as input, with sign changed.
Logical Output:
Neg X: True (On) when input is 0, False (Off) when input is non zero.
file:///C|/vbp/BankStep/Help/alldocs/math.htm (1 of 2) [9/28/2002 8:56:56 PM]
BankStep Math Modules
BankStep is Copyright © 2001-2002 by John Dunn and Algorithmic Arts. All Rights Reserved.
file:///C|/vbp/BankStep/Help/alldocs/math.htm (2 of 2) [9/28/2002 8:56:56 PM]
BankStep Boolean Modules
OR Module
Produces the logical OR of the three inputs: If any of the inputs is True, the output will be True. Only if
all three inputs are False will the output be False. Available in Short version, with the 3rd input hidden.
Inputs:
Green LEDs (Logical): All three inputs are identical. The green LEDs will highlight when the input is
True (On).
In the Short version, the 3rd input is hidden, but it can be reached by clicking on the green LED to the
left of the 2nd input. The mouse cursor will change from an arrow to an arrow with a question mark to
indicate the availability of the hidden input.
Logical Output:
OR X: The logical OR of all three inputs.
AND Module
Produces the logical AND of the two inputs: If any of the inputs is False, the output will be False. Only if
both inputs are True will the output be True.
Inputs:
Green LEDs (Logical): Both inputs are identical. The green LEDs will highlight when the input is True
(On).
Logical Output:
AND X: The logical AND of the two inputs.
file:///C|/vbp/BankStep/Help/alldocs/boolean.htm (1 of 2) [9/28/2002 8:56:56 PM]
BankStep Boolean Modules
Not Module
Produces the logical NOT of the input: On input produces Off output; Off input produces On output.
Inputs:
Green LED (Logical): Input to be logically reversed at the output.
Logical Output:
NOT X: The logical NOT of the input.
BankStep is Copyright © 2001-2002 by John Dunn and Algorithmic Arts. All Rights Reserved.
file:///C|/vbp/BankStep/Help/alldocs/boolean.htm (2 of 2) [9/28/2002 8:56:56 PM]
BankStep Appendix
Appendix
Technical Support
Technical support is available by email to: [email protected]. We try to answer all support questions
promptly - usually within hours - but please help us help you by first reading the online manual. The
Main Menu, Toolbar, and Options sections are especially helpful for trouble shooting. If you do email,
please include the following information:
1. Describe the computer you are using, including operating system, amount of memory, CPU speed,
graphics settings?
2. What other audio and MIDI software is installed in your computer?
3. As much information as possible relating to your question(s). The more information you provide
the faster we can help you. Feel free to attach illustrative .bsp files if you think that will help.
Please note that while we try to answer all tech support questions as quickly as possible, those that are
already covered in the online manual do not receive the same high priority, and often will be answered
simply by a manual reference.
Update Notification
While we do not send out unsolicited email (spam), we do have a mailing list you may easily subscribe
and unsubscribe to. Even then, we only send out email when we have something new to pass on to you,
such as notice of a new version. To subscribe or unsubscribe to our mailing lists, visit the Algorithmic
Arts Support Page.
BankStep File Compatibility
BankStep Player can read and play any file created with BankStep 2.0, however BankStep 2.0 and Player
can not read BankStep 1.0 files, nor can BankStep 1.0 read files created with BankStep 2.0.
Name Stamping Your Compositions
All compositions created by registered BankStep users will have their name stamped into the .bsp file,
which is displayed on the BankStep title bar when the .bsp file is loaded. Files created by one registered
user but modified by another will have both names listed, with the original creator listed first.
Maximum Number of Modules
file:///C|/vbp/BankStep/Help/alldocs/appendix.htm (1 of 2) [9/28/2002 8:56:56 PM]
BankStep Appendix
It is unlikely you will run out of modules when creating your layouts. The maximum number of any one
kind of module you can create is 99. Modules are named with the module names plus a letter (A, B, C,
etc.) to identify the specific module. If you create more than 26 of a particular module (unlikely, but
allowed), letter designations are taken from the ASCII character set.
CPU Loading Issues
There are two related but separate MIDI timing issues in BankStep you may run in to. One is the CPU
load, and the other is MIDI latency, discussed below.
For the most part, processing MIDI is far less CPU intensive than processing audio streams. And typical
BankStep setups can coexist very well with software synthesizers and samplers on the same computer,
running at the same time. A typical BankStep patch will run at under 10% of CPU load, often under 1%.
However very large layouts running on very slow computers can create a CPU load high enough to cause
problems with co resident soft synths. If your CPU speed is 500 MHz or better, this is unlikely to be a
problem even with the largest of BankStep layouts.
MIDI Latency in BankStep
BankStep uses zero latency, which means that when a note is created it is instantly sent out to MIDI with
no timing lag (latency) other than the overhead of the MIDI driver itself. This may cause timing
problems for some users so BankStep also has a Latency setting that allows you to adjust Latency for
more stable buffered timing. Zero latency is the default, and this setting is recommended for computers
faster than about 450 MHz. See the Options page for details.
Known Bugs
None known at this time. But we want to know if you run into one (see below).
We want your feedback
Customer feedback - whether favorable, unfavorable, or just suggestions and wish list items - is essential
to the process of making software that works well. We really do want to hear from you. Please email
your comments, suggestions, and any other wish list items to: [email protected].
BankStep is Copyright © 2001-2002 by John Dunn and Algorithmic Arts. All Rights Reserved.
file:///C|/vbp/BankStep/Help/alldocs/appendix.htm (2 of 2) [9/28/2002 8:56:56 PM]
BankStep Credits
BankStep Example Patches
The BankStep patches in the Example directory contain many different BankStep configurations to get
you started, and to give you a sampling of what you can do with BankStep.
A few patches are more or less blank, created as examples for you to build your own patches upon. These
will not have an author listed. Of the user created patches, with the author's name in the title bar, you can
play many as complete compositions, by clicking on the tool bar Compose button:
Most patches have multiple Snapshots that you can select from the drop down toolbar Snapshot menu,
then press Run/Stop to play just the Snapshot:
Virtually all of the patches have some description of them by their authors. To see the author's notes,
click on the tool bar Notepad button:
Our thanks to the BankStep users who created the example patches, listed below with the compositions
they donated:
●
●
●
●
Warren Burt
❍ 3rdRowCtrlOfTiming
❍ OldMoog
❍ Polyrhythms
❍ SaturdayArvo
❍ SerialistSpecial
Mary Anne Clark
❍ EstrRec2
Kelly Dunn
❍ Nusery
Gary Knudson
❍ Counterpoint-Piano
file:///C|/vbp/BankStep/Help/alldocs/examples.htm (1 of 2) [9/28/2002 8:56:56 PM]
BankStep Credits
●
●
John Loffink
❍ drum machine
❍ drum machine ultra
Antonio Piga
❍ BetaStep2
❍ BioStep
❍ DataBass
❍ EthnicAlgoRhythm
❍ GeneticRag to S J
❍ HardStep
❍ Quickly-SlowStep
❍ TonalStep
❍ UnusualSnapshot
❍ What is cooking
BankStep is Copyright © 2001-2002 by John Dunn and Algorithmic Arts. All Rights Reserved.
file:///C|/vbp/BankStep/Help/alldocs/examples.htm (2 of 2) [9/28/2002 8:56:56 PM]
BankStep Data Sequencer Module
Dat (Data Sequencer) Module
Sequences arbitary-length data files. You can load any file into the Data Sequencer, however it treats all
files as binary byte sequences. If you want to sequence data from text based numerical file data, such as
data base files or spread sheet files, you can use the DataBin program, available separately from
Algorithmic Arts, to convert the data file to a binary byte file that the Data Sequencer can handle.
Special:
Gray File Load Button: Click button to load a file into the Data Sequencer. You can load any file at all
into the sequencer, but you should avoid loading files that are greatly larger than you need because once
the file is loaded, the data stays with the patch: you only need to load the data file once, and the data
becomes part of the BankStep patch file.
Blue Data Limit Button: In to limit data to the MIDI range of 0-127, by stripping off the high bit. This
bit is still available as a flag at the /b8 logical output.
Red Run/Stop Button: Click in to cause the system Run/Stop button to go to Stop when the Data
Sequencer reaches the end of its sequence.
Sequence End Readout: The box on the left with gray text shows the end of the sequence, how many
bytes are in the sequence.
Sequence Address Readout: The box on the right with blue text shows the current sequence address.
Logical Inputs:
Step: (Yellow LED): Clock pulses at this input step the Data Sequencer to the next stage. The sequencer
steps - and thus generates new values - at the start, or leading edge, of the input pulse.
Reset: (Orange LED): Resets to the start of the sequence and holds it there as long as the input is held
On.
Hold: (Red LED): Holds at the current step as long as the input is held On.
file:///C|/vbp/BankStep/Help/alldocs/dataseq.htm (1 of 2) [9/28/2002 8:56:57 PM]
BankStep Data Sequencer Module
Reverse: (Blue LED): Reverses the stepping direction as long as the input is held On. When direction is
reverse, the blue LED will highlight.
Value Outputs:
Dat X Adr: Address of the current sequence step. The readout for this value is the box with blue text,
just under the output readout.
Dat X Out: Output value of the data byte at the current address. The value range if 0-255 normally, 0127 if the blue data limit button is depressed.
Dat X /32: Output value divided by 32. The purpose of this output is to split the output into 4 ranges (for
a 0-127 output), so you can use 4 different Bank or Row sequencer tables to translate the data into notes.
See the example "DataBin" patches for examples of how this is used,
Dat X /16: Output value divided by 16, gives 8 ranges for a 0-127 output.
Logical Outputs:
Dat X End: True at the end of the sequence.
Dat X /b8: High byte of the currently addressed sequence data.
BankStep is Copyright © 2001-2002 by John Dunn and Algorithmic Arts. All Rights Reserved.
file:///C|/vbp/BankStep/Help/alldocs/dataseq.htm (2 of 2) [9/28/2002 8:56:57 PM]
BankStep Count Module
Cnt (Count) Module
Produces a count value output of input pulses of range between Hi and Lo inputs; counts backwards if Lo
input is greater than Hi input. Secondary function is as a one-shot that produces a logical output that goes
On after a delay in ticks set by Lo, and then remains On for number of ticks set in the Hi input. Thus, this
module has two different functions, depending on whether the Value output or the Logical input is used.
Inputs:
Yellow LED (Clock Logical): Clock pulses at this input increment the count value and start a new Off
(Lo), On (Hi) count sequence for the logical one-shot output.
Hi (High Limit Value): Sets the high limit for the counter. When the count reaches this value, it rolls
around to the Low value and continues counting. If Hi is less than Lo, the module counts down instead of
up. For use as a one-shot, the Hi input sets the number of ticks the logical output will be held On.
Lo (Low Limit Value): Sets the low limit for the counter. This is the start value for the count. When Lo
is greater than Hi, the count is reversed, however the Lo input still specifies the starting point for the
count after it reaches the Hi limit. For use as a one-shot, Lo sets the number of ticks the logical output is
held Off before going On for the number of ticks set by Hi.
Value Output:
Cnt X: The count value, as seen in the value output label. Counter is reset to 0 when Start/Stop toolbar
button is clicked in (Start).
Logical Outputs:
Cnt X: The one-shot pulse that starts upon receiving a clock pulse at the Clock input, after Lo delay
ticks, and On for duration Hi ticks.
BankStep is Copyright © 2001-2002 by John Dunn and Algorithmic Arts. All Rights Reserved.
file:///C|/vbp/BankStep/Help/alldocs/count.htm [9/28/2002 8:56:57 PM]
BankStep Arpeggio Module
Arp (Arpeggio) Module
Produces a series of 4 timed pulses upon receipt of an input pulse.
Inputs:
Yellow LED (Logical): A clock pulses at this input generates a new set of output pulses.
T1, T2, T3 (Time Values): Sets the delay time in ticks for the T1-T3 outputs. T0 delay is always 0.
PW (Pulse Width Value): Sets the On time in ticks for each of the output pulses.
Logical Outputs:
Arp X T0: A pulse is produced at this output, with no delay, when the module receives a pulse at the
clock input. It is the same as the input pulse, except the pulse duration is set to PW ticks.
Arp X T1-T3: Clock pulses produced after their respective delay times, as set by the T1-T3 inputs.
Duration On is the same for all outputs, as set by the PW input. Yellow output LEDS flash to indicate the
output status.
Arp X TA: A series of all 4 pulses, the logical OR of T0-T3.
BankStep is Copyright © 2001-2002 by John Dunn and Algorithmic Arts. All Rights Reserved.
file:///C|/vbp/BankStep/Help/alldocs/arpeg.htm [9/28/2002 8:56:57 PM]
BankStep Flip Module
Flp (Flip) Module
Emulates a classic logic circuit known as a "Set/Reset Flip-Flop." This is essentially a 1-bit memory
circuit, and it is one of the core building blocks of digital computers. In the context of BankStep, it is like
a wall light switch: once it is flipped, it stays there until it is flipped again.
Special:
Blue Feedback Button: Causes the Reset input to be internally connected, so that subsequent pulses at
the Set input cause the output to alternate between On and Off.
Red Run/Stop Button: Click in to cause the Flip module to control the state of the system Run/Stop
button. That is, when clicked in, a pulse at the Set input will set Run/Stop to Run, and a pulse at the Reset
input will set Run/Stop to Stop.
Inputs:
Yellow LED (Set Logical): A pulse at this input causes the output to go On and stay On until the Reset
input gets a new pulse, at which time the output will go Off and stay there until the Set input gets another
pulse, etc.
Orange LED (Reset Logical): A pulse at this input causes the output to go Off and stay Off until the Set
input gets a new pulse, at which time the output will go On and stay there until the Reset input gets
another pulse, etc. This input is ignored when the blue Feedback button is clicked in.
Logical Output:
Flp X: Results of the Flip-Flop operation.
BankStep is Copyright © 2001-2002 by John Dunn and Algorithmic Arts. All Rights Reserved.
file:///C|/vbp/BankStep/Help/alldocs/flip.htm [9/28/2002 8:56:57 PM]
BankStep Sample Module
Sam (Sample) Module
Emulates an analog Sample & Hold. A clock pulse reads the value at the In input, and holds it as the
module output until another clock pulse is received.
Input:
Yellow LED (Logical): Clock pulses at this input reads the Value at the In input and holds it as the
output.
In (Input Value): Value to be sampled.
Value Output:
Sam X: The last In value sampled.
BankStep is Copyright © 2001-2002 by John Dunn and Algorithmic Arts. All Rights Reserved.
file:///C|/vbp/BankStep/Help/alldocs/samp.htm [9/28/2002 8:56:57 PM]
BankStep Delay Module
Dly (Delay) Module
A 3-tap delay line. Each of the 3 outputs reflect the input delayed by the number of ticks set at the T
inputs.
Inputs:
In (Input Value): The value to be delayed. Sent to the outputs unchanged, but delayed by the number of
ticks set at the T inputs.
T1, T2, T3 (Time Value): The time in ticks to delay the respective T outputs by. Values of 0 (no delay)
to 9999 are allowed.
XT (Expand Value): Multiplier for the T inputs. For example with an XT input of 10 and a T1 input of
77, the actual delay time for T1 would be 770 ticks.
Value Output:
Dly X T1-T3: Copy of the input delayed by the ticks set in the respective T inputs.
BankStep is Copyright © 2001-2002 by John Dunn and Algorithmic Arts. All Rights Reserved.
file:///C|/vbp/BankStep/Help/alldocs/delay.htm [9/28/2002 8:56:58 PM]
BankStep Knob Module
Knb (Knob) Module
Simple Value knob. Range is 0-127. Use click and up/down drag to make large changes; click and drag
left/right for small changes.
Value Output:
Knb X: The knob value.
You may set the Help Tip message that pops up whenever the mouse cursor is over a Knob, as well as an
offset to the value and a multiplier for it, with the Knob Setup dialog, which can be invoked by right
clicking on the Knob Letter label.
A non zxero Mult input causes that value to be multiplied by the Knob value, so for example a Mult
setting of 2 gives the Knob Value a range of 0 - 254 in increments of 2.
A value in the Ofst input adds an offset to the Knob value. You can add negative as well as positive
offsets.
XK (Expanded Knob) Module
file:///C|/vbp/BankStep/Help/alldocs/knob.htm (1 of 2) [9/28/2002 8:56:58 PM]
BankStep Knob Module
An array of Value Knobs. Up to 48 Knobs may be defined in a single XK module, in any combination of
Rows x Columns, defined in the Layout dialog. Knobs will be given successive letters starting with "A"
so, for example, the 3rd knob will appear in the Value Input dialog as "XK-C."
Each knob's range is 0-127. Use click and up/down drag to make large changes; click and drag left/right
for small changes.
As for the Knob module, above, you can set offsets and multipliers for each knob with the XKnob Setup
dialog, which can be invoked by right clicking on the knob letter label. You also have the option of
setting an entire row or column to the same setup values, and to copy or paste the knob settings, to allow
you to duplicate the settings into another XKnob module.
Btn (Button) Module
This is a set of two single-click strobe buttons, and three on/off gate buttons. Each button's output is
available as a separate logical output:
Btn X T1, Btn X T2: Trigger outputs that go True for one module calculation (MIDI clock) cycle, then
return to False. Use these to manually trigger events that might otherwise require a clock or strobe pulse.
Btn X G1, Btn X G2, Btn X G3: Gate outputs that are True when the button is depressed, and False
when it is up.
BankStep is Copyright © 2001-2002 by John Dunn and Algorithmic Arts. All Rights Reserved.
file:///C|/vbp/BankStep/Help/alldocs/knob.htm (2 of 2) [9/28/2002 8:56:58 PM]
BankStep Link Module
Lnk (Link) Module
Link is used to link to other programs or synths. It can be used as a MIDI Input connection or it can be
used for fast and accurate direct linkage to other BankStep or SoftStep programs running on the same
computer. When used as a Direct Link the module acts as both input from other Direct Links, and as
output to other Direct Links. When used as MIDI Input the module is input only (MIDI output is done by
the MIDI module).
Mode Button: The small blue button on the top selects the link mode. Click to change mode. The modes
are Direct Link, MIDI Control In, MIDI Key Aftertouch In. The current mode is indicated by the button
label of the first value input button: In = Direct Link, CC = Control In, KA = Key Aftertouch In.
Additionally, the button tool tips will change for each mode.
Inputs for Direct Link Mode:
In (Input Value): The value to be sent to other programs. Only MIDI values 0-127 are allowed. Values
less than 0 are set to 0, values greater than 127 are set to 127. Values are sent automatically whenever
they are changed, so a changing value can be used as the value itself and it can also be used to accurately
synchronize other instances of BankStep or SoftStep.
Ch (Link Channel Value): Selects the Link Channel, 0-127, which determines which of the 128
available channels the link value will be sent to, or received from.
Inputs for MIDI CC and KA Input Mode:
CC/KA (Control or Key Value): The MIDI Control Channel if Control mode or the MIDI Key number
if Key Aftertouch.. Only MIDI values 0-127 are allowed. Values less than 0 are set to 0, values greater
than 127 are set to 127.
Ch (MIDI Channel & Page Value): Sets the MIDI Channel and Page to receive the input from. MIDI
Channels here are numbered 0-15, not 1-16 as they are in the MIDI module buttons. Page is also
numbered from 0, 0-3 instead of 1-4. Page and Channel are combined into one value by multiplying Page
by 16. This gives a legal range of 0-63, with 0-15 for Page 0, 16-31 for Page 1, 32-47 for Page 2, and 4863 for Page3.
Value Output:
file:///C|/vbp/BankStep/Help/alldocs/link.htm (1 of 2) [9/28/2002 8:56:58 PM]
BankStep Link Module
Lnk X: The output of the Link module, as seen in the blue output box, shows any values that have been
sent to the selected Link Channel by Link modules in other instances of BankStep or SoftStep, or by
MIDI Control or Key Aftertouch messages on the Channel/Page selected - depending on Link mode
selected..
Logical Output:
Lnk X: This is the Value output converted to a Logical. Values of 0 are Off, any non zero value is On.
BankStep is Copyright © 2001-2002 by John Dunn and Algorithmic Arts. All Rights Reserved.
file:///C|/vbp/BankStep/Help/alldocs/link.htm (2 of 2) [9/28/2002 8:56:58 PM]