1
9.OPERATION PROCEDURES
1. General:
1).
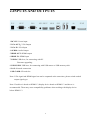
Turn on the power switch.
2).
Place the target object on the base unit surface.
3).
Adjust the image size according to the object size by pressing the ZOOM+,
ZOOM- buttons on the control panel.
4).
Press the AF button for automatic focus and white balance.
5)
Press Save/Record to capture and save the image/video clip to memory.
6).
FRZ button can be used to lock the image while changing displaying materials.
7)
DIV2 button can be used to compare the camera live image with a saved image in
memory side by side.
2. Display the PC signal:
Connect the VGA IN of the document camera to the PC OUTPUT with the provided VGA
cable, then press PC to display the PC signal.
3. Showing the 3D objects:
Use the FOCUS+, FOCUS- buttons on the front panel to adjust the focus on any part of
the 3D object.
4. Showing the transparent material such as an overhead transparent sheet:
Press the LAMP button to turn on the built-in base light, then press P/N, switch to
negative mode.
5. By-pass function
When turn off the power switch, the PC signal can pass through the document camera via
VGA in and VGA out.
Note: Please disconnect the power cable if document camera will not be used for a long
period.
18