1
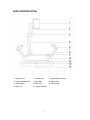
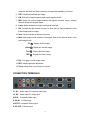
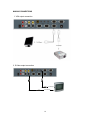
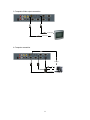
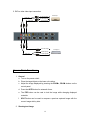
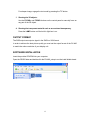
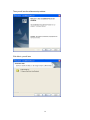
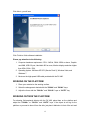
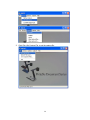
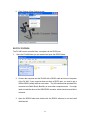
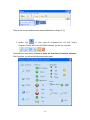
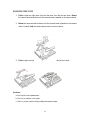
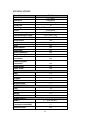
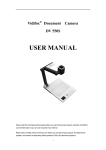
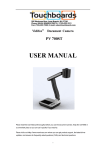
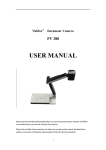
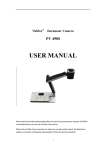
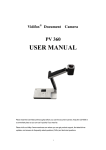
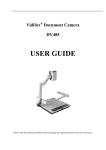
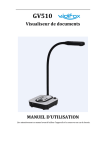
Vidifox® Document Camera DV 480 USER MANUAL Please read this User Manual thoroughly before you use the document camera. Keep the CD-ROM in a convenient place so you can use it quickly if you need to. Please visit us at http://www.waninusa.com where you can get product support, the latest driver updates, and answers to frequently asked questions (FAQs) and technical questions. 1 PRECAUTIONS NOTICES: PLEASE READ CAREFULLY BEFORE USE Use the document camera under the rated electric conditions. Do not place the document camera on any unstable surface. It may fall and cause injuries or damages. Do not place this device directly under sunlight or near heaters. Do not place this device near water. Keep the camera away from acid or alkali gas. Do not place this document camera in humid, dusty, windy or vibrant locations. The recommended operating environment is: Temperature: 32ºF-113ºF (0ºC--45ºC) Humidity: less than 75% Always unplug BEFORE cleaning the device. Use a damp soft-cloth for cleaning. Do not use volatile solvent. When this equipment functions abnormally, such as smoke, smell, noise, immediately unplug and call for professional assistance. Unplug the document camera or shut off the power when not in use. Legal Notice FCC Part 15 This device complies with Part 15 of the FCC Rules. Operation of this product is subject to the following two conditions: (1) this device may not cause harmful interference, and (2) this device must accept any interference received, including interference that may cause undesired operation. Compilation and Publication Notice This manual has been compiled and published to cover the latest product’s descriptions and specifications. The contents of this manual and the specifications of this product are subject to change without notice. Wanin USA reserves the right to make changes without notice in the specifications and materials contained herein and shall not be responsible for any damages (including consequential) caused by reliance on the materials presented, including but not limited to typographical and other errors relating to the publication. © 2010 Wanin USA Inc. 2 Table of Contents Basic Setup ............................................................................................................. 4 Parts Identification .................................................................................................. 5 Control Panel ........................................................................................................... 6 Button Instruction ................................................................................................... 7 Remote Control ....................................................................................................... 7 Input and Output Ports ........................................................................................... 8 Making Connections ............................................................................................. 10 Access Basic Functions ....................................................................................... 12 Output Format ...................................................................................................... 13 Software Installation ............................................................................................ 13 Working on the Platform ....................................................................................... 15 Working outside the Platform............................................................................... 15 Light ....................................................................................................................... 16 Zoom In and Zoom Out ......................................................................................... 16 Positive/Negative Conversion .............................................................................. 16 Focus Adjustment ................................................................................................. 16 Brightness Adjustment ......................................................................................... 16 White Balance Adjustment ................................................................................... 16 Text/Image Mode ................................................................................................... 16 Color Adjustment .................................................................................................. 17 Image Freeze ......................................................................................................... 17 Image Mirror .......................................................................................................... 17 Split Screen ........................................................................................................... 17 Image Save ............................................................................................................ 17 Image Recall .......................................................................................................... 17 RBG Input Switch .................................................................................................. 17 Video Input Switch ................................................................................................ 17 USB 2.0 Port .......................................................................................................... 18 USB Image Capture and Video Recording........................................................... 18 RS232 Control ....................................................................................................... 23 Folding the Unit ..................................................................................................... 25 Specifications ........................................................................................................ 26 Technical Support ............................................................................................... 27 3 BASIC SETUP 1. Unpack, put aside all packing materials. 2. Unfold the light arms until reaching the end position. 3. Raise the camera arm completely. Rotate the camera head until the lens face the center of the base unit. 4 PARTS IDENTIFICATION 1. camera cover 2. camera lens 3. upper mechanical arm 4. main mechanical arm 5. side lamp 6. lighting arm 7. power switch 8. base light 9. control panel 10. base unit 11. infrared receiver 5 CONTROL PANEL DOC: Press this button for shorter than 3 seconds to display the image on the platform. If pressing DOC for longer than 3 seconds, the camera will stop transmitting image and go to standby; pressing for another 3 seconds, the camera will come back to work. C-VIDEO S-VIDEO: Switch the input between Composite Video and S-Video. PC1 PC2: Switch the input between PC1 and PC2. LAMP: Switch between arm light, back light and no light. AUTO: Carry out auto focus, color adjustment and white balance adjustment. ZOOM+, ZOOM-: Image zoom in and zoom out control. NEG: Switch the image mode between positive and negative. FRZ: Freeze and unfreeze the image. SPLIT: Split screen, enable comparison between the frozen image and live image. RECAL: Display saved images. SAVE: Save the current image. T/P: Switch the output image between the text mode and picture mode SXGA: Switch the output signal between XGA (1024 x 768) and SXGA (1280 x 1024) VOLUME+, VOLUME-: Output volume control PAGE+, PAGE-: Navigate between pages in Image Recall mode. BRIGHT+, BRIGHT-: Image brightness adjustment FOCUS+, FOCUS-: Adjust focus manually, focus far and focus near. In the Image Recall mode: 1 (BRIGHT+): Display the first image. 2 (FOCUS+): Display the second image. 3 (BRIGHT-): Display the third image. 4 (FOCUS-): Display the fourth image. 6 BUTTON INSTRUCTION REMOTE CONTROL 1. Home: Press for shorter than 3 seconds to output the current image of the camera. Press this button for longer than 3 seconds to adjust color and white balance automatically. 2. PC: Switch the input VGA source between PC1 and PC2. 3. Video: Switch the input Video signal source between video1 and video2. 4. Text: Switch the image between the text mode and image mode. Text mode 7 enhances the black and white contrast to increase the readability of the text. 5. FRZ: Freeze and unfreeze the image. 6. P/N: Switch the image between positive and negative mode. 7. MIR: Switch the output image between the right/left mirrored image, up/down mirrored image and original image. 8. Lamp: Switch between arm light, back light and no light. 9. DIV: Activate the Split Screen function to allow side by side comparison of the frozen image and live image. 10. Save: Save the image in display to memory. 11. Multi: Multi-image mode enabled. Press again, back to the normal mode. In the multi-image mode: PC/○ 1 : Display the first image. Video/○ 2 : Display the second image. Text/○ 3 : Display the third image. FRZ/○ 4 : Display the fourth image. 12. Flip: Turn page in multi-image mode. 13. BRT: Image brightness adjustment. 14. Zoom: Image zoom in and zoom out control. CONNECTION TERMINALS L1, R1: Audio input of Composite Video input L2, R2: Audio input of S-Video input VID IN: S-VID IN: Composite Video input S-Video input VID OUT: Composite Video output S-VID OUT: S-Video output 8 MIC:Microphone input RGB AUDIO IN 1/2: Audio input for RGB input 1/2 AUDIO OUT: Audio output RGB IN 1/2: RGB signal input 1/2 (15 pin D-SUB) RGB OUT 1/2: RGB signal output 1/2 (15 pin D-SUB) RS-232: Allow a computer or external control system to control the document camera via this port. USB: Capture images and video into a connected computer via provided software 9 MAKING CONNECTIONS 1. VGA output connection 2. S-Video output connection To Audio input S-Video cable To S-Video Input 10 3. Composite Video output connection To Audio Input Video Cable To Video Input 4. Computer connection Audio Cable To Audio Output USB RS232 To RGB Output 11 5. DVD or other video input connection To Audio Output(L) Audio cable DVD Player 1 To Audio Output(R) Video cable S-Video cable To Video Output To S-Video output DVD player 2 To audio output(L) Audio cable To audio output(R) Access Basic Functions: 1. General a. Turn on the power switch. b. Place the target object on the base unit surface. c. Adjust the image displayed by pressing the ZOOM+, ZOOM- buttons on the control panel. d. Press the AUTO button for automatic focus. e. The FRZ button can be used to lock the image while changing displayed materials. f. SPLIT button can be used to compare a previous captured image with the current image side by side. 2. Showing text image 12 For sharper image, engage the text mode by pressing the T/P button. 3. Showing the 3D objects: Use the FOCUS+ and FOCUS- buttons on the control panel to manually focus on any part of the 3D object. 4. Showing the transparent material such as an overhead transparency Press the LAMP button until the built-in light box is on. OUTPUT FORMAT The RGB output can output a signal in the SXGA or XGA format. In order to achieve the best picture quality you must set the output format of the DV 480 to match the native resolution of your display unit. SOFTWARE INSTALLATION Insert the provided CD-ROM into your computer. Open the RS232 folder and double click the DV 480_setup to run the install shield wizard. 13 Then you will see the software setup window: Click Next>, you will see: 14 Click Next>, you will see: Click Finish to finish software installation. Please pay attention to the following: 1. Computer hardware requirement: CPU: 2.4GHz, RAM: 256M or above, Graphic card 64M, USB 2.0 port, Hard disk 40G or more, Monitor display resolution higher than XGA (1024 x 768). 2. Operating system: Windows XP SP2 (Service Pack 2), Windows Vista, and Windows 7. 3. Must use the high-speed USB cable provided with the DV 480. WORKING ON THE PLATFORM 1. Place your material on the working surface. 2. Select the enlargement desired with the “ZOOM+” and “ZOOM-” keys. 3. Adjust the focus with the “FOCUS+” and “FOCUS-” keys or “AUTO” key. WORKING OUTSIDE THE PLATFORM For showing 3-dimensional objects with the DV 480, place them on the platform and adjust the “FOCUS+” or “FOCUS-” and “AUTO” keys. If the object is too big for the platform or you want to show it from the side, just place it behind or in front of the unit and 15 tilt the camera by hand. LIGHT Press “LAMP” to switch between arm light, back light and no light. ZOOM IN AND ZOOM OUT Press "ZOOM+"or "ZOOM-" POSITIVE/NEGATIVE CONVERSION Press the N/P button, the output image will be converted to negative color. Press it again, the output image will be converted back to original color. FOCUS ADJUSTMENT When the DV 480 is turned on, the focus automatically adjusts to the stage. It is usually not necessary to re-adjust the focus if you are only working with flat materials (text, photos, etc.). Only 3D objects require a focus adjustment. Press the “AUTO” button to auto focus. Press the "FOCUS+" or "FOCUS-" button to focus manually. BRIGHTNESS ADJUSTMENT If the image effect is not satisfactory, you can adjust the brightness to get a better image effect. To increase the brightness, press the “BRIGHT+” button. To decrease it, press the “BRIGHT-” button. To go back to the initial brightness, press the “AUTO” button. WHITE BALANCE ADJUSTMENT Each time the lighting condition changes, the user should adjust the white balance of the image. Press the “AUTO” button to adjust the white balance automatically. TEXT/IMAGE MODE The Text enhancement feature provides the option to improve the readability of the text by improving the contrast of the image by pressing the “T/P” button. 16 COLOR ADJUSTMENT To adjust white balance automatically, (a) press "AUTO" button on the control panel, or (b) press the "Home" button on the remote control for 3 seconds. IMAGE FREEZE The freeze function allows you to discretely prepare the next image without interrupting current presentation. Press "FRZ" to freeze and unfreeze the image. IMAGE MIRROR Press “MIR” to vertically reverse the image. SPLIT SCREEN Press “Split” to compare two images or compare two different views of one object side by side. IMAGE SAVE The DV 480 offers the opportunity of storing 12 images on board. Press "Save" to capture the image currently displayed. IMAGE RECALL To display saved images, (a) press “RECAL” button, thumbnails of saved images are displayed; (b) use “Page+” and press one of the numerical buttons on the control panel or remote control. RGB Input Switch Press the “PC1 PC2” key to toggle between the two VGA input ports. Video Input Switch Press the “C-VIDEO S-VIDEO” key to switch between Composite Video & S-Video ports. 17 USB 2.0 PORT The USB port can be used to capture still images from the DV 480 into a computer. In this way, the DV 480 can be used as a 3-D scanner for your computer. Connect the DV 480 to your computer with the supplied USB cable. The capture software is available on the supplied CD-ROM. USB IMAGE CAPTURE AND VIDEO RECORDING 1. Connect the computer and the DV 480 with a USB cable and power on the DV 480. 2. Open My Computer, you will see a USB Video Device: 3. Double click USB Video Device, you will see the following image capture window: 18 To capture the video, please follow the steps below: Insert the provided CD-ROM into the computer. Create a folder on the hard drive and name it DV 480. Then copy the RS232 and USB application on the provided CD into this folder. 1. Open the DV 480 folder you just created on the hard drive and click to open the USB folder, then double click the provided software to run the USB capture application: You will see the following window: 2. Please make sure the software is in the proper setting. Make sure to click Devices->USB video device and Options->Preview. 19 3. Click File->Set Capture File, to set the capture file. 20 a. Set the location where the file is to be saved to and file name. b. Set the file size. 21 4. Click OK to finish the setup and click Capture->Start capture to capture video. 5. You will see the following window, Click OK to start capture. 22 6. Click Capture->Stop Capture to stop RS232 CONTROL The DV 480 can be controlled from a computer via the RS232 port. 1. Open the DV 480 folder you just created and open the RS232 folder. 2. Connect the computer and the DV 480 with a RS232 cable and turn on the power of the DV 480. If your computer does not have a RS232 port, you need to get a USB to RS232 (serial) cable as a converter. The US customers can purchase this converter from Radio Shack, Best Buy or some other computer stores. You might need to install the driver of the USB-RS232 converter, which should come with the converter. 3. Open the RS232 folder and double click the RS232 software to run the install shield wizard. 23 Then you will see the software setup window (Described on Page 15-17) 4. Double click or click start->All Programs->The DV 480 Control Program->The DV 480 to run the RS232 software, you will see a tool bar: The definition of each button is Zoom in, Zoom out, Auto focus, Functions, minimize. Click Functions, you will see the following control panel. 24 FOLDING THE UNIT 1. Fold the right arm light down first onto the base, then the left arm down. Rotate the camera head clockwise until the camera head is parallel to the camera stand. 2. Rotate the camera head clockwise until the camera head is parallel to the camera stand. Carefully fold the camera stand down to the front panel. 3. Fold the right arm light down first onto the base, then the left arm down. Cautions: a. Don’t lay the unit upside down. b. Don’t try to stand it on its sides. c. Don’t try to pick up this unit by pulling the camera stand. 25 SPECIFICATIONS Model No. Sensor Total pixel Zoom Frame rate Shooting area Focus Native output signal Converted output signal Resolution (Horizontal) Image mirror Image capture OSD White balance Image split Color adjustment Brightness adjustment Black and white/color conversion DV 480 1/3" CMOS 2 Megapixel 8x optical, 12x digital 15 Max: 13.5" x 10.6" Min: 0.1" x 0.1" Auto/manual SXGA (1280 x 1024) XGA (1024 x 768) More than 750 TV lines Yes Yes (image: 12 picture) Yes Yes Yes Yes Yes Yes Positive/negative conversion Image freeze Video scalar INPUT PORTS VGA VIDEO S-VIDEO AUDIO MICROPHONE OUTPUT PORTS VGA VIDEO AUDIO S-VIDEO OTHER PORTS USB2.0 RS232 (computer controllable) Yes Yes Yes x2 x1 x1 x4 x1 x2 x1 x1 x1 x 1(USB camera) x1 Remote control Yes 26 Arm Light × 2 (LED) 8”x10” Lightbox (LED) 32° F to 104° F 0° C to 40° C Folded: 15.9" x 16.7" x 6.1" 40.4 cm x 42.4 cm x 15.5 cm Setup: 18.7" x16.7" x 22.3" 47.5 cm x 42.4 cm x 56.6 cm Light source Operating temperature Dimensions Power supply 12V DC power adapter Power consumption (Max) 20W Weight(net) Compliance 11lbs/5 kg FCC, CE, RoHS * Design and specifications are subject to change without notice. TECHNICAL SUPPORT Wanin USA is committed to providing highest possible stand of customer service. We can be reached: By Phone Call us at 1-877-369-3130. Our technical support staff provides technical assistance from 9:00AM through 5:00PM Pacific Standard Time, Monday through Friday. Please gather the following information before calling: - Product model name(s) and numbers - Product serial number(s) - Detailed questions or problem descriptions. Online Technical support is also available online at Wanin USA’s web site at www.waninusa.com. You can enter your questions and concerns through our online form, email us at [email protected]. Wanin USA Inc. 12961 Ramona Blvd., Irwindale, CA 91706 Toll Free: 1-877-369-3130 E-mail: [email protected] ©2010 Wanin USA Inc. All Rights Reserved. 27 Fax: 626-609-3380 Web: www.waninusa.com