1
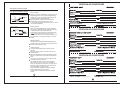
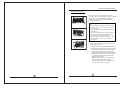
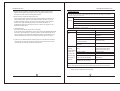
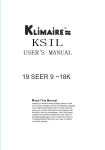
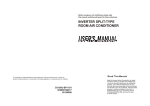
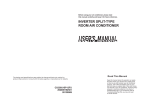
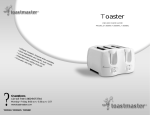
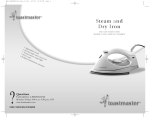
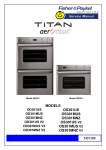
OPERATING INSTRUCTIONS
NOTE: This manual does not include Remote Controller Operations, see the
<<Remote Controller Instruction>> packed with the unit for details.
Operating temperature
Mode
Heating operation
Cooling operation
Temperature
Drying operation
Room temperature
17
62
18
64
Outdoor temperature
32
90
0
32
10
30
86
43
109
11
-7
43 20
109
( For the models with low
temperature cooling system
18 52 64
126
(For special tropical models)
-7
20
24
76
32
43
50
52
90
3rd Free Service Coupon (Dry)
within 3rd qtr from the date of purchase
2nd Free Service Coupon (Wet)
within 2nd qtr from the date of purchase
1st Free Service Coupon (Dry)
within 1st qtr from the date of purchase
Model No.:
Model No.:
Model No.:
Sr.No.:
Sr.No.:
Sr.No.:
Name:
Name:
Name:
Address:
Address:
Address:
Land Mark if any:
Land Mark if any:
Land Mark if any:
Telephone No.:
Telephone No.:
Telephone No.:
Date of Purchase:
Date of Purchase:
Date of Purchase:
109
18
52 64
126
(For special tropical models)
NOTE:
1. Optimum performance will be achieved within these operating temperatures.If air
conditioner is used outside of the above conditions, certain safety protection features
might come into operation and cause the unit to function abnormally.
2. Room relative humidity less than 80%. If the air conditioner operates in excess of this
figure, the surface of the air conditioner may attract condensation. Please sets the vertical
air flow louver to its maximum angle (vertically to the floor), and set HIGH fan mode.
Manual operation
Arrival
Time:
Completion
of work:
Arrival
Time:
Completion
of work:
Arrival
Time:
Date:
Date:
Date:
Time.:
Time.:
Time.:
Completion
of work:
Manual operation can be used temporarily in case the remote controller is disable or
the unit requires maintenance.
Open and lift the front panel up to an angle
1
Techinician
Signature
Customer
Signature
Techinician
Signature
Customer
Signature
Techinician
Signature
Customer
Signature
until it remains fixed with a clicking sound.
For some models, please use suspension
bars to prop up the panel.
2
AUTO/COOL
operation mode is shifted in an order as:
Manual control button
AUTO, COOL, OFF.(The default setting
(1 )
Suspension bars
position.
CAUTION:
This is used for testing purposes only.
●
●
AUTO/COOL
Service 1
To restore the remote controller operation,
use the remote controller directly.
2 3
Service 1
2 3
Service 1
Air filter cleaned
Voltage I/P & O/P
Checked
Fan Motor a) speed Check
Grill Temp.
Checked
Drain System
checked
b) Noise Check
Room Temp.
Checked
Brushing of
Coolng coil
c) Alignment Check
Amperes
Checked
General Cleaning
& Brushing up
temperature is 24
3
Close the panel firmly to its original
Manual control button
Please tick üfor the Checks carried out and O for the job not carried out
Once you push the manual button, the
2 3
Grill / Louver / Knobs
Checked
(2 )
The Service coupons are utilised in first year, if not utilised then coupons will be expired.
Customer to call at Call center to avail 3 preventive services.
8
21
VIDEOCON CARE CENTER
OPERATING INSTRUCTIONS
Airflow direction control
Adjust the air flow direction properly otherwise it
might cause discomfort or cause uneven room
temperatures.
Adjust the horizontal/vertical louver using the remote
controller. For some models, the vertical louver can
only be adjusted manually.
To set the horizontal/vertical air flow direction
Perform this function while the unit is in operation.
Use the remote controller to adjust the air flow direction.
The vertical/horizontal louver changes 6 degree in angle
for each press, or swing up and down automatically.
Please refer
,, to the REMOTE CONTROLLER OPERATION
MANUAL for details.
Range
,,
For some models, the vertical louver can only be adjusted
manually. Move the deflector rod manually to adjust the air
flow in the direction you prefer.
IMPORTANT:Do not put your fingers into the panel of
blower and suction side.The high-speed fan inside may
cause danger.
CAUTION
Deflector rod
Range
20
Do not operate the air conditioner for long periods with
the air flow direction set downward in cooling or
dehumidifying mode. Otherwise, condensation may
occur on the surface of the horizontal louver causing
moisture to drop on to the floor or on furnishings.
When the air conditioner is started immediately after it
was stopped, the horizontal louver might not move for
approximately 10 seconds.
Open angle of the horizontal louver should not be set
too small, as COOLING or HEATING performance may
be impaired due to too restricted air flow area.
Do not move the horizontal louver manually, otherwise
the horizontal louver will be out of sync. Please cease
operating, unplug power for a few seconds,then restart
the air conditioner.
Do not operate unit with horizontal louver in closed
position.
9
VIDEOCON AIR CONDITIONER
OPERATING INSTRUCTIONS
How the air conditioner works
SLEEP operation
7 hours timer off
Set
Temperature
1 hour
1 hour
Cooling
SLEEP operation
7 hours timer off
Set
Temperature
1 hour 1 hour
Heating
AUTO operation
When you set the air conditioner in AUTO mode, it will
automatically select cooling, heating(cooling/heating
models only), or fan only operation depending on set
temperature and the room temperature.
The air conditioner will control room temperature
automatically to the temperature point you set.
If you feel uncomfortable in the AUTO mode, you can set
your desired temperature.
SLEEP operation
When you push SLEEP button on remote controller
during cooling, heating(cooling & heating models only),
or AUTO operation , the air conditioner will
automatically increase (cooling) or decrease (heating)
per hour for the first 2 hours, then hold
steadily for the next 5 hours, after that it will switch off.
This mode saves you energy and brings you comfort
at night.
VIDEOCON AIR CONDITIONER
DRYING operation
The temperature is regulated while dehumidifying by
repeating turning on and off of the cooling operation or
fan only. The fan speed is LOW.
Optimal operation
To achieve optimal performance, please note the
following:
Adjust the air flow direction correctly so that it is not
forwards people.
Adjust the temperature to achieve the highest comfort
level. Do not adjust the unit to excessive temperature
levels.
Close doors and windows on COOL or HEAT modes,
or performance may be reduced.
Use TIMER ON button on the remote controller to
select a time you want to start your air conditioner.
Do not put any object near air inlet or air outlet, as the
efficiency of the air conditioner may be reduced and
the air conditioner may stop running.
Clean the air filter periodically, otherwise cooling or
heating performance may be reduced.
Do not operate unit with horizontal louvre in closed
position.
VIDEOCON AIR CONDITIONER
10
19
CARE AND MAINTENANCE
Care and Maintenance
Cleaning the Grille, Case and Remote Controller
Turn the system off before cleaning. To clean, wipe with
a soft, dry cloth. Do not use bleach or abrasives.
NOTE: Power supply must be disconnectd before
cleaning the indoor unit.
CAUTIONS
Fi l t er Handl e
A cloth dampened with cold water may be used
on the indoor unit if it is very dirty. Then wipe it
with a dry cloth.
Do not use a chemically treated cloth or duster to
clean the unit.
Do not use benzine, thinner, polishing powder, or
similar solvents for cleaning. These may cause
the plastic surface to crack or deform.
Never use water hotter than 40 C/104 F to clean
the front panel, it could cause deformation of
discoloration.
Cleaning the air filter
NOTE: Power supply must be disconnectd before
cleaning the indoor unit.
A clogged air filter reduces the cooling efficiency of
this unit. Please clean the filter once every 2 weeks.
1. Lift the indoor unit panel up to an angle until it
stops with a clicking sound.For some models,
please use suspension bars to prop up the panel.
2. Take hold of the handle of the air filter and lift it
up slightly to take it out from the filter holder,
then pull it downwards.
3. Remove the AIR FILTER from the indoor unit.
Clean the AIR FILTER once two weeks.
Clean the AIR FILTER with a vacuum cleaner
or water, then dry it up in cool place.
11
18
CARE AND MAINTENANCE
4. Remove the Air Freshening Filters from its supporting
frame (The solution to disassemble may differ from
each other for different filters. Refer to 1 and 2 ).
Clean the air freshening filter at least once a month,
and replace it every 4-5 months.
Clean it with vacuum cleaner, then dry it in cool place.
? For the models with plasma, do not touch the plasma
within 10 minutes after you open the panel.
Air freshening filter
1
Plasma
PLASMA
Air filter
Hold the two parts of Plasma where are
marked with
signal and lift it. Then you
can open the cover of the the plasma and
remove the filter.
2
5. Install the air freshening filter back into position.
6. Insert the upper portion of air filter back into the
unit, taking care that the left and right edges line up
correctly and place filter into position.
Maintenance
If you plan to not use the unit for a long time, perform
the following:
(1) Clean the indoor unit and filters.
(2) Operate the fan for about half a day to dry the
inside of the unit.
(3) Stop the air conditioner and disconnect power.
(4) Remove the batteries from the remote controller.
The outdoor unit requires periodic maintenance
and cleaning. Do not attempt to do this yourself.
Contact your dealer or service provider.
Checks before operation
Check that the wiring is not broken off or
disconnected.
Clean the indoor unit and filters.
Check that the air filter is installed.
Check if the air outlet or inlet is blocked after the
air conditioner has not been used for a long time.
Caution
Do not touch the metal parts of the unit when
removing the filter. Injuries can occur when
handling sharp metal edges.
Do not use water to clean inside the air conditioner.
Exposure to water can destroy the insulation,
leading to possible electric shock.
When cleaning the unit, first make sure that the
power and circuit breaker are turned off.
Do not wash with hot water at more than 40℃.
Shake off moisture completely and dry it in the
shade; do not expose it directly to the sun.The
filter may shrink.
12
Manufacturer of this Videocon Air Conditioner ( Split AC) undertake that the product is warranted against manufacturing
defects for a period of 1 year from the date of purchase on all parts except front grill & plastic parts and thereafter
4 year Additional warranty on the compressor, as per the terms and conditions mentioned here below. In the event of
any complaint contact our nearest Videocon service center.
4 Year Additional Warranty on Compressor
The 4 year warranty on Compressor will be continue even after the expiry of 1 year period from the date of purchase. This
warranty covers Compressor only. Gas charging is included only when compressor is defective & inoperative. During the
additional warranty period, it does not cover any part such as condenser coil, evaporator coil, capillary, suction line,
electronics parts etc. Standard visiting charges will be applicable within the municipal limit of town where
Videocon Industries Ltd. (VIL) has it's Authorized Service center, Service outside municipal limit will attract to and fro traveling,
other incidental expenses in addition to standard visiting charges, as prevailing from time to time. During the warranty period,
only the parts replaced or repaired shall be free of costs, but service charges shall always be payable by the customer.
Terms & Condition
1.The warranty is confined to the first purchaser of the Air- Conditioner only & is non-transferable.
2.Installation, Repairs & replacements will be carried out by the dealer (Sales & Service Dealer) from whom the product has
been purchased, or through the Authorized Service Centers of VIL. In case the customer shifts the place of residence during
warranty period, it is advised to contact Authorized Service Center directly or call our help line no's (toll free). Any Installation /
alteration in the installation position or shifting of the Air- Conditioner from one premises to another should be carried out by
VILs Customer Care Center or its Authorised Service Franchised / Sales & Service Dealer only. Such change if address of the
installation must be notified to VIL Customer Care Center.
3.Repairs under warranty shall be carried out by an authorized service personnel only. The details of centralized help
lines are attached.
4.For units installed beyond municipal limits of the jurisdiction of company's Authorized Service Center, it is responsibility of the
purchaser to contact the nearest authorized service center and bring the unit to the authorized service center at its own cost
and risk. All expenses incurred in collecting the units or parts thereof from the company's authorized service center, as well as
expenses incurred with deputizing of service personnel/technicians towards conveyance and other incidentals etc. will be borne
by the customer. Local Charges for transportation and handling charges may vary from location to location. Customers are
advised to verify before. In case the customer desires to bring the unit on its own to the Authorized Service Center, the same
shall be at its own risks & consequences.
5.The concerned authorized service center will advise the customer whether to effect the repairs at site or at the authorized
service center.
6.Call registered with the centralized helpline/Authorized service center, wherein only cleaning of the unit/parts in the unit due
to dust accumulation on portions of the unit, general explanations / returning, are not to be considered as defects.
7.In case of repairs or replacement of any part/s of the unit, this warranty will thereafter continue and remain in force only for the
unexpired period of the warranty. Replacement of parts would be purely at the discretion of VIL alone. In case the replacement
of the entire unit is being made, (subject to the sole discretion of VIL), the same model shall be replaced and in the event such
model has been discontinued, it shall be replaced with the model of price equivalent at the time of purchase.
8.In case of any damage to the product / customer abuse/ repairs by un-authorised personals / misuse detected/ by the
Authorized Service Center personnel, the warranty conditions are not applicable and repairs will be done subject to availability
of parts and on a chargeable basis only.
9.This warranty shall not cover any consequential or resulting liability, damage or loss to property or life arising directly or
indirectly out of any defect in the Air- Conditioner. The company's obligation under this warranty shall be limited to repair or
providing replacement of defective parts only under the warranty period.
10.The company or its Authorized Service Center reserves the right to retain any part/s or component replaced at its discretion,
in the event of a defect being noticed in the equipment during warranty period.
11.While the company will make every effort to carry out repairs at the earliest, it however is made expressly clear that the
company is under no obligation to do so in a specified period of time.
12.Warranty does not cover accessories external to the equipment supplied by the dealer.
13.If any coloured internal or external components are replaced, there will be commitment to ensure that the shades match with
the original or other components. The replaced shades, patterns, tints may vary from the customer's unit due to continuous
usage of the unit. Any matching components changed at customer's request will be on chargeable basis except the component
which actually needed.
14.The unit shall be operated with variation of + 5% of rated voltage at 50Hz. Any failure due to voltage / fluctuation beyond
specified tolerance will not be covered under warranty.
This Warranty is not applicable in any of the following cases :
1.The warranty card is not completed properly at the time of purchase.
2.The completed warranty card is not presented to authorized service personnel at the time of service of the product.
3.The product is not operated according to instructions given in the Operating Instruction Booklet.
4.Defects are caused by improper or reckless use, which shall be determined by the company personnel.
5.Any repair work is carried out by persons other than authorized service personnel.
6.Defects are caused by due to causes beyond control like lightening, abnormal voltage, acts of God or while in transit to service
center or purchaser's residence.
7.The warranty is not valid in case, the serial number is deleted, defected or altered. Damage to the product or any part/s due to
transportation or shifting is not covered by warranty.
8.a) This warranty will automatically terminate on the expiry of the warranty period of 12 months, even if the Air- Conditioner may
not be in use for any time during the warranty period for any reason
b) The warranty on compressor will automatically terminate on expiry of 4 years (after 1 year
warranty period) even if the Air- Conditioner may not be in use for any time during the said period
for any reason
9. All disputes are subjected to Aurangabad Jurisdiction.
10. All the disputes and / or differences arising between the parties will be referred to sole
Arbitrator, to be appointed by VIL . The Arbitrator shall be conducted subject to Arbitration & conciliation act 1966.
The place of Arbitration shall be Aurangabad (MS)
17
OPERATION TIPS
The following events may occur during normal operation.
1. Protection of the air conditioner.
Compressor protection
The compressor can't restart for 3-4 minutes after it stops.
Anti-cold air (Cooling and heating models only)
The unit is designed not to blow cold air on HEAT mode, when the indoor heat exchanger is in
one of the following three situations and the set temperature has not been reached.
A) When heating has just started.
B) Defrosting.
C) Low temperature heating.
The indoor or outdoor fan stop running when defrosting (Cooling and heating models only).
Defrosting (Cooling and heating models only)
Frost may be generated on the outdoor unit during heat cycle when outdoor temperature is low
and humidity is high resulting in lower heating efficiency of the air conditioner.
During this condition air conditioner will stop heating operation and start defrosting automatically.
The time to defrost may vary from 4 to 10 minutes according to the outdoor temperature and
the amount of frost built up on the outdoor unit.
2. A white mist coming out from the indoor unit
A white mist may generate due to a large temperature difference between air inlet and air outlet
on COOL mode in an indoor environment that has a high relative humidity.
A white mist may generate due to moisture generated from defrosting process when the air
conditioner restarts in HEAT mode operation after defrosting.
3. Low noise of the air conditioner
You may hear a low hissing sound when the compressor is running or has just stopped running.
It is the sound of the refrigerant flowing or coming to a stop.
You can also hear a low "squeak" sound when the compressor is running or has just stopped
running. This is caused by heat expansion and cold contraction of the plastic parts in the unit
when the temperature is changing.
A noise may be heard due to louver restoring to its original position when power is turned on.
4. Dust is blown out from the indoor unit.
This is a normal condition when the air conditioner has not been used for a long time or during first
use of the unit.
5. A peculiar smell comes out from the indoor unit.
This is caused by the indoor unit giving off smells permeated from building material, from furniture,
or smoke.
6. The air conditioner turns to FAN only mode from COOL or HEAT (For cooling and
heating models only) mode.
When indoor temperature reaches the temperature setting on air conditioner, the compressor will
stop automatically, and the air conditioner turns to FAN only mode. The compressor will start again
when the indoor temperature rises on COOL mode or falls on HEAT mode (For cooling and heating
models only) to the set point.
7.The air conditioner runs Anti-mildew function after turning off the unit.
16
When turning off the unit under COOL(AUTO COOL, FORCED COOL) and DRY mode,the air
conditioner will run Anti-mildew function for 7-10 minutes, then stop the operation and turn
off the unit automatically.
13
OPERATION TIPS
TROUBLESHOOTING TIPS
8. Dripping water may generate on the surface of the indoor unit when cooling in a high
relatively humidity (relative humidity higher than 80%). Adjust the horizontal louver to
the maximum air outlet position and select HIGH fan speed.
9. Heating mode (For cooling and heating models only)
The air conditioner draws in heat from the outdoor unit and releases it via the indoor unit
during heating operation. When the outdoor temperature falls, heat drawn in by the air
conditioner decreases accordingly. At the same time, heat loading of the air conditioner
increases due to larger difference between indoor and outdoor temperature. If a
comfortable temperature can't be achieved by the air conditioner, we suggest you use a
supplementary heating device.
10. Auto-restart function
Power failure during operation will stop the unit completely.
For the unit without Auto-restart feature, when the power restores, the OPERATION indicator
on the indoor unit starts flashing. To restart the operation, push the ON/OFF button on the
remote controller. For the unit with Auto-restart feature, when the power restores, the unit
restarts automatically with all the previous settings preserved by the memory function.
Troubleshooting Tips
If one of the following faults occurs, stop the air conditioner immediately, disconnect the power
and then connect it in again. If the problem still exists, disconnect the power and contact the
nearest customer service center.
OPERATION indicator or other indicators continue flashing.
Trouble
Fuse blows frequently or circuit breaker trips frequently.
Other objects or water fall into the air conditioner.
The remote controller won't work or works abnormally.
If one of the following code appears on the display area :
E0,E1,E2,E3.....or P0,P1,P2,P3......
Cause
Malfunctions
What should be done?
Power cut
Wait for power to be restored.
Unit may have become Unplugged.
Check that plug is securely in wall
receptacle.
Fuse may have blown.
Replace the fuse.
Battery in Remote controller may
have been exhausted.
Replace the battery.
The time you have set with timer
is incorrect.
Wait or cancel timer setting.
Unit not cooling
Inappropriate temperature
Set temperature correctly. For
or heating
setting.
detailed method please refer to
Unit does not
start
11. Lightning or a car wireless telephone operating nearby may cause the unit to malfunction.
Disconnect the unit with power and then re-connect the unit with power again. Push the
ON/OFF button on the remote controller to restart operation.
"Using remote control" section.
(Cooling/ heating
models only)
Air filter is blocked.
Clean the air filter.
room very well
Doors or Windows are open.
Close the doors or windows.
while air flowing
Air inlet or outlet of indoor or
outdoor unit has been blocked.
Clear obstructions away first, then
restart the unit.
Compressor 3 or 4 minutes
protection has been activated.
Wait.
out from the air
conditioner
If the trouble has not been corrected, please contact a local dealer or the nearest customer
service center. Be sure to inform them of the detailed malfunctions and unit model number.
Notes: Do not attempt to repair the unit yourself.
Always consult an authorized service provider.
14
15