1
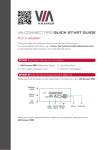
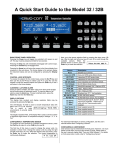
VIA COLLAGE QUICK START GUIDE
For Installer
This guide helps you install and use your product for the first time.
For more detailed information, go to http://bit.ly/Kramer-VIA–collaboration-hub
to download the latest manual or scan the QR code above.
STEP 1: Check What’s in the Box
1. VIA Collage Collaboration Device
3. Quick Start Guide
2. Power supply (19V DC) with power cords
4. DP to HDMI Adapter
STEP 2: Install the VIA Collage
Place the VIA Collage on a table or mount in a rack with optional adapter RK-COLLAGE.
STEP 3: Inputs and Outputs at a Glance
Always switch off the power on each device before connecting it to your VIA Collage.
External
HDMI Input
Source
MacBook/
Laptop
VIDEO IN
Android
Device
HDMI - IN
RS-232
AV - IN
DISPLAY OUT
DC IN
19V
iAMT
LAN
DP
AUDIO
HDMI
USB 3.0
LINE OUT
M IC IN
iOS
Device
Wireless
Router
DP HDMI
Output Output
Powered
Speakers
Mouse
Keyboard
Always use Kramer high-performance cables for connecting AV equipment to the
VIA Collage.
STEP 4: Connect the Unit
• Connect keyboard and mouse
• Connect your main display (dual displays are optional)
• Connect a Local Area Network (LAN) cable for connection to your network
or use a router for connection to Wi-Fi
• Connect the power supply
• Turn on the device
STEP 5: Configure VIA Collage
Open the VIA Collage menu and click on Features, then on Settings.
Enter password: viaadmin.
The Settings Menu tabs are:
• LAN Settings – Configure your network parameters and apply settings
• Room Name/Code – Manage room code and name preferences
• Configurations – Activate/deactivate PiP, media mode and other options
• System Controls – Manage your display and audio settings, run control panel, etc.
• Wallpaper – Insert a custom wallpaper image
• Third Party Apps – Install/remove third party software applications
• Authentication – Activate presentation mode and define moderator/participant settings
• Streaming Server – Configure your IP streaming server address
After settings are defined, click on reboot button to apply all settings. For more details, read the
Settings section in the user manual.
VIA COLLAGE QUICK START GUIDE
For User
STEP 1: Connect Your Device to the Proper Network
Connect your device to the same network used by Kramer VIA Collage in the specific
meeting room (either Wi-Fi or LAN).
STEP 2: Run or Download the Application
MAC or PC
1. Navigate to the embedded Web page of VIA Collage by entering the Room Name of
the VIA into your computer’s browser.
2. Select Virtual Run to execute the application only (intended for guests who will be
using the VIA once) or select VIA Installer to install the VIA application on your
computer (intended for regular users of the VIA).
Welcome to VIA Collaboration Hub,
please download the latest VIA Application
Virtual Run
VIA Installer
iOS /Android
1. Download and install the free VIA App from Apple's App Store or Google's Play Store.
Use the QR code above.
STEP 3: Login
Room Name: Copy the room name as appears in the wallpaper
(IP Address).
Room Name
192.168.11.67
Nickname
dave
Room Code
QQQ2
Nickname: Enter a name for your device.
Room Code: Enter a 4-digit code as it appears in the wallpaper.
Login
Login: Press Login to join the meeting.
STEP 4: Main Menu
Features
Step-in
Participants
Click on Step-in™ to put your screen up front
and on Participants to see who else is connected.
STEP 5: Features
Wireless Connection
Enable Control
Bring your own device (BYOD) and join
the session through wireless connection.
No dongle is needed.
Give a participant control over the
presenter's MAC® or PC laptops.
MultiMedia
Chat
Share smooth full motion video (up to
1080p/60), Mp3 files, and photos.
Send a message to a colleague in the
meeting.
Cloud
Web Browser
Drag and drop files to the cloud to share
instantly with everyone in the meeting.
Open a browser for presenting any
content directly from a website.
File Transfer
View Main Display
Share a file with one or several
collaborators.
View the main screen on your own device.
Whiteboard
Third Party Apps
Create, annotate, illustrate, review or
highlight the current display.
Supports office applications and conferencing
programs such as Skype®, WebEx®,
Go To Meeting®, Lync® and more.
Start Collaboration
HDMI Input 1
Click to collaborate through a common
display, using your own device. Multiple users
can interact and control what's happening on
the main display at the same time.
Connect any external HDMI source
(camera, DVD, Blu-ray™) and present it
over the main screen view.
VIA Collage Quick Start (P/N: 2900-300403QS REV 2)
Rev: 2