1
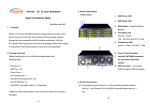
NA250A
External PCIe to GPU Enclosure
3. Panel layout
1. Overview
1. Slot1 : PCIe ×16 connector (×8 signal)
2. Slot2 : PCIe ×16 connector (×8 signal)
The easy and cost-effective PCIe to PCIe expansion system
TurboBox Pro NA250A features easy plug and play installation,
containing PCIe 2.0 ×8 host card and data cable for up to 40 Gbps
high-speed transfer rate. The TurboBox Pro NA250A is configured by
the BIOS from the workstation or server automatically, which makes all
the PCIe slots on TurboBox Pro NA250A available to the server or
workstation.
3. Slot3 : PCIe ×4 connector (×4 signal)
4. Slot4 : PCIe ×16 connector (×8 signal)
5. Slot 5: PCIe ×4 connector (×4 signal)
6. Slot 6: PCIe ×16 connector (×8 signal)
7. 8 × 6+2 pin PCI Express power connectors for
graphics cards
To server or workstation, the speed of the PCIe slots on NA250A
runs at PCIe ×8 (40 Gbps).
2. Package checklist
Before the installation of this unit, verify the package contains the
following items.
4. Installation of PCI Express
1 2 3 4
10
5 6 7 8
Add-On/Graphics Card
9
1. Power on/off button
Blue – power-on
Note: To power on/off the TurboBox Pro NA250A, press the
button for two seconds.
2. Buzzer mute button
A
3. Fan LED
Green – normal
Red – fan failure (low frequency of RPM or stop)
TurboBox NA250A x 1
4. Temperature LED
Green – normal
Red – overheated (higher than 55℃)
Before following the installation procedures, disconnect
TurboBox Pro NA250A from power source to prevent
electric shock or damage to add-on/graphics card.
1. First, loosen the two thumbscrews and remove the side
door from TurboBox Pro NA250A.
Step 1
5. Power switch
B
PCIe 2.0 ×8 host adapter with
standard and low profile bracket x 1
6. Power receptacle
7. 60×60×25 mm hot-swappable cooling fan
8. External PCIe ×8 connector for host connection
9. PCIe slots
C
D
PCIe 2.0 ×8 cable (1.5 meter) x 1
10. Thumbscrew to loosen/tighten the side door
2. Bend the L shape metal bracket on rear panel of
TurboBox Pro NA250A for preparation of the installation
of PCIe add-on or graphics card
6
5
4
3
2
Power cord x 1
1
Step 2
‧inside
Green IT makes
Green Earth
NetStor Technology Co. Ltd.
www.netstor.com.tw
E
CD containing user manual x 1
7
65432
1
Note: it is easier to use a screwdriver to bend the L
shape metal bracket.
NA250A
External PCIe to GPU Enclosure
3. Insert a PCIe add-on/graphics card into PCIe ×16 slot and
tighten it with a screw. If you are installing a graphics card
that requires extra power resources, connect the 6 pin PCI
Express power resource provided by NA250A to the 6 pin
PCI Express power connector on graphics card, or connect
the 6+2 pin PCI Express power resource provided by
NA250A to the 8 pin PCI Express power connector on
graphics card.
5. Fan Speed Adjustment
7. Power On TurboBox Pro NA250A
You are able to adjust the speed of 120×120×25 mm cooling
fan inside TurboBox Pro NA250A. To do so, pull the cooling
fan out, and you will see five sets of jumpers labeled with
F, 1, 2, 3, and 4 respectively from left to right on the board.
The default setting is the jumper being placed over pin 9 and
pin 10 for label 4, meaning the slowest speed of fan. If the
jumper is placed over pin 1 and pin 2 for label F, the fan will
spin at full speed. From label 1 to label 3, the fan speed
decreases. If all of the pins are open (meaning no jumper is
placed over the pins), the fan will not spin.
2
4
6
8
10
1
3
5
7
9
6. Installation of Host Adapter and Cable
Connection
5. Connect the end of PCIe ×8 cable to PCIe ×8 connector on
rear panel of TurboBox Pro NA250A. Also, connect the end
of power cord to power receptacle on TurboBox Pro NA250A
and the other end of power cord to a grounded outlet or
power strip.
Before following the installation procedure, disconnect the
server or workstation from power source to prevent electric
shock or damage to add-on/graphics card.
1. Install TurboBox Pro PCIe 2.0 ×8 host adapter
into an available PCIe ×8 connector (compatible with
×16 connector) in server or workstation. Secure the host
adapter with a screw.
PCIe ×8 cable
Step 5
Note:
there are two hot-swappable
120×120×25 mm cooling
fans for ventilation inside
TurboBox Pro NA250A.
You may simply draw the
cooling fans out by pulling
the L type metal handle on
the fan modules.
8. Power On Server or Workstation
In order to let the BIOS of server or workstation identify and
assign resources appropriately, make sure to power on
TurboBox Pro NA250A first, and then power on server or
workstation.
4. Place the side door back to TurboBox Pro NA250A, and
tighten the two thumbscrews to fasten the side door.
Step 4
Power on the TurboBox Pro NA250A by pressing the power
button for two seconds.
There is no software required for proper configuration of
TurboBox Pro by server or workstation’s operating system;
however, as a third party PCIe card is installed in TurboBox Pro,
a request for the driver of the third party PCIe card will be
prompted by the operating system. Please follow the instruction
provided by the third party PCIe card.
9. Remove TurboBox Pro from Server or
Workstation
To remove TurboBox Pro NA250A from server or workstation,
power off server or workstation first, and then power off
TurboBox Pro.
10. Verify Installation
motherboard
2. Connect the other end of PCIe ×8 cable to TurboBox Pro
PCIe 2.0 ×8 host adapter on server or workstation.
To remove TurboBox Pro NA250A from server or workstation,
power off server or workstation first, and then power off
TurboBox Pro.
‧For Windows operating system
When you want to verify a successful installation on Windows
operating system, go to My Computer and right click the icon of
My Computer. Select Manage from the menu (see figure 10-1),
and click Device Manager in the left side of window of Computer
Management (see figure 10-2).
NA250A
External PCIe to GPU Enclosure
Click More Info… from the window.
Figure 10-1
You will see six PCI standard PCI-to-PCI bridges below the
PCI Express Root Port.
Note:
If there is a yellow exclamation mark in front of the third
party PCIe/graphics card under PCI standard PCI-to-PCI
bridge, it means the third party PCIe/graphics card is
without the driver, so you have to install its driver on
operating system to make it work with the server or
workstation.
Figure 10-2
And then click View from the top side of the window, and select
Devices by connection.
After the driver is installed on operating system, the third
party PCIe/graphics card will work properly with the server
or workstation via TurboBox Pro, and the name of the third
party PCIe/graphics card will be shown under PCI standard
PCI-to-PCI bridge; furthermore, the name of the third party
PCIe/graphics card will also be shown in the list of Device
Manager.
Click PCI Cards from the left side of the window, and when
there is no third party PCIe/graphics card plugged in
TurboBox Pro, you will see six pci-bridges that indicate six
PCIe slots on TurboBox Pro.
When a third party PCIe/graphics card is plugged in one of
the PCIe slots on TurboBox Pro, the third party
PCIe/graphics card will be shown under the six pci-bridges.
‧For Mac OS
Open ACPI Multiprocessor PC, open Microsoft ACPI-Compliant
System, open PCI bus, click PCI Express Root Port, click PCI
standard PCI-to-PCI bridge, and click again PCI standard
PCI-to-PCI bridge. And then you will find your third party
PCIe/graphics card under PCI standard PCI-to-PCI bridge.
Note:
You may see PCI Express Root Ports with different ending
numbers such as 2E21, 2E29, and 2E20. These different
ending numbers indicate different PCIe slots on motherboard
To verify a successful installation on Mac OS X, select About
This Mac under the Apple icon.
When the driver of the third party PCIe/graphics card is
installed on Mac OS X, your server or workstation will begin
working with the third party PCIe/graphics card on
TurboBox Pro.