1
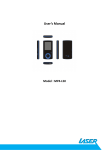
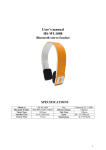
AO-BTHD
USER MANUAL
Please read carefully before use
1
AO-BTHD
USER MANUAL
TABLE OF CONTENTS
IMPORTANT SAFETY INSTRUCTIONS AND PRECAUTIONS ................................................................... 3
WHAT’S IN THE BOX .......................................................................................................................... 5
CHARGING THE AO-BTHD .................................................................................................................. 5
SWITCH ON /OFF THE AO-BTHD......................................................................................................... 5
PAIRING THE AO-BTHD WITH OTHER BLUETOOTH DEVICES ............................................................... 6
A: PAIRING AO-BTHD WITH MOBILE PHONE (HFP) ......................................................................... 6
B: PAIRING AO-BTHD WITH IPAD /IPHONE ..................................................................................... 7
C: PAIRING AO-BTHD WITH PC/NOTEBOOK OR TABLET .................................................................. 7
D: PAIRING AO-BTHD WITH MAC OS X 10 OR ABOVE ..................................................................... 8
E: PAIRING AO-BTHD WITH A SONY PLAYSTATION 3 ® (PS3) ........................................................... 8
RE-CONNECTING TO A BLUETOOTH DEVICE ....................................................................................... 9
MAKING PHONE CALLS WITH THE AO-BTHD ...................................................................................... 9
CONTROLS FOR MUSIC .................................................................................................................... 10
LED AND TONE INDICATIONS ........................................................................................................... 10
SPECIFICATIONS .............................................................................................................................. 11
TROUBLE SHOOTING / Q & A ........................................................................................................... 12
2
AO-BTHD
USER MANUAL
IMPORTANT SAFETY INSTRUCTIONS AND PRECAUTIONS
- Please read all instructions carefully before use
- Please retain this manual for future reference
- Use this product only in the manner described
- Only use a water-dampened soft cloth to clean the surface of this product
- The following will damage this product: any liquid such as water or moisture, extreme
heat; cold; humidity, dusty or sandy environments
-It is recommended to thoroughly charge this device before first use. Subsequent charges
may be as needed
- During charging, or extended use, the product may become warm. This is normal
- There are no user serviceable parts in this product
- Unauthorized attempts to dismantle or repair this product will void product warranty
- Using this device near other electronic devices may cause interference
- Do not use this product in electrical storms
3
AO-BTHD
USER MANUAL
PRODUCT CONNECTIONS AND USE
1.
Adjustable headband.
2.
<
next song / track
3.
>
last song / track
4.
LED
status Indicator
5.
Multifunction Button (MFB)
Switch On/Off the headset, Answer or Stop call,
Voice dial, Last Number Redial, Pause or Play
6/7.
+/-
8.
Mini USB port for charging
9.
Microphone Built in, high sensitivity
volume up / down
4
USER MANUAL
AO-BTHD
WHAT’S IN THE BOX
1 x Bluetooth headset AO-BTHD
1 x Mini USB charge cable
1 x User manual
2 x Spare foam ear pads
1 x Carry case
CHARGING THE AO-BTHD
It is recommended to thoroughly charge this device before first use.
Subsequent charges may be as required.
Charging via USB cable
•
Ensure the AO-BTHD is turned off before charging
•
Connect the included USB cable into the mini USB port on the headphones.
•
Connect the other end of the USB cable to a USB power adapter, an in car 12vDC to USB
adaptor, a PC or notebook USB port or any other device which can supply power via
USB (5volts)
•
When the red LED light is on, the headset is charging
•
When the blue LED light is on, the headset is fully charged
•
It should take around 3 hours to fully charge the AO-BTHD (if connected to a PC which
has a sleep/hibernate function, the device will not charge)
SWITCH ON /OFF THE AO-BTHD
Function
Operation
LED indicator
Indication tone
Switch on
Press the MFB button for 3
seconds, until the blue LED is on
Blue LED blink 3 times.
2 x audible tones
Switch off
Press the MFB button for 5
seconds, until the red LED is on
Red LED blink 3 times
3 x audible tones
5
AO-BTHD
USER MANUAL
PAIRING THE AO-BTHD WITH OTHER BLUETOOTH DEVICES
Entering the pairing mode:
Function
Enter pairing
mode
Operation
Make sure the headset is off.
Press and hold MFB button for 6
seconds, until the red and blue
LED blink alternately
LED indicator
Indication tone
Red and blue LED
blinks alternately.
2 x audible tones
A: PAIRING AO-BTHD WITH MOBILE PHONE (HFP)
Ensure your mobile phone has Bluetooth capability
Pairing procedures may vary between brand types and handsets. Please refer to your mobile
phone manual for further information
•
Please keep the headset and mobile phone within 1 meter of each other whilst
pairing.
•
Activate the headset pairing mode (hold the MFB (middle button) for 6 seconds - the
red and blue LED will blink alternately)
•
Activate the Bluetooth function on your mobile phone so it can search (discover)
Bluetooth devices.
•
When located, Select AO-BTHD in the Bluetooth device list on your phone.
•
If a password or PIN is required, enter 0000, and press Yes or Confirm if required.
•
After successfully pairing, select AO-BTHD in the Bluetooth device list and press
connect on your mobile phone.
•
If the pairing is successful a blue LED on the headset will blink.
Note:
•
If the pairing is not successful, switch off the headset, and then restart the
procedure. Your device may also need to be reset.
•
After pairing is successful, the paired devices will be stored in memory so there is no
need to repeat the pairing process. Some devices may only allow you to pair one set
of Bluetooth headsets at a time however you can use the AO-BTHD on multiple
devices (but not at the same time)
6
AO-BTHD
USER MANUAL
B: PAIRING AO-BTHD WITH IPAD /IPHONE
•
Please keep the headset and iPhone/iPad® within a range of 1 meter of each other
whilst pairing.
•
Activate the headset pairing mode (hold the MFB (middle button) for 6 seconds - the
red and blue LED will blink alternately)
•
In the iPhone/iPad home screen, select settings,then general,then Bluetooth
•
Swipe the on/off switch to on The message Now Discoverable will appear
•
The Headset should be identified by your iPhone/iPad. Select it to complete the
pairing
C: PAIRING AO-BTHD WITH PC/NOTEBOOK OR TABLET
Before installing this product, please make sure your PC or device supports Bluetooth, that the
Bluetooth feature is enabled or that the Bluetooth dongle has been installed correctly
•
Open the Bluetooth program of your PC or device and keep the AO-BTHD and PC
within 1 meter of each other whist pairing.
•
Activate the headset pairing mode: hold the MFB (middle button) for 6 seconds - the
red and blue LED will blink alternately
•
Activate Bluetooth connectivity on your PC and begin the SEARCH NEW DEVICE
function.
•
After a short scanning period, your PC or Device will indicate that your AO-BTHD
headset has been discovered and is ready for connection/pairing
•
If you are prompted to enter a pin-code, use the code 0000 (four zero’s)
•
The connection should then be complete and the headset will be ready for use
Note: If the above pairing process has failed, please ensure your Bluetooth receiver or software
has been installed correctly and then repeat the above steps.
Once paired and recognized by your PC/notebook, you can use the headset for chat
functions such as Skype® or MSN®.
7
AO-BTHD
USER MANUAL
D: PAIRING AO-BTHD WITH MAC OS X 10 OR ABOVE
•
Activate the headset pairing mode: hold the MFB (middle button) for 6 seconds - the
red and blue LED will blink alternately
•
From the Setup Bluetooth Device in the Bluetooth status menu / menu bar, follow
the onscreen instructions to help pair your headset.
Note: If the Bluetooth status menu is not available, open Bluetooth Preference
and select the Show Bluetooth status in the menu bar checkbox.
•
As part of the pairing process, you will enter a passkey 0000 (four zero’s)
•
Open System Preferences and click Sound
•
Click Output and select Bluetooth headset
•
Click Input and select your headset. Adjust the Input and Output volume as needed
Note: Some applications, including iChat AV, allow you to select the audio device
from within the application (independently of the default audio input and output
selected on the Sound pane of System Preferences). To use a Bluetooth headset
within iChat AV, select the Bluetooth headset for audio input and output on the
Video pane of iChat preferences.
E: PAIRING AO-BTHD WITH A SONY PLAYSTATION 3 ® (PS3)
Note – PS3 doesn’t allow you to listen to music/game/video content on a Bluetooth
headset – it’s only for online gaming chat
•
Activate the headset pairing mode: hold the MFB (middle button) for 6 seconds - the
red and blue LED will blink alternately
•
In the PS3 menu,go to the settings section,select accessory settings,then go to
Manage Bluetooth Devices. With your AO-BTHD in pairing mode, follow the
onscreen instructions and let the PS3 scan for your headset. When your headset is
found, follow the prompts and enter the pin-code 0000 (four zero’s). The pairing
should now be complete.
•
More help can be found at:
http://community.us.playstation.com/thread/2344930?start=0&tstart=0
8
AO-BTHD
USER MANUAL
RE-CONNECTING TO A BLUETOOTH DEVICE
•
Automatic connecting: Every time the AO-BTHD is switched on, it will connect to last
connected device automatically
•
Manually connecting to the last connected HFP device: When the AO-BTHD is in
standby mode and doesn’t connect to any HFP devices, press the MFB button twice,
it will connect to the last connected device automatically
Note: Before connecting to a Bluetooth device, please enable the device’s Bluetooth
function.
MAKING PHONE CALLS WITH THE AO-BTHD
(The headset must be connected and paired with a Bluetooth compatible mobile phone)
Function
Status of AO-BTHD
Operation
Voice dial
Standby mode
Press and hold the MFB button for 1 second, release
it when you hear a tone
Redial last
number
Standby mode
Press the MFB button twice quickly
Volume up
Conversation mode
press the
+ key
Volume down
Conversation mode
press the
- key
Answer call
Ringing
press the MFB button
Reject call
Ringing
Press and hold the MFB button for 1 second. Release
the MFB button when you hear a tone.
Note:
•
The AO-BTHD can be switched between music or phone call, so you wont miss
incoming calls whilst listening to music
•
Not all the mobile phones support all the functions listed above. Please refer to
the instruction manual of your mobile phone.
•
Some functions and indication tones may vary with different mobile phones.
•
When the volume is adjusted to max or min, you will hear an indication tone.
•
When accepting or making calls on some mobile phones, the default setting may
be to communicate via the phone (speaker and microphone) instead of on the
headset. If the is the case, simply switch over to the headset within the phones
9
AO-BTHD
USER MANUAL
relevant menu. Please refer to the instruction manual of your mobile phone for
further information
CONTROLS FOR MUSIC
Once the AO-BTHD headset connects with a music device (such as an iPod touch, iPhone or
Smartphone) high quality stereo music can be transmitted to the headset with volume and
track playback functions controlled from the headset:
Function
Status of headset
Operation
Pause
Playing music
press the MFB button
Play
Pause
press the MFB button
Last song
Playing music
press the
Next song
Playing music
Volume up
Playing music
Volume down
Playing music
> key
press the < key
press the + key
press the - key
Note:
•
On some mobile phones, when playing music, the sound may be heard on the
speaker of the mobile phone. If this is the case, please choose “transmit the sound
through Bluetooth / AO-BTHD” (or something similar). This is normally found within
the settings section on your device. When the volume of headset is adjusted to
maximum or minimum, you will hear an indication tone.
•
The Remote control functions will only work with devices which support Bluetooth
standard AVRCP (such as iPhone/iPad/some smartphones). Please refer to the
instruction manual of your mobile phone or Bluetooth transmitter for further
information.
LED AND TONE INDICATIONS
LED indicator
Red LED is on
Blue LED is on
Red and blue LEDs blink alternately
Status of the headset
The headset is charging
The headset has finished charging
Pairing mode – the headset is now
discoverable.
10
USER MANUAL
AO-BTHD
Blue LED quickly blinks twice every 1 second.
The headset is not connected to a device
Blue and Red LED quickly blinks three times
every 2 seconds
Set up HFP and A2DP connection
Red LED blinks twice every 20 seconds
Low power
Tone indicator
Status of the headset
an alert tone sounds every 20 seconds
Power is low
SPECIFICATIONS
Construction
Protocol
Button Controls
Effective range
Response Band
Working time
Standby time
Battery
Intergrated Microphone
Rechargeable Port
Speaker sensitivity
Pairing
Flexible overhead band
Rubberized underside band for grip
Moisture sealed rubber buttons
High integrity light-weight construction
Aluminum size adjusters
Heavy duty ball-pivoting earpads
Bluetooth V2.1+EDR
HSP - Headset Profile
HFP - Hands-free Profile
A2DP - Advanced Audio Distribution Profile
AVRCP - Audio/Video Remote Control Profile
AVRCP Music Controls: Play, Pause, Next,
Previous
Call Controls: Answer, End, Reject call
General : Volume, Pair, Power
10-15 meters
2.4Ghz
Music: Up to 10 hours
Talk: Up to 11hours
Up to 250 hours
Charging time : Approx 3 hours
Music Play Time : 10 hours
Talk Time: 11 hours
Capacity : 370mAH Lithium Polymer
Built-in,4.5mm, omni-directional
USB mini 5 pin cable
93 +-3dB At 1KHz
No. of Paired Devices: 1
11
AO-BTHD
USER MANUAL
Compatible Products
Pairing passkey: 0000
PC /Mac with Bluetooth functionality
iPod/iPad
iPhone 3G, 3GS, 4, 4S and beyond
MP3 Players with Bluetooth functionality
Bluetooth Mobile Phones
PlayStation 3
TROUBLE SHOOTING / Q & A
I always find configuring Bluetooth software
to be very difficult. Do you have any tips to
make this easier?
For the first time user, we recommend that
you read these instructions carefully before
connecting your first device. Bluetooth
technology is the preferred wireless
technology, with the set up steps simply
repeated for any Bluetooth device.
Is “discovering” a new device and “pairing” a
new device two different things?
Yes. Think of it like tuning stations into your
TV. The same applies to your headset. First
you have to scan for all stations (in this case
devices) then decide what station to watch (in
this case pair with) Note: Remember to enter
the pairing mode on your headset first before
connecting for the first time
I have paired AO-BTHD with another
Bluetooth device (eg. an iPhone) before. I am
now trying to pair with another device (eg.
iPad) and it doesn’t work.
AO-BTHD cannot “pair” two devices at the
same time. You must first turn off / un-pair /
select “forget this device” in order to pair
another device
I am having trouble pairing with WIN7. I can
“discover” the headset OK but I think I do not
have the right drivers.
Although WIN7 is a superior operating system
with most drivers already built-in, in some cases
this does not cover the various hardware
configurations built into the device (eg. PC,
Notebook, Netbook etc) from the
manufacturer. In this case, please visit the
manufacturer’s web site for the latest Bluetooth
drivers for your onboard Bluetooth device.
Is there a function to remind me when I have
reached the normal operating distance of the
device
Yes. Once you have breached the normal
operating distance for the device an audible
“beep beep” noise will sound. You will then
need to reconnect (only) the device.
For further product information and instructions please visit our product
web page at www.laserco.net or email [email protected]
12
AO-BTHD
USER MANUAL
Please note: As continual improvements are made to this product, slight operational
differences may occur. For the most up-to-date user manual, please visit our web site.
Warranty Against Defects
Laser Corporation Pty Ltd (“Laser”) warrants your new product to be free from defects in
materials and workmanship for 12 months, from the date of purchase, provided that the
product is used in accordance with accompanying recommendations or instructions where
provided. The benefit of this warranty is in addition to your rights under the Australian
Consumer Law and to other rights and remedies of the consumer under a law in relation to
the goods or services to which the warranty relates.
Through a network of retailers and resellers, Laser will provide you with your choice of a
refund, repair or exchange (where possible) for this product if it becomes defective within the
warranty period. This warranty will no longer apply where the defect is a result of alteration,
accident, misuse, abuse, normal wear and tear, neglect or improper storage.
Please retain your receipt as proof of purchase
How to make a product warranty claim:
Step 1: Find your receipt which proves the date of purchase. Where the date of purchase
cannot be verified, your place of purchase or Laser will make an assessment based on the
date of manufacture, the condition of the Laser Product and the type of defect.
Step 2a):
Contact your place of purchase. They will assess the nature of the fault and
refund or replace the product as per their store refund or warranty policy.
Step 2b): If your place of purchase cannot be contacted, then you can contact Laser .
Customer Service with details of your defective Laser Product: Phone: (02) 9870 3355; or
Email: [email protected] or online www.laserco.net/support/warranty (click on
“Consumers (End Users)”). Our business address is at 1/6-8 Byfield Street, North Ryde,
NSW 2113
Step 3:
Laser . will issue you with a Return Authorisation (RA) number within 48 hours.
When requested, send us the defective Product and a copy of your receipt. Laser will cover
the cost of the return delivery.
Step 4: Wait for us to contact you. Once we have received your defective Laser Product for
inspection, we will inform you of our assessment of your claim within 7 days. When we
contact you, we will firstly let you know whether you have a valid claim under this Warranty,
and if so, we will inform you whether your defective Laser Product will be replaced or
repaired, together with the number of days you can expect to wait to receive your replaced
or repaired Laser Product.
Our goods come with guarantees that cannot be excluded under the Australian Consumer
Law. You are entitled to a replacement or refund for a major failure and compensation for
any other reasonably foreseeable loss or damage. You are also entitled to have the goods
repaired or replaced if the goods fail to be of acceptable quality and the failure does not
amount to a major failure.
13