1
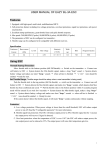
Charging the Main Unit
User Manual
For Operational Use
Connect
The Main Unit has a battery inside. Please re-charge the
battery when the remaining level has become lower than
20% in accordance with the following procedure:
(4) USB Port
①Connect the accessory USB cable.
(14) AC Adaptor
Thank you for your purchase of the Leeb Hardness tester. This product is a digital hardness tester that can measure the hardness
of various metallic materials (carbon steel, cast steel, alloy tool steel, stainless steel, heat resistant steel, cast iron, ductile iron,
cast aluminum alloy, brass, bronze, copper), which are not magnetized, by measuring the rebounding speed of the Prove after the
impact on the surface of a specimen.
②Connect the AC adaptor to the power receptacle.
Connect the AC adaptor plug to a home power receptacle (AC
100 V).
t
ec
(11) USB Cable
n
on
USB Port
C
Output the measured data
●For the safety of yourself and others, please read through this User
Manual and follow its instructions carefully. Ensure that it is retained
securely in a place where it can be readily accessed.
SAFETY NOTICE
●When assigning or lending this product to a third party, make sure that
it is accompanied by this manual.
The measured data can be output to a PC.
Install the software in your PC to use in accordance with the attached “How to Use the Accessory Software”
●For questions regarding this product, contact us or the seller.
Changing Measuring Ring, Cleaning inside Main Unit
■EXTERIOR FEATURES
[ Main Unit ]
(2) Measuring
Ring
②Remove the measuring ring from Main Unit, and take
out the Prove.
(Figure 4)
The measuring ring can be removed by turning. (Figure 4)
Please take out the Prove from inside.
Please use the accessory cleaning brush to clean inside the Main Unit.
Please clean the Prove as well, eliminate the dust from the Prove.
Tighten
Insert the Prove in the Main Unit in the direction in (Fig. 5).
Attach the Measuring Ring (S) on the thread of Main Unit.
ST. & CAST ST.
CWT. STEEL
STAINLESS ST.
G. CAST IRON
N. CAST IRON
CAST ALUMINUM
BRASS
BRONZES
COPPER
●Accuracy : within ±17HL
●Operating temperature range : 0 ∼ 40℃
●Weiht : Main Unit…95g
Total Weight…Approx. 4kg
(4) USB Port ………… The accessory USB cable is connected
for charging or data output.
HL
(5) Cover …………… Cover for (4) USB port. Please close
this while the port is not used.
(6) Measuring Button … Press this button to drop the Prove.
(7) Handle …………… Pull this handle down to catch the Prove.
(2) Measuring
Ring
(10) Selection
Button Lower
(Figure 5)
(1) Prove
HRC
HRB
HB
HS
HV
●Power Source : 3.7 V Lithium Battery(Built in)
●Hours for Continuous Use
: 16 hours from full charge
●Hours necessary for charging : Approx. 1 hour
(11) USB Cable
Put the product into the supplied container case and store it in a
dry, cool, and dark place.
Avoid moisture and direct sunlight. Keep anyone other than the product’s
administrator away from the storage place.
(12) Cleaning Brush … The brush for cleaning inside the Main Unit.
(13) Measuring Ring (S)… Changed to suit the measuring object.
(14) AC Adaptor
MAIL:[email protected]
I205-K 1403
● Dedicated Software … Installed in a PC for writing out the
measurements.
(12) Cleaning Brush
(15) Master
Block
(13) Measuring Ring (S)
[ Measuring Screen ]
B
K
HL
H HLD:
MAX: 419
M I N: 411
AVG: 414
A
C
: 3 3
ST&CAST ST
■ Standard Display
J
0000
075%
I
H
D
B K
E
F
G
HL
A
H HLD:
● Container Case … The case for containing the Main Unit
and accessories after use.
● User Manual ……… This document.
● Dedicated Software ● Container Case ● User Manual
A
6-15-22, Tsukanome, Sanjo, Niigata, Japan, 955-0055
Tel. : +81-256-31-5660 Fax. : +81-256-39-7730
(14) AC Adaptor ……… Connected via USB cable for charging
the Main Unit.
(15) Master Block …… Standard master for calibrating the
precision of Main Unit before every
measurement.
Eliminate the dust or stain while use, using the dry waste cloth etc.
Niigata seiki Co., Ltd.
(9) Selection ………… Button for selecting a setting and to
switch over between the measuring
Button Upper
displays.
(11) USB Cable ……… The cable connected to the Main Unit
for charging or data output.
[ Accessories ]
How to Maintain / Store after Use
If any foreign matter enters the clearance between the Prove and Main Unit, the
smooth movement will not be possible.
(8) Power …………… Button for selecting power ON/OFF,
and making the decision on setting.
(10) Selection ………… Button for selecting a setting and to
delete the measurement just before.
Button Lower
(8) Power
300 ~ 900 20.0 ∼ 68.0 38.4 ∼ 99.5 80 ∼ 647 32.5 ∼ 99.5 80 ∼ 940
300 ~ 640 20.4 ∼ 67.1 46.5 ∼ 100.7
80 ∼ 898
−
−
300 ~ 800 19.6 ∼ 62.4
85 ∼ 802
85
656
−
∼
−
360 ~ 650
90 ∼ 334
−
−
−
−
400 ~ 660
131 ∼ 367
−
−
−
−
174 ~ 560
20 ∼ 190
−
−
−
−
200 ~ 550
13.5 ∼ 95.3 40 ∼ 173
−
−
−
300 ~ 700
60
290
−
−
−
∼
−
200 ~ 690
45 ∼ 315
−
−
−
−
●Capacity of Data Storage
: Maximum number of storage 1486
●Auto Power OFF : Approx. 2 minutes
●Size of Main Unit : 160x43x26mm
(9) Selection
Button Upper
(1) Prove
Insert
List of Measuring Range with regard to Material and Unit / Specifications of Main Unit
1.
2.
3.
4.
5.
6.
7.
8.
9.
(7) Handle
(3) LCD Display …… Measurements and Settings are indicated.
Thread
④Return the Prove, attach the Measuring Ring to the
Main Unit.
Unit
(2) Measuring Ring … Pressed to the specimen for measuring.
(3) LCD Display
(2) Measuring
Ring
③Clean the Main Unit.
Material of Measured Specimen
(6) Measuring
Button
(4) USB Port
①Press the measuring button.
In this manual, the following symbols indicate:
Any action that can cause damage.
Any prohibited action.
Any compulsory instructions.
(1) Prove …………… The gauge head used for impact
measurement.
(5) Cover
Loosen
Release the caught up Prove.
LHT-300D
LEEB HARDNESS TESTER
Main Unit
Please insert the accessory USB cable into the USB port of the
Main Unit and the adaptor.
The Measuring Ring can be changed to a Ring (S) to fit the
object of measurement.
If the Measuring Ring is removed, the inside of the unit can
be cleaned. Please periodically clean it.
Model No.
Hardness Tester for Metallic Material (Rebound Type)
C
419
A Measured conversion /
average value
B Converted Unit
C Measurement
D Maximum Value
E Minimum Value
F Average Value
■ Capital Letter Display
G Record Number
H Remaining Battery Level
I Number of Measurements /
Total number of measurements
J Measured Material
K Over Upper / Lower limit
(H)
(L)
*Press the “selection button upper
” for switching over
between Standard and Capital Letter Displays.
Hardness Test Procedure
Read through this User Manual and follow the instructions.
・Any use of this product in a manner that is not
described in this manual may cause an accident.
Use this product only for hardness measuring work.
・Any use of this product for purposes not described in
this manual may cause damage, abrasion of the
product, or unexpected accidents.
Use this product only in environments that are:
●Dry and free from contact with water.
●Not exposed to direct sunlight.
●Not accessible by children or individuals other than the user.
・Use of this product in an environment other than those
described above can cause inaccuracy, damage to the
product, accidents, or injury.
Treat this device with care.
・Shocks, including those suffered from falling or loading
heavy materials, can result in inaccuracy or damage to
the product, and therefore should be avoided.
Using the menu “3. MAT.& SCALE” of “Set Up Menu” below,
set up the proper material and the unit for the specimen.
After set up, choose “1. MEASUREMENT” and return to the
measurement screen.
③Press the measuring ring to a specimen.
Do not use for the materials easily get broken or a
remaining dent may be problematic.
・A very hard Prove of HLD 1600 will be dropped onto
the specimen to measure the hardness. It must be
noted that a slight dent will remain on the specimen
after measurement.
Do not use for a magnetized specimen or in a
magnetized environment.
・This device measures the hardness by the rebounding
speed of Prove after dropping. If the specimen or the
environment is magnetized, it may influence the
movement of Prove and spoil the precise measurement.
Do not hit without a specimen.
・If this device is hit without a specimen, it may cause a
malfunction or reduced accuracy.
Do not disassemble in a way other than instructed
in the maintenance manual or remodel.
・It may cause the reduced accuracy or failure of the
product. The repair shall be discussed with your
distributor or a sales agency.
Prepare a specimen that meets the conditions indicated in
“Preparation of a Specimen,” and press the measuring ring to it.
* The measurement shall be conducted on an area of the
specimen where no dent or flaw is observed.
(6) Measuring
Button
(7) Handle
④Pull the handle down, and return it up. (Figure 1)
When the handle is pulled down, the Prove inside is caught up.
By returning the handle up as it is to pull up the Prove together.
* Be sure to return the handle while holding it. If the handle is
released when it is pulled down, it may spring up to cause the
failure of the unit from the shock.
⑤Press the measuring button. (Figure 2)
(Figure 1)
Press the measuring button while the ring is pressed to the
specimen. The Prove will drop and hit the specimen; then its
hardness is measured by the rebounding speed.
* When pressing the measuring button, please be careful not to
lower the handle. It may result in improper precision.
(Figure 2)
Average Value
HL
⑥Repeat④~⑤for designated times.
A
To acquire the average value, repeat the measurements for the
designated times. The number of measurements can be
changed in section 2 “AVG. TIMES” in “Set Up Menu”
HLD:
MAX: 419
M I N: 411
AVG: 414
: 3 3
ST&CAST ST
Prepare a specimen for measuring in accordance with the
conditions below:
①Mass : over 5 kg
*A specimen which weighs between 2–5 kg or a thin specimen
which may easily be deformed shall be measured on a stable
plate over 5 kg.
*A specimen which weighs less than 2 kg shall be stuck on a
stable plate over 5 kg using some coupling media, such as
Vaseline, to make no clearance with the plate.
②Surface Roughness : under R2 µm
Confirmation of Accuracy, Adjustment
The shock to the Main Unit or worn Prove may cause reduced
accuracy of measurement. Every time before use, please confirm
the precision of the Main Unit using the Master Block and adjust it.
①Confirm the hardness indicated on Master Block
Confirm the hardness of the Master Block, which is indicated
on the surface of the accessory Master Block.
779HLD
(15) Master Block
*If it is rougher than R2 µm, the surface shall be ground finished.
⑥No magnetization on the surface
*A specimen with the residual magnetization shall be de-magnetized
without fail.
⑦No paint on the specimen
*If the specimen is painted, please remove the paint layer.
⑧Shall not be used for the materials easily get broken
or a remaining dent may be problematic.
*A very hard Prove of HLD 1600 will be dropped onto the specimen
to measure the hardness. It must be noted that a slight dent will
remain on the specimen after measurement.
Measure the hardness of Master Block in accordance with the
“Hardness Testing Procedure” in the right side of the page.
●Material =Carbon Steel ●Unit=HL
●Number of Measurements = 5 times
Set Up Menu
If the power ON button
is pressed while the power is ON, the display will show the screen for the selection of the set up menu.
In the selection menu, the selection button
will be used for selection of an item and change of a value, and the power button
be used for the decision on the item.
will
1. MEASUREMENT ‥ Return to the measurement screen.
2. AVG. TIMES ‥‥‥ Change the number of measurements to acquire the average value. The number can be chosen between two to eight times.
3. MAT. & SCALE ‥‥ Change the material and the measuring unit for the specimen.
When a material is selected, the applicable units are displayed: please select an appropriate one for your purpose.
4. TOLERANCE
for changing the value, “Down”
for moving the decimal point.
‥‥‥ Tolerance set up function. Selection button “Up”
If the measurement exceeds the range, “H” will be displayed, if it falls below the range, “L” will be displayed.
5. LOCATION ‥‥‥‥ Set up the number for starting storage of the measured data. Any number can be chosen for starting storage.
Change the value using the selection button “Up”
6. MEMORY
1. SEQ. STORE‥‥‥1.AUTO STORE → The data will be stored in sequence from the number selected in “5.LOCATION”
2.CLOSE STORE → The measured data will not be stored.
2. BATCH STORE‥‥The 12 separate groups of data can be stored with 99 measurements per group.
③Correction of Error
*Compare the measured value②with the confirmed value②.
If the difference is within ±17HL, the Main Unit is in the
guaranteed range. Please use as it is.
*Compare the measured value②with the confirmed value①.
If the difference exceeds ±17HL, correct the error in
accordance with section “8 CALIBRATION” menu in
“Setting Menu” on the right side of the page.
For example, if a lot number (group) “2” is selected, the measured data number 100–199
will be stored.
3. CLEAR MEMORY‥The measured data in Main Unit will be deleted.
7. DATA OUTPUT‥‥ The measured data will be output to a PC.
for over 3 seconds. The power will be turned OFF, and the LCD display will be turned off.
Attachment:How to use the accessory software.
1. SEQUENCE ‥‥‥Designate the range of the data number to be output, and output the measured data in the designated range.
2. BATCH ‥‥‥‥‥The measured data of the lot number designated in “BATCH STORE” of section “6 MEMORY” will be output.
8. CALIBRATION
. The power turns ON, and the measurement screen will be indicated in the LCD display.
and move the decimal point using the selection button “Down”
‥‥‥‥ The storage type of measured data can be selected as well.
*Please measure the clean surface of Master Block.
*Please measure the area of Master Block where no dent is observed.
Power ON / OFF
●Power ON・・・Press the Power Button
●Power OFF・・Press the Power Button
Average Value
Back Side: The list of measurable range with regard to the material and the unit.
②Measure the hardness of Master Block
⑤Surface Hardness Test of Surface Hardened Material
: Thickness of hardened layer over 0.8 mm.
Minimum Value
Average, Maximum and Minimum values will be displayed in the LCD display.
Hardness of Master Block
③The radius of curvature of the surface : over 30 mm
④Surface Temperature : below 80°C
0000
075%
Maximum Value
(Figure 3)
⑦The measurements are displayed. (Figure 3)
Preparation of a Specimen
Push
Caution
②Set up the material and the unit.
3
Denotes a “requirement”:
You MUST do it.
to turn ON the power.
Return Upward
Denotes a “prohibition”:
You MUST NOT do it.
Press the power button
Pull Down
■Items to be observed are marked by the following symbols:
①Turn the power ON.
2
Caution
Please conduct the standard hardness test in accordance with the following procedure:
1
In order to forestall damages to users, other persons, and property, the instructions below must be strictly adhered to at all times in the manner
that they are described.
■The following set of indications classifies the degree of damage
This mark means that ignoring the instruction
that can arise from improper use of the product or a lack of
can cause injury or physical damage.
compliance with the instructions.
The hardness of the work for measurement may not be uniform.
Please measure at several spots and take an average value.
LHT-300D
It is important to observe all of the following instructions.
LHT-300D
Safety Precautions
‥‥ The measuring error will be corrected by the input of error value confirmed by the “Confirmation of Precision” in
the left side of the page.
9. CONTRAST ‥‥‥‥ Adjust the contrast of the display.
10. DEFAULT ‥‥‥‥ Resume all the various settings to the original.