1
manuale di istruzione per
lavastoviglie/lavaoggetti
instruction manual for
multipurpose container and
dishwasher
notice d’utilisation pour
laveuse À capot multimulti-usages
gebrauchsanweisung für
behÄlterlter- und geschirrspüler
manual de istrucciones para
lavaobjetos
lavaobjetos - vajillas
Mod.
XLC
INSTRUCTIONS FOR THE USER
INTRODUCTION
1) Read carefully all instructions supplied in this manual which contains important
information for correct installation, use and maintenance. Keep in a safe place for
future reference.
2) After opening all packing, check to ensure if all is in order. If in doubt, do not use
and contact a qualified professional to check the appliance.Remove all packing
materials (plastic bags, styrofoam packing, nails or staples, etc.) away from the reach
of children as they can present danger.
3) Before connecting the appliance to the mains, ensure that your water and electrical
supply correspond to the requirements.
4) This appliance must be installed by a qualified technician according to the
manufactures instructions.
5) This appliance must only be used in the manner for which it is intended. Any
other use is considered improper and therefore dangerous.
6) This appliance should only be used by persons trained to use it.
7) When attending to the dishes after washing, proper hygiene must be carefuly
observed.
8) Do not expose appliance to temperatures below 0°C.
9) The protection factor of the machine is IP X4 and should not be washed using
direct jets of water at high pressure.
10) After turning off wall switch, only qualified personnel should remove panelling
for repairs.
11) This appliance conforms to D.M.13/4/89 according to the CEE directive 87/308,
relative to eliminating radio disturbances.
12) Conforms to CEE directive n. 23 of 19/2/73 and to the law n. 791 of 18/10/87,
our dishwashers are built according to the best technical rules in force in ITALY and
ABROAD and are covered by European certificates.
13) Noise level of the machine, less than 67dB(A)
22
INSTRUCTIONS FOR THE USER
INSTRUCTIONS FOR USE
23
INSTRUCTIONS FOR THE USER
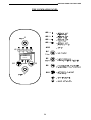
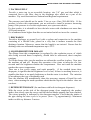
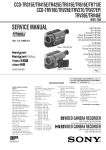
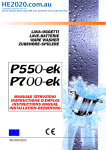
THE COMMANDS PANEL
H9 a
H9 b
S3
H9 c
H9 d
H10
H9
a
c
b
d
Q1
H10
DISPLAY
S3
S9
S10
S9
S10
Q1
24
INSTRUCTIONS FOR THE USER
OPERATION AND USE
HOW TO USE
1 Before using check that:
-it is plugged in
-the water supply is on
-there is water in the pipe
-the pump filter is correctly inserted
-the overflow pipe is connected
-the blades may move freely
-temperatures used are those which are recommended at 55°C for washing and 85°C
for rinsing.
-the crockery to be washed is in good condition and not cracked, as the cracks offer
more opportunity for the soiling to remain and floral bacteria to grow.
SWITCHING ON
When the machine is off, the display shows "O.F.F."
2 To turn on the machine press the
"Q1" switch.
The indicator light of the last cycle selected turns on ("H9 a-b-c-d").
The "H9b" indicator light turns on the first time the machine is turned on.
During the loading of the tank the display shows "F. .2.".
When the loading is completed, the boiler and tank heaters are turned on.
When the machine is ready, the display shows the tank temperature and turns on
the selected cycle indicator light.
Put into the filter in the tank the correct amount of chlorinated industrial detergent
according to the manufactures recomendation.
Using detergents which are chlorated and sanitized, they should be placed in the
machine using an automatic dosage device as when the detergent is poured directly
into the tank the possibility of formulation of dark spots may appear on the surfaces
as a result of the clorate
Dishes should now be put into suitable positions in the racks, after the removal of
solid waste. Cups and cutlery should be placed vertically in the suitable compartment.
Do not overload. The dishes should not be overlapped in such a way as the water
cannot reach every surface of the dish.
25
INSTRUCTIONS FOR THE USER
WASH CYCLE SELECTION
3. Press the
dishes:
"S9" button to select the wash cycle according to the dirtiness of the
• H9a short cycle:
for glasses and cups;
• H9b medium cycle:
for normally dirty dishes;
• H9c long cycle:
for particularly deep or dirty dishes and for
utensils;
for pots and pans.
• H9d intensive cycle:
STARTING THE WASH CYCLE
4. Press and hold the
chosen wash cycle:
"S3" button (for about 5 sec.) to set the startup mode of the
• "H9..." indicator light turns on (steady):
automatic startup by closing the hood.
• "H9..." indicator light flashes:
manual startup pressing the
"S3" button.
If the choice of startup of the cycle in automatic mode is performed with the
hood lowered, it is necessary to lift and then close the hood to start the cycle.
It is important to know that:
the activation of a cycle is shown by the sequential lighting of the indicator
lights of the display:
during the wash phase, the tank temperature flashes
during the dwell nothing is shown
during the rinse phase, the boiler temperature flashes.
26
INSTRUCTIONS FOR THE USER
IMPORTANT
N.B.: Machine in conformity with the existing hygienic standards, guaranteeing
a final rinse at 82°C. Wash cycle automatically lengthened if final rinse
temperature is not reached.
To avoid the machine blocking in this intervention, after 8 minutes the
intervention is stopped and the cycle continues.
INTERRUPTION AND END OF WASH CYCLE
5 It is possible to momentarily interrupt the wash cycle by raising the hood; the
operations will resume by lowering it.
Turning off the machine using the
"Q1" switch terminates all active cycles.
Upon turning on the machine again, the indicator light of the last cycle selected
will light and the display will show the alarm code "A. .1." until a new cycle
starts.
At the end of the cycle, remove the rack at an incline and shake carefully to remove
any remaining drops or residue.
Leave dishes to dry and take out rack with clean hands, paying attention to not touch
internal parts and borders. Remove dishes and place in a hygenic location.
SELF CLEANING AND DRAIN CYCLE
6 At the end of the wash operations turn off the machine by pressing the
switch.
After having removed the overflow pipe and lowered the hood, press the
button for 3 sec.
"Q1"
"S3"
The self cleaning and drain cycle will start, turning on the drain pump for machines
equipped with it.
The display will show "C. .1." during the entire cycle (2 min. and 30
sec.).
At the end of the autowash cycle, remove the tank filter to clean and replace along
with the overflow hose in the correct position. For further information regarding the
accessories please look under the section “USEFUL INFORMATION”.
27
INSTRUCTIONS FOR THE USER
MANUAL DRAIN
7 It is possible to empty the tank at any time of the day.
With the machine off, take out the overflow pipe from the tank and wait until it is
completely empty.
For machines equipped with drain pump it is possible to empty the tank by
starting the manual drain cycle during which only the drain pump is active.
It is possible to perform this cycle only with the machine turned on.
After having taken out the overflow pipe, press the
drain cycle will start.
"S9" button for 5 sec. The
The display will show "C. .2." for the entire duration of the cycle (2 min.
and 20 sec.).
At the end of the cycle it is recommended to remove the filters of the tank for
cleaning and then put them back with the overflow pipe in their positions.
READING THE TEMPERATURE
8. Pressing the
"S10" button it is possible to view in sequence the measured and
programmed temperatures of the tank (t1) and of the boiler (t2) for the selected
cycle.
1. Pressing
" S10" once the display shows the code "t.1. .";
2. pressing
" S10" a second time shows the measured tank temperature
"x.x. .";
3. pressing
"x.x.P.";
" S10" a third time shows the programmed tank temperature
4. Pressing
" S10" a fourth time shows on the display the code "t.2. .";
5. pressing
" S10" a fifth time shows the measured boiler temperature
" .x.x.";
6. pressing
" S10" a sixth time shows the programmed boiler temp. "P.x.x.";
7. pressing
" S10" again returns to the starting state.
The operations described above can not be performed during a cycle.
28
INSTRUCTIONS FOR THE USER
DEACTIVATING THE DISHWASHER AT THE END OF THE DAY
9.At the end of service, turn off by using the main wall switch and close the water
valve.
WARNINGS WHILE WASHING
1) Check that the washing temperature stays at 55°C
2) Do not use bare hands when handling soapy water.
immediately and thoroughly under fresh running water.
If this occurs rinse
3) While the machine is operating, do not turn any knobs too quickly.
4) Use only chlorified anti-suds detergent specifically for industrial use.
5) Turn off machine in case of breakdown or malfunction.. For repair, contact only
authorized technical assistance outlets using only genuine parts.
6) Under no circumstances should the settings of the thermostats be altered.
7) When running continuous cycles throughout the day, change the washing tank
water 2 or more times.
8) Do not subject washed dishes to any other handling such as rotary brushes, vapors,
dish-cloth drying etc.
Mishandling of any of the above may compromise the safety of the appliance.
29
INSTRUCTIONS FOR THE USER
USEFUL ADVICE
1) MAINTANANCE: Before beginning any cleaning or maintanance operation, the
machine MUST be disconnected from the main power supply.
Frequently check and clean the blades, taking them out from the column to remove
any debris or crustation.
The frequency of this operation is suggested by the quantity of residue or by nonsatisfactory results from washing.
For internal and external cleaning of the machine, do not use corrosive products such
as sodium hypochlorite (bleach) or hydrochloric acid (muriatic acid), steel wool or
steel brushes.
So as not to interfere with the correct functioning of the machine, in the presence of
calcium salts or magnesium in the water you are advised to periodically de-encrust
and keep in good order by using personnel professionally qualified.
So as to avoid risk of damage from oxidization or corrosion from chemicals, keep all
steel surfaces well clean.
2) FOR BEST RESULTS: An insufficient wash cycle may occur which is visible
when traces of waste remain. Streaking may be caused when the rinse cycle is
insufficient, in which case check that the rinse nozzles are clean and that the water
source is of suitable pressure.
In case of waste remains check that:
-the wash cycle nozzles are clean.
-the wash cycle temperature is at 55°C.
-the detergent is chlorified, of the correct concentration and specifically for industrial
use.
-the suction pump filter is clean
-the dishes are in the correct rack
-the dishes are placed correctly in the rack
3) PROLONGED DISUSE
In case of prolonged disuse, a few weeks, it is advisable to run the machine empty a
few times with clean water so as to avoid the build up of any odors. If necessary
repeat this operation a few times until the the water at the end of the wash is good and
clean.
If the period of disuse is longer, it is advisable to oil stainless steel surfaces with
vaseline and to remove any water from the boiler and the electric pump. It is always
advisable to run the sanitizing and de-encrustation operations both before and after
periods of disuse.
30
INSTRUCTIONS FOR THE USER
4) SANITIZING
It is vital to thoroughly clean the machine at least once a week. It is advisable to use
specifically a detergent which disinfects, the use of which will substantially increase
the following advantages:
-Establishes a secure hygenic state by using active detergents and disinfectants.
-maintains the machine in perfect hygienic conditions even during periods of nonuse.
At the end of the operation, it is necessary to run the machine empty,so as to rinse it,
for a few minutes.
5) DISENCRUSTATION
In the presence of the use of hard water, lime deposits may formulate internally and
on the dishes, which for hygienic reasons and for good care of the machine must be
removed by disencrustation.
The frequency of such procedure is according to the detergent manufacturers advice,
those products which generally contain a phosphoric acid base.
So as not to damage the machine, do not exceed doses and when the operation is
complete, rinse thoroughly.
6) LOADING AND UNLOADING OF THE MACHINE
For the transportation of the machine from the delivery point to the final installation
position, use a fork lift or adequate lifting equipment used by authorised staff. Lift the
machine by its frame, taking care that any protruding parts are not damaged
(discharges, wiring etc.).
7) MACHINE DISMANTLING
At the end of its normal lifetime, the machine has to be taken apart according to the
local regulations in force by separating the components as follows:
♦ metal parts: hood, platforms, frames, filters
♦ electrical parts: motors, remote control switches, microswitches, wiring
♦ plastic parts: racks, connections
♦ rubber parts: tubes, sleeves
8) RESINS REGENERATION OF THE WATER SOFTENER (only for
machines with built-in water softener)
The flashing of the "C. .3." (30 sec.) on the display indicates the need to regenerate
the resins. First of all, make sure that in the designated tank container there is some
coarse salt.
This operation has to be carried out with full tank.
Close the hood and push the
"S9" button for approx. 5 sec.
The display show "C. .3." (for 21' and 20"). During this operation the machine
cannot be used.
At the end of the regeneration cycle, first start the self cleaning cycle .
31
INSTRUCTIONS FOR TECHNICAL PERSONNEL
INSTRUCTIONS FOR INSTALLATION AND MAINTENANCE
This manual should be used by qualified personnel, authorized to examine and
eventually repair the machine.
The Manufacturer takes no responsibility for action taken by non-qualified personnel.
32
INSTRUCTIONS FOR TECHNICAL PERSONNEL
INSTALLATION
During the installation keep the machine leveled in order to ensure proper functioning
(angle of inclication is maximum 2 degrees). To prevent damage caused by the
release of vapors from the accessories, ensure that any adjacent equipment will not be
damaged by these vapors.
After test-running the machine, check that the temperatures used are the
recommended ones at 55°C for washing and 85°C for rinsing.
1) ELECTRICAL CONNECTION:
The electrical safety of this equipment is only assured if it is connected as follows.
It is necessary to connect the equipment to an effective earthing as specified by the
electrical safety regulations in force. Check that this basic requirement is complied
with, in case of any doubt ask for a careful check of the installation by a qualified
personnel.
In the case the earthing is not efficient there will be a dispersion due to the
suppresser.
The machine shall be included in a correctly dimensioned equipotential, whose
effectiveness is to be very tight in accordance to the procedures set for in the
applicable safety standards. The connection shall be performed through a screw
marked by a plate near the rear side of the appliance.
The manufacturer declines any responsibility for any damages caused by lack of an
effective ground installation. For the electrical power supply have available a wall
circuit breaker switch with multiple phase protection according the following table
with contact aperture distance, equal to or not exceeding 3mm and a supply cable no
less than 2.5mm².
model
Supply 380V 3N
Supply 220V/3
XLC
20A
32A
For other supplies the cable cross section and the circuit breaker switch must be
calculated according to voltage and length of cabling. If cabling too long adjust cable
size to Amp rating; do not pull on supply cable or install it under tension. If cable
needs to be replaced use type H07RN-F.
33
INSTRUCTIONS FOR TECHNICAL PERSONNEL
2) WATER SUPPLY
Provide a water tap in an accessible location, size 3/4" gas, and that which is
connected first to the filter, then to the discharge tube which are a part of the
machine. Pay careful attention to National and Regional requirements.
The pressure used should not be under 2 bar or over 4 bar (200-400 kPa). If the
pressure is below this requirement, you are advised to install a pressure increasing
pump; if the pressure is over this requirement, use a pressure reducer.
For best results, it is advisable to have the inlet water with a hardness not more than
10°French measure.
For a hardness factor higher than this use an ionised switch or invert the osmosis.
3) DISCHARGE
Provide a discharge at ground level with a syphon and connection to the machine
consisting of a flexible tube, placed in a way that it inclines towards the final
discharge location. Moreover, ensure that the length is not twisted. Ensure that the
discharge tube can withstand temperatures up to 70°C.
4) LIQUID BRIGHTENER DOSAGE
The dosage from this compartment is regulated by the regulation screw, of which
after being screwed down completely, should then be unscrewed, three complete
rotations.
To fill the dosage tube, turn the machine on without the overflow in place. Now turn
the machine on and off. Repeat this operation a few times at intervals of a few
seconds until the brightener reaches the compartment. Now wait until the machine
reaches the correct temperature.
Then run a few cycles empty and wash normally: if the washed items show
dropspots, it signifies that the brightener level is low; if there is streaking however, it
signifies that there is too much brightener or that the water is too hard. The variation
is according to the type of brightener used.
Now the machine will automatically draw the necessary amount of liquid for each
rinse; when running the wash operations check that the liquid in the drawer does not
run short.
5) DETERGENT DOSAGE (for machines with built-in detergent dispenser)
With the screw on the side of the detergent pump, close completely the product
intake, then slowly open the screw until the desired intake quantity has been reached.
The correct quantity is indicated by the detergent supplier. Check that the intake of
the pipe during the rinse cycle is as preset. (8cm = 1g approximately). Maximum
intake or delivery distance: 2 meters.
34
INSTRUCTIONS FOR TECHNICAL PERSONNEL
6) VIEWING AND SETTING PARAMETERS
The parameter programming environment can be accessed only with the
machine off, by pressing the
"S3" button. for 10 sec.
There are three types of programmable parameters:
P setting of functions
(same for all cycles);
T setting of temperatures
(for each single cycle);
L setting of wash cycles duration
(for each single cycle).
The display will show "P.r.o." and the indicator light selected at that time
will flash.
FROM THIS STATE IT IS POSSIBLE TO PROCEED TO THE PROGRAMMING
IN SEQUENCE OF ALL THE PARAMETERS.
6.1 CHANGING THE "P" PARAMETERS
Press button
"S3" to enter the programming phase for the "P" parameters.
The display shows "P.1. .".
To confirm and to view the "P" parameters in sequence (P1-P2-P3-P4-P5-P6-P7-P8-Cr)
press
"S3".
Use the
"S9" or
"S10" buttons to change the state of the parameter (0-1).
To exit the programming environment just do not press any button for at least 10 sec.
SETTING STANDARD PARAMETERS –PPARAMETER
FUNCTION
STATE
P1
Water fill normal/cold
0
P2
Normal / with pre-rinse
0
P3
Heating commutated/simultaneous
0
P4
N° wash pumps 1 / 2
0
P5
Boiler safety not active / active
1
P6
Startup safety on the temperature tank not active / active
0
P7
HR / HRT
0
P8
Rack recognition not active / active
0
Cr
Autonomy of the softener (n° cycles)
0/999
35
INSTRUCTIONS FOR TECHNICAL PERSONNEL
6.2 CHANGING "t" and "L" PARAMETERS
Choose the cycle to change using the
Press the
"S9" button.
"S10" button to enter the programming phase.
The display shows "t.1. .".
Press
"S3" to view the value set for the tank temperature of the cycle selected.
Use the
"S9" and
temperature.
"S10" buttons to decrease or increase the value of the
Press
"S3" again to confirm and proceed to the choice of the subsequent parameters
(in sequence t2-L1-L2-L3-L4-L5 PRO
).
To exit the programming environment just do not press any button for at least 10 sec.
STANDARD SETTINGS OF T AND L PARAMETERS
PARAMETRO
FUNZIONE
SHORT
MEDIUM
LONG
INTENSIVE
CYCLE
CYCLE
CYCLE
CYCLE
(H9a)
(H9b)
(H9c)
(H9d)
t1
TANK
TEMPERATURE
55°C
55°C
55°C
55°C
t2
BOILER
TEMPERATURE
85°C
85°C
85°C
85°C
L1
WASH TIME
37sec.
97sec.
157sec.
217 sec.
L2
PAUSE TIME
5sec.
5sec.
5sec.
5sec.
L3
RINSE TIME
18sec.
18sec.
18sec.
18sec.
/
/
/
/
(00)
(00)
(00)
(00)
L4
L5
/
DRAIN TIME
(optional; for Dumper
machines)
6.3 STANDARD PARAMETERS CONFIGURATION
1.: see page "97" to charge the configuration standard.
2.: Pressing the
"S10" button for 10 sec when the machine is off automatically
configures all the parameters (P-T-L) as shown in the Table. The display shows “PST”.
3.:
Important: set L1 for Intensive cycle in “217”.
36
INSTRUCTIONS FOR TECHNICAL PERSONNEL
7) SELF DIAGNOSTICS: ALARMS AND FUNCTIONS ON THE
DISPLAY
The alarm codes and indication of the functions active while the machine is operating are:
♦
OFF.:
MACHINE OFF.
♦
A 1:
CYCLE NOT COMPLETED (appears upon turning the machine on after interrupting a
cycle using the "Q1". main switch)
♦
A 2:
BOILER OVERHEATING (the temperature in the boiler exceeds 105°C – the active
cycle is finished).
♦
A 3:
TEMPERATURE PROBE NOT CONNECTED (the heater of the probe in alarm state
is disconnected - the active cycle is finished).
♦
A 4:
TANK NOT FILLED WITHIN 30 min.(turn off and then turn on the machine).
♦
A 5:
BOILER NOT HEATING WITHIN 30 min.
♦
H 1:
RINSE WATER TEMPERATURE (at least 15°C below the set value - the active cycle
is finished).
♦
H 2:
NO WATER SUPPLY (no incoming RCD water- the active cycle is finished).
♦
H 3:
TANK TEMPERATURE (at least 10°C below the set value - the active cycle is
finished).
♦
F 1:
DOOR OPENING (opening the door during a cycle).
♦
F 2:
INITIAL LOADING PHASE.
♦
C 1:
SELF CLEANING AND DRAIN CYCLE (for the entire duration of the cycle).
♦
C 2:
DRAIN CYCLE (for the entire duration of the cycle).
♦
C 3:
REGENERATION OF THE WATER SOFTENER (for the entire duration of the cycle).
♦
P.r.o.: PARAMETERS PROGRAMMING.
♦
P.S.t.:
PRESET LOADED.
In case of multiple simultaneous alarms the display will show the codes on the basis of the
following priorities:
1.
H1-H2-H3
2.
A1-A2-A3-A4-A5
3.
F1-F2
37
INSTRUCTIONS FOR TECHNICAL PERSONNEL
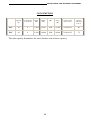
CONSUMPTION
Model
Tank
Capacity
(L)
Water
Consumption
per cycle (L)
Tank
Heater
(W)
Boiler
Heater
(W)
Pump
(W)
Total
Power
(W)
Max hourly
capacity with
water at 55°C
Max water
capacity
with water
at 12°C
XLC
42
4
3.000
9.000
2200
11200
72/40/30/15
40
XLC
42
4
3.000
14.000
2200
16200
72/40/30/15
72
The rack capacity diminishes for water feeders with a lower capacity.
38
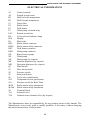
INSTRUCTIONS FOR TECHNICAL PERSONNEL
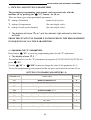
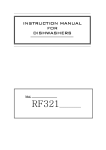
ELECTRICAL INFORMATION
A1
A2
B2
B3
C1
E2
E3
F3
FA2
H9....
H10
K1
KE2
KE2b
KE3
KM3
M2
M3
M5
MC
MD
Q1
S1
S2
S3
S9
S10
S11
SE2b
SE2ab
X1
Y11
Y10
Control console
Printed circuit board
Drill for boiler temperature
Drill for tank temperature
Noise filter
Boiler heater
Tank heater
Wash pump overload relay
Printed circuit fuse
Cycle selected indicator lamp
Display
Main relay
Boiler heater contactor
Boiler heater safety contactor
Tank heater contactor
Wash pump contactor
Rinse booster pump
Wash pump
Drain pump (by request)
Sanitizer dispenser (by request)
Detergent dispenser (by request)
Main switch
Door microswitch
Pressure switch
Start push button
Cycle select push button
Temperature select push button
Pressure switch for Brek Tank
Boiler heater safety thermostat
Boiler heater safety thermostat
Terminal block
Solenoid valve
Osmosis rinse solenoid valve (by request)
The Manufacturer takes no responsibility for any printing errors in this manual. The
Manufacturer reserves the right to modify products, if necessary, without changing
the main characteristics of the product.
39
STANDARD SETTING
900737
07-2011