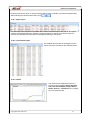
1
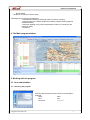
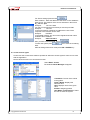
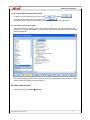
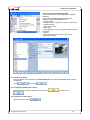
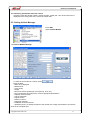
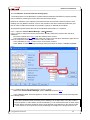
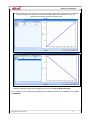
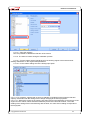
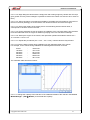
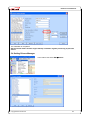
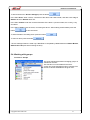
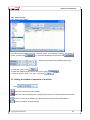
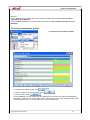
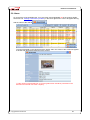
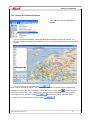
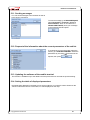
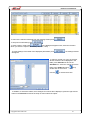
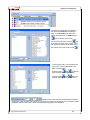
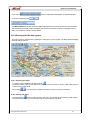
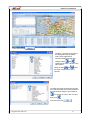
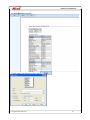
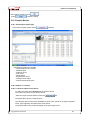
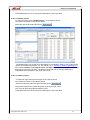
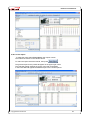
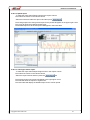
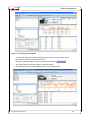
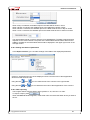
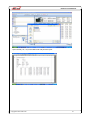
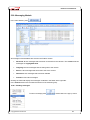
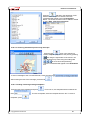
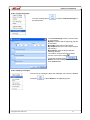
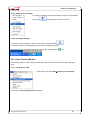
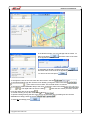
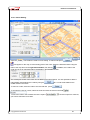
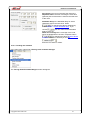
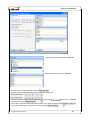
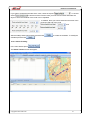
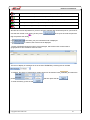
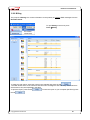
RCN-Conti 31 Elizabetes street, LV-1010 Riga, Latvia Tel: +37167505357; Fax: +37167505358 The NaviFleet™ Client User manual Version Date Technical support 4.46 10.08.2009 [email protected] Reproduction of this document in favor of the third parties is not allowed unless pre-agreed with the author Copyright© 2007 RCN-Conti NaviFleet Client Manual Contents 1. 2. 3. 4. 5. 5.1. 5.1.1. 5.1.2. 5.1.2.1. 5.1.2.2. 5.2. 5.2.1. 5.2.2. 5.2.3. 5.2.4. 5.3. 5.3.1. 5.4. 5.5. 5.5.1. 5.5.2. 5.6. 5.6.1. 5.7. 5.8. 5.9. 5.10. 5.11. 5.12. 5.13. 5.14. 5.15. 5.15.1. 5.15.2. 5.15.3. 5.15.4. 5.15.5 5.16. 5.17. 5.17.1. 5.17.2. 5.17.3 5.17.4 5.17.5. 5.17.6. 5.17.6.1. 5.18. 5.18.1. 5.18.2. 5.18.3. Introduction The general structure of the system Description of the system Main program window Working with the program User authorization Entering the program Access rights Adding/Removing /Editing user‟s data Setting user access rights Working with vehicles Adding vehicles Editing vehicles Removing vehicles Entering vehicle data Vehicle manager settings Calibration of the fuel tank (the analog input) Working with groups Forwarding Manager Setting the manager Setting rules Map manager access rights (Map manager) Click counter Vehicle mode of operation settings Setting event/cause profiles Alarm alerts Setting Points of Interest Sending messages Requesting information on the current parameters of the vehicle Updating the software Setting the table of displayed parameters Working with the map system Zooming maps Relocation of maps Centering Deleting data from maps Google Map Outbox Module (Outgoing messages) Working with routes Setting Routes Setting tables of parameters Configuring routes Exporting Data Deleting data (available for admin) Route Setting in the TRACKING module Route Setting for the last 24 hours Analysis Module Stops Report Detailed report charts Copyright© 2007 RCN-Conti Page 4 4 5 7 8 8 8 8 9 9 10 10 11 11 11 11 12 16 17 18 19 19 20 21 22 23 24 25 25 25 25 28 28 28 29 29 29 30 31 31 31 33 33 33 33 33 35 36 36 36 2 NaviFleet Client Manual 5.18.4. 5.18.5. 5.18.6. 5.19. 5.19.1. 5.19.2. 5.19.2.1 5.19.2.2. 5.19.2.3. 5.19.2.4. 5.19.2.5. 5.19.2.6. 5.19.2.7. 5.19.2.8. 5.19.3. 5.19.4. 5.19.5 5.20. 5.20.1. 5.20.2. 5.20.3. 5.20.3.1. 5.20.3.2. 5.20.4. 5.20.5. 5.20.6. 5.20.7. 5.20.8. 5.21. 5.21.1. 5.21.2. 5.21.3. 5.21.4. 5.22. 5.23. 5.23.1. 5.23.2. 5.23.3. 5.24. 6. 7. 8. Map Summary report Printing reports Report Module Selecting the report type Single vehicle report General report on the vehicle Detailed report Distance report Fuel report Speed report Engine hours report Analog input Reports Vehicle fleet report Choosing the report period Setting tables of parameters Data exporting Messaging Module Sending messages Selecting recipient(s) Choosing destination point Choosing destination point using the Point of Interest (POI) Choosing destination point using maps Creating /removing message templates Finding messages Deleting messages Replying to messages Printing messages Route Tracking Module Creating routes Route Setting Creating schedules Route tracking Billing Finding vehicles Searching Around a Point of Interest; Searching Around the nearest vehicle; Searching Around a GEO point Vehicle Lookup Program settings Minimal system requirements Program installation Copyright © 2007 RCN-Conti 37 37 37 39 39 39 39 40 40 41 41 42 42 43 44 44 46 47 47 47 48 48 48 48 49 49 50 50 51 51 53 54 56 59 60 60 60 61 62 63 64 64 3 NaviFleet Client Manual 1. Introduction The NaviFleet™ is a hardware and software Complex of automatic locating and dispatching system for management of the fleet of vehicles. The system makes it possible for the dispatcher to monitor the movement of vehicles in real time, to receive the data regarding the condition of the vehicle, alerts on activation of the alarm button, notifications if an on-board sensor is activated, and conduct the company‟s fleet management in real time. Introduction of the NaviFleet™ telematics and monitoring system will help: Increase efficacy of operation the dispatcher services Reduce transportation costs Increase transportation safety Exclude the unauthorized usage of vehicles Dramatically improve the system of freight tracking and forwarding Improve the quality of the transportation services for the clients Get the effective tools for analysis of work of the drivers and vehicles of the company 2. The general structure of the system. Copyright© 2007 RCN-Conti 4 NaviFleet Client Manual 3. Description of the system The purpose of the system is controlling and monitoring the motion of the fleet of vehicles. The system makes it possible to receive information regarding the location and condition of vehicles. The data is then processed and analyzed by the dispatcher center, which monitors the motion of vehicles and, if necessary, controls the actuators of the vehicle. The system launches the fleet of vehicle management to a distinctively new level. You gain the possibility at any moment to determine the location of the vehicle, as well as her speed, direction of motion and receive the data from various sensors onboard the vehicle. The system opens up wide prospects regarding the vehicle safety. In particular, it is possible to equip the vehicle with an alarm button to call the quick reaction subdivision in case of emergency. The system allows by a command from the dispatcher center to activate the security systems of the vehicle (e.g. listen to what‟s going on in the driver's cab or passenger compartment; shutdown the engine, lock the doors, etc). You gain the unique methods for route optimization, either on the fly, by direct management from the dispatcher center, taking into account changes of the situation on the road, or by utilizing the accumulated statistical data for the frequently repeated routes. In addition, you can plan the route of the vehicle and receive alerts whenever violations, such as unscheduled stops, deviations from the route, etc, occur. As a result, you get an up-to-date dispatcher system, which will help you most effectively manage the fleet of vehicles and quickly react to various changes and contingencies of the road situation. The system helps considerably reduce the costs of management of the fleet of vehicles, increase overall operational efficiencies, improve the quality of service rendered to the clients and, as a result, increase the ROI of your company. The principles of operation of the system are based on the advanced technologies of the satellite positioning system, the GPS and the GSM/GPRS mobile connection. The vehicle is equipped with an on-board terminal with a GSM/GPRS/GPS module. The on-board terminal determines the coordinates of the vehicle and sends those to the dispatcher center. Tracking a vehicle‟s location can be done either on request of the operator or at certain prescheduled time intervals. All information sent from the mobile terminal immediately enters your dispatcher center (computer), and such an arrangement of data transfer guarantees both confidentiality and the high-speed information exchange. The system consists of the following components: The dispatcher application, the NaviFleet Client Mobile equipment It is possible to employ three different mobile data terminals. - NaviTrac™ is the efficient solution for monitoring - NaviFleet™ is the Smart Telematics Terminal Complex - Mambo55 is the Personal monitoring. The General functions of the program Monitoring - Displaying objects in real time on the digital map - Working in either GPRS or SMS mode - Vehicle location tracking on request of the dispatcher - Vehicle location tracking over time intervals. - Vehicle location tracking over the covered distance intervals. - Time-and-cost effective sending data on 24 locations in one SMS message Copyright © 2007 RCN-Conti 5 NaviFleet Client Manual - Monitoring over arrival of the vehicle to a user defined location (settings can include 10 circles) Control over the vehicle‟s departure of the defined location (settings can include 10 circles) Notification whenever vehicles exceed a defined maximum speed. Sending messages in case of failure of the main power supply source. Remote configuration of the mobile equipment. When the main power supply is on sending notifications on switching on/off, resuming. Saving mode of operation with the turned off ignition of the vehicle (the vehicle is not moving), no information is being sent from her. Permanent control over the GPRS connection and re-establishing broken connection. The Fleet of vehicles management allows you to: - Send and receive text messages and other information - Receive notifications if a vehicle remains stopped for longer than a defined time. Stop/parking time control - Control over the status of the doors of the vehicle (driver‟s/ passenger‟s door opened/closed) - Receive notifications on vehicle status: arrived at a location; available, received order, etc. - Receive the total-covered-distance reports using the GPS receiver and built-in odometer. - request and receive information from the on-board computer of the vehicle (mileage, consumed fuel, engine „s increased RPM operation time, engine temperature, etc.) (Pertains to vehicles from certain manufacturers) - Receive information on the fuel (condition of the fuel tank, discharge and refill of fuel along with notification on location where it happened) - Program three speed-dial numbers on the fly for establishing voice communication with drivers. - Listen to what is going on inside the vehicle cabin on request. - Assign priority to incoming messages (important, regular, and etc.) - Receive sound notifications on incoming messages with the message status color distinction - Archive incoming data to review it later by selecting the vehicle and the time interval - Compilation of various forms/kinds of reports. Safety/security functions - Possibility for the driver to send SOS signals - Receiving alerts if the security devices or alarms are triggered. - Automated switching to vehicle tracking mode should signal be received - Remote disabling of the vehicle engine - Receiving alarm signal from the radio button - Permanent control over presence of connection with the vehicle. The operator is immediately alerted about connection failure (or jamming). Functions for multiple users - Users access rights configuration (certain vehicles, granting certain rights, system configuration, etc.) - Working with vehicle groups - Authorization of the user (name of the user and password) - Configuration of the vehicle (number, model, color, year of production, capacity of the fuel tank, etc.) Cartography data - Displaying objects on the map - digital and bitmapped maps support - Working with the MS Map Point 2002, 2006, MS Map Point WEB Service, Google Maps, Virtual Earth - Configuration of data of the displayed object (coordinates, name, color, direction of motion, etc) - Map scaling - optional use of the cartography module to insert various digital maps on request of the customer use of the cartography server for the Internet applications Copyright© 2007 RCN-Conti 6 NaviFleet Client Manual Route Setting - Display of the Points of Interest (POI) Passenger fleet of vehicles management - Automated accounting of passenger traffic (incoming, outgoing) - Data exporting to the PIKAS graphical schedules program (PIKAS graphical schedules Editor) - Real-time updating of the public transportation routes for accounting of the passenger traffic. - monitoring 4. The Main program window 5. Working with the program 5.1. User authorization 5.1.1. Entering the program Launch the NaviFleet program Enter the data received from the vendor for authorization: Example: Client: client User: user Password: ***********" Copyright © 2007 RCN-Conti 7 NaviFleet Client Manual For Server settings press the tab Enter <Name >. Enter the address of the server in the <Address> field. Server. The address of the server should be in the format IP_ address: port. Example: 127.0.0.1:7080 You may not specify the port should you use the port 7080. Example: 127.0.0.1 In the local network, instead of IP address the name of the computer in the network can be used. Example: NAVISAT In the global network, you can use the registered domain name instead of the IP address. Example: www.navisat.lv After you have entered all data, press . To enter the system press , then enter the remaining data. After all settings have been made press OK or ENTER key 5.1.2. User access rights Control over the access levels makes it possible to define the access rights for each user to work with the application. Not all clients and users can access the function. Select Edit Clients The window Clients Manager will appear. Customers: The list of the clients in the system. Client’s Name: Displays the selected client User: Displays users of the given client Profiles: assigning profiles User Name and Password: to allow the user to enter the system Copyright© 2007 RCN-Conti 8 NaviFleet Client Manual 5.1.2.1. Addition/Removal/Editing user data To add a new name enter the new name, click and then . To remove a name select the user‟s name, click . The definite access rights to the functions of the program can be given to each user. 5.1.2.2. Setting user access rights Each of the users the system Profile is assigned or created anew. The list of operations and modules of the system accessible for users is created by checking the squares in the accessible Profile privileges list. The profile privileges determine how users can work with the program and to limit their access to certain functions and windows of the program. 5.2. Work with vehicles In the main menu, select Edit Vehicles Copyright © 2007 RCN-Conti 9 NaviFleet Client Manual The settings allow entering the data - Name of the vehicle (to be displayed in program modules) - Model of the installed equipment (NaviTrac, NaviFleet, NaviFleet-GlobalStar, etc.) - Vehicle model - Garage number (it may be the same as the name) - Chassis number - Color of the vehicle - Model year - Color (displaying colors in program modules and on the maps) - Notices - View (a picture or photo of the vehicle to be displayed in reports) 5.2.1. Adding a vehicle Enter the Name of the vehicle in the Vehicle Manager, this name will be displayed and used in the program. Press , then press 5.2.2. Changing (editing) the vehicle Select the vehicle from the vehicles list. Then press and then press 5.2.3. Removal of the vehicle Select the vehicle, press Copyright© 2007 RCN-Conti . 10 NaviFleet Client Manual 5.2.4. Entering information about the vehicle If required, enter the garage number, chassis number, model year, color of the vehicle to be displayed on the map, photo of the vehicle and other data. 5.3. Setting Vehicle Manager Press Edit Select Vehicle Models The Vehicle Models Manager To enter the new model of a vehicle, press . Enter the data: - Name to be displayed - Manufacturer - Type, model - Length - Kind of the vehicle (passenger (conveyance), truck, etc.) - Fuel consumption according to the vehicle‟s passport specifications - Capacity of the fuel tank - Year of production - Engine volume - Number of doors - Passenger capacity - Calibration of the fuel sensor - upload the photo. To display the photo of the vehicle click „image‟ and browse to choose the photo in the computer files. Copyright © 2007 RCN-Conti 11 NaviFleet Client Manual 5.3.1. Calibration of the fuel tank (the analog input) The analog sensors of the NaviFleet™ systems with the NaviFleet Client/Server program package can be utilized for metering the level of fuel in the tank of the vehicle. Because of variations in the capacity of fuel tanks and the wear and tear of the fuel sensors, their readings can vary different vehicles, even for the vehicles of the same model and production year; thus in order to obtain the true data it is necessary to gauge or calibrate the fuel tanks. All operations specified below are true for the NaviFleet Client 2006 v.4.3. software. 5.3.1.1. Open the “Vehicle Model Manager ” (Edit Models) 5.3.1.2. Create or select from the list (if it has been already created) the model of the vehicle for calibration. Fill out the outlined area 1 (fig. 1) with the real data of the vehicle In the outlined area 2 (fig. 1), instead of the true volume of the fuel tank, indicate the upper limit of scale of measurement the analog sensor the value of 4095 units. In the outlined area 3 (fig. 1) select “Liters” from the list of values Press “Save” to save the changes and begin setting the values of Sensor 1 “Sensor 1 values ” Fig 1 5.3.1.3. Setting value to the analog sensor 1 (sensor 1 value) While in the Vehicle Models Manager, press “Calibrate” at area 3 (fig. 1). In the calibration table, which will appear on screen, set the extreme values of the metering limits of the analog sensor. Attention! It should be pointed out that the analog sensor readings can change either in the direct OR the inverse proportion. In other words, the sensor indicating “0” can mean that the tank is either empty OR full. Which proportion should be used in each particular case depends on the specific model of the vehicle; it can only be found out by measuring the voltage on the analog sensor for an Copyright© 2007 RCN-Conti 12 NaviFleet Client Manual empty tank and then for a full tank. If the sensor voltage is lower for an empty tank in comparison with that measured for a full tank, then the direct proportion should be used, see Fig. 2.1, otherwise the inverse proportion should be used Fig.2.2 Fig 2.1 Fig 2.2 Save the Calibration table (click the OK tab) and close the “Vehicle Models Manager” 5.3.1.4. Assign the just-created-vehicle-model with its calibration profile to the calibrated vehicle (Edit VEHICLES). Copyright © 2007 RCN-Conti 13 NaviFleet Client Manual 5.3.1.4.1. Save the changes. Now it is possible to calibrate the fuel tank of the vehicle. 5.3.1.5. The order of actions during the calibration process: 5.3.1.5.1. For the vehicle set the interval timer for the working engine each minute and set sending notifications on the engine startup/shutdown. 5.3.1.5.2. In the vehicle settings check the analog input option. 5.3.1.5.3. For example, suppose that we have to calibrate a hypothetical vehicle with the fuel tank capacity of 500 liters with the analog sensor voltage changing in the direct proportion: 5.3.1.5.3.1. Start up the engine of the vehicle, then after receiving the notification on the start up of the engine from the vehicle, which should be followed by arrival of the first interval timer, record the reading of the analog sensor received along with the timer; the value of this reading corresponds to the empty tank. Copyright© 2007 RCN-Conti 14 NaviFleet Client Manual 5.3.1.5.3.2. Begin filling the vehicle with the empty tank and working engine by 100-liter lots of fuel (to get a greater accuracy of the readings it is possible to reduce the volume of a fuel lot to 50 or even 20 liters) 5.3.1.5.3.3. After every filling, to exclude the possibility of a mistake due to fluctuations of the level of the fuel in the tank (shaking), we should wait for 3-5 minutes and then shut down the engine. 5.3.1.5.3.4. Record the reading of the analog sensor received along with the interval timer; it corresponds to 100 liters of fuel in the tank. 5.3.1.5.3.5. Engine shutdown serves as signal to the calibrator of the computer that the first 100 liters have been filled and when the engine is restarted, pumping of the next 100-liter lot will begin. 5.3.1.5.3.6. Start up the engine of the vehicle, and repeat the operation described in articles 5.3.1. ;5.3.2. and 5.3.1. thru 5.3.4. 5.3.1.5.3.7. Repeat the procedures (5.3.1.5.3.2. – 5.3.1.5.3.6.) until the vehicle is fully refueled. 5.3.1.5.6. Enter the data received during calibration into the calibration table of the vehicle. For example, for the vehicle during calibration the following data have been received: 0 liters 100 liters 200 liters 300 liters 400 liters 500 liters - 1025 units 1541 units 2014 units 2488 units 2900 units 3611 units The calibration table will look as follows: 5.3.1.5.7. Change the capacity of the fuel tank of the calibrated models of the vehicle in the Vehicle Model Manager ” (Edit Models) to the actual tank capacity: Copyright © 2007 RCN-Conti 15 NaviFleet Client Manual The calibration is completed. Set the interval timers and the engine startup / shutdown signals processing to previous values. 5.4 Setting Drivers Manager In the main menu select EditDrivers Copyright© 2007 RCN-Conti 16 NaviFleet Client Manual To add a new driver in Drivers manager press the button . In the field "Driver" enter a name, a surname of the driver and a date of birth, and also enter a key of iButton device or Garmin Driver ID*. In the field "Contact" enter the contact information of the driver: a phone number, the country, a city and street. In the field of "Note" enter the notes, concerning this driver. After entering all information press the button , to save this driver. To edit information of existing driver press the button To remove driver press the button . . * Drivers manager feature is used only if NaviFleet is completed by additional devices Dallas iButton, Garmin Nuvi 750 (with driver tracking function) 5.4. Working with groups Click Edit Groups The group management allows arranging groups of vehicles for the user. This function is not accessible for all users. A user can create separate groups of vehicles from the list of vehicles available for the given user. Copyright © 2007 RCN-Conti 17 NaviFleet Client Manual Using the tabs and select vehicles available for the group. 5.5. Forwarding manager Forwarding manager makes it possible to receive information (timers, alarm, can data, etc) from the vehicle at the pre-scheduled time on the cell phone (SMS) and /or e-mail. To open the Forwarding manager, in the main menu select Edit Forwarding manager Copyright© 2007 RCN-Conti 18 NaviFleet Client Manual 5.5.1. Creating the manager Add the vehicle in the <Vehicle Manager > see article 5.2. Working with vehicles. In the vehicle settings, enter the Number where the SMS messages are to be received. Enter the phone number in the Vehicle Settings Connection Request Number. While in Vehicle Settings enter the email address where the electronic messages are to be received. Enter the email address while in Vehicle Settings Connection Sim card ID. To receive SMS messages select the SMS driver. To receive email messages select the SMTP driver. Selecting driver can be done in Vehicle Settings Connection BaseSending through driver. Save the settings by pressing . See article 5.7. Setting the mode of work of the vehicle. Also, see the Technical description of the Navifleet and NaviTrac. Copyright © 2007 RCN-Conti 19 NaviFleet Client Manual 5.5.2. Creating the rule. In the Managers column select vehicle manager and press , in the right corner will appear a new field (record) of the rule. In the Vehicle column, select the vehicles to observe the rule. To remove the rule, press . Selecting settings. Access code: access code Selection of schedule : selection of schedule (Each day, Working days, Days off, Other time) the Schedule : the selected days in the schedule are shown (where Х is the selected day, О is the not-selected day) Message text filter means the messages will be send on matching with the text of the message Send all messages: if the square is checked , all messages will be readdressed. If the square is not checked , then only text messages will be readdressed. Rule active– activate the rule. To save the settings press . Notice: before saving the settings, make sure the selected vehicle is selected from the list of Vehicles. Copyright© 2007 RCN-Conti 20 NaviFleet Client Manual 5.6. The rights of access to the Map manager. In the main menu, select Edit The rights of access to the Map manager. To access the MapPoint Web service, select «Web services » and press the tab . Select the client in the field Client ID. Select the user in the field User ID. Enter your login in the field Services login (for login request your dealer). Enter the password in the field Services Password (request your dealer for the password). Select Environment (Staging is the free test environment with limited speed and number of transactions (clicks), Production is the working environment with no limitations. The Production environment is not free. Ask your dealer) Check the square in Account Active to activate the profile. After entering all data, press To remove a profile press Copyright © 2007 RCN-Conti 21 NaviFleet Client Manual 5.6.1. Clicks counter. In the menu, select Clicks. In the list of groups, select the group or several groups, by checking the square groups, press the tab . To select all . To cancel all selected groups press the tab . Select the report period by setting the time range. To make the report, press . To make the detailed report (users of one group) check To save the report in a file (. xls,. html,. csv) press . 5.7. Setting the modes of operation of a vehicle. Press Button is to save the program settings. button is to save the settings in the program and send them to the onboard terminal device. button is to copy all the settings (except the request number and the SIM card ID). button is to paste the copied settings. Copyright© 2007 RCN-Conti 22 NaviFleet Client Manual NOTICE: For the detailed technical description of the NaviTrac, please see the manual The Technical description of the NaviTrac. For the detailed description of the NaviFleet, see the manual The Technical description of the NaviFleet. 5.8. Setting event/reason profiles In the Edit tab select Reason profiles To create a new reason profile, press To make changes in the current profile, press . . To remove profile, press . For each Reason you can change the color distinction of the event in the table of the displayed parameters. There are four colors: white, green, yellow and red. The colors are positioned in order of their significance (0 = of no significance, 3 = the most significant). Copyright © 2007 RCN-Conti 23 NaviFleet Client Manual 5.9. Alarm On occurrence of the ALARM event (or of any other event highlighted red in the reasons profile, see article 5.8. «Setting event/reason profiles») in the lower right screen corner will appear the tag with the name of the vehicle . To find out the data on the vehicle press the shield and in the center of the screen will appear a window with all the data pertaining to the vehicle. Further actions of the dispatcher on receiving alarm alert should be prescribed in the directions for internal use of the company. Copyright© 2007 RCN-Conti 24 NaviFleet Client Manual 5.10. Setting the Points of Interest In the Edit menu select The Point of Interest The Points of Interest facilitate viewing the tables and analyzing the motion of vehicles. The program computes and displays the distance from the received coordinates to the nearest Point of Interest To enter a new Point of Interest press Enter name of the Point of Interest. The coordinates of the Point of Interest can be entered either manually or by using the map. To enter the coordinates from the map, press , move the mouse pointer to the center of the zone; pressing the right mouse button will display the Point of Interest. To change the Point of Interest press and repeat the above-described actions. To remove of the point select the Point and press Copyright © 2007 RCN-Conti 25 NaviFleet Client Manual 5.11. Sending messages You can send messages to the terminal as well as to the driver‟s cell phone. To send a message go to SEND MESSAGE, select Destination (Terminal or Driver’s Phone Number, which is recorded in the VEHICLE SETTINGS), enter your message in the message field and press 5.12. Request of the information about the current parameters of the vehicle To request the current information about the vehicle, go to STATUS REQUEST. Select the parameters by checking to determine the request, then press . 5.13. Updating the software of the mobile terminal The function is available only to the dealers and the personnel who received the special training. 5.14. Setting the table of displayed parameters the Parameters displayed in the table can be set according to your specific needs. Whenever the vehicle is selected in the line of the table, it is also displayed on the map. Copyright© 2007 RCN-Conti 26 NaviFleet Client Manual To remove the selected message from the message folder press To stop sound notification press To save events in a file press . In the dialog that appears next, select the format in which you want the report to be saved ( .xls; .csv; .html). To make settings of the table of the displayed parameters press will appear , the settings window To select a vehicle or a group of vehicles, whose events are to be displayed in the table, press Vehicles tab and in the Available list select the vehicle and move them to the Visible list using double click of the mouse. Use the or by to reverse the action. In addition, to select the vehicle, the messages from which will be displayed, press the right mouse button in the Vehicles list and in the drop out menu select the option: Copyright © 2007 RCN-Conti 27 NaviFleet Client Manual To select the events to be displayed in the table press Reasons for sending alert. In the Available, list select the events and drag them to Visible list by or by a double mouse click. For the reversed action, use the tab. If you want to select more events, press the left mouse button on the list to scroll up or down, then use the arrow tab . In the Columns tab, you can define the type of the columns displayed in the table and their order. Using the tabs and create the list of columns in the right window. Using the tabs and define the order of appearance of the columns settings to show the events occurred within the period to display the last events in the system. For example, the events for the last 5 hours 0 minutes will be displayed while the rest of the events are hidden and exported to the database. Copyright© 2007 RCN-Conti 28 NaviFleet Client Manual If you check then the map will be displayed in a separate window. To save the settings press the LAST EVENTS in the left corner the tables indicates that since the last time the client program was launched (accessed) 13423 messages arrived into the system of which 0 is displayed in the table, in accordance with the chosen criteria. 5.15. Working with the map system. The map system is supplied with a package of maps upon user‟s request. The Main window displays the map with the tab bar. 5.15.1. Zooming the maps To display a more detailed map press the tab Press and hold the left mouse button and with the mouse pointer on screen outline the area you want to see in more detail. By pressing , you can zoom in (higher resolution) or zoom out (lower resolution). 5.15.2. Moving the maps Press the button and move the pointer to the map, you will see the icon (hand). While holding the left mouse button, you can move the map to the necessary map area. Copyright © 2007 RCN-Conti 29 NaviFleet Client Manual 5.15.3. Centering Press . Then move the pointer to the point, which you select to be the center then press the left mouse button. of the map, 5.15.4. Removal of the information on a map Pressing the tab removes all vehicles information from the map 5.15.5. Google Map To display the location on the Google map, press the right mouse button on the message containing the coordinates you are looking for coordinates in section EVENTS and in the menu select Show on Google Map. Then the Map Viewer will open up in the Internet Explorer showing the point. To change the mode, scale and position of the maps use the built-in tools of the maps. Copyright© 2007 RCN-Conti 30 NaviFleet Client Manual 5.16. Outbox Module (Outgoing messages) To work with the window OUTBOX press the tab The Module makes it possible to display the message sending process. Yellow Wait sending Green Sending in progress Red – Sending failed To export messages into the Excel format press To view the details of the message on (the packets sent), select the message and press In addition, in the window you can manage messages using the tabs (accessible for the administrator): Resend; Copyright © 2007 RCN-Conti Cancel sending; Hide the message; Refresh screen 31 NaviFleet Client Manual 5.17. Working with routes To work with the Routes Module press the tab . 5.17.1. Route Setting Select the vehicle. In the Routes select the time interval to show the route of motion Then press As a result, the route will be displayed on the map while all events for the chosen period will be displayed in the table. Select the event of interest in the table and its location will appear on the map of the route. 5.17.2. Setting the tables of parameters Copyright© 2007 RCN-Conti 32 NaviFleet Client Manual Then press the tab Columns – determines the type of the displayed columns and the order of their appearance whichever better suits the user. Using the tabs and create the list of the columns in the right window. Using the tabs and define the order of appearance of the columns To select the events by which the records to be selected mark the event and add it to the right window using the arrow buttons . To remove an event, click on it and then press Then press the tab Copyright © 2007 RCN-Conti 33 NaviFleet Client Manual 5.17.3. Configuration of the route - Displays the route without showing the position on the actual road - Displays the route and shows the position on the actual road (it works only with the MapPoint). - A displays only incoming message, the route is not shown. Clicking a message will show the displays coordinates on the map (highlighted blue in the table) - Displays all outgoing messages for the chosen period (highlighted pink in the table). 5.17.4. Data exporting. To export data of the route by the selected criteria into an. xls,*. html or .csv file, press to save it. 5.17.5. Removing data (accessible to the administrator) To remove messages from the database select the message and press 5.17.6. Route Setting in TRACKING module While in the TRACKING module press the right mouse button on the message in the EVENTS section and select Show Vehicle Route in the menu. The route will be created point-to- point using all the points displayed in the EVENTS section. 5.17.6.1. Route Setting for the last 24 hours (TRACKING module) Copyright© 2007 RCN-Conti 34 NaviFleet Client Manual While in TRACKING module press the right mouse button on the vehicles in the VEHICLE section and in the menu select Show Vehicle Route for the last 24 hours. The route for the last 24 hours window will appear displaying the route of the vehicle. Copyright © 2007 RCN-Conti 35 NaviFleet Client Manual 5.18. The Analysis Module In the main window Press To create а report, press . . The New Report window will appear. Select the vehicle from the list of Vehicles. Select the date of the report in the Data field. You can select the date of the report using the calendar, by marking and choosing the date of the Copyright© 2007 RCN-Conti 36 NaviFleet Client Manual beginning/ end of the report, or select a specific date (Today, Yesterday, Current/Last week/month). After selecting the vehicle and the date, press . 5.18.1. Stops report. The Start/Stop report contains the detailed data on the motion and stops of the vehicle. The report contains the data indicating time, distance, speed and Points of Interest (POI). When stops are selected, the detailed report will show all messages pertaining to the period. 5.18.2. The Detailed report. The detailed report shows all messages from the vehicle arrived to the base for the selected period. 5.18.3. Charts. The chart section displays the lines for a chosen period indicating: Speed, Distance, Fuel, Fuel Consumption, Engine Hours, Refills, Sensor 1, and Sensor 2. To display the curve press the tab. Copyright © 2007 RCN-Conti 37 NaviFleet Client Manual 5.18.4. The Map. The Map section shows the entire route covered for the selected period. Stops are indicated by the icon. 5.18.5. Summary report The Summary report section contains all data for a selected period. There are 6 sections in the final report: General: contains the general data on the covered route for a selected period. CAN report contain the CAN data (distance, fuel, engine hours) for a selected period? Sensors report contains the analogue sensor data. Analog 1 refuels the time and the amount of the filled fuel in liters. GPS report contains GPS data Reasons why notifications have been sent 5.18.6. Printing reports. To print the report, press the tab Copyright© 2007 RCN-Conti . 38 NaviFleet Client Manual The Print Manager will appear. To setup pages and select the printer, press Copyright © 2007 RCN-Conti . 39 NaviFleet Client Manual After setting up pages, press Press . to print the report. 5.19. Reports Module 5.19.1. Selecting the report type In the main program window select (reports) The following reports are possible - General report on the vehicle - Detailed report - Distance report - Fuel report - Speed report - Engine hours report - Analog sensors report - General vehicle fleet report 5.19.2. Report on a vehicle 5.19.2.1. General report on the vehicle To make the report select Overview in the reports column Then select the vehicle in the vehicle column Select the report interval and then press the tab The figure above shows a sample report. The left upper panel of the report will display a photo of the vehicle or its graphic depiction, name, type, beginning /end date of the report period. The general data for the period will appear in the upper right corner. Copyright© 2007 RCN-Conti 40 NaviFleet Client Manual The detailed report for the chosen period will appear in the lower table 5.19.2.2. Detailed reports To make the report select <Detailed report > in the reports column Then select the vehicle in the vehicle column Select the report interval and then press The detailed report can contain such information as: coordinates, distance, fuel, engine hours, speed, the nearest Interest Point, etc. See article 5.19.4. «Setting the tables of parameters ») The columns Distance, Fuel, Engine hours and Stops Time display the data pertaining to the period from one event to another. The data for the period and the average data for the intermediate interval appear in the upper right corner. 5.19.2.3. Distance report To make the report select general report in the reports column Then select the vehicle in the vehicle column Select the interval to make the report and then press . The general report for the period will appear in the upper right corner The curve will show the graphical distance report The detailed report for the chosen period will appear in the lower table. Copyright © 2007 RCN-Conti 41 NaviFleet Client Manual 5.19.2.4. Fuel report To make the report select Fuel report in the reports column Then select the vehicle in the vehicle column To make the report select the interval, then press The general report for the period will appear in the upper right corner The chart will appear showing the report of the fuel consumption In the lower table will appear the detailed report for the chosen period Copyright© 2007 RCN-Conti 42 NaviFleet Client Manual 5.19.2.5. Speed report To make the report select Report speed in the reports column Then select the vehicle in the vehicle column Select the interval to make the report а and then press The average speed of motion general report for the period will appear in the upper right corner The curve will show the graphical speed report The detailed report for the chosen period will appear in the lower table 5.19.2.6. The Engine hours report. To make the report select Report Engine hours in the reports column Then select the vehicle in the vehicle column Select the report interval and then press the tab The general engine hours report will appear in the right upper corner The chart will show the report on engine hours. The lower table will display the detailed report for the chosen period. Copyright © 2007 RCN-Conti 43 NaviFleet Client Manual 5.19.2.7. The analog sensor Report To make the report select Report Analog sensors sensor 1 in the reports column Then select the vehicle in the vehicle column Select the interval to make the report and then press the tab The analog sensor values/time graphic report will appear The table below will show the detailed report for the chosen period Copyright© 2007 RCN-Conti 44 NaviFleet Client Manual 5.19.2.8. Vehicle fleet report To make the vehicle fleet report select <Overview> in the column vehicle fleet report. Then select the vehicles in the in the vehicle column; Select the period for making the report and then press 5.19.3. Selecting the report time period Report window. The report period can be set by: - The beginning date and the end date - The fixed time interval by setting the start time To set the fixed interval check Copyright © 2007 RCN-Conti and select from the list 45 NaviFleet Client Manual When <Day> is selected, the detailed report in the table will be shown in hours When <Week> is selected, the detailed report in the table will be shown in days When <Month> is selected, the detailed report in the table will be shown in days or weeks When <Year> is selected, the detailed report in the table will be shown in weeks or months The intermediate interval is used to show the more detailed data. The data to appear directly depends on the chosen interval. The points of the intermediate interval will be shown and in addition, the data for the intermediate interval will be displayed in the upper right corner of the Average column. 5.19.4. Setting the tables of parameters In the Report columns, you can make settings of the table of the displayed parameters Columns – determines the type of the displayed columns and the order of their appearance whichever better suits the user. Using the tabs and Using the tabs and you can create the list of the columns in the right window. you can determine the order of their appearance of the columns 5.19.5. Data exporting The Program allows exporting data to other systems in. xls, html and. csv files. To export a report, press . When the Save As window appears, create a file name and select the folder where you want to save it. Copyright© 2007 RCN-Conti 46 NaviFleet Client Manual Open the file (.xls; .csv) in the MS Excel and print the report Copyright © 2007 RCN-Conti 47 NaviFleet Client Manual 5.20. Messaging Module In the main window, press . All messages of the database are stored in the Folders section. Received: all text messages that have been received from the vehicles. The unread received messages are highlighted bold. Outgoing: the text messages that are being sent to the vehicle. Sent: the text messages that have been sent to the vehicle. Deleted the text messages that have been deleted Found the found text messages. Clicking the folder will display the messages contained in the folder at the right side. In the Contact section are recorded all vehicles of the selected group. 5.20.1. Sending messages. To send a message press Copyright© 2007 RCN-Conti or select New in the pop up menu. 48 NaviFleet Client Manual 5.20.2. Selecting recipient(s). To choose the recipient press and in the opened Recipients window select the vehicle or vehicles by adding them to the Selected list using the tab or by double clicking the vehicle. After selecting the vehicle, press . 5.20.3. Choosing the destination point. 5.20.3.1. Choosing destination point using the Point of Interest (POI). Copyright © 2007 RCN-Conti 49 NaviFleet Client Manual Press the tab and in the appearing «POI» window select the point of Interest. Then the coordinates will appear in the line Destination. Notice: The Points of Interest can be added or edited by going Edit The Point of Interest. 5.20.3.2. Choosing destination points using the maps. Press the tab , then in the opened up window «Карта» (Map) select the point by pressing and using the right button of the mouse. You can adjust the map scale using the scaling tabs for more accurate positioning. Then the coordinates will appear in the Destination line. To send a message to the on-board terminal, check the square . After entering the text of the message, press the tab 5.20.4. Creating /removing message templates. Enter the text of the message and press field templates, press Copyright© 2007 RCN-Conti . From now on, this template will be located in the . To insert a template, select the template from the list. To remove . 50 NaviFleet Client Manual 5.20.5. Finding messages. To find а message press the popup menu. or select “Find the message” in In the Find message window, enter the data of the message. By date: enter the date of beginning and end of the search. By sender: enter name of the sender. By recipient: enter the name of the recipient (the vehicle). By message: enter the phrase that the message contains. To include or exclude the search criteria check or uncheck the square . To find the message press . Notice: all found messages would be located in the Found folder. 5.20.6. Deleting messages. From the list of messages, Select the messages you want to be deleted and press Copyright © 2007 RCN-Conti or press Delete in the appearing menu. 51 NaviFleet Client Manual 5.20.7. Replying to a message To reply the message select the message from the list of messages and press or press Reply in the pop up menu. 5.20.8. Printing messages. To print one of the messages, select the message and press the tab To print the entire list of messages press Print list in the appearing menu. On arrival of a new message to the base in the system tray appears the . icon. 5.21. Route Tracking Module The manager allows to plot or assign routes and to trace the motion of the object along the given route. 5.21.1. Creating the route. In the main menu select EditTracking route manager The window Tracking Route Editor will appear Copyright© 2007 RCN-Conti 52 NaviFleet Client Manual In the Routes window, you can manage and set routes. To add a route press in the appeared window and enter name of the route To duplicate the already created routes press and enter name of the route in the appearing window. To remove of the route press To change the name of the route enter the other name in the field To change deviations from the route the route „leeway‟) change the value in the field . The value is set in meters. The minimal value is 10 meters. To change the default allowable delay of the route, change the value in the fields . The digital value is set in the field , while the time values (seconds, minutes, hours and days) are set in the field . To create recurring or loop the route check in the To permit entering /leaving the time zone prior to the assigned time (not taking into account the allowable time delay) check the square To save all the settings press Copyright © 2007 RCN-Conti 53 NaviFleet Client Manual 5.21.2. Route Setting. Open the . The Nodes are used for route setting. To add a node press . An icon will appear on the map, it is the starting point of the route. Select the desired location using the tools of the map and use the right mouse button, first clicking . In addition, the nodes of the route can be set by manually setting coordinates in the Position section. The subsequent nodes of the route can be added in the same fashion. It is also possible to add the intermediate node between the nodes by using the middle between the nodes. To remove a node, select the node to be removed and press tab. a node will be added in the . To change the name of a node, select the node and enter the name in the field . To trace the route in the schedule check the square you want to add some more data: Copyright© 2007 RCN-Conti . Once this square is checked, 54 NaviFleet Client Manual Arrival time is the time of arrival at the node zone. Departure time is the time of leaving the node zone (optional). Each of the times is set from the start time of the route. Allowable delay is the allowable delay for arrival /departure to/from the node zone. When is selected the value is assigned by default Routes-> Default allowable delay. If you choose , the new value for the Allowable delay is to be set. Node area coverage is the coverage of the node, which arrival/departure has been completed. When is selected the values Routes->Route deviation is assumed. Should you choose , Enter the new value in meters. 5.21.3. Creating the schedule In the main menu, select EditTracing route schedule manager The Tracing Route Schedule Manger window will appear. Copyright © 2007 RCN-Conti 55 NaviFleet Client Manual Select the vehicle from the list of Vehicles Select the route from the list of Routes Enter the name of the schedule in the field Enter the time of beginning and the time of the end of the route: The time of the end of the route is entered for a cyclic route ( schedule of the route ( ). If you want to trace the route by the points of the route check the square If you want to trace the route by time, check the square Copyright© 2007 RCN-Conti ) and /or for a repeated 56 NaviFleet Client Manual If you want to repeat the schedule of the route, check the square . To do that select the end time of the route the route you want it to be traced and select the days on which the schedule of the route is to be repeated. In addition, there you want to select the local time of the beginning and end of the route and After all settings have been entered, press the tab schedule press the tab to create the schedule. To modify the . 5.21.4. Route Tracking In the main window press . The Route Tracker window will appear. Copyright © 2007 RCN-Conti 57 NaviFleet Client Manual The SCHEDULE displays all schedules with additional information. To select the schedule check the square at the schedule. The schedules can take various statuses: Waiting Waiting position waiting for a position Active Stopped the route tracking has been suspended. Finished Locally finished: the route has been finished locally. Should the schedule be incontinent with the actual route, notifications (events) will appear in the list of EVENTS and in the SCHEDULE list the current schedule is highlighted in different color. Press schedule with the right mouse button and in the drop out menu select to display the location where incontinency has occurred. By pressing Check event or Check all events, you thus check the event or all events. The next time only the next event will be displayed. The events can be caused by the following reasons: Geographical: points have been incontinent with the plotted route Time in: late arrival at the point of the route Time out: late departure from the point of the route Notice: whenever the point is incontinent with the plotted route (Geographical), the notifications arrive and the red point is displayed on the map until the vehicle goes in accordance with the plotted route, then the red point turns green on the map . On the map of the plotted route, the flags can assume the following values: Flag Description of values Normal state Arrived in time Failed to arrive in time The route has not been traced Arrived to the point in time, not departed the point yet Arrived to the point in due time, departed the point not in time Arrived to the point in due time, tracing from the point was suspended Copyright© 2007 RCN-Conti 58 NaviFleet Client Manual Has not arrived to the point in time, has not departed the point yet Has not arrived to the point in time, departed the point in time Has not arrived to the point in time, tracking from the point was suspended At the point tracing was suspended, departed the point in due time At the point tracing was suspended, departed the point not in time Should it be of minor importance to you as to how the vehicles gets around the point or you know for sure that the vehicle is not arriving in time press . Then upon arrival at the point the flag will possess the value If If is checked, your pre-scheduled route is displayed. is checked, the actual route is displayed. The list of EVENTS shows the history of all messages, which have been received due to geographical or time deviations from the route. The term of display of messages is set in the list of EVENTS by choosing time in the field In addition, the history of messages a certain period can be viewed. Press and select the period . To clear the history, press the tab Copyright © 2007 RCN-Conti and then press the tab . 59 NaviFleet Client Manual 5.22. Billing The purpose of Billing is to receive information on the quantity of outgoing SMS messages from the NaviFleet Client. To open Billing in the menu press Tools Billing To make a month report, select the month in the calendar and press the tab . The table shows which of the vehicles have been sent messages to and how many. If the client has several users, they are separated in the table. To print the report, press the tab the tab . To save the report on your computer (MS Excel) press . Copyright© 2007 RCN-Conti 60 NaviFleet Client Manual 5.23. Finding vehicles In the menu, select Tools Find vehicles. There are three ways to track down vehicles: - Around a Point of Interest; - Around the nearest vehicle; - Around a GEO point; 5.23.1. Around the Point of Interest search Select the Point of Interest from the list of the Points of Interest (see 5.10. Setting Points of Interest ) Select Accuracy (the time interval of the range of search) Select radius of search (km) Press 5.23.2. The around the vehicle search Select the vehicle from the list of vehicles Select Accuracy (the time interval of the range of search) Select search radius (km) Press Copyright © 2007 RCN-Conti 61 NaviFleet Client Manual In addition, the search can be conducted in the in MONITORING module. To do that click the right mouse button on any message of the vehicle in question in section EVENTS and in the menu select Find the closest vehicles by the name of the vehicle In addition, you can choose the search in the MONITORING module. To do that, press the right mouse button on the vehicles of your interest in section THE VEHICLES and in the menu select Find closest vehicles 5.23.3. Search around the GEO point Enter coordinates of the point or use the map to take them. To enter the coordinates using the map press the tab and move it to the center of the zone (area), then press the right mouse button and the point will be displayed. Select Accuracy (the time intervals of the search) Select search radius (km) Press Copyright© 2007 RCN-Conti 62 NaviFleet Client Manual In addition, searching can be made in the in MONITORING module. To do that, press the right mouse button on the message containing the coordinates you are looking for in the EVENTS section and in the menu select Find the nearest vehicles by point. Notice: In the vehicle table, the “Distance” field is colored according to the distance from the point. Green color means up to 10 km from the point, yellow color 10 to 50 km, red color 50 to 100 km and white color means 100 km and more. This rule pertains to all kinds of searches. 5.24. Vehicle Lookup IN the main menu select Tools Vehicle lookup The Vehicle Lookup option is designed to conduct searches for vehicles in the entire database and to display the main communication information. Searches can be conducted by the name of the vehicle, group, request number, drivers‟ phone number and the SIM card ID. To begin the search, in the lookup line enter one of the parameters of the search or a part of information and press . To print the report, press the tab (MS Excel) press the tab Copyright © 2007 RCN-Conti . To save the report on your computer . 63 NaviFleet Client Manual 6. Program settings To enter the Program settings, in the main menu select System Settings Ion the Appearance tab you can choose the language: English, Russian, Latvian, and switch on/off sound notification. Warning: Changes will take place after you restart the program! In the Map you can edit the icon of the vehicle to be displayed on the map in Tracking To do that, select a vehicle from the list of vehicles, then select the icon and press the tab. To change speed colors press Speed color. The points on the map will be displayed according to speed and the Speed field in the tables Warning: Changes will take place after you restart the program! To change measurement units press Measurement and select Metric (km) or Marine (miles) from the list box. Copyright© 2007 RCN-Conti 64 NaviFleet Client Manual 7. The Minimal system requirements OS: Win2000, WinXP. CDROM. PIII 1 GHz Processor. Minimal 512MB RAM. (1GB is better) 2 GB of available disk space on your hard drive. Connection to the Internet for remote connection. Network adapter. TCP/IP. Monitor resolution 1024*768 or higher. SVGA adapter with 16bit color support. USB port 8. Program installation Launch setup.exe from the Client directory Select the directory where you want the NaviFleet 2006 program to be installed Directory by default: C:\Program Files\RCN-Conti\Navifleet\Client2006\ Copyright © 2007 RCN-Conti 65 NaviFleet Client Manual Then press Enter the serial number AkisAx (request from your dealer) Enter the license number (ask your dealer) Copyright© 2007 RCN-Conti 66 NaviFleet Client Manual At the end of installation press Copyright © 2007 RCN-Conti 67