1
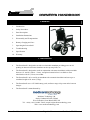
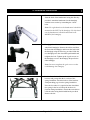
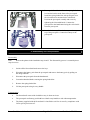
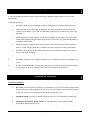
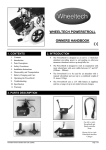
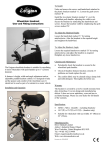
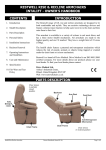
OWNER’S HANDBOOK
Contents
1.
Introduction
2.
Safety Procedures
3.
Parts Description
4.
Installation Instructions
5.
Disassembly and Transportation
6.
Battery Charging and Care
7.
Operating the PowerStroll
8.
Troubleshooting
9.
Specification
10.
Warranty
1. Introduction
•
The PowerStroll is designed as an aid to a wheelchair attendant providing power to aid
pushing in otherwise strenuous situations such as up steep hills, etc.
•
The PowerStroll is designed to work in conjunction with most wheelchairs with seat widths
between 16” and 20” (40cm – 50cm). An optional extension bar is available to fit to
wheelchairs with 22” (55cm) seat widths.
•
The PowerStroll is to be used by an attendant with a manual wheelchair and user up to a
combined weight of 21 stone (135kg).
•
The PowerStroll uses a 12V 20ah battery pack, and has a range of up to ten miles between
charges.
•
The PowerStroll is manufactured by:
Medicare Technology Ltd,
Ainley’s Industrial Estate, Elland,
West Yorkshire, Great Britain HX5 9JP.
Tel: +44 (0) 1422 314488 / Email: [email protected]
Web: www.medicaretechnology.com
PowerStroll Owner’s Handbook
Page 2 of 8
Part Code: Z24000
2. Safety Procedures
•
The PowerStroll must not be used solely by the wheelchair user under any circumstances.
•
Ensure the PowerStroll is installed as far to the rear of the wheelchair as is comfortable for the
attendant to do so.
•
Operate the PowerStroll at a speed that is both comfortable for the operator and wheelchair
user.
•
When connecting / disconnecting the battery from the motor or the charger make sure both the
power to the charger and PowerStroll handcontrol are switched off.
•
Ensure the PowerStroll is secured in transit. It is also recommended that the battery is
disconnected.
•
Ensure that the battery is charged only with the battery charger supplied with the PowerStroll.
Using another battery charger may cause damage or injury.
•
Be careful when installing the telescopic tubes. These are spring-loaded and may cause
damage or injury if caution is not taken when installing or removing these.
•
The PowerStroll should not be used when it is snowing or during heavy rain. This may cause
damage to the PowerStroll. The PowerStroll should not be exposed to damp conditions or
direct sunlight.
3. Parts Description
1. Powerpack
2. Battery Pack
3. Handcontrol
4. Handgrip
5. Wheelchair brackets
6. Spring loaded bar (telescopic)
7. Charger
8. Carry bag
9. Keys
10. Threaded knob
11. Allen keys
PowerStroll Owner’s Handbook
Page 3 of 8
Part Code: Z24000
4. Installation Instructions
1. Handcontrol Installation. Unscrew the 2 short bolts
from the back of the handcontrol using the allen key
provided. Attach the handcontrol to the handgrip
with the extra section by reattaching the 2 short
bolts.
Note: For right-hand use the handcontrol should be
mounted to the LEFT of the handgrip. For left-hand
use the handcontrol should be mounted to the
RIGHT of the handgrip.
2. Handgrip Installation. Remove the existing
wheelchair handgrips. Remove the rubber end from
the PowerStroll handgrips and loosen the bolt inside
the handgrip using the allen key provided. Slide the
new handgrip on to the wheelchair push handle and
retighten the bolt. Tighten up the 2 grub screws on
the handgrip to secure the handgrip. Repeat for the
other handgrip.
Note: Do not overtighten the grub screws as this
could damage the handgrip.
3. Bracket Installation. Unscrew both halves of the
brackets and put together the 2 sections of the
spring-loaded bar. Insert the halves of the brackets
with protruding pegs in to the spring-loaded bar.
Place the bar where it is required on the wheelchair
(the spring in the bar will keep the brackets in
position during installation). Attach the outer halves
of the brackets using the threaded knobs provided.
Remove the bar.
PowerStroll Owner’s Handbook
Page 4 of 8
Part Code: Z24000
4. Powerpack Installation. Insert the spring-loaded
bar into the bracket at the front of the powerpack.
Install the spring-loaded bar with powerpack on to
the 2 brackets now mounted to the wheelchair.
Position the powerpack centrally and secure by
tightening the 2 threaded knobs. Connect the
powerpack to the handcontrol using the coiled cable
from the powerpack.
5. Install the battery. Place the battery on the tray on
top of the powerpack. Connect the battery to the
powerpack.
5. Disassembly and Transportation
Disassembly
Note:
Refer to the photos in the installation step 4 and 5. The disassembly process is essentially these
steps in reverse.
1.
Switch off the PowerStroll and remove the keys.
2.
Disconnect the battery pack from the powerpack and remove the battery pack by pulling on
the integral handle.
3.
Disconnect the powerpack from the handcontrol.
4.
Loosen the threaded knobs securing the spring-loaded bar.
5.
Remove the spring-loaded bar.
6.
Lift the powerpack using its carry handle.
Transportation
•
The PowerStroll comes with a holdall to carry it when not in use.
•
The powerpack and battery pack both have inbuilt carry handles to aid with transportation.
•
The battery supplied with the PowerStroll is classified as safe for air travel by compliance with
IATA special provision A67.
PowerStroll Owner’s Handbook
Page 5 of 8
Part Code: Z24000
6. Battery Charging and Care
To ensure optimum performance and reliability the battery should be charged after every use of the
PowerStroll.
To charge the battery:
1.
Disconnect the battery pack from the motor by unplugging the red/black block connectors.
2.
Charge the battery by connecting the battery to the charger with the block connectors and
switch on at the mains. A red LED will illuminate on the charger to indicate it is powered by
the mains.
3.
Ensure the battery is fully charged. An LED will illuminate on the charger. The LED lights
orange when charging and green when fully charged. If the LED is lit green then the battery is
charging in trickle mode.
4.
Ensure the battery is charged for at least 12 hours to allow the charger to trickle charge the
battery. Trickle charging the battery maintains and can even improve battery performance.
5.
Disconnect the battery from the charger and store. Only reconnect the battery when you are
ready to use the PowerStroll.
•
The battery should also be charged periodically (e.g. fortnightly) when the PowerStroll is not
in use.
•
It is also recommended that you disconnect the battery from the powerpack if the PowerStroll
is not going to be used for a long period of time to prevent drain on the battery.
7. Operating the PowerStroll
Operation Guidelines
•
Reversing. The PowerStroll will allow you to manually reverse the wheelchair without lifting
the powerpack up off the ground. However, please be aware that this can cause the powerpack
to flip over. If you are in any doubt over this do not attempt to reverse.
•
Maximum Speed. Always set a maximum speed which you are comfortable walking with.
•
Pushing the Wheelchair When Not In Use. The wheelchair can be pushed with the
PowerStroll installed but not in use.
PowerStroll Owner’s Handbook
Page 6 of 8
Part Code: Z24000
The PowerStroll is operated by the handcontrol (see photo
left). It has a number of features required for its operation:
1.
Key Ignition. Turn the key 90º clockwise in the
barrel to switch the PowerStroll on. Turn the key
90º anticlockwise to switch the PowerStroll off.
The key can only be removed when the ignition is
switched off.
2.
Thumb Trigger. This drives the PowerStroll. To
operate, push down on the trigger with your thumb.
The further the trigger is pushed down, the faster
the PowerStroll will travel. To stop the PowerStroll
remove your thumb from the trigger.
3.
Speed Dial. This determines the maximum speed of
the PowerStroll. Turn the dial clockwise to increase
speed and turn the dial anticlockwise to reduce
speed.
4.
LED. This is lit solid green to indicate the
PowerStroll is switched on and operating normally.
If the LED starts flashing, recharge the battery.
8. Troubleshooting
Symptom
Possible Remedies
•
Check the PowerStroll is switched on.
•
Check the battery is fully charged.
•
Check the connection between the battery and motor is
correct.
•
Check the wheelchair brakes are not applied.
•
Check the drive wheel is in contact with the ground.
Wheelchair is difficult to
push manually.
•
Check the wheelchair brakes are not applied.
•
Remove PowerStroll.
The PowerStroll is too fast /
slow.
•
Try varying the speed with speed dial.
•
Try recharging the batteries (if too slow).
Wheelchair does not move
when trigger is pressed.
PowerStroll Owner’s Handbook
Page 7 of 8
Part Code: Z24000
9. Specification
Below are the specifications for the single-wheel PowerStroll:
Unit dimensions
(cms / ins)
350(L) x 200(W) x300(D)
cms
Weight
capacity
21 stone / 135kg/ 297 lb
(wheelchair and user)
13.8(L) x 7.9(W) x
11.8(D) ins
Total Weight
12.4kg / 26lb
Motor
160W 12V D.C. ( 4000RPM)
Battery Weight
6.9kg / 15lb
Charger
12V 3A Input: AC 100-240V
Powerpack Wt
5.5kg / 12lb
Battery
12V 20ah VRLA
10. Warranty
To improve the safety and lifespan of your PowerStroll, it is recommended that you have it serviced on a regular basis.
Recommended Service Schedules for PowerStrolls are available to service agents.
There is a comprehensive twelve-month warranty from the date on which your new PowerStroll is delivered. The warranty covers
the PowerStroll for repairs or replacement during this period. For more detail, please see the warranty conditions overleaf:
1. Any work or replacement part installation must be carried out by an authorised Medicare Technology dealer / service agent.
2. To apply the warranty should your PowerStroll require attention please contact the outlet from which you purchased the
PowerStroll.
3. Should any part of the PowerStroll require repair or full or part replacement, as a result of a manufacturing or material defect
within the warranty period, parts will be supplied free of charge. Note: The guarantee is not transferable.
4. Any repaired or replaced parts will be covered by the balance of the warranty period on the PowerStroll.
5. Parts replaced after the original warranty has expired will be covered by a three-month warranty.
6. Consumable items supplied will not generally be covered during the normal warranty period unless such items require repair or
replacement clearly as a direct result of a manufacturing or material defect. Such items include (among others): upholstery and
tyres.
7. The above warranty conditions apply to a brand new PowerStroll. Second-hand PowerStroll supplied directly by Medicare
Technology carry a six-month warranty period. If you are unsure whether your PowerStroll is covered contact your dealer.
8. Under normal circumstances, no responsibility will be accepted where the PowerStroll has required assistance as a direct result
of:
a. the PowerStroll part not having been maintained in accordance with the manufacturers recommendations
b. failure to use the manufacturer’s specified parts
c. the PowerStroll or part having been damaged due to neglect, accident or improper use
d. the PowerStroll or part having been altered from the manufacturer’s specification or repairs having been attempted before
the dealer is notified
In the event of your PowerStroll requiring attention, please contact your service agent / dealer and give all relevant details so
they can act quickly.
The manufacturer reserves the right to alter without notice any weights, measurements or other technical data shown in
this manual. All figures, measurements and capacities shown in this manual are approximate and do not constitute
specifications.
PowerStroll Owner’s Handbook
Page 8 of 8
Part Code: Z24000