1
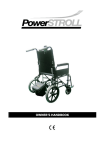
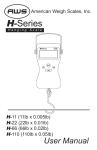
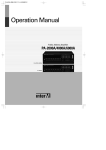
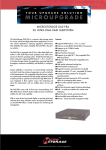
Tips for Proper Printing V3-‐03/10/13 • The printer dialog boxes shown on the following pages are intended to illustrate some key concepts to make printing our downloadable design rings easier for you, and to ensure that they fit and look great inside your Trim-A-Rim (“T-A-R”) or Mini Trim-A-Rim (“Mini T-A-R”). • However, all printers are different – so your printer dialog boxes will probably look different than those shown here. The navigation between boxes will also vary. Please consult your user manual or your printer maker’s customer support for questions which are specific to your particular printer. • Which quality/weight of paper to use? For the best possible appearance, durability, ease of trimming and fit, we recommend paper that is higher than 20lb weight, but not as thick/ stiff as cardstock, and with a high brightness rating (96+). "Cheap" copy paper, which is typically labeled as 20lb (weight or thickness), with brightness ratings in the 80s or low 90s, will work, but the colors in your design will not appear as bright, and the ring can tear or get tattered more easily. Instead, look for widely available 22lb or 24lb letter-size paper (or 26lb to 30lb 11” x 17” paper if using a large format printer), with a brightness rating of 96 or higher. The better quality your paper is, the happier you'll be with your results. • Check before you cut: To save you time, it is always a good idea to lay one of the already cut rings from the T-A-R or Mini T-A-R box on top of your ring print-out to do a size comparison, so that you will know if your print-out is properly sized before cutting it out. 1 Make sure that the correct paper size is selected. Your paper must be large enough to print the particular image file you have chosen. For some files, this will be 8.5 x 11, rather than the 11 x 17 shown in this example. Always select Actual Size (never “fit to page” or any other selection which adjusts the size of the artwork) No large format printer? There is no need to worry if you do not have a printer which can handle “tabloid” (11 x 17) paper -- commonly referred to as a “large format printer”. You can print out all design ring files for the Mini T-A-R on letter-sized (8-1/2 x 11) paper. And for the Full-sized T-A-R, you can choose our files which already have the design split into Half A and Half B for printing on letter-sized paper. 2 Make sure that your particular printer is selected. This is just one example – yours is likely to be different. Choose the proper paper size, to fit the image you have selected for printing. Of course, this needs to be a paper size which you have loaded in the paper tray or are ready to feed manually. As noted on the previous page, it might be a different size than what is shown in this one example. The scaling should always be “None” or “100%” In other words, we do not want the printer to adjust the size of the image at all. 3 Identify the source for your chosen paper (will it be coming from a tray or manual feed, or is your printer capable of Auto Select?) Select the type/quality of paper which you are using Choose your desired print quality. For Black & White templates, “Normal” or “Standard” is usually fine. For color designs, you might wish to choose a higher-resolution option, which is slower to print and uses more ink, but produces a nicer image. Print * Check the Size Against a Pre-Cut Ring * Trim Carefully * Place Inside Your T-A-R or Mini T-A-R and ENJOY! 4