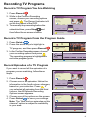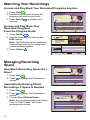
1
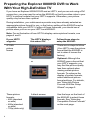
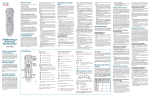
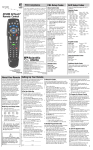
Scientific-Atlanta
Getting Started With The
Explorer ® 8000 and
8000HD DVR
Record your favorite programs when you’re away
Record one program and watch another
Record two live programs while watching a third program you recorded
earlier
Record and store from 30 to 50 hours of standard-definition programs
on the 8000 and, depending on the model, up to 80 hours of standarddefinition programming on the 8000HD
Watch and record high-definition programs on the 8000HD (the actual
high-definition storage capacity depends on the model)
Pause live TV for up to 1 hour without missing a minute
Use instant replay any time you want
Watch two programs at the same time with the Picture-in-Picture feature
on any TV you have
1
Welcome!
Recorded List
With the Explorer® 8000™
Digital Video Recorder (DVR),
you can easily record your
favorite programs and then play
them back anytime. The built-in
DVR and Picture-In-Picture
(PIP) features give you complete control, convenience, and
choice when watching TV. Use
your DVR to control the
following features...
"Design On A Dime"
Save: Until erased
Title
Date
Time
Length
World Soccer
Wed 11/10
4:10am
30min
Extreme Homes
Wed 11/10
8:10pm
50min
Design On A Dime
Mon 11/15
12:00pm
30min
Home Matters
Sun 11/14
12:30pm
30min
Thirteen Days
Mon
8:00pm
1hr 30min
Options/Play
11/8
Scheduled Recordings
Preferences
Control live TV
The telephone is ringing and you do not want to miss any scenes of your
favorite live TV program. DVR lets you PAUSE the live program, or REWIND and
PLAY a portion of it again, or FAST-FORWARD it to catch up to live TV.
Sports fans can enjoy complete control by using INSTANT REPLAY, SLOW
MOTION, and FRAME ADVANCE AND REWIND to watch their favorite play
again.
Record TV programs without a VCR
RECORD and save your favorite TV programs to the DVR to watch later.
When two of your favorite TV programs are scheduled at the same time,
RECORD one program to the built-in recorder while watching the other!
Never miss your favorite programs that are scheduled at the same time. Simply
RECORD both programs at the same time. While recording both
programs, you can play back a third program you have already recorded.
RECORD a single episode or all episodes of your favorite TV programs.
RECORD one of your favorite TV programs and at the same time, access any
advanced application, such as video-on-demand (VOD).
Watch two TV programs at the same time
PIP is built into the Explorer 8000 DVR, so you can watch two live programs at the
same time on any make or model TV that is connected to your DVR.
When something exciting occurs in the PIP program, you can easily swap the
PIP into the Main screen. Once that program is in the Main screen, you can pause
or record it.
When the PIP screen is covering a “must see” moment on the Main screen, simply
MOVE the PIP screen to a different corner of your TV screen.
Let’s Get Started!
2
Using Your Remote Control
Use the keys on the AllTouch® AT8400™ or AT8500™ Remote Control to access
the DVR and PIP features of your DVR.
This guide describes the keys used to access the DVR and PIP features. For
descriptions of the other key functions, refer to the user’s guide for your remote
control model:
• AT8400 AllTouch Remote Control User’s Guide, part number 749219
• AT8500 AllTouch Remote Control User’s Guide, part number 4006383
Important: Your remote control must be set to Cable Mode (CBL) to access the
DVR features.
AllTouch AT8400 Remote Control
If offered by your cable
service provider, displays a
menu of services or options
Power on or off
Displays the Program Guide
Performs the selected action
Selects cable mode
Moves through on-screen
choices
Exits to full-screen TV
Makes on-screen choices
Displays a list of your
recorded programs
Replays the last 8 seconds of
a program (Instant Replay)
Rewinds in 3 speeds
(Must be in Play mode)
Stops recording a program
or stops playback
Pauses the program
you are watching
Swaps PIP screen
with Main screen
Turns PIP feature on or off
Dedicated DVR Keys
Returns to live programming
Fast-forwards in 3 speeds
(Must be in Play mode)
Records a program
Resumes playing a paused
program (Press twice for
slow motion)
Dedicated PIP Keys
Selects PIP channels up or down
Moves PIP screen
T11169
3
Preparing the Explorer 8000HD DVR to Work
With Your High-Definition TV
If you have an Explorer 8000HD DVR and an HDTV, and you are not using a DVI
connection, you may need to set up the 8000HD so that it provides video to your
HDTV in picture formats that your HDTV supports. Otherwise, your picture
quality may be less than optimal.
During installation, your cable service provider may have already selected an
appropriate picture format for you, or the factory setting of the 8000HD may be
compatible with your HDTV. In either of these instances, you should see a
picture when you turn on your HDTV and 8000HD.
Note: For an illustration of how HDTVs display various picture formats, see
pages 4 and 5.
If your HDTV
supports:
The HDTV displays
this when ON:
A 1080i
picture
format
There are no steps to follow.
(Your HDTV uses the picture
format that the 8000HD is
set to when it leaves the
factory.)
or
These picture
formats:
• 480i (standard
or wide)
• 480p (standard
or wide)
• 720p (wide only)
4
Follow these steps to
setup the 8000HD:
A black screen
Optional: Although the
8000HD uses a format that
your HDTV supports, you
may find the picture quality
less than optimal when
viewing certain picture
formats. To enhance the
display of certain formats,
select additional picture
format settings. For details,
see “Selecting Picture
Formats With the Setup
Wizard” on page 5.
Use the keys on the front of
the 8000HD to select these
formats. See “Selecting
Compatible Picture Formats”
on the next page.
Selecting Compatible Picture Formats
If your HDTV displays a black screen when you turn it on, the 8000HD may not
be sending your HDTV a picture format that your HDTV supports. Follow these
steps to select picture format settings that your HDTV supports.
Note: Rather than selecting a single picture format setting, you may want to
select all settings that your HDTV supports. Setting up the 8000HD to support a
variety of picture formats allows you to toggle among the different settings while
viewing TV and select the setting that provides the best picture quality for the
format being broadcast.
1. Find the picture formats that your HDTV supports (If necessary, refer to the
user’s manual that came with your HDTV.)
2. If the 8000HD is off, press Cable
control to turn it on.
and then Power
3. On the front of the 8000HD, press and hold Select
Light
blinks.
on the remote
until the Message
4. Then on the front of the 8000HD, press Vol – to indicate that you want to
select a picture format setting. The LED display shows HdSr to indicate that
you are in the Picture Format mode for HDTV screens.
5. Use the following table to select settings that your HDTV supports.
Important: You have 20 seconds to begin selecting picture format settings.
After 20 seconds, HdSr disappears to indicate that the 8000HD is no longer
in the Picture Format mode. If this occurs, repeat this process by starting at
step 3.
On the
To Select This 8000HD
Picture Format: Press:
The 8000HD
Briefly Displays:
And Then
Briefly Displays:
480i
CH+
480i
SEt
720p
VOL-
720p
SEt
480p
CH-
480p
SEt
1080i
VOL+
1080i
SEt
Note: The default picture format setting is 1080i.
6. To start watching TV, make sure the remote control is in Cable mode.
5
Selecting Picture Formats With the Setup Wizard
Setting up the 8000HD to support a variety of picture formats allows you to
toggle among the settings you have chosen while watching TV. You can also
select the setting that provides the best picture quality for the format currently
being broadcast.
There are three ways you can select picture formats for your HDTV. The 8000HD
Setup Wizard guides you through each one:
•
The Quick Setup method, which automatically selects a setting according to
the screen type:
- For a standard-screen (4:3) HDTV, the Wizard selects 480i.
- For a wide-screen (16:9) HDTV, the Wizard selects 1080i.
•
The Standard Setup method, which selects the settings 480i and 1080i.
You can then toggle between these two settings while watching TV.
•
The Custom Setup method, which allows you to select any combination of
the following picture formats that the 8000HD supports:
-
480p (wide and standard)
480i (wide and standard)
720p (wide only)
1080i (wide only)
To start the Setup Wizard, follow these steps.
1. Make sure that the Explorer DVR is OFF and the HDTV is On.
2. On the Explorer DVR, press Guide and
Info at the same time. The Output
Selection screen appears.
Press the Guide and Info
keys at the same time
3. On the remote control, press A to select
the HD output type. The Set TV Screen
Type screen appears.
Note: The setup Wizard begins cycling
when there is a delay in pressing A . If the
Setup Wizard begins cycling through all of the settings, wait for the Output
Selection screen to display properly, and then press A .
4. Press one of the following options to select a TV screen type:
• If you have a standard-screen HDTV, press
screen appears.
• If you have a wide-screen HDTV, press
screen appears.
6
B
A
. The Set Picture Format
. The Set Picture Format
5. Use one of the following methods to select a picture format setting:
• To use a setting of 480i for a standard-screen HDTV and a setting of 1080i
for a wide-screen HDTV, press A to
choose the Quick Setup method.
• To be able to toggle between the 1080i
and 480i settings while watching TV,
press B to choose the Standard Setup
method. Press Exit to close the Setup
Wizard.
• To select any combination of settings that
to choose
the 8000HD supports, press
the Custom Setup method, then follow
the on-screen instructions. For assistance using this method, see “Using
Custom Setup to Select Picture Formats,” shown next.
6. To start watching TV, press Exit , Cable , and then Power
. While
watching TV, you can change the Picture format to any of the settings you
and selecting Picture Format.
selected by pressing Settings
Using Custom Setup to Select Picture Formats
The steps described here help you use the Custom Setup method to select any
combination of the picture format settings that the 8000HD provides.
With this method, after you set up each possible format, you can toggle among
the settings you have selected while watching TV by pressing Settings
.
This allows you to select the setting that provides the best picture quality for the
type of picture format being broadcast.
1. If you have not already done so, start the Setup Wizard as described on
page 5.
2. When the Set Picture Format screen appears, press
Setup.
3. Press
A
to select Custom
to acknowledge that the HDTV is in Normal display mode.
4. Press A again to start the custom setup process, which allows you to test
each setting, one at a time, and gives you the opportunity to select the
settings that provide the best picture quality.
Note: After you select a setting to test, wait 5 seconds for the HDTV to apply
the setting.
5. Follow the on-screen instructions to select settings that provide the best
picture quality.
6. Press . The End Setup screen displays and lists the settings you
selected.
7. To start watching TV, press Exit , Cable , and then Power
. While
watching TV, you can change the Picture format to any of the settings you
selected by pressing Settings
.
7
Controlling Live TV
Control a Live Program You Are Watching
The Pause
, Rewind
, Fast-Forward
, Play
, Instant
Replay
, and Live
keys on the remote control are used to control
the live program in the Main screen.
For example, when you are watching your favorite live TV program and the
to pause the program for up to 1 hour, and
telephone rings, press Pause
then press Rewind
or Fast-Forward
to reverse or advance one frame
at a time.
To resume watching your favorite program, press Play
, and then press
Rewind
or Fast-Forward
to cycle through three different speeds of
rewind or fast-forward.
To replay the last 8 seconds of a live or recorded program, press Instant Replay
.
To see the action in slow motion, press Play
from normal play mode. Press
Play
again to resume normal play mode. From Pause mode, press
Pause
or Play
to resume the normal play mode.
If you have rewound or paused a live program, press Live
up to the live TV program.
at anytime to catch
Note: You can use these same dedicated DVR keys to control the reduced screen
(also known as the quarter screen) in the program guide and in all DVR screens.
Pause a Live Program
The paused status bar appears when you press Pause
Green Area of Bar
Indicates Stored or
Recorded Programming
Triangle Indicates Your
Current Position in Program
Red Area of Bar Indicates
Missed Programming
"Paused" Status Bar
T11170
.
Live Point of Programming
Pause
Design On A Dime
12:00 - 12:30pm
Clear Area of Bar Indicates
Programming Not Aired Yet
Note: All of the features for controlling live TV (such as Pause, Fast-Forward,
Rewind, and so on) are also available when playing back recorded programs.
8
Recording TV Programs
Record a TV Program You Are Watching
1. Press Record
.
2. While in the Confirm Recording
screen, choose your recording options
and press A . The Record Indicator is lit
on the front panel of the DVR.
3. To manually stop recording before the
Confirm Recording
"Design On A Dime"
Tue: 11/13
Save: 14 days
scheduled time, press Stop
and
then follow the on-screen choices.
START
STOP
RECORD
12:00pm
12:30pm
One episode
All episodes
Accept recording
SAVE TIME
14 days
Cancel changes
Record a TV Program From the Program Guide
1. Press Guide
.
2. Press the arrow keys to highlight a
TV program, and then press Record
WSB
02
.
3. In the Confirm Recording screen, choose
your recording options and press A .
The recording program is highlighted in
red in the program guide.
Channel 2 Action News
Tue 5:00-6:00pm
(60 min)
CHANNEL
5:00pm
5:30pm
PBY_B 1915 World View News
DVR
1 Recorded Programs List
WSB
2 Channel 2 Action News
WATL
3 Ricki Lake
WGNX
4 Frasier
Frasier
Browse By
Date TUE 1/15
6:00pm
6:3
Channel 2 Action News
Steve Harvey Simpso
Judge Judy
Record Episodes of a TV Program
If you want to record all the episodes of a
program you are watching, follow these
steps:
Confirm Recording
"Design On A Dime"
Tue: 11/13
Save: 14 days
1. Press Record
.
2. Choose one or all episodes. Notice the
information in the fourth column changes,
based on your selection. Press A . If
you selected all episodes from the third
column, the All Episode Recording
Options screen appears.
3. Choose one of the options on the screen.
to save your settings.
4. Press Select
Note: The “New first-run episodes on this
channel” option is subject to availability
in your area.
START
STOP
RECORD
12:00pm
12:30pm
All episodes
One episode
Accept recording
SAVE TIME
14 days
Cancel changes
All Episode Recording Options
"Design On A Dime"
HGTV (Ch 238)
Thu: 11/13
Options
All episodes on this channel at any time
New first-run episodes on this channel
All episodes on this channel in this time slot
Choose highlighted item
Cancel changes
9
Watching Your Recordings
Access and Play Back Your Recorded Programs Anytime
1. Press List
.
2. Use the arrow keys to choose the
program you want to play back.
3. Press Select
to display your
options.
Access and Play Back Your
Recorded Programs
From the Program Guide
1. Press Guide
.
2. Use the arrow keys to choose the
DVR channel.
Note: The DVR channel is a dedicated
channel that allows you to play back
your recorded programs.
3. Press Select
.
Recorded List
"Design On A Dime"
Save: Until erased
Title
Date
1. Press List
.
2. Press B to display the Preferences
screen.
Length
Wed 11/10
4:10am
30min
Extreme Homes
Wed 11/10
8:10pm
50min
Design On A Dime
Mon 11/15
12:00pm
Home Matters
Sun 11/14
12:30pm
30min
Thirteen Days
Mon
8:00pm
1hr 30min
Options/Play
11/8
Scheduled Recordings
30min
Preferences
DVR
01
Recorded Programs List
Tue 3:00-9:00pm
Programs you have recorded
for later viewing.
CHANNEL
5:00pm
5:30pm
PBY_A 1914 World Business News
PBY_B 1915 World View News
DVR
1 Recorded Programs List
WSB
2 Channel 2 Action News
WATL
3 Ricki Lake
Browse By
Date TUE 1/15
Managing Recording
Space
How Much Recording Space Do I
Have?
Time
World Soccer
6:00pm
Channel 2 Action News
Steve Harvey Simpso
Preferences
Recording Space Used:
19%
You currently have 10 recordings.
Options
Sort Recorded List by time recorded
Turn ON Auto Erase
Recording space used
Change Save Time for future recordings
Schedule a new Manual Recording
Scheduled Recordings
Recorded List
Automatically Erasing Oldest
Recordings If Space Is Needed
1. Press List
.
2. Press B to display the Preferences
screen.
3. Choose Turn ON Auto Erase.
Note: Any recordings that have a Save
Time of “Until I Erase” will not be
automatically erased.
Preferences
Auto Erase is OFF.
Press
if you want your oldest
recordings automatically erased to
make space for new ones.
Options
Schedule a new Manual Recording
Sort Recorded List by time recorded
Turn ON Auto Erase
Recording space used
Change Save Time for future recordings
Scheduled Recordings
10
6:3
Recorded List
Using Picture-In-Picture
Activate PIP on Your TV
While watching a program, press PIP On/Off
to activate the PIP screen.
Notes:
• To pause or record the video in the PIP
screen, you must first swap it to the
Main screen.
• You can only use the dedicated DVR keys
(Pause, Rewind, Fast-Forward) to control the
program shown in the Main screen.
• To change the channel in the PIP screen,
use PIP CH+ and PIP CH- .
PIP
Screen
Main
Screen
Activate PIP from the Program Guide
From the program guide, press Exit
or Guide
guide, and then press PIP On/Off
to activate
PIP. You can only activate PIP from full-screen
video.
to close the program
PIP
Screen
Main
Screen
Swap the Main and PIP Screens
To swap the TV program that is in the PIP screen
.
to the Main screen, press PIP Swap
Note: You will only hear the audio for
the program shown in the Main screen.
Move the PIP Screen
To move the PIP screen clockwise to a different
corner of the Main screen, press PIP Move
.
You can move the PIP screen to any of the four
corners of the Main screen.
Use Power-Save Mode
To maximize the life of your DVR, you should power-down the 8000 every night
before going to bed. Simply press Power on the front panel of the 8000. The
Power light turns off, but the 8000 still is plugged
in, so your scheduled recordings still occur.
If your DVR is turned on, and you do not press a
remote or front panel key in 4 hours, a banner
appears, indicating the 8000 will automatically
activate power-save mode.
Attention
Your DVR will automatically enter power-save mode in 2 minutes.
Please press any remote key to continue watching TV.
11
Frequently Asked Questions
How far back can I rewind live TV? The length of time you can rewind live TV depends
on how long you have been tuned to a single channel. Each time you change channels,
a new copy is automatically stored to the built-in recorder. This copy saves up to the last
one hour of programming. For example, if you have been watching the same channel for
15 minutes, you can rewind that 15 minutes of the program.
Can I record the quarter screen in the Program Guide or the DVR Recorded List? Yes,
you can record the quarter screen on all DVR screens by pressing Record
also record the quarter screen in the program guide. Press Exit
in full screen, and then press Record
Note: Pressing Record
program in the grid.
. You can
to display the video
.
while in the program guide will record the highlighted
Can I record or pause the video in the PIP screen? Yes, but you must swap it into the
Main screen first. After pressing Record
and confirming the recording, you can swap
it back into the PIP screen and it will continue recording. You can also press PIP On/Off
, and the video will continue to record.
If I’ve been tuned to a program since it started, do I have to rewind to the beginning to
record the entire program? No, if you have been tuned to the program since its
from any point in the program to record the entire
beginning, just press Record
program. Recording will automatically stop when the program ends.
How will I know the DVR is almost out of recording space? When you try to schedule
the next recording, a warning appears on the Confirm Recording screen. Also, you can
see what percentage of recording space you have used. Press List
and then
press B for preferences.
Can you play back more than one recording? No, you cannot play back more than one
recording at a time.
What happens if my DVR loses power temporarily? Everything you have recorded is
saved, based on the save time you selected in the Confirm Recording screen. Your
scheduled recordings during the time the DVR lost power are the only recordings you
may miss.
Do my Parental Controls in the Program Guide carry over to DVR recordings? Yes. If
you block programs by channel or rating in General Settings, those settings are carried
over to DVR recordings. For example, if you decide to block all R-rated programs in
General Settings, the R-rated programs will still be recorded, but you cannot play them
back until you enter the correct PIN.
How do I block or erase individual recordings in my list or change the save time for
the recording? Highlight the recording on the Recorded List screen, and press Select
on the remote. An Options screen will appear for the program you selected.
© 2004 Scientific-Atlanta, Inc. All rights reserved.
AllTouch, Explorer, Scientific-Atlanta, and the Scientific-Atlanta logo are registered trademarks of
Scientific-Atlanta, Inc. 8000, 8000HD, AT8400, AT8500, and “Bringing the Interactive Experience
Home” is a trademark of Scientific-Atlanta, Inc.
All other trademarks shown are trademarks of their respective owners. Product and service availability
subject to change without notice.
Scientific-Atlanta, Inc., 5030 Sugarloaf Parkway, Box 465447, Lawrenceville, GA 30042
www.scientificatlanta.com
March 2004 Printed in USA.
For questions or comments, call your cable service provider.
12
740246 Rev D