1
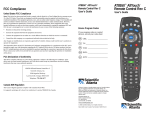
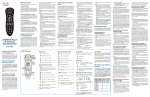
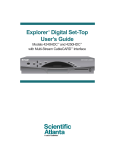
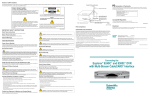
Where Do I Start?
Before you begin using your remote, complete the
following initial setup tasks.
Install the Batteries
POWER
TV
DVD
STB
AUX
FF
REW
CORD
RE
/VIDEO
TV
PAUSE
B
STOP
PLAY
SKIP
ACK
Visit the Quick Reference Section
VOD
MENU
MENU
RD
CO IN
ON DEMAND
LIVEITV
GS
RE
PHONE
DVR
EXIT
INTERACT
MULTISCREEN
GUIDE
GUIDE
VOL
MUTE
JUMP
MUTE
JUMP
Use the Quick Reference section of this guide to
familiarize yourself with the remote and the functions
of its various keys. Knowing the function and location
of the keys on the remote will assist you when you are
programming the remote.
Program the Remote
INFO
SEARCH
The remote requires two AA batteries (alkaline
recommended). A diagram in the battery compartment of
the remote indicates proper placement of the batteries.
When batteries are properly installed, the light on the
remote blinks each time a key is pressed.
CH
PG
To learn how to program your remote, refer to the
sections What Devices Can I Control, What Devices
Do I Want to Control, and Program the Remote to
Control My Devices for further instructions.
Find a Place to Store Your Remote
1
2
3
ABC
DEF
4
5
6
GHI
JKL
MNO
7
8
9
PQRS
TUV
WXYZ
0
#
CLEAR
SPACE
ENTER
Keeping up with one remote is much easier than keeping
up with four or five remotes. However, it is still a good
idea to find a storage location for your remote. The
AT6400 is not a toy. It should be kept out of the reach of
children under the age of 6 years.
Program the Remote
to Control My Devices
Your remote is initially programmed to only operate your
set-top. You will need to set up the remote to operate your
other devices using its TV, DVD, and AUX modes. The
TV key may be programmed to operate a standard or
high-definition television (HDTV). The DVD key may
be programmed to operate a DVD player. The AUX key
may be programmed to operate a VCR, a receiver, an
amplifier, or a Home Theater in a Box (HTIB) system.
If the remote provides only limited functionality for
a device, you can look for a code that provides more
functionality. Refer to the code tables at the end of this
guide to locate additional programming codes.
Note: You have the option to assign some remote keys
to operate one device type only. For example, you may
want to assign volume control to the TV only. If this is
the case, you can reprogram power, volume, and channel
control using procedures found later in this guide.
Assigning a Device Code to a Mode Key
1. Refer to the code tables at the end of this guide to
locate the information for the device you want to
program.
Note: If your device is not listed, you may be able to
program the remote using the Auto-Search function.
Go to What If None of the Codes Work for
instructions.
2. Turn on the device that you want to assign to a mode
key.
3. Press and hold the appropriate mode key (TV, DVD,
or AUX) on the remote, and then press and hold the
OK key.
4. Release both keys and the mode keys blink twice.
AT6400™ AllTouch®
IR Universal
Remote Control
5. Enter the first 4-digit setup code for the device using
the numeric keys (0-9) on the remote. The mode key
blinks three times to indicate that the code entry was
accepted.
Notes:
• When an invalid code is entered, the selected
mode key displays a long flash to indicate that
you have not entered the code correctly.
• Should the remote time-out before you complete
the code setup, you must start over. This is
indicated by one long flash of the red LED.
6. Point the remote at the device, and press POWER to
test the device.
7. Did the device power off?
• If yes, write this code number in the table found in
this guide. You may need it again if the device code
is accidentally erased.
• If no, repeat this procedure from step 3 using a
different setup code.
Note: If none of the codes listed for your brand
of device operate the device correctly, go to
What If None of the Codes Work for
instructions.
8. Repeat this procedure for each mode key you want to
program.
What If None of the Codes Work?
If none of the codes listed for your brand of device
operate the device correctly, or if your device is not
listed in the codes table, you can use the Auto-Search
function to search through the code library for a valid
code. This section provides procedures for using the
Auto-Search function to search the code library for TV,
DVD and AUX mode codes.
Note: Read the procedures in this section thoroughly
before beginning. You need to be prepared to observe
the behavior of the remote.
Auto-Search Features
Consider the following items when using Auto-Search:
• The Auto-Search function begins searching from the
first code.
• If a valid code is not found, the green backlight blinks
twice and the remote returns to normal operation.
• If any other key is pressed except PLAY, ENTER,
POWER, EXIT, REW, FF, or numeric keys 1 through
4 (when programming the AUX mode key), the mode
key displays a long red flash (error message) and the
remote returns to normal operation.
• Should the remote time-out before you complete the
Auto-Search function you must start over. This is
indicated by one long flash of the red LED.
• If the device is not listed and the Auto-Search function
is unable to find a usable code, you may need to use
the original remote provided with the device.
Auto-Searching the Code Library for
TV or DVD Mode Codes
(Program Code 922)
Note: This procedure only applies to TVs and DVDs.
1. Turn on the device you that you want to assign to the
TV or DVD key.
2. Point the remote at the device.
3. Press and while holding a selected mode key (TV or
DVD), press the OK key. For example, to search for
a TV code, press and hold TV and OK at the same
time.
4. Release both keys and all the mode keys blink twice.
5. Enter the programming code 9 2 2 by pressing the
numeric keys on the remote. The mode key you
selected in step 3 blinks twice to indicate a successful
entry.
6. Point the remote toward the device, and press PLAY.
7. Your device powers off when it finds the correct code.
Then, choose one of the following options:
• Save code and exit – Press the ENTER key on
the remote to program the code in the remote
and the mode key flashes three times
indicating successful entry.
• Step forward – Press the fast-forward (FF) key
on the remote to step ahead through the codes
one at a time. Then, return to step 6.
• Step backward – Press the rewind (REW) key
on the remote to step back through the codes one
at a time. Then, return to step 6.
• Exit without saving the code – Press the EXIT
key on the remote. The selected mode key flashes
three times and returns to normal operation.
• Send the current code – Press the POWER key
on the remote to send the current code. If the
device turns back on, press the ENTER key. If
the device does not turn on, return to step 6.
• Continue with auto-search function – Press the
PLAY key on the remote to continue with the
auto-search function. Then, return to step 6.
Auto-Searching the Code Library for
AUX Mode Codes (Program Code 922)
1. Turn on the device that you want to assign to the
AUX key.
2. Point the remote at the device.
3. Press and while holding the AUX key, press the OK
key.
4. Release both the AUX key and the OK key and all
the mode keys blink twice.
5. Enter the programming code 9 2 2 by pressing the
numeric keys on the remote. The AUX key blinks
twice indicating a successful entry.
6. Press the PLAY key, choose one of the following
device categories and then, using the number keys on
the remote, press its assigned number (1 – 4) based
on the following list:
1 = VCRs
2 = Receiver/Tuners
3 = Amplifiers
4 = HTIB
Note: The device categories are number-coded to
provide a more direct programming method.
7. Point the remote toward the device, and press PLAY.
User’s Guide
8. Your device powers off when it finds the correct code.
Then, choose one of the following options:
• Save code and exit – Press the ENTER key on
the remote to program the code in the remote and
the mode key flashes three times indicating
successful entry.
• Step forward – Press the fast-forward (FF) key
on the remote to step ahead through the codes
one at a time. Then, return to step 7.
• Step backward – Press the rewind (REW) key
on the remote to step back through the codes one
at a time. Then, return to step 7.
• Exit without saving the code – Press the EXIT
key on the remote. The selected mode key flashes
three times and returns to normal operation.
• Send the current code – Press the POWER key
on the remote to send the current code. If the
device turns back on, press the ENTER key. If
the device does not turn on, return to step 7.
• Continue with auto-search function – Press the
PLAY key on the remote to continue with the
auto-search function. Then, return to step 7.
Reassign Mode Keys
You can reassign a mode key to operate a different
device. For example, you can reassign the AUX key to
operate a DVD player or a TV. If you reassign a key, be
sure you update the table found in this guide.
Reassigning Mode Keys
(Program Code 944)
1. Press and hold the STB mode key on the remote.
2. Without releasing the STB key, press and hold the
OK key.
3. Release both the keys and all mode keys flash twice.
4. Enter the programming code 9 4 4 by pressing the
numeric keys on the remote. The STB mode key
blinks twice indicating a successful entry.
5. Press and release the mode key associated with the
type of device you want to control, and then press and
release the mode key that you want to change. The
newly assigned mode key blinks one time indicating
a successful entry.
Some common examples:
• To program the AUX key to operate your DVD
player, press DVD and then AUX.
• To program the DVD key to operate your TV,
press TV and then DVD.
Change Volume Control
Welcome to the Ultimate
Control Experience
Device Control
Quick Reference
Viewing and Browsing Control
POWER
Turns devices on or off
Accesses the phone menu
Phone
Your new AT6400™ AllTouch® Infrared (IR)
Universal Remote Control (remote) is a true
universal remote, functioning as four remotes in
one. As one example, you can use this remote
to operate your set-top, your TV, and two other
devices, such as a DVD player and VCR.
Enables set-top mode functions
TV
DVD
AUX
FF
REW
CORD
RE
VIDEO
TV/
PAUSE
Note: These keys are assigned to the TV when the TV
mode key is programmed with a valid code.
There are red LEDs underneath each of the four mode
keys (STB, TV, DVD, and AUX) that flash each time
a key is pressed to show which device the key is
currently controlling.
PLAY
SKIP
ACK
Enables TV mode functions
DVR/VOD/
DVD/VCR
Control
MENU
Enables DVD mode functions
EXIT
SEARCH
How Does A Universal Remote
Control Work?
Accesses the DVR list of recordings
LIVEITV
Numeric Keys
4
Views live TV
GHI
7
PQRS
2
3
ABC
DEF
5
JKL
Enters channel numbers, text, and
remote codes. Also use to enter your
parental control PIN
6
MNO
8
9
TUV
WXYZ
0
SPACE
DVR, VOD, DVD, VCR Control
Moves through selections
Notes:
CLEAR
• In STB mode, these keys control DVR and VOD
functions.
• In DVD and AUX modes, these keys may control
your DVD or VCR depending on how you have
programmed the remote.
GUIDE
GUIDE
MUTE
JUMP
MUTE
JUMP
2
ABC
CH
PG
Clears text and numbers in text fields
Records the selected program
DEF
4
5
6
JKL
MNO
7
8
9
PQRS
TUV
WXYZ
0
#
SPACE
ENTER
Numeric
Keys
EXIT
Clears all menu screens and returns to
broadcast TV
SEARCH
INTERACT
STOP
Stops DVD, VCR, VOD, or recorded
content
Enter
Accesses the search menu
The four mode keys arched across the top of the remote
tell the remote which device you want to operate.
Accesses INTERACT (Internet and
interactive content)
TV
INFO
T12129
Displays text information about the selected
programs
PLAY
Plays DVD, VCR, VOD, or recorded
content
Scrolls through available TV or video input
sources
GUIDE
Displays or closes the program guide
JUMP
Jumps to next section or switches to last
channel
FF
Moves back or forward through
recorded or On Demand content
LA
REP Y
What Devices Can I Control?
POWER
During programming, if the remote times out before
you complete the code setup, you will need to start
over. This is indicated by one long flash of the red
LED.
What Devices Do I Want to
Control?
To help you keep track of the devices you want to
control, list the type of devices you have (including
brand) in the following table. Then, use the code tables
at the end of this guide to locate the codes for your
device. For example, look under TV Group if you
need to program the remote to operate your TV. If
you have two devices that use the same key, you must
reassign the TV, DVD, or the AUX key. The STB key
cannot be reassigned. Go to Reassign Mode Keys.
Otherwise, go to Program the Remote to Control
My Devices for additional instructions.
DVD
STB
AUX
MULTISCREEN
Pauses DVD, VCR, VOD, or recorded
content
REW
Enters and saves (stores) an entry
Turns MultiScreen mode on or off
PAUSE
/VIDEO
TV
#
ENTER
CORD
RE
3
GHI
CLEAR
Selects and deselects screen items
MULTISCREEN
VOL
1
Clear
ORDING
EC
DVR
INFO
INTERACT
Sound
Control
IDE MAN D
1
Enables AUX mode functions
Viewing
and
Browsing
Control
There are also green LEDs that illuminate several keys
whenever the remote is in use. They stay illuminated
for a short time after a key is pressed.
Mutes sound
MUTE
DVD
ON DEMAND
DVR
Adjusts volume
VOL
Accesses the On Demand Menu
AUX
LIVEITV
GS
RE
MENU
RD
CO IN
VOD
ON
VOD
PHONE
Accesses the Interactive Program Guide (IPG)
TV
S
B
STOP
Device
Control
MENU
R
POWER
STB
Your remote is initially programmed to only
operate your set-top. Therefore, you must program
the remote to operate your TV, VCR, or other
devices. See Program the Remote to Control
My Devices to learn how to enter device codes
and program your remote.
You tell the remote which type of device you want
to operate using the four keys arched across the
top of the remote. These keys, known as mode
keys, are labeled STB, TV, DVD, and AUX.
Each mode key is associated with a specific
device. As an example, after programming the
remote, if you want the remote to operate your
TV, you simply press the TV key. Other keys you
press on the remote, thereafter, should operate
your TV. Want to switch the remote to operate a
different device? Just press the mode key for the
next device you want to operate. In this guide, you
will learn which types of devices you can control
and how to program the remote to control your
specific devices.
LED Indicators
STB
Important Information About
Your Remote
Note: You must use the IR remote within line of
sight of the set-top to operate the set-top correctly.
Sound Control
SKIP
Skips back or forward through
recorded or On Demand content
CH
PG
Selects the next channel, up or down, when
watching TV. Moves up or down one page in
the program guide and in some menu screens
T12121
Each mode key is associated with different types of
devices. You can use each mode key to control one of its
associated devices:
Mode Key
STB
Associated Devices
IP gateway set-top
TV*
TVs (including HDTVs)
DVD*
DVD players
AUX*
VCRs, receivers, tuners, and Home
Theater in a Box (HTIB)
*These keys can be reassigned to control different
devices. Go to the Reassign Mode Keys section of this
guide for instructions.
Mode
Key
Device
Type
Brand
Code
Example:
DVD
DVD
Sony
2066
STB
TV
DVD
AUX
By default, once the TV mode key is programmed with a
valid code, the volume and mute buttons control your
TV. These keys adjust the volume of your TV higher,
lower, or temporarily switch the volume off (Mute),
regardless of whether the remote is in STB, TV, DVD,
or AUX mode.
If you prefer, you can choose to have the volume and
mute buttons always control a different device rather
than your TV, such as a home theater receiver. (See
Controlling Volume for One Device below.) Note that
you must first program one of the mode keys,
such as AUX, with a valid code for that device.
Alternatively, you can choose to have the volume and
mute buttons control different devices when the remote
is in different modes. For example, you might want
to control the volume on your TV when in TV mode,
but the volume on your home theater receiver when in
AUX mode. (See Controlling Volume for Different
Devices below.) Note that not all devices have volume
controls, so if you choose this option, the volume and
mute buttons may do nothing in some modes, such as
STB and DVD.
Controlling Volume for One Device
(Program Code 955)
1. Press and hold the STB mode key on the remote.
2. Without releasing the STB key, press and hold the
OK key.
3. Release both keys and all mode keys blink twice.
4. Enter the programming code 9 5 5 by pressing the
number keys on the remote. The STB mode key
blinks twice indicating a successful entry.
5. Press and release the mode key for the device you
want the volume keys to control. For example, if you
want to control volume through your TV, press and
release TV. The selected mode key blinks three times
to indicate a successful entry.
The volume keys now control only one device whether
you are in STB, TV, DVD, or AUX mode.
Controlling Volume for Different
Devices (Program Code 955)
1. Complete steps 1 through 4 of the Controlling
Volume for One Device procedure.
2. Press and release the Enter key. The STB mode key
blinks three times to indicate a successful entry.
After you press the Enter key, the volume keys control
the device assigned to that mode. For example, in TV
mode, the volume keys control volume for the TV only.
Notes:
• If any other key is pressed except the Mode keys
and the ENTER key, the remote does not accept any
changes or updates. The STB mode key displays
a long red flash and the remote returns to normal
operation.
• If the remote times out before you complete
programming volume control, the remote does not
accept any changes. You must start over from step 1 of
this procedure.
Change Channel Control
The remote is set by default to control channel selection
on the set-top. You can also program channel control to
control any of the TV, DVD, or AUX mode devices
provided the device allows for channel control assignment.
Or, you can set the channel selection control programming
to control channels (or page up or down) for all of the
devices programmed in the four mode keys. Otherwise,
you can only control channels (or page up or down) on a
specific device, for example, the TV or DVD.
Note: The channel control keys include CH / Page, Jump,
and the numeric keys 0 through 9.
Controlling Channels for One Device
(Program Code 966)
1. Press and hold the STB mode key on the remote.
2. Without releasing the STB key, press and hold the
OK key.
3. Release both keys and all mode keys blink twice.
4. Enter the programming code 9 6 6 by pressing the
numeric keys on the remote. The STB mode key
blinks twice to indicate a successful entry.
5. Press and release the mode key for the device you
want the channel key to control. For example, if you
want to control channels on your TV, press and release
TV. The selected mode key blinks three times to
indicate a successful entry.
The channel key now always controls the device
associated with the mode you selected in this procedure,
whether in STB, TV, DVD, or AUX mode.
Controlling Channels for Different
Devices (Program Code 966)
1. Complete steps 1 through 4 of the Controlling
Channels for One Device procedure.
2. Press and release the Enter key. The STB mode key
blinks three times to indicate a successful entry.
After you press the Enter key, the channel key now
controls the device associated with the mode key you
select. For example, in TV mode, the channel key
controls the TV, but in STB mode, the channel key
controls the set-top.
Notes:
• If any other key is pressed except the Mode keys
and the ENTER key, the remote does not accept any
changes or updates. The STB mode key displays
a long red flash and the remote returns to normal
operation.
• If the remote times out before you complete
programming channel selection control, the remote
does not accept any changes. You must start over from
step 1 of this procedure.
Change Power Control
Notes:
The POWER key on the remote is set by default to
control the power switch on one device at a time,
in either mode (STB, TV, DVD, or AUX). When in
STB mode, the remote switches the set-top from OFF
(standby mode) to ON, or from ON to OFF (standby
mode). However, you can alternatively program the
POWER key to control the power switch on up to four
devices at the same time, instead of controlling one
device at a time. It is highly recommended that you set
up the POWER key to turn on and off your set-top and
your TV at the same time. Turning off the set-top saves
electricity and extends the life of the box. When turned
off, the set-top can still record scheduled programs on its
DVR and perform any other necessary functions.
• If any other key is pressed except the numeric keys,
the remote does not accept any changes or updates.
The STB mode key displays a long red flash
and the remote returns to normal operation.
• If the remote times out before you complete the
factory default reset procedure, the remote does not
accept any changes. You must start over from step 1
of this procedure.
Troubleshooting
If there is no response when you press the keys on the
remote, please check the following items before calling
for service.
Controlling Power for Multiple
Devices at Once (Program Code 977)
Check the Batteries
1. Press and hold the STB mode key on the remote.
2. Without releasing the STB key, press and hold the
OK key.
3. Release both keys and all mode keys blink twice.
4. Enter the programming code 9 7 7 by pressing the
numeric keys on the remote. The STB mode key
blinks twice to indicate a successful entry.
5. For the first device, press the STB key. The STB mode
key blinks twice.
6. For the second device, press the applicable mode key
(TV, DVD, or AUX). The selected mode key blinks
twice.
7. Repeat step 6 for up to two more devices (total of
four devices).
8. Press the ENTER key to complete the power switch
control programming. The last selected mode key
blinks 3 times to indicate a successful entry.
Example: In an example scenario where you press only
TV in steps 6 and 7, the POWER key controls both the
set-top and the TV at the same time, regardless of which
mode the remote is in (STB, TV, DVD, or AUX).
• Check the battery condition for leakage.
Controlling Power for One Device at a
Time (Program Code 977)
1. Complete steps 1 through 4 of the Controlling
Power for Multiple Devices at Once procedure.
2. Press the ENTER key to complete the power switch
control programming. The last selected mode key
blinks 3 times to indicate a successful entry.
After you select a mode, the POWER key controls the
device assigned to that mode. For example, in TV mode,
the remote controls power for the TV only.
Notes:
• If any other key is pressed except the Mode keys
and the ENTER key, the remote does not accept any
changes or updates. The STB mode key displays
a long red flash and the remote returns to normal
operation.
• If the remote times out before you complete
programming power switch control, the remote does
not accept any changes. You must start over from step
1 of this procedure.
Put It Back the Way I Got It
You can return all advanced functions back to their
original settings by resetting the remote to factory
default settings. Resetting the remote to factory default
settings removes all of the programming you have
entered for the remote. You must reprogram the remote
to restore your original settings.
Resetting the Remote to Factory
Default Settings (Program Code 900)
1. Press and hold the STB mode key on the remote.
2. Without releasing the STB key, press and hold the
OK key.
3. Release both keys and all mode keys blink twice.
4. Enter the programming code 9 0 0 by pressing the
numeric keys on the remote. The STB mode key
blinks four times to indicate you have successfully
reset the remote to factory default settings.
• Are the batteries inserted correctly?
TV/DVD Combo Codes
Brand
TV
DVD
Apex
Broksonic
RCA
Sansui
Sylvania
1163
1114
1115, 1162
1122
1150
2095
2053
2063, 2099
2071
2092
Toshiba
1116
2054
TV/VCR Combo Codes
Brand
TV
VCR
Broksonic
GE
Quasar
RCA
Samsung
Sylvania
Toshiba
1121
1164
1165, 1166
1167, 1168
1161
1145
1006
3081
3090
3091, 3092
3093, 3094
3089
3095
3096
Zenith
1118
3097
• Replace with new alkaline batteries.
Check the Device
• Is the device’s power cord connected to the power
outlet?
• Is the device switched on?
Check the IR Database Codes List
Is the device brand name for the device listed in the
code list?
• If yes and there is more than one code listed, try using
a different code to provide more functionality
• If no, try the following:
- Use the Auto-Search function to find a usable code.
- If the Auto-Search function is unable to find a
usable code, you may need to use the original
remote provided with the device.
Code Tables
TV/DVD/VCR Combo Codes
Brand
TV
DVD
VCR
Panasonic
RCA
Sharp
Sylvania
1123, 1152
1151
1153
1027, 1124
2075, 2076
2077
2086
2064, 2078
3087, 3086
3106
3100
3105, 3088
Toshiba
1154, 1158
2093, 2094
3099, 3098
DVD/VCR Combo Codes
Brand
DVD
VCR
Broksonic
2072
3082
Daewoo
2062
3076
Emerson
2073
3083
Go Video
2046, 2127, 2129
Hitachi
2126
3066, 3110, 3109
3117
JVC
2047, 2097
3067, 3118
If the remote does not recognize your device, you
can find codes for your device by brand name. With
combination devices (such as a TV with a built-in
DVD player), there are separate codes for each device
component. Therefore, for ease of use, the combination
device codes are listed first. All other code tables in this
section are organized by the devices assigned to each
mode (TV, DVD, and AUX).
Panasonic
2066
3078
Philips
2051
3071
Combination Device Codes
If you have a combination device, you may need to
reassign the AUX key to operate one of the devices, for
example, the VCR. The following tables provide some
examples of combination devices. If your combination
device is not listed, simply look for the codes for each
separate device.
Polaroid
2007
3111
RCA
2048
3068
Samsung
2049, 2074, 2085
3069, 3084, 3101
Sanyo
2050
3070
Sony
2065, 2067
3104, 3085
Toshiba
2080, 2084
3103, 3102
Zenith
2052, 2128
3072, 3119
TV Group
TV Codes
Abex
Admiral
Advent
Adventura
Aiko
Aiwa
Akai
Alleron
Amtron
Anam National
AOC
Apex
Audiovox
Belcor
Bell & Howell
Benq
Bradford
Broksonic
Brokwood
Candle
Celebrity
Citizen
Colortyme
Concerto
Craig
Crosley
Crown
Curtis Mathes
CXC
Daewoo
Daytron
Dimensia
Dumont
Dynatech
Electroband
Electrohome
Emerson
Envision
Fisher
Fujitsu
Funai
Futuretec
Gateway
GE
Gibralter
Goldstar
Grunpy
Hallmark
Harvard
1098
1001, 1099
1005, 1053, 1110, 1113
1100
1015
1034
1002
1044
1036
1003, 1036
1004, 1005
1111, 1119, 1163
1036
1004
1001, 1045
1042
1036
1114, 1121
1004
1004, 1007, 1100
1002
1004, 1007, 1015, 1036, 1073, 1097, 1100
1004
1004
1036
1000, 1053
1036, 1053
1000, 1004, 1014, 1045, 1073, 1097
1036
1004, 1005, 1013, 1015, 1016, 1097, 1106
1004, 1097
1000
1160
1004
1002
1002, 1003, 1004, 1018, 1021
1004, 1011, 1013, 1025, 1028, 1031, 1033, 1036, 1044,
1045, 1080, 1097, 1101, 1102, 1107
1004
1043, 1045, 1047, 1103
1044, 1029
1036, 1044
1036
1038
1000, 1003, 1004, 1008, 1021, 1048, 1049, 1063, 1068,
1094, 1144, 1164
1160
1004, 1005, 1011, 1018, 1050, 1090, 1091, 1097, 1098
1036, 1044
1004
1036
TV Codes, continued
HDTV Codes
Hisense
Hitachi
Apex
Daewoo
Dell
Mitsubishi
Philips
Proscan
RCA
Sampo
Samsung
Sony
Zenith
1112
1004, 1011, 1012, 1051, 1052, 1084, 1085, 1086, 1087,
1102
IMA
1036
Infinity
1053
Janeil
1100
JBL
1053
JCB
1002
JC Penney
1000, 1004,1005, 1007, 1012, 1021, 1048, 1049, 1058,
1063, 1068, 1072, 1073, 1075,1097, 1098
Jensen
1004
JVC
1011, 1012,1026, 1049, 1052,1054, 1055, 1080, 1092,
1117, 1131
Kawasho
1002, 1004
Kenwood
1004, 1018
Kloss Novabeam
1036, 1056, 1057, 1100
KTV
1036, 1097, 1101
LG
1005
Loewe
1053
Logik
1001
Luxman
1004
LXI
1000, 1004, 1045, 1053, 1058, 1068, 1075
Magnavox
1004, 1007, 1018, 1053, 1056, 1057, 1059, 1060, 1083,
1110, 1147
Majestic
1001
Marantz
1004, 1051, 1053
Megatron
1004, 1051
Memorex
1001, 1004, 1005, 1022, 1045
MGA
1004, 1005, 1018, 1021, 1047, 1061, 1062
Midland
1049, 1068, 1097, 1098, 1160
Minutz
1048
Mitsubishi
1004, 1005, 1018, 1021, 1047, 1061, 1062, 1081
Montgomery Ward 1001
Motorola
1003, 1099
MTC
1004, 1005, 1073
Multitech
1036
NAD
1004, 1058, 1075, 1085
NEC
1003, 1004, 1005
Net-Tv
1040
Nikko
1004, 1015
NTC
1015
Onwa
1036
Optimus
1085
Optonica
1064, 1099
Orion
1023, 1033, 1107
Panasonic
1003, 1010, 1049, 1053, 1096, 1123, 1152
Philco
1003, 1004, 1005, 1007, 1011, 1018, 1053, 1056, 1057,
1059
Philips
1003, 1004, 1007, 1011, 1017, 1018, 1053, 1056, 1057,
1059, 1060, 1063, 1110, 1126, 1129, 1148, 1155
Pilot
1097
Pioneer
1004, 1085, 1102
Polaroid
1146
Portland
1004, 1005, 1015, 1097
Price Club
1073
Prima
1113
Prism
1049
Proscan
1000, 1008, 1068,
1108
Proton
1004, 1011
Pulsar
1160
Pulser
1004
Quasar
1003, 1039, 1049, 1096, 1165, 1166
Radio Shack
1000, 1045, 1098
Radio Shack/Realistic 1004, 1011, 1036, 1045, 1064, 1097, 1098
RCA
1000, 1003, 1004, 1005, 1008, 1018, 1049, 1065, 1066,
1067, 1068, 1069, 1070, 1071, 1082, 1102, 1104, 1106,
1108, 1115, 1151, 1162, 1167, 1168
Runco
1160
Sampo
1004, 1097, 1098, 1120
Samsung
1004, 1005, 1011, 1014, 1018, 1019, 1072, 1073, 1074,
1097, 1098, 1156, 1161
Sansui
1023, 1107, 1122
Sanyo
1045, 1062, 1095, 1103
Scotch
1004
Scott
1004, 1011, 1033, 1036, 1044
Sears
1000, 1004, 1012, 1018, 1044, 1045, 1047, 1055, 1058,
1068, 1075, 1076, 1103, 1105
Sharp
1004, 1009, 1011, 1025, 1064, 1077, 1078, 1097, 1099,
1153, 1157
Shogun
1004
Signature
1001
Simpson
1007
Sony
1002, 1109, 1137,
Soundesign
1004, 1007, 1036, 1044
Squareview
1105
SSS
1036
Starlite
1036
Supre-Macy
1100
Supreme
1002
Sylvania
1004, 1007, 1018, 1027, 1053, 1056, 1057, 1059, 1060,
1124, 1145, 1150
Symphonic
1024, 1031, 1036, 1105
Tandy
1099
Tashiko
1058
Tatung
1003
Technics
1049
Techwood
1004, 1049
Teknika
1001, 1004, 1005, 1007, 1011, 1012, 1015, 1036, 1044,
1060, 1073, 1096, 1097
Tera
1004, 1011
TMK
1004
Toshiba
1006, 1045, 1058, 1073, 1075, 1079, 1093, 1116, 1154,
1158, 1159
Totevision
1097
Universal
1048, 1063
Victor
1055
Vidtech
1004, 1005
Viking
1100
Vizio
1004, 1018, 1041, 1042, 1184, 1188
Wards
1000, 1001, 1004, 1005, 1018, 1031, 1044, 1048, 1053,
1056, 1057, 1059, 1060, 1063, 1064
White Westinghouse 1013
Yamaha
1004, 1005, 1018
Zenith
1001, 1089, 1118, 1125, 1161
1088
1135
1141, 1142, 1146
1032
1126, 1129
1000
1143
1038
1019
1037, 1128, 1137
1020, 1139
LCD TV Codes
Benq
NET-TV
Sharp
Sylvania
1136
1040
1138
1046
Plasma TV Codes
Acer
Fujitsu
Gateway
Pioneer
Viewsonic
1041
1029
1038
1035
1038, 1149
Projection TV Codes
Hitachi
JVC
Panasonic
Toshiba
1030, 1132, 1133, 1134
1130, 1131
1140
1127
DVD Group
DVD Codes
Aiwa
2026, 2131
Apex
2001, 2056, 2057, 2061, 2095, 2098
Audiovox
2132
Blaupunkt
2136
BOSE
2122, 2130
Broksonic
2053, 2072
Clarion
2100
Classic
2101
Cyberhome
2083
(Portable DVD)
AUX Group
Amplifier Codes
Aiwa
Carver
Citizen
Denon
Fisher
GE
Goldstar
Harman Kardon
Hitachi
JVC
Kenwood
Maganvox
Marantz
Nakamichi
NEC
Onkyo
Optimus
Panasonic
Pioneer
Proton
Quasar
RCA
Sharp
Sherwood
Sony
Teac
Technic
Technics
Toshiba
Victor
Yamaha
6003, 6020
6002
6026
6014
6002
6028
6016, 6021
6013
6034
6018, 6024
6015, 6022
6035
6000
6012
6033
6005, 6006, 6017
6008
6001
6004, 6009, 6010, 6023, 6036
6035
6001
6025
6029, 6030, 6031, 6032
6011
6020
6019
6001
6001
6027
6024
6007
Home Theater in a Box (HTIB) Codes
Brand
Audio
DVD
Bose
JBL
JVC
Koss
Onkyo
Panasonic
Philips
Pioneer
RCA
Sony
4000
4001
4002
4003
4004
4005
4006
4007
4008
4009, 4010
2130
2043
2035
2060
2024
2104
2036
2016
2042
2113, 2108
4011
2011
Daewoo
2058, 2062, 2137, 2138
Venturer
Denon
2110, 2133, 2040
Receiver/Tuner Codes
Emerson
2002, 2059, 2073
Fisher
2112, 2134
Funai
2002
GE
2079, 2118, 2041
Go Video
2046, 2127, 2129
Go Video
2124
(Network DVD)
GPX
2114
Harmon Kardon
2125
Hitachi
2000, 2027, 2126
Irradio
2149
JVC
2017, 2028, 2047, 2090, 2096, 2097, 2115
Kenwood
2142, 2148
Konka
2029, 2030
Koss
2060
Lasonic
2081
Magnavox
2002, 2018, 2033, 2089
Marantz
2143
Memorex
2003
Mintek
2004
Mitsubishi
2019, 2123, 2145, 2147
NAD
2059, 2139
Nakamichi
2116
Nexxtech
2140
Norcent
2005, 2117
Onkyo
2006
Oritron
2009
Panasonic
2031, 2066, 2075, 2076, 2104, 2105, 2106, 2111
Philips
2018, 2032, 2033, 2045, 2051, 2091, 2109
Pioneer
2008, 2021
Polaroid
2007
Proscan
2010, 2118, 2144
Qwestar
2009
RCA
2010, 2048, 2063, 2077, 2099, 2107, 2118
RCA
2055
(Portable DVD)
Sampo
2119
Samsung
2012, 2049, 2074, 2085, 2102
Sansui
2071
Sanyo
2034, 2050, 2120
Sharp
2013, 2015, 2044, 2086
Sharp
2082
(Portable DVD)
Sherwood
2121
Sony
2014, 2020, 2022, 2065, 2067, 2068,2069, 2070, 2087,
2103, 2108, 2113
Sylvania
2002, 2064, 2078, 2092
Techwood
2141
Toshiba
2023, 2025, 2037, 2038, 2040, 2041, 2054, 2080, 2084,
2088, 2093, 2094
Toshiba
2135
(Portable DVD)
Venturer
2011
Yamaha
2106, 2146
Zenith
2039, 2052, 2128
Aiwa
Bose
Bose
(Tuner/CD Combo)
Carver
Denon
Harman Kardon
JBL
JVC
Kenwood
Linn
Maganvox
Marantz
Onkyo
Panasonic
Philips
Pioneer
RCA
Sansui
Sherwood
Sony
Technics
Wards
Yamaha
5000, 5001, 5002, 5004, 5005, 5006
5007
5007
5000
5008
5000, 5009
5009
5010
5011, 5012, 5013
5000
5000
5000
5018
5019, 5020
5000
5021, 5022
5024, 5025, 5026
5000
5027
5017, 5023, 5028,5029, 5030, 5031, 5032, 5033
5016, 5019, 5020
5000, 5021
5003, 5014, 5015,5021
VCR Codes, continued
Device Program Codes
Jensen
3055
JVC
3005, 3006, 3007, 3014, 3055, 3060, 3067, 3118
Kenwood
3005, 3006, 3007, 3014, 3055, 3060
Lloyd’s
3021
Magnavox
3036, 3037, 3051, 3061
Marantz
3005, 3006, 3007, 3014, 3036
Memorex
3001, 3004, 3007, 3021, 3051
MGA
3023, 3038
Minolta
3052
Mitsubishi
3023, 3038, 3039, 3060, 3108
Montgomery Ward 3001
Motorola
3001
Multitech
3021
NEC
3005, 3006, 3007, 3014, 3055, 3060
Optimus
3001
Optonica
3047
Orion
3004
Panasonic
3053, 3062, 3063, 3077, 3078, 3079, 3086, 3087, 3107
Pentax
3052, 3059
Pentex Research
3014
Philco
3036, 3037
Philips
3036, 3047, 3061, 3071
Pioneer
3006, 3060
Polaroid
3111
Portland
3013
Proscan
3000
Pulsar
3051
Quarter
3007
Quartz
3007
Quasar
3062, 3091, 3092
Radio Shack
3001, 3047
Radio Shack/Realistic 3007, 3021, 3023, 3029, 3047,
RCA
3000, 3003, 3040, 3041, 3042, 3052, 3059, 3062, 3068,
3075, 3093, 3094, 3106
Realistic
3001, 3007, 3011, 3021, 3023, 3029, 3047
Ricoh
3064
Runco
3051
Samsung
3011, 3069, 3084, 3089, 3101
Sanky
3001, 3051
Sansui
3004, 3006, 3055, 3060
Sanyo
3007, 3070
Scott
3011, 3038
Sears
3007, 3029, 3030, 3052,
Sharp
3001, 3013, 3023, 3047, 3080, 3100
Shintom
3048, 3058
Signature
3001
Singer
3064
Sony
3048, 3049, 3058, 3085, 3104
STS
3052
Sylvania
3021, 3036, 3037, 3038, 3061, 3088, 3095, 3105
Symphonic
3002, 3021
Tandy
3007
Tatung
3055
Teac
3021, 3042, 3055
Technics
3053
Teknika
3021, 3050
Tivo
3074
Toshiba
3011, 3029, 3030, 3038, 3096, 3098, 3099, 3102, 3103
Vector Research
3005, 3006, 3011
Victor
3006
Video Concepts
3005, 3006, 3011
Wards
3001, 3011, 3021, 3023, 3047, 3052
White Westinghouse 3002
XR-1000
3021
Yamaha
3005, 3006, 3007, 3014, 3055
Zenith
3048, 3051, 3058, 3064, 3072, 3097, 3119
If you program codes to control devices, record your
codes here for easy reference:
STB
STB: ____________________
TV
TV: ______________________
DVD
DVD: ____________________
AUX
AUX: ____________________
FCC Compliance
United States FCC Compliance
This device has been tested and found to comply with the limits
for a Class B digital device, pursuant to part 15 of the FCC Rules.
These limits are designed to provide reasonable protection against
such interference in a residential installation. This equipment
generates, uses, and can radiate radio frequency energy. If not
installed and used in accordance with the instructions, it may
cause harmful interference to radio communications. However,
there is no guarantee that interference will not occur in a particular
installation. If this equipment does cause harmful interference to
radio or television reception, which can be determined by turning
the equipment OFF and ON, the user is encouraged to try to correct
the interference by one or more of the following measures:
• Reorient or relocate the receiving antenna, if applicable.
• Increase the separation between the equipment and receiver.
• Connect the equipment into an outlet on a circuit different
from that to which the receiver is connected.
• Consult the cable company or an experienced radio/television
technician for help.
Any changes or modifications not expressly approved by
Scientific-Atlanta, Inc., could void the user’s authority to operate
the equipment.
The information shown in the FCC Declaration of Conformity
paragraph below is a requirement of the FCC and is intended to
supply you with information regarding the FCC approval of this
device. The phone numbers listed are for FCC-related questions
only and not intended for questions regarding the connection
or operation for this device. Please contact your cable service
provider for any questions you may have regarding the operation or
installation of this device.
Declaration of Conformity
This device complies with Part 15 of FCC Rules. Operation is
subject to the following two conditions: 1) the device may not cause
harmful interference, and 2) the device must accept any interference
received, including interference that may cause undesired operation.
AllTouch RF and IR Universal Remote Control AT6400
Scientific-Atlanta, Inc.
5030 Sugarloaf Parkway
Lawrenceville, Georgia 30044 USA
Telephone: 770-236-1077
Canada EMI Regulation
This Class B digital apparatus complies with Canadian ICES-003.
Cet appareil numérique de la class B est conforme à la norme
NMB-003 du Canada.
VCR Codes
Admiral
Adventura
Aiwa
Akai
Audio Dynamics
Bell & Howell
Broksonic
Candle
Canon
Carver
Citizen
Colortyme
Curtis Mathes
Daewoo
DBX
Dimensia
Dynatech
Electrohome
Emerson
Fisher
Fuji
Funai
Garrard
GE
Go Video
Goldstar
Gradiente
Harley Davidson
Harman Kardon
Headquarter
Hitachi
JC Penney
3001
3021
3021
3003, 3055, 3058
3005, 3006
3007
3081, 3082
3011, 3013, 3014
3016
3036
3011, 3013, 3014
3005
3000, 3005, 3014
3011, 3013, 3021, 3076
3005, 3006
3000
3021
3023
3003, 3011, 3021, 3023, 3038, 3083
3007, 3029, 3030
3058
3002, 3021
3021
3000, 3059, 3090
3066, 3073, 3109, 3110
3005, 3014
3021
3021
3005
3007
3052, 3055, 3059, 3117
3005, 3006, 3007, 3030, 3036, 3052
20060628FDC
Scientific Atlanta, A Cisco Company
5030 Sugarloaf Parkway
Box 465447
Lawrenceville, GA 30042
770.236.5000
www.scientificatlanta.com
Scientific Atlanta and AllTouch are registered trademarks of
Scientific-Atlanta, Inc.
AT6400 is a trademark of Scientific-Atlanta, Inc.
Cisco, the Cisco logo, and Cisco Systems are trademarks
of Cisco Systems, Inc. and/or its affiliates in the U.S. and
certain other countries.
All other trademarks shown are trademarks of their respective owners.
Product and service availability subject to change without
notice.
© 2007 by Scientific-Atlanta, Inc. All rights reserved.
November 2007
Remote Control Part Number 4012519 (Linux version)
User’s Guide Part Number 4013053 Rev C