1
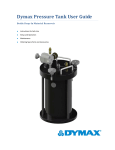
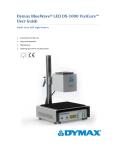
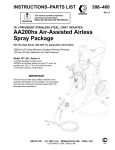
2
SD-100 Digital Syringe Dispenser User Guide
About Dymax
UV/Visible light-curable adhesives. Systems for light curing, fluid dispensing, and fluid packaging.
Dymax manufactures industrial adhesives, light-curable adhesives, epoxy resins, cyanoacrylates, and activator-cured
adhesives. We also manufacture a complete line of manual fluid dispensing systems, automatic fluid dispensing systems,
and light-curing systems. Light-curing systems include LED light sources, spot, flood, and conveyor systems designed for
compatibility and high performance with Dymax adhesives.
Dymax adhesives and light-curing systems optimize the speed of automated assembly, allow for 100% in-line inspection,
and increase throughput. System designs enable stand-alone configuration or integration into your existing assembly line.
Please note that most dispensing and curing system applications are unique. Dymax does not warrant the fitness of the
product for the intended application. Any warranty applicable to the product, its application and use is strictly limited to
that contained in the Dymax standard Conditions of Sale. Dymax recommends that any intended application be evaluated
and tested by the user to insure that desired performance criteria are satisfied. Dymax is willing to assist users in their
performance testing and evaluation. Data sheets are available for valve controllers or pressure pots upon request.
SD-100 Syringe Dispenser User Guide
Contents
Contents............................................................................................................... 3
Introduction ......................................................................................................... 4
Where to Get Help ............................................................................................4
Safety ................................................................................................................... 5
General Safety Considerations ..........................................................................5
Specific Safety Considerations ..........................................................................5
Product Overview................................................................................................. 6
Description of the SD-100 Syringe Dispenser ....................................................6
Special Features and Benefits of the SD-100 ....................................................6
Front Control Panel ...........................................................................................8
Rear Panel .......................................................................................................10
Assembly and Setup ........................................................................................... 10
Unpacking and Inspecting Your Shipment ......................................................10
Parts Included in the SD-100 Syringe Dispenser .............................................11
System Interconnect .......................................................................................11
Operating the System ......................................................................................... 12
Operation ........................................................................................................12
Saving Dispense to Memory ............................................................................13
Loading from Memory ....................................................................................14
Setting the Decimal Point ................................................................................15
Auto-Purge Function .......................................................................................15
Troubleshooting ................................................................................................. 16
Spare Parts and Accessories ............................................................................... 17
Options/Accessories ........................................................................................17
Specifications ..................................................................................................... 18
Specifications ..................................................................................................18
Warranty ............................................................................................................ 19
Index .................................................................................................................. 19
3
4
SD-100 Digital Syringe Dispenser User Guide
Introduction
This guide describes how to assemble, use, and maintain the Dymax SD-100 syringe dispensing
system (PN T17242) safely and efficiently.
Intended Audience
This user guide was prepared for experienced process engineers, maintenance technicians, and
manufacturing personnel. If you are new to pneumatically operated fluid dispensing
equipment and do not understand the instructions, contact Dymax Application Engineering to
answer your questions before using the equipment.
Where to Get Help
Additional resources are available to ensure a trouble-free experience with our products:
■
Detailed product information on www.dymax.com.
■
Customer Support and Application Engineering teams are available in Germany, Monday
through Friday, from 8:00 a.m. to 5:00 p.m. Central European Time. You can also email
Dymax Europe GmbH at [email protected]. Please see the back cover for the contact
information for other Dymax locations.
■
Dymax adhesive Product Data Sheets on our website.
■
Material Safety Data Sheets (MSDS) provided with shipments of Dymax adhesives.
SD-100 Syringe Dispenser User Guide
Safety
!
WARNING! If you use this fluid dispensing equipment without first reading
and understanding the information in this guide, personal injury can result from
the uncontrolled release of high-pressure gas, injection, or exposure to
chemicals. To reduce the risk of injury, read and understand this guide before
assembling and using Dymax fluid dispensing equipment.
General Safety Considerations
All users of Dymax fluid dispensing equipment should read and understand this user guide
before assembling and using the equipment.
To learn about the safe handling and use of dispensing fluids, obtain and read the MSDS for
each fluid before using it. Dymax includes an MSDS with each adhesive sold. MSDS for Dymax
products can be requested through the Dymax website.
Specific Safety Considerations
Using Safe Operating Pressures
Pressurizing the components in the dispensing system beyond the maximum recommended
pressure can result in the rupturing of components and serious personal injury. To minimize
the risk of rupturing components and injury, do not exceed the maximum operating pressure
of the components in your fluid dispensing system (see system specifications on page 18).
Preventing Injection Injury
Discharging fluids or compressed air with a dispensing tip against your skin can cause very
serious injection injury. To minimize the risk of injection injury, do not place the dispensing tip
in contact with your skin.
5
6
SD-100 Digital Syringe Dispenser User Guide
Product Overview
Description of the SD-100 Syringe Dispenser
The SD-100 digital liquid dispenser, with its versatile design, is perfectly suited for a wide
variety of dispensing applications from microdot deposits to large potting and filling. Suitable
for all types of fluids, it includes a suck-back feature to ensure low viscosity liquids do not drip
from the dispense tip.
The SD-100 provides a micro-controlled timer programmable from 0.01 to 9999 seconds.
Included hoses, fittings, and dispense tips make the unit ready to use right out of the box.
Special Features and Benefits of the SD-100
Feature
Benefit
Adjustable vacuum
suck-back
Clean, drip-free cycle shut-off
Digital timer with a range of
0.01 to 9999 seconds
Precision control over fluid dispense
Delivers micro-shots, beads, or
fills
Timed or manual mode with adjustable time and pressure
settings; includes the ability to save a set time in memory
9 Programmable memory slots
Memory saves system settings for future cycles
Activation by foot pedal or
external signal; optional finger
switch available
Manual or system-integrated operation
Adjustable air pressure fluid
regulator
Adjust and set the proper air pressure setting for very thin
fluids to very thick fluids
SD-100 Syringe Dispenser User Guide
Figure 1. Main Components of the SD-100 Syringe Dispenser
T16307
Filter Regulator with
Dump Valve (optional)
¼" NPT Input
¼" OD Tube Output
T17022
Air Pressure Connector
(¼" Male Quick Connect,
Twist Lock Push-In Connector)
Power Cord
Air Cap Adapter
Syringe Barrel
T17253
Foot Switch
T15466
Syringe Stand
Suck-Back Control
7
8
SD-100 Digital Syringe Dispenser User Guide
Front Control Panel
The front control panel of the SD-100 (Figure 2) includes:
■
Suck Back Control — Keeps a steady pull of air pressure in the syringe when not
dispensing. This will help if material is leaking from the syringe.
■
Pressure Gauge — Shows the amount of pressure being applied to the syringe, via the
aircap, to dispense.
■
Air Pressure Regulator — Adjusts the amount of pressure being used to dispense. In
order to reach a desired pressure level, first pull the knob out to unlock it so it will rotate.
Turn the knob counter-clockwise to a point below the desired pressure, and then turn the
dial clockwise to reach the desired pressure.
■
Barrel/Valve Air Cap Outlet — Air outlet where valve or barrel can be hooked up.
■
Digital Display — Displays information pertaining to the programming and use of the
unit.
■
▲/SET – Used as an up scroll key and to begin programming a mode.
■
▼/MEM – Used as a down scroll key and to save / recall a program.
■
◄/SHOT – Used as a left scroll key and to begin dispensing.
■
MODE/EXIT – Used to toggle between dispensing modes and to exit some functions. The
SD-100 has the following operation modes:
MANUAL – In this mode the unit will dispense as long as the foot pedal or SHOT
button is pressed.
TIMER – The unit will dispense for a set amount of time regardless of how long the
foot pedal or shot button is pressed.
CYCLE – The unit will dispense and wait for a specified amount of time before
dispensing again. It will cycle continuously until the EXIT button is pressed.
SD-100 Syringe Dispenser User Guide
Figure 2. SD-100 Front Panel
Suck Back
Control
Pressure Gauge
Digital Display
Air Pressure
Regulator
Barrel/Valve
Air Cap Outlet
Figure 3. Rear Panel
Power Cord Receptacle
Fuse Holder
Power Switch
Foot Switch Jack
9
10
SD-100 Digital Syringe Dispenser User Guide
Rear Panel
The rear panel of the SD-100 (Figure 3) includes:
■
Power Cord Receptacle — Connection point for the power cord.
■
Fuse Holder
■
Power Switch
■
Foot Switch Jack — Connection point for the foot switch. Pressing the foot switch
starts a dispense cycle. In timed operation, pressing and releasing the foot switch
dispenses fluid for the length of time displayed on the digital display. In manual
operation, pressing and holding the foot switch dispenses fluid until the switch is released.
■
Air Outlet Port — Connection point for air out.
■
Air Inlet Port— Connection point for air in.
Assembly and Setup
Unpacking and Inspecting Your Shipment
When your SD-100 syringe dispensing system arrives, inspect the box for damage and notify
the shipper of box damage immediately.
Open the box and check for equipment damage. If parts are damaged, notify the shipper and
submit a claim for the damaged parts. Contact Dymax so that new parts can be shipped to you
immediately.
Check that the parts included in your order match those listed below. If parts are missing,
contact your local Dymax representative or Dymax Customer Support to resolve the problem.
SD-100 Syringe Dispenser User Guide
Parts Included in the SD-100 Syringe Dispenser
■
■
■
■
■
■
■
■
SD-100 digital syringe dispense controller
Air cap adapter, 1 each for 3, 5, 10, and 30/55 mL barrels
Air hose and fittings
Foot switch
Power cord
Syringe stand
Start-up kit containing assorted dispense tips
Printed user guide
System Interconnect
1.
Connect air hose to filtered compressed air 70 - 100 psi (5-7 bar) and connect fitting to the
dispenser.
2.
Insert the foot switch plug.
3.
Insert and twist the male quick connect into the dispenser.
4.
Insert the power cord’s female plug into the dispenser and insert the male plug into a
grounded outlet.
5.
Attach the syringe barrel (with tip cap on the syringe barrel) with the material to be
dispensed. Lock the barrel to the air cap assembly as shown in Figure 4.
Figure 4. Barrel and Air Cap Assembly Lock Procedure
11
12
SD-100 Digital Syringe Dispenser User Guide
Operating the System
Operation
Manual Mode
Manual mode allows the user to dispense for an unlimited amount of time by either pressing
down on the supplied foot pedal or pushing the SHOT button on the front of the SD-100 unit.
The material will continue to dispense for as long as the user is pushing down on the foot pedal
or pressing the SHOT button. As soon as either of these are released, the dispensing will stop.
The unit will also count the amount of time you are dispensing during a cycle which may be
helpful in determining a time to be used when programming the timer mode. If you need to
adjust the decimal point to allow for the timer to show a higher or smaller value, press the SET
button then use the ▲ and ▼ to adjust the position.
1.
Press the MODE button to cycle to Manual Mode.
2.
Press the SHOT button or the foot pedal to start dispense. Release either to stop dispense.
Timer Mode
The Timer Mode allows the user to dispense for a set period of time despite how long the foot
pedal is pressed.
For example: If you would like to set the dispenser to dispense for 1 second, follow the
instructions below.
1.
Press the MODE button until the timer mode is selected.
2.
Press the SET button. The first digit on the right side of the display will start blinking.
3.
Press the ◄ button twice. The third digit from the right on the digital display should be
blinking.
4.
Press the ▲ button once to increase the value of this digit. To adjust the decimal refer to
page 15.
5.
Press Exit/Mode to save as current setting.
SD-100 Syringe Dispenser User Guide
To use timer mode, you can either press the SHOT button on the front panel of the
SD-100 unit or press down on the foot pedal.
Cycle Mode
Cycle mode allows the user to create a repeating cycle of dispensing. This is programed by
setting a wait time between dispensing. This mode is reliant on the previous setting that was
made in timer mode to determine the length of dispensing during the cycle.
For example: If you would like to dispense for 1 second, then wait for 5 seconds, and cycle
these times over again, you would need to have already set your timer mode for
1 second (see previous page for these instructions). To set the 5 second wait time in your cycle,
follow the directions below.
1.
Press the MODE button until the cycle mode is selected.
2.
Press the SET button. The first digit on the right side of the digital display will start
blinking.
3.
Press the ◄ button two times. The third digit from the right should be blinking.
4.
Press the ▲ button five times. The display should now show a 5 second wait time. (To
adjust the decimal refer to page 15)
5.
Press Exit/Mode to save as current setting.
To use the cycle mode, press the SHOT button on the SD-100 to activate the cycle. To
deactivate the cycle, press the EXIT button.
Saving Dispense to Memory
The SD-100 has the storage capacity for up to 9 programs that can be saved to its memory for
future recall. The memory will always save your current settings for the particular mode you
are in.
For example: If you want to save your current timer mode setting to Program 9, you will first
need to select timer mode then proceed with saving. You can also save your cycle mode
settings to Program 9 by following the same procedure.
To save your current settings to memory address 9, follow the instructions below.
13
14
SD-100 Digital Syringe Dispenser User Guide
1.
While in timer or cycle mode, change to the mode you would like to save then press and
hold the MEM (Memory) key for 2 seconds until the unit beeps.
2.
The display will show Ld 1 (Load from Memory #1).
3.
Press the MEM key again to change from Ld 1 to Sv 1 (Save to Memory #1).
4.
Press the ▲ key 8 times to get to memory address 9.
5.
Press the EXIT key to complete the save.
To save your current cycle mode settings, switch the mode to cycle and then continue with the
above procedure.
Loading from Memory
After saving your cycle and timer mode settings to the SD-100 memory, you can recall them to
be used again. Both the cycle mode and timer mode need to be loaded separately by switching
to the mode you would like to load.
For example: To load the cycle time that was saved in Memory 9 on the previous page, follow
the steps below.
1.
Switch to cycle mode then press and hold the MEM (Memory) key for 2 seconds until the
unit beeps.
2.
The display will show Ld 1 (Load from Memory #1).
3.
Press the ▲ key 8 times to get to memory address 9.
4.
Press the EXIT button to complete the load. Program 9 cycle mode settings are now in
effect. The display should show 5 seconds.
To load the timer mode settings, switch to timer mode then follow the same directions.
SD-100 Syringe Dispenser User Guide
Setting the Decimal Point
The decimal point is normally set at a default place between the second and third digits on the
display. This can be changed to allow for a longer or shorter dispense time. To change the
decimal place position, press the SET button then the ◄ button 4 times. This will make the
decimal point blink. When the decimal point is blinking, you can then press the ▲ or ▼
buttons to adjust its position.
Auto-Purge Function
The auto-purge function is used when a material is being dispensed that may cure in the
dispensing needle if left sitting for long periods of time. Before auto purging your material, be
sure to read over the material MSDS for any precautions that may need to be taken. Also be
sure that you have a proper storage container for the purged material.
In order to setup auto-purge on the SD-100 dispenser, the user must configure both the time it
needs to dispense (dispense time) and the time it pauses before dispensing again (wait time).
The total time will be the time it takes the dispenser to complete the whole cycle.
Cycle Time = Dispense Time + Wait Time
For example, let’s say you wanted to auto-purge one second worth of material every five
seconds for a total time of six seconds. What you need to do is:
■
Set the dispense time to 1 second.
■
Set the wait time to 5 seconds.
15
16
SD-100 Digital Syringe Dispenser User Guide
Troubleshooting
If you are experiencing a problem with your SD-100 Syringe Dispenser, please look through the
following troubleshooting section. If your unit is still not working properly after reviewing the
troubleshooting recommendations, please contact Dymax Application Engineering for
assistance.
IMPORTANT! Before dispensing always check to make sure that tubing and connections are
not damaged or loose. Always replace damaged parts immediately.
Table 2. Troubleshooting Chart for SD-100 Controller
Problem
Possible Cause
Corrective Action
Clogged dispensing tip
Replace the clogged tip with a new
dispensing tip
Unit is not properly
connected to air or
power
Check that all electrical and air
utilities are operating and connected
Air cap line is clamped
shut
Make sure that the tubing clamp is
not on the air cap line
Syringe barrel is not full
Add material to the syringe barrel or
replace it with a new filled barrel
Foot pedal is not
connected
Fully insert the foot pedal into
connector on rear of system
Continued flow,
bleeding, or dripping
after the dispenser
is shut off
Not enough vacuum
Increase the amount of vacuum you
are using
Air or material is
being pulled up into
the tubing
Vacuum is too high
Decrease the amount of vacuum you
are using
No flow
Not enough air pressure
Increase the air pressure or use a
larger orifice dispense tip
Unit will not
dispense
SD-100 Syringe Dispenser User Guide
Spare Parts and Accessories
Options/Accessories
Item
Part Number
Air Cap Assemblies
Plastic, 3 mL
T17600
Plastic, 5 mL
T17603
Plastic, 10 mL
T17602
Plastic, 30/55 mL
T17601
Air Filters
Filter Regulator with Dump Valve
T16307
Foot Switches
Replacement Foot Switch
T17253
Power Cords
Power Cord, North American (Type B, 120V)
T17021
Power Cord, China/Europe (Type G, 220-240V)
T17247
Power Cord, International (No Plug End Installed)
T17248
Stands
Syringe Stand
T15466
3-Position Suspended Syringe Stand
T15505
Syringes/Pistons
Syringe, Clear, 3 mL / Piston, Gray, 3 mL
T15652 / T15656
Syringe, Clear, 5 mL / Piston, Gray, 5 mL
T11169 / T11171
Syringe, Clear, 10 mL / Piston, Gray, 10 mL
T11172 / T11174
Syringe, Clear, 30 mL / Piston, Gray, 30 mL
T11176 / T11181
Tip Caps, Dispense Tips, & Air Pressure Connectors
Air Pressure Connector
T17022
Syringe Tip Cap
T11182
Dispense Tip Kit (assorted)
T16972
17
18
SD-100 Digital Syringe Dispenser User Guide
Specifications
Specifications
Property
Part Number
Power Requirements
Air Requirements
Dispense Time
Cycle Speed
Dimensions (W x D x H)
Weight
Unit Warranty
Certifications
Specification
T17242
International Version (contains the appropriate
power cord for Europe)
Input Voltage:
90 - 260 VAC
Internal Voltage:
24 VDC
Input
70 - 100 psi [5-7 bar]
Output
1 - 100 psi [0.1-7 bar]
0.01- 9999 seconds
600+ /minute
8.625" x 8.50" x 2.625" [22 cm x 21 cm x 6.7 cm]
2.2 lbs (1 kg)
2 years from purchase date
CE, RoHs 2002/95/EC
SD-100 Syringe Dispenser User Guide
Warranty
From date of purchase, Dymax Corporation offers a two-year warranty against defects in
material and workmanship on all system components (excluding consumables) with proof of
purchase and purchase date. Unauthorized repair, modification, or improper use of equipment
may void your warranty benefits. The use of aftermarket replacement parts not supplied or
approved by Dymax Corporation will void any effective warranties and may result in damage to
the equipment.
IMPORTANT NOTE: DYMAX CORPORATION RESERVES THE RIGHT TO INVALIDATE ANY
WARRANTIES, EXPRESSED OR IMPLIED, DUE TO ANY REPAIRS PERFORMED OR ATTEMPTED ON
DYMAX EQUIPMENT WITHOUT WRITTEN AUTHORIZATION FROM DYMAX. THOSE CORRECTIVE
ACTIONS LISTED ABOVE ARE LIMITED TO THIS AUTHORIZATION.
Index
Air Connections, 7, 11
Timer Mode, 12
Assembly and Setup, 10
Optional Equipment, 17
Auto-Purge Function, 15
Parts Included, 11
Back Panel Controls, 10
Product Overview, 6
Components, 7
Purging the System, 15
Error Codes and Troubleshooting, 16
Safety, 5
Preventing Injection Injury, 5
Using Safe Operating pressures, 5
Features and Benefits, 6
Fluid Connections, 11
Front Panel Controls, 8
Memory
Loading from Memory, 14
Saving to Memory, 13
Operation Modes
Cycle Mode, 13
Manual Mode, 12
Setting the Decimal Point, 15
Spare Parts and Accessories, 17
Specifications, 18
Troubleshooting, 16
Unpacking, 10
Warranty, 19
19
Dymax Corporation
860.482.1010
[email protected]
www.dymax.com
Dymax Oligomers &Coatings
860.626.7006
oligomers&[email protected]
www.dymax-oc.com
Dymax Europe GmbH
+49 (0) 611.962.7900
[email protected]
www.dymax.de
Dymax UV Adhesives &
Equipment (Shenzhen) Co Ltd
+86.755.83485759
[email protected]
www.dymax.com.cn
Dymax UV Adhesives &
Equipment (Shanghai) Co Ltd
+86.21.37285759
[email protected]
www.dymax.com.cn
Dymax Asia (H.K.) Limited
+852.2460.7038
[email protected]
www.dymax.com.cn
Dymax Korea LLC
82.2.784.3434
[email protected]
www.dymax.co.kr
© 2012 Dymax Corporation. All rights reserved. All trademarks in this guide, except where noted, are the property of, or used under license by Dymax Corporation, U.S.A.
The data contained in this bulletin is of a general nature and is based on laboratory test conditions. Dymax Europe GmbH does not warrant the data contained in this
bulletin. Any warranty applicable to products, its application and use is strictly limited to that contained in Dymax Europe GmbH’s General Terms and Conditions of Sale
published on our homepage http://www.dymax.com/de/pdf/dymax_europe_general_terms_and_conditions_of_sale.pdf. Dymax Europe GmbH does not assume any
responsibility for test or performance results obtained by users. It is the user’s responsibility to determine the suitability for the product application and purposes and the
suitability for use in the user’s intended manufacturing apparatus and methods. The user should adopt such precautions and use guidelines as may be reasonably advisable
or necessary for the protection of property and persons. Nothing in this bulletin shall act as a representation that the product use or application will not infringe a patent
owned by someone other than Dymax Corporation or act as a grant of license under any Dymax Corporation Patent. Dymax Europe GmbH recommends that each user
adequately test its proposed use and application of the products before actual repetitive use, using the data contained in this bulletin as a general guide.
T17308
MAN043EU 12/26/2012