1
USER'S
MANUAL
Thank you for purchasing the SuperScan
Plasma Display TV.
Before using your TV, please read the "SAFETY iNSTRUCTIONS"
and this "USER'S MANUAL" carefully to learn how to operate the TV
properly. Keep this manual in a safe place. You wi!l find it useful in
the future.
Notes
on
Installation
This product is marketed with the assumption
that it is to be
installed by qualified personnel with relevant skills and
competence.
It is recommended
to consult with an installation
specialist or your dealer instal! and set up the product. SuperScan
cannot
assume
installation
liabilities
or mounting,
for damages
misuse,
caused
modifications
by improper
or natural disasters.
IMPORTANT
SAFETY POINTS THAT
Our reputation has been
Safety is also foremost
safety tips which will be
your Superscan Plasma
SAFETY
INSTRUCTIONS
YOU SHOULD KNOW ABOUT YOUR Superscan PLASMA TV
built on the quality, performance, and ease of service of Superscan Plasma TV.
in our minds in the design of these units. To help you operate these products properly, this section illustrates
of benefit to you. Please read it carefully and apply the knowledge you obtain from it to the proper operation of
TV.
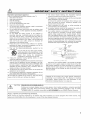
Follow all warnings and instructions
marked on this TV.
The lightning flash with arrowhead symbol, within an equilateral
triangle, is intended to alert the user to the presence of uninsulated
"dangerous voltage" within the product's enclosure that may be of
sufficient magnitude to constitute a risk of electric shock to persons.
The exclamation point within an equilateral triangle, is intended to
alert the user to the presence of important operating and
maintenance (servicing) instructions in the literature accompanying
the appliance.
CAUTION:
TO REDUCE THE RISK OF ELECTRIC SHOCK,
DO NOT REMOVE THE COVER (OR BACK).
NO USER SERVICEABLE
PARTS INSIDE
REFER SERVICING TO QUALIFIED SERVICE PERSONNEL.
WARNING:
• TO AVOID FIRE OR ELECTROCUTION,
DO NOT EXPOSE THIS MONITOR TO RAIN OR MOISTURE.
• THE MONITOR SHOULD NOT BE EXPOSED TO DRIPPING OR SPLASHING
AND OBJECTS SUCH AS
VASES
NOTE:
LIQUIDS,
SHOULD
NOT BE PLACED
• There are no user serviceable
parts inside the TV.
• Model information and serial numbers are indicated
CAUTION:
ON THE TV.
on the rear side of the TV.
Adjust
expresslyonlyapproved
those controls
by Superscan
that arecould
covered
void in
thethese
user's instructions,
authority to as
operate
improper
the TV.
changes
MODiFiCATiONS:
POWER
FILLED WITH
or modifications
not
The not
are
FCCexpressly
requires approved
that the user
by Superscan
be notified may
that void
any the
changes
user's orauthority
modifications
to operate
madethetoequipment.
this device,
that
SOURCE
THIS TV IS DESIGNED
60Hz OUTLET.
TO OPERATE
ON 120 VOLTS 60Hz, AC CURRENT.
INSERT
THE POWER
CORD INTO A 120 VOLT
TO PREVENT
ELECTRIC
SHOCK,
DO NOT USE THE TV'S (POLARIZED)
PLUG WITH AN EXTENSION
CORD,
RECEPTACLE,
OR OTHER OUTLET UNLESS THE BLADES AND GROUND TERMINAL
CAN BE FULLY INSERTED.
THIS
IS TO PREVENT
BLADE EXPOSURE.
NEVER CONNECT THE TV TO DIRECT CURRENT
OR ANYTHING
OTHER THAN
THE SPECIFIED
Z_
2
VOLTAGE.
AUTION:
Never remove the back cover of the TV as this can expose you to very high voltages and other
center.hazards"
If the TV does not operate properly, unplug the TV and call your author zed dea er or serv ce
IMPORTANT
Read before operating the appliance
Follow all warnings and instructions marked on this TV.
1. Read these instructions.
17. The
18.
2.
3.
4.
Keep these instructions.
Heed all warnings.
Follow all instructions.
5.
6.
7.
Do not use this appliance near water.
Clean only with a dry cloth.
Do not block any ventilation openings.
with the manufacturer's instructions.
8.
Do not install near any heat sources such as radiators, heat
registers, stoves, or other appliances (including amplifiers)
that produce heat.
Do not defeat the safety purpose of the polarized or
grounding- type plug. A polarized plug has two blades with
one wider than the other. A grounding type plug has two
blades and a third grounding prong. The wide blade or the
third prong are provided for your safety. If the provided plug
does not fit into your outlet, consult an electrician for
replacement of the obsolete outlet.
Protect the power cord from being walked on or pinched,
particularly at plugs, convenience
receptacles, and at the
point where they exit from the appliance.
Only use the attachments/accessories
specified by the
manufacturer.
Use only with the cart, stand, tripod, bracket,
or table specified by the manufacturer, or sold
with the appliance. When a cart is used, use
caution
when moving the cart!appliance
combination to avoid injury from tip-over.
Unplug this appliance during lightning storms or when
unused for long periods of time.
Refer all servicing to qualified service personnel. Servicing is
required when the appliance has been damaged in any way,
9.
10.
11.
12.
13.
14.
SAFETY
19.
Install in accordance
20.
such as when a power-supply cord or plug is damaged, liquid
has been spilled or objects have fallen into apparatus, the
apparatus has been exposed to rain or moisture, does not
operate normally, or has been dropped.
15. To reduce the risk of fire or electric shock, do not expose this
appliance to rain or moisture.
16. Do not expose this appliance to dripping or splashing. Do not
place objects filled with liquids on this appliance.
21.
Shock
INSTRUCTIONS
Hazard
Marking
and
Associated
ANTENNA
ELECTRODE
SYSTEM
(NEC ART 250 PART
NEC NATIONAL
ELECTRICAL
H)
CODE
Note to the CATV system installer: This reminder is intended
to point the CATV system installer to Article 820-40 of the NEC
that provides guidelines for proper grounding and, in particular,
specifies that the cable's ground wire shall be connected to the
grounding system of the building, as close to the point of cable
entry as possible.
Disposal of this product may require specific
pertaining to your resident state. For disposal
Do not aplace
anyc objects
on retr
top eve
of the
They may fall or
cause
ch d to
mb up to
the TV.
ob ects.
Graphical
Symbol is provided on the bottom panel of the unit.
This appliance is designed to comply with the recommended
safety standards for tilt and stability.
Do not pull the cabinet with excessive force. Doing so can
cause the product to overturn, resulting in damage to the
product and/or personal injury.
Follow instructions for wall, shelf, or ceiling mounting as
recommended by the manufacturer.
An outdoor antenna should not be located in the vicinity of
overhead power lines or other electrical circuits.
If an outdoor antenna is connected to the receiver, ensure
that the antenna is grounded to provide some protection
against voltage surges and built up static charges. Section
8!0 of the National Electric Code, ANSl/NFPA No. 70-1984,
provides information with respect to proper grounding for the
mast and supporting structure, grounding of the Iead-in wire
to an antenna discharge unit, size of grounding connectors,
location of antenna-discharge
unit, connection to grounding
electrodes and requirements for the grounding electrode.
information,
please
Electronic Industries
instructions
or recycling
contact your local authorities
Alliance: www.eiae.org.
or the
I
CAUTION:
PREVENTION
OF SCREEN
BURN
IN
I
I
Continuous
graphics,
SCREEN
PUBLIC VIEWING
Public viewing
require
on-screen
and
BURN
OF COPYRIGHTED
of programs
prior authorization
other
broadcast
displays
fixed
such as video
(non-moving)
games,
patterns
stock
can cause
N const tute m suse and are NOT COVERED
market
quotations,
permanent
computer
damage
by your SEARS
generated
to the TV.
J
Such
Factory Warranty.
MATERIAL
by TV stations
from the broadcaster
and cable
companies,
or owner of the video program
as well as programs
from other
sources,
may
material.
3
Important
Never
use acid/alkaline
detergent,
alcoholic
detergent,
abrasive
cleaner, powder soap, Electronic
equipment
cleaner, car wax, glass
Please read this User's Manual thoroughly,
especially
the important
Safety instructions
on Pages 2 to 3 and 6 to 10. Misuse may cause
cleaner,
etc. especially
scratches or cracks.
because
they
would
cause
discoloration,
damage
to your plasma TV and could shorten its lifespan, or may
even cause injury to yourself.
Should you encounter
any difficulty
in
the set-up or operation of your TV, refer to the Troubleshooting
at the back of this manual.
In the unlikely
switch off the
guide
event that there is a problem with your plasma TV,
power and unplug the TV, and contact your dealer
immediately.
Enhanced
CAUTION
display
Under
The 42-inch
no circumstances
plasma TV.
Never guess
or take
should
you remove
any chances
with
the back cover
electrical
equipment
of your
of any
Software
It is prohibited
Notice
for the
end
engineer or reverse compile
extent permitted by taw.
Plasma
user
of this
the software
product
to copy,
included
therein,
reverse
to the
TV
After the plasma TV has been on for any length of time, you will notice
that the screen becomes warm. Please note that this is normal
panel
color plasma
scratches
or damages
to the plasma
screen,
do not knock
or rub the surface with sharp or hard objects. Clean the screen with a
soft cloth moistened with warm water and dry with a soft cloth. A mild
soap may be used if the screen is extremely
abrasive cleaners!
dirty. Do not use harsh or
Use a soft cloth to clean the cabinet and the control panel of the TV.
When excessively
soiled, dilute a neutral detergent in water, wet and
4
panel, with a resolution
of 852 (H) x
High Performance
Processor
This panel
displays
Digital
a wide range of personal
computer
640 x 400, 640 x 480 VGA to 1600 x I200
UXGA.(RGB
Easy-to-use
control
on screen
remote
remote
display
control operates
on-screen display system,
an easy-to-view
fashion.
Power
a
saving
signals
Analog
from
input)
and
system
all TV functions.
Further, the
shows the status of the control settings
in
system
The International
ENERGY STAR® power saver feature saves power
consumption
automatically
when input signals are not available.
CAUTION
wring out the soft cloth, then
with a dry soft cloth.
display
kit.
The included
To prevent
plasma
480 (V) pixels, creates a widescreen
picture. This panel features
thin form factor and can be hung on a wal! with an optional wal!
mounting
kind - it is better to be safe than sorry!
definition
wipe the TV and afterwards
wipe
it off
When connected to a VESA DPMS-compliant
power consumption
while it is idle.
PC, the monitor
cuts its
Important
Safety
Features
Safety
Instructions
.............................
.................................................................
Instructions
...............................................
Prevention
of Screen
Installation
Instructions
Burn-In
.....................
...................................
2
Parental
4
General Setting
Captions Menu
6
11
12
Desk Top Stand ...............................................................
12
Anti-tipping
Prevention
...................................................
Mounting the Speakers
..................................................
Power Cord Connection
.................................................
12
13
13
Connecting
Connecting
Antenna/Cable
TV Signal .............................
to Video Components
..................................
14
15
Connecting
to a PC .........................................................
16
Component
Name ...............................................
Main Unit .........................................................................
Remote Control ..............................................................
17
17
18
Operating
20
Instructions
.......................................
Turning Power On and Off ..............................................
Selecting AV Inputs ........................................................
20
21
Volume Adjustment
........................................................
Audio Mute .....................................................................
21
21
Using the Menu Screen ..................................................
Picture Parameters .........................................................
PC Parameters
...............................................................
22
23
24
Audio Setting ..................................................................
Picture-in-Picture
............................................................
24
25
Channel Setting ..............................................................
ASPECT .........................................................................
25
27
ZOOM ..............................................................................
Picture-in-Picture
............................................................
27
28
Other Functions
31
Notes
about
..............................................................
this
Controls
............................................................
32
...............................................................
...............................................................
36
37
..................................................
38
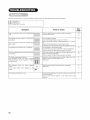
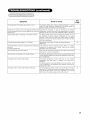
Troubleshooting
Symptoms
Abnormal
Product
.......................................................................
Displays
Corrections
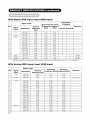
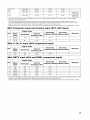
Specifications
RGB 2 only ....................
......................................
Component Connection ...................................................
Recommended
Signal List ..............................................
Warranty
.............................................................
38
41
42
43
44
46
manual
The information in this manual is subject to change without notice.
While meticulous care has been taken in the preparation of this manual, you are requested to notify your dealer or us should you have any
comments, views or questions about our product.
Fully understand the prerequisites to using the product, such as hardware and software specifications and constraints, when using the product.
We are not held liable for damages caused by improper handling of the product.
Reproduction of this manual in whole or in part without our prior written permission is prohibited.
The product names mentioned in this manual may be trademarks or registered trademarks of their respective owners.
5
This
Plasma
TV has been designed
and manufactured
to meet international
safety
taken if you are to obtain the best results and safety is to be assured.
Before using this product, please read and understand
the Safety Instructions
Various symbols are used in this manual, the user's
to prevent property damage. The meaning of these
fully understand
to ensure
correct
usage,
equipment,
and follow
This symbol indicates
incorrect handling.
information
information
that,
if ignored,
that, if ignored,
could
possibly
could result
result
possibly
in personal
in personal
indicates
an additional
warning
(including
cautions).
to
thesymbol
left indicates
is prohibited).
This
indicatesthata disassembly
prohibited action.
The contents
An illustration
will be clearly
indicated
is provided
to clarify
in an illustration
al! the instructions.
injury or even
injury or physical
and
and
death
due to
damage
due to
Never use the TV if a problem
should
occur.
Abnormal
operations
such as smoke, strange odor, no image,
the contents.
or adjacent
This symbol indicates
a compulsory
action. The contents will be clearly indicated in an illustration
symbol to the left indicates that the power plug should be disconnected
from the power outlet).
to the symbol
or adjacent
Do not insert foreign
objects
Penetration of liquids or foreign
are present.
If liquids or foreign
objects
enter the projector,
excessive
sound,
damaged
casing,
elements,
cables,
immediately
shock.
Use speciat
turn off the power
caution
switch,
in households
disconnect
where
the power
• Do not place metals,
combustibles,
Never disassemble
or modify the TV,
The TV contains high voltage components.
• Never remove
Do not subject
liquids such as water, etc. on or around
etc. on or around
Modification
plug from
the
5)
in a fire or electrical
Do not
disassemble.
shock.
any cover.
the TV to shock
or impact,
If the TV is subject to shock and/or is broken, it could result in an injury, and continued use in such a state could result in fire or
electrical shock. If the glass panel is broken or damaged,
immediately
turn off the power switch, disconnect
the power plug from
the power outlet
and contact
the ventilation
_"_
in fire or
of the TV,
is obstructed during the operation of the TV or just after switching off the power, it could result in damage
of your TV due to overheating.
Make sure there is ample ventilation.
• Keep a space of t0Omm (1Ocm) or more between
• Do not place anything around ventilation openings
• Never block ventilation
• Do not put the plasma
k.Y
your dealer.
Do not place the TV on an unstable
surface,
If the TV should be dropped and/or broken, it could result in an injury, and continued
use in such a state could result
electrical shock. Do not place the TV on an unstable, slanting or vibrant surface such as a wobbly or inclined stand.
Do not obstruct
®
the TV.
the TV.
could result
Disconnect the
plug from the
power outlet.
children
power outlet and contact your dealer.
• Do not place the TV in a bathroom.
• Do not expose the TV to rain or moisture.
• Do not place flower vases, pots, cups, cosmetics,
the sides, rear and top of the TV and other objects such as walls.
of the TV.
openings.
screen side up.
• Do not cover the TV with a tablecloth, etc.
• Do not place the TV on a carpet or bedding,
or near a curtain.
(the
_?_.
no sound,
or pour liquids
inside the TV,
objects could result in a fire or electrical
should
(the symbol
to the symbol.
penetration of liquids, or foreign matter, can cause a fire or electrical shock,
In such cases, immediately turn off the power switch and then disconnect
the power plug from the power outlet. After making sure
that the smoke or odor has cleared, contact your dealer. Never attempt to make repairs yourself because this could be dangerous.
6
must be
Symbols
This symbol
If ventilation
the lifespan
care
the contents.
CAUTION
(_
thoroughly
but like any electrical
manual and on the product itself to ensure correct usage, to prevent danger to the users
symbols are described below. It is important that you read these descriptions
thoroughly
This symbol indicates
incorrect handling.
Typical
standards,
and shorten
/k
Use
only
the
correct
power
outlet.
Incorrect power supply could result
and the safety standard.
• The enclosed
power
in fire or electrical
cord must be used depending
shock.
Use the correct
on the power
power
outlet depending
on the indication
on the TV
outlet to be used.
Be cautious of the power cord connection,
Incorrect connection of the power cord could result in fire or electrical shock
• Do not touch the power cord with a wet hand.
• Check that the connecting portion of the power cord is clean (with no dust), before using Use a soft and dry cloth to clean the
power plug
• Insert the power plug into a power outlet firmly Avoid using a loose, unsound outlet or contact failure.
• Do not cut off the fitted power plug, the removal of which could lead to impah-ed performance. If you wish to extend the lead,
obtain an appropriate extension lead or consult your dealer
Be sure to ground the connection properly.
• Connect the ground terminal of the AC inlet of this TV with the ground terminal provided at the power outlet using the enclosed
power cord. If the provided plug does not fit your outlet, consult an electrician for replacement of the obsolete outlet.
Be careful when handling the power cord and external
connection
cables,
O
Sure_y connect
the ground
wire.
Do not use damaged power cords or cables as they can cause a fire or electrical shock Do not apply excessive heat, pressure or
tension to the power cord and cables.
If the power cord or cables are damaged (exposed or broken core wires, etc.), contact your dealer
• Do not place the TV or other heavy objects on the power cord and cables Also, do not place a spread, cover, etc, over them as
this could result in the inadvertent placing of heavy objects on the concealed power cord or cables
• Do not pull the power cord and cables. When connecting and disconnecting the power cord or cables, do it with your hand
holding the plug or connector
• Do not place the power cord near a heater.
• Do not touch the power plug just after disconnecting it from the power outlet The static discharge can cause an electric shock.
• Do not touch the power plug during a lightning storm
• Avoid coiling the power cord and bending it sharply.
• Protect the power cord from being walked on or pinched at particularly at plugs, conveniences receptacles, and at the point
where they exit from the panel
• Do not modify the power cord.
Be careful when handling the batteries of the remote control,
Incorrect handling of the batteries could result in a fire or personal injury. The batteries may explode if not handled properly.
• Keep the batteries away from children and pets If swallowed, consult a physician immediately for emergency treatment
Do not allow the batteries to be exposed to fire or water
Avoid fire or high-temperature environments.
Do not hold the batteries with metallic tweezers
Keep the batteries in a dark, cool and dry place.
Do not short circuit the batteries
Do not recharge, disassemble or solder the batteries
Do not physically impact the batteries.
Use only the batteries specified in the manual accompanying this TV
• Make sure the plus and minus terminals are correctly aligned when inserting the batteries
• If you observe a leakage of the batteries, wipe out the liquidand then replace the batteries If you spill the liquid on your body or
clothes, rinse well with water
• Obey the local laws when disposing the batteries.
7
CAUTION
Be careful in moving
the TV
Neglect could result in an injury or damage.
• Do not move the TV during use. Before moving, disconnect
• Get the help of another person if you find it difficult to move
• Avoid any impact
or shock to the TV; in particular
the power plug and all external
the TV alone.
take care of the glass screen.
Do not put anything
on top of the TV,
Placing anything on top of the TV could result in loss of balance
in households
where
children
connections.
or falling,
and can cause an injury or damage.
Take special
care
are present.
Avoid a humid or dusty place.
Placing the TV in a smoke filled, or in a highly humid, dusty place with oily soot or corrosive gas could result in fire or electrical
shock.
• Do not place the TV near the kitchen, a humidifier or any other place where there is oil, smoke or humidity.
Avoid a high temperature
The heat could have adverse
environment.
influence on the TV and its components,
and could result
• Do not place the TV, the remote control and other parts in direct sunlight
• Do not put the TV in a place where the temperature
varies rapidly.
Remove the power cord when
• For safety, disconnect
the power
• Before
cleaning,
not using the TV for a long time,
cord if the TV is not to be used for prolonged
turn off and unplug
PRECAUTIONS
• Installation
the TV. Neglect
to do so could
in transformation,
periods
®
melting or fire.
or near a hot object such as heater,
etc.
Disconnect the
plug from the
power outlet.
of time.
result in a fire or electrical
shock.
J
environment
Do not obstruct
the ventilation
slots.
Do not place the TV on a carpet
the TV.
or blanket,
Do not place the TV in the following
or near a curtain
or anywhere
else where
there
is a possibility
of obstructing
the ventilation
slots of
places.
Hot places such as near heaters, or in places exposed
Places where the temperature
varies rapidly.
to the direct
rays of the sun.
Places with soot, dust or high humidity.
Places with poor ventilation.
Places such as near a fire.
Wet places such as bathrooms, or shower
Places where you can trip over the TV.
On objects
that vibrate.
On objects
that are unstable.
• How
to view
the
rooms.
TV
If you use the TV in too dark a room, your eyes
may become
Use it in a reasonably
bright room.
Avoid direct rays of the sun on the screen to prevent
tired.
eye fatigue.
Your eyes will get tired after viewing the TV for long periods of time.
Relax your eyes by looking away from the TV from time to time.
Please watch the TV in downward direction.
• Notes
on image
retention
The plasma TV illuminates
phosphors
to display images. The phosphor
particles have a finite illumination
life. After extended
periods of
illumination,
the brightness of the phosphors will degrade to such an extent that stationary images would burn-in the relevant part of the screen and
appear as grayed-out
images.
Tips to prevent such image retention:
- Do not display images having sharp brightness differences
or high-contrast
long periods of time as this can cause ghost images to form on the screen.
- Do not display stationary images for extended periods
- Turn down the contrast and brightness
controls.
• How
to clean
Before cleaning
the
plasma
screen
the TV, turn off the TV and disconnect
images,
of time, but try to change
panel
of the
such as monochrome
them at appropriate
characters
intervals
and graphic
patterns,
for
of time, or use screen savers.
TV
the power plug from the power outlet.
To prevent scratching or damaging the plasma screen, do not knock or rub the surface with sharp or hard objects. Clean the screen with a soft
cloth moistened with warm water and dry with a soft cloth. If it is not enough, then use a cloth with mild detergent.
Do not use harsh or abrasive
cleaners.
• How
to clean
the
cabinet
Use a soft cloth to clean the cabinet
of the
and control
TV
panel of the TV. When
soft cloth, wipe the TV and afterwards wipe with a dry soft cloth.
Never use acid/alkaline
detergent,
alcoholic detergent,
abrasive
cause discoloration,
8
scratches
or cracks.
excessively
cleaner,
powder
soiled, dilute a neutral detergent
soap,
OA cleaner,
car wax,
in water, wet and wring out the
glass cleaner,
etc.
as they could
• Prevention
of an obstacle
This TV has been designed pursuant
- Keep the TV away from Radio.
to Radio
receivers
to the international
EMI standards.
This is to prevent a problem
to Radio
receivers.
- Adjust Radio antennas in order for the TV not to receive interference.
- The antenna cable of Radio should be kept away from the TV.
- Use a coaxial cable for antenna.
You can check if this TV influences
If you find a problem
• Precautions
receiving
Radio receivers
by turning
off all other equipment
Radio when using the TV, check the instructions
for the cable
other
mentioned
than the TV.
above.
connection
- Do ensure that al! connections,
(including the power plug, extension leads and interconnections
properly made and in accordance
with the manufacturers
instructions.
Switch off and withdraw
connections.
- Confirm the connector is fixed tightly when the signal cable is connected.
Also confirm the screws on the connector are tightened.
- Plug the power cord of the TV into a different socket from that for other equipment,
- Use a plug with ground
• Precaution
Please
terminal
during
pay attention
and make sure that it connects
such
between the pieces of equipment),
are
the power plug before making or changing
as Radio etc.
to the ground.
transportation
when you transport
this TV because
it is heavy.
Furthermore,
use the original carton box and its packaging materials when the TV is transported.
Failure to transport the TV in any carton except the original carton may result in damage to the TV.
Save the original
carton
box and all packing
material.
Do not physically impact the remote control,
A physical impact could cause damage or malfunction of the remote control.
• Take care not to drop the remote control.
• Do not place heavy objects on the remote control.
Avoid strong rays.
Any strong rays (such as direct sun rays or room lighting) onto the remote control sensors could invalidate the remote control.
Avoid
radio
interference,
Any interfering radiation could cause distorted images or noises.
• Avoid radio generator such as a mobile telephone, transceiver,
Set the
sound
volume
at a suitable
It is better to keep the volume
• Precautions
for
- Do not use makeshift
etc. around
the TV.
level,
level low and close the windows
the
installation
stands
and NEVER
at night to protect
fix legs with wood screws
or legs with the fixings provided according to the instructions.
- Use only with the cart, stand, tripod, bracket, or table specified
the neighborhood
- to ensure complete
by the manufacturer,
safety,
front, or top, of the cabinet that could cause the product to overturn resulting in product damage
- Follow instructions
for wall, shelf or ceiling mounting as recommended
by the manufacturer.
• Other
always fit the manufacturers
or sold with the apparatus.
caution when moving the cart/apparatus
combination
to avoid injury from tip-over.
- This product is designed to comply with the recommended
safety standards for tilt and stability.
- Only use the attachments/accessories
specified by the manufacturer.
- Consult your dealer if you are in any doubt about installation, operation
environment.
When
Do not apply excessive
and/or personal
approved
a cart is used,
pulling
stand
use
force to the
injury.
or safety of your equipment.
precautions
- Do not leave equipment switched on when
stand-by mode. Switch off using the switch
handicapped
people.
- Disposal of this product
may require
- Never guess or take any chances
specific
it is unattended unless it is specifically stated that it is designed for unattended operation or has a
on the equipment and show your family how to do this. Make special arrangements
for infirm or
instructions
with electrical
pertaining
equipment
to your resident
region.
of any kind - it is better to be safe than sorry!
9
° FCC
(Federal
For model SSH2442
WARNING:
Communications
This equipment
Commission)
has been tested
and found to comply
Rules. These limits are designed
to provide reasonable
generates,
uses, and can radiate radio frequency
energy
STATEMENT
with the limits
protection
against
and, if not installed
WARNING
for a Class
B digital
device,
pursuant
to Part 15 of the FCC
harmful interference
in a residential
installation.
This equipment
and used in accordance
with the instructions,
may cause harmful
interference
to radio communications.
However, there is no guarantee that interference
will not occur in a particular installation.
(f this equipment
does cause harmful interference
to radio or television reception,
which can be determined
by turning the equipment
off and on, the user is
encouraged
to try to correct the interference
by one or more of the following
- Reorient or relocate the receiving antenna.
- increase
- Connect
the separation
the equipment
between the equipment
and receiver.
into an outlet on a circuit different from where
the receive
- Consult the dealer or an experienced
radio / TV technician for help.
Instructions
to Users:
This equipment
complies with the requirements
that following conditions are met.
Video inputs: The input signal amplitude
CAUTION:
Changes
the equipment.
or modifications
must not exceed
not expressly
the specified
approved
measures:
is connected.
of FCC (Federal
Commission)
regulations,
for compliance
could void the user's
of Conformity
According to 47CFR, Part 2 and 15 for
Class B Personal Computers and
Peripherals; and / or
CPU Boards and Power Supplies used
with Class B Personal Computers:
We:
Hitachi America
Ltd. Home Electronics division
Located at:
909 Hitachi Way Chula Vista. CA 91914. U.S.A.
Telephone:
!-80O-HITACHI
Declare under sole responsibility that the product identified herein, complies with 47CFR Part 2 and I5 of
the FCC rules as a Class B digital device. Each product marketed, is identical to the representative unit
tested and found to be compliant with the standards. Records maintained continue to reflect the
equipment being produced can be expected to be within the variation accepted, due to quantity production
and testing on a statistical basis as required by 47CFR § 2.909. Operation is subject to the following two
conditions: (I) This device may not cause harmful interference, and (2) This device must accept any
interference received, including interference that may cause undesired operation. The above named party
is responsible for ensuring that the equipment complies with the standards of 47CFR § §1 5.101 to
15.I09.
Trade name: Plasma Display TV
Model Number: SSH2442
10
provided
level.
by the party responsible
Declaration
Communication
authority
to operate
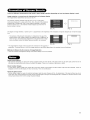
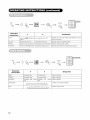
There are different characteristics that result in panel image retention depending on how the plasma display is used,
Image retention or screen burn-in characteristics
The image retention phenomenon can occur on any TV.
of a plasma
display
For example, when the character image as shown in Fig. A at the right is
continuously
displayed for a long period of time, then, only part of the phosphors
displayed age. Consequently,
when a white image is displayed on the entire
screen as shown in Fig. a, the character marks displayed up to that time will
become
visible
to the eye.
[Fig. A]
The degree
time.
of image
• The tendency
retention
or screen
of the phosphor
burn-in
to breakdown
is proportional
will depend
to the brightness
[Fig. a]
of the characters
and figures
where the brighter
figures
are present,
:b
are noticeable.
[Fig.
* The image retention
explanation.
images
in this document
The actual manner
are overdrawn
in which the image
as well as the display
on the age of the
plasma display. When images of figures with different levels of brightness,
as
shown in Fig. B, are continuously
displayed for a long period of time, image
marks at locations
displayed
retention
for the purpose
is seen differs
B]
[Fig.
b]
of
depending
on the operation
time and brightness.
Methods to Reduce the Occurrence
of Image Retention
• Lower the Contrast and Brightness settings of the plasma display as much as possible.
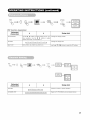
About
screen
• High precision
illuminate)
About
defects
technology
is used in the making
of plasma
and bright spots (points that are too bright)
residual
panels
that appear.
but over
These
the life of the panel,
do not indicate
there
a malfunction
may be dark
spots
(points
that do not
or defect.
images
• In some cases, residual images may remain after a short-term display of stil! images
disappear over time and the display will return to normalcy. This is not a malfunction.
About
the panel
screen
• Plasma display images by means
of electrical
discharges
inside
some cases. Also, plasma displays are made of finely processed
strong impact because there is still a danger of glass breakage.
the panel.
Because
glass. Although
and after another
image
of this, the temperature
a reinforced
has been displayed.
of the panel
glass filter is installed
surface
These
wil!
may rise in
over the panel surface,
avoid
11
m
m
TV
Desk top
stand
Use one of the special
mounting
or dropping
and result
in fire, electrical
or property
damage
caused
units to install this product.
shock
A mounting
unit of insufficient
or injury. Please note that our company
by use of other mounting
units or improper
strength
assumes
or inadequate
absolutely
design
can cause overturning
no responsibility
for personal
injuries
installation.
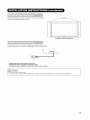
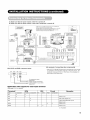
cAuTioN1
10cm (4 incur
Do not attempt installation
of the wall mounting unit and ceiling mounting
dangerous. Ask your dealer to provide the name of a qualified technician.
unit by yourself
more*
as it can be
In order to prevent overheating,
maintain a space of 10cm (4 inches: For a desktop setup) or more between
the sides of the TV and other objects such as walls, etc., so that the ventilation holes are not blocked.
Have th sun
t mounted
Using a commercially
1 ) Using screws
in a stable place. Take measures
available
(two), fasten
2) Using commercially
cord, chain and clamp,
the desktop
available
screws,
to prevent
down to avoid possible
physical
injury.
secure the set to a firm wal! or pillar.
stand using the two screw
secure
it from tumbling
the set firmly
holes on the rear of the stand as shown.
in position.
Mounting
Screw
hole location
Two places
12
Refer to the installation
Please refer to speaker
instructions
installation
concerning
manual.
mounting
of the speakers.
Speakers_
Connect the power cord, after completing
all other connections,
Connect the power cord to the rear of the TV.
Connect the power cord plug to the power outlet.
(The type of plug is different from this drawing for some countries.)
cAuTioN
1
• _wer
cord provided.
• Do not use a power supp y vo tage other than that nd cated
AC1O0-240V,
5O/6OHz
as this may cause fire or electric
shock.
13
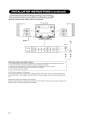
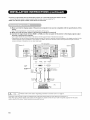
Make sure that the power
switch
of the TV is turned
off,
Speaker(L)
antenna
AV4
Precautions
when
connecting
IN
AV2
the antenna
• Use a coaxial cable which is free from interference.
Avoid using a parallel fiat wire
causing the reception to become unstable and noise to appear on the screen.
• Avoid using an indoor antenna as this may be affected by interference
• Keep the power cord as far away from the antenna wire as possible.
• Auto Tuning
please
IN
as interference
may occur,
and poor reception.
refer to page 25.
VHF(300-Ohm) antenna / UHF antenna
When using a 300-ohm twin lead from an outdoor antenna, connect the VHF or UHF antenna leads to the
screws of the VHF or UHF adapter. Plug the 300-ohm to 75-ohm adapter into the antenna terminal on the
TV.
When both VHF and UHF antennas are combined
Attach an optional antenna cable signal combiner to the TV antenna terminal, and connect the cables to the
antenna mixer. Consult your local electronics retailer.
14
(1) Make sure that the power
(2) Make sure that the power
switch
switch
of the TV is turned off.
of the Video component
is turned
off.
U=S=
Cgbles shown are not suppled with the television and are available locally
where ever consumer electronic p_oducts _re sol
*Les cables indiq_s ne sent p_s foumis avec m_t#l_vision mais son disponibles
Iocalement padout o_ de_ produits electriques sont vendus,
_Los cables mostrados no se incluyen con el telev_so_ y est_n disponibme_
Iocalmente en cL_alquier tienda de p_oductos _lectr6nicos,
F
(Supplied Speaker wire)
(Pil des haut=pa_eurs fourn_)
(Cable del altawz incluido}
B_si¢ Connection
Connexion d_ B_se
C_nexibn _siea
You car_ connect regular
to AV4 IN as well
DVD player
BetterConnectit_n
Meilleure
Cenn6×ior_
e jot¢onexio_I
I
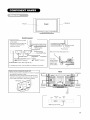
[An example of connecting
With
DVI-D and RGB component
t't-_'
,'27
11t'
• If the OUTPUT (MONITOR) terminal is connected to a 2nd monitor,
it is possible to view the same image as on the main source. The
composite video signal from AVl, AV2 input will be displayed on
both screens at the same time.
:?
To component
Applicable
video signals
(See page 42_45 for details)
video
Please use the connection
equipment.
cable
suitable for your video
equipment.
_I
Terminal
video components]
setup
for each
input
terminal
RCA
Type
AVl
Composite
O
S-video
O
AV2
O
O
PC
STB
Remarks
D-sub
DVI
Component
RGB
Component
Refer to P2I
AV3
0
480i Video Signal only
AV4
0
1080i/720P/480P/4801 inputs.
Refer to p21
Refer to p21
RGB1
RGB2
0
0
Refer to p21
'O: Available)
15
• Choose an appropriate
site and install the product
on a level table where the stand
• Ensure that a power socket is readily accessible near the place where you instal! the TV.
• Make sure that the power switch of this device is turned off,
(1) Make sure that the display
device.
signal
of the personal
computer
is secure,
to be used is compatible
with the specifications
of this
• See "Product Specifications" concerning the specifications of this device.
(2) Make sure that the power switch
(3) Connect
the signal input terminal
of the personal
computer
is turned off.
(RGB 1 or RGB 2) on the rear panel of this
device
to the display
signal
output
terminal
of the personal computer.
• Use a cable that fits the input terminal of this device and the output terminal of the personal computer.
• Depending on the type of personal computer being connected, the use of an optional conversion adapter or the adapter provided with the
personal computer may be necessary in some cases. For details, refer to the instruction manual of the personal computer or ask the
personal computer manufacturer or your local retail dealer.
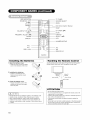
TV rear panel
Speaker(L)
con
neoto,
AU_EOE_
RGa2
.....
!ii! ii iiii,i
DEGETA,
ENPUTRGa2
AUOIOIN
RGBI
AN_LOG]NPUT
RGBI
Power
cord
3.5mm
Stereo
Audio cabl{
DVt-nDec_o
r
Con
1
To Audio
Output
/
\
PC
iZ_
Subwoofer
]k'°te
I
° Please
Output provides
refer
a single
to the caution
un-ampflfied
Note: When using a Home Theater audio system
system) directly to the Home Theater components
16
regarding
prevention
audio output that passes
of screen
along
with this plasma TV, please
subwoofer terminal.
burn
the audio signal
connect
in on page
3.
from the plasma
the sub woofer
(if originally
TV.
supplied
with the audio
Plasma
Control
Speakers
Front
panel
• Adjustment buttons are located
on the bottom.
• The back cover is provided with
indications to distinguish the
adjustment buttons.
o contro
Power
lamp
Main power switch (See page 20, (_))
JSOURCE
button
°
I
PROGRAM
UP/DOWN
buttons
(41 •
SUB-POWER
ADJUST
buttons)
(&V
SELECT
The ma
power switch is II I_
located
button)
button (See page 20, (_))
back, on the
lower surface
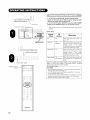
0 indicates the function while the MENU is displayed on the screen
Caution
when
moving
the main unit
• As this product is heavy, whenever it is moved, two people
are required to transport it safely.
• Whenever the unit is moved it should be lifted forwards
using the two handgrips at the back, and the unit should
then be held at the base on both sides for stability.
_@
__.-
___
V
/
__
Rear
Handgrips
Lm...._.._l_c::::_
o_e
c::::_
_
aandgripsl
Handgrips
External
\
_l_c====v=__ocz:::_._lll
speaker
terminals
__ _,.,_ _
J _
AUDIO _
O_OITA_-INPUT
ROB 2
AUDIO 1
Ext
o
_
_
!
rnal
speaker
terminals
ANALOO
RGS I
17
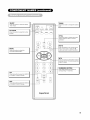
LED INDICATION
POWER
TV TUNER
ON / OFF
SLEEP
CH-LOCK
SOURCE
SELECT
ZOOM
ASPECT
_CCD
(Close Caption
PIP
Display)
SWAP
STILL
VOLUME
PROGRAM
CH UP/DN(AV)
UP / DN (AV)
/ADJUST
MENU
MUTE
(_11_)
ENTER
LAST-CH
SELECT
(AV)
MTS
DISPLAY
@
@
@@
NUMBER
@
KEYPAD
AV2
AV1
AV3
RGB 1-VGA
AV4
RGB-2 DVI-D
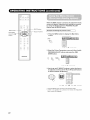
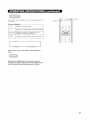
I Installing
1, Open
the
battery
the
Batteries
}
{Handling
the
Use the remote
cover.
remote-control
• Slide back and remove the battery
cover in the direction of the arrow
control
sensor
Remote
and within
30 degrees
2, Installing
the batteries.
• Install two included Size AA
batteries observing
polarities(+,-)
Within 30
degrees
the correct
Control
1
within about 16 feet from front of the unit's
on both sides
30
i
degrees
About
About 10 feet
I
I About 16 feet
3, Close the battery cover.
• Replace the battery cover in the
direction of the arrow and snap it
back into place.
%.
%,. ......
ATTENTION
• Do not drop the remote
i cAuTioN
I
• Do not mix new and old batteries
explode or leak, resulting
• When inserting batteries,
marked on the product
batteries could explode
or stains
together
The batteries
could
in fires, physical injury, or stains
observe their correct polarities as
If inserted in the wrong direction, the
or leak, resulting in fires, physical injury,
the remote
control with
• If leaving the remote control out of use for an extended
time, remove the batteries from it.
• If the remote
batteries.
control does not respond
properly,
• Strong light such as direct sunlight exposed
of the remote control can cause operational
unit to avoid direct
18
control
• To avoid possible failures, do not splash
water or put it on a wet object
contact with such light,
replace
period
of
the
on the photoreceptor
failure, Position this
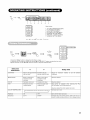
SLEEP
ZOOM
Press this button to select the Sleep
Timer mode.
Press this button to change the picture
size
I
CH-LOCK
Press this button to select the V-chip
function.
STILL
Press this button to freeze the picture.
Press it again to return to normal
operation.
MUTE
Press this button to turn off the sound,
Press it once more or press the •
volume up button to return the sound.
MENU
Press this button to select the
On Screen Display Menu
- -
MTS
Press this button
to select Multi-channel
television sound. This is to be used only
in the TV mode.
NUMBERS
KEYPAD
Press these buttons to access
corresponding
TV channels.
the
AVI
Press this button to select the VIDEO
or S-VIDEO 1 INPUT function.
1
AV2
Press this button to select the VIDEO
or S-VIDEO 2 INPUT function.
2
19
(_ To turn the TV power ON, press the main power
switch on the main unit to ON; the power lamp will light
and turn to green, the TV will turn on.
Power lamp
Main power
switch
_
To turn the TV power ON/OFF, press the SUB POWER
button or the ON/OFF button on the remote control.
• Note: During normal use, the main power switch is set in the ON
position.
O
Power
lamp
Power
lamp
TV
status
Operation
Off
Off
When the main
set to OFF.
power
switch
is
Lights red
Off
When
power
switch
is
(standby)
ON, and the OFF button on the
remote
control
or
the
SUB
the
main
POWER button on the underside
of the front of the frame is OFF.
Lights green
On
When the main power switch is
ON, and the ON button on the
remote
control
or
the
SUB
POWER button on the underside
of the front of the frame is ON.
Lights orange
Off
(Power
OL
l
©
©
©
SUB-POWER button
POWER ON/OFF
button
©
©
©
©
When
Save)
the
main
power
switch
ON, and the PC is in power
mode.
is
save
When the indicator
lamp lights orange or the message
"No Sync.
Signal" or "Power Save" appears on the screen, there is something
abnormal about the status of the reception.
See Trouble Shooting.
CAUTION
• Avoid repeatedly turning the TV on and off at short time intervals.
Failures might result from doing so.
• Turn off the main power switch before
for an extended period of time.
leaving the TV out of use
• If a power failure occurs while the main unit is running, it would
powered on upon recovery from the failure. Turn off the main
power switch
2O
when a power failure
occurs.
be
The volume
buttons
buttons
can be adjusted
of the remote
of the TV).
by pressing
theA
(or the •
+ and •-
control
and •
volume
Volume setting value
SOURCE button
Adjustment status guide display
• When
the
volume
status
guide
• The volume
will increase
are
will
pressed,
the
volume
be displayed.
when the VOL+
(or A) button
• The volume
CONTROL_
AV
E
will decrease
when the VOL- (or •)
button
is pressed
while the guide is being displayed.
i
The audio volume can be temporarily
muted
the MUTE button of the remote control.
• When
the
MUTE
button
is pressed,
appear.
• The volume setting can be lowered
while the audio is muted.
• Input can be switched
by pressing
AV4, RGB1, or RGB2 buttons
the AVl,
AV2, AV3,
• Input can be switched
in the sequence
TV _ AV1-Video
AVl-SVideo
_ AV2-Video
_ AV2-SVideo
_ AV3 480i
AV4 480p/480i
_ RGB1 VGA
_ RGB2 DVI-D by
pressing
the SOURCE button and then select the Input
with the select keys •
•and
then press the ENTER
G_
button.
is pressed
while the guide is being displayed.
VOLUME
Select
buttons
adjustment
button.To
select
a TV station,
the
above
by pressing
• Muting can be cancelled
by pressing
MUTE button while the audio is muted.
by pressing
icon
the VOL-
the VOL+
button
will
button
or the
When the MUTE button of the remote control
is pressed
again, the audio will be restored and the volume display
(green)
will appear.
press the TV
21
rpOWER
i_oj,
_LEE_
iA_ECT
O
C_LOC_ Z_O_ _OU_CE
_1_
SWAP
CCU
When the MENU button is pressed, the adjustment
menu
screen wilt appear, Adjustment
and setting are possible
VOL
UU_'E
by using the SELECT buttons, PROGRAM
buttons and the ENTER button.
CH
ADJUST
ENTER button
MENU button __
_EN_
LAST
J
PROGRAM/
ADJUST • •buttons
SELECT buttons
I Example:
Selecting
the picture
screen
]
1. Press the MENU button to display the Main Menu
screen.
( 8
:i
\
J
AW
_, S _
,Z h
\ ._
S _
_, S
_,,,9
2. Select the Picture
Parameters
PROGRAM ADJUST
ENTER button.
buttons
screen with the • and •
and press the
3. Use the • and • SELECT buttons to select the item to
be adjusted and then use the • and • ADJUST buttons
to adjust (example: Brightness.)
SELECT: AV
E_TER:
,_
ADJUST:
_ti_"
RETURN: MENU
• Press the MENU button to return to the previous screen.
• If there is no operation for a period of one minute, the Adjustment
Menu screen
22
will disappear.
1
2
3
4
5
6
7
Main buttons:
1.
2.
3.
4.
5.
6.
7.
SELECT:
A_r
E.TE_:_J
ADJUST:
"_
PICTURE PARAMETERS MENU
PC PARAMETERS MENU
AUDIO SETTING MENU
PICTURE-in-PICTURE MENU
CHANNEL SETTING MENU
PARENTAL CONTROLS MENU
GENERAL SETTING MENU
O_ETUR.:ME.U
BR_G_TNES_
C0NTRA_T
COLOR
MENU
%
TI_T
FLES_TONE
¢OLORTEMP
_HAR_ES_
1 .Press the "MENU"
2.Press the ENTER
adjusted
button to display the Main Menu screen.
button to confirm then use the • and • SELECT
and then use the • and • ADJUST
buttons
buttons
to adjust the selected
to select the item to be
items.
Selected
<
characters
CONTRAST
Narrows
thegapbetween
light and dark.
BRIGHTNESS
Black is subdued
increased overall
Setup
•
Broadens
between
for
darkness,
thegap
Adjust
light and dark.
Black is set to off for
increased overall
Decrease
TINT
Enhances red and
weakens green,
Adjust
as desired.
color level.
Increase
color level.
Enhances green
weakens red.
and
Adjust
visibility
to
suit
the
as desired.
This cannot
be adjusted
when
receiving
SECAM signal, and will be greyed out.
Adjust
TEMPERATURE
maximum
ambient
brightness.
brightness.
COLOR
COLOR
for
hint
Warm._,-,_N0rmal_,-_ Coo _
UserR<--_ UserG _
UserB
as desired
Normally
for photo realistic
the
PAL/
skin color.
set to Cool.
t
Fleshtone
ON
OFF
Set to ON for richer
skin color.
Sharpness
SOFT
SHARP
Normally set to the center position; shift to the minus (-)
side for a softer picture and plus (+) for a sharper picture.
23
MENU
%
Selected
characters
AUTO
<
Press the (_
I_
ENTER
button
Setup
to make the word "ON"
light on.
CLOCK
Reduces
the dot clock
PHASE
Slows the dot clock
POSITION
Press the PROGRAM
Phase
Increases
the dot clock
Advances
the dot clock
button to adjust the display
Phase
position
Normally
set to off mode.
phase,
and position.
Adjust
for maximum
Adjust
for clear character
Adjust
the horizontal
hint
Adjust
character
automatically
clarity.
visibility.
and vertical
display
MENU
%
Selected
characters
<
•
BASS
Decreases
bass.
TREBLE
Decreases
treble.
BALANCE
Decreases
level,
right
volume
Increases
bass.
Increases
treble.
Increases
level.
left
Setup
volume
SURROUND
24
as desired.
Adjust
as desired.
Adjust
asdesired.
Creates
OFF _
MTS
Adjust
BAS{C _
a surround
MONO - STEREO
SAP- -q
Selects
hint
sound effect.
ENHANCED _]
TV tuner sound.
for clock,
positions.
MENU
%
PIP function
descri )tion
Selected
<
characters
PIP POSITION
Use the •
•
•
Setup
buttons to adjust pictures to the up or Change PIP display position.
down positions. Use the •
•
buttons
)ictures to the right or left positions.s
to adjust
PIP SIZE
Change PIP display Size.
SMALL _
MULTI
PIP
OFF--POP(1
•--_,-
MEDIUM _
LARGE _
SPLIT _
+12)--POP(1+8)--POP(1
+3)
OFF
use the •
•/•
•
buttons to select the PIP setting.
ii_i:i!!i_
/ !i!iii_
_
Selected
characters
Setup
SYSTEM
hint
Antenna or cable TV system selection.
F'_ANTENNA_
CHANNEL
hint
CABLE
EDIT
Begin AUTO PROGRAM, add and delete channel.
[_ AUTO PROGRAM _-_ADD_DELETE
_-_
25
Pre-setting
TV Channels
Note: The TV must be in "rv mode for access to this Menu.
CHANNELSYSTEM:TV
[1] SYSTEM -- Select between antenna or cable TV system
CHANNEL
SYSTEM:CATV
m
SELECT:_,V
ENTER: _
ADJUST: 4
R_TURN:
MENU
[2] AUTO PROGRAM -- Auto search channels
iiiiiiiiiiiiiiiiiiiiiiiiiiiiiiiiiiiiiiiiiiiiiiiiiiiiiiiiiiiiiiiiiiiiiiiiiiiiiiiiiiiiiiiiiiiiiiiiiiiiiiiiiiiiiiiiiiiiiiiiiiiiiiii
SELECT:
A_'
ENTER:
4_j
ADJUST:
_
RETURN:
MENU
[3] CHANNEL ADD -- Change the OSD channel number from Red to Green
,_
SELECT:
Ay
ENTER:
_
ADJUST:
_
_
RETURN:
MENU
[4] CHANNEL DELETE -- Change the OSD channei number from Green to Red
SELECT:
26
,_"
ENTER:
_
ADJUST:
_
_
RETURN:
MENU
iiiiiiiiiiiiiiiiiiiiiiiiiiiiiiiiiiiiiiiiiiiiiiiiiiiii
¸
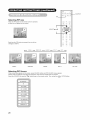
The ASPECT
TV's screen.
button
will select
how the video
image
appears
on the
ASPECT--
There are 4 selections.
16:9
Displays a wide screen image
4:3
Displays a 4:3 square picture with letterbex bands
PANORAMIC Stretches the picture to increase the size of
images in the center of the picture.
CINEMA
Magnifies the image to fill the screen with a picture.
16:9
CINEMA_
-_ 4:3
PANORAMIC
Note: For PC set, you can select
mode.
Each time the ZOOM
button
1
_ -_
4:3 and 16:9 aspect
of the remote
control
is
pressed, the image on the screen will be enlarged. There
are 10 selections, Zoom 0(=Normal
size) to Zoom 9.
27
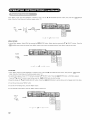
PIP_
Selecting
PiP size
When the PIP button on the remote control is pressed,
a black box will appear on the screen.
I
SELECTAandV
I
Each time the PIP button is pressed, the size of box
changes as follows.
SMALL
SMALL
Selecting
MEDIUM
_
MEDIUM
_
LARGE
LARGE
_
SPL_T
_
OFF
,_
SPLIT
PIP-OFF
PIP Source
While a black box appears on the screen_ press SOURCE button and PIP SOURCE menu appears.
Picture mode will change in the following sequence, each time the remote button is pressed.
Select the SOURCE
28
by using the •
•
select keys on the remote control. Then, press the (_
ENTER button.
Setting
Up PIP through
PICTURE
1. Press the "MENU"
2.Select"
PICTURE
button
(N PICTURE
to display
IN PICTURE"
On Screen Main Menu
the Main Menu screen.
Menu with •
•
ADJUST
button
and press (_
ENTER
button,
then following
menu will appear.
Select PIP size
1. Press
@
2. Select
the PIP size with
ENTER
button.
•
•
SELECT
3. Press @
ENTER button.
4. Press "MENU" button 2 times to return
5. Press "MENU"
button.
to PICTURE
IN PICTURE
Main Menu.
to exit.
Select PIP Source
While
Select
a black box appears
the SOURCE
on the screen,
by using the•
•
press
SELECT
SOURCE
buttons
button
and PIP source
on the remote
control.
MENU
Then
appears.
press the @
ENTER
button.
29
Change
PIP Position
After selecting
PIP Size and PIP Source,
PICTURE
1. Press the "MENU" button to display on the On Screen Main Manu.
2. Select "PICTURE
IN PICTURE"
Menu with•
_" ADJUST button.
3. Press _
ENTER
button• The following
IN PICTURE
Menu and a diagram
wi!l appear•
4. Press the @
of the diagram•
ENTER
Key and a white
ball appears
in the center
5. Move the PIP display with • • SELECT and • 1_ ADJUST buttons.
6. Press "MENU" button 2 times to return to "PICTURE
IN PICTURE"
Menu.
7. Press "MENU"button
to exit.
Multi PIP
PICTURE
1. Press the "MENU" button to display on the On Screen Main Manu.
2. Select "PICTURE
IN PICTURE"
Menu with•
I_ ADJUST button.
3. Press (_
will appear•
4.Select
ENTER
button• The following
Multi PIP with
•
5. Select the PIP display
6. Press "MENU"
7. Press "MENU"
•
SELECT
mode with
Menu and a diagram
button•
•
SELECT
key 2 times to return to "PICTURE
to exit.
A
_
A
A
A
buttons•
IN PICTURE"
A
Menu.
A
A
,¢
PIP(l+12)
3O
•
A
IN PICTURE
A
A
A
PiP(l+8)
A
A
PIP(!+3)
• The MTS button
is used only v/hen
Stereo
and SAP (2nd
When a bilingual program
using the TV channel
selector.
Audio
program)
sound
program
is received, the sound mode display appears
as shown on the right.
Press the MTS button to select the sound to be heard.
Each time the button
[
is pressed,
Stereo,
CHANNEL/0
SAP
SAP or Mono appears
,j
.........
CHANNEL
Each time the button
Monaural
is pressed,
to select between
10
MON
I TV11
....._
Mono
and SAP (2nd Audio
program)
sound
program
When a program is received, the sound mode display will appear
and you can press the MTS button
on the screen.
as shown on the right,
SAP and mono sound.
SAP or Mono will appear
on the screen.
sound
When a monaural program is received, the sound mode display will be shown.
You can press the MTS button to manually select monaural Sound.
NOTES
• If the sound signal is not strong enough, press the MTS button until Mono appears on the screen, to receive a clear mono sound
• If the sound has a hiss noise or keeps switching between stereo and mono mode or SAP and mono mode due to signal strength, press the
MTS button unt Mono appears on the screen to rece vea c ear mono sound.
Stereo
sound
When a stereo program is received, the sound mode display will be shown
You can press the MTS button to select the sound mode for stereo or mono reception
31
Press
"MENU"
button.
and select
PARENTAL
Enter the V chip Password:
button
the factory
CONTROLS
preset
menu with the
•
•
PROGRAM
ADJUST
buttons,
then
press
the
@
ENTER
code is Ili1.
PARENTAL CONTROLS
£_LEC_
MPAA
_
_NTER:
_
AOJUST:
_
£ETURN:_EF_U
RATING
A second
Menu
appears.
ENTER
button
Select
MPAA
to enter the rating.
by pressing
the (_
Press "MENU"
ENTER
button
PARENTAL
button.
Select
rating
twice to return to parental
by pressing
controls.
the •
Press "Menu"
•
SELECT
button
buttons.
Press
the
to exit screen.
CONTROLS
TWATING
_A_SW0_I)
SE
TV
ECT:
_
ENTEr:
_
AOJU_T:
_
RETUrN:MENU
RATING
1.Press
button.
"MENU"
2.A second
and select PARENTAL
Menu appears.
Press the •
&Select
button
Enter the V chip Password:
•
SELECT
the ratings with
•
Select
buttons
CONTROLS
the factory
preset
menu with the •
TV PG Rating by pressing
to select
•PROGRAM
rating,
ADJUST
•
PROGRAM
press the
buttons.
the •
SELECT
@
ENTER
Press the
@
button.
button
5.To exit the TV PG Rating menu,
press the "MENU"
button.
6.To exit Parental
press the "MENU"
button
Menu,
PAeENTAL
Press the @
ENTER
button
a second
time.
CONTROLS
P&$$WO_D
SELECT:_Ti
32
buttons,
then press the
_
ENTER
ENZER: ,_
_JUSZ:
_
RETW_:MENV
ENTER
button,
a third Menu appears.
to enter the rating.
4.To exit the sub menu press "MENU" button.
Controls
ADJUST
code is 1Ill.
to set the rating,
a dot will appear
next to the rating.
PASSWORD
1.Press
button.
"MENU"
button
and select
Enter the V chip Password:
2.A second Menu appears.
the numbers on the TV's
3.Enter
the password
4.A password
window
CONTROLS
the factory
Select password
remote control.
a second
confirmed
PARENTAL
menu with the •
•
PROGRAM
ADJUST
buttons,
then press the
_
ENTER
preset code is Ili1.
by pressing
they
SELECT
button,
press the @
ENTER
button,
Enter the new password
using
time to continue.
will appear.
Press Menu button to exit Parental
Controls.
PARENTALCONTROLS
SELECT;
_
E_TER:
_
ADJUST:
_
RETURt_:MEt_U
33
This function witl block out the selected channel
number buttons to select the secret code.
Change
Access
Code
Enter Access
or video input.
Not Rated:
the LOCKS
Code
feature
The factory
Enter NEW Access
MPAA Ratings
The code to enter
Code
G; PG; PG-13;
is a four-digit
preset
When
Use the
code is (Illl).
This is used to enter
R; NC-17; X
secret code number.
a new four digit number
this is selected,
you can
block
you prefer.
various
types
of
movies and videotapes
based on motion picture ratings.
Picture-in Picture will also be blocked automatically.
TV Ratings
TV-Y; TV-Y7
(FV); TV-G; TV-PG
TV-14 (D; L; S; V); TV-MA
(D; L; S; V)
When
this
is
selected,
various
types
of
television
programming
based on parental
guide ratings wil! be
blocked.
Picture-in-Picture
will
also
be
blocked
(L; S; V)
automatically.
If you forget your secret code use the factory
preset (1Ill).
The secret
code prevents
viewing
code (1Ill)
to erase
your secret
of any movie that you feel may be inappropriate
the MPAA RATING category that you want to block. Press the OK button
selected, for example PG-13, all MPAA rated PG-13 and higher (R, NC-I7
Press RETURN
Motion
to return
to the previous
Picture
Not Rated (NR)
Ratings
Contains
General
PG
Parental
PG-13
Parents
X
34
due to its content.
Use the •
code number
or •
back to the factor
SELECT
to block the MPAA RATING that you have selected.
and X) movies will be blocked.
Chart
G
NC-17
This will reset the secret
menu.
no rating.
Not Rated (NR) and Not Applicable
Movie has not been rated or ratings
R
code.
audiences.
guidance
strongly
Restricted.
Under
Atl ages are permitted
suggested.
cautioned.
17 requires
No one I7 and under
Adults
only.
Some
Some
to watch.
material
material
to watch.
may not be suitable
may be inappropriate
an accompanying
are permitted
(NA) programs.
do not apply.
for children.
for children
parent or adult guardian.
under I3.
buttons
to select
Once the rating is
TV
Ratings
This is to prevent
Use the •
or •
viewing
SELECT
of any TV program
buttons
that you feel may be inappropriate
to highlight
the category
due to its content.
that you want to block.
Press the OK button to block the TV RATING that you have selected.
Press the RETURN
button to return to the previous menu.
TV
Parental
Guide
Ratings
TV-Y
Chart
All children.
The themes
audience, including children
TV-Y7
Directed
violence,
TV-G
General audience,
situations.
and elements
in this
from ages 2-6.
program
are
specifically
to older children,
Themes and elements in this program
or may frighten children under the age of 7.
It contains
little or no violence,
no strong
may include
language,
TV-PG
Parental guidance
suggested.
The program may contain
some suggestive
sexual dialogue and situations.
TV-14
Parents strongly
cautioned.
This program may contain sophisticated
more intense violence and intensely suggestive
dialogues.
TV-MA
Mature audience
only. This program
and explicit sexual content.
FV
Fantasy
may contain
mature
designed
infrequent
themes,
for a very
mild physical
young
or comic
and little or no sexual dialogue
coarse language,
themes,
indecent
intense
language,
or
limited
violence,
sexual
situation,
graphic
violence
Violence
V
Moderate
S
Sexual
Situations
Violence
L
Coarse
Language
D
Suggestive
Dialogue
NOTE
If you block TV-14D,
w
st
you will still permit
permtTV-MALSprograms.
TV MA programs;
ThsmeansthattheTVw
if you block TV-14DV,
bockvoence
you will automatically
nTV-14andhgher
block TV-MAV
TV-MA),
programs,
but not anguage
but you
and sex.
35
MENU
Selected
Setup
characters
OSD POSITION
Use the •
•
OSD position
OSD TIMEOUT
and
•
•
buttons to adjust the
hint
Adjusts
the OSD position
3SEC--10SEC--20SEC.
Adjusts
OSD display
OSD LANGUAGE
English--French--Spanish
Sets the language
SLEEP TiME
Use the •
•
Set the TV off time for each mode
120 MIN)
iNPUT
To display
information
INFO
FACTORY
RESET
TRANSPARENCY
Depending
36
buttons to set the TV off time mode.
ON
OFF
Use the •
transparency
on the type of signal
about the input signal.
displayed,
•
buttons to adjust OSD menu
displays
may not be optimized
Displays
information
and on-screen
for the OSD,
all settings to FACTORY
Adjusts
OSD MENU transparency
automatic
(OFF/30
MIN/60MIN/
about the input signal
Resets
through
time
adjustment.
Manually
defaults,
adjust to optimize
them.
Setup
up Closed
Press the CCD
Caption
button
on the remote
button
and press the @
Select
the closed
To exit Captions
ENTER
caption
Menu,
control and select
MODE
menu by pressing
the •
SELECT
button.
by pressing
MENU,
the A•
press the MENU
button
SELECT
buttons.
Press the @
ENTER
button.
twice.
CCD
{
CC4
L
TEXT2
E
TF_T_
%
TFXT_
To Select
Box
Press the CCD
Select
or Shadow
button
on the remote
BOX or SHADOW.
To exit Captions
Menu,
display
control and DISPLAY
Press the @
press the MENU
ENTER
button
menu by pressing
the •
SELECT
button
and press the @
ENTER
button.
button.
twice.
ccD
Closed Captions
are the dialogues,
Television screen.
Caption
Display
narration
and/or
Press the SOURCE button twice
CCl--CC2--CC3--CC4
(Captions)
Channel
TEX1--TEXT2--TEXT3--TEXT4
of a television
program
or home
video
that are displayed
on the Plasma
[Captions] is for the program you are viewing.
[Text] is for additional information such as news reports or a TV program guide.
This information covers the entire screen and viewing the TV program is not possible.
Text may not be available with every [C.C] program.
¢ =CC1--CC2=-CC3=-CC4--TEXTI==
Channel
effects
[1]Press the SOURCE button twice to turn the [C.C] display on or off.
Mode
" ==TEXT4--TEXT3--TEXT2
sound
....
[1] is used for the primary
language
(usually
English)
[2] is sometimes
[3] is sometimes
used for a second language (may very by region).
used for a third language (may very by region).
[4] is sometimes
used for a fourth language
(may very by region).
(Text)
BOX
[1] is used for the primary language, and has a black back ground.
SHADOW
[1] is used for the primary language, and has a line back ground.
NOTE
• CAPTION DISPLAY will not work when viewing a 480P, 720P, or 1O8Oiinput via the COMPONENT: Y-PBPR or DVI-HDTV inputs.
• CAPTION DISPLAY will not work for other Extended Data Services.
• When P P Mu t P cture) mode s on, CAPT ON D SPLAY s act vated on the se ected d sp ay.
37
If the point to check does not correct
Self servicin=
the symptoms,
please
contact
your local Sears Service
Point
The message
is displayed.
"No Sync. Signal"
lamp
or "Power
Check to see that the power
Press the main switch.
Save"
is no picture and the power indicating
lamp
cable is properly
16
No sync signal is detected.
Check that the signal cable is properly
connected.
Make sure that the computer,
equipment,
imaging
2O
connected.
etc., is turned
on.
lights orange.
Make sure the computer isnot inpower-save mode.
Ensure thatthe inputselectionmatches the connection terminal.
The message
"Invalid
Scan
Freq." is displayed.
An inputsignalisreceived abnormally.
Ensure thatthe inputsignN matches the monitor specifications.
Check to see that the signal
The power indicating lamp is lit normally but there
is no picture.
The display image appears slanted.
Text
displayed
across
the
screen
streaked,
blurred.
Text
displayed
blurred.
A fine
See
to check
Page
There is no picture and the poweFindicating
is off.
vertically
columns
for assistance.
can be hazardous.
Symptom
There
center
pattern
with the characters
across
flickers
the
when
screen
displayed
screen,
Check
contrast
and
brightness
connected.
settings
(adjust
(RGB
appears
)
for
23
connected.
Adjust the clock frequency
and the phase.
frequency first, the dot clock phase next.)
in vertical
them
16
higher contrast and brightness).
Check to see that the signal cable is properly
appears
on
the
cable is properly
16
(Adjust
the clock
22
16
input)
Adjust
the clock phase till the desired
(RGB
input)
clarity
24
is obtained.
16
the
i_
i
J
The remote
control does not work.
Ensure that the batteries
the correct
Check to
functional.
38
polarity.
see that
the
in the remote
batteries
in
control
the
are inserted
remote
control
with
are
18
Point
Symptom
The temperature
of the display
panel
See
to check
Page
surface
is warm.
The plasma
display
panel
works
by lighting
phosphors.
cases, this may cause the temperature
of the panel
increase. Please note that this is not a malfunction.
In some
surface
to
Points that do not light, points with brightness
different from
that of the periphery, points with color different from that of the
High-precision
technology
is used to manufacture
the plasma
display panel, However over the life of the plasma panel, a few pixel
periphery,
elements
Vertical
etc.
stripes
appear,
depending
on the screen
contents.
may fail. This is not to be considered
The plasma
display
panel works
by lighting
a defect
in the panel.
the phosphors
on it by
the discharge
of internal
radiation.
Depending
on the screen
contents, in rare cases, this may cause vertical stripes to appear
because of its failure to light the relevant
this is not a malfunction.
Coarse
horizontal
stripes
appear
in FULL display.
The screen
and down.
flickers
in the form of horizontal
PC INPUT
MODE
only)
The top surface
of the monitor
Adjusting the Clock
(RGB input)
lines oscillating
up
If the frequency
from the
frequency
(to a maximum
attenuation
heats up.
Phase will reduce
When
of the current
pixels.
Please
the horizontal
note that
24
stripes.
computer
is below 85Hz, try a higher
limit of 85Hz). There may be a slight
image.
used for long periods
of time, the top surface
of the monitor
may heat up. This is not a malfunction.
Text characters
are displayed
with varying
thickness.
The thickness
of characters
vertical resolution greater
is not a malfunction.
The display
does not seem bright enough.
The ambient
temperatures
luminance.
temperature
less than
The panel protection
and lines may vary when images
than 480 lines are displayed;
does not seem bright enough.
(RGB
input)
this
of the monitor may be low. Ambient
about 15 ° degrees,
may cause lower
circuit automatically
is not a malfunction.
The luminance
turned on for a while.
The display
with a
however
lowers
the luminance,
will be restored
when
and
power
is
The setup-frequency
setting in RGB input may be set to PC mode.
When set to PC mode, the luminance
is lowered by about I0% than
when set as Movie mode.
mind flicker on the display,
23
This is not a malfunction.
If you do not
please switch to Movie mode.
39
Make the checks
suggested
below depending
on the symptoms
observed.
If the symptoms
remain
unresolved,
contact
your dealer.
L£,vARN
] ,To
Do not attempt
to service
this unit.
Symptom
Possible
reason
Remedy
(I)Connection
of antenna/cable
lead in wire
the TV is poor
(2)Corroded
or poor antenna/cable
connections
(3)Antenna
has moved position
to
(1)Make new connection and/or change
antenna plug
(2)Make new connections
or use new cable.
(3)Re-align
(4)None
(4)Adverse
weather conditions
(5)Transmitter
problems
(5)Check
(I)Antenna
(2)Adverse
(1)Re-align
(2)None
the antenna
with the local Operator
snowy picture - poor sound
has moved position
weather conditions
(3)Transmitter
problems
(4)AV Input is not set correctly
(5)Corroded
or poor antenna
connections
multiple
images
- sound
(3)Check
(4)Check
/ cable
(5)Make
the antenna
with the local Operator
the external equipment
new connections
connected
or use new cable.
O.K
(I)interference
from electrical
motors, fluorescent
etc.
lights,
or mechanical
portable
radios
(1)Check
devices
for shielding
and renew if
necessary or move further from TV
(2)Make new connections
or use new cable.
(2)Corroded
or poor antenna/cable
connections.
intermittent
interference
(I)TV
may be in AV mode
(2)Picture/sound
(3)TV
setting
is in standby
is set to minimum
or power
(4)Corroded
or poor antenna
connections.
no picture
(1)Press
the PROGRAM
buttons on your
normal TV mode
save mode
(2)Check
MENU)
/ cable
(3)Press
(4)Make
picture
control
/ sound
controls
or the @ to @
to return
or sound
/0
MONO l
to
(go to MAIN
POWER ON / OFF button
new connections
or use new cable.
CHANNEL
T_/
40
button
remote
Depending on the kind of system equipment used, images may not be displayed normally. In this case, make the
adjustments suggested below. (only for RGB2)
Symptom
I
Text displayed across the screen appears vertically
The display image appears flowing (figure 2) (RGB
Example
Figure
Adjustment
1) Press the MENU button.
0rocedure
2) Press the •
I
4) Press the •
When adjustment
SELECT
6) Press the •
button.
SELECT
8) Press the •
SELECT
button
10) Perform
2
Example
blurred
(figure
I).
SELECT
and select
and select
The Setup
button
or IP" ADJUST
adjustment
Auto Adjust.
with Auto Adjust:
Horizontal
Clock.
or a vertical striped
buttons
for symptom
disturbed
Setup.
Menu will be displayed.
and select
as characters
image may be momentarily
Setup.
Menu will be displayed.
The Main Menu witl be displayed.
button
button.
fine patterns
9) Press the •
and Select
The Setup
is not possible
7) Press the ENTER
Symptom
characters
The Main Menu will be displayed.
button
5) Press the MENU button.
• The display
with some
Before characters
adjustment
Some
a_e blurred
3) Press the ENTER
(Displays
streaked,
input).
and search
pattern
over the entire screen
for clear characters
2 below, when the characters
during
clock adjustment
during
Horizontal
are blurred
on the entire screen.
but this is not a failure.
Text displayed across the screen appears blurred in its entirety (figure 2).
A fine pattern flickers when displayed on the screen (figure 3).
Before
Figure 2
adiustment
Figure
Beforeadjustment
3
HHHHHHHHHHHHHHHHHHHHHHHHHH
:iiii :il
iii:
i
iiiiiiiiiiiiiiiiiiiiiiiiiiiiiiiiiiiiiiiiiiiiiiiiiiiii
iiiiiiiiiiiiiiiiiiiiiiiiiiiiiiiiiiiiiiiiiiiiiiiiiiiii
iiiiiiiiiiiiiiiiiiiiiiiiiiiiiHHHHHHHHHHHH
iiiiiiiiiiiiiiiiiiiiiiiiiiiiiiiiiiiiiiiiiiiiiiiiiiiii
iiiiiiiiiiiiiiiiiiiiiiiiiiiiiiiiiiiiiiiiiiiiiiiiiiiii
After _tment
Adjustment
3rocedure
Clock adjustment.)
over the entire screen.
1) Press the MENU button.
2) Press the •
SELECT
3) Press the ENTER
4) Press the •
SELECT
The Main Menu witl be displayed.
button
button.
After adjustment
and Select
The Setup
button
Setup.
Menu will be displayed.
and select
Auto Adjust.
When adjustment
is not possible with Auto Adjust
5) Press the MENU button. The Main Menu witl be displayed.
6) Press the •
SELECT
7) Press the ENTER
8) Press the •
SELECT
(Displays
fine patterns
9) Press
•
clean across
button
button.
button
buttons
Setup.
Menu will be displayed.
and select
as characters
or I_- ADJUST
the screen,
and select
The Setup
Clock
Phase.
or a vertical
striped
to make
the text
pattern over the entire screen
appear
9) Press
without
•
during
or IP" ADJUST
Clock
Phase adjustment.)
buttons
to make
the text appear
flickering.
41
Panel
Display
dimensions
Approx. 42 inches (920 (H) x 518 (V) mm, diagonal 1059mm)
Resolution
852 (H) x 480 (V) pixels
Net dimensions
(excluding Speakers/Stand)
1030 (W) x 636 (H) x 91 (D) mm
Net weight
(excluding Speakers/Stand)
38.64 kg
Ambient
conditions
Temperature
Operating: 5°C to 35°C, Storage: -15°C to 60°C
Relative humidity
Operating: 20% to 80%, Storage: 20% to 90% (non-condensing)
Power supply
AC100 - 240V, 50/60Hz
Power consumption/at standby
3IOW / <3W
Audio output
10W + 10W (6_))
(RGB input)
Input signals
Input terminals
RGBI-VGA audio input terminat (3.5mm Stereo Mini Jack)
RGB1-VGA analog RGB input terminal (D-sub 15-pin)
RGB2 DVI-D input terminal (DVI-D
RGB2 DVI-D audio input terminal (3.5mm Stereo Mini Jack)
Video signals
0.7 V/1.0 Vp-p, analog RGB (Recommended Signal
480i, 576i, 480p, 576p, 1080i/50, 1080i/60, 720p/60
Sync signals
H/V separate, TTL level [2K_)]
H/V composite, TTL level [2K_)]
Sync on green, 0.3 Vp-p [75_)]
Recommended signal
47 modes
(Video input)
Input signals
Input terminals
AVI video: video input terminal (RCA)
AV1 video: SVideo input terminal
AVI: L/R audio input terminal (RCA)
AV2 video: video input terminal (RCA)
AV2 video: Svideo input terminal
AV2: L/R audio input terminal (RCA)
AV3 video: video input terminal (RCA)
AV3: L/R audio input terminal (RCA)
AV4 video: video input terminal (RCA)
AV4: L/R audio input terminal (RCA)
Video
Video output
Recommended
signals
Signal
AVI: NTSC3.58,
AVI : 480i
NTSC4.43
AV2: NTSC3.58,
AV2: 480i
NTSC4.43
AV3: NTSC3.58,
AV4: NTSC3.58,
NTSC4.43
NTSC4.43
OUTPUT
(MONITOR):
composite
OUTPUT
(MONITOR):
L/R audio monitor-
1I modes
signal
(RF input)
input signals
input terminals
ANT: 75£) Unbalanced
RF Video
NTSC-M
System
It takes at least 30 minutes
42
to attain
the maximum
picture quality.
video monitor-output
terminal
output terminal
(RCA)
(RCA)
Pin
Input
signal
1
T.M.D.S.
Data2-
2
T.M.D.S.
Data2+
3
T.M.D.S.
Data2/4
4
T.M.D.S.
Pin
Input
signal
14
+5V Power
15
Ground
16
Hot Plug Detect
Data4-
I7
T.M.D.S.
Data0-
Data4+
Shield
(for+5V)
5
T.M.D.S.
I8
T.M.D.S.
Data0+
6
DDC Clock
19
T.M.D.S.
DataO/5 Shield
7
DDC Data
20
T.M.D.S.
Data5-
8
No Connect
21
T.M.D.S.
Data5+
9
T.M.D.S.
Data1-
22
T.M.D.S.
Clock Shield
lO
T.M.D.S.
Data1+
23
T.M.D.S.
Clock+
1I
T.M.D.S.
Data1/3
24
T.M.D.S.
Clock-
12
T.M.D.S.
Data3-
Frame
GND
13
T.M.D.S.
Data3+
RGB terminal
Shield
(D-sub
Pin
15-pin
Input
R (PR/CR)
G or sync on green (Y)
12
17
18
19 20
13 14
2I
r-m
22
23 24
/
B (PB/CB)
4
No connection
5
No connection
6
R.GND
7
• When different
(PR/CR, GND)
B.GND
9
Sync
(PB/CB, GND)
HN composite
GND
I1
sync.on
No connection
I2
possible.
H. sync or H/V composite
I4
V.sync.
are simultaneously
input to
type
sync.
sync.
Green
*
Priority
I
2
3
• Even in the case of the recommended
signals shown on the
following page, there may be instances when correct display is not
[SDA]
I3
signal
H/V separate
No connection
IO
kinds of input signals
the monitor via a graphics board or the like, the monitor witl
automatically
select the signals in the following priority order:
G.GND (Y, GND)
8
sync
In this case, use H/V separate
sync, or H/V composite
sync.
[V.CLK]
[SCL]
I5
0: With
Pin
11
signal
2
S-input
10
connector)
1
3
9
connector
component
input
pin specifications
Input
signal
1
Y
2
%GND
3
C
4
C-GND
Frame
GND
43
With
Digital
RGB
signal
Signal
mode
input
1
VGA
2
Resolution
input)
Horizontal
Dot
Vertical
frequency
frequency
frequency
(kHz)
(kHz)
No.
Signal
name
(RGB
clock
Setup Menu
Condition
Remarks
DVI-PC
DVI-STB
(Hz)
640 x 400
70.08
31.47
25.18
o
640 x 480
59.94
31.47
25.18
o
3
W-VGA
864 x 480
59.94
31.47
34.24
o
4
MESA
640 x 480
72.81
37.86
31.50
o
5
640 x 480
75.00
37.50
31.50
o
6
640 x 480
85.01
43.27
36.00
o
7
800 x 600
56.25
35.I6
36.00
o
8
800 x 600
60.32
37.88
40.00
o
9
800 x 600
72.19
48.08
50.00
o
lO
800 x 600
75.00
46.88
49.50
o
1I
800 x 600
85.06
53.67
56.25
o
12
I024 x 768
60.00
48.36
65.00
o
13
I024 x 768
70.07
56.48
75.00
o
14
I024 x 768
75.03
60.02
78.75
o
o
15
480p
720 x 480
59.94
31.47
27.00
o
EIA-861
16
720p/60
1080i/60
I280 x 720
60.00
45.00
74.25
o
1920 x I080
60.00
33.75
74.25
o
EIA-861
EIA-861
17
Make sure that the signal of the equipment to be connected is compatible with the specifications on this list.
With
Analog
RGB
signal
Signal
No.
1
Signal
name
VGA
2
input
(RGB
mode
Resolution
input)
Horizontal
Vertical
frequency
frequency
Dot clock
(kHz)
frequency
70.08
31.47
25.I8
640 x 480
59.94
31.47
25.I8
W-VGA
864 x 480
59.94
31.47
34.24
4
VESA
640 x 480
72.8I
37.86
3I .50
5
640 x 480
75.00
37.50
3I .50
6
640 x 480
85.0I
43.27
36.00
7
800 x 600
56.25
35.I6
36.00
8
800 x 600
60.32
37.88
40.00
9
800 x 600
72.I9
48.08
50.00
10
800 x 600
75.00
46.88
49.50
1I
800 x 600
85.06
53.67
56.25
12
I024 x 768
60.00
48.36
65.00
13
I024 x 768
70.07
56.48
75.00
14
I024 x 768
75.03
60.02
78.75
15
I024 x 768
85.00
68.68
94.50
16
I152 X 864
75.00
67.50
108.00
17
1280 X 1024
60.02
63.98
108.00
18
1600 X 1200
60.00
75.00
162.00
640 X 480
66.67
35.00
30.24
2O
832 X 624
74.55
49.72
57.28
2I
I024 X 768
74.93
60.24
80.00
22
I152 X 870
75.06
68.68
100.00
44
Macintosh
(kHz)
Remarks
(Hz)
640 x 400
3
19
(O): acceptable
WVGA
type: On
23W-XGA
24
25
1280
x768
1280
x768
1280
x768
59.833
69.997
59.876
47.986
56.I37
47.776
81.00
94.760
79.50
WXGA
Mode:
(1280
x768)
26
1366
x768
60.015
47.712
89.50
WXGA
Mode:
(1386
x768)
•Thetypeofvideo
board
orconnecting
cable
used,
may
notallow
forcorrect
display
adjustment
ofHorizontal
Position,
Vertical
Position,
Horizontal
Clock
andClock
Phase.
•Themonitor
may
failtodisplay
ananimation
image
correctly
when
asignal
having
avertical
frequency
of85Hz
orhigher
isinput
toit.
•Themonitor
differentiates
thesignal
modes
according
tothehorizontal
and
vertical
frequencies
and
thehorizontal
and
vertical
sync
signal
polarities.
Note
thatdifferent
signals
having
allthese
elements
alike
maybehandled
asthesame
signal.
• Displaying
images
withmore
than
480lines
ofvertical
resolution
atFulldisplay
(compressed
display)
canresult
intheinterpolation
ofstripes.
With
Composite
Input
Signal
No.
and
S-video
Input
(AVI~AV2
mode
Vertical
Resolution
name
frequency
frequency
NTSC-M
PAL-M
525
59.94
I5.73
2
PAL-M
625
50.00
I5.63
Y, Cb,
Cr input
Signal
No.
Signal
name
I
2
576i
480i
With
HDTV
(AV3
component
mode
frequency
480
(AV4
Signal
(kHz)
frequency
and
frequency
Dot clock
I
Signal
name
Resolution
(kHz)
I5.73
RGBl-component
input)
mode
Vertical
frequency
frequency
Dot clock
(kHz)
frequency
31.26
576p
480p
480
59.94
31.47
3
1080i/50
I080
50.00
28.I3
4
1080i/60
I080
60.00
33.75
5
720p/60
720
59.94
44.96
6
1080p/60
I080
59.94
64
• The monitor differentiates
the signal modes according
to the horizontal
and vertical frequencies
and the horizontal
polarities. Note that different signals having all these elements alike may be handled as the same signal.
with more than 480 lines of vertical
Remarks
(kHz)
(Hz)
50.00
2
images
Remarks
I5.63
576
• Displaying
Remarks
(Hz)
Horizontal
No.
(kHz)
input)
50.00
59.94
576
input
frequency
Horizontal
Vertical
Resolution
(kHz)
(Hz)
I
With
Dot clock
Horizontal
Signal
input)
resolution
at Full display
(compressed
display)
and vertical
can result in the interpolation
sync signal
of stripes.
45
Your Home
Forrepair-in
your home-of aii major brandappJiances,
Jawn and garden equipment, or heating and cooling systems,
no matter who
made
it,no matter who somd it!
For the replacement parts,accessories and
owner s manuals thatyou need to dodt-yourseJf.
For Sears professJonaJinstallation
of home appJiances
and items likegarage door openers and water heaters.
I oe00-4oMY-HOME ®
(1-800-469-4663)
ca,anytime,
dayornight
(USAandCanada)
www.sears.¢om
www.sears.¢a
our Ho_o
Forrepair
ofoarry-in
items
Uke
vao,.,.ms,
_awn
eq,Jipment,
ande_eotronios,
oa,orgoon=Une
Forthetooation
ofyo.rnearest
SearsP
arls
& ReRair
Center
1-800-488-1222
ca,anytime,
dayornight
(USAonly)
.............................. oo,
Top,.,rohase
aproteot_on
agreement
(USA)
orma,ntonanoe
agreement/Canada)
oneprod,.,ot
servioed
Sears:
1-800-827-6655
(U.S.A.)
to800-36to6665
Para pedir serviaio de reparaai6
(Canada)
Au Canada pour service en fran@i s:
a domicilio,
y pareordenarpiezas:
1-888-SU-HOGARSM
I_800_LEoFOYERMC
(1-800-533-6937)
(1-888-784°6427)
www.sears.ca
SEAl, S
()R Registered
Trademark / Tr_
' Trademark / SM
' Service Mark of Sears, Roebuck and Co
@ Marca Registrada / TH
_ Marca de Fabrica / SM
• Marca de Servicio de Sears, Roebuck and Co
HD
MCMarque de commerce / ' Marque dl@o see de Sears, Roebuck and Co
© Sears, Roebuck
and Co
One Year Full Warranty
if this product experiences
date of purchase, contact
This warranty
This warranty
state.
Sears,
46
any failure due to a defect in material or workmanship
within one year from the
Sears at I_800-4oMY°HOME(R)
to arrange to have it repaired free of change.
applies only if this product is used for private household purposes.
gives you specific legal rights, and you may also have other rights which vary from state to
Roebuck
and
Co.,
Dept.
817WA,
Hoffman
E states,
IL
60179