1
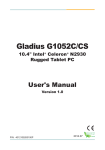
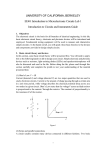
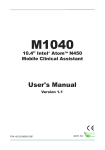
User Manual I1010Q16DCZ
Explanation, Note and Warning
*Explanation: important information, which can help you better use your tablet PC.
*Note: indicates that not observing the content may result in hardware damage or data
loss.
*Warning: indicates that not observing the content may result in property damage, personal
injury or death.
3
Catalog
*Parts………………………………………………………………………5
* Accessories……………………………………………………………..7
Configuring your tablet PC …………………………………………….8
Charging your tablet PC…………………………………………..8
Starting up your tablet PC……………………………………….10
Shutting down your tablet PC…………………………………...11
Disabling the display……………………………………………..11
Inserting a micro SD card………………………………………..12
Using a headset or earphones…………………………………..14
Using the tablet PC…………………………………………………….15
Wi-Fi settings……………………………………………………...15
Gesture…………………………………………………………….15
Screen orientation………………………………………………...18
The Windows 8 start screen……………………………………..18
Syncing your tablet PC……………………………………………21
*Troubleshooting………………………………………………………...22
Cleaning your tablet PC………………………………………..…25
Refreshing/resetting your tablet PC…………………………......26
Specifications……………………………………………………....27
1
4
Parts
5
6
7
1
2
3
10
4
9
8
——————————————————————————————————————
Part
Function
——————————————————————————————————————
1The power button
• Hold to start up or shut down the tablet PC
• Press to activate or disable the display
——————————————————————————————————————
2 Micro-USB port
•.Connect the power adapter provided with the
Tablet PC to the supply power to charge the
battery
• The optional USB Portable (OTG) encryption
dog USB device can be used to transfer
data, music, photos, videos, and other files
5
Part
Function
——————————————————————————————————————
3, MINI HDMI
Primarly used for connecting portable devices such as
DV,
digital cameras, portable media players, etc.
——————————————————————————————————————
4, Audio port (3.5 mm)
Used to connect a headset, headphones, microphone,
or other audio device to listen to stereo, record audio or
make calls
——————————————————————————————————————
5, Lock screen button
Press to lock the screen
——————————————————————————————————————
6, Volume buttons
Press to increase/decrease the volume
2
——————————————————————————————————————
7, Front camera
• Take a picture or video from front view
• Make video calls
——————————————————————————————————————
8, Pogo pin interface
• Used to connect a Pogo pin keyboard
——————————————————————————————————————
9, Speakers
• Used to output audio
——————————————————————————————————————
10, Micro SD card slot
• Used to read and write files stored on the microSD
card
6
Charging accessories
5V/2A power adapter with a Micro-USB connector
to supply power to the tablet PC and charge its battery
7
Configuring your tablet PC
Note: Only charge the battery at ambient temperatures from 0℃ to 35℃.
3
Note: Use only the power adapter provided with your tablet PC for charging. Using
unauthorized power adapters or Micro-USB cable can cause severe damage to
your tablet PC.
Note: The battery is not fully charged in a new tablet PC.
1. Connect the power cord to the power adapter.
2. Connect the Micro-USB cable to the Micro-USB port on the tablet PC.
8
3. Plug the power adapter into a power socket and to charge the tablet PC until the battery
is fully charged.
Explanation: It will take approximately 4 hours to charge the battery if the battery
is charged while the tablet PC is switched off. Charging the battery will take longer
if the tablet PC is switched on.
You can view the battery charging status for the tablet PC in the following ways:
The battery icon appears on the screen:
The battery charging light is located
on the right side of the tablet PC:
—————————————————————
The battery icon
——————————————————
Explanation
LED status
—————————————————————
Explanation
——————————————————
Tablet PC is connected to the power
Permanent red - the battery is
charging.
supply and the battery is fully charged
—————————————————————
—————————————————
Tablet PC is connected to the power
LED off - battery is not charging
4
or
supply and the battery is being charged.
——————————————————
battery fully charged.
—————————————————
Tablet PC is running and using battery
power and the battery is discharging
———————————————————————
Tablet PC is plugged into a power supply and
no battery is detected or the battery is not working.
—————————————————————
Tablet PC is running on battery power and the battery is low.
Tablet PC is running on battery power and the battery is almost empty.
9
Starting up your tablet PC
When you start up your tablet PC for the first time, you have to complete the Windows
setup before using your tablet PC.
1 Press and hold the power button for 2 seconds to turn on your tablet PC . The
lock screen will be displayed.
2, Touch the bottom section of the screen and swipe your finger upward to switch to
the login screen and enter your password in the Windows login.
Once the Windows start screen is displayed, you can start using your tablet PC.
Note: If the Windows 8 login screen is not enabled, you enter the start screen
directly from the lock screen.
10
Shutting down your tablet PC
Using the power button:
1 Press and hold the power button for at least 4 seconds
5
2 Swipe the shutdown screen to the bottom of edge of the LCD to shut down your
tablet PC.
Using the onscreen icons:
1 Swipe from the right edge of the screen to access the charms toolbar.
2 Touch "Settings
→Power
→Shutdown"
Disabling the display
Using the power button:
Press the power button briefly and the display will be switched off.
Using the onscreen icons:
1 Swipe from the right edge of the screen to access the charms toolbar.
2 Touch "Settings →Power →Hibernate"
Note: If your tablet PC is on standby (turned on with display disabled), press the
power button or the Windows button to enable the display.
11
Inserting a microSD card
1
n the USB cover located on the back cover.
Ope
6
2 Make sure the microSD card is facing in the right direction.
3 Insert the microSD card into the slot.
4 Close the USB cover.
12
Removing a microSD card
Note: Removing a microSD card while in use may cause data loss or an application
error. Make sure you have saved all data and completed all operations requiring the
microSD card before removing it.
1 Touch the desktop icon on the Windows start screen to enter desktop mode.
2 Touch the "Safely Remove Hardware" icon in the notification area on the bottom
right corner of the screen.
* Note: If you do not see the "Safely Remove Hardware" icon, touch the arrow icon in
the notification area to display all hidden icons.
3 Touch eject the microSD card. A message will be displayed to confirm that you can
safely remove the microSD card. If the warning message appears , showing the microSD
card can not be deleted , please Ensure that all data related to the microSD card transfer
have been completed.
4 Open the USB cover.
5 Press the microSD card to release it from the slot.
6 Remove the microSD card.
13
Using a headset or earphones
Insert the headset or earphones jack into the tablet PC's audio port.
Warning: Listening to loud music for prolongued periods of time may cause hearing
loss.
1
Connect the headset or earphones jack to the tablet PC's 3.5 mm audio port.
7
2 Place the headset or earphones on or in your ears and adjust the volume to a
comfortable level。
Note: When connecting an audio device to the 3.5 mm audio jack, the tablet PC's
integrated speaker will automatically be muted.
Note: In order to avoid damage to the earphones, hold the jack and not the cable
when unplugging..
14
Using the tablet PC
Wi-Fi settings
Switching Wi-Fi on/off:
1
Swipe from the right edge of the screen to access the charms toolbar.
2
Touch settings →Internet icon.
3
Swipe the Wi-Fi icon to the left or right to turn Wi-Fi on or off.
Connecting to the internet:
1 Swipe from the right edge of the screen to access the charms toolbar.
2 Touch "Settings → Available".
3 Select an available network from the list and connect to the network.
Using gestures
This tablet's LCD supports multi-touch gestures. You can operate the tablet PC using
its click screen.
Gesture
Operation(s)
Click
Use fingertips to gently click on the display
• Select items on the screen including
options, entries, images and icons.
• Start an application.
• Touch a button on the screen.
• Use the on-screen keyboard to enter
text.
Gesture
Operation(s)
Press
Press your finger on the display for 2 seconds.
• Display detailed information about an
item.
• Open an item's context menu for
further action.
8
Drag
Press an item on the screen with your finger.
Keep touching the display.
Move your finger to the desired position.
Remove your finger from the display to drop the
item in the desired location.
• Move images, icons and other items
on the screen .
Swipe or slide
Move your fingervertically or horizontally on the
screen.
• Scroll screen, web page, list, entries,
photos, contacts, etc.
• Close an application by swiping it to
the bottom of the screen.
16
Gesture
Operation(s)
Zoom in
Touch the display with two fingers, then move
the fingers apart.
Enlarge an image or page.
Zoom out
Touch the display with two fingers, then move
the fingers together.
Reduce an image or page.
9
Rotation
Rotate an object 90 degrees.
Touch screen with two or more fingers, then
move your fingers in a clockwise or
counterclockwise direction.
17
Screen orientation
For the best viewing, the screen will automatically change its orientation to portrait or
landscape format depending on how you hold the tablet PC. You can disable automatic
screen rotation and lock the screen in portrait or landscape mode if needed.
Note: Some applications may not support automatic screen rotation, as they are designed
for use with only one screen orientation.
Lock screen orientation
1 Change screen to the desired orientation
2 Swipe from the right edge of the screen to access the charms toolbar.
**3 Touch "Settings→ Screen".
**4 Touch
"Lock screen orientation".
The Windows 8 start screen
The Windows 8 start screen shows a list of standard and custom dynamic tiles used to
access applications including Mail, Windows Explorer, Weather, Calendar, Windows Store,
Internet Explorer and other installed programs.
The Windows 8 start screen will automatically display up-to-date news, sports news,
weather reports, social network news and much more.
This tile-based user interface allows you to directly access recently used applications for
email, photos, music, videos, contacts, social networking and frequently visited sites. You
can customize the start screen according to your individual preferences.
You can also add your favorite pictures as wallpaper and personalize the start screen.
**Note: Dynamic tiles can be pinned to the to the taskbar or removed from the start screen
by right-clicking on then and selecting "Pin to taskbar" or "Remove from start"
respectively.
18
Accessing the start screen
**When Windows starts on your tablet PC, the start screen will be displayed by
10
default.
The start screen can be accessed from any other application by using one of the
following methods:
• Press the Windows button on your keyboard
• Swipe from the right edge of the screen to access the charms toolbar and then
click on the Start icon.
***If you are already on the start screen, pressing the Start icon will display the most
recently used application or most recently viewed content.
* Note: The Start icon and the Windows button have the same functionality.
Using the Windows 8 charms toolbar
• Swipe from the right edge of the screen to access the charms toolbar. This toolbar
provides a set of buttons for system commands including start, search, share,
devices and settings options.
* • Swipe to the left on the start screen until the Applications icon (downward
pointing arrow) is displayed. Click this icon to display an alphabetical list of all the
applications installed on your tablet PC.
19
Swiping the screen to the right
•Swipe the screen quickly inwards from the left edge to switch between currently
running applications.
•Swipe the screen quickly inwards from the left edge to display thumbnails of
currently running applications.
Swipe the screen quickly inwards from the left edge to display a list of recently
running applications.
Swiping the screen to the left/right
*•On the start screen, you can swipe inwards from the top or bottom edge of the
screen display a customizing icon. You can use this to customize the tiles that you
would like to have displayed on the start screen.
• Applications can be closed by swiping from the top to the bottom of the
application.
11
20
Syncing your tablet PC
Using your Microsoft account
If your computer is running Microsoft Windows 8, you can use your Microsoft account to
synchronize your tablet PC with your user settings.
When using your Microsoft account to log in, your settings (including your browser history,
application settings and personal files, etc.) will be synchronized with any other personal
computer or tablet PC running Windows 8.
1. On the tablet PC, activate the charms toolbar and then click "Settings
→Change
PC Settings →Accounts → Your account → connect to Microsoft account". You can
switch the local account to your Microsoft account.
2 Click "Settings → Change PC Settings → OneDrive → Sync settings". You can view the
data and options for syncing.
Copying music, photos and videos
1 Use a Micro-USB to standard USB adapter cable to connect the tablet PC to a USB
storage device. You can then transfer files to and from the USB storage device.
After transferring files, use the "Safely Remove Hardware" wizard to remove the USB
storage device.
Explanation: The Micro-USB to standard USB adapter cable is sold separately and are not
provided with the tablet PC.
21
Troubleshooting
Battery problems
Problem
Possible cause
Possible solutions
Can't charge
Adapter is defective or
damaged
1 Ensure proper connection.
2 Unplug the AC power
adapter from the wall, and
make sure plug is working
properly.
3 Check all lines and then
connect one end of the
adapter to the tablet PC and
the other end to the wall
outlet.
Tablet PC is in an
environment with a
temperature lower than 0℃
or higher than 35℃.
Charge the battery at a
12
temperature between 0 ℃
and 35℃
Battery or power adapter is
damaged
Contact the dealer to
replace the battery or power
adapter.
If the tablet PC is within
range of a network that it
can’t connect to, it will
continue to send a signal to
the base station, which
consumes power.
Shut down the tablet PC
temporarily. Move the tablet
PC to a place where it can
connect to the network or
switch off the tablet PC's
Wi-Fi.
Problem
Possible cause
Possible solutions
Can’t start up
Battery is completely
discharged
1 The tablet PC should be
charged for at least four
hours.
2 Press and hold the power
button for two seconds
Can’t shut down
The machine has crashed
Press and hold the power
button for 10 seconds to
force shutdown
Computer locked
Illegal operation
Press and hold the power
button for 10 seconds to
force shutdown
Tablet PC does not respond
or runs abnormally
Programs are defective
1 Reboot the tablet PC. See
section on starting up and
shutting down the tablet PC.
2 Reset the tablet PC. Refer
to the section on resetting
the tablet PC.
Tablet PC can’t log on to
Windows
Operating system is
defective
Contact supplier for
servicing
Software is not working as
expected
Not compatible or update is
in progress
The software may be being
downloaded and updated in
the background .
Swipe the screen inward
The battery is quickly
depleted even when the
tablet PC is in standby
mode.
22
System problems
13
from the right edge to
access the charms toolbar
and click "Settings → Power
→ Restart" to restart the
tablet PC.
23
Touch screen problem
Problem
Possible cause
Possible solutions
Touchscreen is responding
slowly or improperly
• The screen is dirty.
• A protective cover is
preventing tablet input
recognition
• Use a soft cloth dampened
with water to wipe the
surface of the tablet until it
is clean.
•Do not allow water to seep
from the cloth into the tablet
PC ports or buttons.
• Remove any protective
covers from the
touchscreen.
Problem
Possible cause
Possible solutions
No wireless connection
No wireless access point
Wi-Fi is switched off
1 Make sure Wi-Fi is on.
2 Make sure your tablet PC
is close enough to the
wireless access point.
3 If you are using a private
network, reset the wireless
router; If you are using a
public network, open a
browser to view the login
page.
Internet connection slow
Wi-Fi signal is not strong
enough
Move your tablet PC to a
different location to improve
signal quality.
Network Problems
24
Cleaning your tablet PC
Note: Before you clean your tablet PC, disconnect all lines and turn off the tablet. Use
14
a soft cloth dampened with water to clean the tablet PC. Do not use liquid or aerosol
cleaners, which may contain flammable substances.
1. Turn off the tablet PC. Refer to the section about shutting down your tablet PC.
2. Disconnect any connected devices, headphones and speakers from the tablet
PC.
3. Use a soft cloth dampened with water to wipe the surface of the tablet PC until it
is clean. Do not allow any water to seep from the cloth into the tablet PC ports or
buttons.
Note: To avoid damaging the tablet PC or screen, do not spray cleaning solution
directly onto the display.
Use specially designed products for cleaning the screen, and follow the instructions.
Note: Do not use a damp cloth to clean the keyboard.
25
Refreshing your tablet PC
Refreshing your Tablet PC will restore Windows to the original factory settings, but
will not delete any of your personal files, apps installed from the Windows store or
personalized settings.
To reset your tablet PC, you must connect the adapter.
1. Swipe inwards from the right edge of the screen to access the charm toolbar.
2 Touch "Settings→Change PC settings→Update and recovery →Recovery".
3 Touch "Refresh your tablet PC without affecting your local files"
4 Read the warnings then touch “Next”.
Explanation: Applications from the Windows store will be re-installed automatically
after resetting. Applications which are not from the Windows store will be deleted and
must be installed again manually. A list of deleted applications will be created on your
desktop.
Resetting your tablet PC
Resetting your tablet PC will restore the system to its original factory settings.
1. Swipe inwards from the right edge of the screen to access the charms toolbar.
2 Touch "Settings→Change PC settings→Update and recovery →Recovery".
3 Touch "Delete all and reinstall Windows"
4 Read the warnings then touch “Next”.
Note: Resetting your tablet PC will erase all data from it.
The data includes your account configuration, applications, music, pictures,
documents, etc. Make sure you back up all the data needed before resetting.
26
Specifications
Dimensions and weight
Height
266 mm
15
Width
Thickness
169 mm
11.2 mm
Environmental requirements
Temperature Range
Operating temperature
Storage temperature
Ports and connectors
Audio
MicroSD Card
USB
HDMI
0℃~ 35℃
-10 ℃~ 60℃
headset / audio output port
microSD card slot
Micro-USB 2.0 port
Micro HDMI port
Display
Touchscreen
Panel size (max.)
10.1” Multi-Point Capacitive Panel
1366 x 768 TN Panel
27
Brightness
200 cd/m2
AC adaptor
Input
Input current (max.)
Input frequency
Output power
Output current
Rated voltage
100~ 240 V AC
0.35 A
50-60 Hz
10 W
2A
5 V DC
Operating temperature
Storage temperature
-10℃~ 70℃
Camera
Resolution
Front camera
0℃~ 40℃
2 MP
16