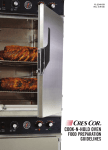
1
Table of Contents
1. IMPORTANT SAFETY INSTRUCTIONS ................................................................................. 4
2. INSTALLATION ....................................................................................................................... 5
2.1 Oven Use ........................................................................................................................................................ 5
3. GUIDE TO THE OVEN ............................................................................................................ 8
3.1 Control panel ................................................................................................................................................... 9
4. AVAILABLE ACCESSORIES ................................................................................................ 11
5. USING THE OVEN ................................................................................................................ 12
5.1 Warnings and general advice for usage ........................................................................................................ 12
5.2 General description ....................................................................................................................................... 12
5.3 Operating modes ........................................................................................................................................... 13
5.4 First use ........................................................................................................................................................ 13
5.5 Selecting a function ....................................................................................................................................... 13
5.6 Programmed cooking procedures ................................................................................................................. 15
5.7 Secondary menu ........................................................................................................................................... 17
6. FUNCTION GUIDE ................................................................................................................ 18
7. COOKING HINTS AND TIPS ................................................................................................ 20
7.1 Hints on using the accessories: .................................................................................................................... 20
7.2 General hints: ................................................................................................................................................ 21
7.3 Cooking hints for meat: ................................................................................................................................. 21
7.4 Cooking hints for desserts and biscuits: ....................................................................................................... 21
7.5 Hints for defrost and rising: ........................................................................................................................... 22
7.6 Cooking tables: ............................................................................................................................................. 23
8. CLEANING AND MAINTENANCE OF THE OVEN ............................................................... 25
8.1 Cleaning stainless steel ................................................................................................................................ 25
8.2 Ordinary daily cleaning .................................................................................................................................. 25
8.3 Food stains or residues ................................................................................................................................. 25
8.4 Cleaning the inside of the oven ..................................................................................................................... 25
8.5 Cleaning the door glazing ............................................................................................................................. 26
9. EXTRAORDINARY MAINTENANCE ..................................................................................... 27
9.1 Replacing oven light bulbs ............................................................................................................................ 27
9.2 Removing the oven door ............................................................................................................................... 27
9.3 Removing the internal glass panels .............................................................................................................. 28
9.4 What to do if... ............................................................................................................................................... 30
NOTE: THIS APPLIANCE MUST BE INSTALLED SOLELY AND EXCLUSIVELY BY A QUALIFIED
TECHNICIAN. ANY TECHNICAL PROCEDURES MUST BE CARRIED OUT BY AN AUTHORIZED
TECHNICIAN.
INSTRUCTIONS FOR THE USER: these instructions contain user advice, a description of the controls
and the correct procedures for cleaning and maintenance of the appliance.
3
Important Safety Instruction
1. IMPORTANT SAFETY INSTRUCTIONS
READ AND SAVE THESE INSTRUCTIONS – Your safety and the safety of others are very important.
We have provided many important safety messages throughout this manual and on the appliance.
Read all the instructions before using the appliance and always obey all safety messages.
RECOGNIZE SAFETY INFORMATION
This is a safety alert symbol. This symbol alerts you to potential hazards that can kill or hurt you and
others.
UNDERSTAND SIGNAL WORDS
A signal word – DANGER, WARNING, or CAUTION – is used with the safety alert symbol. DANGER
denotes the most serious hazards. It means you can be killed or seriously injured if you do not
immediately follow the instructions. WARNING means you can be killed or seriously injured if you do not
follow the instructions. CAUTION indicates a potentially hazardous situation which, if not avoided, could
result in minor to moderate injury.
-
This appliance is intended for home use only.
-
Use this appliance only for its intended purpose. The manufacturer is not
responsible for damage caused by improper use of this oven.
WARNING
4
-
This appliance complies with current safety regulations. Improper use of the
appliance can result in personal injury and material damage.
-
Read all the instructions before installing or using the oven for the first time.
-
Keep these operating instructions in a safe place and pass them on to any future
user.
Important Safety Instruction
2. INSTALLATION
-
Before installation, make sure that the voltage and frequency listed on the ID plate match the
household electrical supply. This data must be the same to prevent injury or damage to the
appliance. Consult a qualified electrician if in doubt.
-
Make sure your appliance is properly installed and grounded by a qualified electrician.
-
To guarantee the electrical safety of this appliance, it must always be continuously connected to a
reliable grounding system. This basic safety requirement must be met. If there is any doubt, have
your household electrical system checked by a qualified electrician.
-
The manufacturer is not responsible for damage caused by the lack or inadequacy of a reliable
grounding system or the failure to meet the requirements of national and local electrical codes.
-
The oven should not be operated until it has been properly installed within the cabinetry.
-
Installation, maintenance and repair work should be performed by an authorized service technician.
Work by unqualified persons can be dangerous and may void the warranty.
-
Before installation or service, disconnect the power supply to the work area by “tripping” the circuit
breaker, or shutting off the main power.
2.1 Using the oven
WARNING
BURN HAZARD
The oven can produce high temperatures that can cause burns.
To reduce the risk of fire, electrical shock, personal injury or damage when using
the oven, follow basic safety precautions, including the following:
-
Prevent children from touching the appliance when in use.
-
Use heat-resistant pot holders when placing items in the oven, shifting them, or removing them
from the oven. The top heating element and oven racks can become very hot and cause burns.
-
To prevent burns, always position oven racks at the desired height while the oven is cool.
-
Always open the door carefully. Allow hot air or steam to escape before food is placed in the oven
or removed.
-
To prevent burns, allow heating elements to cool before cleaning by hand.
-
Only clean the parts listed in this manual.
-
Remove all accessories from the oven before the self-cleaning cycle is engaged. The high
temperatures required for this cycle will damage the accessories.
5
Important Safety Instruction
CAUTION: Heating elements may be hot even if not glowing. During and after use, do not allow clothing
or other flammable materials to come into contact with the heating elements or inner surfaces of the
oven until they have had sufficient time to cool. External parts of the oven such as the oven window, vent
openings and the control panel may also become hot.
-
Do not obstruct oven vents.
-
Do not let metal objects (aluminum, foil, metal pans) come into contact with the heating elements.
-
Do not slide cookware across the bottom of the oven. This could scratch and damage the surface.
-
Do not lean, sit or place heavy items on the open oven door. The door can support a maximum
weight of 75 lbs. (34 kg).
-
Do not heat unopened food containers in the oven. Pressure could build up and the container could
burst and result in injury.
-
Never add water to a hot oven tray or pan or pour water directly on food in a hot oven. The steam that
is formed could cause serious burns. Any sudden change in temperature can damage the oven's
enamel.
-
This oven must only be used for cooking. Do not use this appliance as a dryer, kiln, dehumidifier,
etc. Fumes or vapors given off by glues, plastics or other non-food items could ignite and cause
material damage and personal injury.
-
Cover all cooked food that is left in the oven to keep it warm. This will prevent moisture from
condensing on the inside of the oven. Long-term or excessive condensation can damage the oven.
-
Never use aluminum foil to line the oven bottom. Do not place pots, pans or baking sheets
directly on the oven bottom when using the top and bottom heating elements, the top and bottom
heating elements + convection fan or the convection heating element. This could crack the enamel of
the oven bottom.
-
Never store flammable liquids or materials in, above or under an oven or near cooking
surfaces.
-
Do not use a steam cleaner to clean the oven. Steam can penetrate electrical components and
result in a short circuit.
-
Children should not be left alone or unattended in the area where the oven is in use. Never allow
children to sit or stand on any part of the oven.
CAUTION: Items of interest to children should not be stored in cabinets above the oven. Children
climbing on the oven to reach these items could be seriously injured.
6
Important Safety Instruction
-
Do not leave the oven unattended when cooking with oil or grease as there is an increased risk of fire
in case of overheating.
-
Never use water to put out grease fires!
-
Put out the fire with an appropriate rated dry chemical or foam-type fire extinguisher.
-
Be careful of loose-fitting or hanging garments while operating the oven.
-
Do not use the oven as a room heater.
-
Make sure that the power cords of small appliances do not come into contact with or get caught in
the oven door.
-
Use only dry, heat resistant potholders. Moist or damp potholders used on hot surfaces may result
in burns from steam. Do not let potholders come into contact with hot oil. Do not use towels or other
bulky cloth in place of potholders.
SAVE THESE INSTRUCTIONS
NOTE: The California Safe Drinking Water and Toxic Enforcement Act requires the Governor of
California to publish a list of substances known to the State of California to cause cancer, birth defects
or other reproductive harm, and requires businesses to warn customers of potential exposure to such
substances.
WARNING: This product contains a chemical known by the State of California to cause cancer, birth
defects or other reproductive harm.
This appliance can cause low-level exposure to some of the substances listed, including benzene,
formaldehyde, carbon monoxide, toluene, and soot.
7
Instructions for the user
3. OVEN GUIDE
8
Control panel
Oven light
Rotisserie motor
Rack and tray guides
(four levels)
Oven door
Temperature sensor
Oven convection fan
ID plate position
Instructions for the User
3.1 Control panel
All the appliance's control and monitoring devices are located together on the front panel. The symbols
used are described in the table below.
Oven functions and symbols:
PT1
FUNCTION
THERMOSTAT
KNOB
allows to set the time, select the cooking temperature
and time and program the timed cooking start and
stop times.
Selectable functions
DSP3
DSP1
DISPLAY
CURRENT TIME
This display shows the current time or the cooking
PROGRAMMED
time.
COOKING
PROCEDURES
The turning on of the following symbols indicates:
Clock: adjusting the cooking time
Bell: timer alarm activated.
Delayed start: setting the cooking time with a delayed start.
Cooking time: setting the cooking time.
9
Instructions for the user
Temperature
display
This display shows the preset temperature for the
desired function, or the temperature set by the user.
DSP2
The turning on of the following symbols indicates:
Internal oven
The oven is heating up.
temperature:
Child lockout:
Child lockout feature ON (see “Secondary menu” on
page 17).
Showroom Showroom feature ON (see “Secondary menu” on
indicator light: page 17).
FUNCTION
ON-OFF KNOB
PT2
10
(PT2)
allows to select one of the oven's three operating
modes as well as a cooking function or cooking
program (see paragraph “5.3 Operating modes”).
Instructions for the User
4. AVAILABLE ACCESSORIES
Oven rack: for cooking food in pans, small cakes, roasts or food
requiring light broiling.
Pan rack: fits on top of the oven pan for food that could drip.
Oven pan: catches the grease from foods cooked on the rack
above.
Pastry pan: used for baking cakes, pizza and desserts.
Roof liner: remove it to make cleaning inside the oven easier.
Roasting spit: used for roasting chicken, sausages and anything
else requiring uniform browning.
Rotisserie frame: fits into the slots of the oven pan prior to
attaching the rotisserie rod.
Chromium-plated gripper: use to remove hot oven racks and
pans.
NOTE: Ask your authorized dealer for original SMEG accessories.
11
Instructions for the user
5. USING THE OVEN
5.1 Warnings and general advice for use
WARNING
BURN HAZARD
Keep the oven door closed during cooking.
NOTE: Before using the oven for the first time, heat to the maximum temperature
(500°F) for sufficient time to burn away any oily residue resulting from the
manufacturing process.
The heating elements and the fan shut off when the oven door is opened.
NOTE: During cooking, do not cover the oven bottom with aluminum or tin foil and do not place pans or oven
pans or bakeware on the oven bottom as this may damage the enamel surface. If you wish to use waxed paper,
position it so that it does not interfere with the hot air circulation inside the oven.
NOTE: When accessing food inside the oven, leave the door open for the shortest
time possible so that the internal oven temperature does not cool.
To prevent any steam in the oven from creating problems, open the door in two
stages: half open (approx. 2 inches) for 4-5 seconds and then completely open.
To access food, always leave the door open for the shortest time possible to
prevent the oven temperature from cooling and ruining the food.
5.2 General description
5.2.1 Oven racks
The oven features 4 guides for positioning oven trays and racks at different
heights. The rack positions are numbered from the bottom up (see figure).
5.2.2 Cooling system
The oven is equipped with a cooling system which begins operating as soon as a cooking function starts.
The fan produces a steady flow of air from above the door, which may continue for a brief period of time
even after the oven has been turned off.
5.2.3 Oven light
The oven light turns on when the door is opened or when an oven function is selected.
12
Instructions for the User
5.3 Operating modes
This appliance is designed to have 3 operating modes, which can be changed by pressing PT2.
STAND-BY mode: with DSP1 on and showing the
current time (enabled as soon as the current time has
been confirmed).
ON mode: from the stand-by mode, press PT2 once.
All the displays and control knobs light up.
OFF mode: from the ON position, press and hold PT2
until it turns off. Only the
illuminated.
symbol on DSP1 remains
5.4 First use
When using for the first time, or after a power failure, the left oven display, DSP1, will display a flashing
symbol. Before starting any oven cooking, the current time must be set.
5.4.1 Setting the current time
Adjusting the current time:
• turn PT1 to the right or to the left to increase or decrease the time. (Hold the knob in one direction to
accelerate the change in time).
• When PT1 is released, after a few seconds the display will be steadily illuminated and only the colon
separating hours from minutes will flash, indicating that it is working properly. (The display will also
show the
symbol).
Note: It might become necessary to change the current time, for example when changing over from
daylight savings to standard time. Starting in the stand-by mode, (see paragraph "5.3 Operating
modes"):
•
•
press and hold PT1 for a few seconds until the symbol
stops flashing.
repeat the steps described in paragraph “5.4.1 Setting the current time”.
5.5 Selecting an oven function
While the oven is in the ON mode only, any cooking function can be selected by simply turning PT2 to
the right or left. The selected function will change color to red on the display. After the selection, the
preset cooking temperature for that function will be displayed on DSP2.
5.5.1 Cooking at a preset temperature
After selecting the desired oven function, the oven will start the cooking procedure at the preset
temperature and the symbol
will come on. Prior to cooking, there is a preheat stage, that allows the
oven to rapidly heat up to the cooking temperature. The
symbol flashes on DSP2 to indicate that
oven preheating is in progress. When preheating stops, the
symbol will be steadily illuminated and a
buzzer will sound to indicate that the food can be placed inside the oven.
13
Instructions for the user
5.5.2 Changing the preset temperature
The temperature preset for each function can be changed to suit the user's needs.
At any time while cooking is in progress, turn PT1 in either direction to raise or lower the cooking
temperature by 5 degrees at a time. (PT1 can also be held to the left or right in order to accelerate or
slow the temperature adjustment.)
DEFAULT PRESET
(°F)
RANGE
(°F)
ECO function
320
120 - 500
Top and bottom heating elements
340
120 - 500
Broil (Rotisserie feature)
480
120 - 535
Bottom heating element
175
120 - 500
320
120 - 500
320
120 - 500
480
120 - 535
320
120 - 500
European convection
320
120 - 500
European convection with top and
bottom heating elements
320
120 - 500
Defrost
85
-
Rising
105
-
OVEN FUNCTION
European convection
heating element
with
bottom
Convection with
heating elements
and
bottom
top
Convection Broil
Convection
element
14
with
bottom
heating
Instructions for the User
5.5.3 Using the timer
Press PT1 once (while the oven is in STAND-BY or ON mode). The display will show the value
(steady on) and the
symbol (flashing). Turn PT1 to set the cooking time (from 00:01 to 04:00). A few
seconds after the desired amount of cooking time is set, the
symbol will stop flashing and remain
steady on; the countdown will then start. Now select the desired cooking function and wait for the buzzer
to sound, indicating that the cooking time has elapsed.
Press PT1 once to shut off the buzzer; the cooking time can be extended by turning PT1.
If the timer was set with the oven in STAND-BY mode, when the oven is activated in ON mode (selection
of a cooking operation), the counter is reset to zero.
Warning: the timer does not stop the cooking process. It only alerts the user that the preset number of
minutes has elapsed. Press PT2 to turn off the oven.
Changing the timer setting
After setting the countdown, press PT1 once. The
symbol starts flashing; turn PT1 to change the set
duration. A few seconds after the new value is set, the
will restart from the new value.
symbol will stop flashing and the countdown
5.6 Programmed cooking procedures
5.6.1 Semiautomatic cooking
Semiautomatic cooking is the function which allows a cooking operation to be started and then ended
after a specific length of time that is set by the user.
Select an oven function (see paragraph “5.5 Selecting an oven function”) and press PT1 twice. The
display will show the value
and the
symbol (flashing).
Turn PT1 to the right or left to set the cooking time (from 00:01 to 23:59). A few seconds after the desired
cooking time is set, the
symbol will stop flashing and semiautomatic cooking will start from that
moment. When the cooking time has eleapsed, the word STOP will be displayed on DSP1, cooking will
stop and a buzzer will sound; press PT1 to silence it.
If you wish to lengthen the cooking time, press PT1 again. The oven will restart normal operation with
the cooking settings selected previously. However, PT2 must be pressed to turn the oven off completely.
Changing the cooking settings
The cooking time can de changed after semiautomatic cooking has started.
When the
symbol is steady on and cooking is in progress, press PT1 once. The
symbol starts
flashing and PT1 can be turned to change the cooking time. A few seconds after the last change, the
symbol will stop flashing, and semiautomatic cooking will restart using the new value.
To change the preset temperature, wait for the
to raise or lower the cooking temperature.
symbol to turn steady and turn PT1 to the right or left
15
Instructions for the user
5.6.2 Automatic cooking
Automatic cooking is the function which allows a cooking operation to be started at a set time and then
ended after a specific length of time that is set by the user.
Select a cooking function, set the desired cooking temperature or use the preset temperature (see
paragraph “5.5 Selecting an oven function”) and press PT1 twice. The display will show the values
and the
symbol (flashing).
Turn PT1 to the right or left to set the cooking time (from 00:01 to 23:59).
For safety reasons, when setting automatic cooking the user must first program a cooking time and then
select the cooking start time. The cooking start time cannot be set without first setting the cooking time.
After setting the amount of cooking time, press PT1 once.
The
symbol and the current time will appear on the display.
Turning PT1 to the right increases the time, allowing the desired cooking start time to be set.
A few seconds after the desired time is set, the
and
symbols will stop flashing, and the oven will
start to wait for the starting time setting. When the cooking time has elapsed, the word STOP will appear
on DSP1, cooking will stop and a buzzer will sound; press PT1 once to silence it.
If you wish to lengthen the cooking time, press PT1 again. The oven will restart normal operation with
the temperature settings selected previously.
PT2 must be pressed to turn the oven off completely.
Changing the cooking settings
Once automatic cooking has started, the cooking time can be changed.
When the
and
symbols are steady on and cooking is in progress, or the oven is in stand-by
mode waiting for cooking to start, press PT1 once. The
turned to change the cooking time.
symbol starts flashing and PT1 can be
Press PT1 again; the
symbol turns off, the
symbol will start to flash, and the cooking start time
will be displayed on DSP1. The cooking start time can be advanced or turned back by turning PT1.
A few seconds after the last change, the
and
symbols will appear (in steady on mode) on DSP1
and automatic cooking will restart with the new settings.
Once cooking has been programmed, before it starts, the function symbol will remain on, as will the
symbols
16
,
.
Instructions for the User
5.7 Secondary menu
This appliance also has a concealed "secondary menu" allowing the user to:
•
Enable or disable the child lockout feature
•
Enable or disable the Showroom feature (which disables all the heating elements so that only the
control panel works).
Enable or disable the power miser feature.
•
With the oven in the OFF mode (see "5.3 Operating modes") press and hold PT1 for at least 5 seconds
to display the secondary menu. Turning PT1 to the right or left changes the feature status (ON / OFF) or
(HI /LO).
Press PT1 again to move to the next feature.
Child lockout feature: Two minutes after enabling this
feature, the controls will automatically be locked, indicated
by the symbol
turning on, without any intervention from
the user. To temporarily release the lock during cooking,
press and hold PT1 for at least 5 seconds. The lock will
reengage after a two-minute delay.
If a control knob is turned, the word “bloc” appears
for 2 seconds.
Showroom feature: (For exhibitors only) enabling this
feature disables all the heating elements so that only the
control panel works. To operate the oven normally, set this
feature to OFF.
Power miser feature: If the LO setting is selected, the oven
will use less energy. To restore the appliance's normal
energy consumption level, select HI.
17
Instructions for the user
6. OVEN FUNCTIONS GUIDE
ECO FUNCTION:
Using the broiler and the bottom heating element together with the convection fan is
particularly suitable for cooking small quantities of food because less energy is
consumed.
TOP AND BOTTOM HEATING ELEMENTS:
With the heat coming from the top and bottom at the same time, this option is
particularly suitable for certain types of food. Conventional cooking, also known as
static or thermal radiation cooking, is suitable for cooking just one dish at a time.
This function is perfect for all types of roasts, bread, and tarts and particularly
suitable for fatty meats such as goose and duck.
BROIL (Rotisserie feature):
Heat produced by the broiler element gives perfect broiling results mostly for thin
and medium cuts of meat and in combination with the rotisserie (where fitted) gives
the food a uniform browning at the end of the cooking cycle. This function is perfect
for sausages, ribs and ham. This function can be used to evenly broil large
quantities of food, particularly meat.
The rotisserie feature in combination with the broiler element browns food perfectly.
BOTTOM HEATING ELEMENT:
Bottom heat allows foods that require a longer basic cooking time to be completely
cooked without affecting browning. Perfect for cakes, pies, tarts and pizzas.
EUROPEAN CONVECTION WITH BOTTOM HEATING ELEMENT:
Forced air combined with bottom oven heat to yield light browning. This function
can be used for any type of food.
CONVECTION WITH TOP AND BOTTOM HEATING ELEMENTS:
The convection fan combined with conventional static cooking ensures uniform
cooking even when complex recipes are involved. This function is perfect for
cookies and cakes, even if cooked simultaneously on different rack positions inside
the oven.
18
Instructions for the User
CONVECTION BROIL:
The air produced by the convection fan softens the strong heat wave generated by
the broiler, delivering perfect broiling even of very thick food. This function is perfect
for large cuts of meat (e.g. pork shank).
CONVECTION WITH BOTTOM HEATING ELEMENT:
The combination of the convection fan and the bottom heating element allows
cooking to be completed more rapidly. This function is recommended for sterilizing
or for finishing off the foods that are already well done on the outside but not on the
inside and therefore need a little more heat. This function can be used for any type
of food.
EUROPEAN CONVECTION:
The combination of the convection fan and the circular heating element (built into
the rear of the oven) can be used to cook different foods on different rack positions,
as long as they need the same cooking temperatures and time. The circulation of
air ensures instant and uniform distribution of heat. It will be possible, for instance,
to cook fish, vegetables and cookies simultaneously without mixing odors or
flavors.
EUROPEAN CONVECTION WITH TOP AND BOTTOM HEATING ELEMENTS:
The combination of European convection with conventional static cooking can be
used to cook different foods on different rack positions extremely quickly and
efficiently.
Perfect for large volumes of food that need intense cooking.
DEFROST:
Rapid defrosting is aided by turning on the convection fan and the top heating
element, which ensures uniform distribution of low-temperature air inside the oven.
RISING:
Proving is aided by the top heat, quickly delivering perfect results for all types of
dough.
19
Instructions for the user
7. COOKING SUGGESTIONS AND TIPS
7.1 Suggestions on using the accessories:
Use only original SMEG oven pans.
When the pan is in the oven, the handle must be facing the oven door.
Push the pan right inside the oven.
Use only original SMEG oven racks.
When the rack is in the oven, the contoured part must be facing down.
Push the rack right inside the oven.
For best cooking results, we recommend placing ovenware in the center
of the rack.
7.1.1 Suggestions on using the rotisserie rod:
Prepare the rotisserie rod with the food, tightening the meat fork set screws (A). Slide the rods of the
rotisserie support assembly (B) into the slots in the drip tray (F). Remove the grip (D) and mount the
rotisserie rod so that the bushing (E) fits in the groove in the support assembly (B) on the right.
Completely insert the drip tray into the oven until the tip of the support assembly rod (B) on the left side
is inserted into place (C) in the rotisserie motor drive on the back wall of the oven cavity. Add a little water
in the tray to keep smoke from forming.
The rotisserie motor operates only when the Broil cooking function is on
20
.
Instructions for the User
7.2 General suggestions:
We recommend preheating the oven before putting the food in. Do
not place the foods inside the oven until the degrees
symbol on the
display stops flashing and the tone has sounded to confirm that the set
temperature has been reached.
For cooking on several levels, we recommend using a convection
function to achieve uniform cooking at all rack positions.
In general, increasing the temperature does not shorten the cooking
time (the food will likely be well done on the outside and undercooked
on the inside).
When cooking desserts and vegetables, some liquid may seep out from
the bottom of the door. This is a natural physical phenomenon which
occurs primarly when the food is placed in a oven before preheating. To
prevent this, carefully open the door a couple of times during cooking.
7.3 Suggestions for cooking meat:
Cooking times, especially for meat, can vary according to the thickness and quality of the food and to
personal taste.
To save energy when roasting, we recommend placing the food in the oven while it is cold.
When roasting meat, we recommend the use of a meat thermometer. Alternatively, simply press on the
roast with a spoon: if it is hard it is ready, if not, it needs a few more minutes of cooking time.
7.4 Suggestions for cooking desserts and cookies:
Use dark metal bakeware for desserts: it helps in absorbing the heat.
The temperature and the cooking time depend on the quality and consistency of the batter.
The tables indicate the temperature ranges. Initially, try the lowest value (the lower temperature yields
more even browning); if the dessert is not cooked to your liking, increase the temperature the next time.
Check whether the dessert is cooked throughly through: About 10 minutes before the end of the cooking
time, insert a toothpick into the highest point on the dessert. If the batter does not stick to the toothpick,
the dessert is done.
If the dessert collapses when it comes out of the oven, the next time reduce the oven temperature by
about 50 °F and select a longer cooking time if necessary.
21
Instructions for the user
7.5 Suggestions for defrosting and rising:
We recommend placing frozen foods in an uncovered container on the first rack position (bottom) of the
oven.
Food must be defrosted with all wrapping removed.
Space the food to be defrosted evenly and do not overlap.
When defrosting meat, we recommend placing the food on a rack in the second rack position and
inserting a tray in the first rack position (bottom). Any liquid dripping from the defrosting food will be
caught by the tray.
The tenderest parts of the food can be protected with aluminum foil.
For successful rising, a container of water should be placed at the bottom of the oven.
During rising, it is recommended to cover the dough with a damp cloth.
22
Instructions for the User
7.6 Cooking tables:
Note: The times indicated in the following tables do not include the preheating times. Always
make sure you pre-heat the oven and load food when the
OVEN FUNCTION
is steady on.
RACK TEMPERATURE
POSITION
°F
FROM
BOTTOM
TIME IN MINUTES
FIRST COURSES
LASAGNA
Top and bottom heating
elements
1
430 - 450
50 - 60
OVEN-BAKED PASTA
Top and bottom heating
elements
1
430 - 450
40
2
360 - 375
70 - 80
2
360 - 375
70 - 80
2
356 - 375
90 - 100
2
360 - 375
70 - 80
2
360 - 375
110 - 120
2
360 - 375
190 - 210
2
360 - 375
60 - 70
MEAT
ROASTED VEAL
PORK LOIN
PORK SHOULDER
ROASTED RABBIT
TURKEY BREAST
ROASTED NECK OF PORK
ROASTED CHICKEN
Convection with top
and bottom heating
elements
Convection with top
and bottom heating
elements
European convection
with top and bottom
heating elements
European convection
Convection with top
and bottom heating
elements
European convection
with top and bottom
heating elements
European convection
with top and bottom
heating elements
BROILED MEATS
FIRST
SIDE
SECOND
SIDE
PORK CHOPS
Convection Broil
4
535
7-9
5-7
FILLET OF PORK
Broil
3
535
9 - 11
5-9
FILLET OF BEEF
Broil
3
535
9 - 11
9 - 11
LIVER
Convection Broil
4
535
2-3
2-3
SAUSAGES
Convection Broil
3
535
7-9
5-6
23
Instructions for the user
MEATBALLS
Broil
3
535
7-9
5-6
ROTISSERIE MEATS
On a
Broil (Rotisserie feature) rotisserie
rod
480 - 535
60 - 70
SALMON TROUT
European conv. with
bottom heating element
2
300 - 320
35 - 40
PIZZA
Convection with top
and bottom heating
elements
1
480 - 535
6 - 10
BREAD
European convection
2
375 - 395
25 - 30
MUFFINS
European convection
with top and bottom
heating elements
2
355 - 375
15 - 20
2
320
55 - 60
2
320
30 - 35
2
320 - 340
20 - 25
2
320
20 - 25
2
320
55 - 60
2
300 - 320
40 - 50
CHICKEN
FISH
DESSERTS
DOUGHNUTS
FRUIT PIES
SMALL PASTRIES
JAM TARTS
PARADISE CAKE
ECLAIRS
Convection with top
and bottom heating
elements
Convection with top
and bottom heating
elements
European conv. with
bottom heating element
European convection
with top and bottom
heating elements
Convection with top
and bottom heating
elements
European convection
with top and bottom
heating elements
SPONGE CAKE
European convection
2
300 - 320
45 - 50
RICE PUDDING
European convection
with top and bottom
heating elements
2
320
40 - 50
CROISSANTS
European convection
2
320
25 - 30
24
Instructions for the User
8. CLEANING AND MAINTENANCE OF THE OVEN
BURN HAZARD
WARNING
-
The oven can produce high temperatures that can cause burns.
-
To prevent burns, allow the heating elements to cool before cleaning.
-
Only clean the parts listed in this manual.
Do not use a jet of steam for cleaning the inside of the oven.
8.1 Cleaning stainless steel
To keep stainless steel in good condition it should be cleaned regularly after use. Let steel parts cool
first.
8.2 Regular daily cleaning
To clean and preserve stainless steel surfaces, always use only products for use on stainless steel that
do not contain abrasives or chlorine-based acids.
How to use: pour the product onto a damp cloth and wipe the surface, then rinse thoroughly and dry with
a soft cloth or deerskin.
8.3 Food stains or residues
Do not use metallic scouring pads or sharp scrapers: they will damage the oven enamel.
Use standard non-abrasive cleaners and a wooden or plastic scraping tool if necessary.
Rinse thoroughly and dry with a soft cloth or deerskin.
Do not allow residues of sugary foods (such as jam) to set inside the oven. If allowed to set
for too long, sugar residue could pit the enamel lining of the oven.
8.4 Cleaning the inside of the oven
For optimal upkeep, regularly clean the oven after it has
cooled. Take out all removable parts.
• Clean oven racks and trays with hot water and nonabrasive detergent. Rinse and dry.
• For easier cleaning, the oven door can be removed (see
paragraph “9.2 Removing the oven door”).
The oven should be operated at its maximum temperature for 15/20 minutes after use of certain
products to burn off any residue left inside the oven.
25
Instructions for the user
8.5 Cleaning the oven door glass
The oven door glass should always be kept thoroughly clean. Use absorbent paper towel; remove
stubborn dirt with a damp sponge and ordinary detergent.
Do not use abrasive or corrosive cleaners for cleaning the oven door glass. (e.g.: scouring products,
oven-cleaner sprays, stain removers and metal steel wool).
Do not use rough or abrasive materials or sharp metal scrapers to clean the oven door glass as they can
scratch the surface or cause the glass to break.
26
Instructions for the User
9. SPECIAL MAINTENANCE
The oven may require special maintenance or replacement of parts subject to wear such as gaskets,
bulbs, etc. The following instructions describe how to perform these minor maintenance operations.
WARNING
ELECTRICAL SHOCK HAZARD
Before any maintenance operation, disconnect the power supply to the
appliance.
9.1 Replacing the oven light
Remove
upper
oven
protection A and ring B as
well as the glass
cover C, unscrewing it
anticlockwise.
Replace
light bulb D.
Reassemble ring B, cover
C and upper protection A.
CAUTION: The standard bulbs are halogen: do not touch them directly with your fingers. Use
insulation to protect your hand. Use only bulbs that are available at authorized service centers.
NOTE: Use only oven-rated appliance bulbs (T 540°F - 300°C)
9.2 Removing the oven door
9.2.1 Doors with moveable hinge levers
With the oven door completely open, raise the hinge
levers A until they touch the hinge arms B, then grasp
both sides of the door near the hinges. Raise the door
to an angle of about 45° and remove it. If the hinge
arms do not lock, repeat the operation, raising the
hinge levers and keeping the oven door slightly raised.
To remount the door, fit the hinges arm B into the hinge
slots, then lower the door into place, making sure that
the hinge arm notch C, is firmly seated in the slot, then
lower the hinge levers A.
27
Instructions for the user
9.2.2 Removing the oven door using the pins
Open the door completely and insert the pins (supplied) into the holes starting from the inside. Close the
door to an angle of about 45° and lift the door to remove it. To remount the door, fit the hinge arms into
the hinge slots, then lower the door into place and extract the pins. In case you lose the pins, two
screwdrivers can be used.
9.2.3 Removing the oven door gasket
In order to thoroughly clean the oven, the gasket may be removed. Before removing
the gasket, remove the oven door as described above. Once the door has been
removed, lift the tabs at the corners as shown in the figure. After cleaning, replace the
gasket starting with the longer, horizontal side and insert the tabs into the appropriate
slots at the top.
9.3 Removing the inner oven door glass
Before removing the oven glass, make sure that at least one of the door's hinges
has been locked in the open position as described in paragraph “9.2 Removing the
oven door”. This operation might have to be repeated during the glass removal
process if the door is accidentally released.
WARNING
Do not use the appliance without replacing the oven glass as the outer
surface of the door will overheat.
The glass panes in the oven door should always be kept thoroughly clean. For easier cleaning, it is
possible to remove the oven door (see 9.2 Removing the oven door) and place it on a protective cloth or
fully open the door and lock the hinges as you remove the oven glass.
The glass panes in the oven door can be completely removed by following the steps found below.
Removing the inner glass:
•
28
Remove the inner glass pane by pulling it
towards you, in the direction indicated by the
arrows. Removal includes dislodging the 4 pins
attached to the glass from their slots in the
oven door.
Instructions for the User
Removing the middle glass:
•
Remove the middle glass by lifting it up.
Cleaning:
•
It is now possible to clean the outer oven door
glass as well as the glass panes removed in
the previous steps. Use absorbent paper towel.
In case of stubborn dirt, wipe with a damp
sponge using mild detergent.
Replacing the glass:
•
Replace the glass panes in inverse order to
removal.
•
Reposition the inner oven door glass, being
careful to center and insert the 4 pins attached
to the glass into their slots on the oven door by
applying light pressure.
WARNING
Replace the oven door glass panes so that they are ordered and oriented as they
were before removal. Finally, if the door was not removed, unlock the hinges and
close the door.
29
Instructions for the user
9.4 What to do if...
The oven display is blank
•
Check the mains power supply.
•
Check the household circuit breaker panel to make sure the
circuit breaker on the circuit supplying the oven is in the “ON”
position.
•
Check whether the “Showroom” feature has been enabled. For
further details see paragraph “Secondary menu” on page 17.
•
Check whether the “Child Lockout” feature has been enabled.
For further details see paragraph “Secondary menu” on page 17.
The oven does not heat up
The controls do not respond.
Cooking takes longer than the
times indicated in the cooking •
table.
After self-cleaning, the oven •
functions do not work.
Check whether the “PO” (power miser) feature has been
enabled. For further details see paragraph “Secondary menu” on
page 17.
Check whether the door interlock device is enabled. If it is not,
the oven has a safety feature that does not allow functions to be
selected while the door interlock device is active. This is because
the temperatures inside the oven are still too high to allow any
type of cooking.
The display shows ERR 4
•
If the door is opened during an
oven function using convection, •
the fans shut off.
30
The door interlock device has not hooked to the door properly.
This might be because the door was accidentally opened during
its activation. Turn off the oven and turn it on again waiting a few
minutes before selecting a new cleaning cycle.
This is not a fault. It is a normal feature of the appliance and is
meant to avoid excessive loss of heat when the door is opened.
When the door is closed, the oven will resume normal operation.