1
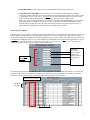
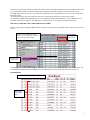
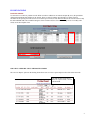
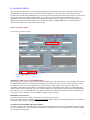
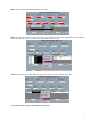
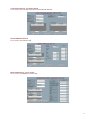
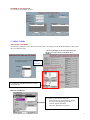
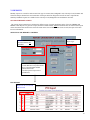
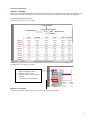
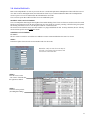
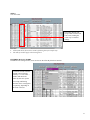
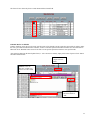
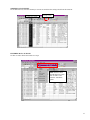
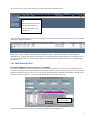
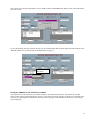
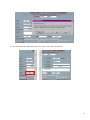
SBS BOOKKEEPING SYTEM
USER MANUAL
I. MAIN MENU SCREEN
WHAT IS THE MAIN MENU SCREEN?
The main menu screen contains the different forms that compose the bookkeeping system. These forms will allow users to
perform basic bookkeeping functions, such as data input and generation of reports. Each command button in the menu has a
specific function. The menu screen is divided into six main functions:
1) DATA INPUT, 2) DATA UPDATE, 3) ADD-CODES, 4) REPORTS, 5) RECONCILING, 6) ACCOUNT SETUP.
II. DATA INPUT/ DATA UPDATE SCREENS
Data entry and data update are the most common tasks performed by the users. The bookkeeping system contains two forms
that will facilitate these tasks, the Item Input and Item Update forms.
ITEM INPUT SCREEN
Acct #
Acct Type
This data entry form allows users to add new records (items) to an existing account and consists of the following fields:
1
FIELDS’ DESCRIPTIONS
1) Account #: This is a drop-down list of the existing accounts and account types. This is a REQUIRED field; an
account number is necessary for each record. To enter multiple records for the same account, simply keep
pressing the TAB key after the first record has been saved, the system will automatically save all the following
records under the same account number. To enter records under a different account number, select the account
number from the list. Since this is a ‘data base’ program, random account entries can be made in succession.
NOTE: Before adding any records to an account, the account MUST exist in the system. Refer to the
ACCOUNT SET UP section for help on creating a new account (see page 6).
2) Line #: This is the line number for each individual record. It is an AUTO NUMBER field; therefore, the system
will automatically assign a line number or ID to each new record. This field cannot be modified or duplicated.
The Line # is simply an identifier and has no relevant importance. The numbers might not follow a sequence or
order; some numbers might be skipped. For example: if the Line # for one record is 339, the following line #
can be any number, not necessarily 340.
NOTE: Line # will appear after APV Date is entered.
3) APV DATE: This field represents the approval date for the expense; it is a REQUIRED field and must be
entered in the specified format (mm/dd/yy). No need to type the slashes.
4) CNTR (Cost Center): An abbreviation of up to five alphanumeric characters that represent the type of expense
in the appropriate budget. Each account has its own set of cost centers. The cost center is REQUIRED and must
be selected from the drop down list. To add a new cost center to a specific account, use the “ADD CNTR/CCD”
form in the main menu.
NOTE: You must select the cost center from the given list. New cost centers cannot be added using this form.
Refer to the ADD C-CODES section for help on adding Cost Centers and Cost Codes (see page 9).
5) Cost Code: This field is also an abbreviation of up to five characters and it is used in combination
with CNTR to give additional reference to the expense. It is an optional field. The cost code must be selected
from the given list. New cost codes cannot be added using this form. To add a new cost code use the “ADD
CNTR/CCD” form in the main menu.
6) REF ID: The Invoice Reference to the expense. It is a REQUIRED field and takes alphanumeric values. The
Reference ID can be the same for more than one record.
7) 2nd REF: Additional reference to the expense. It is an optional field that can take alphanumeric values.
8) REQUESTOR: The name of the person requesting the expense. Optional.
9) VENDOR_ID: Company or person reimbursed for the expense/purchase. Optional.
10) MEMO: A detailed description of the expense. Optional.
11) CODE (UNI CODE): Object code associated with the expense. This is a REQUIRED, numeric field and must
be selected from the given list. Each account has its own set of object codes. New object codes cannot be added
using this form. To add a new object code to an account, or to modify the list, please contact your bookkeeping
administrator.
12) CNR: Additional object code. Optional. Must be a numeric value.
13) AMT (Price): Amount of the expense. This is a REQUIRED field; the default value is zero.
14) DESCRIPTION: Object Code Description. This field cannot be modified; it will automatically be entered
when you select the object code. There is an assigned description for each object code. To make changes to
object code descriptions please contact your bookkeeping administrator.
15) SAVE RECORD: There are two ways to save a record.
a) After entering all the required information, you can automatically save a record by pressing the TAB key
past the “Save Record” button. The system won’t send a message to confirm the action, but the record will
be saved, unless you click the “Undo Record” button. This is the easiest way to save records and will save
you an extra “click”.
b) The other way to save a record is by clicking the “Save Record” button.
2
16) UNDO RECORD: Use to delete the current record AFTER the APV Date has been entered.
17) COPY PREVIOUS RECORD: Use to copy the previous record entered. This function is particularly
useful when similar records have to be entered under the same account number. When a new record is copied
it automatically receives a new Line #. Users must enter the APV Date and the Object Code, the rest of the
fields, including REF ID and AMOUNT will remain the same unless the user changes them.
NOTE: To copy a record you must click on the “Copy Previous Record” button BEFORE you go around the
form and the fields are cleared for the next record. Once you pass the “Save Record” button the record is
automatically saved, after that, users can simply click the copy button to copy that record. Once users go
around the form and the fields are cleared, the previous record cannot be copied.
ITEM UPDATE SCREEN
This form allows users to search for existing records based on chosen criteria. The main purpose of this form is to allow users
to make changes or modifications to existing records; in addition, users can use this form to view data and create reports
based on the selected criteria. Modifications include changing any of the fields, except the line #. This form can also be used
to change PTD or EPD dates; however, it is recommended to use the POSTING form to add a PTD or EPD date (see page 5).
Records can be retrieved by Line #, by Account #, by Cost Center or Cost Code, by 1st Reference, by 2nd Reference, by
Vendor, and by Object Code. Only one field may be selected at a time.
Account #,
Cost Center,
Cost Code and
Object Code
must be selected
from the given
list.
Select ONE
ONLY!
To search for an individual record, enter the line #; the form will return the record with that particular line #. To search for a
group of records, select the field that those records have in common from the search options. For example: to look at the
records for a specific account, simply select the desired account number and view the results.
Results for Account # 110000
Different
Records
Different fields in a record
3
The form will return all the existing records for the criteria selected. The Item Update Form has been designed to allow users
to view data based on their own needs and requirements. Results are originally sorted by Uni Code (Object Code) in
ascending order, however, since users can modify the sorting function, it is possible that records are sorted by a field other
than Object Code.
To delete all the fields, select the record (look at the arrow on the left) and click the “Delete Record” button.
Use the LEFT- RIGHT and UP-DOWN arrows to select a different field and the ENTER key to select a different record.
The same restrictions that apply for each field in the “Item Input By Acct” form, apply to the Item Update Form
CREATING A REPORT USING THE ITEM UPDATE FORM
Before creating a report using the ITEM UPDATE form, users can sort data by any desired criteria to make the report easier
to read.
STEP 1: Select column to be sorted.
Place cursor at the beginning of the field
and click the right mouse button.
STEP 3:
Create Report
STEP 2: Select
sorting criteria.
In addition, users can use the ‘Filter By Selection’ function to select only those items that they are interested in. Please refer
to the MANIPULATING DATA IN FORMS section for instructions on how to use the filter function (see page 13).
ITEM REPORT
Report based on the selected search and sorting criteria.
Shows Date
in ascending
order.
4
III. RECONCILING
POSTING SCREEN
Use this form to reconcile or postdate records. When records are added to an account (Item Input By Acct), the posted date
(PTD) and encumbrance date (EPD) are not entered. These records will remain open until they are either posted or
encumbered. The posting form will return a list of all the open records (records with NO PTD) for the account selected. Only
the PTD and EPD fields can be modified using this form. The dates must be selected from the given list. To modify other
fields, use the Item Update Form.
Number of open records
for the selected account.
CREATING A REPORT USING THE POSTING FORM
The “Preview Report” option on the Posting Form allows users to create a report and print a list of the selected records.
Note that the PTD is not shown.
These are “open records”, records
with NO PTD.
5
IV. ACCOUNT SET UP
The college has five main types of accounts: State, Budgeted Local, Cash Style Local, Summer and Grant. Each account is
managed separately and has a special set of instructions and requirements. “Cash Style Local” includes ICR and Gift
accounts. New accounts must be added to the system using one of the setup options listed in the main menu. For each account
created, enter the account’s number (alphanumeric, up to 8 digits long), the account’s name, the name of the person
responsible for the account and the balances in the appropriate categories. The Cost Centers and Cost Codes must also be
added when creating the account. Both the account’s number and type are RERQUIRED; the rest of the information is
optional. The account’s type will be automatically entered.
STATE ACCOUNT SETUP
Use to create a new State Account.
Account type automatically entered.
Delete Account
Number of existing
accounts.
Use the right and left arrows to select an
account.
MODIFYING THE ACCOUNT’S INFORMATION*
After creating an account users might need to go back and modify the account’s information. To make changes to an existing
account select the desired account using the left and right arrows located at the lower left corner of the setup screen. Any of
the fields in the setup screen can be modified. Users can change the account’s number, title or type, the name of the
responsible person and any of the balances for the different categories. After making all the changes or modifications users
must save the account by clicking the “Save New Account” button. Cost Codes and Cost Centers can also be modified using
this form; however, it is recommended to use the ADD C-CODES option instead. For instructions on how to add or delete a
Cost Center or Cost Code please refer to the ADD C-CODES section (see page 9).
DELETING AN ACCOUNT*
To delete an account use the “Delete Account” button at the bottom of the screen.
NOTE: The “Delete Account” command must be used carefully. When you delete an account, all the records, cost codes and
cost centers for that account are automatically deleted.
COPYING COST CENTERS AND COST CODES*
Accounts of the same time often share the same cost centers (CNTR) and cost codes (CCD). To eliminate the need of typing
the same information for two or more different accounts, users can copy the cost centers/codes from one account into another
by following these simple steps:
6
STEP 1: Enter all the required information for the new account:
Account Number automatically
entered here.
STEP 2: Go back to the account you want to copy the cost centers/codes from by using the right and left arrow at the bottom
of the screen. Right click on the Cost Center/Cost-Code column and select ‘Copy’.
Account # automatically entered here
STEP 3: Return to the new account. Right click on the Cost Center/Cost-Code column and select ‘Paste’.
* Note: These procedures apply to all the different account types.
7
CASH STYLE LOCAL ACCOUNT SETUP
Use to create a new Cash Style Local Account (includes ICR and Gift).
GRANT PROFILE SETUP
Use to create a new Grant Account
BUDGETED LOCAL ACCT. SETUP
Use to create a new Budgeted Local Account
8
SUMMER ACCOUNT SETUP
Use to create a new Summer Account
V. ADD C-CODES
ADD CNTR/CCD SCREEN
Use this form to add more Cost Centers and/or Cost Codes to an existing account. Remember that the codes must be
up to five characters long.
* The form will display the account’s information, but
only the Cost Center and Cost Code fields can be
modified.
Select an
Account
Number first!
* To add a new CNTR/CCD tab to the end of
the list and type.
DELETE CNTR/CCD
To delete a Cost Center or Cost Code:
- Select the line you want to delete by placing
the cursor at the beginning of the line.
- Click the right mouse button.
- Select the “Delete Record” option.
9
VI. REPORTS
Monthly reports are created for each account. Each type of account (State, Budgeted Local, Cash Style Local, Summer and
Grant) has unique characteristics and constraints. Each report has been designed to meet the account’s requirements.
Summary and Detail reports are available for the Cash Style Local, Budgeted Local and Summer accounts.
GENERATE REPORT SCREEN
The “Report Criteria Input Screen” displays the different types of reports that balance to the University FBM090 and
FBM091 ‘FRS’ Reports. To generate a report, both the Account Number AND the PTD Date must be selected. Each report
reflects the transactions made for the selected account on the selected date; if a date is not selected, the report will return
incorrect information.
SELECTING THE REPORT’S CRITERIA
STEP 2: Select the
Report Type
STEP 1: Select the
Account Number and
PTD Date.
* View results
for this report
in page 11.
The PTD REPORT displays the
records that have been posted on the
above selected month end date
(PTD) and account.
Use this report to keep track of
posted items.
PTD REPORT
Results for the account and
PTD selected.
10
MANAGING REPORTS
VIEWING A REPORT
Reports are created automatically after selecting the criteria. In many cases, depending on the settings, the report preview
screen will not show the entire report. Users can modify the settings to make reports easy to preview before printing.
SAMPLE REPORT SCREEN SHOT:
Note that only part of the report is shown.
Type of Report
Account Selected
Date Selected
To change the “view setting” for a report:
1.
2.
3.
Place the cursor on the report and
click the right mouse button.
Select the “Zoom” option.
Select the desired % from the drop
down list.
(75% of Fit are recommended).
PRINTING A REPORT
To print a report follow the steps listed above but select the “Print” option instead.
11
VII. MANAGING DATA
Data can be manipulated in several ways to meet the user’s needs and requirements. Manipulation of data will allow users to
view data in a more meaningful format, and will make the forms easy to read and understand. Data can be manipulated to
create a report or a list of records based on the information the user needs.
Users can also export data to Microsoft Excel to create additional reports.
MANIPULATING DATA IN FORMS
Users can manipulate data using the Item Update Form and the Posting Form. These two forms are used to search for records
based on a selected criterion. In the Item Update form users can search for records by selecting a field from the given options.
The Posting form allows users to view the open records for a selected account.
The amount of records these forms can return could be very large and difficult to read. In many situations, the user will only
need to look at specific records within the results.
SORTING DATA IN FORMS
EXAMPLE:
The user wants to search for records that were added to account 110602 and that have the same Cost Center.
STEP 1:
In the Item Update form select the account number and view the results.
Remember: Only one search criteria may be
selected !. You cannot select Account # and
Cost Center at the same time.
STEP 2:
Place the cursor on the
‘Cost Center’ field and click
the right mouse button.
STEP 3:
Select the sorting criteria
(ascending/descending).
12
STEP 4:
View the results.
The sorting function will
group records with the same
Cost Center, making the
results easy to read and
manage.
•
•
All the fields in this form can be sorted by following these four simple steps.
The same procedures apply to the Posting Form.
FILTERING DATA IN FORMS
In addition to the sorting function, users can also use the ‘Filter By Selection’ function.
To filter the records select the
field the want to filter the
results by (i.e. Cost Center =
SUPPL) and choose the
‘Filter By Selection’ option.
The sorting and filtering
functions can be used together
or separately, depending on
the needs of the user.
13
The form will now show only those records that match the selected field.
EXPORT DATA TO EXCEL
In many situations, users may need to create special reports or lists that the current system does not provide. In order to make
the new system more flexible and more efficient, we have created an export function that will allow users to transfer data to
Microsoft Excel. With this feature users will be able to create special reports based on their own specific needs.
After selecting data using the Item Update Form (i.e. select Account # 110602), simply click on the ‘Export to Excel’ button
and follow the directions.
STEP 1: Click the
‘ Export to Excel’
button.
STEP 2: Select the
directory or folder you
want to save the records
in.
STEP 3: Type in the
file name and click
‘OK’.
14
SORTING DATA IN EXCEL
To sort data in Excel, select the column you want to sort and select the sorting criteria from the menu bar.
Column to be sorted
Sorting criteria
FILTERING DATA IN EXCEL
To filter records in Excel follow these two steps:
STEP 1: Select ‘Data’
from the menu bar. Then
click on ‘Filter’ and
select the ‘AutoFilter’
option.
15
STEP 2: Each of the fields will now have a drop down menu. Click on the field that you want to filter the records by and
make a selection.
Select a
CNTR from
the given list.
COPYING RECORDS IN THE ITEM UPDATE FORM
In many occasions there will be groups of records that are almost identical; these records are very similar and only require
minimal changes. Entering the same information for two or more records can be time consuming. To avoid this, users can use
the ‘Copy Records’ function in the Item Update Form. This function will allow users to copy previous existing records.
The record (s) to be copied must be retrieved using the Item Update Form. If you know Line # you need to copy, select that
Line # from the search options and view the results, then select ‘Copy Records’.
1
2
16
After you select the ‘Copy Records’ function, the results will be shown in datasheet view.
3
Right click to select the entire
line and then select copy.
Paste the record in the next
available line.
The system will automatically assign a new Line # for the new record. The user must enter a date for the new record. All the
fields can be changed or modified.
NOTE: The ‘Copy Previous Record’ (ITEM INPUT SCREEN) and the ‘Copy Records’ functions (ITEM UPDATE
SCREEN) are very similar. The difference between the two is that the function in the Item Update Screen will allow users to
copy ANY existing record (i.e. records from past months). The function in the Item Input Screen will copy the PREVIOUS
record entered.
VIII. TROUBLESHOOTING
HANDLING ERRORS IN THE ACCOUNT SET UP SCREEN
One of the most common errors in the Account Setup screen occurs when users try to create an account that already exists.
Account # is a primary key and cannot be duplicated; this number must be unique for each account. If users select an account
number that already exists they will receive an error message saying the changes requested create a duplicate in index or the
primary key. To prevent this error, select an account number that does not exist in the system.
Click OK and enter a
different Account #.
Another common error occurs when users try to delete a CNTR using the backspace key.
17
Users will receive a message asking them to enter a CNTR. CNTR is a REQUIRED field, and the system will assume that its
value can’t be null.
To solve the problem click OK, go back to the list, type the CNTR and then delete using the right mouse button. Refer to the
‘DELETE CNTR/CCD’ section for help on deleting CNTRs (see page 9).
Type CNTR first,
then delete.
HANDLING ERRORS IN THE ITEM INPUT SCREEN
One common error occurs when users try to delete an Object Code using the backspace key. The general rule says that
“Object Codes must be selected from the list”; however, if users know the object code they can simply type it and reduce the
time it takes to go through the list and find it. If users type the wrong object code and then try to delete it, an error message
screen will pop-up.
18
To solve the problem click ‘End’ and type the correct object code or select from the list.
19