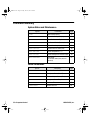
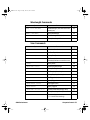
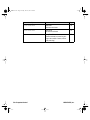
1
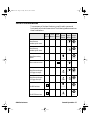
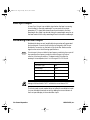
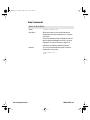
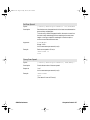
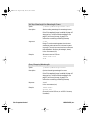
6400 rev A.fm Page 1 Friday, June 11, 1999 4:41 PM
USER’S GUIDE
6400 Series Lasers
External-Cavity Tunable Diode Lasers
U.S. Patent #5,319,668 & Other Patents Pending
Use of controls or adjustments, or performance of procedures
other than those specified herein, may result in hazardous
radiation exposure.
NEW FOCUS, Inc.
®
®
2630 Walsh Ave. • Santa Clara, CA 95051-0905 • USA
phone: (408) 980–8088 • fax: (408) 980–8883
e-mail: [email protected] • www.newfocus.com
6400 rev A.fm Page 2 Friday, June 11, 1999 4:41 PM
Warranty
New Focus, Inc. guarantees its lasers to be free of material and workmanship defects for one year
from the date of shipment or 3,000 hours of operation, whichever comes first. This warranty is in
lieu of all other guarantees expressed or implied and does not cover incidental or consequential
loss.
Products described in this document are covered by U.S. Patent #5,319,668 and patents pending.
Copyright 1999, New Focus, Inc. All rights reserved.
The
symbol and NEW FOCUS, Inc. are registered trademarks of New Focus, Inc. Littelfuse and
Slo-Blo are registered trademarks of Littelfuse, Inc.
Document Number 640046 Rev. A
6400 rev A.fm Page 3 Friday, June 11, 1999 4:41 PM
Contents
User Safety
5
Introduction . . . . . . . . . . . . . . . . . . . . . . . . . . . . . . . . . . . . . . 5
Laser Safety . . . . . . . . . . . . . . . . . . . . . . . . . . . . . . . . . . . . . . . 5
Using the Safety Interlock . . . . . . . . . . . . . . . . . . . . . . . . . 7
Getting Started
9
Introduction . . . . . . . . . . . . . . . . . . . . . . . . . . . . . . . . . . . . . . 9
Unpacking the System . . . . . . . . . . . . . . . . . . . . . . . . . . . . 9
Setting Up the Laser . . . . . . . . . . . . . . . . . . . . . . . . . . . . . . . 9
Starting the Laser for the First Time . . . . . . . . . . . . . . . 10
General Operation
13
Overview . . . . . . . . . . . . . . . . . . . . . . . . . . . . . . . . . . . . . . . . 13
What’s Inside . . . . . . . . . . . . . . . . . . . . . . . . . . . . . . . . . . . . 13
Using the Front-Panel Controls . . . . . . . . . . . . . . . . . . . 14
Control Combinations . . . . . . . . . . . . . . . . . . . . . . . . . . . 17
Back Panel and Tunable Laser Cavity Connections.. 18
Turning on the Power . . . . . . . . . . . . . . . . . . . . . . . . . . . . 19
Enabling Local (Front-Panel) Control. . . . . . . . . . . . . . 20
Setting the Laser Power. . . . . . . . . . . . . . . . . . . . . . . . . . . 20
Setting the Laser Wavelength (Track Mode). . . . . . . . 20
Performing Wavelength Scans . . . . . . . . . . . . . . . . . . . . 21
Laser Sync Output . . . . . . . . . . . . . . . . . . . . . . . . . . . . . . . 24
Modulating the Laser Output . . . . . . . . . . . . . . . . . . . . . 24
Reading an Input Signal . . . . . . . . . . . . . . . . . . . . . . . . . . 25
6400 Series Lasers
Contents • 3
6400 rev A.fm Page 4 Friday, June 11, 1999 4:41 PM
Computer Control
27
Introduction . . . . . . . . . . . . . . . . . . . . . . . . . . . . . . . . . . . . . 27
Using the IEEE-488 Interface . . . . . . . . . . . . . . . . . . . . . . 27
Using the RS-232 Interface . . . . . . . . . . . . . . . . . . . . . . . 28
Restoring Local (Front-Panel) Control . . . . . . . . . . . . . 29
Understanding the Command Types . . . . . . . . . . . . . . 29
Programming for the 6400 Series Laser. . . . . . . . . . . . 30
Conventions . . . . . . . . . . . . . . . . . . . . . . . . . . . . . . . . . . . . . 31
Command Summary . . . . . . . . . . . . . . . . . . . . . . . . . . . . . 32
Command Definitions . . . . . . . . . . . . . . . . . . . . . . . . . . . 35
Principles of Operation
57
Overview . . . . . . . . . . . . . . . . . . . . . . . . . . . . . . . . . . . . . . . . 57
General Theory . . . . . . . . . . . . . . . . . . . . . . . . . . . . . . . . . . 57
Changing the AC-Voltage Selection
61
Troubleshooting
65
Front-Panel Controls Won’t Work . . . . . . . . . . . . . . . . 65
Computer Control Doesn’t Work . . . . . . . . . . . . . . . . . 65
Wavelength Not Set to the Start Wavelength . . . . . . 65
Scans Won’t Start . . . . . . . . . . . . . . . . . . . . . . . . . . . . . . . . 66
Error Codes. . . . . . . . . . . . . . . . . . . . . . . . . . . . . . . . . . . . . . 66
Calibrating the Laser . . . . . . . . . . . . . . . . . . . . . . . . . . . . . 67
Customer Service
69
Service . . . . . . . . . . . . . . . . . . . . . . . . . . . . . . . . . . . . . . . . . . 69
Technical Support . . . . . . . . . . . . . . . . . . . . . . . . . . . . . . . 69
Appendices
71
Appendix A: Physical Specifications . . . . . . . . . . . . . . 71
Appendix B: RS-232 Connector Wiring . . . . . . . . . . . 72
Appendix C: Specifications . . . . . . . . . . . . . . . . . . . . . . . 73
4 • Contents
NEW FOCUS, Inc.
6400 rev A.fm Page 5 Friday, June 11, 1999 4:41 PM
User Safety
Introduction
Your safe and effective use of this product is of utmost importance
to us at New Focus. Please read the following laser safety
information before attempting to operate the laser.
Laser Safety
The laser radiation emitted from this unit may be harmful. Always
follow these precautions:
• Avoid direct exposure to the beam.
• Always wear protective goggles or eyeglasses appropriate for
working with laser light.
• Avoid looking at the beam directly.
• Be aware of and follow the warnings on the safety labels
(examples are shown on page 6).
• To completely shut off electrical power to the unit, turn off the
keyswitch. The Power button on the front panel only controls
power to the laser diode; even when power to the diode is off,
power is still supplied to other system components.
• Do not open the laser system. There are no user-serviceable
parts inside the unit.
Diode-laser power at the wavelengths shown in the following table
could be accessible inside the laser. Unauthorized opening of the laser
6400 Series Lasers
Contents • 5
6400 rev A.fm Page 6 Friday, June 11, 1999 4:41 PM
will void the warranty and may result in burns, electric shock, misalignment
of the laser cavity and/or irreparable damage to the internal components.
The following table shows the wavelength range and the maximum
internal power accessible inside the laser.
Note:
Model
Wavelength Range
6428
1450–1650 nm
Max. Power
55 mW
These values represent maximum values for the laser diode. The actual wavelength
range will be less and the output power will only be a fraction of the maximum
internal diode power shown here. See page 73 for operating specifications.
Label Identification
The following figures show the locations of the various warning labels
used with this product. Please be aware of them and use caution when
working with the laser.
Figure 1:
Safety labels on the
front of the laser
Danger label
Aperture label
INVISIBLE LASER RADIATION AVOID
DIRECT EXPOSURE TO BEAM
AVOID EXPOSURE
INVISIBLE LASER RADIATION
EMITTED FROM THIS APERTURE
Power output
Wavelength
CLASS IIIB LASER PRODUCT
Telecom-Test Laser
6428
Made in USA
Addressed
Remote
Temperature (˚C)
Wavelength (nm)
Laser Power
Power (dBm)
Current (nA)
AVOID EXPOSURE
Track
0
Scan
Start
λ
|
Stop
Local
AC Power
6 • User Safety
Scan Speed
Wavelength
Adjust
INVISIBLE LASER RADIATION
EMITTED FROM THIS APERTURE
Laser
˚C
INVISIBLE LASER RADIATION AVOID
DIRECT EXPOSURE TO BEAM
Motor
Trigger
Laser Output
FC/APC
Power output
Wavelength
CLASS IIIB LASER PRODUCT
NEW FOCUS, Inc.
Power
Adjust
NEW FOCUS, Inc.
6400 rev A.fm Page 7 Friday, June 11, 1999 4:41 PM
Figure 2:
Certification label
on the back of the
laser
Model Number:________________________________
Serial Number:_________________________________
Manufactured:_________________________________
NEW FOCUS, Inc.
2630 Walsh Ave., Santa Clara CA 95051-0905
This product conforms to the applicable requirements of 21 CFR 1040.10 and 1040.11 at the date of manufacture.
Model Number:________________________________
IEEE 488
Serial Number:_________________________________
Laser
Sync
Output
Manufactured:_________________________________
NEW FOCUS, Inc.
2630 Walsh Ave. • Santa Clara CA • 95051-0905
This product conforms to the applicable requirements of 21 CFR 1040.10 and 1040.11 at the date of manufacture.
Current
Modulation
Input
Detector
Input
WARNING
For continued protection against fire hazard, replace
only with the same type and rating of fuse.
Wavelength
Trigger A
Output
Interlock
Input VAC
Fuse
90 - 120
200 - 250
2.0 A T
1.0 A T
120Vac
CAUTION Risk of electric shock, do not remove cover. Refer servicing to qualified personnel.
10 - 250 VAC
1.2 - 0.5A, 48-66Hz
Wavelength
Trigger B
Output
RS232
Using the Safety Interlock
The safety interlock connector on the back of the controller is provided
for external safety systems. The system is shipped with a jumper across
the interlock terminals. Do not remove this jumper unless you are
using the safety interlock feature; the laser will not emit light unless the
interlock circuit is closed. The circuit carries 15-V DC.
6400 Series Lasers
User Safety • 7
6400 rev A.fm Page 8 Friday, June 11, 1999 4:41 PM
8 • User Safety
NEW FOCUS, Inc.
6400 rev A.fm Page 9 Friday, June 11, 1999 4:41 PM
Getting Started
Introduction
This section outlines the basic steps needed to start using your 6400
Series laser system, including information on unpacking the system
and brief set-up and starting notes. For more detailed information on
how to operate the instrument, refer to the “General Operation”
chapter beginning on page 13.
Unpacking the System
Carefully unpack the laser system. Compare the contents against the
packing slip and inspect them for any signs of damage. If parts are
missing or you notice any signs of damage, such as dented or scratched
covers, or broken knobs, please contact New Focus immediately. Save
the shipping container and packing material for future shipping needs.
Check that the power module on the back of the controller is set to the
AC line voltage appropriate for your setup (see page 61 for information
on checking and changing the voltage).
Setting Up the Laser
The laser is designed to operate in environments from 15–35 ˚C. If the
laser has been in storage at temperatures outside the range of 10–40 ˚C,
allow the laser system at least 4 hours to equalize.
When connecting fiber to the laser, use only FC/APC-connectorized
fiber.
6400 Series Lasers
Getting Started • 9
6400 rev A.fm Page 10 Friday, June 11, 1999 4:41 PM
The laser is shipped with brackets for mounting the system in a rack
and with rubber feet for using the system on a table top. Use a 1/8"
Allen wrench to add or remove the feet or the brackets.
Starting the Laser for the First Time
The following section takes you through the basic steps of starting up
and shutting down the laser. The controls and functions are described
in more detail in the following chapter.
Figure 3:
Front Panel
Telecom-Test Laser
6428
Made in USA
Addressed
Remote
Temperature (˚C)
Wavelength (nm)
Laser Power
Current (mA)
Power (dBm)
AVOID EXPOSURE
Track
0
Scan
Start
λ
|
Stop
Local
AC Power
Scan Speed
Wavelength
Adjust
INVISIBLE LASER RADIATION
EMITTED FROM THIS APERTURE
Laser
˚C
INVISIBLE LASER RADIATION AVOID
DIRECT EXPOSURE TO BEAM
Motor
Trigger
Laser Output
FC/APC
Power output
Wavelength
CLASS IIIB LASER PRODUCT
NEW FOCUS, Inc.
Power
Adjust
1. Make sure the laser aperture is blocked or attached to an optical fiber that is connected to an appropriate receptacle. Only
use fiber with FC?APC connectors.
2. Check the voltage setting: Check that the power module on
the back of the laser is set for the proper AC line voltage (see
page 61 for information on checking and changing the voltage).
3. Connect the power cord: Attach the power cord to the laser and
plug it into a wall outlet.
Note:
4. Turn on the system: Turn on the AC Power keyswitch (position
“1”). The system will start up and the system ID will scroll across
the display.
After turning the keyswitch, allow the system a minimum of 45 minutes to
warm before turning on the laser diode (step 4).
Once the keyswitch is turned on, the system can be operated
remotely through the IEEE-488 (GPIB) or RS-232 ports. Refer to
the “Computer Control” chapter beginning on page 27 for details.
10 • Getting Started
NEW FOCUS, Inc.
6400 rev A.fm Page 11 Friday, June 11, 1999 4:41 PM
5. Set the power to minimum: For safety, turn the Power Adjust
knob counter-clockwise until it stops to set it to minimum power.
6. Activate the laser: Push the Laser Power button. The button will
flash for 5 seconds before current flows through the diode and the
laser begins to emit light.
Laser radiation emitted from this unit may be harmful. Avoid direct exposure
to the beam.
Note:
7. Set the operating power: Turn the Power Adjust knob clockwise
to set the laser’s output power (the units are dBm).
To prevent damage to the laser diode, the factory has limited the maximum
current to the laser diode (the maximum is wavelength dependent). When you
reach maximum power for the current wavelength, the controller will engage
the current limiter and the power display will start to flash.
8. Set the system to track mode: To manually set the wavelength,
the system needs to be in track mode. A light in the Track button
indicates when the system is in track mode. If it is not lit, press the
Track button to turn it on.
9. Set the Wavelength: Turn the Wavelength Adjust knob to set the
wavelength. This will allow you to tune the laser with a resolution
of 0.01 nm. For 0.001-nm resolution, press the Scan button and
then turn the knob. (Scanning is discussed on page 21.)
Note:
6400 Series Lasers
10. Turn the laser off: To minimize the risk of power surges
damaging the laser diode, push the Power button to turn off the
laser when it is not in use (the LED on the button will turn off) and
before shutting down the system. Turn the keyswitch off (position
“0”) to shut down the entire system.
To avoid the warm-up period, you may want to leave on the system power.
Getting Started • 11
6400 rev A.fm Page 12 Friday, June 11, 1999 4:41 PM
12 • Getting Started
NEW FOCUS, Inc.
6400 rev A.fm Page 13 Friday, June 11, 1999 4:41 PM
General Operation
Overview
The 6400 Series laser is a stable, narrow-linewidth source of tunable
light. Use it in track mode to operate it at a set wavelength. In scan
mode, it is capable of fast and extremely linear scans between the start
and stop wavelengths that you specify. The system can be operated
manually, using the front-panel controls, or remotely, using one of the
computer interfaces.
What’s Inside
The 6400 Series laser is an external-cavity diode laser (ECDL) based on
the Littman-Metcalf design (see “Principles of Operation” on page 57).
The laser is designed to provide very accurate and linear wavelength
scans. Smooth and fast tuning is achieved with a brushless DC motor.
An optional wavelength ramp ensures linearity by adding 2 nm before
and after the specified tuning range to compensates for the motor’s
start-up and slow-down times (page 21); enable or disable the ramp
using the computer interface (page 53). The system also provides high
resolution when stepping between wavelengths. An ultra-low-noise
current source controls the laser’s output power. A temperaturecontrol circuit actively stabilizes the laser-cavity temperature for
optimal performance (the temperature is displayed on the front panel
but cannot be adjusted).
Control the laser’s parameters either through the front panel or via the
computer interface (see “Computer Control” on page 27).
6400 Series Lasers
General Operation • 13
6400 rev A.fm Page 14 Friday, June 11, 1999 4:41 PM
Connecting Fiber to the Laser
Use only FC/APC-connectorized fiber with the 6400 Series laser. We
use polarization-maintaining fiber inside the laser, with the polarization aligned parallel to the key on the FC connector. The laser output
comes to the front panel through a fiber with an optical isolator of
30 dB, preventing optical feedback into the laser cavity.
Using the Front-Panel Controls
The 6400 Series laser has two control options, local and remote. In
local mode, the front panel provides control of the laser system. In
remote mode, you control the laser over the computer interface (IEEE488 or RS-232). Whenever the 6400 receives a command over the
computer interface, it automatically deactivates most of the front-panel
controls (the Local button, which restores local control, the Laser
Power button, and the power keyswitch all remain active). For
information on using computer control, see page 27.
The controls on the front panel (Figure 4) allow you to read and set the
laser power, wavelength, start and stop wavelengths for scans,
scanning speed, and computer-interface parameters.
Figure 4:
Controller front
panel
4
5
6
7
Telecom-Test Laser
6428
Made in USA
Addressed
Remote
Temperature (˚C)
Wavelength (nm)
Laser Power
Power (dBm)
Current (mA)
AVOID EXPOSURE
Track
0
INVISIBLE LASER RADIATION
EMITTED FROM THIS APERTURE
Scan
Laser
Start
λ
|
Stop
Local
Wavelength
Adjust
Scan Speed
AC Power
9
1
14 • General Operation
2
3
8
˚C
INVISIBLE LASER RADIATION AVOID
DIRECT EXPOSURE TO BEAM
Motor
Trigger
Laser Output
FC/APC
Power output
Wavelength
CLASS IIIB LASER PRODUCT
NEW FOCUS, Inc.
Power
Adjust
11
10
12 13
14
15
NEW FOCUS, Inc.
6400 rev A.fm Page 15 Friday, June 11, 1999 4:41 PM
1. AC Power Keyswitch: Controls AC power to the entire laser system, including the temperature-control circuit. Power is not supplied to the laser diode until the Laser Power button is activated.
2. Power Indicator: This indicator is lit when the system power is
on. To check if power is being supplied to the laser diode, check the
indicator light in the Laser Power button.
3. Local Button: Returns the controller to local (front-panel) control
when the driver is in remote (computer-control) mode.
4. Laser Power Button: Turns on and off current to the laser diode.
When the laser power is on, this button will remain lit.
5. Addressed Indicator: This indicator is lit whenever the controller
is communicating over the computer interface (see the “Computer
Control” chapter beginning on page 27).
6. Remote Indicator: This indicator is lit whenever the controller is
under computer control, via either the IEEE-488 (GPIB) or the RS232 interface. (See “Computer Control” on page 27.)
7. Wavelength, Temperature, Current, and Power Displays:
Show the status of the different laser parameters, as well as errors
and system-identification information. Units are nm, ˚ C, mA, and
dBm, respectively.
The Temperature display indicates the laser-cavity temperature.
The laser controller actively stabilizes the cavity temperature for
optimal performance. The system is designed to operate in
environments from 15– 35 ˚C; if the system is exposed to
temperatures outside this range and is unable to maintain the
cavity temperature, the temperature display will flash. If this
occurs, shut down the unit until the environmental temperature
returns to the operating range.
The current changes with the power and wavelength; it is not
adjustable. You can modulate the current through a back-panel
BNC input (see page 24). The display does not reflect any current
modulation.
8. Scan Speed Switch: Hold this switch up to view or set the scan
speed.
6400 Series Lasers
General Operation • 15
6400 rev A.fm Page 16 Friday, June 11, 1999 4:41 PM
9. Track Button: Switches the laser between track mode, where you
can specify a set operating wavelength, and scan mode.
10. Wavelength Adjust Knob: Adjusts the wavelength while in track
mode. Sets other parameters when other buttons or switches are
depressed (see “Control Combinations” on page 17).
11. Scan Button: Starts and stops a wavelength scan. For continuous
scanning, hold up the Start/Stop λ switch before pressing Scan.
Pressing the button twice aborts a scan. (For more on scanning, see
page 21.)If pressed while in track mode, allows high-resolution
tuning (0.001 nm) and shifts the wavelength display by two
decimal places.
12. Start/Stop λ Switch: Display or set the start and stop wavelengths
for wavelength scans. In the down position, it will also change the
temperature display to show the motor temperature.
13. Trigger: SMB connector for TTL input pulses. Each input pulse has
the same effect as pressing and releasing the Scan button. The
falling edge of the pulse initiates the action.
14. Laser Output: Connector for FC/APC-connectorized single-mode
fiber. Make sure the laser output is blocked or attached to an optical
fiber and the fiber is connected to an appropriate receptacle on the
other end.
We use polarization-maintaining fiber in our 6400 Series lasers.
The polarization is aligned parallel to the key on the FC connector.
15. Power Adjust Knob: Adjusts the laser’s output power.
16 • General Operation
NEW FOCUS, Inc.
6400 rev A.fm Page 17 Friday, June 11, 1999 4:41 PM
Control Combinations
To access many of the laser’s features, you will need to use several
front-panel controls at the same time. The following table summarizes
these combinations.
Scan Wave- WaveLocal
Track
Scan
Speed length length
Button Button Button
Switch Switch Knob
Start
λ
Stop
View/Set start
wavelength for scans
Start
λ
Stop
View/Set stop
wavelength for scans
View/Set scanning
speed
Start
λ
Stop
Scan Speed
Start
λ
Stop
View/Set wavelength
for Trigger B output
6400 Series Lasers
Start
λ
Stop
Scan
View/Set wavelength
for Trigger A output
Wavelength
Adjust
Wavelength
Adjust
Scan Speed
Start continuous scan
Wavelength
Adjust
Scan Speed
Set GPIB address
Local
Scan Speed
Set RS-232 baud rate
Local
Scan Speed
Wavelength
Adjust
Wavelength
Adjust
Wavelength
Adjust
Wavelength
Adjust
General Operation • 17
6400 rev A.fm Page 18 Friday, June 11, 1999 4:41 PM
Back Panel and Tunable Laser Cavity Connections.
There are several input and output connectors on the back of the laser
controller.
Figure 5:
Controller back
panel
1 2
3
4
5
6
7
Model Number:________________________________
8
9
IEEE 488
Serial Number:_________________________________
Laser
Sync
Output
Manufactured:_________________________________
NEW FOCUS, Inc.
2630 Walsh Ave. • Santa Clara CA • 95051-0905
This product conforms to the applicable requirements of 21 CFR 1040.10 and 1040.11 at the date of manufacture.
Wavelength
Trigger A
Output
Interlock
Current
Modulation
Input
Detector
Input
WARNING
For continued protection against fire hazard, replace
only with the same type and rating of fuse.
Input VAC
Fuse
90 - 120
200 - 250
2.0 A T
1.0 A T
120Vac
CAUTION Risk of electric shock, do not remove cover. Refer servicing to qualified personnel.
10 - 250 VAC
1.2 - 0.5A, 48-66Hz
Wavelength
Trigger B
Output
RS232
1. Laser Sync Output: The controller sends a TTL signal out
through this BNC connector when the laser is scanning from the
start to the stop wavelength.
2. Wavelength Trigger A Output: The controller sends a TTL
pulse through this BNC connector when a scan hits the specified
trigger wavelength.
3. Wavelength Trigger B Output: The controller sends a TTL
pulse through this BNC connector when a scan hits the specified
trigger wavelength.
4. Interlock: For use with external safety systems, the laser will
not operate if the interlock circuit is open.
5. IEEE 488: Connector for controlling the laser over an IEEE-488
(GPIB) interface.
6. Current Modulation Input: BNC connector for modulating
the laser current (amplitude).
7. Detector Input: BNC connector for monitoring an external
instrument through the laser controller’s computer interface.
8. Power Module: The operating voltage is displayed on the
power module. The module also contains the fuses for the unit.
18 • General Operation
NEW FOCUS, Inc.
6400 rev A.fm Page 19 Friday, June 11, 1999 4:41 PM
9. RS232: Connector for controlling the laser over an RS-232
interface.
Turning on the Power
1. Make sure the laser aperture is blocked or attached to an optical
fiber that is connected to an appropriate receptacle. Use only
FC/APC-connectorized fiber.
2. Before turning on the system for the first time, check that the AC
line voltage indicator on the back of the controller matches the
voltage you are using (see page 61).
3. Turn the power keyswitch on the front panel clockwise (to the “1”
position). The display will show the laser model number and
software revision number.
The keyswitch turns on AC power for the entire laser system,
including the temperature circuit for the laser diode. It does not
turn on the power to the laser diode.
4. Wait at least 45 minutes after turning on the keyswitch to allow the
system to warm up.
5. Press the Laser Power button on the controller front panel to allow
current to flow to the diode. The button will flash during the five second safety delay before the current is activated. The button will
remain lit while current is flowing to the laser diode.
6. Turn the Power Adjust knob to control the amount of current to
the laser diode. Turning the knob clockwise increases power:
counter-clockwise decreases power. If the Power Display begins
to flash, the power is already at maximum.
Note:
6400 Series Lasers
Before turning off the system, you should first turn off power to the
laser diode by pressing the Laser Power button.
You can avoid the 45-minute warm-up period by leaving the system power
(keyswitch) on when you are not using the laser.
General Operation • 19
6400 rev A.fm Page 20 Friday, June 11, 1999 4:41 PM
Enabling Local (Front-Panel) Control
When the laser receives a command from the computer interface, it
deactivates all of the front-panel controls except the Laser Power and
Local buttons. This remote-control mode is indicated by the Remote
LED on the front panel. To return the controller to local (front-panel)
control, press the Local button on the front panel.
Setting the Laser Power
Turn the Power Adjust knob to set the power.
Note:
To prevent damage to the laser diode, the factory has limited the
maximum current to the laser diode. When you reach maximum
power, the controller will engage the current limiter and the power
display will start to flash.
Maximum power is wavelength dependent. See page 73 for power specifications.
Setting the Laser Wavelength (Track Mode)
The 6400 Series laser has two modes, track mode and scan mode.
While in track mode, you can actively control the tuning motor to
operate the laser at a set wavelength.
1. If the laser is in scan mode (the LED in the Track button is off),
switch to track mode by pressing the Track button.
You cannot switch to track mode during a scan. Press the Scan
button to cancel a scan (press it once to finish the current scan;
press twice to abort the scan immediately).
2. Standard tuning resolution is 0.01 nm. For 0.001-nm resolution,
press the Scan button while in track mode. The wavelength display will shift two decimal places.
3. Turn the Wavelength Adjust knob to set the wavelength. Turn the
knob clockwise to increase the wavelength: counter-clockwise
to decrease the wavelength.
20 • General Operation
NEW FOCUS, Inc.
6400 rev A.fm Page 21 Friday, June 11, 1999 4:41 PM
Performing Wavelength Scans
The 6400 Series laser has two modes, track mode and scan mode. In
scan mode, the laser continuously tunes from one wavelength to
another. You control the start and stop wavelengths, the scan speed,
and the number of scans. The system always scans from low to high
wavelengths. You can also set the laser to send trigger signals at
specified wavelength (see “Setting Output Triggers” on page 22).
Using the Wavelength Ramp
In order to obtain extremely linear tuning, the laser can add 2-nm
“ramps” to the beginning and end of the scan range which allow the
motor to get up to speed before the specified start wavelength and to
slow down after the specified ending wavelength. For example, if the
ramp is enabled and you set a scan to run from 1500–1550 nm, the
laser will actually start at 1498 nm and run through 1552 nm.
Use computer control to enable or disable the ramp (see page 53).
Setting the Start and Stop Wavelengths
1. Display the current start wavelength by pushing up the Start/Stop λ
switch.
2. While still holding the switch up, turn the Wavelength Adjust knob
to change the start wavelength.
3. Push the Start/Stop λ switch down to display the current stop
wavelength.
4. While still holding the switch down, turn the Wavelength Adjust
knob to change the stop wavelength. The stop wavelength must be
larger than the start wavelength.
5. Release the switch.
Note:
6400 Series Lasers
6. If the laser is in track mode, switch to scan mode by pressing the
Track button. The laser will then tune to the start wavelength
(minus the 2-nm ramp, if it is enabled).
You should not change the start or stop wavelengths during a scan.
General Operation • 21
6400 rev A.fm Page 22 Friday, June 11, 1999 4:41 PM
Setting the Scan Speed
1. Display the current scan speed by pushing up the Scan Speed
switch. The Wavelength display will change to show the current
scan speed.
2. While still holding the switch up, turn the Wavelength Adjust knob
to change the scan speed.
Note:
3. Release the switch.
If you change the scan speed during a scan, the new speed will not take effect until
the current scan is cancelled or finished and a new scan is started.
Setting Output Triggers
As the laser scans, it is capable of sending TTL trigger signals. The
signals are sent through the two back-panel BNC connectors, Output
Trigger A and Output Trigger B.
1. To set trigger A, hold down the Scan Speed switch and push up the
Start/Stop λ switch while turning the Wavelength Adjust knob.
2. To set trigger B, hold down both the Scan Speed switch and the
Start/Stop λ switch while turning the Wavelength Adjust knob.
3. Release the switches.
The rising edge of the output signal corresponds with the trigger
wavelength. The trigger jitter of the rising edge is about 1 ms. The pulse
width can vary, but is usually around 1 ms.
Starting a Scan
From the front panel, you can set the laser to perform a single scan or
to continuously scan.
1. If the laser is in track mode, press the Track button to switch the
laser to scan mode (the light in the track button should be off).
2. To run a single scan, press the Scan button once. To repeatedly run
scans, push up the Start/Stop λ switch and press the Scan button.
22 • General Operation
NEW FOCUS, Inc.
6400 rev A.fm Page 23 Friday, June 11, 1999 4:41 PM
Note:
3. After the laser finishes a scan, it returns to the start wavelength
minus the ramp (see “Using the Wavelength Ramp” on page 21).
You can set the laser to run a specific number of scans using computer control (see
page 54).
Using a Trigger to Begin a Scan
There is a Trigger input jack with an SMB-type connector under the
Start/Stop λ switch. A TTL signal sent to the laser through this
connector is equivalent to depressing and releasing the Scan button.
The actual trigger happens on the falling edge.
Cancelling a Scan
To stop an ongoing scan, press the Scan button. The laser will finish the
current scan and return to the Start wavelength.
To abort a scan, press the Scan button twice. The laser will immediately
stop the current scan and return to the Start wavelength.
Using a Trigger to End a Scan
There is a Trigger input jack with an SMB-type connector under the
Start/Stop λ switch. A TTL signal sent to the laser through this
connector is equivalent to depressing and releasing the Scan button.
The actual trigger happens on the falling edge.
Scan Maintenance
If you repeat a scan for a long period of time, the system’s moving parts
are restricted to a small range of motion, which could lead to uneven
wear. You can initiate full motion of all moving parts by turning the
power keyswitch off and then back on. You can also initiate the same
motion using the Start Maintenance Cycle command via computer
control (see page 36).
We recommend running this maintenance routine once for every
30,000 scans (about once every 24 hours of continuous scanning.
6400 Series Lasers
General Operation • 23
6400 rev A.fm Page 24 Friday, June 11, 1999 4:41 PM
Laser Sync Output
A Laser Sync Output is provided to signal when the laser is scanning
from the start to the stop wavelength. In scan mode, this output
generates a TTL signal as the laser scans from the start to the stop
wavelength. No signal is produced during the wavelength ramps or as
the laser resets from the stop wavelength back to the start wavelength.
Modulating the Laser Output
Note:
Modulate the laser current (amplitude) using an externally generated
low-level signal. Connect the line for the input signal to the Current
Modulation connector on the back of the controller. Make sure the
signal conforms to the following specifications:
Since changes in the current affect the laser frequency, modulating the current will
also create some fine-frequency modulation due to changes in the index of
refraction of the laser-gain medium. The degree to which this affects the
wavelength is laser dependent, but it is in the range of 25–40 MHz/mA.
Current Modulation Input Guidelines (DC-coupled)
Connector Type
BNC
Max. Voltage
±10 V
Input Frequency Range
5 kHz–1 MHz
Impedance
5 kΩ
Modulation
0.2 mA/V
The DC-coupled Current Modulation Input is NOT current limited. To prevent
damage to the laser diode DO NOT modulate the current above ±10 V.
The front-panel current readout does not reflect the modulation input.
You can calculate the actual current by adding the current shown on
the front-panel display to the modulation input.
24 • General Operation
NEW FOCUS, Inc.
6400 rev A.fm Page 25 Friday, June 11, 1999 4:41 PM
Reading an Input Signal
You can monitor an input signal using the DC-coupled Detector Input
connector on the back of the laser controller. The input is connected to
a 10-bit analog-to-digital converter. This general-purpose input allows
you to collect data from another instrument, such as a photodetector,
during a wavelength scan.
Connect the line for the input signal to the BNC connector on the back
of the laser controller. Make sure the signal conforms to the following
specifications:
Detector Input Guidelines
6400 Series Lasers
Connector Type
BNC
Voltage Range
0 V to +5 V
Input Frequency
DC–10 kHz
Impedance
51 kΩ
General Operation • 25
6400 rev A.fm Page 26 Friday, June 11, 1999 4:41 PM
26 • General Operation
NEW FOCUS, Inc.
6400 rev A.fm Page 27 Friday, June 11, 1999 4:41 PM
Computer Control
Introduction
The 6400 Series can be operated remotely through either the parallel
IEEE-488 (GPIB) interface or the serial RS-232 interface. Most
computers have RS-232 interfaces built in. In order to use the IEEE-488
interface, a special card or interface box is necessary. The IEEE-488
interface is many times faster than the RS-232 interface and can be
used to communicate with up to 30 instruments at the same time. RS232 is limited to communication with one instrument at a time.
Upon receiving a command over the computer interface, the frontpanel functions are locked out. Use the Local button on the front panel
to re-enable the front panel. All front-panel operations are available
through computer control. In addition, several functions are unique to
computer control.
Before attempting to communicate with the instrument, you must set
the device address (for IEEE-488) or the baud rate (for RS-232) via the
front panel.
Using the IEEE-488 Interface
The IEEE interface, also known as the General-Purpose Interface Bus or
GPIB, is a standard interface used for personal computers to
communicate with laboratory instruments. Several manufacturers
make printed circuit board “cards” that plug into the computer,
allowing it to communicate over the IEEE interface. The card’s
manufacturer can provide information for configuration with your
6400 Series Lasers
Computer Control • 27
6400 rev A.fm Page 28 Friday, June 11, 1999 4:41 PM
computer. Configuration is required to talk to an instrument at a given
address, and to issue commands to it from the programming language.
The IEEE connector on the back of the laser controller allows for
remote operation through a standard IEEE-488 (GPIB) cable. The
connector is a standard, female, 24-pin IEEE-488 connector for use
with a standard shielded IEEE-488 cable.
In order to function properly, you must assign a device address to the
laser controller that is unique from all the other IEEE-488 components
attached to your computer.
See “Programming for the 6400 Series Laser” on page 30 for more
information on using the IEEE interface.
Setting the Device Address
1. On the front panel, press and hold the Local button and hold up the
Scan Speed switch.
2. Turn the Wavelength Adjust knob until the desired address
number appears in the Wavelength display. The address can be
from 1 to 31.
3. Release the Local button and the Scan Speed switch.
Using the RS-232 Interface
Note:
The RS-232 9-pin connector on the back of the controller allows for
remote operation through a standard 9-pin RS-232 cable (see page 72).
To use the RS-232 port, attach a standard, shielded RS-232 cable to the
connector.
RS-232 ports can be configured for operation in DTE or DCE mode. The RS-232
port on the 6400 Series laser is configured as a DCE port. This means the laser
controller receives data on pin 2 and transmits data on pin 3 (see page 72). If you
have trouble communicating with the laser over the RS-232 port, you may need to
use a null-modem adapter or cable.
To communicate with the laser, set your computer to 8-bit, no parity,
1-stop, xon or xoff. The controller can support baud rates between 300
and 19,200 bps. Use the following steps to set the controller’s baud rate.
28 • Computer Control
NEW FOCUS, Inc.
6400 rev A.fm Page 29 Friday, June 11, 1999 4:41 PM
See “Programming for the 6400 Series Laser” on page 30 for more
information on using the RS-232 interface.
Setting the Baud Rate for RS-232
The RS-232 interface works at baud rates of 300, 1200, 2400, 4800,
9600, or 19200.
1. On the front panel, press and hold the Local button and hold down
the Scan Speed switch.
2. Turn the Wavelength Adjust knob to change the baud-rate setting.
3. Release the Local button and the Scan Speed switch.
Restoring Local (Front-Panel) Control
Note:
Commands which alter the state of the laser controller will switch the
laser into remote mode and disable most of the front-panel controls.
This remote-control mode is indicated by the “Remote” LED on the
front panel of the laser.
Commands which do not alter the state of the laser will not affect the control mode.
For example, you can use the computer to monitor all laser-operating parameters
while the operator manually changes the wavelength from the front panel.
To return the controller to local (front-panel) control, press the Local
button on the front panel.
Understanding the Command Types
There are three types of commands understood by the laser controller:
Set commands, Query commands, and Sense commands.
• Use Set commands to set or change a value. Examples would be
commands that turn on the laser or set the operating power.
• Use Query commands to check the user- or factory- set values of
the laser. Examples include checking the set value for the power
and checking the start wavelength for scans.
• Use Sense commands to determine the actual values for the laser
properties at any given time. For example, to check the actual
operating current or the voltage from the Detector Input.
6400 Series Lasers
Computer Control • 29
6400 rev A.fm Page 30 Friday, June 11, 1999 4:41 PM
Controller Responses
All commands evoke a response from the driver (set commands return
an “Ok” when executed). If you are using RS-232, the response is sent
immediately; with IEEE-488, the response is loaded into the output
buffer (a first-in, first-out buffer with a capacity of 5 messages).
Programming for the 6400 Series Laser
When programming for the laser, keep the following rules in mind.
• With GPIB, all commands are issued using the IBWRT function
call. To read the controller’s response to a command, use the IBRD
function call.
• For RS-232 operation, use @ to get the attention of the controller
before starting a command entry, and end each command with a
carriage return (<cr>).
• A command is not parsed until a new line character is received (RS232) or a hardware EOI is detected (IEEE-488).
• Numbers may contain at most 15 characters. The number 1550
will be read correctly, but the number 00000000000001550 will be
read as 15.
• Commands that expect integer values will truncate after any
decimal point in the input. For example, if a command is issued to
run “11.76” scans, the laser will run 11 scans.
• Only one command can be issued per line. For example, if the
controller receives WAVE 1550;*IDN?, it will change the
wavelength to 1550, but the Identification Query will be ignored.
• Laser-controller responses are sent differently depending on the
interface you are using.
IEEE-488: responses are written into the output buffer — a first-in
first-out (FIFO) buffer with a capacity for 5 outgoing messages. You
will need to send a separate command to read the response from
the buffer.
RS-232: responses are sent immediately and can be processed or
ignored.
•
30 • Computer Control
The controller does not echo the command.
NEW FOCUS, Inc.
6400 rev A.fm Page 31 Friday, June 11, 1999 4:41 PM
•
If sent an action command (such as change the power or set the
wavelength), the controller will return one of the following
responses:
•
“OK” if the command was properly executed.
•
“Out of Range” if a source value is outside the allowed range.
•
“Unknown Command” if the command is not recognized.
Conventions
The following pages contain a summary of all available commands,
followed by detailed definitions for each command. The following
conventions are used in both the “Command Summary” and the
“Command Definitions” sections.
• The part of the command shown in uppercase represents the short
form of the command. The commands are case insensitive.
If the syntax shown is “:SOURce:CURRent?”, then the controller
will accept any of the following: “:SOUR:CURR?”, “:sour:curr?”, or
“:sour:current?”. It will not accept commands such as
“:SOURC:CURR?” or “:sour:curre?”.
•
•
•
6400 Series Lasers
Optional values and portions of syntax are indicated by square
brackets ([ ]).
Values to be input are indicated by angle brackets (< >) and are
separated from the command either by a space or by a colon, as
shown in the command syntax.
Common IEEE-488 commands all begin with an asterisk character,
“*”; the device-specific commands all begin with a colon, “:”. These
characters are not optional.
Computer Control • 31
6400 rev A.fm Page 32 Friday, June 11, 1999 4:41 PM
Command Summary
System Status and Maintenance
Syntax
Command
Page
*IDN?
Identification Query
35
*OPC?
Operation Complete Query
35
:OUTP:SCAN:MAIN
Start Maintenance Cycle
36
:SYST:MCON <INT|EXT>
Set Control Mode (Remote/Local)
37
:SENS:WAVE
Sense Wavelength (nm)
38
:SENS:CURR:DIOD
Sense Level of Current (mA)
38
:SENS:TEMP:LASE
Sense Temperature (˚ C)
39
:SENS:VOLT:AUX
Sense Voltage from Detector Input
39
:OUTP:SCAN:STAT?
Scan State:
Check scan state (none, set, continuous)
55
Command
Page
Power Commands
Syntax
32 • Computer Control
:OUTP <on/off>
Turn Laser Power On/Off
40
:OUTP?
Query Laser Power (On/Off )
40
:POW <value>
Set Laser Output Power (dBm)
41
:POW?
Query Laser Power Setpoint
41
:POW:TRIM <value>
Set Power Trim
42
:POW:TRIM?
Read Power Trim
42
NEW FOCUS, Inc.
6400 rev A.fm Page 33 Friday, June 11, 1999 4:41 PM
Wavelength Commands
Syntax
Command
Page
:WAVE <value|MIN|MAX>
Set Wavelength (also switches to track
mode) (nm)
43
:WAVE? [<MIN|MAX>]
Query Wavelength
44
:WAVE:OFFS <value>
Set Wavelength Offset (nm)
44
:WAVE:OFFS?
Query Wavelength Offset
45
Scan Commands
Syntax
Command
Page
:OUTP:TRAC OFF
Switch to Scan Mode:
46
:WAVE:SLEW <value|MIN|MAX>
Set Scan Speed (nm/sec)
47
:WAVE:SLEW? [<MIN|MAX>]
Query Scan Speed
47
:PAUS <value>
Set Pause (ms):
Set delay between consecutive scans
48
:PAUS?
Query Pause
48
:WAVE:STAR <value>
Set Starting Wavelength
49
:WAVE:STAR?
Query Starting Wavelength
49
:WAVE:STOP <value>
Set Stopping Wavelength
50
:WAVE:STOP?
Query Stopping Wavelength
50
:WAVE:TRIG:A <value>
Set Trigger A (nm)
51
:WAVE:TRIG:A?
Query Trigger A
51
:WAVE:TRIG:B <value>
Set Trigger B (nm)
52
:WAVE:TRIG:B?
Query Trigger B
52
:WAVE:RAMP <ON|OFF|0|1>
Enable/Disable Wavelength Ramp
53
:WAVE:RAMP?
Query Wavelength-Ramp Status
53
:OUTP:SCAN:STAR <value>
Start scanning
(–1 = continuous scanning)
54
6400 Series Lasers
Computer Control • 33
6400 rev A.fm Page 34 Friday, June 11, 1999 4:41 PM
Syntax
Command
Page
:OUTP:SCAN:RESE
Reset Scan:
Finish scan and reset
54
:OUTP:SCAN:ABOR
Abort Scan:
Cancel scan and reset
55
:OUTP:SCAN:STAT?
Query Scan State:
Check scan state (not scanning, running a set number of scans, continuously scanning)
55
34 • Computer Control
NEW FOCUS, Inc.
6400 rev A.fm Page 35 Friday, June 11, 1999 4:41 PM
Command Definitions
System Status and Maintenance Commands
Identification Query
Syntax
*IDN?
Description
Returns the system identification string containing
the manufacturer, model number, serial number,
and firmware revision numbers for the laser cavity
and controller.
Example
*IDN?
⇒ NewFocus 6400 HM20 H3.00 C1.00
(Manufacturer = New Focus, Model = 6400, Serial
Number HM20, Motor Firmware Rev. 3.00, Controller Firmware Rev. 1.00)
Operation Complete Query
6400 Series Lasers
Syntax
*OPC?
Description
Returns 0 if a long-term operation is ongoing.
Returns 1 if no long-term operation is ongoing.
The laser has four long-term operations:
• Scanning (:OUTPut:SCAN:START)
• Resetting (:OUTPut:SCAN:RESEt)
• Scan Maintenance (:OUTPut:SCAN:MAIN)
• Set Wavelength ([:SOURce]:WAVElength)
Starting any of these operations clears the OPC status bit. When the laser returns to the start wavelength or reaches the target wavelength, the OPC
status bit is set to 1. The bit is also set to 1 if the
movement is interrupted, either with SCAN:STOP,
which interrupts a scan or reset, or OUTPut:TRACk
OFF, which interrupts a wavelength set.
Argument/Response
None
Computer Control • 35
6400 rev A.fm Page 36 Friday, June 11, 1999 4:41 PM
Start Maintenance Cycle
Syntax
:OUTPut:SCAN:MAINtenance
Description
Initiates movement of all mechanical parts and performs a tuning routine. (This same routine is performed whenever you turn on the system
keyswitch.) The full cycle requires less than 30 seconds. The laser returns to the start wavelength
when the maintenance cycle is complete.
Periodic use of this command will extend the lifetime of the laser and improve wavelength accuracy.
Once every 30,000 scans or every 24 hours of continuous scanning is sufficient.
Note: Turn off power to the diode before initiating this
command.
Example
36 • Computer Control
OUTP:SCAN:MAIN
⇒ OK
NEW FOCUS, Inc.
6400 rev A.fm Page 37 Friday, June 11, 1999 4:41 PM
Set Control Mode (Local/Remote)
Syntax
:SYSTem:MCONtrol <INT|EXT>
Description
Puts controller into Remote mode (using the internal DACs) or Local Mode (using the external frontpanel controls).
Argument
INT or EXT
INT sets the laser to use the internal DACs and gives
you remote control via the computer interface. The
laser will use the current power setpoint when it
switches to remote control. The front-panel displays will change as sensed. Target values can differ
by up to 3% due to component variations.
EXT returns control to the external front-panel
controls. The laser power will return to the last level
set from the front panel.
Note that in Remote Mode the front-panel potentiometers are ignored, but they are still active. If a
potentiometer is changed to an extreme setting and
the controller is then switched back to external control, the corresponding parameter will then move
to the extreme setting.
Example
6400 Series Lasers
:SYST:MCON INT
⇒ OK
(The laser switches to remote mode and the front
panel’s remote light turns on.)
Computer Control • 37
6400 rev A.fm Page 38 Friday, June 11, 1999 4:41 PM
Sense Wavelength
Syntax
:SENSe:WAVElength
Description
Returns the current wavelength of the laser.
This value will match the front-panel display.
Each laser is calibrated with respect to
wavelength at the factory and a calibration
table loaded into the Tunable Laser Cavity.
Response
“x.xxx”
Units: nanometers (nm).
Example
:SENS:WAVE
⇒ 1550.025
(The wavelength is 1550.025 nm.)
Sense Level of Current to Diode
38 • Computer Control
Syntax
SENSe:CURRent[:LEVel]:DIODe
Description
Returns the magnitude of the laser-diode current in milliamperes. The value returned is the
same as that seen on the front panel of the controller at the time the command is executed.
Response
“x.x”
Units: milliamperes (mA).
Example
:SENS:CURR:DIOD
⇒ 59.2
NEW FOCUS, Inc.
6400 rev A.fm Page 39 Friday, June 11, 1999 4:41 PM
Sense Temperature
Syntax
:SENSe:TEMPerature[:LEVel]:LASEr
Description
Returns the temperature of the laser cavity.
Note: The laser controller actively stabilizes the
temperature for optimal performance. If the system is
exposed to environments outside the operating
temperature of 15–35 ˚C and is unable to maintain
the cavity temperature, the temperature display will
flash. If this occurs, shut down the system until the
environmental temperature returns to this range.
Response
“x.x”
Units: ˚ C
Example
:SENS:TEMP:LASE
⇒ 21.1
(The diode temperature is 21.1 °C.)
Sense Voltage from Detector Input
Syntax
:SENSe:VOLTage[:LEVel]:AUXiliary
Description
Returns the voltage detected at the Detector
Input on the back panel of the laser controller.
Note: This is the only way this value can be read; it
cannot be read on the front panel.
The resolution for the Detector Input is 10 bits,
so the step size is 5 V/210 = 4.88 mV. The
response will be rounded to the nearest mV.
Response
“x.xxx”
Range: 0 to 5.
Units: volts (V).
Example
6400 Series Lasers
:SENS:VOLT:AUX
⇒ 1.200
(The Detector Input sees 1.2 volts.)
Computer Control • 39
6400 rev A.fm Page 40 Friday, June 11, 1999 4:41 PM
Power Commands
Turn Laser Power On/Off
Command Syntax
:OUTPut[:STATe] <ON|OFF|1|0>
Description
Turns the laser on or off. When turning the laser on,
the light in the front panel’s Laser Power switch
will flash for five seconds before the power is turned
on.
Argument
OFF, ON, 0, or 1.
0 or OFF turns the laser off, 1 or ON turns the
laser on.
Example
Turn off power to the laser:
:OUTP 0
⇒ OK
Query Laser Power (On/Off)
40 • Computer Control
Syntax
:OUTPut?
Description
Reads whether or not the laser power is on.
Response
“0” for laser current off and “1” for laser current on
Example
Determine if the laser current is on or off:
:OUTP?
⇒1
(The laser is turned on.)
NEW FOCUS, Inc.
6400 rev A.fm Page 41 Friday, June 11, 1999 4:41 PM
Set Laser Output Power
Syntax
[:SOURce]:POWer[:LEVel] <value>
Description
Sets the power level.
This command will not turn on power to the laser.
Argument
x.x
Range: -3.0 to +6.9.
Units: dBm
Note: Power is wavelength dependent. You will not be
able to achieve full power at all wavelengths. See
specifications on page 73.
Example
Set the laser power to 2.5 dBm:
:POW 2.5
⇒ OK
Query Laser Power Setpoint
6400 Series Lasers
Syntax
[:SOURce]:POWer[:LEVel]?
Description
Queries the laser-power setpoint.
Response
“x.x”
Range: -3.0 to 6.9 dBm
Example
SOUR:POW?
⇒ 2.8
(Laser output is set to 2.8 dBm.)
Computer Control • 41
6400 rev A.fm Page 42 Friday, June 11, 1999 4:41 PM
Set Power Trim
Syntax
[:SOURce]:POWer:TRIM <value>
Description
Allows you to calibrate the output power to an external power meter. You can alter the output power by
±15% from factory settings.
Note: The laser power must be off to change the trim.
Argument
x.xx
Range: 0.85–1.15
This value is a multiplier to the photodetector signal.
The value 0.85 corresponds to -0.7 dB and 1.15 corresponds to +0.6 dB. To calculate a value based on a
desired dB correction, use value=10(dB correction)/10.
Example
The power level shown on the front panel is off by
10% when measured by an external power meter, so
you want to increase the output power by 10%:
:POW:TRIM 0.90
⇒ OK
(You will not notice any change without an external
power meter, which will read 10% higher than it did
before with the same power level displayed on the
laser’s front panel.)
Query Power Trim
42 • Computer Control
Syntax
[:SOURce]:POWer:TRIM?
Description
Checks the trim applied the laser output power. The
trim is used to calibrate the laser to an external
power meter.
Response
“x.xx”
Example
:POW:TRIM?
⇒ 1.12
(The laser has been adjusted to decrease the output
power by 12%. [10log(1.12)=0.5 dB])
NEW FOCUS, Inc.
6400 rev A.fm Page 43 Friday, June 11, 1999 4:41 PM
Wavelength Commands
Set Wavelength
6400 Series Lasers
Syntax
[:SOURce]:WAVElength <val|MIN|MAX>
Description
Switches the laser to track mode and drives the laser
to the specified wavelength, the laser’s minimum
wavelength, or the laser’s maximum wavelength.
The minimum and maximum values are laser
dependent and may be queried (see next page).
If the value is out of range, the laser returns an out
of range error and no other action is taken.
Argument
x.xxx, MIN, or MAX
Range: Within the laser’s minimum and maximum
wavelength range. (These values are laser dependent; use the Query Wavelength command to
determine your laser’s range.)
Units: nanometers (nm).
Example
Set the wavelength to 1525 nm.
:WAVE 1525
⇒ OK
(The wavelength starts changing at the maximum
rate until it reaches 1525 nm.)
Computer Control • 43
6400 rev A.fm Page 44 Friday, June 11, 1999 4:41 PM
Query Wavelength
Syntax
[:SOURce]:WAVElength[ MIN|MAX]?
Description
Queries the wavelength setpoint, or the minimum
or maximum available wavelengths.
Response
“x.xxx”
Units: nanometers (nm).
Example
:WAVE?
⇒ 1525.000
(The wavelength is set to 1525 nm)
:WAVE MIN?
⇒ 1500
(The shortest wavelength possible is 1500 nm.)
Set Wavelength Offset
Syntax
[:SOURce]:WAVElength:OFFSet <val>
Description
Allows you to recalibrate the laser to an external
wavelength meter. (This value is reset to factory
default if the system power (keyswitch) is shut off.)
Note: You need to initiate a scan or a track-mode
operation to activate the offset.
44 • Computer Control
Argument
x.xxx
Range: ±2.5.
Units: nanometers (nm).
Example
Set the absolute wavelength 0.02-nm lower than
before:
:WAVE:OFFS -0.02
⇒ OK
(You will not notice a difference without using an
external wavelength meter.)
NEW FOCUS, Inc.
6400 rev A.fm Page 45 Friday, June 11, 1999 4:41 PM
Query Wavelength Offset
6400 Series Lasers
Syntax
[:SOURce]:WAVElength:OFFSet?
Description
Checks the value of the wavelength offset.
The units are in nanometers.
Response
“x.xxx”
Units: nanometers (nm).
Example
:WAVE:OFFS?
⇒ −0.030
(The wavelength has been offset by -0.030 nm from
the factory-calibrated setting.)
Computer Control • 45
6400 rev A.fm Page 46 Friday, June 11, 1999 4:41 PM
Scan Commands
Switch to Scan Mode
Syntax
:OUTPut:TRACk OFF
Description
Switches the laser into scan mode and sets the
wavelength to the start wavelength so it is ready to
start a scan.
Note: If the wavelength ramp is enabled, the laser will
be set to the start wavelength minus the 2-nm ramp.
See page 21 for more on the ramp, or page 53 for
information on enabling or disabling the ramp.
Example
46 • Computer Control
Turn off track mode and set the laser to the start
wavelength in scan mode.
:OUTP:TRAC OFF
⇒ OK
NEW FOCUS, Inc.
6400 rev A.fm Page 47 Friday, June 11, 1999 4:41 PM
Set Scan Speed
Syntax
[:SOURce]:WAVElength:SLEWrate <val|MIN|MAX>
Description
Sets the slew rate, the speed at which the laser tunes between the
start and stop wavelengths.
This value only affects the speed at which the motor tunes from
the start to stop wavelength. When resetting to the start wavelength or tuning to a specific wavelength in track mode, the
motor moves at the maximum rate.
Argument
x, MIN, or MAX
Range: 1–100
Units: nanometers per second (nm/s).
Example
Set the scan speed to 15 nm/s.
:WAVE:SLEW 15
⇒ OK
Query Scan Speed
Syntax
[:SOURce]:WAVElength:SLEWrate[ <MIN|MAX>]?
Description
Checks the set value of the scan speed.
Response
“x.xx”
Units: nanometers per second (nm/s).
Example
:WAVE:SLEW?
⇒ 22
(The laser will scan at 22 nm/s.)
6400 Series Lasers
Computer Control • 47
6400 rev A.fm Page 48 Friday, June 11, 1999 4:41 PM
Set Pause
Syntax
[:SOURce][:WAVElength]:PAUSe <val>
Description
Sets a delay between consecutive scans. The laser
scans from the start to the stop wavelength at the
set scan rate, resets to the start wavelength, and
then pauses before performing the next scan.
Argument
x
Units: milliseconds (ms).
Example
Set a 1.5-second pause between consecutive scans.
:PAUS 1500
⇒ OK
Query Pause
48 • Computer Control
Syntax
[:SOURce][:WAVElength]:PAUSe?
Description
Checks the delay between consecutive scans.
Response
“x.xx”
Units: milliseconds (ms).
Example
:PAUS?
⇒ 800
(The laser will pause for 800 ms between scans.)
NEW FOCUS, Inc.
6400 rev A.fm Page 49 Friday, June 11, 1999 4:41 PM
Set Starting Wavelength for Wavelength Scans
Syntax
[:SOURce]:WAVElength:STARt <val>
Description
Sets the starting wavelength for wavelength scans.
Note: If the wavelength ramp is enabled, the laser will
start scanning 2 nm before the start wavelength. See
page 21 for more on the ramp, or page 53 for
information on enabling or disabling the ramp.
Argument
x.xxx
Range: The value must be less than the stop wavelength and must be within the laser’s operating
range. (The minimum and maximum values are
laser dependent. See Query Wavelength, page 44.)
Units: nanometers (nm).
Example
Set scans to start at 1530 nm.
:WAVE:STAR 1530
⇒ OK
Query Starting Wavelength
Syntax
[:SOURce]:WAVElength:STARt?
Description
Queries the starting wavelength for scans.
Note: If the wavelength ramp is enabled, scans will
start 2 nm before this wavelength. See page 21 for
more on the ramp, or page 53 for information on
enabling or disabling the ramp.
6400 Series Lasers
Response
“x.xxx”
Units: nanometers (nm).
Example
:WAVE:STAR?
⇒ 1530.000
(Scans will start at 1530 nm, or at 1528 nm if the
ramp is enabled.)
Computer Control • 49
6400 rev A.fm Page 50 Friday, June 11, 1999 4:41 PM
Set Stop Wavelength for Wavelength Scans
Syntax
[:SOURce]:WAVElength:STOP <val>
Description
Sets the ending wavelength for wavelength scans.
Note: If the wavelength ramp is enabled, the laser will
stop scanning 2 nm after the stop wavelength. See
page 21 for more on the ramp, or page 53 for
information on enabling or disabling the ramp.
Argument
x.xxx
Range: The value must be greater than the start
wavelength and must be within the laser’s operating range. (The minimum and maximum values are
laser dependent. See Query Wavelength, above.)
Units: nanometers (nm).
Example
Set scans to start at 1530 nm.
:WAVE:STAR 1530
⇒ OK
Query Stopping Wavelength
Syntax
[:SOURce]:WAVElength:STOP?
Description
Queries the ending wavelength for scans.
Note: If the wavelength ramp is enabled, the laser will
stop scanning 2 nm after the stop wavelength. See
page 21 for more on the ramp, or page 53 for
information on enabling or disabling the ramp.
50 • Computer Control
Response
“x.xxx”
Units: nanometers (nm).
Example
:WAVE:STOP?
⇒ 1560.000
(Scans will end at 1560 nm, or at 1562 if the ramp
is enabled.)
NEW FOCUS, Inc.
6400 rev A.fm Page 51 Friday, June 11, 1999 4:41 PM
Set Trigger A
Syntax
[:SOURce]:WAVElength:TRIGger:A <value>
Description
Sets a wavelength that will send a TTL output pulse to the
controller’s Trigger A output during a wavelength scan.
The rising edge of the pulse corresponds with the trigger
wavelength. The trigger jitter is about 1 ms and the pulse
width is also about 1 ms.
Argument
x.xxx
Range: The value should be between the laser’s start and
stop wavelengths.
Units: nanometers (nm).
Example
Send a trigger pulse when the scan crosses
1552.655 nm.
:WAVE:TRIG:A 1552.655
⇒ OK
Query Trigger A
6400 Series Lasers
Syntax
[:SOURce]:WAVElength:TRIGger:A?
Description
Queries the trigger A wavelength.
Response
“x.xxx”
Units: nanometers (nm).
Example
:WAVE:TRIG:A?
⇒ 1552.655
(Scans will trigger a pulse at 1552.655 nm.)
Computer Control • 51
6400 rev A.fm Page 52 Friday, June 11, 1999 4:41 PM
Set Trigger B
Syntax
[:SOURce]:WAVElength:TRIGger:B <value>
Description
Sets a wavelength that will send a TTL output pulse to the
controller’s Trigger B output during a wavelength scan.
The rising edge of the pulse corresponds with the trigger
wavelength. The trigger jitter is about 1 ms and the pulse
width is also about 1 ms.
Argument
x.xxx
Range: The value should be between the laser’s start and
stop wavelengths.
Units: nanometers (nm).
Example
Send a trigger pulse when the scan crosses
1559.25 nm.
:WAVE:TRIG:B 1559.25
⇒ OK
Query Trigger B
Syntax
[:SOURce]:WAVElength:TRIGger:B?
Description
Queries the trigger B wavelength.
Response
“x.xxx”
Units: nanometers (nm).
Example
:WAVE:TRIG:B?
⇒ 1559.250
(Scans will trigger a pulse at 1559.25 nm.)
52 • Computer Control
NEW FOCUS, Inc.
6400 rev A.fm Page 53 Friday, June 11, 1999 4:41 PM
Enable/Disable Wavelength Ramp
Syntax
[:SOURce]:WAVElength:RAMPenable <ON|OFF|0|1>
Description
Enables or disables a 2-nm wavelength “ramp” at the beginning
and end of a scan.
The ramp enables the laser to scan at a constant rate between the
specified start and stop wavelengths. The ramp is used at the
beginning of a scan to accelerate the tuning motor to the desired
scan speed. The laser then tunes at a constant rate through the
stop wavelength, and uses the ramp to decelerate to a stop.
Argument
0, 1, ON, or OFF
1 or ON enables the ramp, 0 or OFF disables it.
Example
Enable the wavelength ramp:
:WAVE:RAMP 1
⇒ OK
Query Wavelength-Ramp Status
Syntax
[:SOURce]:WAVElength:RAMPenable?
Description
Checks the status of the 2-nm wavelength “ramp” at the beginning
and end of a scan.
Response
“1” for enabled, “0” for disabled.
Example
:WAVE:RAMP?
⇒1
(The ramp is enabled.)
6400 Series Lasers
Computer Control • 53
6400 rev A.fm Page 54 Friday, June 11, 1999 4:41 PM
Start Scanning
Syntax
:OUTPut:SCAN:STARt[ <value>]
Description
Runs the specified number of wavelength scans.
The laser scans from the start to the stop wavelength at the specified scan speed, and then returns
to the start wavelength at maximum speed.
If no value is entered, the laser will scan once and
remain tuned to the ending wavelength (plus 2-nm,
if the ramp is enabled).
The *OPC? command will return 0 until the stop
wavelength is reached on the last scan.
Argument
x (or no argument)
Range: -1 or any positive integer.
A value of -1 will repeat scans until scanning is cancelled or aborted.
Example
Run 25 wavelength scans:
OUTP:SCAN:STAR 25
⇒ OK
Reset Scan
54 • Computer Control
Syntax
:OUTPut:SCAN:RESEt
Description
Resets the laser to ready mode. If a scan is in
progress, it will be allowed to finish the current
scan before the laser is reset.
The Operation Complete Query will return 0 until
the start wavelength is reached.
Example
Complete the current scan and return to ready
mode at the start wavelength.
:OUTP:SCAN:RESE
⇒ OK
NEW FOCUS, Inc.
6400 rev A.fm Page 55 Friday, June 11, 1999 4:41 PM
Abort Scan
Syntax
:OUTPut:SCAN:ABORt
Description
Immediately cancels the current scan and sets the
laser to the start wavelength.
This is similar to the Reset Scan command, except
that the current scan is not completed.
Example
Cancel the current scan and reset immediately to
the start wavelength:
OUTP:SCAN:ABOR
⇒ OK
Query Scan State
Syntax
:OUTPut:SCAN:STATe?
Description
Reads the scan state of the laser.
Response
“x”
0 indicates the laser is in scan mode and waiting at
the start wavelength.
An integer indicates the laser is in the middle of performing that fixed number of scans.
-1 indicates the laser is performing continuous
scans.
-2 indicates the laser is in track mode.
Example
:OUTP:SCAN:STAT?
⇒0
(The laser is at the start wavelength and ready
to scan.)
6400 Series Lasers
Computer Control • 55
6400 rev A.fm Page 56 Friday, June 11, 1999 4:41 PM
56 • Computer Control
NEW FOCUS, Inc.
6400 rev A.fm Page 57 Friday, June 11, 1999 4:41 PM
Principles of Operation
Overview
Traditional diode-laser technology provides high reliability, high
electrical efficiency, and a wide range of available wavelengths in a
compact package. By using an external cavity built around a diode
laser, the 6400 Series laser provides enhanced performance compared
to an off-the-shelf diode laser, guaranteeing single-mode operation
with narrow linewidth and precise wavelength tuning.
General Theory
Laser Diode
Littman-Metcalf Laser Cavity
The 6400 Series laser
HR
Chip
Coating
US Patent #5,319,668
cavity is based on the
Collimating Lens
Littman-Metcalf design
AR
Retroreflector
Coating
(see refs. on page 59),
which uses a diffraction
Pivot
Point
grating at grazing
Wavelength
incidence to provide
Laser
Tuning
Output
wavelength selectivity.
Diffraction
Essential to the
Grating
performance of tunable
external-cavity diode lasers (ECDLs) is a high-quality anti-reflection
(AR) coating on the front facet of the diode. The AR coating turns the
diode into purely a gain element. A collimating lens directs the output
of the diode across a diffraction grating at grazing incidence. The
retroreflector in the laser cavity reflects the first-order diffraction off
the grating to provide feedback. Dispersion provided by the grating
allows only one cavity mode to lase, resulting in a very narrow
6400 Series Lasers
Principles of Operation • 57
6400 rev A.fm Page 58 Friday, June 11, 1999 4:41 PM
linewidth. The specular reflection or zero-order diffraction off the
grating serves as the output beam of the laser.
The angle between the grating and the end mirror determines the
lasing wavelength. Tuning is achieved by varying the angle using a
brushless DC motor to rotate the end reflector. Continuous (mode-hop
free) tuning requires selecting an appropriate rotation point.
Discontinuous tuning, characterized by periodic “mode-hops” results
from two competing wavelength-selection constraints, the mirrorgrating angle and the laser-cavity length. The laser-cavity length, L,
defines a discrete set of possible wavelengths or modes, λN, that can lase,
given by the equation L = NλN/2, (N = integer). The grating equation
insists that λ = Λ(sin θi + sin θd), where Λ refers to the groove spacing
of the grating while θi and θd refer to the incident and diffracted angles
of the laser beam. Rotation of the end mirror causes parameters in
both equations to change. An appropriately selected point of rotation
synchronizes the two, such that the cavity length remains the same
number of half-wavelengths long as the mirror is being rotated. Thus
mode-hop free tuning is achieved. When this condition is not met, the
lasing wavelength will periodically hop from one mode to the next (e.g.
from N to N +1) as the laser is tuned. The mechanical design of the 6400
Series laser provides truly mode-hop free tuning.
The laser controller provides current and temperature controls to the
laser cavity, as well as manual and computer controlled input/output
interfaces. The low-noise current supply drives the diode in the laser,
controlling the output power. The temperature control regulates the
laser-cavity temperature, providing a stable-output wavelength.
The laser wavelength is also affected by the current through the diode.
Changing the diode current affects the refractive index of the diode
lasers and therefore, the laser cavity length. The magnitude of the effect
is diode dependent, but is typically 25–150 MHz/mA.
58 • Principles of Operation
NEW FOCUS, Inc.
6400 rev A.fm Page 59 Friday, June 11, 1999 4:41 PM
References
T. Day, F. Luecke, and M. Brownell, “Continuously tunable diode
lasers,” Lasers and Optronics, pages 15–17, June 1993.
K. C. Harvey and C. J. Myatt, “External-cavity diode laser using a
grazing-incidence diffraction grating,” Optics Letters, vol. 16, pages
910–912, 1991.
M. G. Littman and H. J. Metcalf, “Spectrally narrow pulsed dye laser
without beam expander,” Applied Optics, vol. 17, pages 2224–2227,
1978.
M. G. Littman, “Single-mode operation of grazing-incidence pulsed
dye laser,” Optics Letters, vol. 3, pages 138–140, 1978.
M. G. Littman, “Single-mode pulsed tunable dye laser,” Applied Optics,
vol. 23, pages 4465–4468, 1984.
K. Liu and M. G. Littman, “Novel geometry for single mode scanning of
tunable lasers,” Optics Letters, vol. 6, pages 117–118, 1981.
6400 Series Lasers
Principles of Operation • 59
6400 rev A.fm Page 60 Friday, June 11, 1999 4:41 PM
60 • Principles of Operation
NEW FOCUS, Inc.
6400 rev A.fm Page 61 Friday, June 11, 1999 4:41 PM
Changing the AC-Voltage Selection
The laser controller can operate at 100, 120, 220, or 240 V AC, at AC
frequencies of 47–63 Hz. The unit is configured at the factory for the
standard AC voltage of the purchaser’s country.
To check the voltage setting, look at the voltage indicator on the back of
the laser controller.
Figure 6:
AC power module
& voltage indicator
Voltage indicator
~
120Vac
To change the operating voltage:
1. Make sure the laser power is off and the power keyswitch is in the
off position.
2. Disconnect the AC power cord.
3. Open the cover of the power module on the rear panel with a small
blade screwdriver or similar tool.
6400 Series Lasers
Changing the AC-Voltage Selection • 61
6400 rev A.fm Page 62 Friday, June 11, 1999 4:41 PM
Figure 7:
Power Module with
the cover open
AC-voltage
selection wheel
~
100Vac
~
120Vac
~
220Vac
Fuses &
fuse holders
Model Number:________________________________
IEEE 488
Serial Number:_________________________________
Laser
Sync
Output
Manufactured:_________________________________
NEW FOCUS, Inc.
2630 Walsh Ave. • Santa Clara CA • 95051-0905
This product conforms to the applicable requirements of 21 CFR 1040.10 and 1040.11 at the date of manufacture.
Current
Modulation
Input
Detector
Input
WARNING
For continued protection against fire hazard, replace
only with the same type and rating of fuse.
Wavelength
Trigger A
Output
Interlock
Input VAC
Fuse
90 - 120
200 - 250
2.0 A T
1.0 A T
120Vac
CAUTION Risk of electric shock, do not remove cover. Refer servicing to qualified personnel.
10 - 250 VAC
1.2 - 0.5A, 48-66Hz
Wavelength
Trigger B
Output
RS232
4. Remove the AC-voltage selection wheel from the unit.
Do not attempt to rotate the wheel while it is still in the power
entry module; the wheel must be removed, turned, and then
reinserted for proper operation.
5. Re-insert the wheel into the module so the desired AC voltage can
be viewed in the power-module window.
6. Ensure the proper fuses are installed in your system.
The power entry module requires two 5x20-mm slow-blow fuses,
such as Littelfuse’s® Slo-Blo® 239 series: one for the hot line and
the other for the neutral line. Replacement fuses should be as
follows:
62 • Changing the AC-Voltage Selection
NEW FOCUS, Inc.
6400 rev A.fm Page 63 Friday, June 11, 1999 4:41 PM
Figure 8:
AC Voltages and
their recommended fuses
AC Voltage
Fuse Rating
Slo-Blo Fuse #
100 V AC
2.0 A
239 002
120 V AC
2.0 A
239 002
220 V AC
1.0 A
239 001
240 V AC
1.0 A
239 001
7. Close the power-module cover.
8. Verify the proper voltage is showing through the module window.
9. Reconnect the AC-power cord.
6400 Series Lasers
Changing the AC-Voltage Selection • 63
6400 rev A.fm Page 64 Friday, June 11, 1999 4:41 PM
64 • Changing the AC-Voltage Selection
NEW FOCUS, Inc.
6400 rev A.fm Page 65 Friday, June 11, 1999 4:41 PM
Troubleshooting
Front-Panel Controls Won’t Work
If the front-panel controls aren’t working, the laser may be in remote
(computer-control) mode. Press the Local button on the front panel to
restore local control.
Computer Control Doesn’t Work
If you are using the IEEE (GPIB) interface, make sure the laser is set to
the same device address as your software is requesting (see page 28).
If you are using the RS-232 interface, make sure the laser system is set
to the correct baud rate for your system (see page 29). If the baud rate is
correct, then it may be that the serial connector on the laser and on
your computer are both set to transmit on pin 2 (see page 72). If this is
the case, then using a null-modem adapter or a null-modem cable will
solve this problem.
Wavelength Not Set to the Start Wavelength
If the laser is in track mode (the Track button should be lit), it will not
tune to the start-scan wavelength. Press the Track button to switch the
laser to Scan mode.
If the laser is in scan mode and the wavelength display does not show
that the laser is at the start wavelength, it may be because the
wavelength ramp is enabled. The wavelength ramp is a 2-nm offset
from the start wavelength that allows the motor enough time to get to
6400 Series Lasers
Troubleshooting • 65
6400 rev A.fm Page 66 Friday, June 11, 1999 4:41 PM
the specified scan speed before it starts tuning across the designated
tuning range. Using the ramp results in extremely linear tuning
between the start and stop wavelengths. (Another 2-nm ramp after the
stop wavelength is used to slow down the motor). Use the computer
interface to enable or disable the ramp. See page 53.
If the wavelength display does not match the wavelength measured by
an external wavelength meter, you can recalibrate the laser by adding a
wavelength offset using the computer interface. See page 44.
Scans Won’t Start
You cannot start a scan if the laser is in track mode. Press the Track
button to switch to scan mode.
Error Codes
The wavelength display will indicate an error code if the controller is
unable to perform its proper functions.
Errors 1 through 7 indicate that a switch is depressed during startup.
Error 21 may indicate that the safety interlock circuit is open; if you are
not using the safety interlock feature (page 7), check to make sure the
jumper on the back of the controller is securely in place. If the errors
persist, contact New Focus.
Error
66 • Troubleshooting
Description
Error 1
Laser Power switch depressed during power up.
Error 2
Scan button depressed during power up.
Error 3
Track button depressed during power up.
Error 4
Multifunction switch depressed during power up.
Error 5
Scan Speed switch depressed during power up.
Error 6
Local button depressed during power up.
Error 7
Multiple stuck buttons during power up.
Error 21
Interlock error or over-power protection.
NEW FOCUS, Inc.
6400 rev A.fm Page 67 Friday, June 11, 1999 4:41 PM
Errors 11–30 indicate an internal hardware error. Switching the laser
controller off and then back on can clear some of these errors. If the
errors persist, please contact the New Focus for assistance.
Error
Description
Error 11
Microprocessor RAM error.
Error 12
EPROM revision number mismatch.
Error 14
Temperature board revision wrong.
Error 15
Tunable Laser Cavity EEPROM stability error, or
there is a compatibility conflict between controller
and Tunable Laser Cavity.
Error 16
Motion control board error.
Error 17
Communication error between microprocessor
board and motion control board.
Error 20
Over Current protection
Error 21
Interlock error or Over Power protection. If you are
not using the safety interlock feature (page 7), check
to make sure the jumper on the back of the controller
is securely in place.
Error 30
Motor-controller error.
Calibrating the Laser
You can calibrate the laser power or wavelength to an external meter
using the computer interface. To calibrate the power, see page 42; to
add an offset to the wavelength, see page 44.
6400 Series Lasers
Troubleshooting • 67
6400 rev A.fm Page 68 Friday, June 11, 1999 4:41 PM
68 • Troubleshooting
NEW FOCUS, Inc.
6400 rev A.fm Page 69 Friday, June 11, 1999 4:41 PM
Customer Service
Service
We designed the 6400 Series lasers to be maintenance free; no
scheduled service actions are required.
If your laser does require service, repair, or calibration, please call for a
Return Authorization Number before shipping the unit to New Focus.
There are no user-serviceable parts inside the laser. Unauthorized opening of the
laser will void the warranty and may result in burns, electric shock, misalignment
of the laser cavity, and/or irreparable damage to the internal components.
Technical Support
Engineers are on duty at (408) 980-8088 from 8:30–5:00 PST Monday
through Friday (excluding holidays) to answer questions about the
performance or operation of your laser. For quickest response ask for
“Technical Support” and have your model and serial number available.
The model and serial number can be read from the certification label
on the back panel of the laser.
You can also send technical questions by email directly to our
Technical Support department at [email protected]. We will
typically respond to email within one business day.
6400 Series Lasers
Customer Service • 69
6400 rev A.fm Page 70 Friday, June 11, 1999 4:41 PM
70 • Customer Service
NEW FOCUS, Inc.
6400 rev A.fm Page 71 Friday, June 11, 1999 4:41 PM
Appendices
Appendix A: Physical Specifications
Figure 9:
Front view and
side view of the
6400 Series laser
19.05" (483.9)
18.35" (446.1)
16.80" (426.7)
Telecom-Test Laser
6428
Made in USA
Addressed
Remote
5.20"
(132.1)
Temperature (˚C)
Wavelength (nm)
Laser Power
Current (mA)
Power (dBm)
AVOID EXPOSURE
Track
0
Start
λ
|
Stop
Local
AC Power
Scan Speed
Wavelength
Adjust
INVISIBLE LASER RADIATION
EMITTED FROM THIS APERTURE
Scan
2.25"
(57.2)
Laser
˚C
INVISIBLE LASER RADIATION AVOID
DIRECT EXPOSURE TO BEAM
Motor
Trigger
Laser Output
FC/APC
Power output
Wavelength
CLASS IIIB LASER PRODUCT
NEW FOCUS, Inc.
Power
Adjust
2.25"
(37.6)
17.50" (444.5)
5.56"
(141.1)
Controller Weight: 34 lbs (15.4 kg)
6400 Series Lasers
Appendices • 71
6400 rev A.fm Page 72 Friday, June 11, 1999 4:41 PM
Appendix B: RS-232 Connector Wiring
The RS-232 connector on the back of the laser controller is a standard
female 9-pin D-connector. RS-232 ports can be configured for
operation in DTE or DCE mode. The RS-232 port on the 6400 Series
laser is configured as a DCE port. This means the laser controller
receives data on pin 2 and transmits data on pin 3 (see below). If you
have trouble communicating with the laser over the RS-232 port, you
may need to use a null-modem adapter or cable.
Figure 10: RS-232
Female 9-Pin DConnector
6
7
8
9
Pin
1
5 4 3 2 1
Gnd
Rx Tx
Description
Not Connected
2
Tx
Serial Transmit Line
3
Rx
Serial Receive Line
4
5
6–9
72 • Appendices
Name
Not Connected
Ground
Digital Ground Line
Not Connected
NEW FOCUS, Inc.
6400 rev A.fm Page 73 Friday, June 11, 1999 4:41 PM
Appendix C: Specifications
Specification
6400 Series Lasers
Model 6428
Tuning Range
1500–1575
Output Power
> 6dBm (1520–1570 nm)
> 0 dBm (1500–1575 nm)
Mode-Hop Performance
mode-hop free
from 1520–1570 nm
Side-Mode Suppression Ratio
> 40 dBc
(relative to central mode)
>45 dBc typical
Tuning Speed
1–100 nm/s
Wavelength Resolution
1 pm
Absolute Wavelength Accuracy
±0.2 nm over
warranty period
Computer Interface
IEEE (GPIB) and RS-232
Appendices • 73
6400 rev A.fm Page 74 Friday, June 11, 1999 4:41 PM
74 • Appendices
NEW FOCUS, Inc.