1
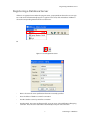
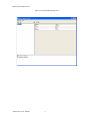
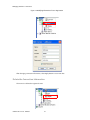
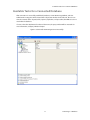
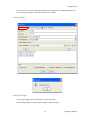
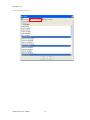
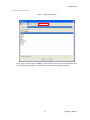
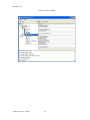
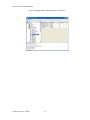
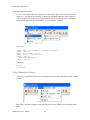
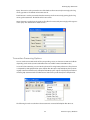
ALTIBASE Tools & Utilities
Admin Center Users’ Manual
release 5.3.3
1
ALTIBASE Application Development Stored Procedure User’s Manual
Release 5.3.3
Copyright ? 2001~2009 Altibase Corporation. All rights reserved.
This manual contains proprietary information of Altibase Corporation; it is provided under a license agreement containing restrictions
on use and disclosure and is also protected by copyright patent and other intellectual property law. Reverse engineering of the software is prohibited.
Altibase Corporation
10F, Daerung PostTower II, 182-13,
Guro-dong Guro-gu Seoul, 152-847, Korea
Telephone: +82-2-2082-1000
Fax: 82-2-2082-1099
E-mail: [email protected]
www: http://www.altibase.com
2
Contents
Preface ............................................................................................................................................................................ i
About This Manual ...................................................................................................................................................................................ii
1. Installation ................................................................................................................................................................1
Installing AdminCenter ..........................................................................................................................................................................2
2. Connecting to a Database ........................................................................................................................................5
Getting Started ..........................................................................................................................................................................................6
Registering a Database Server .............................................................................................................................................................7
Managing Database Connections ......................................................................................................................................................9
Available Tasks for a Connected Database .................................................................................................................................. 11
3. Managing a Database .............................................................................................................................................13
Tasks for a Database ............................................................................................................................................................................. 14
Managing Tablespaces........................................................................................................................................................................ 17
Managing Users ..................................................................................................................................................................................... 22
Managing Tables ................................................................................................................................................................................... 32
Managing Views..................................................................................................................................................................................... 44
Managing Sequences........................................................................................................................................................................... 48
Managing Replications........................................................................................................................................................................ 53
Manging Procedures ............................................................................................................................................................................ 60
4. Monitoring a Database Server ...............................................................................................................................73
Information for the Administration ................................................................................................................................................ 74
Warning Server Termination ............................................................................................................................................................. 79
5. Interactive Query Windows ....................................................................................................................................81
Starting a Query Window ................................................................................................................................................................... 82
Connecting to a Database in the Query Windows .................................................................................................................... 83
Running SQL Statements.................................................................................................................................................................... 85
1
Preface
i
Preface
About This Manual
About This Manual
This manual describes how to use Admin Center to manage Altibase database.
Target Users
This manual could be useful for the following Altibase users.
•
Database administrators
•
Application designers
•
Programmers
Before reading this manual, understanding of following background knowledge is recommended.
•
Basic knowledge required for computers, operating systems, and operating system command
•
Experience in using the relational database or understanding of the database concepts
•
Computer programming experience
Software Environment
This manual has been prepared assuming Altibase 5.3.3 will be used as the database server.
Organization
This manual has been organized as follows:
•
Chapter 1. Installation
This chapter shows you installation of the AdminCenter after installating of Altibase.
•
Chapter 2. Connecting to a database
This chapter shows you to help user to create objects in Altibase GUI.
•
Chapter 3. Managing a database
•
Chapter 4. Monitoring a Database Server
•
Chapter 5. Interactive Query Window
This chapter shows the existing feature of iSQL using the GUI.
Documentation Rule
This chapter describes the rules of this manual. With understanding of this rule, it is easy to search
information in this manual and other manuals.
AdminCenter Users’ Manual
ii
About This Manual
Rules are as follows:
•
Syntax diagram
•
Sample code rule
Syntax Diagram
This manual describes the command syntax using the diagram composed of the following elements:
Elements
Meaning
The command starts. The syntax element which is not a complete command starts with an arrow.
Reserved
word
The command continues to the next line. The syntax element
which is not a complete command terminates with this symbol.
The command continues from the previous line. The syntax
element which is a complete command starts with this symbol.
End of a statement.
;
Mandatory
SELECT
Optional
NOT
Mandatory field with optional items. Only one field must be
provided.
ADD
DROP
iii
Preface
About This Manual
Elements
Meaning
Optional field with optional item.
ASC
DESC
Optional multiple fields are allowed. The comma must be in
front of every repetition.
ASC
DESC
,
Sample Code Rule
The code example explains SQL, stored procedure, iSQL, or other command line syntax. The following table describes the printing rules used in the code example.
Rules
Meaning
Example
[]
Indicates optional fields.
VARCHAR [(size)] [[FIXED |]
VARIABLE]
{}
Indicates mandatory fields. Indicates
to make sure to select at least one.
{ ENABLE | DISABLE | COMPILE }
|
Argument indicating optional or mandatory fields.
{ ENABLE | DISABLE | COMPILE
}[ ENABLE | DISABLE | COMPILE
]
...
Repetition of the previous argument.Omit the example codes.
SQL> SELECT ename FROM
employee;
ENAME
-----------------------SWNO
HJNO
HSCHOI
...
20 rows selected.
Other symbols
Other symbols
EXEC :p1 := 1;
acc NUMBER(11,2);
Italicicized words
Indicates variable or value that must
be provided by user.
SELECT * FROM table_name;
CONNECT userID/password;
AdminCenter Users’ Manual
iv
About This Manual
Rules
Meaning
Example
Lower case words
Program elements provided by the
user such as table names, column
names, file names, etc.
SELECT ename FROM
employee;
Upper case words
Elements provided by the system or
keyword appeared in the syntax.
DESC SYSTEM_.SYS_INDICES_;
References
For more detailed information, see the following document list.
•
Altibase Installation Manual
•
Altibase Administrator’s Manual
•
Altibase Replication User’s Manual
•
Altibase Precompiler User’s Manual
•
Altibase ODBC User’s Manual
•
Altibase Application Program Interface User’s Manual
•
Altibase iSQL User’s Manual
•
Altibase Utilities User’s Manual
•
Altibase Error Message Reference
Online Manual
Korean and English versions of on-line manuals (PDF or HTML) are available from Altibase Download
Center (http://atc.altibase.com/).
Altibase Welcomes Your Opinions!
Please send us your comments and suggestions regarding this manual. Your comments and suggestions are important, and they may be used to improve future versions of the manual. When you send
your feedback, please make sure to include the following information:
•
The name and version of the manual in use
•
Your comments or suggestions regarding the manual
•
Your name, address, and phone number
Please send your e-mail to the following address:
[email protected]
v
Preface
About This Manual
This address is intended to report any errors or omissions discovered in the manual. When you need
an immediate assistance regarding technical issues, please contact Altibase Customer Support Center.
We always appreciate your comments and suggestions.
AdminCenter Users’ Manual
vi
1 Installation
1
Installation
Installing AdminCenter
Installing AdminCenter
This section describes installation of the AdminCenter after installation of Altibase.
Click on management tab on Environment menu of product at Altibase download center (http://
adc.altibase.com/), and install after downloading the software (admin_center.bat,
Query_Window.bat) in the same directory.
Figure 1-1 Initial Screen after Executing admin_center.bat
Copy JDBC Driver (Altibase.jar) in $ALTIBASE_HOME/lib directory created upon installation of Altibase to the same directory. Or change the default class path into the Altibase.jar file upon execution
of admin_center.bat (or Querry_Window.bat.)
Download over JRE 1.4.x version from the http://java.com/
Execute admin_center.bat.
Register the server through the GUI.
Admin Center Users’ Manual
2
Installing AdminCenter
Figure 1-2 Server Registration Screen
After the server is successfully registered, “Registered New Server” message will be displayed in the
result message window.
Figure 1-3 Screen after Registering Server
3
Installation
Installing AdminCenter
To connect to the server right-click on the name field of the registered server, and than choose ‘Connect’ from the shortcut menu or click on the corresponding button in the tool bar.
Figure 1-4 Screen after Connecting to Server
When the server is connected, the user can use the Admin Center through GUI to manage (create or
execute) Altibase objects, monitor the server, and execute the query.
Restrictions
In Admin Center access to server in SYSDBA mode is not available. SYSDBA mode process like on/off
of the database is available only in server’s console.
Admin Center Users’ Manual
4
2 Connecting to a Database
This tool is provided to help users to create object (table, sequence, replication, procedure, etc.) in
Altibase using GUI.
5
Connecting to a Database
Getting Started
Getting Started
The following is when the program starts. On the left side of the screen, the registered databases will
be displayed. By clicking on each database, the details of the database will be displayed on the right
side of the screen.
You can select each item from the object tree or from the tool bar. You can also right-click on the
name field of the object tree, and than choose ‘Connect’ from the shortcut menu.
Figure 2-1 Initial screen after executing Admin Center
AdminCenter Users’ Manual
6
Registering a Database Server
Registering a Database Server
If there is no registered server when the program starts, a popup window where the user can register a new server will automatically appear. To register a new server, click on Database and New or
select the corresponding button from the tool bar menu.
Or
Figure 2-2 Server Registration Screen
•
Name : the name of server specification information currently specified
•
Host : IP address of database server for connection
•
Port No : Database server’s port No for connection
•
User/Password : User name and Password for access to server. Select Add button after typing
each item. Then, the server data will be automatically read upon next connection.
7
Connecting to a Database
Registering a Database Server
Figure 2-3 Screen after Registering Server
AdminCenter Users’ Manual
8
Managing Database Connections
Managing Database Connections
Connecting to a Database
When a new server is registered, the name of the registered server will be displayed in the object
tree window on the left. Right-click on the item and select Connect from the shortcut menu, or
select the corresponding button from the tool bar. After the connection is established, the corresponding menu will be changed into Disconnect.
or
or
Modifying the Connection Information
This menu is to change information about the registered server. If the user selects Edit, the following
popup screen will appear.
9
Connecting to a Database
Managing Database Connections
Figure 2-4 Modifying Information of Server Registration
After changing connection information, select Apply button to store new data.
Delete the Connection Information
This menu is to delete the registered server.
AdminCenter Users’ Manual
10
Available Tasks for a Connected Database
Available Tasks for a Connected Database
After connection is successfully established, Databases, Server Monitoring & Admin, and User
Administration categories will be created in the object tree window on the left side. The user can
view the contents of the objects (table, sequence, replication, and procedure) that Altibase can created under the database.
If a user selects the SQL button from the tool bar menu, the query window will be executed. For
more information, see Query Window chapter.
Figure 2-5 Screen after Connecting to Server Successfully
11
Connecting to a Database
Available Tasks for a Connected Database
AdminCenter Users’ Manual
12
3 Managing a Database
13
Managing a Database
Tasks for a Database
Tasks for a Database
There are menus about executing CheckPoint, setting TRCLOG property and generating script files
related to database object.
or
CheckPoint
Execute Checkpoint
Set TRCLOG Property
Set TRCLOG Property. Refer to the supplement to Administrator’s Manual for specific contents about
this property.
AdminCenter Users’ Manual
14
Tasks for a Database
Save As Script File
Save as Script File all objects(table, sequence, replication, procedure, etc.) generated from this
server.
e.g.) allObject.sql
-- Table Script
@TABLE_SYS_BOOK.sql
@TABLE_SYS_CUSTOMER.sql
@TABLE_SYS_DEPARTMENT.sql
@TABLE_SYS_DUAL.sql
@TABLE_SYS_EMPLOYEE.sql
@TABLE_SYS_GOODS.sql
@TABLE_SYS_ORDERS.sql
@TABLE_SYS_SEQTBL.sql
@TABLE_SYS_T1.sql
@TABLE_SYS_Y1.sql
-- Sequence Script
@SEQ_SYS_SEQ1.sql
-- Replication Script
-- Procedure Script
@PROC_SYS_PROC1.sql
@PROC_SYS_PROC2.sql
@PROC_SYS_PROC3.sql
15
Managing a Database
Tasks for a Database
e.g.) TABLE_SYS_BOOK.sql
DROP TABLE BOOK;
CREATE TABLE BOOK(BNO CHAR(6) ,
BNAME VARCHAR(50) ,
BAUTHOR VARCHAR(30)
);
Generate iloader script
Generate the script file which you can use to download, upload or formout through iLoader.
e.g.) allTbl_in.sh
### iloader In Script
${ALTIBASE_HOME}/bin/iloader -s 127.0.0.1 -u SYS -p MANAGER in -f
SYS_BOOK.fmt –d SYS_BOOK.dat -log SYS_BOOK.log –bad SYS_BOOK.bad
${ALTIBASE_HOME}/bin/iloader -s 127.0.0.1 -u SYS -p MANAGER in -f
SYS_CUSTOMER.fmt -d SYS_CUSTOMER.dat -log SYS_CUSTOMER.log -bad
SYS_CUSTOMER.bad
e.g.) allTbl_out.sh
### iloader Out Script
${ALTIBASE_HOME}/bin/iloader -s 127.0.0.1 –u SYS -p MANAGER
SYS_BOOK.fmt -T BOOK
${ALTIBASE_HOME}/bin/iloader -s 127.0.0.1 -u SYS -p MANAGER
SYS_BOOK.fmt -d SYS_BOOK.dat -log SYS_BOOK.log
${ALTIBASE_HOME}/bin/iloader -s 127.0.0.1 -u SYS -p MANAGER
SYS_CUSTOMER.fmt -T CUSTOMER
${ALTIBASE_HOME}/bin/iloader -s 127.0.0.1 -u SYS -p MANAGER
SYS_CUSTOMER.fmt -d SYS_CUSTOMER.dat -log SYS_CUSTOMER.log
AdminCenter Users’ Manual
16
formout -f
out -f
formout -f
out -f
Managing Tablespaces
Managing Tablespaces
Select Tablespaces from the object tree window (or right-click the mouse) and choose New to create
a new tablespace. You can save the SQL script for each tablespace by using Save As Script File menu.
Refresh is used to bring new data from the DB.
Listing Tablespaces
If a user selects Tablespaces in the object tree window, all tablespaces will be listed.
The file name and their size will be displayed when selecting a each tablespace name from the
object tree.
17
Managing a Database
Managing Tablespaces
Creating a Tablespace
Select New from the shortcut menu or the toolbar menu. Then, the following screen will appear:
Type the name of the tablespace on the screen, and set necessary options. Click on the Create button to execute the command.
AdminCenter Users’ Manual
18
Managing Tablespaces
Working with the Tablespace Menu
Alter
The user can change the property of the corresponding tablespace.
19
Managing a Database
Managing Tablespaces
Adding a data file
Changing data file name
AdminCenter Users’ Manual
20
Managing Tablespaces
Deleting a data file
Changing data file properties
Refresh
New loading tablespace information from the server.
21
Managing a Database
Managing Users
Managing Users
If you selects Users from the object tree widow, all user names will be displayed so that the user can
manage the database users.
You can create, change, delete the database user and give the privileges to each user.
Creating a User
Select the corresponding button from the tool bar. Or right-click on Users menu and select New.
or
AdminCenter Users’ Manual
22
Managing Users
You can create a user or grant privileges from the System Privileges tab and Object Privileges tab.
(You should grant privileges to the user after the user is created.)
Creating a User
Grating Privileges
You can give privileges to the created users to access the objects.
The following dialogue is to give system privileges or object privileges.
23
Managing a Database
Managing Users
Granting System Privileges
AdminCenter Users’ Manual
24
Managing Users
Granting Object Privileges
Figure 3-1 Object Privilege Grant
If you select a user (for example CHARLIE), all of the privileges of the selected user will be displayed
on the right window. Privileges are divided into system privileges and object privileges.
25
Managing a Database
Managing Users
Figure 3-2 User Privileges Checking Screen
To access the server Altibase with another user, select Disconnect and Edit from the Altibase server
menu in the object tree window on the left side. Then, type the user ID and the password to connect
to the server.
Figure 3-3 Connection as Other User
AdminCenter Users’ Manual
26
Managing Users
Working with the User Menu
Popup menu provides Alter, Revoke, Drop, Save As Script File, and Refresh menus.
Figure 3-4 User Pop-up Menu
or
Alter, Grant
Changes information and privileges of a user. You can change the password, and grant and change
the system and the object privileges.
Changing Password
To change the password, activate the corresponding user and select Alter & Grant from the popup
menu or the tool bar. Then, follow the next procedure:
27
Managing a Database
Managing Users
Figure 3-5 Password Change
AdminCenter Users’ Manual
28
Managing Users
Changing the system and the object privilege
Changes the privileges of the corresponding user from the system and object privileges tab.
29
Managing a Database
Managing Users
Figure 3-6 User Privilege Change
Revoke
Revokes the privileges of the corresponding user from the system and object privileges tab.
Figure 3-7 No Grant to User Privilege
AdminCenter Users’ Manual
30
Managing Users
Drop
Drops the corresponding user.
Save As Script File
You can store the SQL scrip which will create a user who has the same status including privileges.
Refresh
Loads the corresponding user's information from the database.
31
Managing a Database
Managing Tables
Managing Tables
Select Tables in the object tree window. Then, select New from the tool bar (or right-click the mouse)
to create a new table. Using Save As Script File menu, the user can save the SQL script for each table
as a file. Refresh menu is used to bring new data from the DB.
Figure 3-8 Table Creation
or
Listing Tables
Select a user from the object tree window, and select Table menu of the user. Then, all tables created
by the user will be listed. (Databases -> Users -> SYS -> Table)
AdminCenter Users’ Manual
32
Managing Tables
Figure 3-9 User Table Checking Screen
Table list of
corresponding user
Select a table from the object tree window to see detailed information like column, primary key,
index etc. of the table.
33
Managing a Database
Managing Tables
Figure 3-10 Checking Table Schema
Table Schema
Creating a Table
Select New from the popup menu or the toolbar menu. Then, the following screen will appear:
AdminCenter Users’ Manual
34
Managing Tables
Figure 3-11 Table Creation
Table name
Selecting tablespace
Column name
type length etc...
Input the table information like this, and then generate the table by clicking the executing button, '!'.
1.
Table Name : Input the table name to generate.
2.
Tablespace Name : Select the tablespace where you generate table
3.
Input the column information.
Column Name : Input the column name to generate.
Data Type : Select the data type of column.
Length(Precision) : Input the length in case of the character type like Char, and the precision in case
of the number type like Numeric.
Scale : Input the scale in case of the number type like Numeric.
Not Null : Get the chance to set Null or not. If you select this, Null is not available.
IsVariable : Get the chance to set fixed length type or variable length type. If you select this, the column of the variable length type is generated.
Default : Input the default of the column. If you don't input it, NULL is inputted.
Upon creation of the table, the user can use the following menu to insert or delete the column:
35
Managing a Database
Managing Tables
Figure 3-12 Column Change upon Table Creation
or
Creating a Index
Figure 3-13 Full Screen for Creating Index
Input index name
Select column
for index creation
Decide index type
Output result
message for
executing
AdminCenter Users’ Manual
36
Managing Tables
Input the index information like this, and click on "+" button to add a index. Then, the added index
name will be displayed on the drop combo box.
•
Set Available Columns : The columns defined are changed to be available, so you can see these
in Available window.
•
'>', '<' : The columns generating the index are added to Used or deleted by these.
•
Desc : Choose how to sort the index. If you select this, the index is generated in descending
order.
•
Index Type : Choose the type of the index, for example, Primary Key, Unique Key.
•
Index Name : Input the name of the index generated. If you don't input this, the operating system specifies the default as this in case of Primary Key.
•
“+” button : Generate the index by this. The added index name will be displayed on the drop
combo box. If the table is not generated yet while the index is generated, the table is generated.
Figure 3-14 Index Creation
•
Tablespace Name : Select the tablespace name in which the index is added. In case of Primary
Key, it is added only in the tablespace including table. In case of other indexes except Primary
Key, it can be added in other tablespaces except the tablespace including table. But you can
select only same kinds of tablespace (for example, memory or disc) as the tablespace including
table. Drop : Select the index to delete.
•
Drop : Select the index to delete.
•
“–“ button : Delete the index.
37
Managing a Database
Managing Tables
Figure 3-15 Index Deletion
working with the Table Menu
The following is the shortcut menu of each table. If you selects Open Table, the Query Window will
appear. Alter Table will open a window in which the user can change the index of the table (add/
delete the index and change the primary key). Truncate Table and Drop Table are used to delete all
records of the table or delete the table. To rename the table, select Rename Table. Save As Script File
is used to store the DDL script as a file. Refresh is used to bring the current information of the table
from the server.
Figure 3-16 Table Pop-up Menu
or
AdminCenter Users’ Manual
38
Managing Tables
Open Table
The Query window will appear for the corresponding table, and all rows from the table will be displayed.
Alter Table
Adds or deletes the index (including the primary key) in the table.
Truncate Table
Truncates the data of the corresponding table.
Drop Table
Drops the corresponding table.
Rename Table
Renames the corresponding table.
Save As Script File
Saves the table-creation DDL script as a file.
39
Managing a Database
Managing Tables
Data Out
Downloads the data in the corresponding table in the ASCII format. (Same as Out in iLoader) Refer to
the following for more information.
Data In
Loads data in a ASCII file to the table. (Same as ‘in iLoader’) Refer to the following for more information.
Refresh
Gets the current information of the table from the server.
Data Out
If you select Data Out menu, you can see the columns pane. And then select the columns that you
want to download in this pane.
Figure 3-17 Column Information in Data Out menu
Select Next to specify the logfile for writing records occurred while specifying data file and downloading it. Input the field term for seperating columns and the row term for seperating data records.
AdminCenter Users’ Manual
40
Managing Tables
Figure 3-18 Inputting Field and Row Terms in Data Out menu
Download the data by Data Out menu. If you download it successfully, you can see the window like
this.
Data In
If you select Data In menu, you can see the pane like this.
41
Managing a Database
Managing Tables
Figure 3-19 Column Information in Data In menu
Select Next to input details data file.
Figure 3-20 File Information Input in Data In menu
Specify the data file in database and logfile for writing messages occurred. Input the field term for
seperating columns and the row term for seperating data records. In Mode Append is the menu to
input data adding to the existing data, and Replace is the menu to delete the existing data and to
input new data. Commit Count is the menu to commit them if the default values are 1000 whenever
AdminCenter Users’ Manual
42
Managing Tables
you input 1000 cases. If you select Data In, data is inputted. If you do it successfully, you can see this
message.
43
Managing a Database
Managing Views
Managing Views
Select View from the object tree window, and select New from the tool bar (or right-click the mouse)
to create a new view. Using Save As Script File menu, the user can store the DDL script for each view
in the file. Refresh is used to load the data from the database.
Listing Views
Select View in the object tree window to list all views created by the corresponding user.
Figure 3-21 View Screen
Select each view in the object view window to view all column information of the view.
AdminCenter Users’ Manual
44
Managing Views
Figure 3-22 Column Information of the Selected Views
Creating a View
Select New from the shortcut menu or the toolbar menu.
Figure 3-23 Pop-up Menu in case of Creating a View
Set the view name and the force option in the screen, and type the subquery of the View in As box.
Then, click on Create button.
45
Managing a Database
Managing Views
Figure 3-24 View Creation
Working with the View Menu
The following is the shortcut menu for a view.
Figure 3-25 Pop-up Menu related to View
AdminCenter Users’ Manual
46
Managing Views
Open View
The query window will appear so that the user can see all rows from the table.
Replace
Creates the corresponding view again.
Compile
If the corresponding view is not valid, you can compile the view again.
Drop View
Drops the corresponding view.
Rename View
Renames the corresponding view.
Sava As Script File
Saves the view-creation SQL script as a file.
Refresh
Gets the current information of the view from the server.
47
Managing a Database
Managing Sequences
Managing Sequences
Select Sequences from the object tree window, and select New from the tool bar (or right-click the
mouse) to create a new sequence. Save As Script File is to store the DDL script of each sequence in
the file. Refresh is to bring the current information from the server.
Figure 3-26 Sequence Pop-up Menu
or
Listing Sequences
Select Sequences in the object tree window to view all sequences created by the corresponding
user.
AdminCenter Users’ Manual
48
Managing Sequences
Figure 3-27 Information of the Selected Sequences
Creating a Sequence
Select Sequences from the object tree window and select New from the tool bar (or right-click the
mouse) to create a sequence. Or enter the sequence creation statement in the query window and
click on the Execute button.
Figure 3-28 Sequence Creation
When entering only the name of the sequence to create, the sequence is created using default values.
(Default - Start: 1, Increment: 1, Max: 9223372036854775806, Min: 1, Cache: 20, Cycle: NO)
or (upon using the Query window)
49
Managing a Database
Managing Sequences
CREATE TABLE SEQTBL(I1 INTEGER);
CREATE SEQUENCE SEQ1
START WITH 13
INCREMENT BY 3
MINVALUE 0
NOMAXVALUE
CYCLE
CACHE 25;
INSERT INTO SEQTBL VALUES(seq1.NEXTVAL);
INSERT INTO SEQTBL VALUES(seq1.NEXTVAL);
SELECT * FROM SEQTBL;
AdminCenter Users’ Manual
50
Managing Sequences
Working with the Sequence Menu
The following explains the shortcut menu for a sequence.
Figure 3-29 Created Sequence and Alteration Pop-up Menu
51
Managing a Database
Managing Sequences
Alter
Changes the elements of the corresponding sequence.
You cannot change the name of the sequence and Start value.
Drop
Drops the corresponding sequence.
Save As Script File
Saves the SQL script of the corresponding sequence as a file.
Refresh
Gets the current information of the sequence from the server.
AdminCenter Users’ Manual
52
Managing Replications
Managing Replications
Select Replications in the object tree window (or right-click the mouse), and select New from the
tool bar to create a replication. Save As Script File is used to store the DDL script of each replication
as a file, and Refresh is used to bring the current information from the server.
Figure 3-30 Replication Pop-up Menu
or
Listing Replications
Select Replications to display replication information on the right part of the screen.
53
Managing a Database
Managing Replications
Figure 3-31 Checking Information of created replication
Select each replication from the object tree window to view related information.
AdminCenter Users’ Manual
54
Managing Replications
Figure 3-32 Checking Information of Each Created Replication
Creating a Replication
Select New from the shortcut menu or tool bar, and enter the IP address of the remote server
(192.168.1.11) and the port number (25524) to replicate the Employee table and the Department
table.
In case of a local server (IP: 192.168.1.243):
55
Managing a Database
Managing Replications
Figure 3-33 Success Message of Creating a Replication
Figure 3-34 Replication Creation
AdminCenter Users’ Manual
56
Managing Replications
In case of a remote server (IP: 192.168.1.11)
iSQL> CREATE REPLICATION REP1 WITH '192.168.1.243', 25524
FROM SYS.DEPARTMENT TO SYS.DEPARTMENT, FROM SYS.EMPLOYEE TO SYS.EMPLOYEE;
Create success.
Starting a Replication
Select Start to resume replication.
Figure 3-35 START Click for Altering Replication
57
Managing a Database
Managing Replications
Figure 3-36 Success Screen after Altering Replication
After replication is successfully performed, message saying “Alter Replication Success” will be displayed on the result message window.
* Before starting replication, you should check that there is match in the protocpl between ALTIBASE
and replication. You should also check that database character set in ALTIBASE is identical with
national character set, and can set them when creating database.
Dos prompt> altibase –v
version 5.3.1.0 WIN_NT_5.0-32bit-5.3.1.0-release-VC7 (MS_WINDOWS) Sep 8 2009
15:34:11, binary db version 5.3.1, meta version 5.5.1, cm protocol version
5.5.1,replication protocol version 5.3.1
shell> altibase –v
version 5.3.1.0 INTEL_LINUX_ubuntu_8.10-32bit-5.3.1.0-release-GCC4.3.2
(i686-pc-linux-gnu) Sep 2 2009 13:48:15, binary db version 5.3.1, meta version 5.5.1, cm protocol version 5.5.1, replication protocol version 5.3.1
Working with the Replication Menu
The following describes the shotcut menu of replication.
For each replication, the user can execute the command by using following menus:
Figure 3-37 Replication Pop-up Menu
or
AdminCenter Users’ Manual
58
Managing Replications
Alter Status
Changes the status of the corresponding replication.
Alter Schem.
Changes information about From and To tables.
Drop
Drops the corresponding replication.
Save As Script File
saves the DDL script of the corresponding replication as a file.
Refresh
Gets the current information of the replication from the server.
59
Managing a Database
Managing Procedures
Managing Procedures
Select Procedures in the object tree window, and select New from the tool bar (or right-click the
mouse) to create a new procedure or function. Save As Script File is used to store the DDL script of
each procedure and function as a file, and Refresh is used to bring the current information from the
server.
Figure 3-38 Procedure Pop-up Menu
or
Listing Procedures
Select Procedures in the object tree window to view description of all procedures and functions created by the corresponding user.
AdminCenter Users’ Manual
60
Managing Procedures
Figure 3-39 Checking Procedure Information
Select the name of the procedure or function from object tree window to view the details on the
right part of the screen.
61
Managing a Database
Managing Procedures
Figure 3-40 Procedure Information in detail
Creating a Procedure
Select Procedures in the object tree window on the left side (or right-click the mouse), and select
New from the tool bar to create a procedure. Or enter the procedure creation statement in the query
window and select the Execute button (or Files -> Create) to create a procedure.
Select New from the shortcut menu or the toolbar menu. Then, the following screen will appear: The
user can enter each argument, and depending on the return type, some arguments cannot be
entered. Then, enter the body of the procedure in Body window.
AdminCenter Users’ Manual
62
Managing Procedures
Figure 3-41 Typing Contents for Creating a Procedure
After entering the contents, select the Execute button from the tool bar or select File -> Create to
create a new procedure.
Figure 3-42 Procedure Creation after Typing Contents in Menu
63
Managing a Database
Managing Procedures
Figure 3-43 Procedure Creation Screen
The user can insert or delete the argument by using the following menus when creating a procedure
or function. The user can also change (insert or delete) the arguments of the existing procedure or
function.
Figure 3-44 Changing a Procedure
or
AdminCenter Users’ Manual
64
Managing Procedures
Executing a Procedure
Figure 3-45 Running a Procedure
Note: You must input value event for the parameter with the default value when executing the procedure
using the above interface.
or (upon using the Query window)
exec proc1;
select * from t1;
exec proc1(2);
select * from t1;
exec proc1(3,3);
select * from t1;
exec proc1(4,4,4);
65
Managing a Database
Managing Procedures
For more information, see the Query Window part.
Creating a Function
Select Procedures in the object tree window on the left part (or right-click the mouse), and select
New from the tool bar to create a function. Or enter the function creation statement in the query
window and select the Execute button (or File -> Create).
AdminCenter Users’ Manual
66
Managing Procedures
Figure 3-46 Function Creation
Select New from the popup menu or the toolbar menu. Then, the following screen will appear: In the
screen, the user can enter information of each argument. Depending on the function, the user can
enter the return type. Enter the contents of the function in the lower body window.
create or replace function get_rate
(p1 in char(30), p2 in char(30), p3 in varchar(9))
return number
as
v_rate number;
begin
select NVL(SUM(rate), 0)
into v_rate
from (select rate
from t2
where start_date = TO_DATE(p1)
and end_date = TO_DATE(p2)
and user_id = '000000' || p3
and seq_no = 0);
return v_rate;
end;
/
67
Managing a Database
Managing Procedures
Figure 3-47 Typing Contents for Creating a function
Excuting a Function
insert into t1 values(0, '000000500', 200.50, '23-May-2002', '23-Apr-2002');
insert into t1 values(0, '000000501', 190, '23-Nov-2002', '23-Dec-2002');
insert into t1 values(0, '000000523', 100, '12-Dec-2001', '12-Jan-2001');
insert into t1 values(0, '000000532', 100, '11-Dec-2001', '11-Jan-2002');
insert into t1(seq_no, user_id, start_date, end_date) values(0, '000000524',
'30-Oct-2001', '30-Nov-2001');
insert into t1 values(0, '000000524', 200.50, '30-Apr-2002', '30-May-2002');
insert into t1 values(0, '000000524', 200.50, '30-Apr-2002', '30-May-2002');
insert into t1 values(1, '000000524', 100, '30-Apr-2002', '30-May-2002');
insert into t1 values(1, '000000524', 115.0, '19-Jan-2002', '19-Mar-2002');
insert into t1 values(0, '000000502', 120.0, '27-Jan-2002', '27-Feb-2002');
select * from t2;
insert into t1 values(1, '000000504', 150.0, '26-Nov-2001', '26-Dec-2001');
select * from t2;
AdminCenter Users’ Manual
68
Managing Procedures
Figure 3-48 Function Execution Screen
Unlike procedure you must specify the variable to return the result of a function. However, you cannot declare that variable in the query window. If you selects Executes Procedure from the menu,
enters data in each field, and clicks on the Execute button, the returned value will be displayed in the
query window.
69
Managing a Database
Managing Procedures
Working with the Procedure Menu
The following shows the shortcut menu of the procedure (or function).
You can execute Alter, Drop, Save As Script File, and Refresh commands for each procedure or function.
Figure 3-49 Pop-up Menu for Altering a Procedure
AdminCenter Users’ Manual
70
Managing Procedures
or
Alter
Replaces the corresponding procedure or function.
Drop
Drops the corresponding procedure or function.
Save As Script File
Saves the SQL script of the corresponding procedure or function as a file.
Refresh
Gets the current information of the replication from the server.
Not supported yet
Column level change such as column add and drop, and Help file, etc.
71
Managing a Database
Managing Procedures
AdminCenter Users’ Manual
72
4 Monitoring a Database
Server
The user can monitor internal information of Altibase - system memory, process status, and memory
structure including buffer status by using the performance view.
73
Monitoring a Database Server
Information for the Administration
Information for the Administration
By selecting Server Monitor & Admin menu, you can use Performance View.
Figure 4-1 Server Monitor and Administration Menu
For more information about the performance view, see the Administrator's Manual.
Getting Performance View
Select Performance View in the object tree on the left side to view information of current Altibase data files, memory status, property status, replication, session, transactions, user and table information.
AdminCenter Users’ Manual
74
Information for the Administration
Figure 4-2 Performance View
Select one view from Performance View to view information of all view columns.
75
Monitoring a Database Server
Information for the Administration
Figure 4-3 Checking Column Information of the Selected Views
AdminCenter Users’ Manual
76
Information for the Administration
Listing Performance Views
Figure 4-4 Performance View Pop-up Men
Open View
When the query window is opened for the corresponding view, you can view all the rows.
V$TABLESPACES and V$REPGAP are displayed as examples.
<V$TABLESPACES>
77
Monitoring a Database Server
Information for the Administration
Figure 4-5 -V$TABLESPACES Check
<V$REPGAP>
Figure 4-6 -V$REPGAP Check
AdminCenter Users’ Manual
78
Warning Server Termination
Warning Server Termination
Informs the termination of the server (including abnormal termination) Checks the connected server
every 10 seconds, and informs the termination of the server with "beep" sound as shown below:
Figure 4-7 Server Termination Warning
79
Monitoring a Database Server
Warning Server Termination
AdminCenter Users’ Manual
80
5 Interactive Query
Windows
The user can use the existing feature of iSQL using the GUI tool. The query window consists of the
editing window where the user can edit the query statement, the result window that shows the
result of Select query, the message window to display the execution messages, and the history window that stores the executed queries.
81
Interactive Query Windows
Starting a Query Window
Starting a Query Window
When the query window is opened, the following will be executed:
Figure 5-1 Query Window Initial Screen
AdminCenter Users’ Manual
82
Connecting to a Database in the Query Windows
Connecting to a Database in the Query Windows
To connect the query window to Altibase server without executing the admin center, the user must
execute the query window batch-processing file (QueryWindow.bat). When the query window
appears, select Database -> Connect from the tool bar menu and enter connection information to
connect to the server. In case connection information is already stored, the server will be immediately connected. Select Database -> Configuration from the tool bar not only to modify existing connection information and connect to the server but also to store modified information. (Select
Connect button inside the frame to connect to the server after storing the data.)
You should enter IP address of the server, port number, user name and password to establish a connection.
Figure 5-2 Connecting to Server in Query Windows
After the connection is established, above Connect menu will be changed into Disconnect menu as
below.
83
Interactive Query Windows
Connecting to a Database in the Query Windows
* You can execute the query by opening the query window with a new session.
AdminCenter Users’ Manual
84
Running SQL Statements
Running SQL Statements
Executing SQL Statements
After connection with the server is successfully established, enter the SQL statement in the query
window and select Query -> Execute from the tool bar.
The result set of the select statement will be displayed in the result window . However, the result of
Insert, Update, or Delete statement will be displayed in the lower message window.
The query input window provides basic text-editing features - Copy, Cut, Paste, Select All, Redo,
Undo, Clear Query, Clear Message, and Clear History.
The executed queries are stored in History tab located next to the Message tab.
85
Interactive Query Windows
Running SQL Statements
Query Window executes only one SQL statement at a time. Editting several SQL statements, execute
them keeping a specific SQL statement dragged with your mouse, and then only selections of them
are executed.
SQL statement in the History tab can be edited in the query window by double-clicking it or execute
it directly by selecting Execute query from the shortcut menu.
AdminCenter Users’ Manual
86
Running SQL Statements
Executing Stored Procedures
After successfully establishing a connection with the server, select Query -> Execute Procedure from
the tool bar.
Select this menu to view the list of current procedures and functions in the list box. Select one of
them to view the list of arguments. Enter necessary value for In or In Out type argument, and execute it.
Then, you can check the execution result by selecting the data from the table of which data has been
changed by the procedure.
87
Interactive Query Windows
Running SQL Statements
Saving Query Results
The user can save SQL statements in the Query window and the data in the result window as a file.
Select File -> Save and select Save Query or Save Result. The default extension of the stored file is
*.sql for the query and *.dat for the result. The format to store the result is the same as the default
format of the loading data (column identifier - ^, record identifier - new line).
* Query.sql
create table t1 (i1 integer, i2 integer, i3 integer);
select * from t1;
insert into t1 values (1,1,1);
update t1 set i1 = 100 where i1= 1;
select * from t1;
-- execute procedure proc1
select * from t1;
* Result.dat
100^1^1
150^150^150
Query Execution Options
Select Query -> Options from the tool bar to change the environmental setting like the limit and the
timeout.
Qeury limit is to limit the number of rows fetched from the select statement and the default value is
3000.
AdminCenter Users’ Manual
88
Running SQL Statements
Query Timeout is used to prevent the size of the database from excessively increasing by the long
running operation. The default value is 600 seconds.
Fetch Timeout is used to prevent the database memory size from excessively growing by the long
running Select statement. The default value is 60 seconds.
Utrans Timeout is used to keep the number of log files from excessively increasing by the long transaction query. The default value is 3600 seconds.
Transaction Processing Options
You can set the autocommit mode of the corresponding session, and execute commit and rollback
depending on the mode. (Commit and Rollback are not availble in Autocommit On mode.)
In case of Select statement, you can view the plan tree for having better performance. The plan tree
is outputted by setting Explain Plan option. Explain Plan On option outputs Explain plan by executing SQL statement simultaneously and Explain Plan Only option outputs only Explain plan without
executing SQL statement. Refer to Administrator’s Manual for specific description of Explain Plan.
The following shows the result when Select statement is executed after Explain Plan On is set.
89
Interactive Query Windows
Running SQL Statements
AdminCenter Users’ Manual
90
Index
A
F
add data file 20
Admincenter installation 2
alter function 71
alter procedure 71
alter replication 59
alter replication scheme 59
alter sequence 52
alter table 39
Alter tablespace 19
alter user 27
function execution 68
C
O
G
generating a iloader script 16
grant 23
M
Manaing a Database 13
modifying the connection information 9
change data file name 20
changing a password 27
Check point 14
compile view 47
connecting to a database 9
creating a function 66
creating a procedure 62
creating a replication 55
creating a sequence 49
creating a table 34
creating a tablespace 18
creating a view 45
creating an index 36
creating an user 22
object privileges 25
open table 39
open view 47
organization 90
D
R
P
performance view 77
privilege 23
procedure 60
processing a transaction 89
Q
Query execution option 88
Query window 82
data in 40, 41
data out 40
default value for sequence 49
delete data file 21
deleting a database connection information 10
disconnecting from a database 9
drop function 71
drop procedure 71
drop replication 59
drop sequence 52
drop table 39
drop user 31
drop view 47
registering a database 7
rename table 39
rename view 47
replace view 47
replication 53
revoke 30
S
Saving query results 88
sequence 48
server monitor & admin 74
Set TRCLOG Property 14
starting a replication 57
system privileges 24
E
executing a function 68
executing a procedure 87
executing a query 85
executing procedure 65
explain plan 89
T
tables 32
tablespace 17
truncate table 39
91
U
users 22
V
view 44
92