1
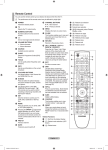
Remote Control You can use the remote control up to a distance of about 23 feet from the TV. N The performance of the remote control may be affected by bright light. 1 POWER button (turns the TV on and off) 2 Selects the TV mode directly. 3 Number buttons for direct channel access 4 One or more digit channel selection 5 Temporary sound switch-off 6 Available source selection 7 Volume increase Volume decrease 8 Electronic Program Guide (EPG) display d Use this when connecting a SAMSUNG DMA (Digital Media Adapter) device through an HDMI interface and switching to DMA mode. (The DMA button is optional.) For more information on the operating procedures, refer to the user manual of the DMA. This button is available when Anynet+(HDMI-CEC) is On (see page 54) e This function enables you to view Content Library. f Digital subtitle display 9 Use to quickly select frequently used functions. 0 Control the cursor in the menu ! Use to see information on the current broadcast @ Use these buttons in the Channel list and WISELINK, etc. $ Press to select the optional display and sound modes for sports, cinema and games. Teletext Functions 2 Exit from the teletext display (depending on the model) 6 Teletext mode selection (LIST/ FLOF) 8 Teletext store % Use these buttons in the Channel list, WISELINK Pro and Anynet+. 9 Teletext size ^ ON/OFF Press to backlight the buttons on the remote. This function is convenient for using at night or when the room is dark. (Using the remote control with the ON/OFF( ) light button set to On will reduce the battery usage time.) @ Fastext topic selection & Previous channel * Next channel Previous channel ( Displays the main on-screen menu ! Teletext reveal # Teletext display/mix both teletext information and the normal broadcast & Teletext sub page * P P :Teletext next page :Teletext previous page ( Teletext index a Teletext hold b Teletext cancel ) This function enables you to view and play photo (JPEG) , audio files (MP3) and movie files from an external device. a Returns to the previous menu b Exit the on-screen menu c Press to use the News, Stock Market and Weather Forecast information services available over the network. English - BN68-01757D-Eng_.indb 8 2008-08-20 오후 7:18:20 Plug & Play Feature When the TV is initially powered on, basic settings proceed automatically and subsequently. 1. Press the POWER button on the remote control. The message The Menu Plug & Play Language, Store Demo, Channels and Time will be set. is displayed. The Menu Language, Store Demo, Channels and Time 2. Press the ENTERE button, then Select the OSD Language. menu is will be set. automatically displayed. Press the ENTERE button. OK 3. Select the appropriate language by pressing the ▲ or ▼ button. Press the E Enter ENTERE button to confirm your choice. 4. Press the ◄ or ► button to select Store Demo or Home Use, then the ENTERE button. N We recommend setting the TV to Home Use mode for the best picture in your home environment. N Store Demo mode is only intended for use in retail environments. N If the unit is accidentally set to Store Demo mode and you want to return to Home Use (Standard): Press the Volume button on the TV. When the volume OSD is displayed, press and hold the MENU button on the TV for 5 seconds. N The Screen Saver is activated if there is no remote control key input for longer than 1 minute while Plug & Play is running. N The Screen Saver is activated if there is no operating signal for longer than 15 minutes. 5. Press the ENTERE button. Select the appropriate country by pressing the ▲ or ▼ button. Press the ENTERE button to confirm your choice. 6. Press the ▲ or ▼ button to select the channel source to memorize. Press the ENTERE button to select Start. N Digital & Analogue: Digital and Analogue channels. Digital: Digital channels. Analogue: Analogue channels. N The channel search will start and end automatically. N Press the ENTERE button at any time to interrupt the memorization process. N After all the available channels are stored, the message Set the Clock Mode. is displayed. 7. Press the ENTERE button. Press the ▲ or ▼ button to select Auto, then Press the ENTERE button. N If you select Manual, Set current date and time is displayed. (See page 26) N If you have received a digital signal, the time will be set automatically. If not, see page 26 to set the clock. 8. The message Enjoy your viewing is displayed. When you have finished, press the ENTERE button. If you want to reset this feature... Setup 1. Press the MENU button to display the menu. Press the ▲ or ▼ button to select Setup, then press the ENTERE button. 2. Press the ENTERE button again to select Plug & Play. 3. Enter your 4 digit PIN number. The default PIN number of a new TV set is ‘0-0-0-0’. N If you want to change PIN number, refer to 23 page. N The Plug & Play feature is only available in the TV mode. Plug & Play Language : English ► Time Network Selection : Cable Wireless Network Setup Cable Network Setup Child Lock : On Change PIN Channel Control Storing Channels and channel ❑ Country Digital Channel: You can change the country for digital channels. N The PIN number input screen appears. Enter your 4 digit PIN number. Channel Analogue Channel: You can change the country for analogue channels. Country ► Auto Store Manual Store Full Guide Mini Guide Default Guide : Mini Guide Channel List Channel Mode : Added Ch. English - 11 BN68-01757D-Eng_.indb 11 2008-08-20 오후 7:18:21