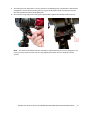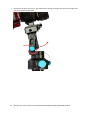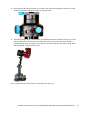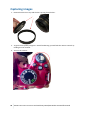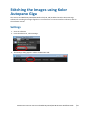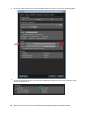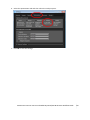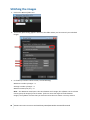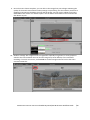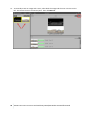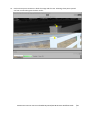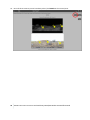
1
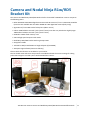
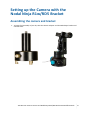
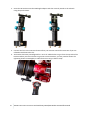
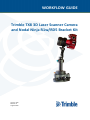
WORKFLOW GUIDE
Trimble TX8 3D Laser Scanner Camera
and Nodal Ninja R1w/RD5 Bracket Kit
Version 1.00
Revision A
August 2014
1
Corporate Office
Trimble Navigation Limited
935 Stewart Drive
Sunnyvale, CA 94085
USA
www.trimble.com
GeoSpatial business area
Trimble Navigation Limited
GeoSpatial business area
10355 Westmoor Drive,
Suite #100
Westminster, CO 80021
USA
800-538-7800 (toll free in USA)
+1-937-245-5600 Phone
+1-937-233-9004 Fax
http://www.trimble.com/support/
Legal Notices
© 2014, Trimble Navigation Limited. All rights reserved.
Trimble, the Globe & Triangle logo, and RealWorks are trademarks of
Trimble Navigation Limited, registered in the United States and in other
countries.
All other trademarks are the property of their respective owners.
Release Notice
This is the August 2014 release (Revision A) of the TX8 3D Laser Scanner
Camera and Nodal Ninja R1w/RD5 Bracket Kit Workflow Guide. It applies
to version 1.00 of the 3D Laser Scanner Camera and Nodal Ninja
R1w/RD5 Bracket Kit.
Product Limited Warranty Information
For applicable product Limited Warranty information, please refer to the
Limited Warranty Card included with this Trimble product, or consult your
local Trimble authorized dealer.
2
TX8 3D Laser Scanner Camera and Nodal Ninja R1w/RD5 Bracket Kit Workflow Guide
Contents
1 Camera and Nodal Ninja R1w/RD5 Bracket Kit
4
2 Setting up the Camera with the Nodal Ninja R1w/RD5 Bracket
5
Assembling the camera and bracket
Capturing images
3 Stitching the Images using Kolor Autopano Giga
Settings
Stitching the images
4 Matching the Images in RealColor
TX8 3D Laser Scanner Camera and Nodal Ninja R1w/RD5 Bracket Kit Workflow Guide
5
10
13
13
16
20
3
Camera and Nodal Ninja R1w/RD5 1
Bracket Kit
The Camera and Nodal Ninja R1w/RD5 Bracket kit for the Trimble® TX8 3D laser scanner comprises
the following items:
l
l
l
Nikon D5100 16.2MP CMOS digital SLR camera with 18 to 55 mm f/3.5 to 5.6 AF-S DX VR Nikkor
(some kits are available with the Nikon D5300 24.2 MP digital SLR camera (body only))
Sigma 8 mm f/3.5 EX DG circular fisheye lens (Nikon mount)
Pelican 1400 lockable case with "pick n'pluck" foam (some kits may include the slightly larger
1450 Pelican lockable case with "pick n'pluck" foam).
l
8 GB Class 4 SDHC flash memory card
l
USB 2.0 high speed compact card reader
l
Nodal Ninja R1w/RD5 bracket with ring clamp F6120
l
Stop plates F2106
l
Tribrach kit R10/R1 with 63.8 mm height adapter (P/N D12603)
l
Autopano Giga software (electronic delivery)
Please check that all items are included in your new kit.
The kit should come with most components assembled and with the correct settings for taking
panoramic images to use with your Trimble TX8 3D laser scanner.
TX8 3D Laser Scanner Camera and Nodal Ninja R1w/RD5 Bracket Kit Workflow Guide
4
Setting up the Camera with the
Nodal Ninja R1w/RD5 Bracket
2
Assembling the camera and bracket
1. To begin final assembly of your kit, take the tribrach adapter and the Nodal Ninja bracket and
connect them:
TX8 3D Laser Scanner Camera and Nodal Ninja R1w/RD5 Bracket Kit Workflow Guide
5
2. Screw the R1 bracket onto the TX8 height adapter and then securely attach to the tribrach
using the quick release.
3. Connect the lens to the camera. Please refer to you cameras manual for instruction if you are
unfamiliar with how to do this.
4. The bracket has been preconfigured for a 12.5° tilt. Slide the lens ring in from the top side of the
bracket. Before you insert the lens ring mount into the bracket, you may need to loosen the
tightening thumb screw slightly to allow for the lens ring to slide in easily.
6
TX8 3D Laser Scanner Camera and Nodal Ninja R1w/RD5 Bracket Kit Workflow Guide
5. The setting for the nodal point is 1.15 as shown in the following step. The bracket is fitted with a
stop plate to ensure that mounting the lens ring to the bracket is quick and accurate. Ensure
that the assembly matches the image below.
6. Once the lens ring stop plate is firm against the bracket, tighten the thumb screw to secure:
Note – The camera should be oriented vertically and perpendicular to the mounting plate. If it
is not, you may need to loosen the lens ring slightly and rotate the lens carefully until it is
correct.
TX8 3D Laser Scanner Camera and Nodal Ninja R1w/RD5 Bracket Kit Workflow Guide
7
7. Check that the tilt is set at 12.5°. This will allow for enough overlap at the top of the images and
miss most of the tripod below:
8
TX8 3D Laser Scanner Camera and Nodal Ninja R1w/RD5 Bracket Kit Workflow Guide
8. Check that the horizontal rotation is set at 60°. This requires six images to be taken for a full
panorama providing adequate images for a good stitch:
9. The detent plunger knob, shown above, should be positioned in the 60° hole to give you the
feel of a click stop once every 60°. The larger blue knob is the rotator lock knob, which is
typically locked until it is ready to use to prevent the camera/lens from freely rotating. Once
fully assembled, it should look like this:
You are now ready to remove the lens cap and the lens cap ring.
TX8 3D Laser Scanner Camera and Nodal Ninja R1w/RD5 Bracket Kit Workflow Guide
9
Capturing images
1. Remove both the lens cap and the lens cap ring from the lens.
2. To get the best quality images it is worth familiarizing yourself with the camera controls by
reading the user manual.
3. Turn on the camera:
10 TX8 3D Laser Scanner Camera and Nodal Ninja R1w/RD5 Bracket Kit Workflow Guide
4. It is highly recommended that you set the camera to Manual (M) to avoid variations in the
images from one shot to the next.
5. Focus the camera according to preference. One common strategy is to manually set the focus
just short of infinity. (see your camera manual for instructions on turning the autofocus feature
off). In the images below you can see how we have set the focus.
Tip – Place a small piece of tape over the focus ring to keep the focus locked while you are working.
6. Take a sample shot to set the exposure. Once this is done, it should generally stay set for the
remainder of the setups. In general, setting the aperture to f9 and setting the shutter speed as
needed will give good results.
To select the shutter speed, use the command dial on the Nikon D3200 and D5100.
TX8 3D Laser Scanner Camera and Nodal Ninja R1w/RD5 Bracket Kit Workflow Guide
11
To select the aperture on the Nikon D3200 and D5100, press the
command dial.
button while rotating the
7. To avoid camera shake, you may want to set the timer to something like two seconds.
8. Starting at the 0° position of the bracket, rotate the assembly clockwise and you will feel the
click stops every 60°. It is at these positions, you will take the image. Six images complete a full
360° rotation.
9. Take your first photo.
10. Check the view finder to make sure it is in focus and has a good exposure.
11. Rotate the bracket to the next detention.
12. Continue until all six images have been captured.
13. Once images have been captured for all stations, turn off the camera and remove the flash
memory card.
14. Use the USB 2.0 flash memory card adapter to download the images to your computer.
12 TX8 3D Laser Scanner Camera and Nodal Ninja R1w/RD5 Bracket Kit Workflow Guide
Stitching the Images using Kolor
Autopano Giga
3
The Camera and Nodal Ninja R1w/RD5 Bracket kit (JH3, JH4) includes the Kolor AutoPano Giga
software for stitching the images together. For instructions on how to install the software, refer to
the software manual.
Settings
1. Start the software.
2. From the Edit menu, select Settings:
3. The Settings dialog appears. Select the Detection tab:
TX8 3D Laser Scanner Camera and Nodal Ninja R1w/RD5 Bracket Kit Workflow Guide
13
4. Go to the Project section and select the folder where you want to store the stitched images:
5. Go to the Automate section and select the following check boxes: Auto color correction, Auto
render, and Auto save:
14 TX8 3D Laser Scanner Camera and Nodal Ninja R1w/RD5 Bracket Kit Workflow Guide
6. Select the Optimization tab and then select the Fisheye option:
7. Click OK to save the settings.
TX8 3D Laser Scanner Camera and Nodal Ninja R1w/RD5 Bracket Kit Workflow Guide
15
Stitching the images
1. Click on the Browse folder icon:
2. The Browse folder dialog appears. Browse to the folder where you have stored your individual
images:
3. In the Group creation criteria section, set the following:
Minimum number of images – 6
Average number of images – 6
Maximum time lapse (sec.) – 8
Note – The Maximum time lapse is the time between each image; the software uses it to know
how to group the images for each station. If there is more than eight seconds between
images, the software assumes that you have moved to the next station. You may need to
16 TX8 3D Laser Scanner Camera and Nodal Ninja R1w/RD5 Bracket Kit Workflow Guide
adjust this if you use the camera timer or if you simply let more than eight seconds pass
before you take the next image.
4. Click OK to save the settings and import the images.
5. Ensure that each group contains six images; the amount of images that you took at each scan
station:
6. In the lower left of the screen, click on the Detect/Stop all icon to begin matching key points
and rendering the images:
TX8 3D Laser Scanner Camera and Nodal Ninja R1w/RD5 Bracket Kit Workflow Guide
17
A status dialog shows the progress:
7. Once the process is finished, by default the software will give an audible indication.
The status for each group should now show green arrows indication success and completion.
The rendered panoramic images will now be in the folder you designated in the Project
settings:
18 TX8 3D Laser Scanner Camera and Nodal Ninja R1w/RD5 Bracket Kit Workflow Guide
8. If any of the images stitched poorly, you can turn off the Auto render and Auto save options in
the Settings and then import the individual images to use the advanced tools in the AutoPano
Giga software.
Trimble recommends that you now move the stitched images from the folder you designated for
saving and place them into the RWI folder for your Trimble TX8 project simply for the purpose of
keeping them with your project. This is also the folder that the Trimble RealColor tool looks in by
default.
TX8 3D Laser Scanner Camera and Nodal Ninja R1w/RD5 Bracket Kit Workflow Guide
19
Matching the Images in RealColor 4
You are now ready to open your TX8 project in the Trimble RealWorks® software and begin
matching the panoramic images to the scans using the RealColor tool.
1. Open the TX8 project in the Trimble RealWorks software.
2. From the File menu, select Open RealColor.
3. If you have not processed the scan data, you are prompted to do so:
4. Click OK. All scans in the project appear as a thumbnail image on the left.
5. Import the panoramic images into the tool. Click the Add TZF scan and JPEG panoramas icon
to browse to the folder containing the images:
6. Select the panoramic images and then click Open.
TX8 3D Laser Scanner Camera and Nodal Ninja R1w/RD5 Bracket Kit Workflow Guide
20
7. Click Match to start automatically pairing the images with the correct scan and then matching
them:
8. The software will link the images and then move them to the Process pane giving a score
indicating the confidence that the correct scan and image have been matched:
21 TX8 3D Laser Scanner Camera and Nodal Ninja R1w/RD5 Bracket Kit Workflow Guide
9. Once the status shows Complete, you can click on the image/scan pair to begin evaluating the
quality of the match even while the other pairings are processing. Use the Intensity scroll bar to
toggle the transparency between the scan and the image. You can use the yellow cross-hair in
the middle of the screen as a reference point. Use the mouse scroll wheel to zoom and the left
click button to pan:
10. Outdoor settings with a high amount of vegetation especially in high wind, or many people or
vehicles that move between the scan and the image may cause difficulty in the automatic
matching. If a match is incorrect, click Un-link to send the image and scan back to the Scans
and Panoramas list:
TX8 3D Laser Scanner Camera and Nodal Ninja R1w/RD5 Bracket Kit Workflow Guide
22
11. To manually match an image with a scan, select both the image and the scan in the list on the
left. This moves them to the Control pane. Then click Manual:
23 TX8 3D Laser Scanner Camera and Nodal Ninja R1w/RD5 Bracket Kit Workflow Guide
12. Click on three points common in both the image and the scan. Selecting three points spread
out from one another gives the best results:
TX8 3D Laser Scanner Camera and Nodal Ninja R1w/RD5 Bracket Kit Workflow Guide
24
13. Once all three common points have been picked, click Match in the Control pane.
25 TX8 3D Laser Scanner Camera and Nodal Ninja R1w/RD5 Bracket Kit Workflow Guide
The pairing will then display in the Process pane and the colorizing process will start. Once the
colorizing process is complete, the pairing can be selected for evaluation in the Control pane.
14. Once you are satisfied with the results, select Project / Save As to save the RealColor project.
At any time you can save the RealColor project and reopen it later to continue working where you
left off.
TX8 3D Laser Scanner Camera and Nodal Ninja R1w/RD5 Bracket Kit Workflow Guide
26
You can now close the RealColor tool and begin working with the colorized data.
For Autopano Giga software support, please contact Kolor at [email protected].
27 TX8 3D Laser Scanner Camera and Nodal Ninja R1w/RD5 Bracket Kit Workflow Guide