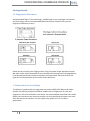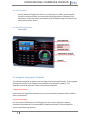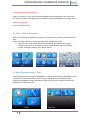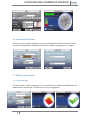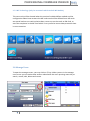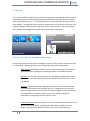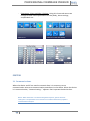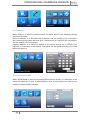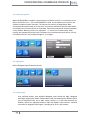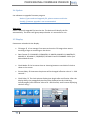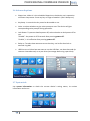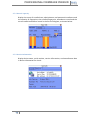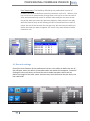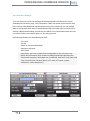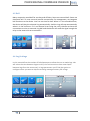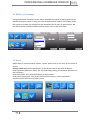
1
PROFESSIONAL FIRMWARE VERSION 1 de marzo de 2013 2013 PROFESSIONAL FIRMWARE VERSION User guide V1.0 PROFESSIONAL FIRMWARE VERSION 2013 Index: Getting started ....................................................................................................................... 3 1.1 Fingerprint Placement ........................................................................................................ 3 1.2 Instruction for Card Swipe.................................................................................................. 3 1.3 Precautions ......................................................................................................................... 4 Introduction of Device........................................................................................................ 4 2.1 Overview of Device Functions ............................................................................................ 4 2.2 Important Safeguards ......................................................................................................... 4 2.2.1 Installation Location .................................................................................................... 4 2.2.2 Use of Sensor ............................................................................................................... 5 2.2.3 Product Appearance .................................................................................................... 5 2.3 Using the Fingerprint Terminal .......................................................................................... 5 2.4 Date / Time Adjustment ..................................................................................................... 6 2.5 Enroll Administrator / User ................................................................................................ 6 2.6 Password Enrolment .......................................................................................................... 7 2.7 RFID Card Enrolment .......................................................................................................... 7 2.7.1 ID Technology .............................................................................................................. 7 2.7.2 MF Technology (Only for terminals which include MF Module) ............................... 8 2.8 Manage Users ..................................................................................................................... 8 2.9 Events .................................................................................................................................. 9 2.10 Access (only for terminals with relay) ............................................................................. 9 SYSTEM .................................................................................................................................... 10 3.1 Communications ............................................................................................................... 10 3.1.1 Network ..................................................................................................................... 11 3.1.2 Serial Port options ..................................................................................................... 11 3.1.3 Security options ......................................................................................................... 12 3.1.4 Wiegand ..................................................................................................................... 12 3.1.5 Wireless setup (Only for terminals with WI-FI) ........................................................ 14 ................................................................................................................................................. 14 1 PROFESSIONAL FIRMWARE VERSION 2013 3.1.6 Dial –Up settings GPRS (Only for terminals with GPRS)........................................... 15 3.2 Language ........................................................................................................................... 15 3.3 Fingerprint ........................................................................................................................ 16 3.4 Update .............................................................................................................................. 17 3.5 Display ............................................................................................................................... 17 3.6 Advanced options ............................................................................................................. 18 3.7 System info ....................................................................................................................... 18 3.7.1 Record capacity ......................................................................................................... 19 3.7.2 Device information .................................................................................................... 19 Terminal settings ................................................................................................................ 20 4.1 Keypad .............................................................................................................................. 20 ................................................................................................................................................. 21 4.2 Barcode settings ............................................................................................................... 21 4.3 Pen drive Management .................................................................................................... 22 4.3.1. Download.................................................................................................................. 22 4.3.2. Upload....................................................................................................................... 22 4.3.2. Pen drive Settings ..................................................................................................... 23 4.3 Bell .................................................................................................................................... 24 4.4 Log Settings ....................................................................................................................... 24 4.4 Multi-verify settings ......................................................................................................... 25 4.5 Reset ................................................................................................................................. 25 4.6 Auto test ........................................................................................................................... 26 Data Management ............................................................................................................. 27 5.1 Data Management ............................................................................................................ 27 2 PROFESSIONAL FIRMWARE VERSION 2013 Getting started 1.1 Fingerprint Placement Recommended fingers: The index finger, middle finger or the ring finger; the thumb and little finger are not recommended (because they are usually clumsy on the fingerprint Collection screen). Please enroll and verify your fingerprint by using the proper finger placement mode. We shall not be held accountable for any consequences arising out of the degradation in verification performance due to improper user operations. We shall reserve the right of final interpretation and revision of this document. 1.2 Instruction for Card Swipe This device is supplied with an integrated non-contact RFID (125 MHz) card reader module. By offering multiple verification modes such as fingerprint, RF card and fingerprint + RF card verification, this device can accommodate diversified user needs. Swipe your card across the sensor area after the voice prompt and remove your card after the device has sensed it. For the swipe area, please see 2.2.3 Product appearance. 3 PROFESSIONAL FIRMWARE VERSION 2013 1.3 Precautions Protect the device from exposure to direct sunlight or bright light, this greatly affects the fingerprint collection and leads to fingerprint verification failure. It is recommended to use the device under a temperature of 0–50°C so as to achieve the optimal performance. In the event of exposure of the device to the outdoors for long periods of time, it is recommended to adopt sunshade and heat dissipation facilities because excessively high or low temperature may slow down the device operation and result in high false rejection rate (FRR). When installing the device, please connect the power cable after connecting other cables. If the device does not operate properly, be sure to shut down the power supply before performing necessary inspections. Note that any live-line working may cause damage to the device and the device damage arising out of live-line working falls beyond the scope of our normal warranty. For matters that are not covered in this document, please refer to related materials including the installation guide, access control software user manual. Introduction of Device 2.1 Overview of Device Functions As an integrated fingerprint & access control device, our product can be connected with either an electronic lock or an access controller. This device features simple and flexible operations and supports the use of administrators. The screen displays will guide you through all the operations. It supports access control function for a security management and supports multiple communication modes. 2.2 Important Safeguards 2.2.1 Installation Location Do not install terminal in areas which are exposed to bright sunlight or rain, as the fingerprint readers are not designed to work in those areas. Bright light will interfere with reading of the sensor and fingerprint readers are not waterproof or vandal proof. It is recommended to protect your fingerprint terminal with enclosure. 4 PROFESSIONAL FIRMWARE VERSION 2013 2.2.2 Use of Sensor Do not abuse the fingerprint sensor by scratching the surface, contacting the sensor’s surface with heat, pressing hard during placement of fingerprint for verification. Clean the sensor occasionally with cellophane tape to maintain the performance of the sensor. 2.2.3 Product Appearance Front view: 2.3 Using the Fingerprint Terminal This chapter will guide on how to use the fingerprint terminal effectively. To get a good reading every time, initial fingerprint enrollment must be done properly. The fingerprint terminal provides 4 types of enrolment methods: • Fingerprint enrolment User enrolls his fingerprint template into a terminal and the template will be used for future verifications. • Password enrolment For user who has difficulty to enroll fingerprint due to poor fingerprint quality, enrolment of password is recommended. Password enrolment is also suitable for visitors and temporary workers. 5 PROFESSIONAL FIRMWARE VERSION 2013 • Fingerprint and password enrolment Under this option, a user can enroll both fingerprint and password at the same time. The user can either use fingerprint or password to report attendance or to gain access. • RFID card enrolment User can enroll RFID Card 2.4 Date / Time Adjustment When first installing a fingerprint terminal, it is important to set the correct date and time. Follow the steps shown to access the Date/Time adjustment menu: You can insert inputs into the terminals through the keypad. It contains numbers from 0-9, an OK button, an ESC/Cancel button, a Scroll up/down button, a doorbell button and a Menu button. 2.5 Enroll Administrator / User Once the fingerprint terminal is switched on, a display on the screen will appear. Enroll a supervisor or an administrator, who is the in-charge person to administer the fingerprint templates and the transaction data in the terminal. Choose trustworthy people for this particular role 6 PROFESSIONAL FIRMWARE VERSION 2013 2.6 Password Enrolment If a user cannot enroll his fingerprint or wants also another kind of verification, he can choose to use passwords. Password may contain numbers ranging from 1 – 8 digits. 2.7 RFID Card Enrolment 2.7.1 ID Technology If a user cannot enroll his fingerprint, he can choose to use a RFID Card. RFID card is for added security on the unit, or if the user can’t use a fingerprint. 7 PROFESSIONAL FIRMWARE VERSION 2013 2.7.2 MF Technology (Only for terminals which include MF Module) This menu only will be showed when the terminal includes Mifare module and the configuration about how we want the MF cards work will be defined here. MF cards are special and we can read and write data, so we can set the cards as PIN Card, or store the templates in the MF Card which is very useful to ensure data protection laws in some countries 2.8 Manage Users To open the manage screen, you may click on F5 key. When you are in the manage user screen you can make some actions related with the users pressing menu key as search, record, edit, delete and create. 8 PROFESSIONAL FIRMWARE VERSION 2013 2.9 Events In this menu will be created all the events we are going to use depend of the time and attendance system we want, being possible create usual events like (Doctor, smoke, lunch, breakfast and so on…). This system offers to control perfectly the work time of each employ. Through SDK we can send an event picture to the terminal so when one employ is going to make an event log he’ll see the event picture in the screen which offer a better knowledge to the users about what they are checking… 2.10 Access (only for terminals with relay) In the access control menu we can configure so many access control parameters such as: Time zones, holidays, groups, access combined, alarm and antipassback. 9 - Time zones: We’ll define the time zones we want to assign to the users to give them access privileges for opening the door or denied the access. - Holidays: It’s the menu where you can set the public holidays and private ones as well. So those days the access will be denied for the user or users you decide. - Groups: This functionality it’s especially useful for Access control due we can create like profiles for the same users. So, imaging we have 10 users with the same access control time zones and setting this menu provides us the capability to include all of them in only one group, setting the parameters in the group instead of user by user. - Combined Access: With this option, we can increase the security level of our Access control terminals, by offering the possibility to oblige users of different groups to be identified at the same time to door opening. PROFESSIONAL FIRMWARE VERSION 2013 - Parameters, Alarm and Misc. Options: Using this three sub-menus we configure some kind of parameters as relay delay, alarm settings, antipassback etc… SYSTEM 3.1 Communications When the device and PC are used to transmit data, it is necessary to use communication wire to set communication parameters in the device. When the device is in communication, “communicating…” appears. Don’t operate the device then. Notice: When the device is communicating with computer, please check the setting here. The parameters here must be in accordance with that of software communication interface. 10 PROFESSIONAL FIRMWARE VERSION 2013 3.1.1 Network When Ethernet is used for communication of device and PC, the following settings need to be checked: Device IP address: IP is 192.168.1.201 by default. You can modify it if it is necessary. But it cannot be the same with that of PC. Subnet mask: It is 255.255.255.0 by default. You can modify it if it is necessary. Gateway address: It is 0.0.0.0 by default. If the device and PC are in different net segment, it is necessary to set address. Net speed: Set the speed according to the LAN where the device is. 3.1.2 Serial Port options When RS232/RS485 is used for communication of device and PC, it is necessary to set device ID. Device ID: 1—254. If RS232/RS485 is used, this ID needs to be input on the software communication interface. 11 PROFESSIONAL FIRMWARE VERSION 2013 3.1.3 Security options When RS232/RS485 is used for communication of device and PC, it is necessary to set device ID. Device ID: 1—254. If RS232/RS485 is used, this ID needs to be input on the software communication interface. To improve the security of attendance data, connection password needs to be set here. Connection password must be input when PC software is to connect device to read data. Connection password: System password is 0 by default. Namely, there is no password. )it can be set as other value. After setting, the password must be input if software is to communicate with device. Or the connection will fail. The password length is 1~6 digits. 3.1.4 Wiegand Define Wiegand input & output format. 3.1.4.1 Input Opt. User defined format: User defined Wiegand input format bit digit: Wiegand data digit length pulse width: Pulse width is 100 microseconds by default, which can be adjusted from 20 to 800. Pulse interval: It is 900 microseconds by default, which can adjusted between 200 and 20000. Input content: Content contained in Wiegand input signal, including User ID or card number. 12 PROFESSIONAL FIRMWARE VERSION 2013 3.1.4.2 Output Opt. 13 Format: It is the defined format in the system. User need not specify total digit and the information position. There are 4 definition formats by default in the system: Wiegand 26 with site code, Wiegand 34 with site code, Wiegand 26 without site cod and Wiegand 34 without site code. Wiegand26 with site code means W26 format output with device ID. Wiegand26 without site code means W26 format output without site code. If there is no site code, then the signal not to be output does not contain the information. If there is site code, the output is the set site code (similar to device ID. But this code is specified by the user and different devices can be repeated, with range of 0-255. Failed ID: It is the failed ID after unsuccessful verification. “Close” means not to output it.(with range of 0-65534) Site code: Similar to device ID. But the code is specified by user. Different device can be repeated. (With range of 0-255) Pulse width: Pulse width is 100 microseconds by default, which can be adjusted from 20 to 800. Pulse interval: It is 900 microseconds by default, which can adjusted between 200 and 20000. Output content: Content contained in Wiegand output signal, including User ID or card number. PROFESSIONAL FIRMWARE VERSION 2013 3.1.5 Wireless setup (Only for terminals with WI-FI) Before the device is used for wireless network, other physical groupware of 802.11 networks, such as joint, distributing system, wireless medium must be in existence. ESSID to connect to the network must be known (network ID). Network ID: Network ID to be connected to wireless network. (There is difference between small letter and capital letter.) Network model: there are two models: infrastructure model (for star structure) and ad-hoc model (for peer-to-peer-network). Authentication mode: Infrastructure mode includes five authentication modes: OPEN, SHARED, WEPAUTO, WPAPSK and WPA2PS002E. Ad-hoc model includes four authentication modes: OPEN, SHARED, WEPAUTO and WPANONE. Encrypt type: when the selected encrypt type is NONE, the password in WEP (Wired equivalent privacy) and WPA (Wi-Fi protested access) cannot be edited, namely, it is not necessary to input password. Device IP address: In 802.11 wireless networks, there is DHCP. Or enter IP interface to input correct IP address, subnet mask and so on. 14 PROFESSIONAL FIRMWARE VERSION 2013 3.1.6 Dial –Up settings GPRS (Only for terminals with GPRS) When the equipment is in the Dial-Up Network, making sure the device is in the coverage of GPRS or CDMA signal, and it is must know of the used modem type, APN name and access number and so on. Modem type: Set the modem type that the device used according to SIM Card type. Frequency: Select the appropriate frequency according to the business operators. APN Name: Access Point Name, used to identify GPRS / CDMA types of business. User name and password: Verify whether the user has permission to use this network. Access Number: The access number of GPRS / CDMA business. Redial interval: The interval of automatic redial after the network is disconnected. Redial times: The times of attempt to redial the number if the network is disconnected. 3.2 Language The Professional firmware version includes text and voices in all European languages, the voices have been recorded in a professional studio, getting really high sound quality. When the terminal start up for the first time it’ll ask you to select the language you want, if later you would like modify it coming to this menu you can change to the new configuration. Professional firmware version provides the capability to select if you prefer female or male voices. 15 PROFESSIONAL FIRMWARE VERSION 2013 3.3 Fingerprint 1:1 matching threshold value: The similarity of ID + fingerprint verification and the enrolled template 1:N matching threshold value: The similarity of verification and the enrolled template Recommended matching threshold value: Matching threshold value FRR FAR 1:N 1:1 High Low 45 25 Middle Middle 35 35 Low High 25 45 Finger sensitivity control the reaction of the sensor with an external light, the light can affect always to optical sensor, with this parameter we can make lower this effect if over our terminal there is a source light. Alg. Version: can be set 9.0 or 10.0 being this last one faster and improve the error rate. Take care because the size of trace information recorded with 10.0 algorithms is 1.2kb double size more than 9.0 algorithms, you can’t transfer templates enrolled with 9.0 to 10.0, neither vice versa. 16 PROFESSIONAL FIRMWARE VERSION 2013 3.4 Update Use software to upgrade firmware program. Notice: If you need such upgrade file, please contact technician. Usually, firmware upgrade is not recommended. Operation Insert U disk with upgrade file into the slot. The device will identify the file automatically. The device will give prompt whether it is successful or not. 3.5 Display Parameters related with the display. FP Image it’s to manage if we want to show the FP image when we are enrolling a finger or matching on the device. Date Format YY-MM-DD, YY/MM/DD, YY.MM.DD, MM-DD-YY, MM/DD/YY, MM.DD.YY, DD-MM-YY, DD/MM/YY, DD.MM.YY and YYYYMMDD. Select your desired date format. Clock Mode Can be never show or choosing between two kinds of clock to show on the screen. Picture Delay How soon the picture will be changed effective value is 3~999 seconds.) Clock Delay The clock picture display time length after verification. After the display delay, the propaganda picture will be displayed on the initializing interface again (with effective value of 0~999 seconds, and 0 means displaying clock all along). 17 PROFESSIONAL FIRMWARE VERSION 2013 3.6 Advanced options Sleep time: When it is the scheduled sleep time, the device not in operation will enter sleep status. Press any key or finger to awake it. (Set 0 always on). Key beep: It controls the key sound to be enable or not. Voice: to select whether to give voice prompt or not. The device will give corresponding voice prompt during operation. Lock Power: To prevent hostile power-off, select whether to lock power-off or not. “Disable”: the power is off 3 seconds after pressing power-off. “Enable”, it is ineffective after pressing power-off. Relay as: To select how we want to use the relay, can be for door lock or external ring bell. USB Port as: to Select how we want to use the USB Port, can be as barcode (to connect a barcode scan) or as pen drive (to manage data using a pen drive) 3.7 System info Use system information to check the current device’s saving status, its version information and so on. 18 PROFESSIONAL FIRMWARE VERSION 2013 3.7.1 Record capacity Display the count of enrolled user, administrator and password enrollment and the capacity of fingerprint, the enrolled fingerprint, attendance record and the current saved attendance record in the form of diagram, as shown below: 3.7.2 Device information Display device name, serial number, version information, and manufacture date in device information for check: 19 PROFESSIONAL FIRMWARE VERSION 2013 Terminal settings 4.1 Keypad In this menu you configure all terminal function keys as we desire to terminal giving total flexibility as we will explain in the next point. This menu has two sections we will detail below. - 20 Functions keys settings: From this menu you can define what function we want for each function keys available in the terminal, you can select from these options: (Undefined, key state, see SMS, events list, see records and help key). PROFESSIONAL FIRMWARE VERSION 2013 - Conf. Status keys: The flexibility offered by the professional version of firmware allows us to define a status key whatever such as F1 = Doctor, that key can be set to automatically change state, one key for a time can have a state and automatically switch to another state and you can even set the day of the week you want this operation happens. With what we can play with the function keys at will allowing all sorts of combinations to make it easier the use of the terminal for the end-user. We also have the ability to define the code you want to appear ATT and if a key state allows to make records or not. 4.2 Barcode settings One of the main features of the professional version is the ability to define the use of the USB port, when you define as barcode reader and reboot the computer, instead of finding the menu pen drive, we found the menu reader barcode in which we can define the length of the code, name and even may reach defined as the pen drive, the bar code fields. 21 PROFESSIONAL FIRMWARE VERSION 2013 4.3 Pen drive Management 4.3.1. Download Download user data Save all users’ information and fingerprint in the device to U disk. Download SMS Save SMS added to the device to U disk. Download user photo Save employee’s photo into U disk. 4.3.2. Upload Upload user data Upload user information and fingerprint saved in U disk to device. Upload SMS Upload SMS in U disk to the device. Upload user defined picture Upload JPG picture started with “ad_” in U disk to the device. Then these pictures will be displayed on the initializing interface Upload user photo Upload JPG picture named with User ID in U disk to device. Then the employee’s photo will be displayed upon fingerprint verification. 22 PROFESSIONAL FIRMWARE VERSION 2013 4.3.2. Pen drive Settings From the menu pen drive can perform all data downloads from the device, these download can be done: (Logs, user information, SMS, user photo, and terminals that have camera allow download capture photos too.) In the same way you can upload data to the terminal if we want to move data quickly and safely from one terminal to another. Within downloading records we can define a lot of parameters that will help us achieve further attendance reports in the way you want. Definable parameters for downloading records - 23 File name. Fix text. Delete or not after download. Separator character ASCII value Data fields: we have 10 data fields configurable by user where we can define the information that we want to download and the position that information occupies, these data are: (Undefined, fixed User code, Date and Time, Terminal Cod, Terminal Name, ATT code, ATT name, system verification, code, description). PROFESSIONAL FIRMWARE VERSION 2013 4.3 Bell Many companies need bell for on-duty and off-duty. Some use manual bell. Some use electronic bell. To save cost and provide convenience for management, we integrate bell functions to the device. You can set time for bell. When it is the scheduled time, the device will play the selected ring automatically. And the ring will stop automatically when it is the end time. If it’s an external siren using the relay’s device we have the connections to wire an external ring bell and the device will send the signal trough the relay to the external siren to activate it. 4.4 Log Settings In this menu define the number of failed attempts to allow the user to make logs. We will select the time between logs as well (is the minimum time that must elapse between logs from the same user). In logs parameters you’ll find the option to configure when you want to skip the warning message memory full of logs. 24 PROFESSIONAL FIRMWARE VERSION 2013 4.4 Multi-verify settings Using professional firmware version will be available the option to set by terminal the default verification mode. If each user has not defined their specific verification mode the system will check this value which will be default for all users in the terminal. We are able to make multiple modifications for many users at the same time. 4.5 Reset Make device’s communication option, system option and so on reset to the state of factory. Factory reset: Make all the parameters in the device reset to the state of factory. Reset keyboard definition: Reset the corresponding setting of keyboard definition to that of factory. Reset bell option: Only reset bell option to factory state. Reset other parameters: only reset communication option, system parameter, interface option and so on to factory state . 25 PROFESSIONAL FIRMWARE VERSION 2013 4.6 Auto test The device can test various modules automatically to help operator to judge the module with fault quickly, including test of TFT display, voice prompt, clock, keyboard, and fingerprint sensor. TFT display test The device can automatically test TFT color display effect (through color display, white display and black display) to see whether the screen works normally Voice test The device can automatically test voice prompt effect through playing voice files in the device to see if the files are complete and the voice effect are good or not. Keyboard test The device can automatically test various keyboards to see if the keys work normally or not. Press any keyboard on the test interface (except for OK and “ESC”). Sensor Test The device will automatically test the sensor to see if it works normally. Press fingerprint to see if the image is clear and usable. Press fingerprint on the sensor window and the fingerprint image will appear on the screen. RTC Test The device can automatically test the clock to see if it works normally. Press OK to start time and then press OK to stop time. Press “ESC” to exit. 26 PROFESSIONAL FIRMWARE VERSION 2013 Data Management 5.1 Data Management Employee’s attendance record will be saved in the device. For query convenience, query record function is provided. 27 Data query - Query attendance: According to user’s input query condition, the records will be displayed on the screen for user selected. Only shows log related with attendance and job costing only with date and time. - Query user: To query the current user in the device. - Query SMS: To query SMS in the device. PROFESSIONAL FIRMWARE VERSION 2013 28 Delete Data To delete all data recorded in the device such as: Logs, users, pictures).