1
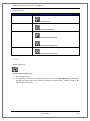
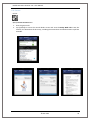
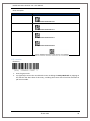
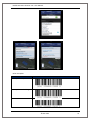
Healthcare Demo Scanner 2.0 – User Manual Healthcare Demo Scanner 2.0 User Manual Version 1.1, Approved, 30 July 2015 © GS1 2015 1 Healthcare Demo Scanner 2.0 – User Manual Document Summary Document item Current value Document Title Healthcare Demo Scanner 2.0 – User Manual Date Last Modified 30/07/15 Current Document Issue v1.1 Status Approved Document Description The User Manual is a guideline describing the main functions of the Healthcare Demo Scanner application. It also includes demo codes which helps to demonstrate the use of GS1 barcodes in healthcare environment. Contributors Name Company/Organisation Tania Snioch GS1 Global Office Chuck Biss GS1 Global Office Zsolt Bócsi GS1 Hungary Log of Changes Issue No. Date of Change Changed By Summary of Change 1.1 30 July 2015 Chuck Biss, Zsolt Bócsi New chapter added: 5. Information access and data protection 1.0 21 May 2015 Zsolt Bócsi First version of the User Manual © GS1 2015 2 Healthcare Demo Scanner 2.0 – User Manual Table of Contents Table of Contents ............................................................................................................................... 3 1. Introduction ............................................................................................................................. 4 2. Registration ............................................................................................................................. 5 3. Mobile application................................................................................................................... 6 3.1. How to download the mobile application ............................................................................... 6 3.2. Main screen – Quick guide ...................................................................................................... 6 3.3. Settings .................................................................................................................................... 7 3.3.1. GPS ON level .................................................................................................................... 8 3.3.2. GPS OFF level ................................................................................................................... 8 3.3.3. Scanning mode ................................................................................................................ 8 3.4. Scanning modes....................................................................................................................... 8 3.4.1. How to use the app in Normal mode .............................................................................. 9 3.4.2. How to use the app in Survey mode ............................................................................. 10 3.4.2.1. Considerations for a survey ....................................................................................... 10 3.4.2.2. Uploading data to the HDS server ............................................................................. 11 3.4.2.3. Products with multiple barcodes .............................................................................. 11 3.4.2.4. Products without a barcode ...................................................................................... 11 3.4.2.5. Adding photos to records .......................................................................................... 11 3.4.2.6. Survey process ........................................................................................................... 12 4. Administration website ......................................................................................................... 13 4.1. List view ................................................................................................................................. 13 4.2. Admin page............................................................................................................................ 15 4.3. Statistics................................................................................................................................. 15 4.4. How to generate survey statistics ......................................................................................... 17 5. Information access and data protection ............................................................................... 18 5.1. User access levels .................................................................................................................. 18 5.2. Data protection ..................................................................................................................... 18 6. Demo test data ...................................................................................................................... 19 6.1. Product .................................................................................................................................. 20 6.2. Document .............................................................................................................................. 22 6.3. Asset ...................................................................................................................................... 23 6.4. Person .................................................................................................................................... 25 6.5. Location ................................................................................................................................. 26 © GS1 2015 3 Healthcare Demo Scanner 2.0 – User Manual 1. Introduction Healthcare Demo Scanner is a dual purpose healthcare Automatic Identification and Data Capture (AIDC) application: Use the Normal mode to scan barcodes one by one, validate them against GS1 data format standards and collect information about the product, manufacturer, scanning location, etc. Use it to demonstrate the advantages of GS1 DataMatrix when used in healthcare applications for Automatic Identification and Data Capture (AIDC) marking of trade items. In Survey mode the app can be used to measure the prevalence of GS1 bar codes marked on healthcare products. With this function, users are able to gather information about changing trends in bar code use. Barcode symbol data can be collected and statistically analysed. Multiple symbols can be scanned, and information added about location, product type, packaging level, pictures and comments. © GS1 2015 4 Healthcare Demo Scanner 2.0 – User Manual 2. Registration Healthcare Demo Scanner is only available for a closed group of users, therefore registration is required to use the application. The registration website can be accessed from the mobile application or directly from an internet browser: To register using the mobile application: press the Registration button. This will access the mobile registration website (see Figure 2.1). To register directly from a browser go to: http://hcdemo.gs1hu.org/Home/Register After the HDS administrator reviews the registration information and activates the account, access will be granted to the application. Applicants will be informed about the result of the registration process via e-mail within 24 hours. The activated account grants the user access to both to the mobile application and to the website (see Chapter 3. and 4.). 2.1. Figure © GS1 2015 5 Healthcare Demo Scanner 2.0 – User Manual 3. Mobile application 3.1. How to download the mobile application The Healthcare Demo Scanner mobile app is available in Google Play for Android and in AppStore for iOS platform. Go to the appropriate application store and search for “Healthcare Demo Scanner”. As there are some differences in the design of the android and iOS versions of the application, in the following chapters screenshots are included from both versions. 3.2. Main screen – Quick guide Android: ADD PHOTO: Add photo(s) to the record - e.g. take pictures of product, barcode etc. SETTINGS: Set the location information and scanning mode HISTORY: Check your scanning history - shows your previous records (up to 100) CLEAR: Discard the latest record and clear the main window MANUAL INPUT: Create a record without scanning a barcode (e.g. there is no barcode on the packaging or the barcode cannot be scanned) UPLOAD: Upload all records that have not been uploaded yet to the server SCAN: Scan a barcode (1D/linear or 2D/matrix code) ADD BARCODE: Add another barcode to the previously scanned one. If there are two barcodes on the packaging, you can add both to the record. This button is only active when a barcode has been already added to the record using the Scan button. DATA CONTENT: Shows the data content of the scanned barcode and the result of validation against GS1 Standards. © GS1 2015 6 Healthcare Demo Scanner 2.0 – User Manual iOS: ADD BARCODE: Add another barcode to the previously scanned one. If there are two barcodes on the packaging, you can add both to the record. This button is only active when a barcode has been already added to the record using the Scan button. DATA CONTENT: Shows the data content of the scanned barcode and the result of validation against GS1 Standards. UPLOAD: Upload all records that have not been uploaded yet to the server SCAN: Scan a barcode (1D/linear or 2D/matrix code) MANUAL INPUT: Create a record without scanning a barcode (e.g. there is no barcode on the packaging or the barcode cannot be scanned) HISTORY: Check your scanning history - shows your previous records (up to 100) CLEAR: Discard the latest record and clear the main window ADD PHOTO: Add photo(s) to the record - e.g. take pictures of product, barcode etc. SETTINGS: Set the location information and scanning mode 3.3. Settings Tap on the [Settings] button on the main screen to access the Settings screen to set the scanning location and scanning mode information. This data will be added to each record. © GS1 2015 7 Healthcare Demo Scanner 2.0 – User Manual 3.3.1. Figure – Settings (Android on left, iOS on right) 3.3.1. GPS ON level The user can set the level of location information to attach to the records. This setting is applied if the GPS (location) is allowed on the user’s mobile phone. The default value is “Coordinates” that means that the GPS coordinates will be attached to each record. If the user does not want to share coordinates but the GPS is switched on, the user should select the “Smallest region” or “Country”, therefore only the Town or Country name will be attached to the records as location information. 3.3.2. GPS OFF level This setting is applied when the GPS is not allowed on the user’s phone or the GPS information is not available (e.g. the user is in a warehouse where the GPS sign is low). The user can add here the name of country where the application is being used. If it is available the user can add information of lower location levels (e.g. Region, Town, District etc.). This information comes from the Location database hosted by GS1 Hungary. The Location database contains detailed information (other than country names) only for countries whose GS1 Member Organisation provided this information. 3.3.3. Scanning mode The user may switch between Normal and Survey mode on the Settings screen. If Survey mode is selected, completing the Survey location field is mandatory. The field contains plain text data and it is not connected to GPS information. Survey location enables a record of the location / entity in which the survey is being completed and is an important attribute of the survey from the perspective of follow-up analysis and statistics. 3.4. Scanning modes The Healthcare Demo Scanner application can be used in two modes: Normal mode: the same functions are available as in version 1.0. Use the app in normal mode to scan barcodes one by one, validate them against GS1 Standards and get more information about the product, manufacturer, scanning location etc. Survey mode: use the app in Survey mode to conduct surveys, scan hundreds of barcodes, add information about product category and packaging level and send the information to the administration website where records are available for further statistics and analysis. © GS1 2015 8 Healthcare Demo Scanner 2.0 – User Manual The selected scanning mode is indicated in the header of the main screen, meaning the user can easily check which mode is being used. 3.4.1. Figure - Main screen (Android on left, iOS on right) 3.4.1. How to use the app in Normal mode Normal mode is recommended when you want to scan a barcode and check the data content against GS1 Standards, collect information about the product, manufacturer, scanning location, etc. Press the [Scan] button to scan a barcode or tap on the manual input field to type in a GS1 ID Key. If there is more than one barcode on the product press [Add barcode] to append the second code to the same record. When scanning a barcode that contains a website URL (either in line with GS1 standards – encoded with AIs 01+8200 - or just an html address) the website will open automatically after the scan. Press the [Back] button to go back to the main screen of the application. Press [Data content] to see the content of the scanned barcode and the result of the validation against GS1 Standards. Upload the record to the server by pressing the [Upload] button. As a result the user will see the record details information gathered by the HDS server from GEPIR1 (Global Electronic Party Information Registry) and other data sources. The user can attach photos to the record immediately after the scan, after the upload (on the Record details screen), or later in the process using the [History] button. On the History screen the user will see the last 100 records created. In Normal mode pressing the [Scan] button without uploading the current record results in deleting the previously scanned data and creation of a new record. 1 GEPIR is a unique, internet-based service that gives access to basic contact information for companies that are members of GS1. © GS1 2015 9 Healthcare Demo Scanner 2.0 – User Manual 3.4.2. How to use the app in Survey mode The app can be used in Survey mode to gather information about changing trends in barcode use. Barcode symbol data can be collected and statistically analysed. Multiple symbols can be scanned, and information added about location, product type, packaging level, pictures and comments. 1. Create an account (register a user) dedicated for surveys (e.g. myMO_survey) – see Section 2 2. Log in to the mobile application with the "survey user". The same account should be used on all mobile devices taking part in the survey. 3. Switch to Survey mode on the Settings screen and fill in the Survey location field. Ensure the name is structured to include both Business Name (e.g., The Royal Adelaide Hospital) and location in the business (e.g., Catheter Laboratory 1). When the data is extracted into Excel (see Chapter 4), location names will be able to be used for filtering and sorting. 4. Go back to the main screen (press [Back] button) 5. Scan a barcode 6. After each scan, select the product category and packaging level of the product 7. Add comments to the record (optional) 8. Add photo(s) to the record if the photos can help the follow-up (optional) 9. Repeat step 5 onwards. 3.4.2. Figure - Scanned data (Android on left, iOS on right) 3.4.2.1. Considerations for a survey 1. Naming your Survey location (in the survey location field). Ensure the name is structured to include both Business Name (e.g. ”The Royal Adelaide Hospital”) and location in the business (e.g. ”Catheter Laboratory 1”). When the data is extracted into Excel, location names will be able to be used for filtering and sorting. 2. Recommended sample size(s) criteria per location when conducting a survey. Ensure: More than 25 different suppliers should be surveyed (if practical) © GS1 2015 10 Healthcare Demo Scanner 2.0 – User Manual To ensure statistical relevance, more than 100 samples per packaging level should be surveyed Where locations are of limited size (e.g. ward storage, medical imaging storage, etc) it is recommended to scan all products in that location In an environment where not all items can be surveyed (e.g. warehouses) items should be sampled from a minimum of aisles (10 aisles minimum, if possible), and a minimum of shelves per row (3 minimum, if possible) 3. Ensure that analysis is undertaken on statistically relevant samples, i.e., more than 100 items per category as defined by the user as relevant to the survey (e.g. pack size, product type, location, etc). 3.4.2.2. Uploading data to the HDS server Records can be uploaded to the server one-by-one or in a batch. It is more time-efficient to gather records offline and upload them as a batch. To create a batch of records, press [Scan] after step 8, therefore the previous record will be saved on your device and a new record will open. Press [Upload] to ensure that all records not already uploaded are sent to the server. Please note: Attaching pictures to the records results in larger data files, meaning batch upload could take a significant time. A stable internet connection is recommended. 3.4.2.3. Products with multiple barcodes If there is more than one barcode on the product the user can add two codes to a record. Scan the first barcode by pressing [Scan], then press [Add barcode] to add the second barcode to the record. The following barcode combinations are supported in this version of Healthcare Demo Scanner. EAN / UPC + DataMatrix EAN / UPC + GS1 DataMatrix EAN / UPC + Code-128 EAN / UPC + GS1-128 DataMatrix + DataMatrix DataMatrix + GS1 DataMatrix GS1 DataMatrix + GS1 DataMatrix Code-128 + Code-128 GS1-128 + GS1-128 Code-128 + GS1-128 Note: GS1 Databar will be supported in the next minor release of the application. 3.4.2.4. Products without a barcode Use the manual input field if there is no barcode on the product. Select the “No barcode” option, then define the product category and packaging level and add a short description of the product (using the Comment field). 3.4.2.5. Adding photos to records Up to 3 photos may be added per record. This will ensure it is easier if follow up is required after the survey. Scenarios in which photos are added to a record include: Immediately after the scan: press [Add photo] to access to the screen where pictures are attached. To take a photo tap on one of the 3 thumbnail square – the camera will be launched. Press [Back] to get back to the current record in order to continue scanning or to upload the record to the server. © GS1 2015 11 Healthcare Demo Scanner 2.0 – User Manual 3.4.3. Figure - Add photo (Android on left, iOS on right) Pictures may be added to a record even after it has been already uploaded to the server: press [History], select the record from the history list. On the History screen the last 100 records are displayed. Record details information can be accessed. 3.4.2.6. Survey process The following flowchart details the main steps for gathering records in Survey mode. © GS1 2015 12 Healthcare Demo Scanner 2.0 – User Manual 4. Administration website The Healthcare Demo Scanner website allows users to review scan history, access basic statistical information or export data into an Excel file for further analysis. In order to access survey records, the user must log in with the survey account details. Website address: http://hcdemo.gs1hu.org/ 3.4.1. Figure - Website, Login page 4.1. List view After login all records created by the user, and the related information, is accessible in a structured format. © GS1 2015 13 Healthcare Demo Scanner 2.0 – User Manual 4.1.1. Figure – Website, List view The upper part of the page contains filter options. Using these fields the user can filter the list to a specific set of criteria (e.g. select date, set scanning mode to Survey, select the proper scanning location(s)). 4.1.2. Figure - Filter Below the filter options a list detailing each record that meet the filter settings is displayed. To get all the information related to the user’s scans in Excel format, select the “Download list as excel worksheet” link which is found at the bottom right of the page 4.1.3. Figure - Export to Excel file © GS1 2015 14 Healthcare Demo Scanner 2.0 – User Manual Press the [Information] button in the last column to view the record details on the website, without downloading the data to Excel. 4.1.4. Figure - Record details page 4.2. Admin page The Admin page is available only for authorised users. This page lists all the records that contain a GS1 ID Key created from the authorised user’s country prefix. The Admin page shows the records from different users filtered by the GS1 country prefix associated with the authorised user. 4.3. Statistics Real-time statistical data can be accessed using the Statistics menu. The Statistics dashboard contains 6 different types of charts that show statistical data created on a real-time basis from the records of the current user or users (when multiple users are conducting a survey with the same account details). Filter by date and scanning mode to access relevant information. © GS1 2015 15 Healthcare Demo Scanner 2.0 – User Manual 4.3.1. Figure - Statistics dashboard For more detailed information about a particular graph, click on the [Details] link found next to each chart. This directs to the Statistics details page from which the chart selected may be downloaded as image files. The statistical data can be exported into Excel file by clicking on the “Download list as excel worksheet” link at the bottom of the page. © GS1 2015 16 Healthcare Demo Scanner 2.0 – User Manual 4.3.2. Figure - Statistics details 4.4. How to generate survey statistics 1. Log in to the hcdemo.gs1hu.org website using your "survey user" account. 2. By default the List view is shown: all the records created by the survey user are listed - filter by date and survey location to constrict the list - click on "Export into excel" at the bottom of the page to export data into excel sheet for further analysis 3. Select the Statistics menu to access the statistics dashboard - filter by date and survey location to constrict the input of statistics 4. Click on the "Details" button (available for each statistic) to get more detailed statistical information © GS1 2015 17 Healthcare Demo Scanner 2.0 – User Manual 5. Information access and data protection Healthcare Demo Scanner is only available for a restricted group of users, therefore registration is required to use the application. Users must use their official company e-mail address for registration. A limited amount of personal data will be recorded in the process of registration of end-users and this data is maintained during the use of the application. 5.1. User access levels Both the mobile application and the website can only be accessed through a registered account. In the Healthcare Demo Scanner system there are 3 levels of users, each with different access rights. System Administrator Company Supervisor Company User User Tasks and rights System Administrator Manages and supports the registration of companies and users. For support reasons the System Administrator can view all records of all registered users on the HDS website (hcdemo.gs1hu.org). Company Supervisor The individual at a registered company who can view on the website all of the records of the users under his/her supervision (Company users). Company supervisor rights are allocated by the System Administrator upon request. Company user “Company users” can only view their own records on the HDS website. 5.2. Data protection User data (collected during the registration) and the scanned records of the users are stored in the Healthcare Demo Scanner database. The HDS server and database is located in Microsoft Azure which is a cloud computing platform and infrastructure. MS Azure meets a broad set of international and industry-specific compliance standards, such as ISO 27001, HIPAA, FedRAMP, SOC 1 and SOC 2, as well as country-specific standards including Australia IRAP, UK G-Cloud, and Singapore MTCS. Microsoft was also the first to adopt the uniform international code of practice for cloud privacy, ISO/IEC 27018, which governs the processing of personal information by cloud service providers. For more information on data security and privacy visit the following website or write an e-mail to [email protected]: http://azure.microsoft.com/en-us/support/trust-center © GS1 2015 18 Healthcare Demo Scanner 2.0 – User Manual 6. Demo test data In order to support the demonstration function of the app some demo databases have been created, as detailed below. For demonstration purposes use the application in Normal mode. Prepared Demo test entities with master data background exist: Entity Product Location Document Asset Person Example Pharmaceutical Medical device Hospital Hospital Main Building Warehouse Surgery Department Bed A Operating room Waiting Hall Laboratory Pharmacy Patient information leaflet Warranty card Curriculum Vitae Patient record Prescription Washing machine Medical transport trolley Medical waste container Doctor Nurse Pharmacist Patient Note with product hierarchy information for GS1 pill for asset for doctor for patient for patient and pharmaceutical prescribed by the doctor with warranty card with CV with patient record © GS1 2015 19 Healthcare Demo Scanner 2.0 – User Manual 6.1. Product GS1 Pill 98% - Secondary packaging 1. Scan the given code 2. The Demo directs the user to the product website where the patient information leaflet and the master data of the product is located. The user can also access the product hierarchy from the product master data sheet (last row). 3. By clicking on the Back button the user can access the main screen to view the decoded data. The product website can be accessed by tapping on the URL address. By uploading the record to the server (press [Upload]) the user can go to the record details where you can find the Entity Web Link which also directs to the website. © GS1 2015 20 Healthcare Demo Scanner 2.0 – User Manual Other examples: Product – hierarchy level GS1 Pill 98% - Blister Code GS1 Pill 98% - Case GS1 Pill 98% - Pallet Surgical Scissors (01)09504000059088(21)9378NG © GS1 2015 21 Healthcare Demo Scanner 2.0 – User Manual 6.2. Document Patient information leaflet (253)9504000059101 1. Scan the code 2. Tap [Upload] to access the record details screen where to view the Entity Web Link. By tapping on the web link to view the demo data of this entity, including the master data and the document in pdf format. © GS1 2015 22 Healthcare Demo Scanner 2.0 – User Manual Other examples: Document Warranty card Code (253)9504000059118 Curriculum Vitae (253)5996507000016000569 Patient record (253)5996507000023000009875 (253)5996507000023000009876 Prescription (253)5996507000030000125984 6.3. Asset Washing machine (8004)599650700000035365 1. Scan the given code 2. Tap [Upload] to access the record details screen and view the Entity Web Link. By tapping on the link the demo data of this entity, including the master data is visible, as well as the document in pdf format. © GS1 2015 23 Healthcare Demo Scanner 2.0 – User Manual Other examples: Asset Medical transport trolley Code (8004)599650700000035366 Medical waste container (8003)05996507000047 Surgical Scissors (01)09504000059088(21)9378NG © GS1 2015 24 Healthcare Demo Scanner 2.0 – User Manual 6.4. Person Doctor (8017)599650700000001233 1. Scan the given code 2. Tap [Upload] to access the record details screen and view the Entity Web Link. From this location, the demo data of this entity, including the master data and the document in pdf are available. © GS1 2015 25 Healthcare Demo Scanner 2.0 – User Manual Other examples: Person Nurse Code (8017)599650700000001240 Pharmacist (8017)599650700000001257 Patient (8018)599650700000070451 (8018)599650700000070468 6.5. Location Pharmacy 1. Scan the given code 2. Tap [Upload] to access the record details screen including the Entity Web Link. By tapping on the web link the demo data of this entity, including the master data of and the document in pdf are accessible. © GS1 2015 26 Healthcare Demo Scanner 2.0 – User Manual Other examples: Location Hospital main premises Code Hospital Main building Warehouse © GS1 2015 27 Healthcare Demo Scanner 2.0 – User Manual Location Surgery Department Code Surgery Department, Bed A Surgery Department, Operating room Waiting Hall Laboratory © GS1 2015 28