1
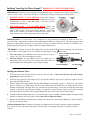
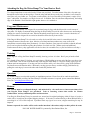
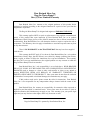
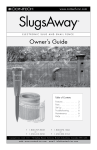
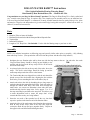
DOG-ON WATER RAMP™ Instructions “The Original Inflatable/Floating Waterdog Ramp” Distributed by Bear Brained Ideas, Inc. – Made in the USA Congratulations on your Dog-On Water Ramp™ purchase! The Dog-On Water Ramp™ is a finely crafted and very versatile water ramp for dogs. It requires only a few simple steps for assembly and is easy to install and use. Your new Dog-On Water Ramp™ is constructed of sturdy, durable materials that are gentle on dog’s feet, joints and muscles. Dogs love the independence it gives them and enjoy having their own place - off the boat or dock - to shake off, sit and rest between uses. Parts 2 - Flotation Tubes w/inner air bladders 1 - Platform/Deck attached to Mesh Ramp and Metal Spreader Bar 1 - Traction Mat 1 - Inflation/Fill Adapter 2 - Lengths of 3/8” Rope/Line - Not Included - Used to lash the floating ramp to your boat or dock Assembly NOTE: See inflation instructions on following page and partially inflate tubes prior to assembly – fully inflating them after Step 5 below. (The spreader bar will not fit into the pockets with the tubes fully inflated.) 1. Straighten the two flotation tubes and lay them out with the long straps at the top. On each tube, the words ‘Dog-On Water Ramp’ should be facing up (and slightly to the outside) and the long hook & loop strips will be on the inside next to the mesh ramp. 2. As pictured, place the deck at the top end of the tubes, above the straps. The deck’s raised ridges should be facing up and the mesh ramp and spreader bar will be at the bottom. 3. The Traction Mat that was shipped loose with the unit should be placed on top of the deck at this time, aligning the slits with the deck holes, prior to attaching the deck to the tubes (Step 4). 4. Attach each tube to the deck by threading the two long straps on each tube through the appropriate deck holes. Feed each strap up through the outside deck holes, then back down through the inside holes, (see arrows on illustration), then under the tubes and thread strap into the strap locks. Leave approx 3” to 4” of the strap extending beyond/below the strap lock. This allows you to make adjustments and to assure the straps don’t overly constrict the tubes as they are being inflated. 5. Insert the two ends of the spreader bar all the way into their respective pockets at the bottom end of the flotation tubes. 6. Attach the sides of the mesh ramp to the flotation tubes using the hook & loop closure strips. Start at the deck end; align and overlap the hook & loop and press together firmly. Repeat on the opposite side and then finish inflating the tubes. Page 1 – June 2011 Inflating Your Dog-On Water Ramp™ - IMPORTANT VALVE INFORMATION! Inflation Port: On the top end of each tube is an Inflation Port (fig. 2). Remove the Locking Cap by turning counterclockwise (left) ¼ turn. Under the cap is a valve stem for filling or releasing the air in the tubes. FOR INFLATION – VALVE STEM UP: Using your fingertip, gently press down the valve stem and, while holding it down, turn it counterclockwise (left) ¼ turn, and release. The stem is springcontrolled and will pop up. FOR DEFLATION – VALVE STEM DOWN: Using your fingertip, gently press down valve stem and turn clockwise (to the right) ¼ turn to “lock” stem in the “down” position. Locking the stem “down” enables easy, hands-free deflation of the tubes. This feature allows you to roll or squeeze the air out of the tubes. Valve Stem Locking Cap fig. 2 Inflation Source: To fill the tubes, use a compressor or pump which has an adapter to inflate car tires or a universal fill tip. Suggestions are; high volume hand pumps, portable air compressor, 12-volt mini-compressor that plugs into a lighter/power accessory, service station. Do not use smaller mattress, ball, hand, or inflatable “toy” pumps (pumps need to provide adequate volume to fill the flotation tubes). Fill Adapter: The large end of the Fill Adapter (fig. 3) locks into the Inflation Port by inserting it in and twisting ¼ turn clockwise (to the right). There are 2 options for connecting it to your inflation source: Tire valve stem: If your inflation source has a tip like you use on car tires, use Tire Valve Stem adapter provided. Universal adapter: If your inflation source has another type of universal tip, remove the Tire Valve from the clear plastic tube on the Fill Adapter and check that the universal tip fits snugly. Insert into Inflation Port on Tube Twist to Lock Universal Adapter Tire Valve Stem fig. 3 Inflating the Flotation Tubes: 1. Twist and remove the locking cap (fig.2) on the end of each tube. Check to be sure the valve stem is in the up position (See directions above.) 2. Insert the large end of the Fill Adapter (fig.3) into the tube inflation port, twist it clockwise (right) to lock in place and start filling the tubes. 3. Partially inflate tubes and assemble Dog-On Water Ramp™ as instructed on page 1. (NOTE: As a precaution prior to inflation, you might unzip each tube and confirm that the bladder has not shifted during factory deflation and packing; and again after your seasonal or long term storage). Check the deck and the mesh ramp position on the tubes; and rotate tubes slightly, as required, to ensure that the mesh lies flat (where attached under the platform) and will be able to hang straight down from sides when tubes are fully inflated. 4. Continue inflation until the tubes feel very firm and tight, with no wrinkles, and then tighten the straps around the tubes so that they will not be able to rotate. (Do not over-inflate the tubes!) 5. Remove the Fill Adapter and replace the Locking Cap over the valve stem of the Inflation Port. This will protect the valve and keep it clean. Additional Inflation Notes: Changes in elevation, air temperature and excessive exposure to direct sunlight can have an effect on the air pressure in the tubes. Check the tubes occasionally and release or add air pressure as required. Page 2 – June 2011 Attaching the Dog-On Water Ramp™ to Your Boat or Dock Tie a large simple knot on one end of each of 2 lines (not provided). From the bottom of the deck, slip each rope through the corner holes on the top ridge. Float the ramp and lash the rope ends to any available, secure location; cleat, pole, rail, post, ladder, etc. For greater overall stability, the 2 ropes should be tied at points a couple of feet apart – rather than, for example, to a single cleat or rail. In addition, since the unit floats independently, the leading edge of the Platform / Deck should be tight against whatever it is attached to. Usage and Maintenance The Dog-On Water Ramp™ is designed for recreational usage by dogs and should provide several seasons of enjoyment. We highly recommend taking the Dog-On Water Ramp™ out of the water between uses and hosing or washing it to remove residual salt water, chlorine/chemically treated pool water, algae, corrosive chemicals, etc. The Traction Mat is designed for wet areas but should be allowed to dry between uses. If the Dog-On Water Ramp™ is to be used as a safety device and left in the water for extended periods, the prolonged contact with salt water, algae, chlorine or residual petroleum products may cause some of the components to start breaking down prematurely. For these situations, spare parts are available so that the affected pieces can be replaced without requiring the purchase of a whole new unit. (Minor repairs and additional reinforcement for heavy-duty applications can also be done, for reasonable fees, at your local tailor or sail shop.) Training Some dogs take to Dog-On Water Ramp™ naturally, showing you how it is done. But if your pal needs a little help: Tie a length of line, about 15 feet long, to a retrieving toy. While holding on to one end of the line, toss the toy into the water about 5 feet in front of the mesh ramp of the Dog-On Water Ramp™. Dogs are usually eager to get wet without much encouragement. (Your dog can also be trained to safely enter the water by going off the Platform / Deck and between the flotation tubes.) Wait until your dog gets near the toy and then simply guide him/her by pulling the retrieving toy between the tubes and towards the platform deck. Questions We would be happy to assist with assembly or installation questions. Please first call or email the retail outlet where you purchased your Dog-On Water Ramp™. If further assistance is required, please contact Bear Brained Ideas, Inc.; [email protected] . Returns ALL returns must be coordinated through - and authorized by - the retail store or internet merchant where your Dog-On Water Ramp™ was purchased. Prior to returning, contact that retailer for ‘Return Authorization’ and any additional policies and instructions. Your Dog-On Water Ramp™ may be returned new, unused and in original packaging within 30 days of receipt; a credit will be issued (less the original shipping charges). If the unit is returned directly to Bear Brained Ideas, a restocking fee of 15% will be imposed. If products show any sign of use or wear, a higher restocking fee may be imposed. Returns requested of a retailer will be at the retailer/merchant’s discretion, subject to their policies & terms. DOG-ON WATER RAMP™ is patented by Bear Brained Ideas, Inc. Page 3 – June 2011 Bear Brained Ideas, Inc. Dog-On Water Ramp™ One (1) Year Limited Warranty Bear Brained Ideas, Inc. warrants to the original purchaser of this product herein registered, to perform according to the designed functions for a period of one year from the original date of purchase. The Dog-On Water Ramp™ is designed and engineered FOR DOG USE ONLY. This warranty applies ONLY to repair or replacement of any supplied or manufactured part(s) of this product that, upon inspection by Bear Brained Ideas, Inc or its product manufacturer, Buck’s Bags, proves to have failed in normal use due to defects in materials or workmanship. Bear Brained Ideas, Inc. will determine whether to repair or replace the unit or component. This Warranty does not apply to installation or associated expenses onto any boat or any other structure. There is NO WARRANTY on the TRACTION MAT that may have been supplied with the unit. This warranty shall NOT apply if it is shown by Bear Brained Ideas, Inc. or its product manufacturer, Buck’s Bags, that the defect(s) was caused by damage resulting from misuse, abuse, neglect or failure to follow the instructions for set-up and installation. This warranty also does NOT cover any modifications to the original product or to any structure to which the Dog-On Water Ramp™ has been attached. Bear Brained Ideas, Inc.’s sole responsibility is as set forth above. BEAR BRAINED IDEAS, INC. SHALL NOT BE LIABLE FOR ANY CONSEQUENTIAL OR INCIDENTAL DAMAGES (such as damage to a boat or other such structure or injury to any animal or person) RESULTING FROM ANY BREACH OF WARRANTY, EXPRESSED OR IMPLIED, APPLICABLE TO THIS PRODUCT. Since some states do not allow the exclusion of limitation of consequential or incidental damages, this limitation may not apply. If this product needs service please contact the seller for instructions. Bear Brained Ideas, Inc. is not responsible for any transportation charges incurred with the return of this product. Bear Brained Ideas, Inc. assumes no responsibility for warranties either expressed or implied beyond that which is contained herein. Since some states do not allow a limit on implied warranties, this limitation may not apply to you. This warranty gives you specific legal rights and you may also have other rights, which vary from state to state. Dog-On Water Ramp™ is patented by Bear Brained Ideas, Inc. June 2011