1
Spectrum™ Technology Platform
Version 9.0
Installation Guide for Windows
Contents
Chapter 1: System Requirements......................................................................5
Server Requirements............................................................................................6
Client Tools Requirements...................................................................................7
Client SDK Requirements.....................................................................................7
Supported Compilers....................................................................................7
SAP and Siebel Support.....................................................................................10
Chapter 2: Installing the Server.......................................................................11
Upgrading from a Previous Version..................................................................12
Installing a New Server.......................................................................................12
License Keys and Access Keys.........................................................................13
Installing a License Key..............................................................................14
Installing an Access Key.............................................................................14
Using the Silent Installer....................................................................................14
Adding Modules..................................................................................................15
Chapter 3: Installing Databases.......................................................................17
Installing the Address Now Module Database..................................................18
Installing the Advanced Matching Module Database.......................................18
Installing Data Normalization Module Databases............................................19
Installing Enterprise Geocoding Module Databases.......................................20
International Geocoding Databases...........................................................20
U.S. Geocoding Databases........................................................................20
U.S. Reverse Geocoding Databases..........................................................21
Points Databases (U.S. Only).....................................................................21
Early Warning System (U.S. Only).............................................................22
Installing Enterprise Routing Module Databases.............................................22
Installing Enterprise Tax Module Databases....................................................22
Installing Master Files, Taxware, Vertex, and Boundary Files....................22
Installing Florida Format Files....................................................................23
Installing TS-158 Format Files....................................................................24
Installing the GeoTAX Auxiliary File...........................................................24
Installing a User Auxiliary File....................................................................24
Installing Payroll Tax Correspondence Files...............................................25
Installing the Global Sentry Module Database.................................................25
Installing Location Intelligence Module Databases.........................................27
Installing Universal Addressing Module Databases........................................27
Installing Validate Address Global Databases............................................27
Installing Validate Address Loqate Databases...........................................28
Installing Universal Name Module Databases..................................................28
Using the Database Silent Installer...................................................................29
Chapter 4: Installing the Client Tools..............................................................31
Installing the Client Tools...................................................................................32
Chapter 5: Installing the Client API.................................................................33
Installing the Client API......................................................................................34
Chapter 6: Removing Spectrum Technology Platform..................................35
Removing the Server..........................................................................................36
Removing the Client Tools.................................................................................36
Removing the Client API.....................................................................................36
Chapter 7: Configuring SAP and Siebel..........................................................37
Configuring SAP..................................................................................................38
Import Dataflow Files..................................................................................38
Import .SAR Files.......................................................................................39
Configure the SAP GUI..............................................................................39
Configure SAP Web Dynpro.......................................................................43
Configure SAP ICWC.................................................................................44
Configuring French Address Validation......................................................45
Configuring Siebel..............................................................................................45
Import Dataflow Files..................................................................................45
(Optional) Verify the Geocoding Database Resource Name......................46
Integrate Spectrum™ Technology Platform with Siebel..............................47
Chapter 8: Support............................................................................................65
Technical Support...............................................................................................66
Documentation....................................................................................................66
Blog.......................................................................................................................66
4
Spectrum™ Technology Platform 9.0
System Requirements
In this section:
•
•
•
•
Server Requirements . . . . . . . . . . . . . . . . . . . . . . . . . . . . . .6
Client Tools Requirements . . . . . . . . . . . . . . . . . . . . . . . . . .7
Client SDK Requirements . . . . . . . . . . . . . . . . . . . . . . . . . .7
SAP and Siebel Support . . . . . . . . . . . . . . . . . . . . . . . . . . .10
1
Server Requirements
Server Requirements
Operating Systems
• Windows Server 2003
• Windows Server 2008 R2
1
• Windows Server 2012
64-bit Required
The server requires a 64-bit system. 32-bit systems are not supported.
Disk Space
New Installation
Upgrade
• 3 GB to install all modules, less if installing fewer • Free disk space equal to three times the size of
modules.
your current installation. To determine the size
of your current installation, look at the size of the
• 2 GB to 3 GB of temp space for the installation
folder where you installed Spectrum™
to extract the files it needs, but you may need
Technology Platform.
more depending on the options you are installing.
If necessary, modify your TEMP environment
• If you are adding modules as part of your
variable to point to a location with enough space.
upgrade, you will need 3 GB to install all
modules, less if installing fewer modules.
• 2 GB to 3 GB of temp space for the installation
to extract the files it needs, but you may need
more depending on the options you are installing.
If necessary, modify your TEMP environment
variable to point to a location with enough space.
Note: If you are installing a module that uses a reference database, such as a postal database,
geocoding database, or data normalization tables, you will need space for this data. The total
disk space varies, depending on what modules(s) and what database(s) you are installing.
Memory
• Basic memory requirement: 2 GB
• The Enterprise Geocoding Module requires an additional 500 MB memory for the first non-U.S.
geocoder, and 250 MB for each additional non-U.S. geocoder, with these exceptions:
• Germany, Australia, and the U.K. each require 1 GB additional memory
• Japan requires 2 GB additional memory
Note that you may distribute processing among multiple servers which may allow you to take advantage
of existing hardware instead of adding memory to a single Spectrum™ Technology Platform server.
This is referred to as remote server processing. For information on remote servers, see the Spectrum™
Technology Platform Dataflow Designer Guide.
• The Data Normalization Module and Universal Name Module require additional memory if you use
the following name databases:
• Arabic Plus Pack: 5.5 GB
• Asian Plus Pack - Chinese: 32 MB
1
6
The Enterprise Tax Module is not supported on this operating system.
Spectrum™ Technology Platform 9.0
Chapter 1: System Requirements
• Asian Plus Pack - Japanese: 1.6 GB
• Asian Plus Pack - Korean: 8 MB
• Core Names: 1.1 GB
Note: The Arabic Plus Pack and Asian Plus Pack databases are only supported on 64-bit computers.
Additional Requirements
• Administrator rights
Client Tools Requirements
Enterprise Designer, Management Console, and Interactive Driver require the following:
• Operating system requirements:
• Windows XP
• Windows 7
• 86 MB of disk space to install the client without any modules. Each module you install requires additional
disk space.
• Microsoft .NET Framework 4.0 (available from the Spectrum™ Technology Platform Welcome Page,
http://<SpectrumServerName>:8080)
• A monitor with at least 1024 x 768 resolution
• Maximum Windows DPI setting: 150%
• Adobe Reader 7 or later (for viewing and saving reports)
• To use the Business Steward Portal or the Data Hub Relationship Analysis Client, a browser with
Microsoft Silverlight 5 installed. See www.microsoft.com/getsilverlight.
Client SDK Requirements
The Client SDK provides API access to Spectrum™ Technology Platform services. If you are a developer
and you want to use the Client SDK, your computer must meet the following requirements:
• Disk space—1.25 GB
• JDK 1.7 is required to install the Client SDK. Be sure that JDK 1.7 is in the PATH environment variable.
Once installed, the Client SDK supports JDK 1.4 and greater.
• iSeries platforms support the Client SDK in Java only
Supported Compilers
The Spectrum™ Technology Platform Client SDK is supported with the following compiler and runtime
minimum versions.
Java
Client SDK Package Directory: clientSDK/platforms/java
Client SDK requires the Java JDK, version 1.4 or higher. This is not installed with the Client SDK.
Installation Guide for Windows
7
Client SDK Requirements
Windows
•
•
•
•
•
JDK: 1.4
C Compiler: MSVC 6.0 SP3, MSVC 2003, MSVC 2005
C++ Compiler: MSVC 6.0 SP3, MSVC 2003, MSVC 2005
C# .NET: Microsoft .NET Framework 1.1
Visual Basic: MS Visual Basic 6.0
HP-UX RISC
• JDK: 1.4
• C Compiler: cc: HP92453-01 A.11.01.21 HP C (Bundled) Compiler
• C++ Compiler: aCC: HP aC++ B3910B A.03.30 HP aC++ B3910B A.03.27
The clientSDK 32 bit lib is linked to the following libraries:
•
•
•
•
libpthread.1
librt.2
libnsl.1
libxti.2
The clientSDK 64 bit lib is linked to the following libraries:
•
•
•
•
•
•
•
libpthread.1
libnsl.1
librt.2
libdl.1
libc.2
libxti.2
libdl.1
HP-UX Itanium
• JDK: 1.4
• C Compiler: cc: HP aC++/ANSI C B3910B A.06.05
• C++ Compiler: aCC: HP aC++/ANSI C B3910B A.06.05
The clientSDK 32 bit lib is linked to the following libraries:
•
•
•
•
•
libpthread.so.1
libnsl.so.1
librt.so.1
libxti.so.1
libdl.so.1
The clientSDK 64 bit lib is linked to the following libraries:
•
•
•
•
•
libpthread.so.1
libnsl.so.1
librt.so.1
libxti.so.1
libdl.so.1
Red Hat (32 bit)
• Operating System: Red Hat Linux 2.4.9-e.65smp
• C Compiler: gcc version 2.96 (gcc 4.1 required for the Address Now Module)
• C++ Compiler: g++ version 2.96
8
Spectrum™ Technology Platform 9.0
Chapter 1: System Requirements
The clientSDK lib is linked to the following libraries:
•
•
•
•
libstdc++-libc6.2-2.so.3
libm.so.6
libc.so.6
ld-linux.so.2
Red Hat (64 bit)
• Operating System: Red Hat Linux version 2.6.9-34.0.2.ELsmp
• C Compiler: gcc version 3.4.5
• C++ Compiler: g++ version 3.4.5
The clientSDK lib is linked to the following libraries:
•
•
•
•
•
•
libstdc++.so.6
libm.so.6
libgcc_s.so.1
libpthread.so.0
libc.so.6
ld-linux-x86-64.so.2
SuSE
• Operating System: SuSE SLES 8 (powered by UnitedLinux 1.0) (i586)\nKernel 2.4.21-295-smp (0).
• C Compiler: gcc version 3.2.2
• C++ Compiler: g++ version 3.2.2
The clientSDK lib (32 bit) is linked to the following libraries:
•
•
•
•
•
libstdc++.so.5
libm.so.6
libgcc_s.so.1
libc.so.6
ld-linux.so.2
Solaris
• Operating System: Solaris 5.8
• C Compiler: cc: Forte Developer 7 C 5.4 2002/03/09
• C++ Compiler: CC: Forte Developer 7 C++ 5.4 Patch 111715-16 2005/04/28
The clientSDK 32 bit lib is linked to the following libraries:
•
•
•
•
•
•
•
•
•
libpthread.so.1
libsocket.so.1
libnsl.so.1
librt.so.1
libc.so.1
libdl.so.1
libmp.so.2
libaio.so.1
libc_psr.so.1
The clientSDK 64 bit lib is linked to the following libraries:
• libpthread.so.1
• libsocket.so.1
Installation Guide for Windows
9
SAP and Siebel Support
•
•
•
•
•
•
•
•
•
•
•
•
libnsl.so.1
librt.so.1
libc.so.1
libmp.so.2
libmd5.so.1
libscf.so.1
libaio.so.1
libdoor.so.1
libuutil.so.1
libm.so.2
libc_psr.so.1
libmd5_psr.so.1
AIX
• Operating System: AIX version 5.1.0.0
• C Compiler: xlc 6.0 Visual Age C 6.0
• C++ Compiler: xlC 6.0 Visual Age C++ 6.0
The clientSDK 32 bit and 64 bit lib are linked to the following libraries:
•
•
•
•
libC.a
libc_r.a
libpthread.a
librtl.a
SAP and Siebel Support
As of this release the following versions of SAP and Siebel are no longer supported:
SAP ECC 5.0
Siebel Enterprise 7.8
Siebel Industry 7.8
This release of Spectrum™ Technology Platform supports the following versions of SAP and Siebel:
SAP CRM 6.0
SAP CRM 7.0 EHP 2
SAP ECC 6.0 EHP 6
SAP Web DynPro Java 7.01
Siebel Business 8.0
Siebel Business 8.1.1
Siebel Industry 8.0
Siebel Industry 8.1.1
10
Spectrum™ Technology Platform 9.0
Installing the Server
In this section:
•
•
•
•
•
Upgrading from a Previous Version . . . . . . . . . . . . . . . . .12
Installing a New Server . . . . . . . . . . . . . . . . . . . . . . . . . . . .12
License Keys and Access Keys . . . . . . . . . . . . . . . . . . . .13
Using the Silent Installer . . . . . . . . . . . . . . . . . . . . . . . . . .14
Adding Modules . . . . . . . . . . . . . . . . . . . . . . . . . . . . . . . . .15
2
Upgrading from a Previous Version
Upgrading from a Previous Version
Important: Before upgrading, be sure to read the release notes for the new version. The release notes
contain important compatibility information as well as supported upgrade paths.
1. Download the updated version of Spectrum™ Technology Platform using the download instructions
contained in the release announcement email.
2. Stop the Spectrum™ Technology Platform server. To stop the server, right-click the Spectrum™
Technology Platform icon in the Windows system tray and select Stop Server. Alternatively, you
can use the Windows Services control panel and stop the Pitney Bowes Spectrum™ Technology
Platform service.
3. If you have the Address Now Module installed, shut down the Address Now server by going to the
Windows services control panel and stopping the Address Now Server service.
4. If you have the Global Sentry Module installed, shut down the Global Sentry server by going to the
Windows services control panel and stopping the Global Sentry Database Server service.
5. The files in the folder <SpectrumPlatformLocation>\server will be deleted. Before upgrading,
review the files and folders in this location and back up any files you have modified. If you are installing
the Siebel or SAP modules, be sure to back up existing dataflows, especially any that are customized.
6. If you want to change the location where Spectrum™ Technology Platform is installed, uninstall the
existing Spectrum™ Technology Platform installation first. For instructions on uninstalling, see
Removing Spectrum Technology Platform on page 35.
7. Run the Spectrum™ Technology Platform installer to upgrade your system.
Note: Any job or subflow stored in the system during a server upgrade is marked as exposed to provide
the same behavior for those jobs and subflows as before the upgrade. Any job or subflow that
is exported prior to the upgrade will not be exposed. Therefore, when importing these jobs or
subflows back into the system, you must manually expose the imported job or subflow.
Installing a New Server
Before installing Spectrum™ Technology Platform, be sure to read the release notes. The release notes
contains important compatibility information as well as release-specific installation notes.
Note: You may encounter installation problems on Windows if the data execution prevention (DEP)
setting is not set correctly. The DEP setting must be set to Turn on DEP for essential Windows
programs and services only. For instructions on how to change your DEP setting, see the
Windows documentation.
1. Download Spectrum™ Technology Platform using the download instructions contained in your welcome
letter.
2. Extract the downloaded file to a temporary location on the server where you want to install Spectrum™
Technology Platform.
3. Double-click the file install.exe.
4. The installer walks you through the installation process.
• When prompted, select the modules that you want to install.
• Make sure that Spectrum™ Technology Platform is selected.
• If you are installing the SAP Module you must install these modules: Address Now Module and
Advanced Matching Module. The Enterprise Tax Module is optional. The Universal Addressing
Module is only required if you will be using the SAP module service
SAPValidateAddressWithCandidates.
• If you are installing the Siebel Module you must install these modules: Advanced Matching
Module, Data Normalization Module, and Universal Name Module You may need to install
12
Spectrum™ Technology Platform 9.0
Chapter 2: Installing the Server
one or more of these modules depending on the features you have licensed: Address Now
Module, Enterprise Geocoding Module, and Universal Addressing Module.
• When prompted, enter the HTTP port that you want to use and then press Enter. The default is
8080. For a complete listing of ports used by Spectrum™ Technology Platform see System
Requirements on page 5.
• If you have access keys, enter them when prompted. Enter one key per line. Note that access keys
are case sensitive. If you do not have access keys, leave the field blank. Most users do not have
access keys and instead have license keys.
Note: Access keys expire 21 days after receipt.
5. After the installation completes, the Spectrum™ Technology Platform server starts automatically.
Wait for the server to start up.
You can see when the server has stared up by opening the log file <Spectrum Installation
Location>\server\app\repository\logs\wrapper.log and looking for this message:
INFO [Server] Pitney Bowes Spectrum(TM) Technology Platform (Version
version build) Started
Important: Do not attempt to stop the server until after it has fully started for the first time. Stopping
the server before it performs an initial startup can cause your installation to become
unusable.
6. Install your license key. For instructions, see Installing a License Key on page 14.
License Keys and Access Keys
License keys and access keys grant access to the software and data you have licensed. They are part
of a license management system that enables Pitney Bowes Software to administer agreements with
you and with data providers. The license management system monitors transaction counts, term limits,
and regulatory compliance. Failure to adhere to license restrictions may result in the disabling of the
product until compliance is achieved.
Typically you will use a license key, but in some situations you may be given an access key. The
differences between a license key and an access key are shown in the following table.
Table 1: Comparison of License Keys and Access Keys
Purpose
Format
Installation Method
License Key
Provides long-term
An encrypted XML
access to software
document with a file
pursuant to the terms of name ending in .key.
your license.
The .key file is copied
to a folder on the
Spectrum™ Technology
Platform server.
Access Key
Provides temporary
access to the software.
Most customers do not
use access keys.
The access key is
entered during the
installation process by
manually typing in the
access key or by
importing them from a
text file. Access keys can
also be installed using
the access key installer
utility.
Installation Guide for Windows
A string of 17 to 21
characters (for example,
01-2199949494-XXX or
06-2199949494-YYY/ZZZ).
13
Using the Silent Installer
Installing a License Key
A license key provides access to your software pursuant to the terms of your license.
Note: When you upgrade an existing Spectrum™ Technology Platform installation, you may continue
to use your existing license key. You do not need to get a new one.
To install a license key:
1. Locate the email containing your license key that you received from Pitney Bowes Software.
Important: You must install the license key within 45 days of receiving it. If you do not you will need
to contact Pitney Bowes Software for another license key.
2. Copy the .key file to the following directory:
<SpectrumPlatformLocation>\server\app\import
The license key is applied to your system. There is no need to restart your server.
If there was a problem installing the license key, check the log file in:
<SpectrumPlatformLocation>\server\app\repository\logs
Depending on whether the key was processed successfully or there was an error processing the key,
the processed key goes into one of these folders:
• <SpectrumPlatformLocation>\server\app\import\archive\license-keys
• <SpectrumPlatformLocation>\server\app\import\error\license-keys
Installing an Access Key
An access key provides temporary access to the software. Most customers do not use access keys.
However, if you have been given an access key there are two ways to install it:
• During the installation process when prompted
• After the installation process using the Access Key Installer utility
Note: Access keys expire 21 days after receipt.
The following procedure describes how to use the Access Key Installer utility to install access keys.
1. Select Start > Programs > Pitney Bowes > Spectrum™ Technology Platform > Server > Access
Key Installer.
2. Enter the access keys.
3. Click Install.
4. Click Exit when the installation is complete.
Using the Silent Installer
The silent install process allows you to pre-configure the installation process so that it runs without user
intervention. Instead of the user responding to prompts from the installation process for information such
as the installation location and which modules to install, you specify these responses in a properties file
which the installer uses instead of user prompts.
1. In the Spectrum™ Technology Platform installer, browse to the SilentInstaller folder.
2. Open the file installer.properties in a text editor.
3. Edit installer.properties as necessary to specify the installation settings you want to use.
See the comments in installer.properties for additional information.
14
Spectrum™ Technology Platform 9.0
Chapter 2: Installing the Server
4. To run the installer in silent mode, place installer.properties in the same directory as install.exe.
When the installer executes it will detect installer.properties and automatically run in silent
mode.
Alternatively, you can place installer.properties in different directory and give the absolute
path to the property in the command prompt using the -f argument, as follows:
install.exe -f %PathOfPropertyFile%\installer.properties
Adding Modules
Spectrum™ Technology Platform is designed so that modules can be added as you grow your system
over time. For example, you may have one Spectrum™ Technology Platform module and then license
another module a few months later. The second product may be built on a newer version of Spectrum™
Technology Platform. This will require you to upgrade your version of Spectrum™ Technology Platform.
In another case, the second product is compatible with the installed version. In both cases, the install
program recognizes if it needs to upgrade Spectrum™ Technology Platform and will do so without
prompting. If an upgrade is not required, the installer will skip the Spectrum™ Technology Platform install
steps and install the new module.
The process for adding a module is similar to that of a new installation. In both cases you start the
installation process by running the Spectrum™ Technology Platform installer. Note that Spectrum™
Technology Platform modules do not have their own installer. Instead, you use the Spectrum™ Technology
Platform installer to add modules.
1. If the Spectrum™ Technology Platform server is running, stop the server. To stop the server, right-click
the Spectrum™ Technology Platform icon in the system tray (shown below) and select Stop Server.
2. Launch the Spectrum™ Technology Platform installer by double-clicking Install.exe. The installer
walks you through the installation process.
• Select the modules that you want to install. Your currently installed modules are selected.
• If you have access keys, enter them when prompted. Enter one key per line. Note that access keys
are case sensitive. If you do not have access keys, leave the field blank. Most users do not have
access keys. They provide temporary access to the features you have licensed.
3. Install any necessary databases for the new product. For more information on installing databases,
see Installing Databases on page 17.
4. After you install the necessary databases (if any), start Spectrum™ Technology Platform by
right-clicking the Spectrum™ Technology Platform icon in the system tray and selecting Start Server.
5. Install the license key for the module. For instructions, see Installing a License Key on page 14.
Installation Guide for Windows
15
Installing Databases
After you have installed the server you need to install the databases that support
the module(s) you have installed. Databases provide the information that
Spectrum™ Technology Platform modules use to process data, such as postal
address data, name data, or geospatial data. For example, if you have installed
the Enterprise Geocoding Module, you will need to install databases that contain
geospatial data; if you have installed the Universal Addressing Module, you will
need to install databases that contain postal data.
In this section:
•
•
•
•
•
•
•
•
•
•
•
Installing the Address Now Module Database . . . . . . . . .18
Installing the Advanced Matching Module Database . . .18
Installing Data Normalization Module Databases . . . . . .19
Installing Enterprise Geocoding Module Databases . . . .20
Installing Enterprise Routing Module Databases . . . . . .22
Installing Enterprise Tax Module Databases . . . . . . . . . .22
Installing the Global Sentry Module Database . . . . . . . . .25
Installing Location Intelligence Module Databases . . . . .27
Installing Universal Addressing Module Databases . . . .27
Installing Universal Name Module Databases . . . . . . . . .28
Using the Database Silent Installer . . . . . . . . . . . . . . . . . .29
3
Installing the Address Now Module Database
Installing the Address Now Module Database
1. Copy the liclcs.sbi license file provided by Pitney Bowes Software into the following directory:
<SpectrumPlatformLocation>\server\modules\anow\license.
2. Make sure no applications are running.
3. Stop Spectrum™ Technology Platform. To do this, right-click the Spectrum™ Technology Platform
icon in the system tray and select Stop Server.
4. Insert the database DVD containing the database(s) you want to install.
Note: You must install the Postal databases if you want to use the Enhanced databases.
5. Select Start > Programs > Pitney Bowes > Spectrum™ Technology Platform > Modules >
Address Now Module > Address Now Data Loader.
6. The installation wizard guides you through the rest of the process.
Note: The installation location for the Address Now directory defaults to
<SpectrumPlatformLocation>\server\modules\anow. Do not change this path or
the database will not install correctly.
Note: When prompted for the location of the Installation Media Directory, be sure to select the
directory on the database DVD that contains the kbase folder.
Note: You may install databases on a mapped drive, but performance will be affected since you
will be accessing them on a network rather than accessing them locally.
7. When the Data Loader is finished, start the Address Now server by going to Control Panel >
Administrative Tools > Services. Right-click the Address Now Server service and select Start.
8. After the database installed, start Spectrum™ Technology Platform. To do this, right-click the
Spectrum™ Technology Platform icon in the system tray and select Start Server.
Installing the Advanced Matching Module Database
The Advanced Matching Module provides a load utility to install databases. The database files that you
install depend on the databases you have licensed.
Note: To install the Advanced Matching Module databases on Windows Server 2008 you need
administrator privileges.
1. Make sure no applications are running.
2. Stop Spectrum™ Technology Platform. To do this, right-click the Spectrum™ Technology Platform
icon in the system tray and select Stop Server.
3. Insert the database DVD or download the database from the technical support web site,
www.g1.com/support.
Note: If you download the database from the web site, it will be downloaded as a zip file. Unzip the
database before proceeding with the installation.
4. Select Start > Programs > Pitney Bowes > Spectrum™ Technology Platform > Modules >
Universal Name and Advanced Matching Modules > Database Load Utility.
5. Follow the prompts during the rest of the installation process.
Note: You may install databases on a mapped drive, but performance will be affected since you
will be accessing them on a network rather than accessing them locally.
6. Open the file <SpectrumDirectory>\server\bin\wrapper\wrapper.conf in a text editor.
18
Spectrum™ Technology Platform 9.0
Chapter 3: Installing Databases
7. Increase the Java settings for initial heap size (wrapper.java.initmemory) and maximum heap
size (wrapper.java.maxmemory) to reflect the total amount of memory required for the Arabic
Plus Pack and Asian Plus Pack.
•
•
•
•
•
Arabic Plus Pack: 5.5 GB
Asian Plus Pack - Chinese: 32 MB
Asian Plus Pack - Japanese: 1.6 GB
Asian Plus Pack - Korean: 8 MB
Core Names: 1.1 GB
8. Save and close wrapper.conf.
9. Start Spectrum™ Technology Platform. To do this, right-click the Spectrum™ Technology Platform
icon in the system tray and select Start Server.
Installing Data Normalization Module Databases
The Data Normalization Module provides a load utility to install databases for the Advanced Transformer,
Open Parser, and Table Lookup components. The database files that you install depend on the databases
you have licensed. Use this list of database tables to determine which files you should download and
install. For more information on the tables contained in each database, refer to the reference
documentation for each component.
Stage
Available Databases
Advanced Transformer
Data Normalization Module - Base Tables
Open Parser
•
•
•
•
•
Data Normalization Module - Base Tables
Core Names Database
Company Names Database
Arabic Plus Pack
Asian Plus Pack
Table Lookup
•
•
•
•
•
Data Normalization Module - Base Tables
Core Names Database
Arabic Plus Pack
Asian Plus Pack
ZREPLACE (Used by the SAP Module for French
address validation)
Note: To install the Data Normalization Module databases on Windows Server 2008 you need
administrator privileges.
1. Make sure no applications are running.
2. Stop Spectrum™ Technology Platform. To do this, right-click the Spectrum™ Technology Platform
icon in the system tray and select Stop Server.
3. Insert the database DVD or download the database from the technical support web site,
www.g1.com/support.
Note: If you download the database from the web site, it will be downloaded as a zip file. Unzip the
database before proceeding with the installation.
4. Select Start > Programs > Pitney Bowes > Spectrum™ Technology Platform > Modules > Data
Normalization Module > Database Load Utility.
5. Follow the prompts during the rest of the installation process.
Installation Guide for Windows
19
Installing Enterprise Geocoding Module Databases
Note: You may install databases on a mapped drive, but performance will be affected since you
will be accessing them on a network rather than accessing them locally.
6. Start Spectrum™ Technology Platform. To do this, right-click the Spectrum™ Technology Platform
icon in the system tray and select Start Server.
Installing Enterprise Geocoding Module Databases
This module has several databases. You may have one or more of these, depending on the features
you have licensed.
International Geocoding Databases
International geocoding databases contain the data necessary to perform geocoding and reverse
geocoding for locations outside the U.S. Each country has its own database, and some countries have
optional databases that provide enhanced geocoding.
Note: If you install multiple databases, install each database to a separate folder.
Note: To install the Enterprise Geocoding Module databases on Windows Server 2008 you need
administrator privileges.
1. Make sure no applications are running.
2. Download the database from the Pitney Bowes Software eStore using the link provided in the release
announcement or welcome email. You can also download the database from the technical support
web site, www.g1.com/support.
3. The database is downloaded as a zip file. Unzip the database before proceeding with the installation.
4. Run dbloader.exe.
5. Follow the prompts during the rest of the installation process.
Note: Do not install geocoding databases on a network drive. Doing so can cause performance
problems.
6. After you install the database files, use the Database Resource tool in the Management Console to
define the database as a resource. For more information, see the Administration Guide.
Note: If you installed the Australia Geocoded National Address File (G-NAF), you must specify the
GNAF123 and GNAF456 as separate paths but in the same database resource in the Management
Console.
If you install the Australia Geocoded National Address File (G-NAF), there will be two subfolders: GNAF123
and GNAF456. GNAF123 contains the point-level dictionary. This has the highest precision of geocoding
(characterized by Reliability Level 1, 2, or 3.) GNAF456 contains the remainder of address information
in G-NAF that does not meet high precision geocoding criteria (characterized by Reliability Level 4, 5,
or 6.) We recommend that you use both databases to validate the existence of addresses but only use
GNAF123 for parcel-level geocoding. If you do not require parcel-level geocodes you can use GNAF456
for geocoding.
U.S. Geocoding Databases
The U.S. geocoding databases contain the spatial data necessary to perform address standardization
and geocoding. You must install at least one of these databases.
• Centrus Enhanced Geocoding—This database consists of TIGER data provided by the U.S. Geological
Survey and address data provided by the U.S. Postal Service.
20
Spectrum™ Technology Platform 9.0
Chapter 3: Installing Databases
• TomTom Geocoding—This database provides more up-to-date data than the Centrus Enhanced
Geocoding database. It requires an additional license. The data is provided by TomTom, a third-party
provider of spatial data, and postal data from the U.S. Postal Service.
• NAVTEQ Geocoding—This database provides more up-to-date data than the Centrus Enhanced
Geocoding database. It requires an additional license. NAVTEQ data is provided by NAVTEQ, a
third-party provider of spatial data. For more information about these databases, contact your sales
representative.
• ZIP + 4 Centroid—This database provides only address standardization and ZIP + 4 centroid matching.
It does not provide street-level matching.
These databases use proprietary files called GSD files. For ZIP Code centroid matching, the files us.Z9
contains all the centroid info for all states and normally has a z9 extension.
Each geocoding database has an optional Statewide Intersections Index. The Statewide Intersection
Index is designed to enable fast intersection identification on a statewide basis. For example, the Statewide
Intersection Index will allow the database search for "1st and Main St, CO" and return a list of possible
matches in Colorado more quickly than searching the entire geocoding database for each instance of
the intersection.
Note: To install the Enterprise Geocoding Module databases on Windows Server 2008 you need
administrator privileges.
1. Make sure no applications are running.
2. Download the database from the Pitney Bowes Software eStore using the link provided in the release
announcement or welcome email. You can also download the database from the technical support
web site, www.g1.com/support.
3. The database is downloaded as a zip file. Unzip the database before proceeding with the installation.
4. Run DataSets.exe. The installation wizard guides you through the rest of the process.
Note: You may install databases on a mapped drive, but performance will be affected since you
will be accessing them on a network rather than accessing them locally.
5. After you install the database files, use the Database Resource tool in the Management Console to
define the database as a resource. For more information, see the Administration Guide.
U.S. Reverse Geocoding Databases
If you are licensed for Reverse Geocode US Location, you need additional data files called gsx files.
The data installation wizard prompts you to create these files. If you choose not to create these files you
must run the batchind utility after installing the geocoding database. This utility creates the reverse
geocoding files. This utility can be found in the folder where you installed the geocoding database.
Points Databases (U.S. Only)
Points databases contain data for locating the center of a parcel. These databases provides enhanced
geocoding accuracy for internet mapping, property and casualty insurance, telecommunications, utilities,
and others.
• Centrus Points—This database contains the data necessary to locate the center of a parcel or building.
It does not contain assessor's parcel number (APN) or elevation data.
• Centrus Elevation—This database contains the same data as Centrus Points, plus elevation data.
• Centrus Enhanced Points—This database contains the same data as Centrus Points, plus APN
data.
• Centrus Premium Points—This database contains the same data as Centrus Points, plus both APN
and elevation data.
• Centrus TomTom Points Database—The data in this database is provided by TomTom, a third-party
provider of spatial data.
Installation Guide for Windows
21
Installing Enterprise Routing Module Databases
Note: To install the Enterprise Geocoding Module databases on Windows Server 2008 you need
administrator privileges.
1. Make sure no applications are running.
2. Insert the database DVD or download the database from the technical support web site,
www.g1.com/support.
Note: If you download the database from the Pitney Bowes Software web site, it will be downloaded
as a zip file. Unzip the database before proceeding with the installation.
3. Run Setup.exe. The installation wizard guides you through the rest of the process.
Note: You may install databases on a mapped drive, but performance will be affected since you
will be accessing them on a network rather than accessing them locally.
4. After you install the database files, use the Database Resource tool in the Management Console to
define the database as a resource. For more information, see Spectrum™ Technology Platform
Administration Guide.
Early Warning System (U.S. Only)
The USPS provides free Early Warning System (EWS) data to prevent matching errors due to the age
of the address information in the .gsd files. The USPS creates a new EWS data set each week that you
can download from the USPS website (ribbs.usps.gov).
To install the Early Warning System (EWS) database rename the database file from OUT to EWS.txt
and place it in the same folder as the primary database.
Installing Enterprise Routing Module Databases
1. Make sure no applications are running.
2. Insert the database DVD or download the database from the technical support web site,
www.g1.com/support.
Note: If you download the database from the technical support web site, it will be downloaded as
a zip file. Unzip the database before proceeding with the installation.
3. Run dbloader.exe.
4. Follow the prompts during the rest of the installation process.
Note: You may install databases on a mapped drive, but performance will be affected since you
will be accessing them on a network rather than accessing them locally.
Installing Enterprise Tax Module Databases
Depending on the features you have licensed, you need to install one or more of these databases:
Installing Master Files, Taxware, Vertex, and Boundary Files
1. Download the database from the Pitney Bowes Software eStore using the link provided in the release
announcement or welcome email. You can also download the database from the technical support
web site, www.g1.com/support.
22
Spectrum™ Technology Platform 9.0
Chapter 3: Installing Databases
2. The database is downloaded as a zip file. Unzip the database before proceeding with the installation.
3. Select Start > Programs > Pitney Bowes > Spectrum™ Technology Platform > Modules >
Spectrum™ Technology Platform - Enterprise Tax Module > Database Load Utility.
4. Select the database you want to install:
• GeoTAX Master Files—The master files are the main data files used by the Enterprise Tax module.
They identify all geographic components associated with a street address, such as the
latitude/longitude, census tract, and block group. The GeoTAX master files are on the disc labeled
"GeoTAX Subscription."
• Boundary File—Boundary files provide additional data about locations of special tax districts:
Special Purpose Tax Districts (SPD.txb), Insurance Premium Tax Districts (IPD.txb), Payroll Tax
Districts (PAY.txb), and Personal Property Tax Districts (PTD.txb).
• Taxware® cross reference file—Select this option to install the Taxware® sales tax cross-reference
file. Sales tax cross-reference files allow you to use the Enterprise Tax module to determine tax
jurisdictions for a given address, then use Taxware® software to determine the sales tax rates for
those jurisdictions.
• Vertex® cross reference file—Select this option to install the Vertex® cross-reference file if you
obtained the file from Vertex. Sales tax cross-reference files allow you to use the Enterprise Tax
module to determine tax jurisdictions for a given address, then use Vertex® software to determine
the sales tax rates for those jurisdictions.
• PBBI Vertex® cross reference file—Select this option to install the Vertex® cross-reference file
supplied by Pitney Bowes Software.
5. In the Source directory or file field, specify the location of the database file you want to install.
6. In the Destination directory field, specify the location where you want to install the database file.
Note: You may install databases on a mapped drive, but performance will be affected since you
will be accessing them on a network rather than accessing them locally.
7. Click Next.
8. In Management Console, open the Enterprise Tax Module database resource tool and define a
database resource that includes the database you just installed. Be sure to update Assign GeoTAX
Info to use the new database resource.
Installing Florida Format Files
You can obtain the Florida format files from the Florida Department of Revenue. The Florida Department
of Revenue compiles the database based on county.
1. Download the files from the Florida website at: pointmatch.state.fl.us.
2. Unzip the downloaded files and transfer them to the server.
Note: Be sure to FTP your files in binary format.
3. Combine the county files into a single file if you downloaded more than one county. If you downloaded
the entire state list, you have approximately 67 files. You must combine all the files into one file.
4. Select Start > Programs > Pitney Bowes > Spectrum™ Technology Platform > Modules >
Spectrum™ Technology Platform - Enterprise Tax Module > Database Load Utility.
5. Select State supplied Florida format file.
6. In the Source directory or file field, specify the location of the database file you want to install.
7. In the Destination directory field, specify the location where you want to install the database file.
Note: You may install databases on a mapped drive, but performance will be affected since you
will be accessing them on a network rather than accessing them locally.
8. Click Next.
Installation Guide for Windows
23
Installing Enterprise Tax Module Databases
Installing TS-158 Format Files
The Federation of Tax Administrators (FTA) maintains a website with links to all data sources that use
the TS-158 format.
1. Download the files from: geotax.state.fl.us/dorPubIdx.jsp.
2. Unzip the downloaded files and transfer them to the Spectrum™ Technology Platform server.
3. State files are often broken up into individual county files. Combine all state and/or county files into
a single file.
4. Select Start > Programs > Pitney Bowes > Spectrum™ Technology Platform > Modules >
Spectrum™ Technology Platform - Enterprise Tax Module > Database Load Utility.
5. Select State supplied TS-158 format file.
6. In the Source directory or file field, specify the location of the database file you want to install.
7. In the Destination directory field, specify the location where you want to install the database file.
Note: You may install databases on a mapped drive, but performance will be affected since you
will be accessing them on a network rather than accessing them locally.
8. Click Next.
Installing the GeoTAX Auxiliary File
The GeoTAX Auxiliary file contains new addresses that have not yet been added to the Master File. It
provides the most up-to-date address data possible.
1. Download the database from the Pitney Bowes Software eStore using the link provided in the release
announcement or welcome email. You can also download the database from the technical support
web site, www.g1.com/support.
2. The database is downloaded as a zip file. Unzip the database before proceeding with the installation.
3. Select Start > Programs > Pitney Bowes > Spectrum™ Technology Platform > Modules >
Spectrum™ Technology Platform - Enterprise Tax Module > Database Load Utility.
4. Select GeoTAX auxiliary file.
5. In the Source directory or file field, specify the location of the database file you want to install.
6. In the Destination directory field, specify the location where you want to install the database file.
Note: You may install databases on a mapped drive, but performance will be affected since you
will be accessing them on a network rather than accessing them locally.
7. Click Next.
The program produces a database file called G1GTAX2 and G1GTAX2.vix. The Enterprise Tax
Module can now use the auxiliary file for matching.
8. In Management Console, open the Enterprise Tax Module database resource tool and define a
database resource that includes the database you just installed. Be sure to update Assign GeoTAX
info to use the new database resource.
Installing a User Auxiliary File
A user-defined auxiliary file contains addresses that override the results from master files in street-level
matching.
1. Select Start > Programs > Pitney Bowes > Spectrum™ Technology Platform > Modules >
Spectrum™ Technology Platform - Enterprise Tax Module > Database Load Utility.
2. Select User auxiliary file.
3. In the Source directory or file field, specify the location of the database file you want to install.
4. In the Destination directory field, specify the location where you want to install the database file.
24
Spectrum™ Technology Platform 9.0
Chapter 3: Installing Databases
Note: You may install databases on a mapped drive, but performance will be affected since you
will be accessing them on a network rather than accessing them locally.
5. Click Next.
6. The program creates the file G1GTAUX.
7. In Management Console, open the Enterprise Tax Module database resource tool and define a
database resource that includes the database you just installed. Be sure to update Assign GeoTAX
info to use the new database resource.
Installing Payroll Tax Correspondence Files
Payroll tax correspondence files, also called payroll tax cross-reference files, allow you to use third-party
software to determine the payroll tax rates for the tax jurisdictions returned by Assign GeoTAX Info.
1. Download the database from the Pitney Bowes Software eStore using the link provided in the release
announcement or welcome email. You can also download the database from the technical support
web site, www.g1.com/support.
2. The database is downloaded as a zip file. Unzip the database before proceeding with the installation.
3. Select Start > Programs > Pitney Bowes > Spectrum™ Technology Platform > Modules >
Spectrum™ Technology Platform - Enterprise Tax Module > Database Load Utility.
4. Select Payroll tax correspondence file.
5. In the Source directory or file field, specify the location of the database file you want to install.
6. In the Destination directory field, specify the location where you want to install the database file.
Note: You may install databases on a mapped drive, but performance will be affected since you
will be accessing them on a network rather than accessing them locally.
7. Click Next.
8. The program produces a database files called G1GTPTC and G1GTPTC.vix.
9. In Management Console, open the Enterprise Tax Module database resource tool and define a
database resource that includes the database you just installed. Be sure to update Assign GeoTAX
info to use the new database resource.
Installing the Global Sentry Module Database
The following databases are required to run Global Sentry in real-time mode:
• globalsentrydb.script
• globalsentrydb.properties
The following databases are required to run Global Sentry in batch mode:
•
•
•
•
•
•
globalsentrydb.script
globalsentrydb.properties
globalsentrydb.addresses.csv
globalsentrydb.fullnames.csv
globalsentrydb.ids.csv
globalsentrydb.names.csv
In addition, you must install the Data Normalization Module databases to use Global Sentry. For
instructions, see Installing Data Normalization Module Databases on page 19.
1. Open the Windows services control panel and stop the service Global Sentry Database Server.
2. Stop Spectrum™ Technology Platform. To do this, right-click the Spectrum™ Technology Platform
icon in the system tray and select Stop Server.
Installation Guide for Windows
25
Installing the Global Sentry Module Database
3. Insert the database DVD or download the database from the technical support web site,
www.g1.com/support.
Note: If you download the database from the Pitney Bowes Software web site, it will be downloaded
as a zip file. Unzip the database before proceeding with the installation.
4. Select Start > Programs > Pitney Bowes > Spectrum™ Technology Platform > Modules > Global
Sentry Module > Database Load Utility.
5. Follow the prompts during the rest of the installation process.
Note: You may install databases on a mapped drive, but performance will be affected since you
will be accessing them on a network rather than accessing them locally.
6. Start Spectrum™ Technology Platform. To do this, right-click the Spectrum™ Technology Platform
icon in the system tray and select Start Server.
7. Open the Windows services control panel and start the service Global Sentry Database Server.
8. After installing the Global Sentry Module database, you must configure a JDBC connection in the
Spectrum™ Technology Platform Management Console. Go to Start > Settings > Control Panel >
Administrative Tools > Services to verify that the Global Sentry Database is running.
9. Open Management Console by clicking Start > Programs > Pitney Bowes > Spectrum™
Technology Platform > Client Tools > Management Console.
10. Under Resources, select JDBC Drivers.
11. Click Add.
12. Type the JDBC properties in the applicable text box:
• JDBC driver configuration name: HSQLDB
• JDBC driver class name: org.hsqldb.jdbcDriver
• Connection string template: jdbc:hsqldb:hsql://${host}:${port}/${instance}
13. Add the following driver file:
file:<SpectrumPlatformLocation>/GlobalSentryDatabase/lib/hsqldb.jar
14. Add the following Connection properties:
a) Click Add. In the JDBC Connection property dialog box, type "Password" in both the Label and
the Property Token fields and click OK.
b) Click Add. In the JDBC Connection property dialog box type "User" in the Label and the Property
Token fields and click OK.
15. Click OK.
16. Under Resources, click Connections.
17. Click Add.
18. Define the following connection properties:
• Connection name: Global Sentry
• Database driver: select the HSQLDB JDBC driver that you created in the previous steps.
19. Enter the following values in the Connection Properties dialog box:
•
•
•
•
•
user: sa
password: <there is no password>
host: localhost or <your server name>
port: 9001
instance: globalsentrydb
20. Click Test to verify the connection works.
21. Click OK, then click OK again.
26
Spectrum™ Technology Platform 9.0
Chapter 3: Installing Databases
Installing Location Intelligence Module Databases
1. Place the data on the file system, or install the data into a database.
2. Use the Named Connection and Named Table tools in the Location Intelligence Module section of
the Management Console to define the database resources. For more information, see the "Configuring
Database Resources" chapter of the Spectrum™ Technology Platform Administration Guide on
support.pb.com.
Installing Universal Addressing Module Databases
This procedure describes how to install databases used by Get Candidate Addresses, Get City State
Province, Get Postal Codes, Validate Address, and Validate Address AUS. For instructions on installing
databases used by Validate Address Global, see Installing Validate Address Global Databases on
page 27. For instructions on installing databases used by Validate Address Loqate, see Installing
Validate Address Loqate Databases on page 28.
Note: To install the Universal Addressing Module databases on Windows Server 2008 you need
administrator privileges.
1. Make sure no applications are running.
2. Download the database from the Pitney Bowes Software eStore using the link provided in the release
announcement or welcome email. You can also download the database from the technical support
web site, www.g1.com/support.
3. The database is downloaded as a zip file. Unzip the database before proceeding with the installation.
4. Select Start > Programs > Pitney Bowes > Spectrum™ Technology Platform > Modules >
Universal Addressing Module > Database Load Utility.
5. Follow the prompts during the rest of the installation process.
Note: You may install databases on a mapped drive, but performance will be affected since you
will be accessing them on a network rather than accessing them locally.
6. If you choose to install Residential Delivery Indicator, an optional database that you license directly
from the U.S. Postal Service, you are prompted for the nine-digit RDI table and the eleven-digit RDI
table. These are called rts.hs9 and rts.hs11, respectively, and they are provided by the U.S. Postal
Service.
Installing Validate Address Global Databases
This procedure describes how to install the databases used by the Validate Address Global stage. For
instructions on installing databases used by other Universal Addressing Module stages, see the
Spectrum™ Technology Platform Administration Guide.
1. Download the database from the Pitney Bowes Software eStore using the link provided in the release
announcement or welcome email. You can also download the database from the technical support
web site, www.g1.com/support.
2. The database is downloaded as a zip file. Unzip the database before proceeding with the installation.
3. Unzip the database file to the location you want. The database zip files are:
• VAGlobal-EMEA.zip—Contains the data for Europe, Middle East, and Africa.
• VAGlobal-APAC.zip—Contains the data for Asia-Pacific.
• VAGlobal-Americas.zip—Contains the data for the Americas.
Note: You may install databases on a network share, but performance will be affected since you
will be accessing them on a network rather than accessing them locally.
Installation Guide for Windows
27
Installing Universal Name Module Databases
4. To install the unlock code:
a) Open the following file in a text editor:
<SpectrumLocation>\server\modules\addressglobal\conf\unlockcodes.txt
b) Enter your unlock codes, one per line.
c) Save and close the file.
Installing Validate Address Loqate Databases
This procedure describes how to install the databases used by the Validate Address Loqate stage. For
instructions on installing databases used by other Universal Addressing Module stages, see the
Spectrum™ Technology Platform Administration Guide.
1. Download the database from the Pitney Bowes Software eStore using the link provided in the release
announcement or welcome email. You can also download the database from the technical support
web site, www.g1.com/support.
2. The database is downloaded as a zip file. Unzip the database before proceeding with the installation.
3. Unzip the database file(s) to the location you want. If you are installing data from multiple zip files or
discs, be sure to unzip them all to the same location. The database zip files are:
• LQ0—Contains general database setup files.
Note: Regardless of which set of data you use, the files in LQ0 must be installed.
•
•
•
•
•
LQ1—Contains the data for Middle East, Africa, and Asia-Pacific.
LQ2—Contains the data for the Caribbean, Central America, and parts of North America.
LQ3—Contains the data for Eastern and parts of Western Europe.
LQ4—Contains the data for South America and parts of North America.
LQ5—Contains the data for parts of Western Europe.
Note: You may install databases on a mapped drive, but performance will be affected since you
will be accessing them on a network rather than accessing them locally.
4. From the location where you extracted the database files, click install.exe. This will launch the Loqate
Installer.
5. Follow the prompts during the rest of the installation process.
Installing Universal Name Module Databases
The Universal Name Module provides a load utility to install databases. The database files that you load
depend on the databases you have licensed.
Note: To install the Universal Name Module databases on Windows Server 2008 you need administrator
privileges.
1. Make sure no applications are running.
2. Stop Spectrum™ Technology Platform. To do this, right-click the Spectrum™ Technology Platform
icon in the system tray and select Stop Server.
3. Insert the database DVD or download the database from the technical support web site,
www.g1.com/support.
Note: If you download the database from the web site, it will be downloaded as a zip file. Unzip the
database before proceeding with the installation.
4. Select Start > Programs > Pitney Bowes > Spectrum™ Technology Platform > Modules >
Universal Name and Advanced Matching Modules > Database Load Utility.
5. Follow the prompts to complete the installation process. The database files are you can install are:
28
Spectrum™ Technology Platform 9.0
Chapter 3: Installing Databases
•
•
•
•
•
Arabic Plus Pack: g1-cdq-cjki-arabic-<date>.jar
Asian Plus Pack - Chinese: g1-cdq-cjki-chinese-<date>.jar
Asian Plus Pack - Japanese: g1-cdq-cjki-japanese-<date>.jar
Asian Plus Pack - Korean: g1-cdq-cjki-korean-<date>.jar
Core Names Database: g1-cdq-nomino-base-<date>.jar
Note: You may install databases on a mapped drive, but performance will be affected since you
will be accessing them on a network rather than accessing them locally.
6. Open the file <SpectrumDirectory>\server\bin\wrapper\wrapper.conf in a text editor.
7. Increase the Java settings for initial heap size (wrapper.java.initmemory) and maximum heap
size (wrapper.java.maxmemory) to reflect the total amount of memory required for the Arabic
Plus Pack and Asian Plus Pack.
•
•
•
•
•
Arabic Plus Pack: 5.5 GB
Asian Plus Pack - Chinese: 32 MB
Asian Plus Pack - Japanese: 1.6 GB
Asian Plus Pack - Korean: 8 MB
Core Names: 1.1 GB
8. Save and close wrapper.conf.
9. Start Spectrum™ Technology Platform. To do this, right-click the Spectrum™ Technology Platform
icon in the system tray and select Start Server.
Using the Database Silent Installer
The silent install process allows you to pre-configure the database installation process so that it runs
without user intervention. Instead of responding to prompts from the installation process for information
such as the installation location, you specify these responses in a properties file which the installer uses
instead of user prompts.
1. In the Spectrum™ Technology Platform installer server installer (not the database installer), browse
to the SilentInstaller folder.
2. Using a text editor, open the properties file for the database you want to install.
For example, if you want to configure a silent installer for the Loqate database, open the properties
file uam_loqate.installer.properties.
3. Edit the properties file as necessary to specify the installation settings you want to use. See the
comments in the properties file for additional information.
4. To run the installer in silent mode, place the properties file in the same directory as the database
installer's install.exe file. When the installer executes it will detect the properties file and
automatically run in silent mode.
Alternatively, you can place the properties file in different directory and give the absolute path to the
property in the command prompt using the -f argument, as follows:
install.exe -f %PathOfPropertyFile%\installer.properties
Note: When you run the silent installer, the command prompt is returned to you immediately even
though the installer is still running. If you want to have the installer hold the command prompt
until the installer completes, run the installer through a batch file instead of directly at the
command line.
Installation Guide for Windows
29
Installing the Client Tools
In this section:
• Installing the Client Tools . . . . . . . . . . . . . . . . . . . . . . . . .32
4
Installing the Client Tools
Installing the Client Tools
The Spectrum™ Technology Platform client tools are Windows applications that you use to administer
your server and design and run dataflows and process flows. You must install your Spectrum™ Technology
Platform server before installing the client tools.
Before installing, be sure to read the release notes. The release notes contains important compatibility
information as well as release-specific installation notes.
This procedure describes how to install the following client tools:
• Enterprise Designer— Use Enterprise Designer to create, modify, and run dataflows.
• Management Console—Use the Management Console to perform administrative tasks such as setting
service defaults, scheduling jobs, managing users and security, and so on.
• Interactive Driver—Use Interactive Driver to test different processing settings. Interactive Driver allows
you to run a small number of records through a process to preview the result.
• Job Executor—Job Executor is a command line tool that allows you to run a job from a command
line or script. The job must have been previously created and saved on Spectrum™ Technology
Platform using Enterprise Designer.
• Process Flow Executor—Process Flow Executor is a command line tool that allows the execution
of a process flow from a command line or script. The process flow must have been previously created
and saved on Spectrum™ Technology Platform using Enterprise Designer.
To install the client tools:
1. Open a web browser and go to the Spectrum™ Technology Platform Welcome Page at:
http://<servername>:<port>
For example, if you installed Spectrum™ Technology Platform on a computer named
"myspectrumplatform" and it is using the default HTTP port 8080, you would go to:
http://myspectrumplatform:8080
2. Click Platform Client Tools.
32
Spectrum™ Technology Platform 9.0
Installing the Client API
In this section:
• Installing the Client API . . . . . . . . . . . . . . . . . . . . . . . . . . .34
5
Installing the Client API
Installing the Client API
The Client API is used to integrate Spectrum™ Technology Platform functionality into your applications.
If you will be creating your own program to call Spectrum™ Technology Platform, you need to install the
Spectrum™ Technology Platform Client API on the system where you will be developing your application.
The Client API allows access to Spectrum™ Technology Platform through several programming languages,
including Java, C++, and web services.
1. Open the folder where you have downloaded the Spectrum™ Technology Platform Client API installer.
2. Double-click the sdkinst.exe file.
3. The installer guides you through the installation process.
34
Spectrum™ Technology Platform 9.0
Removing Spectrum
Technology Platform
In this section:
• Removing the Server . . . . . . . . . . . . . . . . . . . . . . . . . . . . .36
• Removing the Client Tools . . . . . . . . . . . . . . . . . . . . . . . . .36
• Removing the Client API . . . . . . . . . . . . . . . . . . . . . . . . . .36
6
Removing the Server
Removing the Server
Before uninstalling any product, back up any files you may need in the future. Uninstalling Spectrum™
Technology Platform will remove any job definitions and server-default changes you may have made.
1. If the Spectrum™ Technology Platform server is running, stop the server. To stop the server, right-click
the Spectrum™ Technology Platform icon in the system tray (shown below) and select Stop Server.
2. Go to Start > Programs > Pitney Bowes > Spectrum™ Technology Platform > Server and select
Uninstall Pitney Bowes Spectrum™ Technology Platform.
Note: Some Java files will not be removed because the uninstall process itself uses them.
3. If there are any client tools that you want to uninstall, see Removing the Client Tools on page 36.
Removing the Client Tools
1. Back up any files you may need in the future.
2. Use the Windows Add/Remove Programs control panel to uninstall the Spectrum™ Technology
Platform client tools or Client API.
Removing the Client API
Use the Windows Add/Remove Programs control panel to uninstall the Spectrum™ Technology
Platform Client API.
36
Spectrum™ Technology Platform 9.0
Configuring SAP and Siebel
In this section:
• Configuring SAP . . . . . . . . . . . . . . . . . . . . . . . . . . . . . . . . .38
• Configuring Siebel . . . . . . . . . . . . . . . . . . . . . . . . . . . . . . .45
7
Configuring SAP
Configuring SAP
To configure the SAP Module and your SAP system,
1. Import .SAR Files on page 39
2. Configure the SAP GUI on page 39
3. Configure SAP Web Dynpro on page 43
4. Configure SAP ICWC on page 44
Import Dataflow Files
When you install the SAP Module, several dataflow files are automatically installed. Other dataflow files
must be manually copied into Spectrum™ Technology Platform.
1. If you are adding the Address Now Module, Enterprise Tax Module, or Universal Addressing Module
to an existing installation,
a) Open Spectrum™ Technology Platform Enterprise Designer.
b) Select View > Server Explorer.
c) Delete this dataflow: SAPValidateAddressWithCandidates.
2. Go to: <SpectrumPlatformLocation>\server\modules\dataflows\sap.
3. Review the following table then copy the applicable dataflow files to:
<SpectrumPlatformLocation>\server\app\import
38
If you are installing this set of
modules
Copy these dataflow files to the import folder
Address Now Module
SAPValidateAddressWithCandidates.ANOW.df
Address Now Module
Universal Addressing Module
SAPGenerateCASSReport.df
SAPValidateAddressWithCandidates.ANOW.df
SAPValidateAddressWithCandidates.UAM.df
Address Now Module
Enterprise Geocoding Module
SAPValidateAddressWithCandidates.ANOW_EGM.df
Address Now Module
Enterprise Geocoding Module
Universal Addressing Module
SAPValidateAddressWithCandidates.UAM_ANOW_EGM.df
Address Now Module
Enterprise Tax Module
Universal Addressing Module
SAPAssignGeoTAXInfo.df
SAPBatchAssignGeoTAXInfo.df
SAPGenerateCASSReport.df
SAPValidateAddressAndAssignGeoTAXInfo.df
SAPValidateAddressWithCandidates.UAM_ANOW_ETM.df
Address Now Module
Enterprise Geocoding Module
Enterprise Tax Module
Universal Addressing Module
SAPValidateAddressWithCandidates.UAM_ANOW_ETM_EGM.df
Universal Addressing Module
without Loqate
SAPGenerateCASSReport.df
SAPValidateAddressWithCandidate_UAM.df
Spectrum™ Technology Platform 9.0
Chapter 7: Configuring SAP and Siebel
If you are installing this set of
modules
Copy these dataflow files to the import folder
Universal Addressing Module
without Loqate
Enterprise Tax Module
SAPAssignGeoTAXInfo.df
SAPBatchAssignGeoTAXInfo.df
SAPGenerateCASSReport.df
SAPValidateAddressAndAssignGeoTAXInfo.df
SAPValidateAddressWithCandidates.UAM_ETM.df
Universal Addressing Module with ValidateAddressWithCandidates_UAM_Loqate.df
Loqate
Universal Addressing Module with ValidateAddressWithCandidates_UAM_Loqate_EGM.df
Loqate
Enterprise Geocoding Module
Universal Addressing Module with ValidateAddressWithCandidates_UAM_Loqate_ETM.df
Loqate
Enterprise Tax Module
Universal Addressing Module with ValidateAddressWithCandidates_UAM_Loqate_EGM_ETM.df
Loqate
Enterprise Geocoding Module
Enterprise Tax Module
Universal Addressing Module,
Loqate only
ValidateAddressWithCandidates_Loqate.df
Universal Addressing Module,
Loqate only
Enterprise Geocoding Module
ValidateAddressWithCandidates_Loqate_EGM.df
Enterprise Geocoding Module
GeocodeUSAddressWithCandidates.df
ValidateAddressWithCandidates_EGM.df
Enterprise Tax Module
ValidateAssignGeoTAXInfo.df
SAPBatchAssignGeoTAXInfo.df
Note: If errors occur in Management Console or Enterprise Designer, delete the contents of
<WindowsTemporaryDirectory>\g1Assemblies, where <WindowsTemporaryDirectory>
is one of the following: %TMP%, %TEMP%, %USERPROFILE%, or the Windows directory.
Typically, C:\Documents and Settings\<USERNAME>\Local Settings\Temp\g1Assemblies.
After you delete the contents of this folder log in again.
Import .SAR Files
A .SAR file is a file that contains a third-party add-on package for SAP, such as the Spectrum™ Technology
Platform SAP Module. The .SAR file is located on the Spectrum™ Technology Platform installer in the
SAP Objects folder. For information on importing .SAR files into SAP applications, see your SAP Basis
administrator.
Configure the SAP GUI
Before continuing make sure that you have done the following:
• Either the SAP ECC or SAP CRM environment is available
• The SAR file has been deployed
Installation Guide for Windows
39
Configuring SAP
1. Activate the BC sets.
a) Log-on to the client where the settings for the Spectrum™ Technology Platform SAP Module is
to be configured.
b) Enter the T-Code SCPR20 to activate Business Configuration (BC) sets. This will place the default
entries on the Spectrum™ Technology Platform customizing tables. Enter the BC Set
/HSGRP1/BCSET_BC_BAS_PV. Activate it with the options Overwrite Data and Default Mode.
c) After activating the BC set for Postal Validation, select and activate the remaining BC Sets
(/HSGRP1/BCSET_BC_BAS_DES, /HSGRP1/BCSET_BC_BAS_GTX,
/HSGRP1/BCSET_BUPA_CUSTOM, /HSGRP1/MERGE_SETTINGS) with the Activation Options
set to Overwrite Data and Expert Mode.
2. Set Up the RFC destination.
a) Go to transaction SM59. Click Create.
b) Complete the details of the RFC. Enter any valid name in RFC Destination, select G (HTTP
connection to external server) in Connection Type and add a short description in Description 1,
and then press Enter.
c) On the Technical Settings tab, in the Target Host field, enter the computer name or IP Address
of the server where the Spectrum™ Technology Platform server was installed. In the Service No
field enter 8080.
40
Spectrum™ Technology Platform 9.0
Chapter 7: Configuring SAP and Siebel
d) On the Special Options tab, select No Timeout and HTTP 1.1 on HTTP Setting, and then save
the configuration.
Installation Guide for Windows
41
Configuring SAP
e) After you save, test the RFC by clicking the Connection Test button. If there is a popup window,
check the Accept All Further Cookies checkbox and select YES. When the test is successful, go
to Response Body tab to view the Spectrum™ Technology Platform page.
3. Setting up the Spectrum™ Technology Platform Logging Object
a) Go to Transaction code SLG0 and On the screen select New Entries then add /HSGRP1/DQC
as the Object and DQC Logging as the Object Text and save.
42
Spectrum™ Technology Platform 9.0
Chapter 7: Configuring SAP and Siebel
Configure SAP Web Dynpro
Before continuing make sure that you have done the following:
• Make sure that you have configured the SAP Interface. For more information, see Configure the SAP
GUI on page 39.
• SAP Application, SAP NetWeaver 7.01 with Patch 3 and Spectrum™ Technology Platform is available
• PBS SCA files has been deployed.
• System Landscape Directory (SLD) has been properly configured
1. Set up JCO destinations:
a) Go to the NetWeaver Portal Content Administrator URL and login as J2EE_ADMIN or an account
that has an Administrator Privilege.
b) Expand Deployed Content, then pb.com, then pb.com/dqc. On the Details window, select the
JCO Connections tab.
c) Select WD_DQC_MODELDATA_DEST and click Create. Complete all the required information
to be able to run and test the connection.
d) Repeat the steps and complete the required information for WD_DQC_MODELDATA_DEST.
Note: WD_DQC_MODELDATA_DEST is the Application Data and
WD_DQC_RFC_METADATA_DEST is the Dictionary Metadata.
2. Configure the BuildGlobalAddress web service in the SAP Visual Admin:
a) Go to <drive>:/usr./sap/<system id>/DVEBMGS01/ j2ee/admin and click go.bat and enter
J2EE_ADMIN password.
b) Go to Cluster > Server > Services > JCo RFC Provider and select the Bundles tab.
c) Enter all of the information needed by the application and click Set to save the changes.
d) Go to Cluster > Server > Services > Web Services Security.
e) Create a proxy in Web Services Client > sap.com > Dynamic WSProxies with the name
PBBIWebServiceConnectorBGA.
f) For the URL, enter:
http://<spectrumservername>:<port>/soap/BuildGlobalAddress?wsdl
Installation Guide for Windows
43
Configuring SAP
For example,
http://MySpectrumServer:8080/soap/BuildGlobalAddress?wsdl
g) Restart the application server.
Configure SAP ICWC
Before continuing make sure that you have done the following:
•
•
•
•
SAP CRM 6.0 and Spectrum™ Technology Platform is available
Spectrum™ Technology Platform SAR files has been deployed
ICWC user has the CRM_UI_PROFILE parameter ID with IC_AGENT as the Parameter Value
Check duplicate option is activated in SPRO under ICWC (SPRO > CRM > ICWC > Define Account
Identification Profiles)
To configure the SAP ICWC:
1. Activate BC Sets.
See Configure the SAP GUI on page 39 for the initial steps. After performing the activation for all
available Group1 BC sets, activate the BC Set for Group1 ICWC (/HSGRP1/ICWC_SETTINGS)
Activation Options Overwrite Data and Expert Mode.
2. Set up the RFC Destination. For more information, see Configure the SAP GUI on page 39.
3. Set up the Group1 Logging Object. For more information, see Configure the SAP GUI on page 39.
4. Enable the Group1 ICWC Enhancement Set.
Enter T-CODE SM30. In the Table View text box, enter BSPWDV_EHSET_ASG and then click
Maintain to change the current configurations.
Select New Entries to add the Spectrum™ Technology Platform Enhancement Set. After the screen
is displayed, type the client number where the enhancement set would take effect and the enter
/HSGRP1/ENHANCEMENT_SET as the Enhancement Set.
5. Add the ICWC Configurations.
Enter T-CODE BSP_WD_CMPWB. Enter ICCMP_DETAIL in the Component text box and
/HSGRP1/ENHANCEMENT_SET in the Enhancement Set text box and click Display.
Expand Views and select /HSGRP1/BUPA_CMP_VIEW/BuPaDetailSelectDuplCustomer.
After the View is displayed, go to the Configuration tab and edit the configurations. On the edit screen
select Full Name, Telephone, Street, City and Country context and click the right arrow button and
arrange it in this order; Full Name, Telephone, Street, City, and Country. Save the configuration.
44
Spectrum™ Technology Platform 9.0
Chapter 7: Configuring SAP and Siebel
Configuring French Address Validation
If you will be using French address validation, you must install the Data Normalization Module table
cdq-TableLookup-SAP.tba. For more information, see Installing Data Normalization Module
Databases on page 19.
Configuring Siebel
To configure the Siebel module and your Siebel system,
1. Import Dataflow Files on page 45
2. (Optional) Verify the Geocoding Database Resource Name on page 46
3. Integrate Spectrum™ Technology Platform with Siebel on page 47
Import Dataflow Files
When you install the Siebel module, several dataflow files are automatically installed. Other dataflow
files must be manually copied into Spectrum™ Technology Platform.
1. If you are adding the Address Now Module, Enterprise Geocoding Module, or Universal Addressing
Module to an existing Siebel Module installation,
a) Open Spectrum™ Technology Platform Enterprise Designer.
b) Select View > Server Explorer.
c) Delete these dataflows:
• SiebelValidateAddressWithCandidates
• SiebelValidateAddressWithNoCandidates
2. Do one of the following:
• If you are installing the Siebel Module for Siebel Business Application, go to:
<SpectrumPlatformLocation>\server\modules\dataflows\siebel\sea
• If you are installing the Siebel Module for Siebel Industry Application, go to:
<SpectrumPlatformLocation>\server\modules\dataflows\siebel\sia
3. Review the following table then copy the applicable dataflow files to:
<SpectrumPlatformLocation>\server\app\import
Table 2: Dataflow Files To Import
If you are installing this set of
modules
Copy these dataflow files to the import folder
Address Now Module only
SiebelGetGlobalCandidateAddresses.df
SiebelValidateAddressWithCandidates.ADN.df
SiebelValidateAddressWithNoCandidates.ADN.df
Address Now Module
Universal Addressing Module
SiebelGetGlobalCandidateAddresses.df
SiebelValidateAddressWithCandidates.UAM_ADN.df
SiebelValidateAddressWithNoCandidates.UAM_ADN.df
Address Now Module
Enterprise Geocoding Module
SiebelGeocodeUSAddressWithCandidates.df
SiebelGeocodeUSAddressWithNoCandidates.df
SiebelGetGlobalCandidateAddresses.df
Installation Guide for Windows
45
Configuring Siebel
If you are installing this set of
modules
Copy these dataflow files to the import folder
SiebelValidateAddressWithCandidates.EGM_ADN.df
SiebelValidateAddressWithNoCandidates.EGM_ADN.df
Address Now Module
Enterprise Geocoding Module
Universal Addressing Module
SiebelGeocodeUSAddressWithCandidates.df
SiebelGeocodeUSAddressWithNoCandidates.df
SiebelGetGlobalCandidateAddresses.df
SiebelValidateAddressWithCandidates.UAM_EGM_ADN.df
SiebelValidateAddressWithNoCandidates.UAM_EGM_ADN.df
Universal Addressing Module only SiebelValidateAddressWithCandidates.UAM.df
SiebelValidateAddressWithNoCandidates.UAM.df
Universal Addressing Module
Enterprise Geocoding Module
SiebelGeocodeUSAddressWithCandidates.df
SiebelGeocodeUSAddressWithNoCandidates.df
SiebelValidateAddressWithCandidates.UAM_EGM.df
SiebelValidateAddressWithNoCandidates.UAM_EGM.df
Universal Addressing Module with ValidateAddressWithCandidates_UAM_Loqate.df
Loqate
Universal Addressing Module with ValidateAddressWithCandidates_UAM_Loqate_EGM.df
Loqate
Enterprise Geocoding Module
Universal Addressing Module with ValidateAddressWithCandidates_UAM_Loqate_ETM.df
Loqate
Enterprise Tax Module
Universal Addressing Module with ValidateAddressWithCandidates_UAM_Loqate_EGM_ETM.df
Loqate
Enterprise Geocoding Module
Enterprise Tax Module
Universal Addressing Module,
Loqate only
ValidateAddressWithCandidates_Loqate.df
Enterprise Geocoding Module
SiebelValidateAddressWithCandidates.EGM.df
SiebelValidateAddressWithNoCandidates.EGM.df
Enterprise Tax Module
ValidateAssignGeoTAXInfo.df
SAPBatchAssignGeoTAXInfo.df
Note: If errors occur in Management Console or Enterprise Designer, delete the contents of
<WindowsTemporaryDirectory>\g1Assemblies, where <WindowsTemporaryDirectory>
is one of the following: %TMP%, %TEMP%, %USERPROFILE%, or the Windows directory.
Typically, C:\Documents and Settings\<USERNAME>\Local Settings\Temp\g1Assemblies.
After you delete the contents of this folder log in again.
(Optional) Verify the Geocoding Database Resource Name
If you are using the Enterprise Geocoding Module,
1. In Enterprise Designer, open each of these dataflows: SiebelGeocodeUSAddressWithCandidates
and SiebelGeocodeUSAddressWithNoCandidates.
2. In each dataflow, open the Geocode US Address stage.
46
Spectrum™ Technology Platform 9.0
Chapter 7: Configuring SAP and Siebel
3. In the Database field, select the name of the geocoding database as defined in the Management
Console. The default name is KGDDatasource but if the geocoding database has a different name
on your system, select the appropriate name.
Note: For more information about database resources, see the Spectrum™ Technology Platform
Administration Guide.
4. Save and close each dataflow.
Integrate Spectrum™ Technology Platform with Siebel
1. Copy Siebel objects to your system:
a) Browse to the location where you downloaded the Spectrum™ Technology Platform installer.
b) Browse to the appropriate folder for your version of Siebel as shown in the following table.
Siebel Version
Folder
Siebel Enterprise 7.8
Siebel Objects\7.8\Enterprise
Siebel Industry 7.8
Siebel Objects\7.8\Industry
Siebel Business 8.0 Non-SDQ
Siebel Objects\8.0\Business\non SDQ
Siebel Business 8.0 SDQ
Siebel Objects\8.0\Business\SDQ
Siebel Industry 8.0 Non-SDQ
Siebel Objects\8.0\Industry\non SDQ
Siebel Industry 8.0 SDQ
Siebel Objects\8.0\Industry\SDQ
Siebel Business 8.1.1 Non-SDQ
Siebel Objects\8.1.1\Business\non
SDQ
Siebel Business 8.1.1 SDQ
Siebel Objects\8.1.1\Business\SDQ
Siebel Industry 8.1.1 Non-SDQ
Siebel Objects\8.1.1\Industry\non
SDQ
Siebel Industry 8.1.1 SDQ
Siebel Objects\8.1.1\Industry\SDQ
c) Copy the contents of the folder to a temporary directory. This temporary folder will be the referred
to as <Spectrum Package> in the following steps.
2. Create objects and allow object locking:
a) Log in to Siebel Tools as the user SADMIN, with the connection pointing to the server data source.
b) (Siebel Enterprise 7.8, Siebel Industry 7.8, Siebel Business 8.0/8.1.1 non-SDQ, and Siebel Industry
8.0/8.1.1 non-SDQ only.) Go to Object Explorer, drill down to the Project object. From the Project
area, right-click and select New Record. Create the following projects:
• Group 1 Data Quality
• Group 1 EAI Testing
• Group 1 Workflow
c) Open the file <Spectrum Package>\tools\CDQP_Queries.txt.
d) Copy and paste the query contents to the Project list of your Object Manager. Cross-check the
query result with the table below and perform the action suggested. To toggle object locking, go
to Object Explorer and browse to the Project object. From the Project area, right-click and select
the project, and select Toggle Object Locking.
Business Business Industry Industry Enterprise Project
SDQ
SDQ
X
Installation Guide for Windows
X
X
X
Account
Action
Toggle Object Locking
47
Configuring Siebel
Business Business Industry Industry Enterprise Project
SDQ
SDQ
X
X
X
Account (SCW)
Toggle Object Locking
X
X
X
X
X
Account (SSE)
Toggle Object Locking
X
X
X
X
X
Contact
Toggle Object Locking
X
X
Contact (SSE)
Toggle Object Locking
X
CUT Account
Toggle Object Locking
X
CUT Siebel
Communications
Toggle Object Locking
X
CUT Usage
Toggle Object Locking
X
X
X
X
DNB Data
Toggle Object Locking
X
X
X
DeDuplication
Toggle Object Locking
eAutomotive
Toggle Object Locking
Employee
Toggle Object Locking
X
FINS Contract
Toggle Object Locking
X
FINS Contract Info
Toggle Object Locking
X
FINS Deal Commercial Toggle Object Locking
X
FINS Financial
Services
Toggle Object Locking
X
FINS Oppportunity
Toggle Object Locking
X
X
X
X
X
X
X
X
X
X
X
X
X
X
Group 1 Data Quality
Create and Toggle
Object Locking
X
X
X
Group 1 EAI Testing
Create and Toggle
Object Locking
X
X
X
Group 1 Workflow
Create and Toggle
Object Locking
X
List Mgmt (Import)
Toggle Object Locking
X
List Mgmt (UI)
Toggle Object Locking
X
Mvg
Toggle Object Locking
X
X
X
X
X
X
X
Oppty
Toggle Object Locking
X
X
X
Oppty (SSE)
Toggle Object Locking
X
X
X
X
Personal Contact
Toggle Object Locking
X
X
X
X
Picklist
Toggle Object Locking
X
X
Server Component
Requests
Toggle Object Locking
X
X
Siebel Sales
Enterprise
Toggle Object Locking
X
X
Siebel Universal Agent Toggle Object Locking
X
48
Action
X
Spectrum™ Technology Platform 9.0
Chapter 7: Configuring SAP and Siebel
Business Business Industry Industry Enterprise Project
SDQ
SDQ
X
Action
X
VERT CUT Address
Toggle Object Locking
X
VERT Cut Common
Toggle Object Locking
3. Check out the Siebel Projects:
a) Log in to Siebel Tools on Local Datasource.
b) Select Tools > Checkout.
c) Select the projects indicated in the following table and click Checkout.
Business
SDQ
Business
Industry
SDQ
Industry
Enterprise
Project
X
X
X
X
Account
X
X
Account (SCW)
X
X
X
X
X
X
Account (SSE)
X
X
X
X
X
Contact
X
X
Contact (SSE)
X
X
CUT Account
X
CUT Siebel
Communications
X
CUT Usage
X
X
X
DNB Data
X
X
X
DeDuplication
X
X
X
X
X
X
X
X
X
X
X
Employee
X
FINS Contract
X
FINS Contract Info
X
FINS Deal Commercial
X
FINS Financial Services
X
FINS Oppportunity
X
X
Group 1 Data Quality
X
X
X
Group 1 EAI Testing
X
X
X
Group 1 Workflow
X
List Mgmt (Import)
X
List Mgmt (UI)
X
Mvg
X
X
eAutomotive
X
X
X
X
X
X
Oppty
X
X
X
Oppty (SSE)
Installation Guide for Windows
49
Configuring Siebel
Business
SDQ
Business
X
X
X
X
Industry
SDQ
Industry
Enterprise
Project
X
X
Personal Contact
X
X
Picklist
X
X
Server Component
Requests
X
X
Siebel Sales Enterprise
X
X
Siebel Universal Agent
X
X
X
X
VERT CUT Address
X
VERT Cut Common
4. (Siebel 7.8 and 8.0/8.1.1 non-SDQ only) Import the Spectrum™ Technology Platform Siebel objects:
a) Select Tools > Import from Archive.
b) Import the Siebel SIF files located in <Spectrum Package>\sif. Select Overwrite the object
definition in the repository and click Next to proceed until the import process has been
completed.
Siebel Enterprise 7.8 and Siebel Industry 7.8:
•
•
•
•
•
•
•
•
•
G1_NEW.sif
G1_APPLET.sif
G1_BO.sif
G1_BC.sif
G1_BC_SCRIPTS.sif
G1_EAI_TESTING.sif
G1_APPLICATION.sif
G1_PICKLIST.sif
G1_VIEW.sif
Siebel Business 8.0/8.1.1 non-SDQ and Siebel Industry 8.0/8.1.1 non-SDQ:
•
•
•
•
•
•
•
•
•
•
•
•
G1_NEW.sif
G1_APPLET.sif
G1_BO.sif
G1_LINK.sif
G1_BC.sif
G1_BC_SCRIPTS.sif
G1_EAI_TESTING.sif
G1_APPLICATION.sif
G1_PICKLIST.sif
G1_VIEW.sif
G1_WORKFLOW.sif
(8.1.1 only) Rebranding.sif
5. (Siebel Enterprise 7.8 and Siebel Industry 7.8 only) Deploy the data quality workflows:
a)
b)
c)
d)
Go to Workflow Process objects using the Object Explorer.
Right-click on the Workflow Processes area and choose Import Workflow Process.
Specify Group 1 Workflow as project name for each workflow imported.
Import the workflows in the order shown in the following list. The workflows are located in
<Spectrum Package>\workflow.
1. Baseline workflows:
a. GROUP 1 ADMIN - VIEW ACCESS WORKFLOW
50
Spectrum™ Technology Platform 9.0
Chapter 7: Configuring SAP and Siebel
b.
c.
d.
e.
f.
g.
h.
i.
GROUP 1 ADMIN - ADMIN ACCESS WORKFLOW
GROUP 1 ADMIN - OPTIONS MANAGER WORKFLOW
GROUP 1 DATA CLEANSING WORKFLOW
GROUP 1 DNB ASYNC WORKFLOW
GROUP 1 GENERATE HASH KEY WORKFLOW
GROUP 1 GEOCODING WORKFLOW
GROUP 1 NAME CASING WORKFLOW
GROUP 1 NAME CASING (ACCOUNT) WORKFLOW BATCH
2. Async workflows:
a.
b.
c.
d.
e.
f.
g.
h.
i.
GROUP 1 ASYNC ACCOUNT WORKFLOW
GROUP 1 ASYNC ADDRESS WORKFLOW
GROUP 1 ASYNC ASSOC ADDRESS ACCOUNT WORKFLOW
GROUP 1 ASYNC ASSOC ADDRESS CONTACT WORKFLOW
GROUP 1 ASYNC CONTACT WORKFLOW
GROUP 1 ASYNC DELETE DEDUP RESULT (ADDRESS) WORKFLOW
GROUP 1 ASYNC DELETE DEDUP RESULT (PARENT) WORKFLOW
GROUP 1 ASYNC PERSONAL ADDRESS CONTACT WORKFLOW
GROUP 1 ASYNC WORKFLOW
3. BNS workflows:
a. GROUP 1 BUSINESS NAME STANDARDIZATION WORKFLOW
4. Data cleansing workflows:
a.
b.
c.
d.
e.
f.
GROUP 1 DATA CLEANSING (ACCOUNT) WORKFLOW BATCH
GROUP 1 DATA CLEANSING (CONTACT) WORKFLOW BATCH
GROUP 1 DATA CLEANSING (PROSPECT) WORKFLOW BATCH
GROUP 1 DATA CLEANSING with GEOCODING (ACCOUNT) WORKFLOW BATCH
GROUP 1 DATA CLEANSING with GEOCODING (CONTACT) WORKFLOW BATCH
GROUP 1 DATA CLEANSING with GEOCODING (PROSPECT) WORKFLOW BATCH
5. Geocoding workflows:
a. GROUP 1 GEOCODING (Business Address) BATCH WORKFLOW
b. GROUP 1 GEOCODING (Personal Address) BATCH WORKFLOW
c. GROUP 1 GEOCODING (Prospect) BATCH WORKFLOW
6. Name casing worflows:
a. GROUP 1 NAME CASING (CONTACT) WORKFLOW BATCH
b. GROUP 1 NAME CASING (PROSPECT) WORKFLOW BATCH
7. Deduplication workflows:
a.
b.
c.
d.
e.
GROUP 1 DATA DEDUPLICATION (ACCOUNT) WORKFLOW BATCH
GROUP 1 DATA DEDUPLICATION (CONTACT - Business Address) WORKFLOW BATCH
GROUP 1 DATA DEDUPLICATION (CONTACT - Personal Address) WORKFLOW BATCH
GROUP 1 DATA DEDUPLICATION (PROSPECT) WORKFLOW BATCH
GROUP 1 DATA DEDUPLICATION WORKFLOW
8. DNB workflows:
a.
b.
c.
d.
e.
GROUP 1 DNB BATCH WORKFLOW
GROUP 1 DNB EAI WORKFLOW
GROUP 1 DNB LOAD BATCH WORKFLOW
GROUP 1 DNB VBC WORKFLOW
GROUP 1 DNB WORKFLOW
9. Generate hashkey workflows:
a. GROUP 1 GENERATE HASH KEY (ACCOUNT) WORKFLOW BATCH
b. GROUP 1 GENERATE HASH KEY (CONTACT) WORKFLOW BATCH
c. GROUP 1 GENERATE HASH KEY (PROSPECT) WORKFLOW BATCH
Installation Guide for Windows
51
Configuring Siebel
10. EAI test workflows:
a. GROUP 1 ADMIN - EAI TEST (ACCOUNT) WORKFLOW
b. GROUP 1 ADMIN - EAI TEST (CONTACT with ACCOUNT) WORKFLOW
c. GROUP 1 ADMIN - EAI TEST (CONTACT with ACCOUNT_PERSONAL ADDRESS)
WORKFLOW
d. GROUP 1 ADMIN - EAI TEST (CONTACT with PERSONAL ADDRESS) WORKFLOW
e. GROUP 1 ADMIN - EAI TEST (PROSPECT) WORKFLOW
e) Copy the files from <Spectrum Package>\workflow to C:\.
•
•
•
•
•
•
•
•
Group1_Data_Options_Manager.xml
Group1_Data_Responsibilities.xml
Group1_Data_Views.xml
Group1_EAI_Dataload_Account.xml
Group1_EAI_Dataload_Contact_With_Account.xml
Group1_EAI_Dataload_Contact_With_Account_Personal_Address.xml
Group1_EAI_Dataload_Contact_With_Personal_Address.xml
Group1_EAI_Dataload_Prospect.xml
f) Go through each imported workflow in the same order listed above and click Deploy.
6. Check in all locked projects:
a) Select Tools > Check In.
b) Select all the Projects to check in and click Check in.
7. Compile all Projects:
a)
b)
c)
d)
Select Tools > Compile Projects.
Click All Projects.
In the Siebel Repository File field, enter the path of your Siebel Web Client SRF file.
Click Compile.
8. (Siebel Enterprise 7.8, Siebel Industry 7.8, Siebel Business 8.0/8.1.1 non-SDQ, and Siebel Industry
8.0/8.1.1 non-SDQ) Update the application .CFG flie:
a) Open the appropriate .cfg file in an editor:
For example, for Siebel Enterprise 7.8 and Siebel Business 8.0/8.1.1:
• Siebel Call Center—uagent.cfg
• Siebel Sales—siebel.cfg
For example, for Siebel Industry 7.8 and Siebel Industry 8.0/8.1.1:
• eAutomotive—auto.cfg
• Financial—fins.cfg
• eCommunication—ecomm.cfg
Siebel .cfg files are usually found in the following locations:
• Siebel thick client—Siebel\<version>\web client\bin\enu
• Siebel thin client—<Siebel Server>\bin\enu
b) Add the following lines under the [SWE] section:
ClientBusinessService0 = G1 Async Service
ClientBusinessService1 = G1 Business Name Standardization Service
ClientBusinessService2 = G1 Common Browser Scripts Service
ClientBusinessService3 = G1 Common Server Scripts Service
ClientBusinessService4 = G1 DNB VBC Service
ClientBusinessService5 = G1 Data Cleansing Service
ClientBusinessService6 = G1 DeDuplication Service
ClientBusinessService7 = G1 Generate HashKey Service
ClientBusinessService8 = G1 GeoCoding Service
ClientBusinessService9 = G1 Interactive Service
ClientBusinessService10 = G1 Merge Records Service
52
Spectrum™ Technology Platform 9.0
Chapter 7: Configuring SAP and Siebel
ClientBusinessService11 = G1 Name Casing Service
ClientBusinessService12 = G1WebService
9. Deploy the Siebel objects in the client:
Note: Keep a backup of the old SRF in case old binaries need to be re-implemented.
a) Copy the generated SRF to your web client objects folder.
Example: C:\Program Files\Siebel\8.0\web client\OBJECTS\ENU
b) (Siebel Enterprise 7.8, Siebel Industry 7.8, Siebel Business 8.0/8.1.1 non-SDQ, and Siebel Industry
8.0/8.1.1 non-SDQ only) Open a command prompt and go to the BIN folder of the web client.
Example: C:\Program Files\Siebel\7.8\web client\BIN
c) (Siebel Enterprise 7.8, Siebel Industry 7.8, Siebel Business 8.0/8.1.1 non-SDQ, and Siebel Industry
8.0/8.1.1 non-SDQ only) Generate browser scripts by issuing the command:
genbscript "ENU\siebel.cfg" "[public\enu folder]"
For example:
C:\Program Files\Siebel\7.8\web client\BIN>genbscript "enu\siebel.cfg"
"C:\Program Files\Siebel\7.8\web client\PUBLIC\enu"
d) (Siebel Enterprise 7.8, Siebel Industry 7.8, Siebel Business 8.0/8.1.1 non-SDQ, and Siebel Industry
8.0/8.1.1 non-SDQ only) Copy g1_check.gif and g1_x.gif from the temporary folder to
public\enu\images in the Siebel web client.
e) (Siebel Business 8.0/8.1.1 SDQ and Siebel Industry 8.0/8.1.1 SDQ only) Copy the contents of
<Spectrum Package>\dll to your BIN folder.
f) (Siebel Business 8.0/8.1.1 SDQ and Siebel Industry 8.0/8.1.1 SDQ only) Copy the contents of
<Spectrum Package>\cfg to your BIN/ENU folder.
10. Deploy the Siebel objects to the server:
a) Select Start > Control Panel > Administrative Tools > Services. Right-click the Siebel service
and choose Stop.
b) Copy the generated SRF file to your web client objects folder.
Example (Siebel Business): C:\sea80\siebsrvr\OBJECTS\ENU
c) (Siebel Industry 7.8, Siebel Enterprise 7,8, Siebel Industry 8.0/8.1.1 non-SDQ, and Siebel Business
8.0/8.1.1 non-SDQ only) Open a command prompt and go to the BIN drive of the web client.
Example: C:\sia78\siebsrvr\BIN
d) (Siebel Industry 7.8, Siebel Enterprise 7.8, Siebel Industry 8.0/8.1.1 non-SDQ, and Siebel Business
8.0/8.1.1 non-SDQ only) Generate browser scripts by issuing this command:
genbscript "ENU\siebel.cfg" "[webmaster folder]"
Example:
C:\sia78\siebsrvr\BIN>genbscript "enu\siebel.cfg"
"C:\sia78\siebsrvr\WEBMASTER"
e) (Siebel Industry 7.8, Siebel Enterprise 7.8, Siebel Industry 8.0/8.1.1 non-SDQ, and Siebel Business
8.0/8.1.1 non-SDQ only) Copy g1_check.gif and g1_x.gif from the temporary folder to
public\enu\images in the Siebel web client.
Note: For Siebel Thin Client, copy g1_check.gif and g1_x.gif from the temporary directory
to SWEApp/PUBLIC/enu/images.
f) (Siebel Industry 7.8, Siebel Enterprise 7.8, Siebel Industry 8.0/8.1.1 non-SDQ, and Siebel Business
8.0/8.1.1 non-SDQ only) Copy the generated browser scripts from /WEBMASTER to <SWEApp
Location>/public/ENU.
g) (Siebel Industry 8.0/8.1.1 SDQ, Siebel Business 8.0/8.1.1 SDQ only) Copy the contents of
<Spectrum Package>\lib\win to your BIN folder.
Installation Guide for Windows
53
Configuring Siebel
h) (Siebel Industry 8.0/8.1.1 SDQ, Siebel Business 8.0/8.1.1 SDQ only) Copy the contents of
<Spectrum Package>\cfg to your BIN\ENU folder.
i) Select Start > Control Panel > Administrative Tools > Services. Right-click the Siebel service
and choose Start.
11. Activate the Spectrum™ Technology Platform workflows in the Siebel web client:
a)
b)
c)
d)
e)
f)
Log in to the Siebel Application, connecting to the server data source.
Select Site Map > Administration - Business Process > Workflow Deployment.
Query for all the GROUP 1* workflows.
Click Activate for each workflow.
Query for all the Promote* workflows.
Click Activate for the ff workflows Promote Prospect (Single) and Promote Prospect (Many).
12. (Siebel Enterprise 7.8, Siebel Industry 7.8, Siebel Business 8.0/8.1.1 non-SDQ, and Siebel Industry
8.0/8.1.1 non-SDQ only) Load the Group 1 configuration.
a) Log in to the Siebel application connecting to the server data source.
b) Go to Site Map > Administration - Business Service > Simulator.
c) In the top applet, create a new record and set the following fields:
Service Name
Workflow Process Manager
Method Name
Run Process
Iterations
1
d) In the Input Arguments applet, load:
<Spectrum Package>\tools\OptionsManagerLoadData.xml
Note: Delete the entry if previous GROUP 1 options already exist in the database. Run the
following SQL Script: DELETE SIEBEL.S_LST_OF_VAL WHERE CODE = 'G1'
e) Click Run in the top applet of the Simulator view. Delete the record.
f) Repeat steps c. and d. for the ff files:
• ViewAccessLoadData.xml
• AdminAccessLoadData.xml
g) Go to Site Map > Administration - Application > Responsibilities:
h) Query for the responsibility Group 1 Responsibility.
i) In the Users tab, add SADMIN or any Siebel administrator. This associates the Group 1
Administration Screen to the user.
Note: In order to see the changes you must log-in again.
j)
Go to Site Map > Administration - Group 1 Data Quality > Options Manager > General
Behavior.
k) Change the server and port number where the Spectrum™ Technology Platform server is located.
13. Verify the installation:
a) Log in to Siebel Application.
b) All applets should load properly without error.
14. (Siebel Enterprise 7.8, Siebel Industry 7.8, Siebel Business 8.0/8.1.1 non-SDQ, and Siebel Industry
8.0/8.1.1 non-SDQ only) Modify and apply web services.
a) Go to Site Map > Administration - Web Services > Outbound Web Services.
b) Click Import on the Outbound Web Services area and then specify the file <Spectrum
Package>\tools\G1WebService.xml.
c) Query on the Name field ValidateAddress, and modify its settings as follows:
On the Service Port applet, change the following fields:
• Transport: Local Business Service
• Address: G1 WebService Filter Service
54
Spectrum™ Technology Platform 9.0
Chapter 7: Configuring SAP and Siebel
On the Operations applet, change the following fields:
• Response Filter Service Display: G1 WebService Filter Service
• Response Filter Method Display: filter Response
15. (Siebel Enterprise 7.8, Siebel Industry 7.8, Siebel Industry 8.0/8.1.1 non-SDQ, and Siebel Business
8.0/8.1.1 non-SDQ only) Encrypt and apply Spectrum™ Technology Platform user name and password.
a) Run the following command on the command prompt:
java -version
Java Runtime Environment (JRE) 1.4.x is required. If none is installed, you can download from
java.sun.com/j2se/1.4.2/download.html. Download the JRE of your target platform.
b) Acquire the file <Spectrum Package>\tools\Base64.class.
c) On the command prompt, type the following command:
java Base64 -encode -s "<username>:<password>"
where <username> and <password> is to the login information of Spectrum™ Technology Platform
server. Copy the generated value.
Note: The default Spectrum™ Technology Platform password can be found in <Spectrum
Package>\tools\Default Password.txt.
d) Go to Site Map > Administration - Group 1 Data Quality > Password Manager. Paste the
value generated in step c. and click Save Changes.
16. (Siebel Business 8.0/8.1.1 SDQ and Siebel Industry 8.0/8.1.1 SDQ only) Configure the Siebel instance
configuration parameters:
a) Select Site Map > Administration - Server Configuration > Enterprises.
b) Verify/Change the ff Parameters:
• Data Cleansing Type—G1Cleansing
• DeDuplication Data Type—G1DataMatching
c) Select Component Definitions and select the ff components. For each component, verify
parameters and values.
Table 3: Siebel Business
Component Definitions
Parameter
Value/Value on Restart
*Data Quality Manager *Sales
Object Manager (ENU) *List
Import Service Manager
Data Cleansing Type
G1Cleansing
Data Cleansing Enable Flag
True
DeDuplication Data Type
G1DataMatching
DeDuplication Enable Flag
True
Table 4: Siebel Industry
Component Definitions
Parameter
*Data Quality Manager
Data Cleansing Type
*eAutomotive Object Manager
Data Cleansing Enable Flag
(ENU) *List Import Service
Manager
DeDuplication Data Type
DeDuplication Enable Flag
Installation Guide for Windows
Value/Value on Restart
G1Cleansing
True
G1DataMatching
True
55
Configuring Siebel
d) Select Site Map > Server Configuration > Servers. Repeat steps b through c for server
configuration parameters.
e) Select Site Map > User Profile Preferences > Data Quality. Change the following settings:
Parameter
Value
Enable DeDuplication
Yes
Enable Data Cleansing
Yes
f) Browse to <Siebel Installation>\bin\ENU and open the appropriate file:
• Siebel Business: siebel.cfg and uagent.cfg
• Siebel Industry: auto.cfg
g) Under the area [DataCleansing] change the ff Parameters:
Enable = TRUE
Type = G1Cleansing
h) Under the area [DeDuplication] change the ff Parameters:
Enable = TRUE
Type = G1DataMatching
i)
Select Site Map > Administration - Server Configuration. Click the Synchronize link and
select Synchronize after being redirected.
17. (Siebel Business 8.0/8.1.1 SDQ, Siebel Industry 8.0/8.1.1 SDQ only) Configure data cleansing
configuration parameters:
a) Select Site Map > Administration > Data Quality > Third Party Administration. On the Vendor
Applet, include the ff value
Name
DLL Name
G1Cleansing
Group1Connector
b) Add the ff BC Vendor Field Mapping:
Table 5: Siebel Business
Business Component
Operation
Account
Data Cleansing
Business Address
Data Cleansing
Contact
Data Cleansing
List Mgmt Prospective Contact
Data Cleansing
Table 6: Siebel Industry
56
Business Component
Operation
Account
Data Cleansing
CUT Address
Data Cleansing
Spectrum™ Technology Platform 9.0
Chapter 7: Configuring SAP and Siebel
Business Component
Operation
Contact
Data Cleansing
List Mgmt Prospective Contact
Data Cleansing
c) Under each BC operation, add the ff field mappings:
Table 7: Siebel Business
Business Component Field
Mapped Field
Account
Name
FirmName
Business Address
City
City
Country
CountryName
County
USCountyName
G1 Latitude
Latitude
G1 Location Code
LocationCode
G1 Longitude
Longitude
G1 Match Code
MatchCode
Postal Code
PostalCode
State
StateProvince
Street Address
AddressLine1
Street Address 2
AddressLine2
Disable DataCleansing
DisableDataCleansing
Contact
First Name
FirstName
Last Name
LastName
Middle Name
MiddleName
M/M
TitleOfRespect
List Management Prospective Contact
City
City
Country
CountryName
County
USCountyName
First Name
FirstName
Last Name
LastName
Middle Name
MiddleName
Installation Guide for Windows
57
Configuring Siebel
Business Component Field
Mapped Field
G1 Latitude
Latitude
G1 Location Code
LocationCode
G1 Longitude
Longitude
G1 Match Code
MatchCode
Postal Code
PostalCode
State
StateProvince
Street Address
AddressLine1
Street Address 2
AddressLine2
Disable DataCleansing
DisableDataCleansing
Table 8: Siebel Industry
Business Component Field
Mapped Field
Account
Name
FirmName
CUT Address
City
City
Country
CountryName
County
USCountyName
G1 Latitude
Latitude
G1 Location Code
LocationCode
G1 Longitude
Longitude
G1 Match Code
MatchCode
Postal Code
PostalCode
State
StateProvince
Street Address
AddressLine1
Street Address 2
AddressLine2
Disable Data Cleansing
DisableDataCleansing
Contact
First Name
FirstName
Last Name
LastName
Middle Name
MiddleName
M/M
TitleOfRespect
d) Add the ff Vendor Parameters.
58
Spectrum™ Technology Platform 9.0
Chapter 7: Configuring SAP and Siebel
Table 9: Siebel Business
Name
Value
Account DataCleanse Record Type
Account
Business Address DataCleanse Record Type
Business Address
Contact DataCleanse Record Type
Contact
List Mgmt Prospective Contact DataCleanse Record
Type
List Mgmt Prospective Contact
Table 10: Siebel Industry:
Name
Value
Account DataCleanse Record Type
Account
CUT Address DataCleanse Record Type
CUT Address
Contact DataCleanse Record Type
Contact
List Mgmt Prospective Contact DataCleanse Record Type List Mgmt Prospective Contact
e) Select Site Map > Administration - Data Quality > Third Party Administration > Data Quality
Settings. Add the ff data for Data Quality Settings. These settings enable data cleansing for your
Siebel Application
Name
Value
Enable DataCleansing
Yes
18. (Siebel Business 8.0/8.1.1 SDQ and Siebel Industry 8.0/8.1.1 SDQ only) Configure data matching
configuration parameters:
a) Select Site Map > Administration > Data Quality > Third Party Administration. On the Vendor
Applet, include the ff value
Name
DLL Name
G1DataMatching
Group1Connector
b) Add the ff BC Vendor Field Mapping:
Table 11: Siebel Business
Business Component
Operation
Account
DeDuplication
Business Address
DeDuplication
Contact
DeDuplication
List Mgmt Prospective Contact
DeDuplication
Installation Guide for Windows
59
Configuring Siebel
Table 12: Siebel Industry
Business Component
Operation
Account
DeDuplication
CUT Address
DeDuplication
Contact
DeDuplication
List Mgmt Prospective Contact
DeDuplication
c) Under each BC Operation, add the ff Field Mappings.
Table 13: Siebel Business
Business Component Field
Mapped Field
Account
Dedup Token
DedupToken
Id
Id
Location
Location
Name
Name
Primary Account City
City
Primary Account Country
CountryName
Primary Account Postal Code
PostalCode
Primary Account State
StateProvince
Primary Account Street Address
AddressLine1
Business Address
City
City
Country
CountryName
Id
Id
Postal Code
PostalCode
State
StateProvince
Street Address
AddressLine1
Street Address 2
AddressLine2
Contact
60
First Name
FirstName
Id
Id
Last Name
LastName
Middle Name
MiddleName
Primary Account Name
AccountName
Spectrum™ Technology Platform 9.0
Chapter 7: Configuring SAP and Siebel
Business Component Field
Mapped Field
Primary City
City
Primary Country
CountryName
Primary Postal Code
PostalCode
Primary State
StateProvince
List Management Prospective Contact
Account
Account
City
City
Country
CountryName
First Name
FirstName
Id
Id
Last Name
LastName
Middle Name
MiddleName
Postal Code
PostalCode
State
StateProvince
Street Address
AddressLine1
Street Address 2
AddressLine2
Table 14: Siebel Industry
Business Component Field
Mapped Field
Account
Dedup Token
DedupToken
Id
Id
Location
Location
Name
Name
Primary Account City
City
Primary Account Country
Country
Primary Account Postal Code
PostalCode
Primary Account State
State
Primary Account Street Address
AddressLine1
CUT Address
City
City
Country
Country
Id
Id
Installation Guide for Windows
61
Configuring Siebel
Business Component Field
Mapped Field
Postal Code
PostalCode
State
State
Street Address
AddressLine1
Street Address 2
AddressLine2
Contact
First Name
FirstName
Id
Id
Last Name
LastName
Middle Name
MiddleName
Primary Account Name
Name
Primary City
City
Primary Country
Country
Primary Postal Code
Code
Primary State
State
List Management Prospective Contact
Account
Account
City
City
Country
CountryName
First Name
FirstName
Id
Id
Last Name
LastName
Middle Name
MiddleName
Postal Code
PostalCode
State
StateProvince
Street Address
AddressLine1
Street Address 2
AddressLine2
d) Add the ff Vendor Parameters:
Note: Token Expression and Query Expression are custom fields in their respective Business
Components.
Table 15: Vendor Parameters
62
Name
Value
Account DeDup Record Type
Account
Spectrum™ Technology Platform 9.0
Chapter 7: Configuring SAP and Siebel
Name
Value
Account Query Expression
"|" + [Query Expression 1] + [Query Expression 2] +
[Query Expression 3]
Account Token Expression
"|" + [Token Expression 1] + [Token Expression 2] +
[Token Expression 3]
Batch Max Num of Records
200
(Siebel Business Only)
Business Address
Business Address DeDup Record Type
(Siebel Industry Only)
CUT Address
CUT Address DeDup Record Type
Contact DeDup Record Type
Contact
Contact Query Expression
"|" + [Query Expression 1] + [Query Expression 2] +
[Query Expression 3]
Contact Token Expression
"|" + [Token Expression 1] + [Token Expression 2] +
[Token Expression 3]
List Mgmt Prospective Contact DeDup List Mgmt Prospective Contact
Record Type
List Mgmt Prospective Contact Query
Expression
"|" + [Query Expression 1] + [Query Expression 2] +
[Query Expression 3]
List Mgmt Prospective Contact Token
Expression
"|" + [Token Expression 1] + [Token Expression 2] +
[Token Expression 3]
Realtime Max Num of Records
200
e) Select Site Map > Administration - Data Quality > Third Party Administration > Data Quality
Settings. Add the ff data for Data Quality Settings. These settings enable data matching for your
Siebel Application.
Name
Value
Enable DeDuplication
Yes
Force User DeDupe - Account
Yes
Force User DeDupe - Contact
Yes
Force User DeDupe - List Mgmt
Yes
19. (Siebel Enterprise 7.8, Siebel Industry 7.8, Siebel Business 8.0/8.1.1 non-SDQ, and Siebel Industry
8.0/8.1.1 non-SDQ only) Configure Siebel server configuration events.
The Siebel server must be configured so that the records created in the local database can be
synchronized to the server.
a) Navigate to View > Administration - Server Configuration > Servers > Components > Event.
b) Locate the Workflow Process Manager Server components.
c) Set the following Component Event Configuration for Workflow Process Manager:
Task Configuration
4
Component Tracing
3
Installation Guide for Windows
63
Configuring Siebel
SQL Parse and Execute
4
Workflow Definition Loading
4
Workflow Engine Invoked
4
Workflow Step Execution
4
Workflow Process Execution
4
Object Manager Business Service Operation
and SetErrorMsg Log
4
Object Manager Business Component
Operation and SetErrorMsg Log
4
Object Manager SQL Log
4
d) Locate the Transaction Merger server components.
e) Set the following Component Event Configuration for Transaction Merger:
General Events
4
Components Tracing
3
SQL Parse and Execute
4
20. (Siebel Enterprise 7.8, Siebel Industry 7.8, Siebel Business 8.0/8.1.1 non-SDQ, and Siebel Industry
8.0/8.1.1 non-SDQ only) Enable marketing server components.
The Marketing Server Components must be enabled to import a list from the List Management
business object.
a) Navigate to Administration - Server Configuration > Enterprises > Component Groups.
b) In the Spectrum™ Technology Platform Server list, select the appropriate server.
c) In the Enterprise Component Groups list, locate each of the required component groups using
the following table. If the Enable State field does not contain the value Enabled, select the
component groups, click the menu button, and choose Enable Component Group.
Group Name
Components
Description
MktgOM
• Marketing Obj Mgr
• eMarketing Obj Mgr
• eEvents Obj Mjr
Marketing Object Manager.
Supports the user interface and
business objects for the
Marketing application.
Mktg Srv
List Import Service Manager
Marketing Server. Used for list
management list import.
d) Click the Synchronize view tab and click Synchronize.
e) Restart the Siebel server. The Siebel server must be restarted each time synchronization occurs.
64
Spectrum™ Technology Platform 9.0
Support
In this section:
• Technical Support . . . . . . . . . . . . . . . . . . . . . . . . . . . . . . . .66
• Documentation . . . . . . . . . . . . . . . . . . . . . . . . . . . . . . . . . .66
• Blog . . . . . . . . . . . . . . . . . . . . . . . . . . . . . . . . . . . . . . . . . . .66
8
Technical Support
Technical Support
If you run into an issue, Pitney Bowes Software Technical Support can help guide you to a solution.
When you contact Pitney Bowes Software Technical Support, please provide the following information:
•
•
•
•
A description of the task you were performing
The level or version of your operating system
The patch level or service pack
The log file located in your install directory at:
<SpectrumInstallationLocation>\server\app\repository\logs\wrapper.log
Contact information for Technical Support can be found at:
www.g1.com/Support/Contact
Note: If you purchased Spectrum™ Technology Platform through a third-party partner, please contact
the partner for technical support.
Documentation
Product documentation can be found at:
www.pbinsight.com
Blog
The Pitney Bowes Software Blog is an online resource for Pitney Bowes Software leadership to share
innovations, goals, and product/solution news, as well as exchange ideas with visitors. You can access
the blog at:
blogs.pb.com/pbsoftware
66
Spectrum™ Technology Platform 9.0
Notices
©
2013 Pitney Bowes Software Inc. All rights reserved. MapInfo and Group 1 Software are trademarks
of Pitney Bowes Software Inc. All other marks and trademarks are property of their respective holders.
®
USPS Notices
®
Pitney Bowes Inc. holds a non-exclusive license to publish and sell ZIP + 4 databases on optical and
magnetic media. The following trademarks are owned by the United States Postal Service: CASS, CASS
Link
Link
Certified, DPV, eLOT, FASTforward, First-Class Mail, Intelligent Mail, LACS , NCOA , PAVE,
Link
PLANET Code, Postal Service, POSTNET, Post Office, RDI, Suite
, United States Postal Service,
Standard Mail, United States Post Office, USPS, ZIP Code, and ZIP + 4. This list is not exhaustive of
the trademarks belonging to the Postal Service.
®
Link®
Pitney Bowes Inc. is a non-exclusive licensee of USPS for NCOA
processing.
Prices for Pitney Bowes Software's products, options, and services are not established, controlled, or
™
approved by USPS® or United States Government. When utilizing RDI data to determine parcel-shipping
®
costs, the business decision on which parcel delivery company to use is not made by the USPS or
United States Government.
Data Provider and Related Notices
Data Products contained on this media and used within Pitney Bowes Software applications are protected
by various trademarks and by one or more of the following copyrights:
©
Copyright United States Postal Service. All rights reserved.
©
2013 TomTom. All rights reserved. TomTom and the TomTom logo are registered trademarks of
TomTom N.V.
©
Copyright NAVTEQ. All rights reserved
Data © 2013 NAVTEQ North America, LLC
Fuente: INEGI (Instituto Nacional de Estadística y Geografía)
Based upon electronic data © National Land Survey Sweden.
©
Copyright United States Census Bureau
©
Copyright Nova Marketing Group, Inc.
Portions of this program are © Copyright 1993-2007 by Nova Marketing Group Inc. All Rights Reserved
©
Copyright Canada Post Corporation
This CD-ROM contains data from a compilation in which Canada Post Corporation is the copyright owner.
©
2007 Claritas, Inc.
The Geocode Address World data set contains data licensed from the GeoNames Project
(www.geonames.org) provided under the Creative Commons Attribution License ("Attribution License")
located at http://creativecommons.org/licenses/by/3.0/legalcode. Your use of the GeoNames data
(described in the Spectrum™ Technology Platform User Manual) is governed by the terms of the Attribution
License, and any conflict between your agreement with Pitney Bowes Software, Inc. and the Attribution
License will be resolved in favor of the Attribution License solely as it relates to your use of the GeoNames
data.
ICU Notices
Copyright © 1995-2011 International Business Machines Corporation and others.
All rights reserved.
Permission is hereby granted, free of charge, to any person obtaining a copy of this software and
associated documentation files (the "Software"), to deal in the Software without restriction, including
without limitation the rights to use, copy, modify, merge, publish, distribute, and/or sell copies of the
Software, and to permit persons to whom the Software is furnished to do so, provided that the above
68
Spectrum™ Technology Platform 9.0
Copyright
copyright notice(s) and this permission notice appear in all copies of the Software and that both the
above copyright notice(s) and this permission notice appear in supporting documentation.
THE SOFTWARE IS PROVIDED "AS IS", WITHOUT WARRANTY OF ANY KIND, EXPRESS OR
IMPLIED, INCLUDING BUT NOT LIMITED TO THE WARRANTIES OF MERCHANTABILITY, FITNESS
FOR A PARTICULAR PURPOSE AND NONINFRINGEMENT OF THIRD PARTY RIGHTS. IN NO
EVENT SHALL THE COPYRIGHT HOLDER OR HOLDERS INCLUDED IN THIS NOTICE BE LIABLE
FOR ANY CLAIM, OR ANY SPECIAL INDIRECT OR CONSEQUENTIAL DAMAGES, OR ANY DAMAGES
WHATSOEVER RESULTING FROM LOSS OF USE, DATA OR PROFITS, WHETHER IN AN ACTION
OF CONTRACT, NEGLIGENCE OR OTHER TORTIOUS ACTION, ARISING OUT OF OR IN
CONNECTION WITH THE USE OR PERFORMANCE OF THIS SOFTWARE.
Except as contained in this notice, the name of a copyright holder shall not be used in advertising or
otherwise to promote the sale, use or other dealings in this Software without prior written authorization
of the copyright holder.
Installation Guide for Windows
69

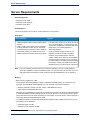
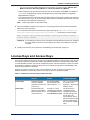

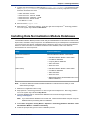


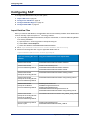
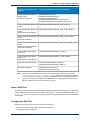
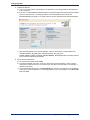
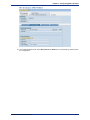
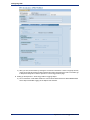
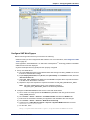
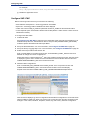
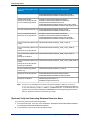
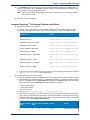
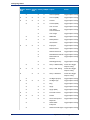
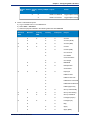

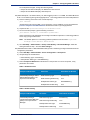
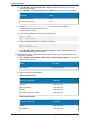
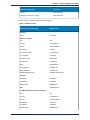
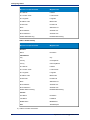
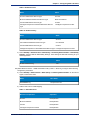
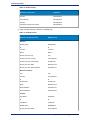
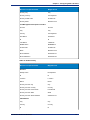
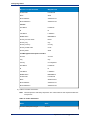
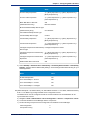


![[1 ] Oracle® Enterprise Manager](http://vs1.manualzilla.com/store/data/005669073_1-0396df232df5e560fdd03210f5126330-150x150.png)