1
118
107
191
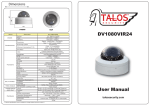
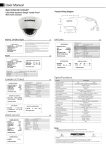
Dimensions
DIMENSION
202
136
285
FRONT
Items
SIDE
Submenu
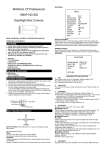
BC1080VIR30
Device
CMOS
1/3” 2MEGA CMOS
2010 (H) x 1108(V)
Total
1944 (H) x 1092(V)
Effective
Resolution
Performance
Scanning system
Digital : 1080P(30p) , 720P(60P)
Max : 1,100TV lines(1080P)
Progressive
Color : 0.1Lux(50IRE)
Minimum illumination(F1.2)
S/N Ratio
OSD
Day&Night
B/W : 0.08Lux(50IRE)
More than 50dB (AGC off)
English/Japanese/German/Italian
Russian/Spanish/Chinese/Portuguese
Auto/Day/B&W/EXT1/EXT2
1800 ~ 10500K
ATW
High Speed Shutter
1/30(1/25) ~ 1/60Ksec
2~4
WDR
Off/ON
D-WDR
Functions
BLC
Off/ON (Size, Position)
HLC
Level Setting(0~20), Color
AGC
Level Setting(0~10)
0~96 Steps
D-Zoom
Camera ID
White Balance
DNR
Off/On (Letters A to Z, Numerals 0 to 9, Symbols)
AUTO / AUTOext / PUSH / MANUAL
3DNR, OFF/LOW/MIDDLE/HIGH
Motion Detection
Privacy Mask
Off/ON
32 Areas (On/Off, Color, Position)
Sens-Up
x2 ~ x4
Sharpness, Reverse(H,V)
Etc. Function
Video Output
Visible Range
(LED On)
ColorBar
Off/ON
Alarm Output
ANALOGUE
NTSC, PAL CVBS(without WDR)
Indoor
Video Output
Built-In 30pcs of Super IR Leds(40M)
Outdoor
Built-In 30pcs of Super IR Leds(30M)
Lens
Power Consumption
Hardware
Etc. Function
In/Output
HD-SDI(SMA CONNECTOR)
Operating Temperature
Operating Humidity
Dimension
BC1080VIR30
6~50mm DC Auto IRIS VF Lens
User Manual
DC 12V/ 24 AC, Less than 2.2Watts
Absolute : - 10C ~ +50C
Less than 90%
140mm (W) x 190mm (H) x 280mm(W)
Weight
*** Above specifications can be subject to change without previous notice***
2200g
talossecurity.com
Camera setting
Camera installation
Anchor
Conduit hole Cap
Mountbase
Fixing Screw
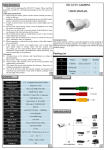
1. On the ceiling(or wall), make the Anchor hole and put the Anchor into
the hole completely.
Use Fixing Screw to settle (Anchor size : Φ4 / Length 30mm)
2. After set up the Bracket Base, use “L”wrench to make tight the Camera Body
and Bracket Head
Camera setting
Camera Base
Video Jack
(BNC/RCA)
DC 12V
Power Jack
T
W
∞
N
Cable Jack Setting
Power (+)
Video Signal
3 Axis Bracket Guard
“L”wrench
UP
Power (-)
Power Jack
(DC 12V)
RIGHT
LEFT
Video GND
Video Jack
Open
DOWN
Joystick Push
Menu / Enter
Cover
Camera
[PIC 1]
Extra Video output
for preview
[PIC 2]
Close
Open
Camera setting
Hood Fixing Screw
Close
1
2
Open
Open
Close
2
1
1
3
1. Open the front cover for adjustment of desired viewing angle and it can be
controlled by using the Focus/Zoom control stick like as [PIC 2]
2. According to [PIC 2], open the front cover to SETUP the OSD menu by using
Joystick.
3. If necessary, change OSD setting for desired
performance, at camera control panel
* The extra video output can be used for installation with
the Portable monitor.( For the camera setting, please check the OSD menu)
* Push the OSD joystick little more than 1sec., OSD manu will be appeared.
* Move the OSD joystick to change the setting.
* Push the OSD joystick to Enter and Set the menu.
How to assemble the hood
How to assemble camera base and Mount Base
4. After changing OSD menu, lock the front cover completely for weatherproof.