1
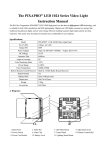
PIXAPRO GLOWPAD 144SB User Manual I Product Structure: 6 8 7 2 9 10 3 1 4 5 ① ④ ⑦ ⑩ Power switch Angle Adjustment Screw LED Light Panel Vertical Mount Thread ② Color Temperature Controls ⑤ Hot Shoe Mount ⑧ Battery Test Button & Indicator ③ Dimmer Controls ⑥ Battery Mounting Plate ⑨ DC input II Method of Application 1. Power input (Two Power input mode, but not both use) 2. Battery input: Compatible With Sony NP-F series Li-Ion Batteries Tips: Mounting the lithium battery: Please Slide the battery in the direction of the arrows shown on the Battery Plate. Disconnecting the lithium battery: Please slide battery out in the opposite direction, and then lift out. 3. DC adapter input: 6.8V-12V DC mains power adapter. Attention: Do not use the battery and Mains DC power Adapter Simultaneously! 2. LED Video Light Installation a. To Camera/Video Hot Shoe: Mount the LED light onto your Stills or Video Camera’s hot shoe, then tighten the nut. b. To Light Stand/ Tripod: There is a 1/4 inch thread in the bottom of the LED light hot shoe mount, which can be directly mounted onto a light stand or tripod. 3. Power Switch Turn the power switch ① to “on”, to switch on your Glowpad Led Light. 4. Dimmer Controls Rotate the dimmer control dial ③ to adjust brightness 0-100%. 5. Colour Temperature Controls Rotate the colour temperature Control Dial ② to adjust colour temperature between 3200-5600K. 6. Battery Power Test First shut off the power, and then press battery test button ⑧, to show the power indication lights. When all of the power indication lights are lit, mean the battery power is full. If only one of the power indication lights are lit, it means that the battery power is low. If none of the Power Indicator lights are lit, this means that the battery needs to be recharged. III Product Specification ≥93% 15W Color Rendering Index Color Temperature 288×148×28mm Weight 360g LED Quantity 144 LEDs Max Output Size 3200-5600K IV Troubleshooting In using this product, you may meet the following problems Description Cause Trouble-shooting Low battery Install new battery or charge the batteries before use. Circuit board damaged Send for repair Inadequate or low luminance at the highest grade Low battery Install new battery or charge the batteries before use. Battery power test Inaccurate when power switch is on Display low battery when you increase the brightness, Display high battery when you lower brightness Battery capacity shown indicated the length of time available for use in the current luminance; A high luminance requires more power and shortens the length of time available for use, so the battery capacity shown is lower. Normal Nothing happens when unit is switched on. PIXAPRO LTD. Address: 50 Popes Lane, Oldbury, West-Midlands B69 4PA Tel.: +44 (0)121 552 3113 Website: http://www.essentialphoto.co.uk E-mail: [email protected]