1
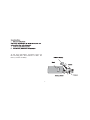
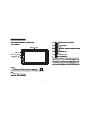
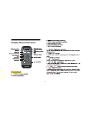
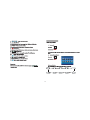
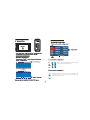
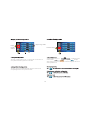
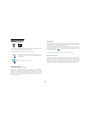
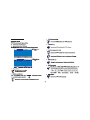
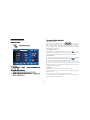
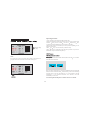
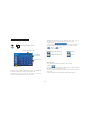
Safety Precautions.............................................................................................................................................1
Precautions prior to Operation.............................................................................................................................2
About Safety....................................................................................................................................2
About LCD.......................................................................................................................................4
Operation and Maintenance of Remote Control...................................................................................5
How to Use Batteries Properly...........................................................................................................5
Playable Disks.................................................................................................................................7
Maintenance of DVD Player...............................................................................................................7
DVD Disks.......................................................................................................................................8
CD-R/CD-RW Disks..........................................................................................................................8
MP3 Files (CD-ROM)........................................................................................................................9
Fast Guide for Buttons on Main Unit....................................................................................................................10
Description of buttons on Remote Control............................................................................................................11
Basic Operation................................................................................................................................................12
Power on/off...................................................................................................................................12
Menu operation..............................................................................................................................12
System Menu.................................................................................................................................13
DVD Disk Playback...........................................................................................................................................15
DVD Playback..................................................................................................................................................16
DVD Functional Operation.................................................................................................................................16
Play and Pause...............................................................................................................................16
Fast forward/Rewind........................................................................................................................16
DVD/USB Playback Selection...........................................................................................................16
Track Selection...............................................................................................................................16
Skip to Designated Track..................................................................................................................16
Numeric Keyboard...........................................................................................................................16
DVD Playback Information Display...................................................................................................16
DVD Subtitle Switch........................................................................................................................17
DVD Multi-language Switch.............................................................................................................17
DVD Setup.....................................................................................................................................18
AUX Playback...................................................................................................................................................21
CAMERA Playback............................................................................................................................................21
SD Card Playback.............................................................................................................................................22
USB Playback...................................................................................................................................................22
GPS function....................................................................................................................................................22
Radio Operation................................................................................................................................................23
TV Reception....................................................................................................................................................24
Touchscreen Rectification..................................................................................................................................25
Switch wheel control keys setup......................................................................................................................26
BlueTooth Function...........................................................................................................................................27
Connect diagram...............................................................................................................................................28
Troubleshooting................................................................................................................................................29
6 Do not allow any hard object to collide with, squeeze or scratch the
player. When it comes to cleaning the player, please only use a piece
of dry cloth or paper tissue to clean the surface of the player. As for
theliquid crystal display screen, clean it up with a piece of dry cloth or
papertissue without depilation gently to avoid any damage to the player.
7 When the screen is ejecting or retracting, or adjusted in terms of the
viewing angle, the motorized mechanism of this player stops on its own
inthe case of any obstacle standing in the way. And then please remove
suchan obstacle away before resuming operation.
8 If any abnormality is found during operation, disconnect the power
immediately and check the list of roubleshooting? for resolution. If
failed, please contact the supplier or maintenance service center for help.
1 This player is an intelligent DVD player,which has the remote control
function such as loading slot open and close the DVD disk.
2
9 When replacing the fuse, be sure to use the fuse of the same
specification (current specification for example). It is very dangerous
touse different fuse or electric wire to substitute the broken one,
which could lead to severe damages to the player.
Do not allow any foreign objects or liquids to enter the player.
3 Please do not place or install the player at a wet place or a place
at high temperature or in the direct sunshine to avoid deformation of
this product. Do not keep this player in contact with any chemical
agent for a long time to prevent the paintwork peeling off the
surface, fire or accidents.
10 This system integrating 10 VCD/CD and 6 DVD disc-loading and
unloading mechanisms, is capable of playing back DVD, VCD,
CD,MP3 and MP4. Meanwhile, it also can be used as a TV set and
radio. In the mode of TV or radio, there is a slight difference in the
aspect
of volume. However, the difference in volume could be
considerable due to various recording standards adopted by diverse
discs. When it happens, please check out the disc standards and
connect the producer for assistance. 11 In the case of any problem
out of the range of roubleshooting?it is not allowed to dismantle the
player for repair on your own discretion,which can only be performed
by professional maintenance personnel.
4 Please replace the batteries for the remote control to ensure
normaloperation of this player. In the case that batteries leak
chemical liquid, please use a piece of dry cloth or paper tissue to
clean up the mass and then replace those batteries. Note that batteries
can not be placed upon any metallic object and never give the batteries
to children to play with soas to prevent fire due to short circuit or
accident due to the leakage. As forthe used batteries, they shall be
disposed in accordance with the local laws and regulations.
12
5 In the case of any leakage of liquid crystal due to rough handling,
please note not to allow the liquid crystal to get in touch with skin, eyes
ormouth. At the same time, try to get in touch with maintenance
personnel to have it replaced. The broken liquid crystal display
screen must be disposed according to the local regulations.
2
Install and operate this player in accordance with corresponding.
instructions set out in the manual. Although a protection circuit
is encompassed, unnecessary damages or losses still can not be
guaranteed.
3) Before installation, make sure to turn the ignition key to the OFF
position or pull it out. When the engine is activated, installation of
this player could cause electric leakage or short circuit of the
batteries.
13 The used player shall be disposed in accordance with the local
regulations.
4) Mind never to damage any piping, wiring, fuel box or electric circuit.
Otherwise, it may lead to a fire. When drilling holes on the front
panel inside the vehicle, you must ensure that any hidden part
beneath is kept intact.
Do not mount this player in this way that the opened or closed
screen blocks driver's visibility or interferes with his or her
operations in the vehicle such as the release of the safety airbag and
the actuation of thesteering wheel, gearlever or braking pedal etc.
5) Never deploy any bolt or screw to fix the safety devices such as the
steering interlock devices, the fuel transfer or breaking system.
Otherwise it may lead to a fire or an accident.
1) The installation of this player is required to be executed by technical
experts.
6) If there is an abrupt change in the ambient temperature, the moist
could condensate on the surface of the screen. All you have to do is to
wai t fo r a while till it is evaporated and then this player becomes
available again.
2) If you try to install this player by yourself, you have to refer to
the installation instructions and circuit diagram contained in the
operation manual. Incorrect installation could lead to a fire.
3
Do not press the LCD monitor. Otherwise, the pictures displayed could
be deformed and such an action could lead to a failure.
The touch screen is firm and reliable. However, you must be aware of
the followings in operation:
Clean-up Cautions
1. Not to scratch the screen with force. In the process of application, all
you have to do is to touch the screen gently.
Use a piece of soft cloth dipped with some water to clean up the
LCD screen instead of solvents such as gasoline, thinner, or cleaning
agent sold on the market or antistatic spray.
2. The touch screen is not waterproof and water could enter the circuit via
the front panel under the extreme conditions.
3. The touch screen is covered by glass. So please do not knock or press
it with force.
Do not use this player when the ambient temperature is lower than -15
or higher than 45 .
4. Try to avoid high temperature, dust or humidity.
If you park your vehicle at a very cold or hot place, pictures on
thescreen may become blur, which is not abnormal at all. As long
as thetemperature changes into normal again, the display on the
screen turns clear.
The stuck pixel, referring to the static blue or red spot appeared on
the screen may happen to any LCD monitor. The LCD is a very
precision instrument with over 99.99% normally-functional portion but
below 0.01% mal-functional portion. The latter portion can not be
normally activated but will not affect you to enjoy it.
4
7) Never place batteries or remote control loaded with batteries in the
surroundings at high temperature including an enclosed vehicle with
doors and windows closed, trunk or a place in the direct sunshine and
adjacent to a heater.
Do not place the remote control on the dashboard, steering wheel or in
any other places in the direct sunshine. If you do, the temperature could
be high enough to deform the remote control, especially in the summer.
8) Keep batteries away from
children.
immediately if they swallow down any battery.
When the vehicle is parked in the sunshine without any shelter, you
should put the remote control in the storage box or in a protective
place. In the direct sunshine, the signal from the remote control may
not be properly received by this player. In such a case, please put the
remote control next to the sensor on the front panel of the mainframe.
And sent to the
hospital
Cautions about Batteries
1. Type of Battery: lithium battery
2. Operation Life: approx. 1 year (under indoor temperature ) in normal
operation 3. While disposing batteries, make sure to observe the local
regulations on depleted batteries.
Treatments for battery electrolyte leakage are presented below:
If the batteries are not used properly, it could lead to overheat, fire,
injury, failure or contamination to the surroundings due to the cracks or
electrolyte leakage of the batteries.
1. Wipe off the electrolyte residue inside the battery compartment and put
in new batteries.
2. When the leaked electrolyte attaches to the human body or skin, rinse it
off with water.
1) Install the batteries properly as required by the operation instructions
upon confirmation of the right battery polarities (+ / -).
3. If the electrolyte enters your eyes, do not rub with hands but rinse with
water and then go through the medical treatment.
2) Never use batteries that are not designated.
3) The empty batteries must be replaced in time.
4) When the remote control is put aside for a long time, please take the
batteries out.
Emergency Treatment:
In order to prevent life or property damages to the user or others, please
immediately turn the power off and deliver it back to the nearest
maintenance center or automobile stereo system dealer for assistance in
the case of any foregoing abnormality.
5) Bind up depleted batteries with adhesive tape or store them in a plastic
bag for insulation in s torage.
6) Never charge, short-circuit, dismantle, deform and heat the batteries
or throw them into fire or water and make them contact with any metallic
object.
5
At the first time before operation, draw out
the extruding thin sheet beneath to make the
battery contact normally.
6
Please use standard round disks. If you insert an irregular, noncircular
or deformed disk, it could get stuck inside the player and is unable to
play back properly.
Before loading a disk into the player, please check out whether there is
any crack, scratch or bend on the disk. If there is, such a disk can not
be usedand could cause failure to this player. When handling a disk,
remember not to get in touch with the recording side(no printing side).
While a disk is not in use, please keep it in the disk box.
Please do not put a disk in the place in the direct sunshine or at
high temperature.
Never attach any label to the disk surface, scratch or apply any chemical
to it.
While cleaning up a disk, please use a piece of soft dry cloth from
the center to the edge to wipe it clean.
If the onboard heating system is on in winter, condensation could take
place inside the DVD player, which may make it unworkable. If any
failure comes into being, please switch off the player immediately and
wait for 1 hour to let it dry out. And use a piece of dry cloth to wipe off
moist on the disk if happened.
Bumpy road could interrupt the disk playback process.
7
Specific functions may not be available for some DVD disks. And this
play could be incompatible with some DVD disks.
While a CD-R/CD-RW is used, it can only play the disks that are
completed.
DVD digital multi-purpose disks
CD-R/CD-RW disks recorded by Track CD recorder or a personal computer
may not be playable due to the property of disks, scratches or dirt on disks,
or dirt or dew on the lens of this player.
DVD can perform large capacity access and processing of digital signals
of audio and video of movie software. It is the compact disk for
accessing high quality of pictures and acoustics.
Disks recorded on a personal computer may not be playable, which is
determined by the setup and environment of the application format.
Please use a proper format for recording. (For details, please
contact the manufacturer of the application process.)
DVD menus
CD-R/CD-RW disks may not be playable under the direct sunshine or at a
high temperature place or the storage environment of automobiles.
DVD can display several headers, hence called the header
menu. In addition, the DVD header menu refers to the display of
various settings of items, which are able to export menus at random
during playing. As software differs, it facilitates audio switching
between Dolby Digital and linear PCM, subtitles and dub languages,
etc.While DVD-R/DVD-RW disks are used, only video formats (in the
video mode) can be played, but it is unable to play general computer files.
Headers and other text information recorded in the CD-R/CD-RW disk may
not be playable in this player (in the case of audio information (CD-DA).
If you mount the CD-RW disk into this player, the time for you to wait for
playing will be longer than you do conventional CD or CDR.
Before using the CD-R/CD-RW disk, please read the relevant cautions.
DVD-R/DVD-RW disks recorded in the video format (in the
video mode) may not be playable due to the property of disks, scratches
or dirt on disks or dirt or dew on the lens of this player.Disks recorded
on a personal computer may not be playable, which is determined by
the setup and environment of the application format. Pleaseuse a proper
format for recording.
8
Files are compatible with ID3 label Version 1.0 and Version 1.1 formats
to show special editions ( headers of disks), Track (Track headers) and
authors(Track performers).
MP3 is a kind of audio compact method, which should be brought
into Audio Level 3 in the MPEG standard. The audio compact
method has already been in the depth of personal computers as a
standard mode. Mp3 can compact original audio data to 10% of its
initial size and to keep the voice in high quality. This means that about
10 Track CDs can be recorded on a CD-R disk or CD-RW disk. In this
case, there is no need to constantly change CD disks for playing for a
long time.
Only when MP3 files at the frequencies of 32, 44.1 and 48KHZ are
playedcan enhancement function be effective (16, 22.05, 24, 32, 44.1,
48KHZ can
be playable)
The acoustics of MP3 files can usually be improved after the increase in
bit rates. This player is able to play recorded voice at the playing bit
rates of 8KBPS to 320KBPS. In order for you to enjoy considerable
acoustics, werecommend that you use the disks recorded at 128KBPS or
higher.
This player allows the playing of MP3 files on CD-ROM, CD-R
and CD-RW disks as well as the content of any disks compatible with
ISO9660 Levels 1 and 2 and ROMEO and JOLOEY file system.
It can play the disks recorded compatible in multiple sections.MP3 files
are incompatible with the transmission of data written in groups.The
maximum number of characters that can be displayed as names of files is
32 characters (calculated from the first character). The maximum
number that can be displayed as the name of a folder is 32 characters.
Important
If a file is recorded in the ROMEO and JOLIET file system, it can
display 32 characters only. When a disk with MP3 files and audio data
(CD-DA), for example, CD-EXTRA and MIXED-MODE CD, they
can switch between MPE and CD-DA to play these two types of discs.
When one MP3 file is
extension name (Mp3).
named, please
add
the corresponding
file
This player will play the files with the extension name (.MP3) as MP3
files. To prevent noise and failure, please do not use such an extension
name for non MP3 files.
The selection sequence of playing and other folders being operated
will become the writing order used by writing software. Therefore, the
sequence expected by the playing time can not be in conflict with the
actual playing. However, some software permits the setup of playing
sequence.
9
10
11
12
Touch to select and adjust the menu,use this menu
to take sound effect configuration.
Standard,Jazz,Rock and Pop are pre-stored.Touch the
relevant button to select your favorite mode.Bass and
TrebleAre pre-stored also.
Imaga
Config
uration
Bright
20
User
Contra
20
Soft
Color
20
Nor
Hue
0
Bri
Clock
11:13
Lang
Eng
Touch
Off
Reset
Off
Adjust image mode
Function Setup
After selecting clock,press to
minute sections,
The range of bright,contrast,Color is 0-40,touch the relevant button to
select yourfavorite mode to get the best video effect.
and then press
highlight hour and
to adjust,
When ready,press the button clock again to undo the highlight and exit the
clock adjustment mode.
This player presets user,Standard,Soft and Bright for selection,touch
corresponding button to select your favorite mode.
14
Attention:
The DVD player can play back either standard 12cm or 8cm (single-sided)
disk at one time . And do not use adaptor while playing back an 8cm disk.
Never insert any other object into the disk slot.
1. Press once to select DVD and insert a playable disk into the disk slot;
2. Insert a playable disk into the disk slot directly;
If you are unable to completely insert one entire disk or you are unable to
play it afte r you insert it, please check whether the side with the label is
facing up. Please press
to exit the disk and check whether the disk
is damaged and then insert it.
3. Select DVD playback mode from the SRC touch area.
Never insert the disk by force so as not to damage the inner par.
When the DVD playback main menu appears, press
this button to let the system start playing back the disk
automatically.
Press this button to eject the disk.
DVD video mark:
Standard DVD-Video Laser Disk
On the cover of each DVD laser video disk package, you can definitely
find out such a mark, indicating that the contents (audio and video)
of DVD disk conform to the DVD-Video standards. And all the
functions are defined according to such standards. As long as this
mark is on, you can tell it is a genuine DVD-Video laser disk which
is playable on this player.
Multi-subtitle Playback
If you like enjoying foreign films, but you are not so good at English, you
must remember this icon, which indicates that this CD provides different
subtitles foryou to play. The numbers are used to show the quantity of
subtitles. This player can play disks of different types; however, such
subtitles are not used in some of DVD disks, so you must note the words on
the packages to make sure whether there are any subtitles in Chinese.
17
Attention: If the selected subtitle language is recorded in the DVD disk,
while playing, the subtitles will automatically display the selected
language; if there is no selected language recorded, then it will display
the subtitle language designated on the compact disk
For DVD, total 6 options are offered including language setup, audio
setup, video setup, rating setup and misc setup.
2
Video setup
21
In the GPS condition,all the touch menu are ineffective.Except touch
operation for navigation.You can use the panel key and remote control to
operate after exit GPS.You need a connector for exernal GPS box ,the
connector and external GPS box are optional.
22
1.Manual Search
Press the menu adjustment buttons
on the remote
control (ordirectly touch the manual search area on the screen) to
start searching radio station automatically, which only stops when a
station is found. At the same time, the actual frequency of searched
station displays on the screen.
2. Automatic Search
S
Touch the fully automatic search area on the screen
to start
searching from 87.5MHz, which only stops when the storage for 16
preset stations is full or the current frequency reaches 108.0MHz.
3. Manual Save
A) When it becomes perfect by fine-tuning, press
and the
current frequency flashes until being saved to the position you select.
Or press "NTER"alternatively on the remote control to save it.
B) Directly touch the current frequency and it flashes and
becomes red. Then select the storage position for the current
frequency on the touch screen directly and click the it again to stop
flicking and save it accordingl.
Attention:
1.In automatic search, press any button to stop searching.
2. This player can save up to 24 radio stations, 8 for FM1, FM2 and
AM respectively.
3.Fully automatic search is only available for AM/FM.
4. In the manual save mode, no button can be actuated while the
frequency to be stored is flashing.
23
S
In the TV mode, touch
to start searching automatically. When
a channel is found,press the same buttonagain to stop searching and save the
found channel.The player can save up to 100 channels. During the process
of search, press any button or touch any active spot on the touch screen
abort and quit. When search is over, the system goes to the first channel.
A)TV System Selection
Touch the System: PAL area to select TV system. TV systems are
PAL/NTSC/SECAM/PAL-M/PAL-N.
B)TV Sound Selection
Touch the Sound: D/K area to select TV sound system. TV sound systems
are D/K B/G I M/N.
Use the remote control or click the relevant buttons on
the touch screen to activate TV function. Press this button
to select previous or next TV channel. In this way, when the end is
reached, system will start from the beginning channel automatically.
And channels can be selected by pressing the numeric buttons directly.
If the number of channel comprises of 2 digitals, only typing in both
digitals within 2 seconds is acceptable. Otherwise, system solely
recognizes the channel corresponding to the digital put in first.
24
Operation steps:
1.Use something spiky to clink the coordinate of the NO.1 position,the
coordinate will be red after clinked,XPOS:168ypos:88in the middle will
display the current coordinate value,(Note:Never use too acuity or tartness
things,otherwise the touchpanel might be hurt).
2.As the first step,take turns to select coordinate 2,3,5,all the coordinate
will be red,as the following image shows:
touchscreen rectification
menu
Operation point
25
Operating Procedure:
1. Press 1234enter to enter setup menu under stand-by state.
2.Setup menu includes 8 function keys,touch the one you need to setup,the menu
will show please press for 5 seconds ,you will see Setup Success after
you done it successfully;If failed,please repeat the above procedures.
3.Repeat as the operate 2 to touch the keys of what you need sequentially,you can
setup 8 keys at the most.
4.Press save key to save and exit,after you finish the setup.
5.Press
Reset
to resetting,then repeat the above procedures if you need to
eliminate the setup records and re-setup the keys.
Menu for setup
the keys
Note:
Short press GPS control button under GPS mode,shift to last state
mode,shift back to GPS mode.
Press 1234enter to enter setup menu under stand-by state.Make sure to
get right connection for the three control cables for keypress.
If not in GPS
Short press GPS control button,you will see Normal/Multi setup menu.In Normal
mode,it is like the normal GPS mode In Multi mode,you can see the GPS image
and listen music at the same time,when there is a voice direction,it will shift
automatically to voice direction mode,after voice direction,it will shift
automatically to music mode.
For GPS navigation details,please read GPS software user manual.
26
2.Multimedia Control Key:used for bluetooth audio play. They are
volume,down,play/pause,last,next,stop and volume up,in turns.
BlueTooth Function(optional)
3.Operation Key
Used for dial operation ,0-9 ,*,# used for dial the number, M is the key to
shift the voice from the DVD unite to cellp hone; C used for back space,
Select BlueTooth Function
dial out,
pick up.
4.Function Selection zone:
Information display zone
Multimedia
Telephone function
Set up
Telephone directory
Exit
Control Key
Operation Key
Operation guide:
1.Press SRC to enter SOURCE selection,get into bluetooth.
2.Choose
Operation guide
3.Search the device which named "arkit"through your bluetooth mobile
phone,then match it with the password 1234.
4.Connect the device,the display zone will show onnection?after you done it
successfully.
Bluetooth menu includes Information Display Zone,Multimedia
Control Key,Operation Key and Function Selection zone.
5.Take the operations which your Bluetooth mobile phone supports.
1.Information display zone:used for display connection
condition,incall display and other operate information.
27


![hank yo_fo buyil_gaSamsung (}a_Te_a ]hs](http://vs1.manualzilla.com/store/data/005691502_1-2e8e29ffb67d0c8f7d0d701e3cb644b7-150x150.png)