1
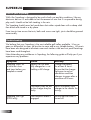
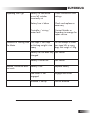
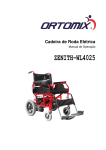
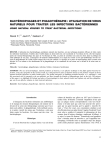
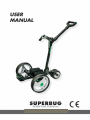
SUPERBUG
Index
Superbug Diagram
.................................. 3
Welcome
.................................. 4
Safety Notices
.................................. 4
Description
.................................. 4
User Controls
.................................. 5
Superbug Contents
.................................. 6
Assembly
.................................. 7
Using your Superbug
.................................. 8
Best Practice
.................................. 10
Care of the Batteries
.................................. 11
Charging the Batteries
.................................. 12
Technical Specifications .................................. 13
Care of your Superbug .................................. 14
Troubleshooting
2
.................................. 14
SUPERBUG
1
13
2
3
12
4
7
11
10
5
6
8
9
Fig 1
1 - ‘D’ Handle
7 - Lower handle lock
2 - Upper Handle
8 - Battery Power Connector
3 - Sliding Lock
9 - Lower Bag Support
4 - Lower Handle
10 - Lower Bag Mount
5 - Drivewheel with AT tyre
11 - Front Wheels
6 - Steering bearing
12 - Battery Pack
13 - Upper Bag Mount
3
SUPERBUG
Welcome to the world of low stress golf
Congratulations on becoming the owner of a Superbug Electric golf trolley.
The lightweight, powerful Superbug has controllability and ease of use that is second to
none.
Please take some time to read this manual carefully so that you will get the most from
your Superbug. If you have any problems or queries, please call your retailer.
Safety Notices
• Do not drop or damage the fully sealed batteries as they contain acid which will
burn the skin and could cause blindness. Never attempt to open the battery case or
incinerate the battery.
• Always charge the batteries in a well ventilated area. During normal use the battery
is effectively sealed and practically no gases or acid escape from the case making
it very safe. In the event of a charger or battery malfunction however explosive gas
may be released.
• Keep the battery away from sparks, flames and dangerous chemicals.
• Always switch off the power at the mains before connecting or disconnecting the
charger.
• Do not put anything metalic near the battery terminals as this risks short circuiting
the battery with the risk of fire or explosion.
• In operation, ensure that the trolley is under control at all times. If it allowed to
collide with other people or property then injury or damage may occur.
• Superbug is designed to carry a golf bag of upto 15Kg - overloading the trolley
may cause damage and will invalidate the warranty.
Description
Superbug is designed for the player to walk behind and steer by moving the D-Handle
in the desired direction of travel.
The controls are on the D-Handle and are arranged for either a left or right handed
operator. All of the weight is taken on the three wheels at4 all times so the player only
has to operate the controls and steer. The two, large diameter front wheels roll freely
whilst drive is from the single steering wheel at the back.
The motor is contained within the rear wheel and drives magnetically with no gears,
brushes or gears to wear out or create noise.
4
SUPERBUG
Superbug folds in just a few seconds to a tiny package to fit in very small cars and for
easy storage.
All controls are located on the D-Handle (Fig 2). There are two on/off switches,
variable speed control and the auxillary function button.
User Controls
Left and Right Hand On/Off Switches
Auxilliary
Function
Speed Control
Fig 2
Power Switches:
There are two power switches to make the Superbug user friendly to left and right
handed golfers. The switches are marked “O” for off and “I” for on. The Superbug
will drive when both switches are in the on “I” position.
Speed Control:
The Speed is set by a roller in the centre of the D-Handle
(Fig 3). This can be set to adjust the speed of the trolley
from about 2kph to 7kph. The actual speed of the trolley
will depend on the speed setting and the terrain.
Auxilliary Functions:
Fig 3
The function of the auxilliary function button differs with each model in the Superbug
Range as follows:
Model
Auxilliary Function
Superbug
Power Boost (press and hold)
Superbug D200
Electronic Brake (toggle on/off)
Superbug Remote
Remote / Manual Mode (toggle on/off)
Please refer to the relevant models for more important information on the use of these
functions as they differ from model to model.
5
SUPERBUG
Superbug Contents
The Superbug carton will contain the following items:
•
•
•
•
•
•
•
Frame with handle folded, integral rear wheel and bag straps
Front wheels x 2
Wire Frame Battery Carrier
Batteries in a custom fit battery bag
Battery Charger
Transmitter (Superbug Remote only)
User Manual
If any of these items are missing please contact your retailer immediately.
6
SUPERBUG
Superbug Assembly - common to all models
Step 1 : Install the Wheels
The wheels are complete with freewheel axles and bearings
and these fit in the holes at the ends of the crossbar and are
held in place by a screw with a triangular knob. Slacken the
screws if necessary, push the axle fully into the hole and
tighten the screws to secure the wheels in place.
Step 2 : Unfold the Handle
Fig 5
The lower handle locks into position in the folded position to
make the Superbug easy to carry. To unlock it press the
two lock buttons on either side of the main pivot and lift the
lower handle. The upper handle locks in place by means
of sliding the locking cover fully over the joint.
Step 3 : Install the Battery
The battery pack is fitted in a tough nylon bag. The bag is
attached to the battery carrier by means of the velcro straps
on the bottom. To fit the battery bag to the carrier turn the
battery bag upside down with the power lead facing front
left and open the velcro straps. Position the battery carrier
on top of the battery with the hooks facing forward (Fig 7)
and securely close the velcro straps. The battery should now
be turned the right way up and may be carried by the
integral carry handle.
To install the battery onto the Superbug, simply locate the
Fig 6
Fig 7
battery carrier hooks over the plastic mounts on the frame. NOTE: when installed on
the trolley the powerlead from the battery should be facing towards the front right of
the battery carrier.
Step 4 : Connect the Battery
7
Before connecting the battery ensure that both power switches
are set to the off “O” position. The battery cable is plugged
into the socket located on the right hand side of the main
chassis tube.
Fig 8
7
SUPERBUG
Step 5 : Position the Golf Bag
Undo the top and bottom straps, rest the golf bag on the
mounts and tighten the straps arond the top and bottom
of the bag. It is important to ensure that the bag is
securely attached as the bag braces the Superbug handle
and is integral to the rigidity of the Superbug.
Position the golf bag centrally so that the weight is
proportionate.
Superbug is now ready for seriously relaxed golf.
Using your Superbug Trolley
Fig 9
Before first use it is vital that the battery is charged for at least 8 hours to ensure that the
maximum charge level is attained. See the later section “Charging the Batteries”.
All Superbug Models:
All Superbugs incorporate a the features SAFE START, CRUISE CONTROL,
DESCENT CONTROL and LOW VOLTAGE PROTECTION.
SAFE START prevents the motor from driving the trolley until it is pushed. If the
Superbug is stationary when the power is switched on nothing will happen until the
user pushes the trolley forwards to approximately 1kph.
The recommended starting procedure is as follows:
• Turn the speed control to minimum - towards you
• Turn both power switches to the on “I” position.
• Push the Superbug forwards until the motor begins to drive (usually within 1/4 to
1/2 metre) and then adjust the speed of the trolley to your preferred walking pace
by means of the speed control.
To stop the trolley turn one of the power switches to the off “O” position. When you
want to continue just turn the power on and push the trolley - it will resume at the same
speed that it was last set to.
CRUISE CONTROL. Cruise control maintains the speed of the trolley irrespective
of terrain, you do not need to continually adjust the speed control of the trolley when
going up or down hills to hold a constant speed.
This is very noticable on undulating fairways when the trolley cuts power when going
down an undulation and applies power as it starts to go up hill - this is a normal
function of the trolley.
8
SUPERBUG
DESCENT CONTROL, if the set speed of the Superbug is too fast to negotiate a hill,
engaging Descent Control can be activated by setting the speed control to minimum
i.e. fully towards you. Descent control will then limit the speed of the trolley
LOW VOLTAGE PROTECTION protects the battery from damage as a result of being
excessively discharged. The effect of this is that if the batter voltage drops below 21V
+/- 0.5V, the trolley will stop. Just prior to it stopping a vibration may be felt through
the trolley - again this is a normal function of the trolley.
Superbug:
The Superbug has a full power button which when pressed allows you to apply
full power should you need it for any reason. When released the speed resets
automatically to the cruise control setting.
Superbug D200:
The Superbug D200 functions in the same way as the Superbug but has a more
powerful motor for very steep courses and instead of a full power button as on the
Superbug the function of this button is an electronic brake, This is in addition to the
descent control which is standard on all models. The electronic brake can be utilized in
the following ways.
If the hill is very steep and requires additional braking the brake button can be
switched on and off repeatedly in order to control the speed of the descent or
alternatively the brake button can simply be switched on and the trolley will make its
descent at a slow crawl.
Please ensure that on starting the Superbug D200 you do not leave the brake engaged
as the trolley will not start.
Superbug Remote:
The auxilliary button now is used to toggle the trolley between Remote and Manual
Modes. In Manual Mode the trolley works in exactly the same way as Superbug. In
Remote Mode the trolley may also be controlled by using the supplied transmitter.
The transmitter provides controls for forward, reverse, left, right,
stop, accelerate and decelerate functions.
Braking in manual mode:
Normal slopes
•
The red button in addition to engaging the remote will
serve to slow the trolley down on a normal slope, simply
push it down whilst you are going downhill and the
trolley will slow to a low speed.
Fig 10
9
SUPERBUG
Very
•
•
•
•
•
Steep Slopes
Stop the trolley and turn it off with one of the green switches
Push down the red button
Turn the trolley on again with the green switches
The trolley will now be very difficult to push forwards and hence on a steep slope
will proceed at a very low speed
In addition turning one of the green switches on and off in this mode will toggle
the braking on and off
Remote Control functions should not be used in areas where a loss of control could
cause damage. The transmitter uses a 12v 23A battery - it is recommended that a
spare is carried at all times as the transmitter range will reduce as the battery starts to
near the end of its useful life..
Horizontal Springs above Yoke
The springs serve to asset the trolley in running in a straight line. They are factory set
and should not normally be adjusted. Should adjustment be required, tightening the left
spring will cause the trolley to turn more to the left and will correct a trolley that tends to
run off to the right and visa versa. Care should be taken not to over tighten as this can
reduce the turning circle
Care
The remote is designed to assist hands free use however care should be taken to use
the in remote function trolley at a range and in situations where the trolley where a loss
of control would not cause damage and where the trolley could easily be taken back
under manual control
Do not try to use your Superbug like a conventional trolley. You should not push down
on the rear wheel to turn the trolley rather you should steer the trolley in the direction
that you want to go by turning the handle.
Best Practice
In very tight spaces you can lift the handle, and therefore the rear wheel and spin the
Superbug around on the two front wheels. This is only possible however with a golf
bag attached otherwise the handle may move forwards.
On very slippery surfaces more weight on the rear driven wheel will help with traction.
This can be done by applying a little downward pressure on the handle.
To negotiate kerbs and other large “step up” obstacles, the correct procedure is to turn
the power off, spin the trolley around on its front wheels, place the small rear wheel
10
SUPERBUG
in the kerb and pull the trolley onto the kerb. When the trolley is facing in the desired
direction the power can then be switched on when required.
When parked on slopes the trolley should be positioned at an angle across the slope
that will prevent the trolley from rolling away.
The sliding lock should always be in place and never apply too much downward
pressure to the handle.
Caution: Stalling
Do not allow the Superbug to stall. Stalling occurs when the rear drive wheel is turning
but power is on. It occurs due to too much weight or too steep a hill and can also be
noticed by a vibration from the wheel. If the Superbug starts to stall immediately turn
off the power or push the Superbug forwards - never pull the Superbug backwards
while under power. Do not use the Superbug in situations where it may stall as heat
buildup can cause overheating and failure of the controller circuit.
Superbug is not designed to be used without a golf bag. It is designed to carry a
maximum 15Kg golf bag and should not be used to carry excess weight or to pull you
along. Neither should you pull the trolley backwards when the power is on as any of
these actions may damage the controller and will invalidate the warranty.
Care of the Batteries
The batteries are a valuable part of your investment and must be looked after correctly.
Read the safety notice at the start of this manual.
The batteries should never be run flat. The standard batteries are adequate for
36 holes provided that they are played on the same day. You should not play
on consecutive days without fully recharging the batteries in between. Very hilly
terrain and / or exceptionally high or low temperatures can adversely affect battery
performance . The published 36 hole range is based on use under normal conditions.
The batteries must be charged as soon as possible after they have been used, even if
for only a few holes. For best battery life we recommend leaving the batteries charging
whenever the Superbug is not in use.
Never leave the battery connected to the trolley when it is not in use even if the trolley
is switched off as this can drain the batteries.
11
SUPERBUG
Charging the Batteries
Only use the charger supplied with the trolley. The use of ANY other
charger may damage the batteries and will void the warranty.
Never connect the charger to mains power first. Always connect the charger to the
batteries first and then connect the charger to the mains.
The charger has two lights which monitor the charging process.
RED - the mains power is on and the batteries are charging rapidly
GREEN - the batteries are in the last charging phase. This final stage of the process is
very important to battery life and must be allowed to complete. Within 1-2 hours of this
charging stage (i.e. after the battery charger light has changed from red to green) the
batteries are fully charged and are being maintained at peak charge by the charger.
Once fully charged it is desirable to leave the charger connected and switched on until
the Superbug is to be next used.
Charging Time - After 36 holes of golf the battery will be fully recharged in about 8
hours.
If the charger is switched off, be sure to disconnect the batteries. If the batteries are not
used for long periods of time, charge them fully, disconnect them from the charger and
store them in a cool, dry place. When stored like this be sure to recharge them for 24
hours at least once every two months.
SAFETY NOTICE :
The charger supplied with your Superbug will go from RED (rapid charge) to Green
(trickle charge) within a maximum of 8 hours. If the charger remains on red for a
longer period them please disconnect the charger as the battery may be damaged. If
this problem persists call your retailer.
The Superbug battery is fused (15A) to protect from over current. The fuse is located
inside the battery bag and should be checked in case of apparent power failure.
12
SUPERBUG
Superbug Range Technical Specifications
Superbug:
Frame
High strength aluminium
Motor
140W, 24 volt, high torque, brushless
Weight
18Kg including batteries
Folded Size (wheels on)
77cm x 59cm x 28cm
Folded Size (wheels off)
77cm x 45.5cm x 22.5cm
Range
36 holes
Battery
2 x 12V 12AH (288WH) sealed lead acid
Battery Charger
Three stage automatic 2A output
Superbug D200 : as Superbug with the following exceptions
Motor
200W, 24 volt, high torque, brushless
Weight
18.5 Kg including batteries
Superbug Remote : as Superbug with the following exceptions
Motor
2x 140W, 24 volt, high torque, brushless
Weight
23.3 Kg including batteries
Range
27 Holes
13
SUPERBUG
Care of your Superbug
Whilst the Superbug is designed to be used in both wet and dry conditions, like any
electronic device it is advisable to limit the amount of rain that it is exposed to during
play and it should not be keft standing in the rain.
The Superbug should never be hosed down but rather wiped clean with a damp cloth
then dried and stored in a dry place.
From time to time ensure that nuts, bolts and screws are tight, joints should be greased
occasionally.
Troubleshooting
We believe that your Superbug is the most reliable golf trolley available. It has no
gears or differential to wear, no brushes to wear and a very reliable battery. All pivots
have been also designed to elimitate wear and stainless steel and rust proof fastenings
have been used throughout.
Notwithstanding our confidence in Superbug, the following guide will help you if you
experience any problems:
Symptom
Cause
Remedy
Superbug works for
a while but slows
and stops before you
complete a round
Battery has not been
fully charged or is not
holding a full charge
Charge the battery
for at least 8 hours.
Ensure that the charger
light goes to red on
connection and then
changes to green after a
maximum of 8 hours.
The battery may be old
or the charger may be
faulty.
Return the battery and
charger to the retailer for
testing.
The Electronic brake is
engaged
Ensure that the Brake is
turned off.
Superbug won’t go
(D200 only)
14
SUPERBUG
Superbug won’t go
Battery not connected
or on/off switches
incorrectly set
Check connections and
settings
Battery fuse is blown
Check and replace as
necessary
Controller / wiring /
motor fault
Contact Retailer or
Superbug to arrange for
repair service.
Vibration or Stalling from The slope is too steep
the Motor
or the bag weight is too
heavy
Do not attempt to climb
too steep hills or carry
bags that weigh >15Kg
Battery has not been fully See Above
charged
Remote Transmitter does
not work
Battery is old or flat
See Above
Battery is flat
Replace Battery
Red Button is not
engaged
Engage Red Button
Antenna is not up
Pull out antenna
15
Copyright @ 2005 Newhope electric vehicle co., Ltd