1
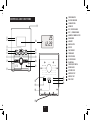
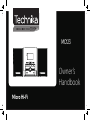
MC123
Owner’s
Handbook
Micro Hi-Fi
IMPORTANT SAFETY INFORMATION
CAUTION!
RISK OF ELECTRIC SHOCK
DO NOT OPEN
TO REDUCE THE RISK OF ELECTRIC SHOCK DO
NOT REMOVE COVER (OR BACK)
This symbol indicates that there are important
operating and maintenance instructions in the
literature accompanying this unit.
This symbol indicates that dangerous voltage
constituting a risk of electric shock is present within
this unit.
Read these instructions.
Keep these instructions.
Heed all warnings.
Follow all instructions.
Do not use this apparatus near water.
Clean only with a slightly damp cloth.
Do not block any ventilation openings.
Install in accordance with the manufacturer's
instructions.
Do not install or operate near any heat
sources such as radiators, stoves, or other
apparatus that produce heat.
Unplug this apparatus during lightning storms
or when unused for long periods of time.
Refer all servicing to qualified service
personnel. Servicing is required when the
apparatus has been damaged in any way,
such as the power-supply cord or plug is
damaged, liquid has been spilled or objects
have fallen into the apparatus, the apparatus
has been exposed to rain or moisture, does
not operate normally, or has been dropped.
Warning: To reduce the risk of fire or electrical
shock, do not expose this product to rain or
moisture. The product must not be exposed to
dripping and splashing and no object filled
with liquids such as a vase of flowers should
be placed on the product.
No naked flame sources such as candles
should be placed on the product.
Caution: Changes or modifications not
expressly approved by the manufacturer
could void the user's authority to operate this
device.
Caution: Usage of controls or adjustments or
performance of procedures other than those
specified herein may result in hazardous
exposure.
These labels tell you that the unit contains a
Laser component. Do not stare at the laser
lens.
IMPORTANT
This equipment generates, uses and can
radiate radio frequency energy and, if not
installed and used in accordance with the
instructions, may cause harmful interference
to radio ommunication. However, this is no
guarantee that interference will not occur in a
particular installation. If this equipment does
cause harmful interference to radio or
television reception, which can be determined
by turning the equipment off and on, the user
is encouraged to try to correct the interference
by one of the following measures:
- Reorient or relocate the receiving antenna.
- Increase the separation between the
equipment and receiver.
- Connect the equipment into an outlet on a
circuit different from that to which the receiver
is connected.
- Consult the dealer or an experienced
radio/TV technician for help.
ELECTRICAL INFORMATION
Mains Supply: The mains operating voltage of
this unit is on the rating plate on the rear.
Class II construction double
insulated. This product must not be
connected to earth.
2
CONTROLS AND FUNCTIONS
1%
b
c
1$
25
I2:29
AM
FM
d
e
f
g
h
PM
1#
1@
1!
1)
j
i
2@
2!
2)
1^
1&
1*
1(
3
POWER INDICATOR
FM STEREO INDICATOR
VOLUME CONTROL
REPEAT KEY
SKIP -/ REVERSE SEARCH
SKIP +/ FORWARD SEARCH
AM/FM/FM ST. BAND SELECTOR
TUNING KNOB
AUX INPUT
BAND SELECTOR
STOP KEY
PLAY/PAUSE KEY
PROGRAM KEY
DISPLAY SCREEN
CD DOOR RELEASE
FM ANTENNA
POWER ON/OFF SWITCH
SPEAKER JACKS
AC POWER CORD
MINUTES SET KEY
HOURS SET KEY
TIME SET KEY
REMOTE
HANDSET
LOUDSPEAKER
CONNECTION
PRELIMINARIES
UNPACKING
The carton contains:
! The MC-123 AM/FM/CD Micro System.
! One pair of loudspeakers:
Unpack and inspect the components carefully. If
any item is damaged or missing, contact the Tesco
store from where you purchased this product, or if
that is not possible, your nearest Tesco store. Please
have your receipt ready when you call.
Retain the packaging. If you dispose of it, do so in
accordance with recycling regulations in your area.
Retain the User Handbook. If you pass the unit on to
a third party make sure you pass on the handbook.
PREPARATION
Remove any strips of tape holding the CD door.
Press the DOOR OPEN button to open the CD lid.
Carefully remove the protective card from the CD
mechanism. Close the CD door and discard the
card and the pieces of tape.
Plug each loudspeaker into the loudspeaker
connectors of the main unit as shown in the
diagram below. Plug the connectors in firmly but do
not use excessive force.
The means of disconnection of the appliance is the
mains plug. This must not be obstructed and must
be freely operable at all times.
Site the system on a stable surface (ideally a stout
shelf) where it is unlikely to fall or get knocked over.
The speakers which should be placed on either side
of the main unit with at least150mm between each
speaker and the main unit.
Switch the function selector to ‘CD’. The clock
must be set when the selector is in this position.
The power light comes on and the
display lights up.
Example: set the time to 3:40 pm.
The Time Setting buttons are on the rear panel.
!
AM
FM
PM
RIGHT SPEAKER
SPEAKERS
L
R
LEFT SPEAKER
!
!
When running speaker cables, keep them away
from areas whey they could cause danger.
You will get better stereo if the speakers are placed
some distance from each other.
CONNECTING THE MAINS
Check that the mains voltage on the rating plate is
the same as the voltage in your area.
!
Switch the Power Switch on the rear
panel to the “0" - OFF position.
!
Switch the FUNCTION SELECTOR to OFF.
SITING AND PLACEMENT
Make sure there is a suitable power point within
easy reach.
REMOTE
HANDSET
SETTING THE
TIME
Uncoil the AC power cord, plug the cord into
the wall socket and switch on the mains power.
!
Switch the Power Switch to the “I” ON position.
The system will now go to Standby. In Standby the
display will light up very faintly and the clock time is
just visible but no controls are operable.
!
You may now set the clock time if you wish but
this is optional. No control functions are
affected if you choose not to set the time.
!
4
!
!
Press and hold the TIME SET
button.
Hold down the Time Set button
and press the HOUR button to set
the hours. When the time goes
past 12:00, the display moves
from AM to PM.
Hold down the Time Set button
and press the MINUTE button to
set the minutes.
Release the Time set button.
I2:00
TIME SET
HOUR
MINUTE
AM
FM
PM
I3:40
Standby and Power Off
When power is connected and the rear panel power
switch is on, switching the Function Selector on the
front panel to “off” sets the unit into standby. In
Standby the unit power consumption is below 1
Watt and the front panel is powered at a very low
level, with no backlight.
The only point of leaving the unit in standby is to
power the clock. As there are no other settings you
can switch the unit off at the rear panel if you wish
but you will have to reset the clock (if required) when
you switch on again.
If you are not using the unit for some time always set
the rear panel switch to OFF for safety.
USING THE CD PLAYER
TO SEARCH FOR A PARTICULAR PASSAGE DURING PLAY
PRELIMINARIES
! Set the FUNCTION Switch to 'CD’
! Press the CD door at the right hand side of the door to open it.
! Before first use, remove the protective card from the CD compartment.
! Place a CD (label up)on the central spindle.
! Press gently to secure the CD in place.
! Close the CD door
The disc will spin briefly, indicate the number of
tracks on the CD and then the disc will stop.
AM
FM
PM
I3:––
I3:40
AM
FM
PM
TO PLAY A CD WHEN STOPPED
PLAY
!
!
Press the PLAY/PAUSE button
AM
FM
The disc will play from Track 1.
PM
TO PAUSE A CD WHILE PLAYING
!
!
!
Press the PLAY/PAUSE button
The disc will pause. In Pause mode the sound mutes and the
display flashes.
PLAY
PLAY
Press the PLAY/PAUSE button again to resume play
TO STOP A CD WHILE PLAYING
AM
!
Press the STOP button.
FM
PM
!
TO PLAY A CD FROM A SELECTED TRACK
!
!
!
I3:24
I3:40
I3:0I
I3:40
I3:02
!
!
!
I3:02
I3:24
I3:40
Press the REPEAT button to cycle the repeat mode:
I3:02
PLAY
REPEAT 1
REPEAT
DISC
I3:02
PLAY
REPEAT ALL
NO
REPEAT
PLAY
I3:02
Repeat can be selected when a disc is playing or stopped.
Search and track select operate in Repeat mode.
Press the STOP button to cancel Repeat and stop the disc.
PROGRAM PLAY
Program play may be selected when the CD is stopped or playing. You may
program up to 20 tracks to play in any order.
To select and play a Program:
!
Press PROG.
The display indicates 01 briefly
and then flashes 00
Move the slider on the Volume Control to the right to increase the volume
level and to the keft to reduce the volume.
!
Press SKIP+/SKIP – repeatedly, to select and play from the desired track.
Press SKIP+/SKIP – to select a track.
The display flashes the chosen track
TO GO BACK TO THE START OF A TRACK DURING PLAY
!
Press the PLAY/PAUSE button to start playing the track.
REPEAT
TRACK
TO CHANGE TRACKS DURING PLAY
!
Insert the CD
Press Press SKIP+/SKIP – repeatedly to select the track
REPEATING A TRACK OR A COMPLETE DISC
!
TO ALTER THE VOLUME LEVEL
!
Press and hold the SKIP+or SKIP – key until the desired passage is located.
During the search the sound is played at reduced volume. Play returns to
normal when the key is released.
!
Press PROG.
The display indicates 02 briefly
Press SKIP – once.
5
I3:0-I
PLAY
MEMORY
I3:00
PLAY
MEMORY
I3:08
PLAY
MEMORY
I3:02
PLAY
MEMORY
I3:00
PLAY
MEMORY
USING THE CD PLAYER-2
! Press SKIP+/SKIP – , to select another track.
The display flashes the chosen track
USING THE RADIO
I3:04
STEREO FM RECEPTION
! Set the FUNCTION Switch to 'RADIO’
! Set the BAND Switch to ‘FM ST’
! Select the station using the Tuning Knob.
PLAY
MEMORY
Repeat the above steps to program additional tracks.
!
!
!
!
Press PROG to store the selection.
Press PLAY/PAUSE to play the program.
I3:08
PLAY
PLAY
MEMORY
AM
FM
PM
Play starts from the first track programmed
The program plays once and stops unless you have selected a repeat mode.
Note: In ‘Program’ mode, if you stop the disc and then press PLAY, the disc will
play from track 1 as normal but the program will still be in the memory.
!
93.40
Rotate the knob to the right to increase and to the left to reduce the
frequency. The frequency is indicated on the screen
The radio will automatically detect stereo and mono broadcasts. When a Stereo
broadcast is detected the Stereo beacon will light. The beacon will not light
when a mono station is received.
! Orient the antenna cable for best signal quality. FM signals are horizontally
polarised - extending the antenna sideways may offer improved reception.
Press PROG to recall and replay the program.
MHZ
To review the contents of a program:
STEREO AND MONO
!
Stereo reception offers a better listening experience. but requires a strong signal
for noise-free reception. In poor reception areas the noise performance will be
improved by listening to the radio in mono.
Press STOP. Keep pressingthe PROG key to review the programmed tracks.
To cancel a program:
!
Press STOP. Open and close the CD door to cancel Program play.
To listen in Mono:
After play: Set the Selector to OFF and remove the CD.
!
THE AUXILIARY INPUT
AM RECEPTION
The AUX input is a 3.5 jack socket on the front panel. You may use it with any
audio unit (e.g. mp3 player) which has a line output or a headphone output.
!
!
!
!
!
Set the BAND switch to ‘FM’ and proceed as for FM Stereo reception. The
stereo indicator will extinguish.
!
!
!
Set the FUNCTION Switch to 'RADIO’
Set the BAND Switch to ‘AM’
Select the station using the Tuning Knob.
Rotate the knob to the right to increase and to the left to reduce the
frequency. The frequency is indicated on the screen
! Rotate the unit for the best signal quality.
The AM antenna is a Ferrite Rod type located inside the unit. AM is liable to
interference from mains appliances, fluorescent lights, cars etc. Changing the
location of the unit may greatly improve signal quality
Switch the Selector switch to the OFF position.
Set the Volume control halfway.
Plug a 3.5 jack cable into the AUX input. Plug the other end of the cable into
the line or headphone output of the source unit.
Switch on the source unit. If the source unit has a volume control set this to
provide a moderate output into the MC-123.
Control the volume with the MC-123 and the functions with the source unit.
AM
FM
PM
NOTE: Connecting the AUX input when either the radio or CD is playing overrides the input (and in the case of CD play, resets the CD). Removing the plug
restores the previous function (and in the case of CD play, reloads the CD).
Note: In Radio mode the clock cannot be viewed or altered.
6
I0 22
KHZ
CARE AND CLEANING
WARRANTY AND SPECIFICATIONS
AFTER USE
WARRANTY
!
!
!
!
Your Tesco appliance is covered by a warranty for 12 months from the date of
purchase. If a fault develops during this period, please contact the TESCO
electrical help line on 0845 456 6767. Please have your original purchase
receipt with you when you call. This warranty in no way affects your consumer
rights.
Stop the CD player (if playing)
Remove any CD from the player
Switch the Function Switch to OFF to set the unit toStandby.
As there no presets or other settings in this unit that require the set to be
under constant power, you may switch the set off at the mains if you wish. for
additional safety.
SPECIFICATIONS
Model:
CARE AND CLEANING
MC-123
Power Supply:
All care and cleaning operations should be carried out with the unit unplugged
from the mains power.
The surface of the unit can be cleaned with a barely damp cloth and then dried
carefully. Never use abrasives or chemical solvents .
Do NOT clean the inside of the CD player with a cloth. Lightly blow out any dust.
If your CDs don’t play properly, this is likely to be caused by surface damage or
dirt on the CD. If the CD lens gets dirty, use a proprietary lens cleaner and follow
the instructions carefully. If you always keep the CD door closed when the unit is
not in use, the lens is unlikely to get dirty.
Voltage:
Consumption:
AC 220 -240V ~ 50 Hz
12.5 Watts
Frequency Range:
FM 88 - 108 MHz
AM 540 - 1600 kHz
Net weight:
2.57 kg
Class II construction double insulated. This product must not be
connected to earth.
CD TOPICS
Dirty, scratched or warped discs may cause skipping or noise. Handle a disc
only by the edges. Store discs in their cases to avoid scratches.
UK: Waste electrical products should not be disposed of with
household waste. Separate disposal facilities exist; for your nearest
facilities see www.recycle-more.co.uk or in-store for details.
Do not expose discs to direct sunlight, high humidity, high temperature, dust,
etc. Do not stick or write anything on the disc. Sharp writing instruments and
some felt tip pens may damage its surface.
ROI: Produced after 13th August 2005. Waste electrical products
should not be disposed of with household waste. Please recycle where
facilities exist. Check with your Local Authority or retailer for recycling
advice.
Loading a CD into the player: Position the disc over
the centre spindle. Make sure the printed side faces out.
Press the CD gently into place. NEVER use force
Removing a CD: Press lightly on the centre spindle.
Ease the CD off - hold it at the edges.Do not touch the
playing surface. NEVER use force
7
Tesco Stores Ltd,
Delamare Road, Cheshunt, Herts, EN8 9SL
Technika Helpline: 0845 456 6767 (Calls cost up to 4p per minute from a BT landline, other providers may vary)