1
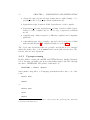
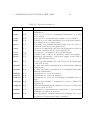
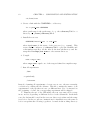
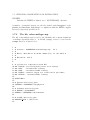
Chapter 3
Compilation and installation
The objectives of this chapter are to explain program installation and compilation, how to run one of the built-in test cases and to summarise the
different steps for setting up a user-defined application. It is assumed that
the operating system is either Unix or Linux1 .
This chapter is organised as follows:
• Instructions for installation and a description of the program’s file system are given in Section 3.1.
• Compilation is explained in Section 3.2.
• The different steps needed to run a test case are explained in Section 3.3. For a detailed description of all test cases the reader is referred
to Part V.
• An example for installing and running a user-defined application is
given in Section 3.4.
• Implementation of external libraries is discussed in Section 3.5.
• A general outline explaining how to set up a realistic application of the
model, is presented in Section 3.6. For a complete description the user
is referred to the User Manual (Part IV).
• More detailed technical information for installing and compiling COHERENS is provided in Section 3.7.
1
Installation and compilation of COHERENS under a WINDOWS platform is not excluded a priori but is beyond the scope of this User Documentation.
55
56
CHAPTER 3. COMPILATION AND INSTALLATION
3.1
Installation
In the following it is assumed that the compressed file with the model code,
e.g. coherensV2.5.tar is downloaded on the user’s home directory. To retrieve
the files use
tar -xvf coherensV2.5.tar
This creates a file directory tree, as shown in Figure 3.1. The root directory is V2.5 which contains the following subtrees
1. code This directory contains subdirectories for each model compartment
• physics: “main” physical compartment
• sediment: sediment model compartment
• biology: biological model compartment (currently not yet available)
Each of these compartments has a source directory with the source
code and a comps directory with the files for compilation.
2. setups
• examples: example code for setting up a user application
• ptests: contains subdirectories each representing a different computing platform. In each directory there are check-up tables for
each test case experiment (see Section 3.3).
• tutorial: setups of test(s) discussed in the tutorial manual (Chapter 2).
• cones, . . . : setups of pre-defined test cases
3. data: data files used in some of the test case applications
4. scr: examples script for running the code on a Unix/Linux platform.
For serial runs Run is the most obvious choice.
5. utils: utility programs
• decomp: utility program for creating a domain decomposition
• post: (non-portable) postprocessing program (only used by some
developers)
The file install test in the root directory is a script, primarily intended
for installing a test case. Its purpose is further explained below.
3.2. COMPILATION
57
comps
physics
COHERENS V2.5
program directory tree
source
comps
code
sediments
source
comps
biology
source
examples
V2.5
cones
setups
.....
ptests
data
eclwf−xlf
linux−gfort
tutorial
osf−dig
scr
utils
decomp
Figure 3.1: COHERENS file directory tree
3.2
Compilation
To compile the COHERENS source code, the following tools are essential
• FORTRAN 90 compiler
• C-preprocessor, usually cpp
• a compiled MPI library which is needed (only) for simulations in parallel
mode. Note that MPI is not supported by all compilers.
• a compiled netCDF library (version 3.6 or higher) which is needed (only)
to read and write data in portable netCDF format.
Compilation is performed with the Unix/Linux make utility. The rules for
making the executable file coherens are defined in the file Makefile located
in the comps directory. Contrary to COHERENS V1 this file is given in a
portable format, i.e. independent of the type of compiler or operating system.
Makefile reads input from a series of additional files:
• objects.cmp: defines macros with a listing of objects (*.o) files.
58
CHAPTER 3. COMPILATION AND INSTALLATION
• objects bio.cmp, objects sed.cmp: defines macros with a listing of object files for the biology, respectively sediment model.
• dependencies.cmp: describes all file dependencies for the compiler.
• dependencies bio.cmp, dependencies sed.cmp: describes all file dependencies for the compiler and for the biology, respectively sediment
model.
• compilers.cmp: defines targets for different compilers and computing
platforms.
• coherensflags.cmp: list of compiler options for the C-prepocessor, links
with external libraries2 . For further details see section 3.7.1.
The object and dependency files are portable and should not be changed
unless the main source code in source has been modified by the user. The
last two files are user dependent.
3.2.1
C-preprocessing
Besides links for using the netCDF and PETSc libraries, further discussed
below, the user can define options in coherensflags.cmp for the CPP through
the macro CPPDFLAGS. The syntax of this macro is:
CPPDFLAGS = -Dname1 -Dname2 ...
where name corrsponds to a C-language statement in the source code of the
form
#ifdef name
...
#endif
or
#ifdef name
...
#else
...
#endif
2
This file is a more extended version of the previous file options.cpp file, which has
been removed in Version 2.4.
3.2. COMPILATION
59
If name is defined in CPPDFLAGS, the C-preprocessor retains all statements
between #ifdef and #endif (first form) or between #ifdef and #else (second
form) and removes all statements between #else and #endif (second form).
If name is not defined, all statements are removed between #ifdef and #endif
(first form) or between #ifdef and #else (second form) and all statements are
retained between #else and #endif (second form). Finally, the lines starting
with # are removed. The remaining code is then passed to the FORTRAN
compiler.
Several CPP options are implemented. The most relevant for COHERENS
users are:
-DMPI
Needed for parallel execution of the program. An error is issued by
the compiler if the MPI library is not installed and linked to the main
source code.
-DCDF
Needed for data input/output in netCDF format. An error occurs if the
netCDF library is not installed and linked to the main source code. If
this option is defined, all user output is written in netCDF format by
default.
-DALLOC
Option for allocation of most local arrays in the model. This will
provide a more efficient memory management.
In the default version of coherensflags.cmp, supplied with the source code,
CPPDFLAGS is left undefined.
3.2.2
Testing compilation
Compilation can be tested by the following recommended procedure
1. Select a working directory, e.g.
cd /home/test
2. Create a link with the COHERENS root directory
ln -s path name COHERENS
where path name is the path name of the coherens/V2.5 root directory, e.g. /home/coherens/V2.5.
60
CHAPTER 3. COMPILATION AND INSTALLATION
3. Install the standard COHERENS code
COHERENS/install test
The script install test creates links to subtrees of coherens/V2.5,
copies the Makefile and coherensflags.cmp files and all the files in the
scr subdirectory to the current directory.
4. Compile
make target name
where target name equals one of the targets defined in compilers.cmp.
The Makefile script reads the coherensflags.cmp file residing in the working directory, which, by default, includes no compiler options. Implementation of the MPI or netCDF library can be tested by inserting the appropriate
options in this file. See Section 3.5 below.
3.3
Installing and running a test case
In addition to the main source code a total of 19 pre-defined test cases are
supplied to the user. Their aim is to:
• test the installation and compilation of the code
• provide examples of model setups
• show how model results are affected by different setups (e.g. numerical
schemes, turbulence closures, different kinds of processes, . . . )
• provide a debugging tool.
Table 3.1 provides a list of all test cases. Each case is composed of a series of
experiments. Each experiment has a name given by the name of the test case
followed by an upper case letter. For examples, the cones test consists of
four experiments each representing a separate simulation: conesA, conesB,
conesC, conesD. A total of 107 experiments are defined in this way.
The procedure for installing and running a specific test case is analogous
to the one presented in Section 3.2.2. The complete procedure, including
running the application, is as follows.
1. Select a working directory, e.g.
3.3. INSTALLING AND RUNNING A TEST CASE
61
Table 3.1: Test case descriptions
Name
cones
front
seich
fredy
pycno
csnsp
river
plume
rhone
bohai
flood2d
flood3d
bedload
totload
wavload
sedvprof
sedhprof
seddens
thacker
Experiments Description
A–D
advection of a uniformly rotating “cone” shaped contaminant
distribution
A–D
advection of a layered contaminant distribution by a tidal
slope current
A–E
propagation of an internal wave within a closed channel
A–D
generation of baroclinic instabilities by a fresh water distribution immersed in a rotating basin
A–G
deepening of an initiallly stratified surface layer by action of
a uniform wind stress (1-D application)
A–I
evolution of temperature and seasonal stratification at station
CS in the central North Sea (1-D application)
A–D
propagation of a salinity front in a tidal channel
A–G
formation and evolution of a tidally modulated river plume
A–G
simulation experiments of the Rhone plume in the Gulf of
Lions (Mediterranean Sea)
A–F
barotropic tidal simulations of the Bohai Sea (northern part
of the Yellow Sea)
A–D
flooding and drying experiments in a channel using different
bathymetries
A–D
flooding and drying experiments in a rectangular basin using
different bathymetries
A–F
experiments for bed load transport
A–F
experiments for total load transport
A–D
experiments for bed/total load transport including wave effects
A–H
diffusion and settling of sediments in a water column (1-D
application)
A–G
experiments simulating the transition between a erodable and
a non-erodable sea bed
A–E
turbidity flow experiments in a channel due to an horizontal
sediment concentration gradient
A–D
flow experiments, including suspended sediments, in a rotating parabolic basin with moving boundaries
62
CHAPTER 3. COMPILATION AND INSTALLATION
cd /home/test
2. Create a link with the COHERENS root directory
ln -s path name COHERENS
where path name is the path name of e.g. the coherens/V2.5 root
directory, e.g. /home/coherens/V2.5.
3. Install the test case
COHERENS/install test -t test name
where test name is the name of the test case (e.g. cones). This
creates links to subtrees of coherens/V2.5, copies the Makefile and
coherensflags.cmp files, all the files in the scr subdirectory and the
setup files in setups/test name to the current directory.
4. Compile
make target name
where target name equals one of the targets defined in compilers.cmp.
5. Run all experiments
./Run
or equivalently,
./coherens
Instead of running all experiments of a test case at once, the user can make
a selection by editing the file defruns. This file contains the names of all
experiments for the specific test case on different lines. If a ! is inserted at
the beginning of a line, the corresponding experiment will be skipped.
To illustrate the use of the CIF utility, the test case runs can be set up
in two modes, depending on different choices for the defruns file. In the first
case, the defruns file located in the test case directory is taken and the setup
is as before. In the second case, instructions for installation are the same as
before except that the following copy has to be made in the working directory
3.3. INSTALLING AND RUNNING A TEST CASE
63
cp cifruns defruns
If Run is executed, two simulations are performed for each experiment
1. The program creates a CIF and a series of forcing files in COHERENS
standard format. No calculations are performed.
2. The test is run again. The program first reads all model setup parameters and forcing data from the previously created CIF and standard
forcing files and then performs the actual calculations.
The CIF utility is further discussed in Sections 9.4 and 14.1.
The following checks can be made for a succesfull run:
1. The Run script terminates with exit status 0.
2. The program terminates with the following message, sent to standard
output (screen or batch file):
Main program terminated
3. At the start of each numerical experiment, the program creates a file
whose name equals the experiment’s name (as listed in defruns) followed by the suffix .errlogA (e.g. conesA.errlogA). The file is used for
the writing of eventual error messages and is automatically deleted at
the end of the simulation. An error occurred if the file still exists, even
without any contents, after completion of the run.
4. The program writes run-time information to a “log”-file with suffix
.runlogA (e.g. conesA.runlogA). The last line of this file should read
Close file log file on unit 1 (A)
where log file is the name of the “log”-file.
It is clear that even when the program terminates without any noticeable
error, the results can still be incorrect. This can easily be verified. Each
experiment produces a file with suffix .tst (e.g. conesA.tst). The file contains
values of some critical parameters produced by the simulation. These can be
compared to the ones obtained from a reference run and listed in a file with
the same name located in one of the setups/ptests subdirectories3 .
3
The parameter sdev defined in some test cases is only used as a measure of rounding
errors and should not be considered as critical.
64
CHAPTER 3. COMPILATION AND INSTALLATION
3.4
Installing a user application
The procedure below, analogous to the one followed for installing a test case,
is to be considered as an example
1. As discussed below a series of setup files needs to created by the
user. Assume now that they are located on some user directory, say
/home/mytest
2. Select a working path for compilation and running of the application,
e.g.
cd /tmp/mytest
3. Create a link with the COHERENS root directory where path name is
the path name of the coherens/V2.5 root directory, e.g. /home/coherens/V2.5.
ln -s path name COHERENS
4. Install the user application on the current directory
COHERENS/install test -u /home/mytest
This creates links to subtrees of coherens/V2.5, copies the Makefile
and coherensflags.cmp files, all the files in the scr subdirectory and all
the setup files in /home/mytest to the current directory.
5. Run the application
./Run
or equivalently,
./coherens
3.5
3.5.1
Running an application with external libraries
Parallel application
The procedure is analogous to the previous ones with the following additional
steps:
3.6. SETTING UP A USER APPLICATION
65
1. Make sure that the MPI library is properly installed.
2. Insert the appropriate library options in compilers.cmp (if needed).
3. Insert -DMPI as CPP compiling option in coherensflags.cmp.
4. The parameter nprocs, defined in the routine usrdef mod params (file
Usrdef Model.f90) must be set to the number of processes used in the
parallel application.
5. Edit the Run script according to the guidelines for running a MPI application on the user machine, e.g.
mpirun -n 4 ./coherens
to run the application using 4 processes with MPICH.
3.5.2
Using netCDF output format
The following additional steps are needed:
1. Make sure that the netCDF library (Version 3.6 or later) is properly
installed.
2. Insert -DCDF as compiling option in coherensflags.cmp.
3. Insert the appropriate library options in coherensflags.cmp.
4. In subroutine usrdef tsr params within the file Usrdef Time Series.f90,
change the values of the parameters(s) ending with %form to ‘N’ or
delete the corresponding code line or change the same parameters in
the CIF in case the CIF utility has been selected (see Chapter 2). When
the run is completed, all time series output will be available in netCDF
format.
3.6
Setting up a user application
Model setup consists in defining, firstly, a series of model parameters for
initialisation and, secondly, providing different kinds of input data at runtime. A first method for implementation is via calls to routines located
in Usrdef * files. These routines need to be programmed by the user. A
summary of their contents is given below. A detailed discussion is given in
Part IV. A second method, mentioned below, is through the use of the Central
66
CHAPTER 3. COMPILATION AND INSTALLATION
Input File (CIF) utility and forcing files in a standard format recognised by
COHERENS.
1. Usrdef Model.f90
• parameters for “monitoring”
• model switches
- activate/deactivate program modules
- selection of a specific numerical/physical scheme
• parameters which determine the kind of forcing input (e.g. file
name, type of file, ...)
• parameters for parallel setup
• define external surface data grid(s) if regular
• model grid, bathymetry, locations of open boundaries
• initial conditions
• open boundary conditions for the 2-D and 3-D mode
• insert code to read the open boundary data
2. Usrdef Surface Data.f90 : meteorological and/or SST forcing
• define surface grid(s) if non-regular
• insert code for reading forcing data
3. Usrdef Nested Grids.f90
• define locations of nested sub-grids
4. Usrdef Sediment.f90
• sediment model parameters and switches
• define initial conditions for the sediment model
• define the particle properties for each fraction (size, density, . . . )
5. Usrdef Time Series.f90 : time series model output
• define “metadata” information
• define output resolution in space and time
• define output parameters
• define output data
3.6. SETTING UP A USER APPLICATION
67
6. Usrdef Time Averages.f90 : time averaged model output
7. Usrdef Harmonic Analysis.f90 : harmonic analysis and output (residuals, amplitudes, phases, elliptic parameters)
8. Usrdef Output.f90 : output defined by the user in any kind of (nonCOHERENS) format
Remarks
1. It is clear that the user only needs to define what is needed for the
application.
2. (Almost) all parameters which can be defined, have default values.
Only a few need to be re-defined by the user.
3. Options are provided to write all parameters and forcing data to files
in a standard COHERENS format. These files can be used for model
setup in subsequent runs.
4. An alternative, available since version V2.1.2, is to define model setup
through a Central Input File (CIF) which is a parameter file read by
the program during initialisation.
5. Some usrdef routines can be made redundant by defining forcing data
through files in standard COHERENS format.
6. A whole series of “standard” output variables are available. They can
be selected by the user via a so-called “key id” number in which case
metadata and output data are automatically generated by COHERENS.
Procedures for creating Usrdef files.
1. The simplest way is to copy the setup (Usrdef files) of a suitable test
case and make the necessary adaptations. The method is recommended
for applications which do not require a too complicated setup.
2. A generic version of each Usrdef file is located in the /setups/examples
subdirectory. All parameters are listed with their default values or with
an undefined value (given by a ?). The user may re-define the default
and either replace the question mark by a specific value or remove those
lines. There are, however, no defaults for defining the input of forcing
data unless the data are read from a file in standard COHERENS format.
68
CHAPTER 3. COMPILATION AND INSTALLATION
3.7
Files for compilation and installation
3.7.1
compilers.cmp
If the user wants to add a new compiler, a new target has to be defined by
inserting the following lines, using the format below, in compilers.cmp:
target\_name:
$(MAKE) $(EXEFILE) \
"FC=" "FCOPTS=" "FCDEFS=" "FCDEBUG=" \
"CPP=" "CPPF=" "CPPOPTS=" "CPPDEFS="
where target name is arbitrarily defined by the user. Line 2 is intended by
one TAB position, the following ones by blanks only. The macro definitions
on line 2 should not be changed, those on the next lines can either be defined
by the user or remain undefined. The latter have the following meaning
FC
name of the Fortran 90 compiler, eventually preceded by its directory
path, such as f90, /usr/bin/gfortran, mpif90 (for parallel runs using
MPICH). This macro has to be defined always!
FCOPTS
Optimisation options for the Fortran compiler.
FCDEFS
Set to $(CPPDFLAGS) if the C-preprocessor is implicitly invoked by
the Fortran compiler, or left undefined otherwise.
FCDEBUG
Debugging options for the FORTRAN compiler, e.g. -g (optional).
CPP
Name of the C-preprocessor including options (except -D options), such
as gcc -E, if invoked implicitly by the Fortran compiler, undefined otherwise.
CPPF
Name of the C-preprocessor, if not invoked by the Fortran compiler or
set to @cp otherwise.
CPPOPTS
Options for the C-preprocessor, excluding -D options, in case that the
C-preprocessor is defined by CPPF, undefined otherwise.
3.7. FILES FOR COMPILATION AND INSTALLATION
69
CPPDEFS
Undefined if FCDEFS is defined, set to $(CPPDFLAGS) otherwise.
A number of standard targets are already defined such linux-gfort for the
gfortran and linux-iforts, linux-ifortp for compilation with the INTEL compiler
in serial, respectively parallel mode.
3.7.2
The file coherensflags.cmp
The file coherensflags.cmp is read by the Makefile and contains definitions
of machine-dependent macros. A default (empty) version, located in the
comps directory is listed below.
1 :#
2 :# Version - @COHERENScoherensflags.cmp
V2.5
3 :#
4 :# $Date: 2012-06-12 16:46:08 +0200 (Tue, 12 Jun 2012) $
5 :#
6 :# $Revision: 474 $
7 :#
8:
9 :# options for compilation with CPP
10:## -DALLOC :allocates/deallocates local arrays
11:## -DMPI
:includes MPI library
12:## -DCDF
:includes netCDF library
13:## -DVERIF :enables output for verification procedure
14:## -DPETSC : includes PETSc library
15:
16:CPPDFLAGS =
17:
18:# physics directory path
19:PHYSMOD = COHERENS/code/physics
20:
21:# sediment directory path
22:# SEDMOD = $(PHYSMOD)
23:SEDMOD = COHERENS/code/sediment
24:
25:# netCDF directory path
26:#NETCDF PATH = /usr/local
27:
70
CHAPTER 3. COMPILATION AND INSTALLATION
28:# netCDF library file
29:#NETCDF LIB FILE = netcdf
30:
31:# netCDF include options
32:#FCIFLAGS NETCDF = -I$(NETCDF PATH)/include
33:
34:# netCDF library options
35:#FLIBS NETCDF = -L$(NETCDF PATH)/lib -l$(NETCDF LIB FILE)
36:
37:# PETSc directories
38:#PETSC DIR = /home/patrick/petsc/petsc-3.1-p5
39:#PETSC ARCH = linux-gfort
40:
41:# PETSc include options
42:#CPPIFLAGS = -I$(PETSC DIR)/include -I$(PETSC DIR)/include/mpiuni
-I$(PETSC DIR)/$(PETSC ARCH)/include
43:#FCIFLAGS PETSC = -I$(PETSC DIR)/include -I$(PETSC DIR)/include/mpiuni
-I$(PETSC DIR)/$(PETSC ARCH)/include
44:
45:# environment variables for PETSc
46:# include $(PETSC DIR)/conf/variables
47:
48:# PETSc libary options
49:#FLIBS PETSC = $PETSC LIB
The macros, which can be defined by the user, are on the following lines
• Line 16: compiler options for the CPP. The following options are implemented
-DALLOC Enables allocation of local arrays.
-DMPI
Allows the use of MPI routine calls.
-DCDF
Allows the use of netCDF routine calls.
-DVERIF Used to run the test cases with the verification procedure.
-DPETSC Allows the use of PETSc routine calls.
• Line 19: path of the physics directory. This path should not be
changed!
• Line 23: path of the sediment directory in case the user wants to enable the COHERENS sediment model. Alternative, as given on line 22,
3.7. FILES FOR COMPILATION AND INSTALLATION
71
is to make this path the same as the physics path, in which case the
sediment model is disabled and not compiled.
• Line 26: installation path of the netCDF library. The compiler then
expects that the library file and the compiled netCDF modules are
found in respectively the directories $NETCDF PATH/lib and
$NETCDF PATH/include
• Line 29: name of the netCDF library file
• Line 32: compiler include options for netCDF
• Line 35: options for compilation with the netCDF library
• Line 38: directory path where the PETSc library is installed
• Line 39: directory where the PETSc installation for a specific fortran
compiler is located
• Line 42: CPP include options for PETSc
• Line 43: FORTRAN include options for PETSc
• Line 46: input file, created by PETSc, with definitions of PETSc variables
• Line 49: options for compilation with the PETSc library
The following changes are to be made by the user
• If -DCDF is defined on line 16, the lines 26, 29, 32 and 35 must be
uncommented and changed where necessary.
• If -DPETSC is defined on line 16 then:
– The installation path names of PETSc must be defined on lines 38–
39. The meaning of PETSC DIR and PETSC ARCH is explained
in the PETSc manual.
– Either 42 or 43 must be uncommented (without further modification), depending on the compiler. In case of a gfortran compiler,
only CPPIFLAGS needs to be defined, while for an intel compiler
only line 43 needs to be uncommented.
– Lines 46 and 49 must be uncommented without further modification.
72
CHAPTER 3. COMPILATION AND INSTALLATION
3.7.3
The script install test
Test cases or a user application can be installed on a working directory with
the shell script install test which can be invoked with optional arguments
install test [-t
test name] [-u
test dir] [-o
flag file]
where
-t
Installs the pre-defined test case test name, e.g. cones.
-u
Installs a user defined application. The setup Usrdef * and defruns
files are copied from directory test dir to the directory where
install test is executed.
-o
Copies the file flag file with the user-specific compilation instructions (see above) to the file coherensflags.cmp in the working directory.
• The link COHERENS must be defined before using the script.
• The options -t and -u are mutually exclusive.
• If neither -t or -u are present, no application has been defined, but the
script can be used for testing the compilation of COHERENS without
a setup.
• If -o is not present, the file coherensflags.cmp in the comps directory
is copied by default.
The script creates the following links
SOURCE
directory path of the “main” source code
BSOURCE directory path of the biological source code
SSOURCE directory path of the sediment source code
COMPS
directory path of the files for compilation of the “main” code
BCOMPS directory path of the files for compilation of the biological source
code
SCOMPS
directory path of the files for compilation of the sediment source
code
SCR
directory path of the scr directory
SETUP
path of the directory where the files for the application are located
DATA
directory path of the data directory