1
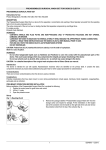
END OF REINFUSION
1
2
Remove caps
(male and female)
from the bag
ORTHO P.A.S.
3
Close both clamps
Quick User’s Guideline
disconnect the bag
from the reservoir and
close the connections
Remove bag and filter.
The system is now working
as drainage only
Turn vacuum to max,
turn lever to “pause”,
disconnect vacuum pump
rev. 02/2010
REDON FUNCTIONING
4
www.eurosets.it
Innovation and Technology for Better Patient’s Outcome
This document is not intended to replace the ORTHO P.A.S. user’s manual, it is for quick
reference only. For complete ORTHO P.A.S. set up and procedure please refer to its User’s manual.
SET UP
REINFUSION
1
2
3
1
2
3
Transfer
Ortho P.A.S.
to the sterile field.
cut the fingers connector
according to the
drainage size in use
4
5
Move Ortho P.A.S. out of the sterile
field. Remove the transparent
pouch. Close the clamp.
Connect the vacuum pump:
holding the black ring down
slide the pump up
7
8
Turn the pump on
and adjust the vacuum
The yellow indicator
disappears
(vacuum ON)
Connect the drainage
to the fingers connector
6
Slide the bag out
from the pouch at the
back of the reservoir
4
write down the
blood collection
start date and time
9
5
The blood moves into the bag.
50 ml (supernatant and fat)
remain in the reservoir
7
Hang Ortho P.A.S.
to the bed.
System working
Turn the lever to the left
(“vent” position). The yellow
indicator becomes visible
Take the bag and
open the connector
Open the clamp
6
Close the clamp
8
Turn the lever back to
“suction” position. Yellow
indicator disappears
9
Insert the
Goccia 40mm filter
Prime the Goccia 40mm filter
and the reinfusion line.
Reinfuse the blood*
In case of multiple reinfusion, repeat the complete sequence without
disconnecting the Goccia filter, neither from the bag, nor from the Patient
*The blood should be reinfused according to your Hospital’s Protocol
Remove the green pouch
Keep the transparent pouch