1
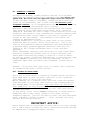
X-AIR Series "F"
Aircraft designed & manufactured by:
RAJ HAMSA ULTRALIGHTS PVT LTD, INDIA
Aircraft denomination:
X-air "F" (France, Europe)
X-air "F" Gumnam (India)
X-air "Falcon" (UK,USA,Canada,Australia)
USER'S MANUAL
AND
MAINTENANCE MANUAL
For AIRFRAME & ENGINE JABIRU 2200
SUMMARY
PAGE
I. Description and usage
II. List of controls, instruments and equipment
III. Pre-Flight Check
IV. Starting the engine
V. Taxiing and the vital actions
VI. Take off
VII. Turn and evolutions
VIII. Flying in turbulence
IX. Stall
X. Flying at high speed
XI. Approach and landing
XII. Flying in cross wind
XIII. Behaviour of the aircraft with respect to weight
XIV. Emergency procedures, forced landings
XV. Dismantling for transport
XVI. Maintenance
XVII. Conclusion
Annex 1
: Aircraft limitations
Annex 2
: Technical Data & Performance
Annex 3
: Maintenance Schedule
Annex 4
: Controls layout
Raj Hamsa Ultralights Pvt Ltd
40, Goshala Road, Mahadevpura P.O. BANGALORE - 560048
Tel: +91(0)80-56965835
Fax: +91(0)80-8518485
Web site: http://x-air.in
1
1
3
4
5
5
6
7
7
7
8
8
9
9
10
11
12
13
13
16
19
1
RAJ HAMSA ULTRALIGHTS PRIVATE LIMITED
X-AIR Series "F"
USER'S MANUAL
AND
MAINTENANCE MANUAL
(revised January 2012)
I. DESCRIPTION & USAGE:
GUMNAM is a fixed wing ultralight aircraft, two-seater side by
side, front engine mounted, high wing, tricycle undercarriage,
fitted with conventional 3-axis controls: ailerons, elevator and
rudder.
In its standard version equipped with complete dual controls,
GUMNAM can be used for recreational flying as well as for
instruction: the excellent behaviour of this aircraft in terms
of responsiveness, docility, forgiveness slow landing speed,
make it idealy suitable for this activity.
GUMNAM is an inexpensive aircraft in terms of capital investment
and cost of operation: However the controls layout and the
feeling in flight are even more similar to those of a light
aircraft (example: Cessna 152) than its predecessor, our X-AIR,
from which it has evolved: GUMNAM, sporting a smaller wing area,
a better streamlined fuselage and very effective FLAPS, although
it fits by all criteria in the MICROLIGHT CATEGORY, has nothing
to envy from a regular aeroplane and as such offers an
undisputed alternative for imparting flight training within the
constraint of limited budgets.
GUMNAM is fitted in option with the JABIRU 2200 4-STROKE engine:
the outstanding rate of climb at take off with 10 degrees of
flaps brings an added safety in routine circuits and there will
be that comfortable feeling of always having extra power at
one's finger tips, if required.
II. LIST OF CONTROLS, INSTRUMENTS & EQUIPMENT:
1. Controls:
- Control stick 2 Nos : controls elevator (pitch) and ailerons
(roll)
- Rudder pedals (2 pairs) : controls rudder (yaw) and nose
wheel steering
- Throttle lever 2 Nos, left hand, controls power (push for
power)
- Toe brakes: differential, on left hand side rudder pedals
only, control 1 brake on each main undercarriage wheel
2
- Trim handle: between pilot and passenger, controls elevator
trim (forward: aircraft nose down)
- Flaps control lever: on cabin ceiling (lever down: flaps
down)
- Two engine ignition switches (dual electronic ignition,
toggle up: on)
- Master switch (key operated, turn clockwise: on)
- Self starter switch (press to start)
- fuel pump switch (toggle up: on)
- Choke lever (lever up: choke open)
Please note that all the controls are
strictly conventional:
Effects of controls
Action on controls
Effect obtained
Press right foot
Press left foot
Stick to the right
Stick to the left
Stick forward
Stick back
Throttle forward
Throttle back
aircraft yaws to the right
aircraft yaws to the left
aircraft banks to the right
aircraft banks to the left
aircraft nosedown
aircraft nose up
increase power
reduce power
2. Instruments (Standard):
- ASI (air speed indicator)
- Altimeter
- Ball
- Compas
- Tachometer (RPM)
- CHT, oil temperature
- Charge indicator
Options: Intercom, EGT and other engine monitoring
instruments, GPS, etc..
3. Fuel tanks:
- Standard capacity, 55 liters in 2 FRP tanks located behind
seats
- Drain on each
- Breather on each
- Tank transparency ensures visual fuel level check.
4. Other features:
- cockpit doors, luggage boot behind seats and wheel pants are
standard.
III. PRE-FLIGHT CHECK:
3
A good pre-flight is the foundation of
safe flying.
We suggest that you go through the following checks before each
flight session.
1.Engine:
Stand in front of the engine and check:
- the propeller and its bolts
- the reduction gear: no oil leak
- the engine supporting frame (ensure that the rubber
foundations are in good condition)
- the cooling system: radiator full of coolant and no leaks in
the hose connections; radiator rubber mountings in good
conditions.
- aspect of the ignition units and adjoining leads.
- spark plug caps properly fitted.
- the exhaust fittings and the exhaust rubber foundations.
- no cracks developing in the exhaust
- throttle and choke cables for fray or misadjustment.
- carburetors and air filters properly secured.
An aircraft engine should always be
spotless clean!
2.Airframe:
Start from left looking at the aircraft from front and check the
following attachments:
- top of the front fuselage tube
- base of the same tube plus check the bolts at the main
axle assembly
- the wing struts at the stainless steel tangs and pins/safety
rings.
- check the right wing:
- the sail condition at the leading edge
- the wing tip tube fully secured
- the sail condition at the trailing edge
- battens properly positioned
- the wing struts from bottom tang to wing tang
- the compression struts at both ends
- the jury struts
- the root attachements of the trailing edge and leading edge
- check ailerons attachments and safety rings
- check flaps attachements
- check ailerons cables, fittings, turnbuckles and pulleys
- follow the fuselage up to the tail and check the following
attachments :
- the elevator hinges
- the elevator struts on top and bottom
- the elevator control plates
- the elevator leading edge connection to the keel
- the upper part of the rudder & its general aspect
- the lower part of the rudder
- the rudder cables connection with the rudder plates
- the trim tab connections
- look into the cockpit and check:
4
- the sticks and corresponding pulleys/cables
- the rudder cables condition especially between the seats and
make sure that they are crossed in the fuselage (ref. annex 4)
- the ailerons "friction free" control cables assembly
- the throttle cable and choke cable connections in the
cockpit
are free-moving and exempt of fray or damage
- the fuel tanks air breather are free, fuel cap is closed and
the content is
sufficient for the flight
- the fuel filter condition
- the fuel line connections
- check the left wing:
- the wing struts stainless steel tangs at the axle
- the wing struts till the upper tangs on the wing
- the compression struts at both ends (open velcro flap)
- the jury struts (and remove the ASI venturi cover)
- the battens properly positioned and the look of the sail
- the wing tip secure
- check:
- the base of the front fuselage tube & attachement at the
engine frame.
You are back at the nose: your tour is complete and you may now
fly with peace of mind.
3. Instruments:
- verify ASI functioning and set altimeter
- verify the proper functionning of all installed instruments
- before take-off for a cross-country flight the reading of
the compass must be checked against a known reference: runway
markings for example.
IV. STARTING THE ENGINE (Jabiru):
If you respect the following procedure, you will avoid problems
while starting your engine:
a. Cold engine:
1. Check throttle closed
2. Prime the carburetors by mean of electric pump
3. Keep ignition off and choke open
4. Press starter button & rotate the propeller for
a few seconds
5. Choke full closed (down). Throttle closed
6. Switch both ignitions on
7. Check for CLEAR PROP !
8. Press the self starter button; the engine should
start at once
9. As soon as started open throttle up to 1300 RPM
and reduce progressively the choke till full open
10. Warm up the engine for 3 minutes at 1300 RPM.
!! WARNING !!
Never forget to open the choke,
failing
which your power will be drastically affected in flight.
5
Never forget to switch off the
electric pump:a pump permanently on increases
fuel
consumption by 30 %! This pump is a primer or else a back-up to
be used only in the 2 following cases:
1. emergencies due to engine misbehaviour related to fuel
starvation whatever the cause
2. as a preventive mesure in case of marginal take off in
hostile surroundings, for a brief duration, say 1 minute.
b. Warm engine: throttle idle position, pressing the starter is
sufficient to restart.
V. TAXIING & THE VITAL ACTIONS :
Before anything, you should have investigated your aircraft
limitations! Please refer to annex 1.
You are now sitting on board, you have tightened your shoulder
harness. The front wheel control is coupled with the rudder.
Push the left pedal to turn left, the right pedal to turn right.
On rough surface we recommend to taxi faster with front wheel
up. Steering control with the rudder becomes efficient from 15
Km/h onwards.
At the end of the taxiway, and before take off...
you are invited to perform the vital
actions :
1. open doors and VISUALLY check for free and correct
directional movement of all control surfaces.
2. doors locked.
3. no obstructions/loose objects in the cockpit which
could interfer with the controls.
4. mag check: maximum drop permitted = 300 rpm. In normal
conditions both mags should be ON while flying.
5. instruments check
6. choke closed
7. fuel quantity check: do NOT take off with less than 10
liters in the tank.
8. flaps lowered in take-off position, first notch, 10
degrees
8. no aircraft in approach.
9. line up.
Everything in order, you may take off.
VI. TAKE OFF:
!! WARNING !!
PILOT QUALIFICATION
It is clear that the following advices are not a
flying course and that you are supposed to have
passed with success the theoretical and practical
tests under an authorised Instructor as required
in your Country. Furthermore we wish to warn
conventional aeroplane pilots that a few hours of
conversion to the type is necessary before flying
6
solo. The particular behaviour of a microlight —
related to its comparatively low wing loading —
demands a bit of acclimatation.
Well, The breeze is gentle. The aircraft is lined up. Push
progressively the throttle to full open and gradually release
the pressure on the front wheel. At 50 Km/h IAS, pull back
progressively on the stick, maintaining your heading by foot
control. At 55 Km/h indicated you are rotating; ease the stick
forward to level off and increase your speed, then climb at 70
Km/h up to 100 meters (300 ft) full throttle: the rate of climb
is about 3 meters per second with passenger.
Note: The normal engine RPMs in the take-off run should be in
the range of 3000 to 3300 In the event of your engine not
reaching at least 3000 rpm at full throttle YOU MUST ABORT TAKEOFF and investigate the cause of lack of power.
When you reach the altitude of 100 meters, retract the flaps,
reduce throttle keeping at 60 Km/h airspeed and climb gradually
up to the safe altitude of 300 m AGL (1000 ft). At this altitude
you may level off, reducing throttle to 2800 rpm, and
maintaining an economy cruise speed of 90-100 Km/h IAS.
This air speed is also the best handling speed and should be
given preference in turbulent air.
Note: Please keep in mind that you are using a NON-CERTIFIED
ENGINE; therefore, tree top height circuits are not recommended.
200 m (600 ft) is just fine.
In the case of loss of power, or worst, of engine failure during
take off, push immediately the stick forward to maintain maneuvrable speed and try to land ahead. Avoid steep banks which
will increase your loss of altitude. Do not fiddle with the
engine but concentrate on your landing, face the wind and keep
constantly an eye on your ASI.
It will help you to relax if you remember that GUMNAM glides
very well engine off and remains perfectly maneuvrable. For
safety, do maintain an air speed of at least 80 Km/h. If they
have already been retracted, Do not forget to lower the flaps to
2nd notch (25°) in final, which is a primordial consideration
for short landing.
However it is good to keep in mind that your engine reliability
will be fairly high if you scrupulously observe the maintenance
schedule given by the manufacturer: please refer to annex 3.
VII. TURNS & EVOLUTIONS:
- GUMNAM responds neatly to any stick input in roll.
- Be very gentle with the stick: the effect is immediate.
- Keep the banked attitude as long as you need; then simply come
back to neutral
coordinating the maneuver with your feet.
- To begin with, limit yourself to a gentle bank of not more
than 10° to the horizon. Watch the ball and seek for perfection.
7
- Never forget that while banking the stall speed of the
aircraft increases with the angle. From a mere 50 Km/h in
horizontal flight, it shoots up to 70 Km/h in a 60° bank!
- You will quickly enjoy the superb maneuvrability of GUMNAM but
never forget that, in spite of the fact that the aircraft may
eventually endure the loads applied while executing drastic
maneuvres, it has not been designed in view of performing
aerobatics and furthermore:
aerobatic maneuvers are forbidden with
an ultralight aircraft
VIII. FLYING IN TURBULENCE:
Thanks to the dihedral, the sweep-back and the washout induced
in the wing design, GUMNAM is self-stable and when disturbed
from its course will return to a normal attitude on its own:
therefore it is important for the pilot to understand that
tension is not necessary; just let the aircraft fly and do the
least possible corrections. In strong wind conditions, never
forget the gradient effect which may induce unexpected stalls at
low altitude while landing — particularly in the last turn:
misjudment of gradient is a too frequent cause of accident in
light aircraft, so beware... avoid steep banks and at low
height, do fly at 70 Km/h or more.
IX. STALL:
To understand perfectly the flight envelope of your machine,
you must perform a few stalls.
To do so, climb at 1000 ft AGL and begin with stalls, engine
idle. At about 50 Km/h the aircraft (clean) becomes less
responsive. If you pull the stick further backwards, the
aircraft will execute a gentle stall break. Open throttle and
push stick forward, the aircraft will recover with less than 20m
altitude loss.
At full power, the high nose attitude will be more impressive
and the break rougher: the maximum altitude loss will be 30
meters in a fully loaded two seater.An assymmetrical stall
generates a larger loss of altitude: recovery comes with stick
forward followed by opposite aileron.
By design, GUMNAM is extremely reluctant to enter into spin.
X. FLYING AT HIGH SPEED :
Beyond 100 Km/h IAS the back pressure on the stick due to the
longitudinal self stability will force you to maintain a forward
pressure on the stick to maintain level flight or to make use of
the elevator trim in order to cancel the nose-up tendency
(please note that the trim is capable of taking care of all the
longitudinal situations in the flight enveloppe). However high
speeds are not fuel efficient and submit your engine to unnecessary stress. Do avoid them.
8
XI. APPROACH & LANDING:
To begin the descent, reduce throttle and set 70 to 80 Km/h
indicated air speed in the final: Remember that you adjust the
speed with the stick and the approach angle with the throttle.
If the aircraft tends to overshoot, reduce throttle and vice
versa if you undershoot, but in both cases do maintain your
airspeed constant. It is airspeed which will give you protection
against turbulence and gradient while landing.
Maintain a safe altitude before the threshold of the runway,
then come-in, with flaps down second notch (25°), throttle
reduced at 1500 RPM (no less to keep a clean airflow on the tail
surfaces) and execute a neat rounding-off avoiding fiddling with
ailerons but rather using rudder if you have to correct the
course at the last moment. This method is the safest for
landing on unprepared fields.
A speed reserve will allow you to keep clear of non visible
obstacles such as fences, wires, big rocks etc.. and it will
also be your guarantee against turbulence and wind gradient.
A shallow angle, powered approach should be used only for
landing on full fledge aerodromes with a clear and safe
approach.
After touch-down, maintain your stick up till your front wheel
naturally touches the ground. This is a way to protect your
front wheel from hitting roughly a stone or a clod of earth.
In case of a small field with obstructions, a side-slip may come
handy: GUMNAM is perfectly fit for this maneuver, at the
condition again that you watch your airspeed: 70 km/h and no
less.
ADVICE: If you feel that your final is a mess, don't hesitate
to overshoot and start a fresh circuit.
XII. FLYING IN CROSS WIND:
Don't fly in cross winds in excess of 20 Km/h unless you have a
good experience of your aircraft. Take off is not a problem:
just keep a bit of stick into the wind.
While landing, do a crabwise final and first touch the ground
with the wheel in the wind, then rectify your heading putting
the second wheel on the ground. Keep nose wheel up and steer
with rudder for as long as possible, till your speed has dropped
so much that the wheel will drop on its own. Taxi with stick
towards the wind.
In any event, relax, since GUMNAM's behaviour in cross wind is
examplary and in many cases, thanks to the short rolling
distance required , you will be able to take- off and land headwind, eventually across a runway... Also, stronger the wind,
shorter the rolling distance.
IMPORTANT ADVICE:
Never forget that an ultralight aircraft due to its very concept
has a lower engine reliability than a certified aircraft and may
be submitted to unexpected engine failure.
9
Therefore, maintain sufficient altitude to have the choice of a
safe emergency landing field.
Never fly over a congested area
particularly over city or hills.
or
a
hostile
area
at
a
low
height,
Make it a rule to be always within gliding distance of a safe
field, as it was customary in the old days of Aviation.
XIII. BEHAVIOUR OF THE AIRCRAFT WITH RESPECT TO WEIGHT:
By the very concept of the aircraft, it is impossible to locate
any load out of the C.G range and which cannot be taken care of
by the trim.
However, there is a slight tendency towards tail-heaviness increasing with load to be aware of, although the C.G. remains
always well within limits. (Refer to the Weight and Balance
Schedule of your aircraft). The elevator trim (a standard
feature) is there to take care of these small variations and
allow you to fly hands-off at any load and speed (within the
respective permitted ranges: refer to aircraft limitations,
annex 1.)
Of course it is clearly understood that:
1. The luggage boot behind the seats has not been conceived to
carry gold bars! 20 kg max please..
2. The volume of fuselage behind the boot and the fuel tanks
is NOT a cargo bay!
The cockpit rear partition is there to remind everyone that
NOTHING should be stored behind, a further complication being
the possible interference with the control push-pull rods and
cables.
When flown at lower weights, solo for example, be prepared for a
short take off and steep rate of climb; while landing you should
avoid any abrupt flare to prevent the aircraft from ballooning
(remember that an important characteristic of a microlight is
its low wing loading)
XIV. EMERGENCY PROCEDURES & FORCED LANDINGS:
a. Emergency Procedures:
Before attempting a forced landing:
- Stay cool, relax, there is nothing to fear, it's NORMAL
- Pick the largest field available, aligned with the wind
- Fasten seat belts full tight (except over water)
- Lower the flaps 2 notches (25°)
- Switch both ignitions OFF
- More important than anything else, WATCH YOUR AIRSPEED &
LAND INTO WIND
- After touch down keep nose wheel up if you can avoid braking
immediately
- If the field is ploughed, do land along the furrows
b. On Corns and Crops:
Bring the aircraft in final at the lowest possible speed and
stall when your wheels are almost to touch the corns or crops.
10
This will protect you from a violent braking effect due to
whatever the plantation.
c. On Water:
Altitude over water is difficult to judge!
- Release your safety belt.
- Face the wind
- Make a mental preparation for your landing and try to
figure out the best direction to swim away. Touch
the water as slow as you can, slightly nose up.
- Once in the water, don't panic, leave the aircraft without
haste and don't try to take anything with you.
d. In the Trees:
If possible, select preferably low and dense trees, fasten your
safety belt full tight. Keep good speed in final: the air is
often turbulent on trees. As soon as you hear the first leaves
brushing your wheels, pull the nose up full stick back to cut
the speed and... good luck !
XV. DISMANTLING FOR LAND TRANSPORT:
We suggest to operate on grass or a soft surface to avoid
damaging tubes or spoiling the sail.
A. Dismantling:
The rudder and the tail plane will remain in place or the
horizontal surfaces may be folded upwards; in any case, the
mobile surfaces will be held with bungees to prevent shaking
during transport.
Removal of the wings:
1. Remove upper and lower root covers as well as the 8 straps
connecting the 2 wings
2. Remove lower surface battens.
3. Remove upper surface battens, proceeding from tip to center.
4. Disconnect the ailerons control cables.
5. Disconnect the jury struts on top only.
6. Have a helper holding the wing level at the tip, remove the
pins from the wing struts and take the struts away.
7. Disconnect the pins connecting leading-edge to keel as well
as trailing edge to keel and take away the wing. Keep all pins
at respective places on struts and brackets.
8. Proceed identically with the other wing.
9. To disassemble the wing further, you may separate the aileron
and disconnect the two compression bars on the trailing edge as
well as the cable on the trailing edge. Extract gently the sail
from the structure and fold it carefully.
10. All components in aluminium should be handled with care and
wrapped in plastic or cloth for transport. Salient fittings
should be further protected with foam.
NOTE: It is a well known fact that careless
transportation generates more wear and tear than
lots of flying hours.
11
B. Reassembling:
Follow exactly the same procedure in the reverse: Enter the
structure of the wing in the sail, connect the wing to the keel,
assemble wing struts and jury struts, reconnect ailerons and
ailerons control cables enter all battens from root to tip,
reconnect both wings with belts, cover the root, and proceed
with a careful and complete preflight check as described in para
III.
XVI. MAINTENANCE:
We cannot insist enough on the importance of the maintenance of
your aircraft: only a strict maintenance discipline applied to
both engine and airframe will give you peace of mind in
flight...
In addition to the daily inspection schedule (Preflight Check
para III), you will find in annex 3 a comprehensive maintenance
schedule for both engine and airframe; this schedule is based on
our long standing experience of flying under tropical
conditions: observing scrupulously this shedule will give you
the best possible garantie of trouble-free operation.
You may also refer to the ROTAX engine manual for more details
specific to your engine.
It is also important that you maintain an up to date AIRCRAFT
MAINTENANCE LOG BOOK where you will record any problem, work,
modification, etc.. related to your aircraft:
This is a mandatory DGCA requirement.
You will have to comply with the maintenance schedule of annex
3, then sign & date the sheets in the bottom box after having
executed and ticked the respective operations.
! ATTENTION !
At the time of renewal of your PERMIT TO FLY you
will have to provide an up to date Journey Log
Book and an up to date Maintenance Log Book along
with the duly filled Maintenance Shedule sheets
(ann.3)
The in-between 100 hours operations of maintenance are very
simple, and anybody with a sense of cleanliness and method can
do it. On the other hand:
We recommand that you send your engine to us
EVERY 1000 HOURS FOR OVERHAUL
We have the expertise for decarbonising and overhaul and it is
easy enough for you to remove the engine and crate it to us: the
work will be done quickly and safely at a reasonnable fee.
To make our task easier, we request you to send your Maintenance
Log Book along with the engine.
! MOST IMPORTANT!
Sailcloth deterioration takes place with UV exposure, and we
would like to stress the importance of keeping your aircraft
12
under shade/hangar when parked. Furthermore, the SAFE LIFE OF A
SAIL IS LIMITED:
IT IS MANDATORY TO PROCEED WITH
A COMPLETE AIRCRAFT COVERING (SAILCLOTH) REPLACEMENT
EVERY 1000 HOURS OF ESTIMATED SUN EXPOSURE
XVII. CONCLUSION:
We have tried to give a maximum of usefull informations in this
manual, however, it is possible that in the course of your
flying activities some questions will raise in your mind. When
in doubt, do not hesitate to contact us at the phone numbers
given at the beginning of this manual. Always remember that in
our sport, mistakes may be heavy in consequences, so check and
recheck your aircraft till you are fully satisfied: YOU are
responsible -- no one else -- for your maintenance, your
aircraft airworthiness, your flying ! This axiome is the
foundation of Ultralight Aviation. So, never take anything for
granted, do not underestimate situations,keep your judgement
sharp at all time, and, above all, NEVER SHOW OFF !
We wish you many happy landings!
*****
13
Annex 1
AIRCRAFT LIMITATIONS
Maximum all up weight permitted:
Maximum load in luggage compartment:
VNE:
Maximum speed for flaps 1st notch 10°:
Maximum speed for flaps 2nd notch 25°:
Maximum engine revs:
Maximum revs in constant utilisation:
CG range: refer to weight & balance schedule
Maximum cross wind component:
450 kg
20 kg
160 km/h (IAS)
100 km/h
90 km/h
3300 rpm
3300 rpm
25 km/h
ALL AEROBATIC MANEUVERS ARE PROHIBITED ON THIS AIRCRAFT
NO INTENTIONAL SPIN
*****
Annex 2
TECHNICAL DATA & PERFORMANCE
Wings:
- Leading edge
- Trailing edge
- Compression struts
- Thrust/drag
- Wing tip
- Wing struts
- Profile
:
:
:
:
:
:
:
64 x 2 mm (sleeved with 60 x 2)
50 x 2 mm (sleeved with 45 x 1.5)
38 x 1.5 mm
cables 3 mm
25 x 1.5 mm
special Raj Hamsa aerofoil tube
25 ribs per wing 12.7 x 1.2 mm T.S
24 ribs per wing 12.7 x 1.2 mm D.S
: Dacron Polyester 185 gr/sq.m.
- Sail fabric (for all)
Ailerons & flaps:
- Leading edge
: 38 x 1.5 mm
- Trailing edge
: 12.7 x 1.2 mm
- Profile
: ribs 10 x 1 mm riveted
Fuselage and tail surfaces:
- Fuselage keel
: 64 x 2 mm sleeved with 60 x 2 mm
- Fuselage tubes
: 25 x 1.5 mm & 12.7x 1.2 riveted
- Tail surfaces
: 25 x 1.5 mm
- Seat
: Upholstered bucket seats with
adjustable head-rest and full 4 points safety harness
- Nose and main wheels
: Aluminium cast alloy, 8"
- Tyres
: 4 plys 3.50 x 8
- Landing gear
: Hydraulic suspension front & rear
- Brake
: Drum brakes on main landing gear
Controls:
- Type
: 3 Axis conventional
- Rudder pedals
: double, acting on front wheel
through connecting rods and on rudder through cables
- Stick
: double, between legs
14
- Throttle
: double, at left hand
- Stick to elevator connection : By push-pull rod
- Stick to aileron connection
: By cables dia 3 mm
Miscellaneous:
- Bolts
: High tensile grade 8.8. quality
- Fitting tangs
: Stainless steel 3 mm thickness
- Paint
: Epoxy
Structural stress resistance:
at 400 Kg all up weight
: + 6G and - 3G
Maximum load on controls : Rudder
:
1380 NEWTON
Elevator :
1480 NEWTON
Aileron
:
1300 NEWTON
Weight and size characteristics:
- Empty weight
: 242 kg
- Empty weight to power ratio
: 3.7 Kg/hp
- Total weight to power ratio
: 6.9 Kg/hp
- Maximum All Up Weight
: 450 kg
- Length
: 5.7 m
- Overall height
: 2.53 m (rudder top)
- Wing span
: 9.38 m
- Chord at the root
: 1.95 m
- Wing area
: 14.32 m²
- Dihedral angle
: 1.5°
- Sweep back angle
: 8°
- Washout angle
: 1.9°
- Vertical stabiliser area
: 0.73 m²
- Rudder area
: 0.63 m²
- Horizontal stabiliser area
: 1.51 m²
- Elevator area
: 0.88 m²
- Aspect ratio
: 6
- Wheel base
: 1.5 m (lateral)
- Wheel track
: 1.5 m (longitudinal)
C.G. Load Displacement:
Due to the concept of the
aircraft, it is impossible to
locate any load out of the CG
limits. There is only one possible load configuration.
(Ref. Weight & Balance Report provided with the aircraft)
Engine:
Brand
: JABIRU
Type
: 2200 A/J
Cooling
: air cooled
Power Maximum
: 55.5 bhp
At
: 3150 RPM
Duration maximum
: no limit
Capacity
: 2200 cc
Type of fuel
: automotive petrol
Fuel tank capacity
: 55 l
Self starter
: Electric
Ignition
: Double electronic
Carburetor brand and number
: 1 BING
Reduction gear type
: direct drive
Propeller:
Type
: Two blades, Carbon "DUC"
Maximum power
: 100 bhp
15
Performances, standard version (410 kg AUW at seal level)
Minimum speed, level flight
flaps up
flaps down
Maximum speed, level flight
Turbulent air best speed
Economic cruise speed
Stall speed, flaps up
flaps down
Maximum climb rate
Glide ratio engine off
Take off roll without wind
Take off distance to clear a
15 meter obstacle
Landing roll with brakes
Landing distance to clear a
15 meter obstacle
Useful cealing
bank 30° to 30 °
Fuel consumption at full load
endurance with 60 l fuel tank
range
:
:
:
:
:
:
:
:
:
:
55 km/h
50 km/h
140 Km/h
90 Km/h
90-100 Km/h
50 Km/h
45 km/h
3.2 m/sec
10.0 to 1
60 m
: 230 m
: 100 m
:
:
:
:
:
:
230 m
3000 m (10.000 ft)
2 sec
12 l/h
3 h (approx)
300 Km (approx)
*****
16
Annex 4
CONTROLS LAYOUT
1.Rudder cables:
2.Ailerons cables:
3. Adjusting cables tension:
When pressing gently in (A), deflexion of the cable should be
about 1" ; avoid excessive tension on cables as well as
excessive slack.
4. Elevator push pull rods:
Adjustment provided: 3 holes in (B) for comfortable pilot's arm
reach. No other adjustment possible.