1
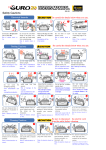
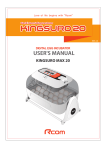
New Rcom 20 USER'S MANUAL
PX-20(Standard)
4. How to Assemble
Digital Incubator
▶ When the machine failed to
power on even if you pluged in,
remove the fixing piece like
the picture by screwdriver.
www.R-com.co.kr
View Window
1. Safety Cautions
REA
Electrical hazards
Ver E 3.1.1
5. How to Replace Fuse
Be careful the details below when you use.
R
Insert the power cord
in the socket at the back
of the main body.
Universal Tray
Main Body-1
RE
AUTOELEX
AUTOELEX
▶ You can find assembled PCB
when open the cover.
Remove faulty fuse with screwdriver.
AR
Egg turning Plate
T
Risk of electric shock or fire.
Do not pull the cord when
taking out the power cord,
and keep wet hands away
from connecting plug.
Risk of electric shock or fire.
Never pull the plug out of
the outlet during the
incubation period.
Do not twist or crush
electric cord.
Incubation will be interrupted.
Risk of electric shock or fire.
Setting Cautions
Do not insert multiple
connecting plugs in an
outlet.
FRON
Do not use a damaged
power cord or loose
outlet.
Lock the three locking
buttons at the front and rear
of the incubator.
Main Body-2
▶ Replace with new fuse.
( 250V 2.0A Ø5*20mm )
6. Before use
Risk of fire or electrical overload.
Be careful the details below when you use.
▶ Insert the electric cord in the connecting socket at the back of the Main body and
put the power cord into the outlet. The display will come on.
There can be some odor the first time you use the incubator, that is normal.
Do not install in dusty or
dirty environment.
Risk of damage or fire within
the incubator.
Do not install under the
direct sunlight.
Risk of fire or interference with
the incubation process.
Do not install in excessively
cold or hot conditions,
cigarette smoke, etc.
Risk of interference with
the incubation process.
Do not install in moist or
humid environment.
Risk of fire or electric shock.
▶ Open the watercap and fill the hole with clean water. And, refill water after 5 min.
The styrofoam ball floats on and blocks the hole when full.
(Humidity goes down temporarily, in case you refill water under incubation period.)
Do not use any other
non-standard parts
except those provided.
Risk of damage or hatching
failure.
You should stop to fill in the water as soon as the Styrofoam ball floats on.
The ball will block the hole when full.
After filling up with water, never shake or turn over the main body of the incubator.
Do not cover the
ventilating opening.
Inner temperature can rise,
interrupting incubation.
Install away from heat
sources.
Risk of damage to the incubator
case and interference with
the incubation process.
Ensure that the incubator is
installed on a stable surface
away from edges.
Risk of damage to incubator
and eggs and user from
accidental knocks or drops.
Do not turn the incubator
upside down.
Water will pour out of the incubator,
and view window can be dropped
or damaged.
Check the water level every three days and refill fully on incubation period.
The light for water top-up can remain for a while after you filled up.
Do not install where
children or other people
can touch with easy.
Risk of knocking the incubator
or accidental interference with
the controls.
▶ Place your eggs and cover the view window.
ER
WAT
The egg to incubate must be a fertilized egg.
Do not disassemble or
modify the incubator in
any way.
Risk if electric shock or fire.
Please ensure that no
small objects get into
the holes on the incubator.
Risk of electric shock or fire.
If the incubator sounds
strange or emits smoke
contact your service
center.
Risk of electric shock or fire.
Clean the incubator
thoroughly before storing.
You can turn off humidification function when you don't fill water with your incubation
or when you need low humidity incubaion under 40%.
(Water supplement alarm will turn off with this function.
Refer to "How to turn OFF humidification function.")
If the incubator requires
repair disconnect from the
power supply and please
contact to your service center.
7. Operation Part
Be sure to disconnect the electric cord
from the outlet before cleaning.
Cleaning Cautions
ER
WAT
Power Failure Alarm Function
Blick with power failure
(to remove, press SET button)
Temp. UP Button
Do not spray cleanser
directly on the incubator
surface.
Clean the incubator by a
soft cloth with a neutral
detergent.
Brush away dust on the
plug with a dry cloth.
Do not use chemicals like wax,
benzene, alcohol, thinner,
aromatic, or lubricant, etc.
Temp. DOWN Button
For special cleaning of
inner part per year, contact
to the service center.
Humidity DOWN Button
New
Digital Incubator
TEMP +
TEMPERATURE
HUMI +
HUMIDITY
CAL
Egg-Turning Setting Button
Humidity UP Button
CAL
TEMP -
HUMI -
Setting Button
(Setting Value check)
HEATING
TURN
Temp. Display
HUMIDIFICATION
TURNING ON
WATER EMPTY
SET
Humidity Display
DIGITAL INCUBATOR
Heater Lamp
AUTOMATIC EG
G T U R N I N G - T E M P E R A T U R E&HUM I D I TY CONTROL
Humidification working lamp
(Lighting when working)
(Lighting when working)
Egg-Turning Lamp
2. Identification of Parts
Vents for air circulation
For circulating warm air
Power Connecting
Egg Tray
For connecting
power cord.
Adjust the space of dividers
(Blink with water shortage)
8. Easy Function Operation
REFER TO "HOW TO START INCUBATION" FOR MORE INFORMATION.
according to egg size.
View Window
For a clear view of
the incubation process.
( duplicated View Window )
Water Supplement Lamp
Turn on with automatic egg-turning mode.
(Blink when working)
Function
Air inlet vent
For inlet of air
from outside
How to Operate
Explanation
Temp.
Setting
Water Cap
To facilitate water top-up
for the humidity control.
Digital Control Center
See description of
the function and operation.
Locking Button
Main Body-1 Main Body-2
3. Basic Components
Main Body-1
REA
R
Main Body-2
RE
Power Cord
AR
FRON
T
User's Manual
Setting of needed temp.
Humidity
Setting
Egg-Turning
Interval Setting
Setting of needed humidity.
Default setting
every1 hour
(Lamp: ON)
SET
once
2 times
3 times(OFF)
TURN
TURN
TURN
2 Hours
3 Hours
Lamp OFF
Universal Tray
Egg-Turning Interval Setting
as required
Egg-Turning
Test
Egg-Turning Test (once)
Changing
Cels. & Fahr.
Changing Cels. & Fahr.
Temp.
Calibration
How to calibrate temperature.
Humidity
Calibration
How to calibrate humidity.
Initialization
Initialization
(Factory setting)
View Window
4 times
every 1 hour
(Lamp ON)
repeat
How to OFF
Humidification
Function
SET
HUMI -
20%
Set Humidity as 20%
※ If you want to change setting value, keep pressing "SET" button and change the value.
New
Digital Incubator
www.R-com.co.kr
16. How to Turn ON/OFF Humidification Function
▶ In a state of SET button being pressed, press HUMI- button to adjust humidity at 20% and,
then, humidification function will be OFF.
On the contrary, if you adjust humidity above 20%, its function will be ON.
9. How to start incubation
▶ If you connect incubator with power cord,
it starts incubation
with existing temperature and humidity.
( Factory default setting-Temp.:37.5℃/ Humidity: 45% )
▶ Be sure to turn on when incubation started,
and turn off before 3 days of hatching.
( Refer to 8. Easy operation)
17. Change Cels.&Fahr.
▶ Press
button and
TEMP +
TEMP -
button
New
Digital Incubator
TEMPERATURE
at the same time, and CA will show on Temp. display.
There can be some odor the first time you use
the incubator, that is normal.
①
TURN
Then, press
button. It will change.
SET
CAL
HUMI -
HEATING
HUMIDIFICATION
TURNING ON
WATER EMPTY
DIGITAL INCUBATOR
repeat
AUTOMATIC EG
G T U R N I N G - T E M P E R A T UR E&HUM I D I TY CONTROL
(Keep pressing the button)
10. How to Terminate Incubation
If you leave the incubator alone without drying water after high humidity incubation,
the water inside of incubator condenses and makes waterdrop at the LCD display or
control device. For preventing this problem, disassemble main body 1 and 2, and
dry completely before storing. (You can dry the incubator as operating the
incubator for about 1 to 2 hours after removing water.)
The styrofoam ball floats on and blocks the hole when full.
12. How to set Temperature
13. How to set Humidity
Digital Incubator
TEMP +
HUMI +
TEMPERATURE
CAL
TEMP -
HUMI -
TURN
WATER EMPTY
HEATING
HUMIDIFICATION
TURNING ON
WATER EMPTY
( ALL RESET )
①
DIGITAL INCUBATOR
DIGITAL INCUBATOR
AUTOMATIC EG
G T U R N I N G - T E M P E R A T U R E&HUM I D I TY CONTROL
AUTOMATIC EG
G T U R N I N G - T E M P E R A T U R E&HUM I D I TY CONTROL
19. Incubator Initialization
Keep pressing SET button
(① Keep pressing the button)
TEMPERATURE
button is pressed, adjust the
SET
temperature you want with
TEMP +
or
TEMP -
▶ In a state of
button.
SET
humidity you want with
HUMI +
or
HUMI -
Humidity setting will be completed when you remove
your finger from the SET button, and present temperature
your finger from the SET button, and present humidity
of the incubator inside will be indicated.
of the incubator inside will be indicated.
▶ Be sure to set humidity 65%~70% from 1~2 days
Temperature and humidity can be different from
normal setting levels according to the surrounding
environment.
▶ Egg Turning Test : If you press
CAL
HUMI -
HEATING
TURN
AUTOMATIC EG
G T U R N I N G - T E M P E R A T UR E&HUMI D I TY CONTROL
TURNING ON
HUMIDIFICATION
WATER EMPTY
SET
DIGITAL INCUBATOR
HOLD
AUTOMATIC EG
G T U R N I N G - T E M P E R A T UR E&HUM I D I TY CONTROL
20. How to Clean after Hatching
▶ Unlock three of locking buttons at the front and back of incubator,
and disassemble the incubator.
▶ Disassemble the incubator. The bottom part shall be thoroughly cleaned
with water and dried.The upper parts shall be naturally dried in order to
remove moisture inside of the incubator.
Assemble the parts in the reverse order of disassembly.
button for
back
WAT
ER
Do not inflict an impact to the humidification heating part ⓐ.
Or, it will be damaged.
LEX
AUTOE
LEX
AUTOE
HUMI +
HUMIDITY
CAL
CAL
TEMP -
TURN
HUMI +
HUMIDITY
CAL
DIGITAL INCUBATOR
about 5 seconds, egg turning test will be effected once.
Digital Incubator
TEMPERATURE
TURN
TEMPERATURE
TEMP -
▶In case of you operate humidification function, there can be moss on the
humidification heating part ⓐ. It doesn't effect in function,
and you just need to clean it with soft brush after hatching.
14. How to Set Egg Turning ON / OFF
New
WATER EMPTY
TEMP +
▶ Pull out the electric cord from connecting jack,
and also take out the plug from the outlet.
before hatching.
If you press SET button, the present setting
temperature and humidity will be indicated and,
if you remove your finger from the button, the present
inner temperature and humidity indicated.
TURNING ON
button.
Temperature setting will be completed when you remove
If you set the incubator under a direct ray of
light or too cold spot, the incubator temperature
can be higher or lower than setting temperature.
TURN
button is pressed, adjust the
Digital Incubator
=
+
HUMI -
HUMIDIFICATION
"rSt" will show on the display as below,
and the incubator initialize to factory setting.
New
CAL
HEATING
③
Re-plug the power supply
HUMI +
HUMIDITY
CAL
TEMP -
▶ In a state of
②
New
Digital Incubator
TEMP +
(① Keep pressing the button)
For returning to the factory setting
HUMI -
HUMIDIFICATION
TURNING ON
HUMIDITY
CAL
CAL
HEATING
CAUTIONS before you calibrate temperature or humidity.
It is for initializing the incubator setting or calibration to factory setting
when you handle improperly so that the value changed.
Unplug the power supply. And, hold SET button as picture①. Re-plug the power supply as picture②.
Then, rSt will show on the display, and the incubator will be initalized to factory setting.
New
New
Digital Incubator
TURN
How to calibrate : Place the thermometer or hygrometer at 5 cm above
the bottom of the tray and operate it for one hour before starting its calibration.
- After Calibration If you can not rely on your thermometer or hygrometer, you can initialize the incubator to factory setting.
(Refer to Incubator Initialization)
Check water level every three days on incubation period,
and refill fully with warm water.
CAL
This calibration function is to reset the temperature and humidity of the incubator to correct values using
your thermometer and hygrometer. It is better not to calibrate the incubator as normal thermometer and
hygrometer are not reliable than incubator factory setting.
▶ How to Calibrate Temp. (or Humidity):
Temp. (Humidity) Calibration: Press TEMP+(or HUMI+) and TEMP-( or HUMI-) button at the same time then "CA" will
show on the display. Keep pressing these buttons for about 5sec. then Temp. ( or humidity) diaplay will blink.
Here, set the required temperature (or humidity) with TEMP+(HUMI+) or TEMP-(HUMI-) button, and press "SET" button.
▶ Check the water level every three days and refill fully on incubation period.
TEMP -
CAUTIONS
* Be sure to check
11. How to Supply Water for Humidity Maintenance
HUMIDITY
②
18. How to Calibrate Temp.(Humidity)
▶ After all eggs are hatched, you should take off the power cord for incubation termination.
TEMPERATURE
HUMI +
HUMIDITY
CAL
TEMP -
HUMI -
HEATING
HUMIDIFICATION
TURNING ON
WATER EMPTY
▶ In a state of
TURN
SET
button being pressed, press
Do not clean the product with organic solvents
such as benzene and paint thinner.
button then the setting will be changed as required.
ⓐ
repeat
SET
DIGITAL INCUBATOR
AUTOMATIC EG
G T U R N I N G - T E M P E R A T U R E&HUM I D I TY CONTROL
① (Keep pressing the button)
Be sure to set TURNING OFF
3 days before hatching.
Once (Lamp ON)
2Times (Lamp ON)
3Times (Lamp OFF)
4Times (Lamp ON)
Egg turning Interval : 2 hours Egg turning Interval : 3 hours Egg turning Interval : OFF Egg turning Interval : an hour
15. How to Set Abnormal High or Low Temperatue Alarm
▶ What is Abnormal High or Low Temperature Alarm?
It is alarm soulds when incubator temperature is higer or lower than setting value because of various
reasons such as room temperature change or disorder of temperature controlling system.
※ How to Set
SET
Press
SET button for
over 5Sec.
SET
Set required
Set required
high range with
high range with
UP / DOWN button UP / DOWN button
* Max. abnormal temp. alarm limit (0.0℃ ~ 5.0℃ Default Setting:2.0℃)
* Min. abnormal temp. alarm limit (0.0℃ ~ -5.0℃ Default Setting:-3.0℃)
SET
Set required
low range with
UP / DOWN button
Save setting and
pass to current
temp. & humid.
indication
21. Specification
Power
AC 100V~120V, 50/60Hz / AC 220V~240V, 50/60Hz
Temp. limits
20℃ ~ 42℃(68℉~107.6℉)
Temp. Accuracy
± 0.5℃
Working Temperature Ideal : 22℃ ~ 25℃
Min. 20℃ / Max. 26℃
Humidity Limits
20% ~ 70% ( It can be changed according to the conditions )
Humidity Accuracy
± 5%
Power Consumption
Average 48W
Capacity
Universal Tray 10란~50란
Net Weight
4.35 Kg
Size
(W)500×(L)410×(H)160 (mm)
Fuse Standard
250V 2.0A (Ø5×20mm)
Visit our web site (www.r-com.co.kr) for more information
on our products and other informations.
Update of information : download the necessary information
from resource room in Rcom homepage.
R-com digital incubator is designed for easy and convenient use.
For the improvement of the functions of the incubator, design,
how to use, etc. can be changed without notice in advance.
COMPANY : #612 DukAm-Ri, JuChon-Myeon,
: GimHae-City, GyeongNam, KOREA
TEL
: 82-55-337-2560 (Direct to sales team)
: 82-55-337-2561-3, 2567 (Office)
●
FAX
: 82-55-337-2568
●
E-MAIL
: [email protected] ( Sales team )
●
●