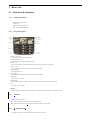
1
User Manual 1 Contents 1 2 3 4 BASIC KNOWLEDGE............................................. 4 1.1 1.2 1.3 INTRODUCTION ............................................ 4 SAFETY INFORMATION.................................. 4 SAFETY AND HEALTH PRECAUTIONS............. 4 1.3.1 General guideline ................................................................4 1.3.2 Mobile phone guideline .......................................................4 1.3.3 Battery guideline..................................................................5 1.3.4 Charger & accessories ........................................................5 1.3.5 Cleaning & maintenance.....................................................5 1.3.6 Others...................................................................................5 BEFORE START....................................................... 6 2.1 PARTS NAMES & EXPLANATION .................... 6 2.1.1 Technical Parameters ..........................................................6 2.1.2 Key pad description .............................................................6 2.1.3 Side keys...............................................................................6 2.1.4 Using T-Flash Car ...............................................................6 2.2 BATTERIES………………………………… 7 2.2.1 Changing a battery ..............................................................7 2.2.2 Charging a battery...............................................................7 2.3 CONNECTING NETWORK ............................... 7 2.3.1 SIM card...............................................................................7 2.3.2 Insert and remove SIM card ................................................8 2.3.3 Switch on/off ........................................................................8 2.3.4 Unlock the SIM card............................................................8 2.3.5 Unlock the mobile phone .....................................................8 2.3.6 Connecting to the network...................................................8 BASIC FUNCTIONS ................................................ 9 3.1 MAKING A CALL ........................................... 9 3.1.1 Domestic call .......................................................................9 3.1.2 Fixed line & extension.........................................................9 3.1.3 International call .................................................................9 3.1.4 Calling from call history......................................................9 3.2 3.3 3.4 3.5 EMERGENCY CALL ....................................... 9 ANSWERING A CALL ................................... 10 CALL TIME.................................................. 10 OPTIONS DURING A CALL............................ 10 FUNCTION MENU................................................. 10 4.1 USING THE FUNCTION MENU...................... 10 4.1.1 Accessing function menu by scrolling ...............................10 4.1.2 Accessing function menu by navigating key......................10 4.1.3 Exit Menu........................................................................... 11 4.2 MENU FUNCTION ........................................ 11 4.2.1 Phone book ........................................................................ 11 4.2.2 Messages............................................................................ 11 4.2.3 Call Center......................................................................... 11 4.2.4 Settings............................................................................... 11 4.2.5 Multimedia.........................................................................12 4.2.6 Fun & Games.....................................................................12 4.2.7 User Profiles ......................................................................12 4.2.8 Organizer ...........................................................................12 4.2.9 Services ..............................................................................12 4.3 4.4 PHONE BOOK .............................................. 12 MESSAGES.................................................. 13 4.4.1 SMS ....................................................................................13 4.4.2 MMS...................................................................................14 2 4.4.3 5 Voice Mail Server...............................................................15 4.4.4 Broadcast Message............................................................15 4.5 CALL CENTER ............................................. 15 4.5.1 Call History .......................................................................15 4.5.2 General call settings..........................................................16 4.6 SETTINGS ................................................... 16 4.6.1 Dual SIM Settings..............................................................16 4.6.2 Phone Setup .......................................................................16 4.6.3 Network Setup....................................................................17 4.6.4 Security Setup ....................................................................17 4.6.5 Restore Factory settings ....................................................18 4.7 MULTIMEDIA .............................................. 18 4.7.1 Camera ..............................................................................18 4.7.2 Image Viewer .....................................................................18 4.7.3 Video Recorder ..................................................................18 4.7.4 Analog TV ..........................................................................18 4.7.5 Video Player.......................................................................19 4.7.6 Audio Player ......................................................................19 4.7.7 Sound Recorder..................................................................19 4.7.8 FM Radio ...........................................................................19 4.7.9 File manager......................................................................20 4.8 4.9 4.10 FUN & GAMES............................................ 20 USER PROFILES .......................................... 20 ORGANIZER ................................................ 20 4.10.1 Calendar ............................................................................20 4.10.2 To Do List...........................................................................20 4.10.3 Alarm .................................................................................20 4.10.4 Calculator ..........................................................................21 4.10.5 Currency Converter ...........................................................21 4.10.6 World Clock .......................................................................21 4.10.7 E-Book Reader...................................................................21 4.10.8 Stopwatch...........................................................................21 4.11 SERVICES .................................................... 21 4.11.1 STK.....................................................................................21 4.11.2 WAP Service.......................................................................21 4.11.3 Data Account .....................................................................22 4.11.4 Bluetooth............................................................................22 INPUT METHOD ................................................... 23 5.1 5.2 5.3 GENERAL ................................................... 23 KEYPAD DEFINITION ................................... 23 INPUT METHOD INSTRUCTION .................... 23 5.3.1 Smart English input method ..............................................23 5.3.2 English and number input .................................................23 3 1 Basic Knowledge 1.1 Introduction Thank you for purchasing the digital color screen mobile phone. By reading these guidelines before using your mobile phone you will have an overall The mobile phone is particularly designed for GSM/GPRS networks environment. In addition to the basic function of communication, the mobile phone also knowledge of this mobile phone and understand its simple but outstanding functions. provide you with multiple applied functions, which include name card style phone book, clock/ alarm, unit conversions, calculator, games, audio player, camera (optional), video recorder (optional), sound recorder and so on, to make your work and leisure activities more convenient. Besides, the mobile phone has unique interface and perfect function design to meet your different needs. The mobile phone reaches the requirement of GSM/GPRS standard and has passed the qualification of authoritative organizations worldwide. Our company keeps the right of modifying the content in the manual without making any notification in advance. 1.2 Safety information If your mobile phone is lost or stolen, inform immediately the telecom branch or its outlet to forbid the use of your mobile phone and SIM card, which will help your to avoid the economic loss caused by other’s misuse of your mobile phone. When you get contact with telecom branch or its outlet, they need to know the IMEI number of your mobile phone, which is marked on the tab on the back of Please take precautionary measure to avoid abuse of your mobile phone. Such as: your mobile phone (you can find it with battery taken out). Keep the number for future use. - Set the PIN number of the SIM card, and modify it if others know. - When you leave your car, please do not put the mobile phone in a place easy to be seen. Better take it with your or put it in trunk. - Set call restriction. 1.3 Safety and health precautions Read the guidelines before using your mobile phone. Failure to comply with them may be dangerous. 1.3.1 General guideline Only use the approved battery and charger. Other products may lead to leaking, over heat, explosion and fire. Do not drop, knock or shake the mobile phone. Rough handling may cause damage to the mobile phone or fire. Do not place mobile phone, battery or charger in the microwave oven or high pressure equipment. Doing so may break the internal circuit boards or cause a fire. Do not use mobile phone in any area with a potentially explosive or flammable atmosphere. Using mobile phone in such area could cause a fire or explosion. Do not keep mobile phone in hot, humid or dusty areas, as its moving parts may be damaged. Keep your mobile phone out of the reach of children. Do not let children play with mobile phone to avoid accident injury. Do not leave mobile phone on unstable or uneven place. Such condition may result in mobile phone falling. 1.3.2 Mobile phone guideline Switch off your mobile phone before boarding an aircraft or in hospital and any other facility where posted notices require you to do so. Mobile phone effects the electronic equipments and medication equipments. The mobile phone has auto switch on function, please check your alarm setting and make sure the mobile phone will not switch on automatically during the flight. Certain electronic equipment may not be shielded against the RF signals from your wireless phone, such as hearing aid, pacemakers, other medical devices, fire sensor, auto gate and others. For the satisfactory operation of the equipment and for the safety of personnel, please consult the manufacturer or local sales outlet to discuss alternatives. Do not put hard pressure or hit on the screen. Rough handling can break the internal circuit board and the screen. The liquid from screen can dangerous human eyes. Please wash eyes with water immediately and go to hospital for further exam if the liquid is in eyes. Do not modify or dismantle the mobile. Unauthorized modify or dismantle will result in damaging the mobile phone. In some cases, mobile phone has side effect to the vehicle carried electronic equipments. Please do not use mobile phone under that circumstance. Failure to observe these instructions may lead to the denial of legal right. Do not operate mobile phone with sharp object such as needle or ball pen. Sharp object will damage mobile phone or lead to malfunction. Please do not use mobile phone which wire is damaged. Otherwise it will be dangerous to the user. Please do not place mobile phone close to magnetic objects. Mobile phone can eliminate the information from disc, credit card and other cards. Please keep small metal objects away from mobile phone’s ear phone. The speaker has magnetism and attract small metal objects which has potential to damage itself and the one who use it, Precipitation, humidity and liquids will corrode electronic circuits. Keep the phone dry. 4 1.3.3 Battery guideline Please keep mobile phone away from fire. Fire will damage the batteries and lead to explosion. During changing batteries, hard pressure will cause the batteries leaking, over heated, explosion and caught fire. Do not short-circuit the battery. Accidental short circuiting can occur when a metallic object (wire line, clip) or necklace connect two terminals. Short circuit may damage the battery. Please do not weld the battery’s terminal. Welding the battery will damage it. The battery liquid is dangerous to human eyes. Please wash eyes with water immediately and go to hospital for further exam if the liquid is in eyes. Do not modify or dismantle the battery. Unauthorized modify or dismantle will result in damaging the mobile battery. Do not place batteries in or on the microwave oven or over heated places. That may damage the battery and exploded. During charging, using or storing, if batteries temperature rise, color change, or deformed, please stop using and replace with new battery. If the battery liquid is leaking or smelly, please remove it from fire to avoid explosion. Please keep battery away from humidity. Humidity will cause over heat, corrosion of the batteries. Please do not leave the battery in hot places such as in a car in summer as you will reduce the capacity and life time of the battery. Please do not leave the battery on charger for over 24 hours 1.3.4 Charger & accessories Please charge with dedicated voltage. Using mismatched power will damage the mobile phone and charger. Short circuit charger is forbidden. It will cause electric shock and damage the charger. If the power line is damaged, please do not use the charger. Please keep the charger free from dust all the time. Keep charger away from liquid. Spilled liquid will dangerous the charger. If charger has close contact with liquid, take off the charger from socket immediately to prevent further damage. Do not modify or dismantle the charger. Unauthorized modify or dismantle will result in damaging the charger or personnel. Please do not charge in humidity place. Humidity will cause over heat, corrosion of the batteries. Do not touch the charger, power line or socket with wet hands. Doing so may give you an electric shock or damage the phone Do not store heavy article on top of power line or dismantle it. Doing so will cause electric shock and fire. Unplug the charger from socket before cleaning and maintenance. Take the terminal to unplug the charger. Pulling the power line to unplug will damage the charger and cause electric shock or fire. 1.3.5 Cleaning & maintenance Mobile phone, batteries and charger are not water proof. Please do not use them in humidity place such as shower room. Avoiding spilled by rain. Clean mobile phone, batteries and charger with soft fabric. Do not use harsh chemicals, cleaning solvents or strong detergents to clean the mobile phone. Please clean the socket regularly. Dirt will make the charger malfunction. 1.3.6 Others Mobile phone: Please always keep the phone at room temperature between 5℃~40℃ and humidity between 35%~85%. Please keep mobile phone away from telephone, TV, Radio and other office electronic appliances. Mobile phone will have side effect over such equipments. Batteries: Keep batteries away from direct sun shine. Keep batteries in cooling place with good ventilation Lifespan of batteries are limited. The stand by time of the batteries will be shortening after frequent charging. When the operation time is noticeable shorter than normal, the batteries are worn out. It is time to buy a new battery. Dispose of used batteries in accordance with location regulation. Always recycle. Do not dispose of batteries with normal daily waste. Charger: Please do not charge in the following places: under direct sun shine, temperatures below 5℃ or above 40℃ place, humidity or dusty place, vibrate place, place close to TV, radio or other appliances. 5 2 Before start 2.1 Parts names & explanation 2.1.1 Technical Parameters Measurement: 102X46.5X10.9 Voltage: 3.7V Maximum charging voltage: 4.2V Input: 100~240V 50/60Hz 200mA 2.1.2 Key pad description K_MENU: Left soft key In idle screen, press it to get into main menu. K_CANCEL: Right soft key In idle screen, press it to get into phonebook menu. K_HUP:End Press it to hung up a call, switch on/off mobile. Press it in edit screen to get back to idle screen. K-CALL:Send Press it to make a call, answer a call; show call history in idle screen. K_NAVI: Navigate Please see detail in 4.1.1. K_NO: Numbers Input numbers and alphabets. 2-9 can be set as short cut and speed dial. K_STAR: Star Input symbols, *, P and +W. K_HASH: Hash Press it to change the input method. In idle screen, hold it to switch between silence and normal mode. K_TV Press ,then go to TV function Attention: PRESS means press the key for short time then loosens. HOLDING means press the key for more than 2 seconds. 2.1.3 Side keys Side key has short cut function: 2.1.4 Press right side key on the idle screen to using audio player. Press left up and down key to on the idle to control the volume. And use camera. Using T-Flash Card At the right- side, there is T-Flash Card slot. You can insert T-Flash card here. 6 Insert T-Flash card Uncover the fixture Insert card into the slot. Cover the fixture. Remove T Flash card 2.2 Uncover the fixture Get card out. Batteries Batteries have been charged to 50% full. It can be used after unpack. The first three times batteries must be totally discharged before charging. It will help to prolong the batteries lifespan and working quality. 2.2.1 Changing a battery Please follow the steps to remove the battery: 1) Push the back cover backward 2) lift the battery up to remove it Please follow the steps to install a battery: 1) Place the top part of the battery to connect with grooves on the phone. 2) Push the battery downward till it clicks into place. 2.2.2 Charging a battery Plug the charger into the socket. Connect the adapter into the left of the phone. Battery charging indicator sign will flash; if mobile phone is switch off during charging, the indicator sign will show on the screen. If the battery is too weak, the charging indicator sign will not show immediately after the charger plugs in. When charging indicator sign shows the battery is full and stop flashing, charging is finished. If charge when switch off, the screen shows charging finished. The charging will last for a few hours. It is normal that the battery, mobile phone and charger’s temperature rise. Disconnect the mobile phone, charger and socket after charging finish. Attention: Please always charge the battery at place temperature between 5℃~40℃ . Use only the supplied charger. Unauthorized charger may damage the phone and violate regulation and guarantee. When mobile phone switch off due to out of power or the indicator sign shows run low battery, charge the battery in time. Battery charging time depends on the remaining battery charge. The standby time and call time of this mobile phone is tested in an idealistic environment. In reality it is greatly affected by the signal strength of the cellular network, working environment and other factors. Do not remove the battery during charging. Please make sure the battery is in place before charging. When charging is finished, unplug the adapter from the power outlet and from the phone. If you do not unplug the adapter from the power outlet and from the phone, after 5 to 8 hours, the phone will start charging again due to the failure of battery power. We strongly suggest no to do so. It will shorten the lifespan of batteries. 2.3 Connecting network 2.3.1 SIM card Please insert the SIM card before switch on the mobile phone. SIM card is the key to GSM network. When you subscribe to a cellular network, the plug-in SIM card loaded with our subscription details such as your call history, call record, messages and others. SIM card can be removed and inserted into any GSM mobile phone ( new mobile phone can read SIM card simultaneously) The plug-in SIM card and its contacts can be easily damaged by scratches or bending, please keep SIM card away from electric, magnetic objects. Once the SIM card is damaged, it will loss the accessibility to GSM network. Warning: Switch off the mobile phone before remove the SIM card. It is forbidden to remove the SIM card when the power resource is connected. 7 2.3.2 Insert and remove SIM card Handle the SIM card with care. Insert SIM card Switch off mobile phone and remove the battery. insert SIM card into the SIM car slot. Remove SIM card Switch off the mobile phone and remove the battery. slide the SIM card out from SIM card slot to remove it. 2.3.3 Switch on/off To switch on the mobile phone, hold the END. To switch off the mobile phone, hold the END If the mobile phone is switched on without insert SIM card, please insert SIM card as instruction shown on screen. Mobile phone will run auto test once the SIM card is inserted. The following messages will show in order Please key in the PIN1—if PIN is set for SIM card Please key in the password—if the password is set to unlock the mobile phone Searching for network—auto search for cellular network until connecting to network 2.3.4 Unlock the SIM card To eliminate unauthorized usage, SIM card can be locked by adding PIN1 number. Once select this function, PIN1 must be inputted every time the mobile is switch on. If user does not set SIM card protection method, SIM card can not be protected from unauthorized usage. Press END to switch on. Input PIN1 number, use right soft key to erase wrong input. Press Confirm to finish. For example, if PIN1 is 1234, then please input 1234. If wrong input for 3 times, the SIM card will be locked by the network. It requests PUK1 number, if you do not know PUK1 number, please do not input yourself. Give the SIM card to cellular network service to deal. Detail information please refer Security setting Attention: The network supplier will set a standard PIN1 (between 4 to 8 digitals) for your SIM card. Please change it to your personal pass word. For detail please see Security setting 2.3.5 Unlock the mobile phone Please set pin number to protect your mobile phone from unauthorized usage. Once select this function, pin number must be inputted every time the mobile is switch on. If user does not set pin number protection method, the mobile phone cannot be protected from unauthorized usage Input mobile phone password, use right soft key to erase wrong input. Press Confirm to finish. For example, if the password is 1122, then please input 1122 If you forget the mobile phone password please contact the local sales branch or service centre to unlock the mobile phone. (Default mobile phone password is 1122) 2.3.6 Connecting to the network After the SIM card is unlocked, the mobile phone searches for network service. Once connected, the cellular service provider will show on the centre of the screen. The mobile phone is at idle stage and can make or receive a call Press right soft key to go into phonebook Press left soft key to go into functional menu 8 Attention: If ONLY EMERGENCY shows on the screen, it means you are not in the service area of the network only the EMERGENCY call can be connected. 3 Basic functions 3.1 Making a call When cellular network service provider shows on the screen, you can receive or make a call through network. The received signal strength is shown on the up left corner of the screen (maximum five lines—best signal condition) The quality of network connection is affected by the environment. Moving within small scale can improve the network connection quality. 3.1.1 Domestic call Use the Number key to input the phone number then press Send key to make connection. Press Right soft key to delete symbols or number. The image is showing on the screen during connecting. The current calling status is also showing on the screen. Press END to end a call 3.1.2 Fixed line & extension Call the switch board first then dial the extension number. If key in P (Pause) between the switch board number and the extension number, the mobile phone will finish the whole process and connects with the extension directly. Press * key to input P. Country code switch board number P extension number Send key Sample for Pause. If you have voice mail service with 8880000 the box number is 6666 and pass word as 8888, you dial 8880000 P 6666 P 8888. The first part of this number is dialing the voice mail service After connecting, 6666 to the right voice mail box. Before key in the pass word, the second Pause key P will cause 5 seconds delay then send in 8888 pass word. 3.1.3 International call To dial an international call press * key until the + sign show up on the screen. This will enable you to dial an international call at anywhere even without knowing the pre fixed country code. After that input the country code and the number you want to dial. Country code follows the common regulation such as 49 for Germany, 44 for UK, 46 for Sweden. Take off the 0 before regional code when dial the international call. Calling from other country for ShangHai service: +86 21 114 + 3.1.4 country code phone number Send Calling from call history Every number you dial or receive will be saved in Call history record. The newest record is on top of the list. They are segregated by Dialed number, Received number and Missed Call. The mobile phone provides the options to search for all record. When the memory status is full, the oldest record will be deleted. To search for record please: To see the Dialed number press Send Key Select the number you want to dial in the call history record, and press Send Key to make a call directly. Once in the call history record, press OK to show the detail. After selecting the number press Save to transmit the number into phonebook directly. 3.2 Emergency call If you are in the area covered by network service, you would be able to make Emergency call. If the cellular network service does not cover that area, ONLY 9 EMERGENCY shows on the screen. That means you are not in the service area of the network only the EMERGENCY call can be connected. If you are in area covered by network service, the Emergency call can be made without inserting SIM card. 3.3 Answering a call If any key to answer is switched on, you can press any key to receive a call. Otherwise press Number key or Left soft key to answer a call. If the ear phone is connected, you can answer a call though ear phone. 3.4 Call time To store the duration of last call and the accumulated call time. 3.5 Options during a call Press Options Key to get into option menu during taking a call. The option menu is similar with Function menu. It is only possible to get into option menu during a call. The functions such as on hold, forward or making a conference call need network support. Please contact your network service provider for detail. In option menu you can select among: Hold single call: Put the call on hold or recover it End single call: End the call New Call: Making a new call Phone Book: Get into phone book to search Message center: Edit and send a message Sound Recorder: Record the conversation Mute: Mute or send DTMF: Press Left soft key to switch on /off H-Free: To switch on the speaker to enlarge the volume Multiparty call - Switch: Keep switching between different parties - Meeting: To have a conference phone call - Transferring: Transfer current call to other phone - End A Call: To end the current call - End All Calls: To end all active calls - Phone Book: To get into Phone book Menu - SMS: To get into Message Menu - Sound Recorder: To record the conversation - Mute: To Mute or send the voice - DTMF: To switch on/ off Attention: Some options are available under certain condition. Such as Switch only can be used when there are more than one call are connected at the same time. 4 Function Menu 4.1 Using the function Menu 4.1.1 Accessing function menu by scrolling In Idle screen, press Menu to get into main menu. In all menus or sub menus, press UP or Down to find the function and press Left soft key to select the function. Press Right soft key to exit current menu. 4.1.2 Accessing function menu by navigating key To serve the user, navigating key can do search function and accessing menu function. In Idle screen, press Up navigating key to start Music Player In Idle screen, press Down navigating key to Short cut. In Idle screen, press Left navigating key to User Profiles In Idle screen, press Right navigating key to Tone Setup 10 4.1.3 Exit Menu In Function Menu, in general, you can press Right soft key to exit from current menu. Press End to get back to idle screen. 4.2 Menu function The structure of the menus: 4.2.1 Phone book Quick Search Search Entry Add New Entry Copy All Delete Caller Group Extra Number Settings Memory Status Preferred Storage My Card vCard version Caller Picture Caller Ring Tone Caller Video 4.2.2 Messages SMS MMS Voice Mail Server Broadcast Message 4.2.3 Call Center Call History General call settings 4.2.4 Settings Dual SIM settings Phone Set up Time and Date Schedule Power On/Off Language Preferred Input Method Display Characteristic Greeting Text Shortcuts Dedicated Key Auto Update of Date and Time UART setup Motion Sensor Setting 3D Style Misc Setting Network Setup SIM1 network setup 11 SIM2 network setup Security Setup SIM1 security setup SIM2 security setup Phone Lock Auto Keypad Lock Change Password Restore Factory Settings 4.2.5 Multimedia Camera Image Viewer Video Recorder Analog TV Video Player Audio Player Sound Recorder FM radio File Manager 4.2.6 Fun & Games Classic Games 4.2.7 User Profiles General Meeting Outdoor Indoor Headset Bluetooth 4.2.8 Organizer Calendar To Do List Alarm Calculator Currency Converter World Clock E-Book Reader Stopwatch 4.2.9 Services STK WAP Data Account Bluetooth Attention: Some menus only appear under circumstance. 4.3 Phone book You can save names, mobile phone number, fixed line number, work place phone number and other information by Phone book function. From Main Menu, 12 select Phone Book or press Right soft key on idle screen to get into Phone book directly Quick Search: select this option to get into phone book screen. There is an input space down the bottom of the screen. Input information as searching criteria. The searching methods are English and Number. Press # Key to switch between different input methods. Search Entry: to search record according to names in the phone book. Add New Entry: to add a new record into phone book. You can select to save in phone and to save in SIM card. The saving form is slightly different Copy All: to copy all record in phone or in SIM card. You can select from Phone to SIM card or from SIM card to Phone. Delete: to delete the record. Select to delete all record from SIM card or from Phone. Select to delete record one by one from SIM card or from Phone. Caller Group: this set provides 5 call groups for you. You can change the group name, ring tone, picture shown, or personal setting for each group. Extra Number: Extra numbers that saved in SIM card such as own number, service number and emergency number. You can select and edit. Settings: phonebook’s setting has 4 sub menus: Memory Status, Preferred Storage, Fields, My Card. - Memory Status: the memory status of SIM card and Mobile Phone - Preferred Storage: to select the prioritized place to save, SIM card or mobile phone. - Fields: to set the content of name card in phone book. - My card: edit owner’s name card and send it. - Card Version Caller Picture: select a picture to display when receiving a call. Caller Ring Tone: select a ring to play when receiving a call. Caller Video: select a video to play when receiving a call. 4.4 Messages 4.4.1 SMS 4.4.1.1 Inbox This menu includes SIM1 Inbox and SIM2 Inbox. All the operations are same. Go into Inbox to read the received messages. In Inbox, the date of receiving and the sender’s name, number are also showing Use scrolling key to choose previous or next message. 4.4.1.2 In Inbox menu, press Send to read the message or select options to : - Reply: reply the message to sender - Delete: to delete the current message - Edit: to edit the content of the message - Forward: to forward the message - Copy to Phone/SIM: to copy the message to Phone - Move to Phone/SIM: to move the message to Phone - Copy All: to copy all from SIM card to phone or from phone to SIM card - Move All: to move all from SIM card to phone or from Phone to SIM card - Delete All: to delete all messages in Inbox - Use Number: to edit the sender’s number, to dial or to save to phonebook - Use URL: to connect the link in the message. Outbox This menu includes SIM1 Outbox and SIM2 Outbox. All the operations are same. Go into outbox to read the saved messages. In Outbox, the date of receiving and the sender’s name, number are also showing Use scrolling key to choose previous or next message. In Outbox menu, press Send to read the message or select options to : - Send from SIM1: to send the message with SIM1. You can choose send or send to groups - Send from SIM2: to send the message with SIM2. You can choose send or send to groups - Edit: Edit the message content - Delete: to delete the message - Copy to Phone: to copy the message to phone - Move to Phone: to move the message to phone - Delete All: to delete all messages in Outbox - Copy All: to copy all from SIM card to phone or from phone to SIM card - Move All: to move all from SIM card to phone or from Phone to SIM card - Use Number: to edit the sender’s number, to dial or to save to phonebook - Use URL: to connect the link in the message. 13 4.4.1.3 Write Message Message service centre allow you to send or receive message through mobile phone. Please confirm that the service center’s number is set before use. Go to sub menu Write New to write new message (detail see chapter 5). Press Options - Done: finished writing message, ready for next step, you can choose SIM1 or SIM2. - Use Template: to insert Idiom that saved before - Insert Object: inset picture, sounds, animations into the message - Format Text: define the format of the message text - Insert PHB Number: insert the number which saved in the phone book - Insert PHB Name: insert the name which saved in the phone - Insert Bookmark : insert the bookmark which saved in WAP - Input Method: to change the input method during editing After finishing, press Yes, press Scrolling key to select send/save and send/ save/ send in group to send the message - Send Only: to send the message, select this option to get into receiver screen, and then press Number key to key in the number or search in phone book to find the number. Press yes to send - Save and Send: sending the message to receiver meanwhile save it in outbox. - Save: do not send but save the message in outbox - Send to Many: send the message to more than one receiver at the same time - Send by Group: select a call group and send the same message to all members of the group Attention: some cities and regions do not support the message that is longer than 160 English letters. 4.4.1.4 4.4.1.5 Template Save some frequent used terms to avoid typing in the same terms many times. It can be edited or deleted. Message settings Finish message setting before using the function. This menu includes SIM1 message settings and SIM2 message settings. All the operations are same. Go into Message settings menu - Profile Setting: select appropriate mode for message. Different mode has different setting for folder name, service center number, expired date, form and other features. - Common Setting: to set Reply pass - Memory Status: to show the memory status of SIM card or phone - Preferred Storage: to select to save in Phone or in SIM card Set message service center number: please contact your network service provider for information. Select the Message service center Menu, input the service center number, press Yes to save setting Status Report: set the status report at ON, then you will be able to see the receiving status of the messages you have sent out. Attention: this function is only available with service provider’s support 4.4.2 MMS Write message: to add a new multi media message. Message include To, Cc, Bcc, Subject, Edit content. Inbox: to receive multi media message - View: to play current selected multi media message - Reply: to reply picture message to the sender of the current selected message - Reply by SMS: to replay with a SMS to the sender of the current selected message - Reply to all: to replay the message to all people. - Forward: to forward correct selected message - Delete: to delete the current selected message - Delete All: to delete all MMS in the Inbox. - Save as template: to save the current MMS as a template. - Properties: to find detail information about current selected message - Use Details: to use the information of the current selected message Outbox: where to save the messages that have been sent - View: to play current selected multi media message - Send: to send the current select message - Delete: to delete the current selected message - Delete All: to delete all MMS in the Outbox. - Save as template: to save the current MMS as a template. - Properties: to find detail information about current selected message - Use Details: to use the information of the current selected message Draft: to save the message before sending; after sending the message will be moved to Outbox - View: to play the current select message 14 4.4.3 - Send: to send the current select message - Edit: to edit the current selected message - Delete: to delete the current selected message - Delete All: to delete all MMS in the Draft. - Save as template: to save the current MMS as a template. - Properties: to find detail information about current selected message - Use Details: to use the information of the current selected message Template: to save some usually messages Message settings: to set the features for the multi media message’s send and receive - Compose: to set the items of MMS - Send: to set the items while sending - Receive: to set the items while receiving - Filter: to set the filter while receiving - Server Profile: to set the network service - Memory Status: to show the memory status of the Picture message Voice Mail Server The voice mail massages are saved in the cellular network. To listen to the voice mail message, please dial the voice mail box number. This menu includes SIM1 voice mail server and SIM2 voice mail server. All the operations are same. Edit: to add/edit the voice mail box number to speed up when using the function Connect to Voice: to connect with the voice mail box to listen to the messages 4.4.4 Broadcast Message This menu includes SIM1 broadcast message and SIM2 broadcast message. All the operations are same. Receive Mode: to switch on/off the broadcasting function Read Message: to select the menu to access to the broadcasting message you ordered Language: to select the language for broadcasting Channel Setting: to select the channel for broadcasting Attention: the broadcasting and voice mail box functions are provided by network service provider. Please contact your service provider for detail. 4.5 Call center Your mobile phone can save each 50 records for miss calls, received calls and dialed calls. Through this menu you can search for all history records 4.5.1 Call History SIM1 Call History: - Missed Calls: press OK to go into Miss calls menu - Dialed Calls: press OK to go into Dialed calls menu - Received Calls: press OK to go into Received calls menu Under Call History Menu, press OK to see all detail information including: date, time, number, dialed times. Under detail information menu, press Option to carry on the following functions: Delete: to delete the current record Save to phonebook/SIM: to save the number to SIM card or phone Dial: to dial the current number Edit: to edit the current number and save it into phone book Send SMS: send SMS to the current number. Send SMS: to send SMS to the current number with UIM card. - Delete Call Logs: select to empty the selected call history folder - Call Time: In call time menu, there are four sub menus: last call time, total sent, total received, reset all time. - Last Call Time: to show the duration of last call Total Sent: to show the total duration of dialed call Total Received: to show the total duration of received calls Reset All Time: to restart time counting Call Cost: to calculate the cost of calls Last Call Cost: Go into Last call Menu to see the cost of last call Total Cost: Go into total cost Menu to see the total call cost Reset Cost: In put PIN2 code ( with network support) to zero take the cost and restart cost counting 15 Max Cost: Go into Cost Limited to search, edit, or cancel the function. Among those, Edit and Cancel function need PIN2 code. Price Per Unit: Go into Price and cost menu to search, edit or cancel the function. Among those, Edit and Cancel function need PIN2 code. Attention: some functions need PIN2 code. Please contact the service provider to get the Pin code. - SMS Counter Sent: to count the messages those have been sent Received: to count the messages those have been received You can press Left Soft key to empty it - 4.5.2 GPRS Counter Last Sent: to record the bites of last uploading Last Received: to record the bites of last downloading All Sent: to record the total amount of bites have been uploaded All Received: to record the total amount of bites have been downloaded Reset Counter: to start counting again SIM2 Call History: Operating as SIM1 call history. General call settings SIM1 Call Settings - Caller ID Set by Network: use default setting Hide ID: to hind own number during calling (under service provider’s support) Send ID: to show own number - Call Waiting: switch on/off call waiting function. Select it to show current waiting status. - Call Divert: Divert All Voice Calls: when Divert all voice is on, all calls will be diverted to the number you set for. Divert If Unreachable: when Divert if unreachable is on, calls that made when you are out of touch will be diverted to the number you set for. - Divert If No Answer: When Divert if no answer is on, calls that can not be connected will be diverted to the number you set for. Divert If Busy: when Divert if busy is on, calls that are made when your phone was occupied will be diverted to the number you set for Divert All Data Call: to divert all data call Cancel All Divert: to cancel all divert Call Barring: to bar certain numbers from dialing Outgoing Calls: to bar the outgoing calls Incoming Calls: to bar the incoming calls Cancel All: to cancel all setting for barring Change Barring PW: to change barring password Closed User Group: to switch off the User group function SIM2 Call Settings: Operating as SIM1 call settings. Auto Redial: when Auto redial is on, every failed call will be auto redialed. Speed Dial: to set the speed dial method. Hold the number keys at idle screen can get connected with pre set receiver. IP Number More - Caller Time Display: to set whether to have call time display - Call Time Reminder: to set whether to have minute reminder at end of each minute during calling - Auto Quick End: to set whether to open or close the function which can end the call automatically. Attention: some functions need support from network service provider 4.6 Settings This menu includes many personal setting to the phone. 4.6.1 Dual SIM Settings You can choose Dual SIM open, Only SIM1 open, Only SIM2 open, Flight mode. 4.6.2 Phone Setup Time and Date: to set the date and time in mobile phone - Set Home City: to select a city for the time setting 16 - Set Time/Date: to set current time and date - Set Format: to select a format to show the time, 12 hours or 24 hours Schedule Power On/Off: to set the time that the mobile phone will be switch on/off automatically Language: to select the language that will be used Preferred Input Method: to select a default input method Display Characteristic - Wallpaper: to select the wallpaper for idle screen - Screen saver: to select a screen saver for idle screen and the default time setting - Power On Display: to select 3D to display at switch on. It could be default setting or downloaded - Power Off Display: to select 3D to display at switch off. It could be default setting or downloaded - Show Date and Time: to select switch on/off the display of time and date on idle screen - Show Owner Number: to select whether to display own number on idle screen. - Clock Type: to select the clock style is analog or digital. Greeting Text: to select whether to display a greeting at switch on screen Shortcuts: to set up the shortcuts Speed dial: to set the speed dial method. Hold the number keys at idle screen can get connected with pre set receiver Dedicated key: to set the function of direction keys in idle screen. Auto Update Date and Time: to select switch on/off the auto update function UART setup: to choose SIM1 or SIM2 Motion Sensor Setting: to select switch on/off the motion sensor function. 3D Style: to set the effect while changing the interface. Misc Setting: to set the LCD backlight and Plate Function. 4.6.3 Network Setup SIM1 network setup - Network Selection New Search Select Network 4.6.4 Selection Mode Automatic: auto search the network which the SIM card belongs to Manual: manual search all current available network and do manual registration - Preferred Networks: pre save the preferred networks - GPRS Connection: the GPRS connection method SIM2 network setup: Operating as SIM1 network setup. Security Setup SIM1 security setup - SIM Lock: Choose security setting under this Menu to avoid unauthorized usage of mobile phone or SIM Card. PIN number setting can avoid unauthorized usage of SIM Card If PIN number is switched off, choose ON to select PIN number protection. Next time when you switch on mobile phone, it will ask for PIN number: If PIN number is switched on, choose OFF to cancel PIN number protection. Choose Change PIN Number to set new PIN Number. Please follow the instruction to input old PIN number, new PIN number and retype new PIN number. Attention: If PIN number has been wrongly inputted for three times, the SIM card will be locked. PUK number is needed to unlock the SIM card. PIN number and PUK number could be provided at the same time to you. If not, please contact the network service provider. The default setting put PIN number is 1234, please set your own PIN number as soon as you receive the mobile. - Fixed Dial: With the SIM card’s support, you can choose to dial only the limited phone number. When this function is on, only certain numbers in your phone book or only numbers start with the fixed numbers could be connected. Going to Menu Fixed Dial: Mode: switch on/off of Fixed Dial(PIN number is needed) Fixed Dial list: input the numbers for Fixed Dial Attention: to switch on/ off Fixed Dial function, the PIN2 number is needed. Please contact your network service provider to get PIN2 number. After switch on Fixed Dial, go into phonebook to show the fixed dial numbers. - Barred Dial: on the contrast to Fixed Dial, you can set the barred numbers from calling. Attention: partial functions need support from network service provider. - Change Password: to change the passwords include PIN and PIN2. SIM2 security setup: Operation as SIM1 security setup. Phone Lock: Phone lock can avoid the unauthorized usage of your mobile phone. Select Phone Lock to switch on the pin number protection. Next time when you switch on mobile phone, you will be asked for PIN number. Press it again to switch off the mobile phone PIN number protection 17 Attention: the default setting for mobile phone pin number is 1122. Please set your own mobile phone PIN number as soon as you receive the mobile. Auto Keypad Lock: Setting the waiting time to lock the keypad. After setting is done, the keypad will be auto locked after the setting waiting time Press right soft key then hash key to lock keypad manually on the idle screen (only the SIM card is active). 4.6.5 Change Password: to change the phone lock password. Restore Factory settings To restore factory settings, please input the initial password: 1122. . 4.7 Multimedia This function includes: Camera, Image Viewer, Video Recorder, Analog TV,Video Player, Audio Player, Sound Recorder, FM Radio and File Manager. 4.7.1 Camera Select Camera to go into menu. Press CAMERA Key to take a photo. Press Option to go into: Album : go to album Camera Setting: to set related parameters for photo taking Image Setting: to set photo’s size and quality. White Balance: choose a light mode for photo taking. Scene Mode: according to the environment to choose a mode Effect Setting: to choose screen style. Add Frame: to choose frame. Storage: to select saving pass. To mobile or SIM card. Restore default: to restore default setting. 4.7.2 Image Viewer Select Image Viewer to open the album and look the photos. Press Option to go into: View: to look the picture which you select Browse Style: to select the display style such as list or matrix Forward: forward the file to phonebook, screen saver, power on/off display Rename: to rename the files Delete: to delete the selected files Delete All Files: to delete all saved files Sort: to set the logic for sorting Storage: to select the pass to store or to read, either from mobile phone or from SIM card 4.7.3 Video Recorder If your mobile phone supports video recorder function, select Video Recorder to get into menu, press K_NAVI to record video. Camcorder Setting: to set related parameters for camcorder Video Setting: to set video parameters Effect Setting: to set video effects Storage: to select saving pass to mobile phone or SIM card Restore Default: to restore default setting 4.7.4 Analog TV You can watch TV by this phone. Please select the menu of analog TV to use it. Choose option to Select Area: choose the district. Channel List: the channel list that is searched. 18 Auto Search: auto search the channel list To Player 4.7.5 Video Player Select Video Player menu to go in video player Select the file to be played in folder. Play: go into play screen Forward: forward the file to phonebook, screen saver, power on/off display Rename: to rename the files Delete: to delete the selected files Delete All Files: to delete all saved files Sort: to set the logic for sorting Storage: to select the pass to store or to read, either from mobile phone or from SIM card Press ‘2’ key and ‘5’ key to change volume. Select Play to start after get into play screen. Press * key to play in full screen, press * again to exit from full screen. 4.7.6 Audio Player Select Audio player to go into MP3 screen. Functions are as follows: Up key: Play/Pause the music Down key: Stop playing Left key: select the previous song Right key: select the next song Press Left soft key to go into play list, use the scroll to select songs to play. In Song list screen, press Left soft key to do setting for songs. Play: play the selected songs Detail: to see detail information for selected song Add To Rings: to add this song to rings tone in Mode setting Add: to add a new song to the list Remove: to remove the song form the list Remove all: to remove all the songs from the list Settings: to do setting for multi media player. 4.7.7 - Play List: memory status for mobile phone or SIM card - List Auto Generation: generation music list automatically or not - Repeat: Select to replay the song - Shuffle: select to play randomly - Background play: select to play music even after exit this menu - BT Stereo Output: select to play music Bluetooth stereo output - BT Stereo Headset: select to use BTstereo headset - Equalizer: select to play music model - Lyrics Display: select to play music Lyrics display On/Off Sound Recorder Select to record sound. Press Left song key to select 4.7.8 Record: to record a new sound Play: to play the selected file Append: to add new extended part to the selected file Rename: to rename the selected file Delete: delete current file Delete All: select all files Settings: to set the parameters for sound record Forward: forward current file to Mode FM Radio You can listen FM radio by this phone, select the menu of FM radio to use it 19 Choose option to Channel list: At most 20 channels. Manual Input: Input one channel manual; Preset Auto Search: Auto search the channel. Settings: Set the background play and skin. 4.7.9 File manager Explore the saved files. Support different functions depending on file format 4.8 Fun & Games 4.9 Classic Games: this mobile phone has many classic games User Profiles User can select different mode, and can define your own modes. This set of mobile provides seven modes: general, meeting, outdoor, indoor and headset and Bluetooth and Spare Profile. General - Activate: select to apply General mode - Customize: Select Customize to set the General mode. Available options are: tone set up, volume, alerl0t type, ring type, extra tone, answer mode and LCF back light. Tone Setup: to set tone for incoming call, alarm, switch on, switch off, open cover, close cover, message tone and key pad tone. Volume: to adjust the volume for ring tone and key pad Alert Type: to select alert type. There are ring, vibration only, vibration and ring, vibration then ring. Ring type: select to single, repeat or ascending Extra tone: to set reminding sound for special case: warning, error, camp on or connect. Answer mode: to set Answer by any key is on/off Meeting: Operating as General Mode Outdoor: Operating as General Mode Indoor: Operating as General Mode Headset: Plug in headset to active this mode. Personal setting is as General Mode Bluetooth: When connected to the Bluetooth, the mode opens automatically. Personal setting is as General Mode 4.10 Organizer The functions include Calendar, To Do List, Alarm, Calculator, Currency Converter, World Clock, E-Book, Stopwatch . 4.10.1 Calendar Going to Calendar menu, press OK to show date. Use up, down, left and right key to select Date and Month. Press Option to go into sub menu View Task: to show all tasks saved Add Task: set a new task and add an alarm clock as reminder. You can choose Once, Everyday, Day, Weekly and Monthly. - Once: only remind once for this task - Every day: remind everyday at set time - Day: to set the time for alarm to ring during a week - Weekly: remind once a week at set time - Monthly: remind once a month at set time Jump to date: jump to selected date from current date. Go to weekly/monthly view: view as once a week or a month. 4.10.1 To Do List Support many to do list items. You can View, Add, Edit Task, Delete Task, Delete All, Send Calendar on a selected item. 4.10.2 Alarm Five alarm clocks can be set: select an alarm clock to edit and set. 20 4.10.3 Calculator This calculator has four basic functions. Select Calculator menu, press Select to go in Use 0-9 number keys to input the number, use # key to input the dot ‘.’ Press touch screen icon to input +、–、x、÷ Press Right soft key to clear off the input or result. Press Right soft key to return. Press Left soft key to make calculation Attention: the calculator’s precision is limited and may have deviation especially in dividing. 4.10.4 Currency Converter To convert currency please input the exchange rate first then input local currency or foreign currency amount, press Left soft key to show the result 4.10.5 World Clock Select World Clock in sub Menu, press left/right navigate key to switch between cities and time zones. 4.10.6 E-Book Reader 4.10.7 Stopwatch Support stop watch 4.11 Services 4.11.1 STK This function is network-or subscription-dependent. Contact your network operator for details. 4.11.2 WAP Service The mobile phone supports functions based on WAP. You can visit the services that are supported by your network service provider. Such services can serve you with news, weather forecast, flight information and others. Attention: GPRS service need network support. Only available when the mobile is switch on and stays within GPRS network coverage. Homepage: to surf homepage. Homepage is the WAP connecting point that you have set for active connection. If no setting is done, the setting by vendor is default setting Bookmark: to show all bookmarks. Select it to link with bookmark’s website Recent Pages: to show all history record that you have visited. Offline Pages: to show all the webs saved. Enter Address: select it to input any WAP address or other website address. Service Inbox: where to save news sent by service provider Settings: to set internet surf - Select SIM - Edit Profile - Browser Options - Service Massage Setting - Clear Cache - Clear Cookies - Trusted Certificates Online function - Go to: go to the linked address - Back: go back ward 21 - Set as homepage: to set current page as homepage - Add bookmark: add address to bookmark - Visit homepage: to visit homepage - Please input URL: You can connect with any address. To do that please input URL directly - Bookmark information: to show all bookmarks. Press Select to link to the current bookmark address, edit bookmark, edit address or delete the - Exit: exit WAP page and return to main menu bookmark. 4.11.3 4.11.4 Data Account GSM Data : Select an account to go in - Account name: select to edit account name - Number: to show account number - Username: server’s account - Password: server’s password - Line type: analogue or ISDN: - Speed: to select the speed for transmit - DNS: IP address GPRS : Select an account to go in - Account name: select to edit account name - APN: input APN - Username: server’s account - Password: server’s password - Auth. Type: to select authentication type Bluetooth There are many Bluetooth around us, such as mobile phone, computer, Bluetooth headset and so on. It is compliant with Bluetooth wireless technology:: HSP (Bluetooth headset to make phone call), A2DP/GAVDP (Stereo music function): These two functions are used on Bluetooth headset. Please pay attention to the product instructions, as many Bluetooth headsets only supports one of these functions. FTP(Change data via Bluetooth wireless technology with other mobile phone) SPP(Change data via Bluetooth wireless technology with computer) DUN( Connecting to internet when connecting to computer) The menus are as follows: Power: open or close the Bluetooth of the mobile phone. Inquiry Audio Device: search for Bluetooth audio headset, which is the opening Bluetooth headset. The devices include HSP and A2DP/GAVDP. Attention: Only Bluetooth headset can open on this menu, and other device should open from “My device”. My Device: If you have Bluetooth devices connected, “My device” has been displayed in the name of connecting all the devices. Otherwise, you can choose “Option -> Inquiry New Device” to search other Bluetooth devices except Bluetooth headset. After connecting to Bluetooth devices, the phone will enter into a number of options in the menu are as follows: - Connect: choose a service to record connecting; - Disconnect: disconnect the connected service. - Rename: edit the name of the Bluetooth. - Delete: disconnect the connecting device. - Delete All: disconnect all the connected devices. - Service List: view the service list. - Inquiry New Device: Inquiry new Bluetooth device except Bluetooth headset. Active Device: Display the connecting service name and choose to disconnecting choosing device. Setting: set the Bluetooth functions of this mobile phone. - Visibility: open or close. - Change Device Name. - Authentication: After switch on, it needs to authentication when other device connecting to. - Audio Path: choose the sound source when Bluetooth connected. - FTP: set the path and popedom of the Bluetooth working folder. About: display the Bluetooth info. 22 5 Input Method 5.1 General It supports normal English input method, smart English input method, number input method, handwriting input method and symbols input method. 5.2 Keypad definition General keypad definitions are as follow: (for detail input keypad definition please refer Input method instruction) Left soft key: to confirm, Right soft key: to delete a letter Scrolling key: to move the cursor up, down, left, right or to see last or next page to select the letter. #key, press it to switch between different input methods *key: to select Symbols 0-9 number keys: represents the letters on that key. 5.3 Input method instruction 5.3.1 Smart English input method Definition of keypad in smart English input method: Name of key Letters or functions 2 Key Abc 3 Key Def 4 Key Ghi 5 Key Jkl 6 Key Mno 7 Key Pqrs 8 Key Tuv 9 Key Wxyz *Key Press * to find symbol input page #Key Switch between input methods Scrolling Up Move cursor up Scrolling Down Move cursor down Scrolling Left Move cursor left Scrolling Right Move cursor right Left soft key OK Right soft key Clear END key Return to idle screen Smart English input method’s operation: Every key pressed has input function to its corresponding letter, and all letters have been pressed will be auto shuffle to find the best combination. Repeat key in until the word or symbol you are looking for appears 5.3.2 Use # key to switch between input methods Hold * key to find symbol input page. Use Right soft key to clear off the wrong input. Hold Right soft key to clear off the whole line. English and number input Detailed definition for English and number input keypad are; Name of key Letters or functions 1key . ,-?!`@ : # $ / - 1 2key ABCabc2 23 3key DEFdef3 4key GHIghi4 5key JKLjkl5 6key MNOmno6 7key PQRSpqrs7 8key TUVtuv8 9key WXYZwxyz9 0key 0 *key Press * to find symbols input page #key Switch between different input methods Scrolling Up Move cursor up Scrolling down Move cursor down Left soft key OK Right soft key Clear End Return to idle screen General operation for English input Every key pressed has input function to its corresponding letter, repeat until the letter you are looking for shows up. After the cursor moved, input next letter. Use # key to switch between different input methods Press * key to add symbols Press 0 key to input space Use Right soft key to clear off the wrong input. 24