1
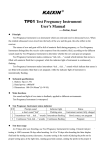
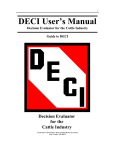
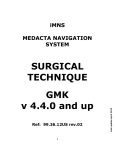
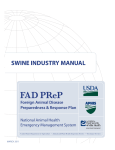
OVASCAN
Instruction Manual
Animark Inc. 876 Ventura Street Aurora Co 80011
303-343-8342 / 800-532-4048
www.Animark.us
[email protected]
1
Table of Contents
Table of Contents.................................................................................................................... 2
Welcome ........................................................................................................................................ 3
Introduction.......................................................................................................................................... 4
Why The Ovascan Works for Ovulation Prediction?.............................................................................. 4
Charting Your Readings.................................................................................................................... 5
Ovascan Instrument Features .............................................................................................................. 7
On / Off Button ................................................................................................................................. 7
Run / Hold Button ............................................................................................................................. 7
Charger Jack .................................................................................................................................... 8
Probe Jack ....................................................................................................................................... 8
Ovascan Set Up................................................................................................................................... 8
Probe Disinfection................................................................................................................................ 9
Using The Ovascan With Mares ......................................................................................................... 10
Charting Readings ............................................................................................................................. 11
Taking Readings............................................................................................................................. 11
1. High readings / Air introduced. .................................................................................................... 14
2. Ovulatory disorders..................................................................................................................... 14
3. Silent heat .................................................................................................................................. 14
4. Abnormally low readings............................................................................................................. 15
5. Continued abnormally low readings............................................................................................. 15
6. Twin ovulation............................................................................................................................. 15
7. Seasonal variations .................................................................................................................... 15
8. Introduction of drugs / hormones................................................................................................. 16
Using the Ovascan instrument with cows............................................................................................ 16
The cow’s cycle .............................................................................................................................. 16
Using the Ovascan for your particular operation.............................................................................. 16
1. Cows detected in standing heat .................................................................................................. 17
2. Cows not detected in heat........................................................................................................... 17
3. Post-Breeding check / late ovulation ........................................................................................... 18
Testing your Ovascan ........................................................................................................................ 19
Ovascan trouble shooting guide ......................................................................................................... 20
Troubleshooting cont.. .................................................................................................................... 21
Care and cleaning.............................................................................................................................. 21
Battery care instructions..................................................................................................................... 22
Owner responsibility for return shipping.............................................................................................. 22
Warranty and service ......................................................................................................................... 23
Warranty validation......................................................................................................................... 23
Warranty service............................................................................................................................. 23
Service after warranty period .......................................................................................................... 23
Warranty exclusions ....................................................................................................................... 23
Voided warranty.............................................................................................................................. 24
Ovascan monitor accuracy................................................................................................................. 24
Customer service /assistance............................................................................................................. 24
Summary ........................................................................................................................................... 25
Other instruments by Animark ............................................................................................................ 26
2
Welcome
Animark is pleased to welcome you to our growing family of satisfied customers.
Our company was founded on the principles of quality, integrity and service. As
we grow, we continue to practice these principles.
Animark pioneered and developed ultrasound pregnancy detection for animals.
Among our many other successful instruments are:
Boveq
Pregnosticator
Pregmatic-3
Ovatest
We have since added several other products to our line, including the new Pregtest
and Pregscan. Each type of Animark instrument can do its individual function
better than any other product in its class. Better accuracy, better performance,
better value.
With the purchase of your Ovascan ovulation monitor, you have joined a
worldwide group of progressive breeders and veterinarians who are realizing the
benefits of today's electronic technology applied to animal sciences. Animark's
continued research and development has made us the world leader in the field. Our
growing list of enthusiastic customers is testimony to Animark's dedication to
integrity and service.
To obtain the maximum benefits from your Ovascan ovulation monitor, please
read this manual carefully before attempting to use the unit.
Thank you for the confidence you have shown in Animark with your recent
purchase. We look forward to serving you in the future.
3
Introduction
Many small to mid size breeders rely on heat indications to determine the
best time to breed their animals. Heat can be an indication that ovulation is
imminent but is not always accurate. Ovulation can actually take place
before, during, or after visible heat. The Animark Ovascan ovulation
detector’s technology is based on a well-documented fact that the chemical
and electrical characteristics of mucus in a healthy animal's vagina will
change in a predictable pattern from the beginning to the end of an
ovulation cycle. It has been established that, as a result of the cyclic
hormonal changes, there are also changes in ion concentration within the
vaginal and cervical mucus of most mammals. By measuring and recording
these changes in ion concentration, you can predict and confirm ovulation.
Why The Ovascan Works for Ovulation Prediction?
The Ovascan instrument utilizes the principles of electricity to identify the various
ion or electrolyte concentrations. Changes during the reproductive cycle (see Fig 11) have a direct impact on the levels of ion concentrations present. During the
reproductive cycle the electrical readings of the vaginal mucus will change in
direct relation to cyclical changes in hormones like estrogen and progesterone. The
presence of estrogen or progesterone will change the electrical characteristics (ion
concentrations) of the vaginal mucus thus allowing the operator to measure these
changes. Estrus will lower the readings and progesterone will raise the readings.
Just before ovulation, there is a flood of estrogen, which affects the ion
concentration, lowering Ovascan readings, and indicating the onset of ovulation.
This is followed by a shift to progesterone dominance, which marks when
ovulation is confirmed. The remainder of the reproductive cycle should stay fairly
consistent. The Ovascan accurately measures these changes and displays them as
an arbitrary numerical reading. By tracking these readings, you can effectively
identify when ovulation has taken place as well as identifying when ovulation is
expected to take place. This allows you time to plan for the insemination. With the
Ovascan’s ease of use combined with a simple digital readout, you can identify all
of your animal’s reproductive cycles easily. Incorporated into a well-managed
breeding program, the Ovascan will prove to be an invaluable tool for years to
come.
4
Fig 1-1
The egg is viable for fertilization for only a few hours once released. This can be as
few as 8 hours. If the egg is not fertilized within this time, you will have to wait for
another cycle. Using the Ovascan to predict and identify when your animal has
ovulated will reduce covers, and improve pregnancy rates. The Ovascan is a
breeding management tool, like a thermometer or speculum. Like any new tool you
need to take the time to learn how to use it and increase your proficiency. It is not
necessary to be a veterinarian: The Ovascan may be used by the knowledgeable
breeder.
Charting Your Readings
Charting or plotting the readings from your Ovascan is the one crucial requirement
for identifying and predicting ovulation. Consistency is the key. The more accurate
your data, the better your results will be. As you take and record readings for each
individual animal, make sure the conditions in which you take your readings are
the same each day. For example, always take your readings the same time each day
if possible. This ensures a similar condition and more accurate readings. Readings
can vary slightly throughout the day based on activity, diet, urination and other
variables.
Once a mare is plotted through one entire cycle, you will have a chart that should
be very clear as to when your animal actually ovulated. This historical information
is critical to ensure your ability to accurately predict the next ovulation. Each cycle
should be similar for each individual animal. Readings will vary between animals
but each animal should show similar patterns. These patterns along with normal
breeding indicators such as teasing, heat detection, etc., can then be interpreted to
5
predict actual ovulation.
During the course of a normal reproductive cycle in any mammal there are several
things that happen prior to ovulation. The first notable and measurable activity is a
flood of estrogen into the animal. This precedes a release of a hormone called LH
(Luteinizing Hormone). The purpose of this hormone is to dissolve the follicle
holding the egg. When the follicle is dissolved the undersized egg is released. The
viability of the egg after release can be as few as 8 hours. The ideal scenario for
fertilization is having semen present 12 to 24 hours before or as soon after the
release of the egg as possible. Having fresh, active semen waiting is ideal. This
means that the best time for breeding or inseminating is the DAY BEFORE
ovulation or as close to it as possible. Research has shown that if an egg is
fertilized later in the eggs maturity, the chances of absorption or abortion are much
greater. The percentage of aborted pregnancies has been shown to be as high as
34%. By charting your readings for each animal with the Ovascan you can get the
advance notice required to inseminate before the actual ovulation.
In summary, you want to make sure that fresh active sperm is available to the egg
as soon after the egg’s release as possible, but not later than a few hours. This is
why, from experience, many breeders breed every other day during heat. This
practice can be both wasteful and expensive.
By charting the readings of the Ovascan, you will accumulate practical information
allowing you to make informed decisions about when to breed your animals.
6
Ovascan Packing List Figure (1-2)
Ovascan Unit
Ovascan Probe
Charger
Carrying Strap
Carrying Case
Tracking Chart
Instruction Manual
Container
Warranty Card
Performance Fluid
Fig 1-2
Ovascan Instrument Features
The Ovascan has a very simple interface for ease of use in the field. On the face of
the instrument there are two buttons and two jacks.
On / Off Button
The On / Off button is the red push in / push out button located in the far right as
you look at the face. Push in for On and push again for Off.
Run / Hold Button
The Run / Hold button is a push in / push out button that controls the number
display. When you want to lock in the displayed number press once to hold or
freeze the reading. The Run / Hold button should be set to Run when first taking
7
your reading. Once the displayed reading settles down (no more than 20 seconds)
press the Run / Hold button to freeze or hold the number so you can record it on
your tracking sheet.
Charger Jack
Plug the charger into charger jack and then into any wall outlet. Charge overnight
or for at least 4 hours (preferably 16 hours) to charge batteries. Make sure the unit
is off before connecting the charger.
Probe Jack
Plug the Sensor or probe cord into this jack. Make sure the unit is off before
connecting probe cord.
Fig 1-3
Ovascan Set Up
To set up and use your Ovascan please follow these simple steps.
1. Connect the ends of the carrying strap to D-rings at either side of the unit.
Place the strap around your neck so that the unit hangs in front with the
screen facing you.
2. Connect the sensor or probe to the probe jack on the front face.
8
3. Turn the instrument on with the Run / Hold switch in the "Run" position.
The display should read around 700 with the probe in place.
4. The Run/Hold switch must be in the "Run" position while readings are being
taken. Be sure the unit is turned OFF when not in use. Both switches are of
the push-on/push-off type, so you simply push the button to change from
“Run” to "Hold" and back or from “On” to “Off”.
(Please Note: The probe must be cleaned, disinfected, and rinsed thoroughly
between each animals readings. See the Probe disinfection section.)
Probe Disinfection
Before you use the Ovascan probe, visually inspect the probe for any oxidation or
any other discoloration. If oxidation or discoloration is detected the probe will need
to be thoroughly cleaned, disinfected and thoroughly rinsed prior to introduction to
your animals. Once the entire probe surface is completely cleansed of oxidation, it
must be disinfected. Oxidation will not hurt your animal but will affect your
readings. Animark recommends the use of “Novasan” or any other similar
disinfectant. If you are unsure what to use, ask your veterinarian or veterinary
supply outlet to recommend an appropriate disinfectant.
Between animals you will want to clean any mucus from the probe, disinfect and
again thoroughly rinse the probe. Disinfectant can irritate the vaginal lining and
can also act as a spermicide in your animals. That is why it is so important to make
sure the probe is 100% clean between readings. See steps below.
1.
WIPE the entire surface of the probe from the handle to the tip with a
dry paper towel to remove any mucous.
2.
WIPE the entire surface of the probe from the handle to the tip with an
undiluted disinfectant applied to a moistened paper towel or disposable
wipe such as a gauze square or cloth baby diaper. It is not necessary to
disinfect the rubber handle of the probe.
9
3.
SOAK the probe by immersing it in a diluted solution of disinfectant
made up according to the manufacturer's directions and allow it to stand
for at least 30 seconds.
4.
RINSE the probe thoroughly with clean running water. This is a
critically important step as the disinfectant could irritate or inflame the
animal’s vagina as well as kill any sperm introduced after the
measurement.
5.
Wipe down with a dry paper towel.
6.
Repeat these steps before testing each animal.
7.
Please Note: After each day's use, clean and dry the probe and store the
meter and
probe in the case. Oxidation may be reduced by storing the probe in a plastic bag.
Using The Ovascan With Mares
In order to effectively predict the onset of ovulation, mares should be checked and
charted daily. To prepare the mare for probe insertion, clean the vulva with soap
and water and/or a tamed iodine spray, or as your veterinarian would recommend
in preparation for a specular exam. Insert the disinfected probe between the parted
vulva. Take care not to spread the vulva so much that air is allowed to enter the
vagina. The introduction of air can alter the accuracy of the readings. Insert the
probe at a slightly upward angle to clear the hip skeletal structure, then lift the
handle slightly and gently slide the probe into the vagina along the horizontal path
until a firm resistance is felt. The probe should be touching the cervix. Raise the
handle of the probe slightly upward to drop the tip of the probe into the Vaginal
pool located just below the cervix (See Fig 2-1). Twist the probe for 10-15 seconds
to fully coat the sensor portion of the probe with vaginal mucus then hold for 10-20
seconds or until the reading settles down. It is normal for the readings to vary
slightly while holding. Press the Run / Hold button on the instrument face at its
lowest maintained number. The length of time you remain in each animal should
be consistent.
10
If desired, hold the reading obtained until it can be recorded. Remove the probe
gently and then record the reading. (See Charting Readings Section). Return the
Run / Hold switch to the run position before turning off the Ovascan.
Fig 2-1
Charting Readings
It is essential to chart each individual animal’s readings separately. Each animal
will have its own base line or standard readings and particular cyclic pattern. After
you have charted one cycle for your mare, you will improve your ability to predict
ovulation accurately. Animark has provided you with one tracking chart included
in your instrument case. To get more you can copy the chart provided or download
the chart from our website.
The exact address is http://www.animark.us/animal_ovulation_prediction.html.
Simply click on the Download sample Ovascan Chart located in the lower left hand
corner. Clicking the highlighted text will automatically open an Excel spreadsheet
on your computer. You can then save the document or print as many copies as you
need. If you do not have a computer you can contact us at 303-343-8342 and we
will be happy to send you as many tracking sheets as you need.
Taking Readings
It is important to take and record readings at approximately the same time each
day. Consistency is the key to accurate readings and tracking. Track all readings
11
through at least one cycle and continue taking readings even after insemination to
ensure accurate interpretation of results. Each mare will establish her own
individual set of readings. A mare not in heat will generally read above 225. When
she is in heat, she will develop a Basic Estrous Reading (B.E.R.) at around 225 or
less. However, there are considerable variations from one mare to another because
of individual hormone and nutritional conditions. During the first day or two of
heat, the readings can be lower due to vaginal material being sloughed from the
uterus through the newly relaxed cervix. As the uterus cleans up, the readings
should rise to the animal's B.E.R. (See Fig 2-2). Four days prior to ovulation, there
will be a drop in the readings. When you see this drop start, you know that your
mare has selected a dominant follicle and can be expected to ovulate within about
four days. This is of course based on the historical record for that particular animal.
In some animals there can be one or more drops prior to actual ovulation. These
“false peaks” (see Fig 2-3) are due to follicular selection being aborted and a new
follicle being selected. This is why is it is so helpful to chart at least one full cycle
in order to identify the animals “true peak”.
Fig 2-2
12
During the early breeding season, it is normal to get readings of less than 100.
These early season lows may last for several days. If this is the case, impending
ovulation (within just a day or two) is signaled by the first increase in readings.
During the warm summer months, mares stay in estrus for a shorter time and late
in the season you should notice that the low readings prior to ovulation will be
lower or deeper than earlier in the season.
Fig 2-3
The "Double Dip" pattern in Fig 2-3 may require two services. This pattern can
result from a surge of hormonal activity that is not enough to complete ovulation,
followed by a second or sometime a third surge which does produce ovulation. The
drop corresponding with ovulation (the second drop) will usually be deeper than
the first (See Fig 2-3).
It is most important to remember that each mare is different and will establish her
own individual range on the Ovascan chart. Graph each animal and breed her in
accordance to her specific pattern. The absolute numbers being recorded are not
important but the pattern they develop is.
13
Abnormal Conditions (as indicated by Ovascan readings)
1. High readings / Air introduced.
Some mares maintain a continuous reading well above the normal B.E.R., even as
high as 400, usually indicating that air is present in the vagina. Whenever this
occurs, it prevents good contact between the surface of the probe and mucus in the
vaginal tract. If air is accidentally introduced with the probe, it can be manually
expelled via rectal palpation or, if a palpator is not readily available, let the animal
walk around for an hour or two before trying to take another reading. Normal
activity will generally result in the natural expulsion of the air. If the introduction
of air continues to be a problem, you may want to try the following tip. Take a new
standard sponge and cut a small hole in it. Make sure the hole is smaller than the
probe end. Wet the sponge and place against the vulva. Slowly insert the probe
through the hole and into the animal’s vaginal tract. This should reduce the amount
of air being introduced. In rare occasions, a "wind sucker" that has chronic
aerovagina will require treatment before the Ovascan device can be used with good
results.
2. Ovulatory disorders
!
!
!
Silent Heat – This is the most common disorder. See “Silent Heat”
below.
Anovulation – Heat without an actual ovulation.
Lutenized unruptured follicle – This occurs when the follicle is
present and continues to grow but is never released.
The Ovascan may not be able to specifically identify the individual disorder
present but will certainly indicate the there is a potential problem. Please consult
your veterinarian if you suspect any of these disorders. Your vet can usually
diagnose and treat any of these rare disorders.
3. Silent heat
A "silent heat" mare is usually an animal that does not show any readily observable
heat indicators or responses when teased. Using the Ovascan to actually detect
when she does ovulate is just as simple as that of any other mare. Take readings
every day and chart her activity just as you would a regular mare. Mares showing
no change in Ovascan readings may have a persistent corpus luteum or a lutenized
14
unruptured follicle. Please consult your veterinarian if you suspect any abnormal
ovulatory conditions other than a silent heat.
4. Abnormally low readings
Abnormally low readings may be caused by a continuing uterine infection. This is
similar to the shedding of organic matter mentioned above in the description of the
normal B.E.R, but if it continues for three or more successive daily readings, it is a
signal of the need for prompt diagnosis and treatment by a veterinarian. These
readings can also be expected if organic material is being sloughed after parturition
during the foal heat.
5. Continued abnormally low readings
Continual very low readings can also be caused by urine in the vagina. The urine
pooling mare should be treated for this condition before normal conception can be
expected, and certainly before normal readings can be taken with the Ovascan
instrument.
6. Twin ovulation
It is possible for some mares to produce two eggs during the ovulatory cycle. This
is the result of the mare ovulating from two ovaries within a two or three day
period. Usually a “W” shaped pattern on the Ovascan chart can be observed. If you
see this pattern, you should consider the possibility of twin ovulation. In such
cases, especially when the mare has a history of twinning, the Pregscan pregnancy
detector or palpation should be used to confirm conception of one or both of the
eggs. This pattern will not always indicate twin ovulation but you should be aware
of the possibility.
7. Seasonal variations
In the mare, there is a tendency for the pre-ovulatory drop to be rather shallow at
the beginning of the season and then become much deeper later in the year. For
example, when the B.E.R. remains consistently around 225, during February and
early March, one might see readings drop to only 80 to 120 prior to ovulation.
Starting around mid-March until mid-May, they may be seen to drop to a range of
60 to 90, and after about May 15th, they may be seen to be much lower to around
35 to 60.
You may also observe that during the early part of the breeding season, some
mares seem to tease warm to hot and will remain in the range of 195 to 120 for
15
many days, sometimes even several weeks. Readings should be continued daily,
without breeding, until a reading less than 120 is seen. Of course, these specific
months do not apply for users in the Southern Hemisphere, where for February it
would change to September, etc.
8. Introduction of drugs / hormones
Introduction of drugs or hormones can and will affect your Ovascan readings. If
your veterinarian is introducing drugs or hormones into your animal, follow the
veterinarian’s guidance and instructions for breeding. The Ovascan unit may not
show a normal dip pattern as these drugs or hormones tend to by-pass the mare's
natural estrogen release pattern.
Using the Ovascan instrument with cows
The cow’s cycle
Cows will usually cycle every 21 days. The estrus period and visible heat usually
lasts 12- 24 hours. The cow’s ovulatory cycle can be tracked and ovulation
predicted and confirmed just as with the horse (See “Why The Ovascan Works for
Ovulation Prediction?” section) or almost any other mammal for that matter. Most
of the time, the hormone that triggers ovulation (luteinizing hormone, or LH) peaks
around mid-estrus, and the lowest Ovascan readings will be found during the
middle of the estrus. This is usually a direct correlation with the LH peak. (See Fig
3-1). Studies have shown that for the highest conception rates, cows should be bred
during this time. Ovulation will usually occur within 24 hours after the LH peak or
from the Ovascan’s lowest reading.
Using the Ovascan for your particular operation
The Ovascan instrument is a tool like any other in your breeding arsenal. You will
need to determine the best time and place to take your readings to ensure
maintaining efficiencies with your standards of operation. The following section is
for general suggestions only and how you use the Ovascan is entirely up to you and
how best to incorporate your new tool into your daily operation. Dairy operations
will clearly differ from other cattle operations. These recommendations are based
on an overall objective of achieving a 12-month calving interval and a higher than
average conception rate.
16
1. Cows detected in standing heat
On average, 50% -60% of cycling cows are detected in heat using traditional
methods. Provided an adequate first service conception rate is being achieved,
these cows may be bred in the usual manner. However, if you feel that a higher
conception rate is desirable, the following procedure may be useful:
a) Take an Ovascan reading soon after the cow is first observed in heat. Reading
should be in the range of 50 -60 or thereabouts.
b) Take a second Ovascan reading after 6 -8 hours.
!
!
!
If reading is similar (+ or -10) to first reading, then breed now.
If reading is lower by 10 or more, take an additional reading in 4 -6
hours. Breed when reading is similar to or higher than previous
reading.
If reading is higher by more than 10, cow is ovulating early and
should be bred immediately. If cow returns to estrus, remember to
breed earlier than usual at the following estrus.
c) Follow post-breeding check.
2. Cows not detected in heat
Cows not detected in heat by 40- 50 days post-calving should be monitored with
your
Ovascan unit. Cows in the luteal phase of the cycle (usually from the third to
sixteenth day of the cycle) will give relatively high Ovascan readings (90 or
greater). Monitor these cows as follows:
a) Take readings every other day.
b) Readings will begin to decline 2 -3 days prior to estrus. Take readings daily at
this stage.
17
c) When readings have declined to 50 -60, cows must be probed at least morning
and evening, or preferably every 6 -8 hours.
d) When a reading does not show a decline from the previous value, or is slightly
higher, the cow should be inseminated.
e) Follow post-breeding check.
3. Post-Breeding check / late ovulation
Late or delayed ovulation: An Ovascan reading should be taken 24 hours after
breeding. Cows ovulating normally will show a reading higher than the one taken
at time of insemination. However, late ovulators will usually have a reading similar
to that at the time of breeding. If a high probability of conception is desired, you
may elect for a second breeding of these cows at this time.
After 22 days you should check the bred animals with the Pregscan to verify
conception. This will minimize your open animals and give you time to re-breed.
See the last page of this manual, our website, www.animark.us or call us for more
information on the Pregscan.
18
Fig 3-1
Testing your Ovascan
To test your Ovascan and ensure the readings you are taking each day are accurate,
you may wish to set up a performance test liquid. To do this, simply take the
Performance test liquid container included in your case and fill it with tap water.
Insert the probe into the container and note the reading. Then take a pinch of salt
and add it to the water. It is not necessary to add too much salt, as much as you
might put on a baked potato is fine. Take another reading with the Ovascan probe
and note the reading. Again add another pinch of salt and take another reading.
Each time that salt is introduced into the tap water, the readings on your Ovascan
should drop. If each time salt is introduced the probe takes a lower reading, the
instrument is working correctly. If the readings do not drop, check the probe for
oxidation. If oxidation is detected then clean and disinfect the probe as per the
“Probe Disinfection” guidelines and test again.
19
Ovascan trouble shooting guide
Problem
Unit does not turn on.
Unit on with out probe,
reading is not at 88.
Probe not taking a reading
Probe readings unusual
Numbers do not change
Possible Cause
Solution
Battery pack discharged.
Charge Unit. If it does not hold a charge call
Animark.
Battery pack requires replacing.
Send to Animark for repair.
Short in electronics.
Send to Animark for repair.
Malfunctioning electronics.
Send to Animark for repair.
If reading is within 5 numbers unit is ok.
No action required
Run / Hold button engaged
Should show -1, press Run / Hold button
Probe not connected.
Battery pack discharged.
Check probe connection.
Charge Unit. If it does not hold a charge call
Animark.
Probe Faulty
Test probe, if not functioning Call Animark.
Run / Hold button engaged
Press Run / Hold Button, take reading.
Oxidation on probe
Ovulatory Disorder
Clean and disinfect Probe.
See Ovulatory Disorder Section, Check with
Vet
Run / Hold button engaged
Press Run / Hold Button, take reading.
Short in electronics.
Send to Animark for repair.
Malfunctioning electronics.
Send to Animark for repair.
Animals readings vary greatly
day to day
Oxidation on probe
Clean and disinfect Probe.
Animal cycle unkown
Chart animal’s reading for at least one cycle.
Probe jack faulty
Call Animark
Probe Faulty
Test probe, if not functioning Call Animark.
Charge Unit. If it does not hold a charge call
Animark.
Charge Unit. If it does not hold a charge call
Animark.
Charge Unit. If it does not hold a charge call
Animark.
Low Battery
Low battery Indicator
Low Battery
Display seems dim
Low Battery
20
Troubleshooting cont..
If your Ovascan system fails to function properly, first charge it for at least four
hours, then check for power. When the unit is turned ON, if the LO-BAT
indication still shows at the left of the display, try charging the unit for eight (8)
more hours. If the low charge indicator still appears, return the unit and the charger
to Animark for service.
If the unit has adequate charge, but readings are erratic:
1. First make sure the electronic unit itself is measuring correctly by turning it on
with the probe disconnected. The display should read around 88. If it passes this
test, the Ovascan meter is working properly.
2. If this is not the problem, connect the probe to the unit, turn the unit ON and test
the unit as described in “Testing Your Ovascan” section.
3. If the chart above does not address your particular concern, contact Animark
repair ((303) 343-8342) for further instruction.
NEVER remove the cover of your Ovascan ovulation monitor. Components are
protected by a chemical spray against humidity and corrosion. Any attempt at
repairing the unit will void the warranty.
Care and cleaning
Although the Ovascan unit is designed for rugged use, excessive rough handling is
undesirable. Sharp bends or kinks in the cable, especially near the ends, should be
avoided. After field use, the instrument should be wiped clean of any moisture,
dirt, or organic material, dried and placed back in the case.
Occasionally, the case may be cleaned with a light duty general purpose household
cleanser. NEVER USE ABRASIVE CLEANERS OR CAUSTIC LIQUIDS ON
THE CASE, FACEPLATE, OR ANY OTHER PART OF THE INSTRUMENT.
A charge will be assessed if a unit requires excessive cleaning prior to service.
21
Battery care instructions
The Ovascan device is powered by a rechargeable nickel-cadmium battery pack.
When fully charged, this pack will operate the instrument for over 6 hours. The
battery should be charged if the LO- BAT indicator (on the left side of the display)
comes on. A full charge takes about 16 hours - typically overnight. The charger
plugs into any standard 110- 120 volt outlet (or 220 volt source with the
appropriate charger/converter).
The unit should be turned OFF when not in use and especially when charging.
Leaving the unit ON after the battery is fully discharged may result in damage to
the battery.
NOTE: Battery damage caused by excessive drainage is not considered ordinary
use and is not covered by the warranty.
The cells in this pack discharge to some extent even when the unit is not turned on,
so it is necessary to recharge the batteries occasionally even when the instrument is
not being used. The batteries will discharge (without instrument use) over a period
of weeks or months, depending on the outside temperature. They discharge faster
when the outside temperature is high. If the unit is not to be used for some months,
it is a good idea to check it occasionally for battery charge. If the unit has been
stored for a long time (several months) without periodic recharging, the batteries
can occasionally lose capacity and then will not operate for the normal time on a
single charge. The battery pack can be restored to normal by cycling the batteries
several times. Cycling means to recharge for 16 hours, then discharge completely
by leaving the unit on until the LO-BAT signal shows on the left side of the
display and then recharge it again. Similarly, if the batteries are left on charge for
too long a period of time (several Weeks) they can lose capacity. In this case
restore by cycling as indicated above, this time starting by discharging.
Owner responsibility for return shipping
It is the responsibility of the owner to pack the instrument securely for return and
to pay shipping and insurance costs to and from the repair center.
22
Warranty and service
All instruments manufactured by Animark, Inc. are warranted to be free of defects
in materials and workmanship for a period of two (2) years from date of purchase.
Within this time, the instrument or part of it will be repaired or replaced at our
discretion if found to be defective by our examination.
Warranty validation
To validate your warranty, the Warranty Registration Card included with your
instrument must be completed and returned to Animark, Inc., 876 Ventura Street,
Aurora, Colorado 80011, within thirty (30) days of purchase. This warranty is nontransferable and applies only to the original Purchaser.
Cables and sensors are warranted for ninety (90) days from the date of purchase.
Warranty service
If your instrument requires service, please call Animark, Inc. before shipping the
unit to the repair center. Some service problems can be diagnosed and corrected by
telephone. If the unit does need to be returned for service, we can suggest suitable
packaging and shipping procedures.
Service after warranty period
After your warranty expires, any necessary service will be provided promptly,
carefully, and at the lowest possible cost to the owner. Replacement cables and
sensors may also be ordered directly from Animark. Please call Animark at 303/
343-8342. If you are calling long distance, remember the difference in time zones.
The best time to call is between 8:30 A.M. and 4:30 P.M. (Mountain Time)
Monday through Friday, except holidays.
Warranty exclusions
This warranty does NOT cover damage to the instrument nor injury or consequent
injury to any animal resulting from any cause, including abuse, failure to following
operating instructions, improper handling or unauthorized attempts to repair the
23
equipment. Batteries, if not properly used (see section in Battery Care Instruction)
are excluded from the warranty.
Voided warranty
This warranty is void if attempts at repair have been made by anyone other than
authorized Animark personnel.
Ovascan monitor accuracy
The purpose of the Ovascan instrument in breeding is to determine the optimum
time to breed an animal in order to achieve higher conception rates. This does not
guarantee conception to a single service, nor does it guarantee conception in any
given animal. Properly used, the instrument will reduce the average number of
services per conception in nearly all operations. Animark does not make any
claims or guarantees as to the effect of performance.
Customer service /assistance
Animark personnel are always happy to provide telephone assistance or, when
possible, to visit an owner who needs more intensive instruction for use of the
Ovascan. Animark has an existing network of breeders who are willing to review
their operation and use of Animark equipment. If you are provided an existing
customer reference please understand that they are simply happy customers that do
not mind taking calls on occasion. Animark does not compensate them in any way,
so please show them the respect and patience they deserve. If after you have
become proficient with you Animark instrument you would like to extend your
knowledge and help, please contact us. We would love to add you to our growing
network of satisfied breeders. Also please understand that we are equipment
manufacturers who produce the best equipment in its class. We do not breed our
own animals and often times are not as proficient as our seasoned users. You in the
field are the experts in its use. We can, of course, provide basic instruction and
explain the operation of the instruments. You will, however, obtain the high degree
of accuracy you need in your operation by taking the most important action...
PRACTICE, PRACTICE, PRACTICE.
24
Summary
This electronic method of detecting and predicting ovulation has been shown to be
reliable in large numbers of animals. Consistency is the key factor in your
continued success. Missing days and spotty testing will not likely provide you with
the level of success you are looking for. Properly used, the Ovascan will provide a
high degree of information on your animal’s ovulatory cycle. Animark does not
make any claims or guarantees as to the efficiency of the instrument, nor is any
other guarantee made or implied.
Welcome to Animark!
We value you
As a customer!
25
Other instruments by Animark
Ultrasound Pregnancy Detectors for Livestock
Our electronic pregnancy detectors are highly accurate and easy to use. Used externally, they
are more convenient and safer for the animal than palpation or internal ultrasound units.
With Animark ultrasound instruments, you can expect to
!
!
!
!
!
Detect pregnancy as soon as 14 days after breeding.
Check at your convenience, in 1-2 minutes.
Check as often as you like, any time until birth.
Cull, keep, or rebreed on accurate information.
Save on vet bills.
The Pregscan
For Mares and Cows
The ultrasound instrument displays the exact location of density changes or tissue interfaces in
your animal. When properly aimed at the uterus, the display will show a pattern or spike
indicating pregnancy and no spike if the animal is open. Because the animal's uterus changes
density soon after conception, you can identify pregnancy as early as 14 days after breeding.
This unit is specifically calibrated to recognize the tissue change upon conception in large
animals. With sophisticated electronics and digital output, the Pregscan is 98% accurate at
detecting pregnancy.
The Pregtest
For Miniature Mares, Llamas, Alpacas, Swine, Sheep and Goats
Ideal for smaller animals
Because palpation is not usually a practical option for smaller animals, an ultrasound (the
Pregtest) is the best option available for the determination of pregnancy. The Pregtest is a
fully external, A-scope ultrasound machine used for the detection of pregnancy in smaller
animals. The Pregtest will provide accurate information about the reproductive status of
your animals, allowing you to increase herd efficiency, decrease costs, and improve your
profitability.
The ultrasound instrument displays the exact location of density changes or tissue interfaces in
your animal. When properly aimed at the uterus, the display will show a pattern or spike
indicating pregnancy and no spike if the animal is open. Because the animal's uterus changes
density soon after conception, you can identify pregnancy as early as 14 days after breeding.
This unit is specifically calibrated to recognize the tissue change upon conception in smaller
animals. With sophisticated electronics and digital output, the Pregtest is 98% accurate at
detecting pregnancy.
Please call us or visit our website if you require additional information about our superior
ultrasound machines.
26