1
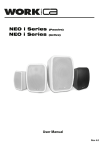
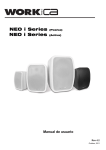
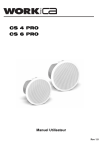
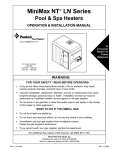
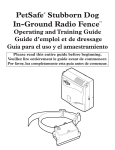
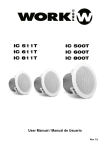
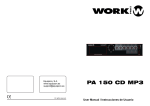
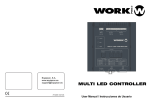
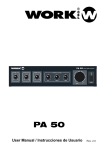
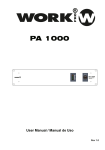
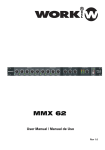
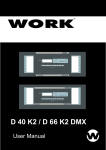
STUDIO LINE Series
User Manual / Manual de Uso
Rev 2.0
EN
STUDIO LINE
2-WAY INDOOR/OUTDOOR SPEAKER
Congratulations on your purchase. We
trust you will enjoy the value and quality
of your STUDIO speaker.
Please take a few minutes to read this
user manual before you get started.
Also, be sure to retain this document should
you need to refer to it in the future.
SPEAKER PLACEMENT
STUDIO speakers are manufactured to resist a variety of weather conditions. However, they are not
waterproof, so if you decide to place your speaker outdoor, position them so they are not exposed to
the elements.
A FEW WORDS ABOUT STUDIO SPEAKERS
STUDIO speakers are designed to accurately reproducer high fidelity music in a variety of
applications, including home theater. Not only are these loudspeakers weather resistant for outrdoor
use, they also include color matched bracket for mounting in most any environment.
SPEAKER MOUNTING
If your application requires the STUDIO speakers to be mounted, please follow these direction. Using
the hardware supplied, mount the bracket first. Attach the speakers to the bracket using ther large
plastic knobs supplied. Never mount a speaker on a wall made of unreinforced drywall or plasteboard.
If you are unsure, consult a professional contractor.
HOOKING IT UP
The binding post speaker terminal on the STUDIO speakers will accomodate up to 2 mm wire. When
connecting the speakers, it is very important to observe the correct polarity. This means that the wire
attached to the (+), red or positive on one component must be attached to the (+), red or positive
terminal on the corresponding output terminal. Similary, the (-), black, negative or ground terminal
must connect to the respective (-), black, negative or ground terminals.
Select the adequate power tap with the switch placed in the rear side.
1
User Manual/Manual de Uso
STUDIO Series
STUDIO 20 LINE
EN
142
212
A STUDIO 20 LINE carton contains two loudspeakers (black or white) and two metallic
wall-mount brackets.
160
The power tap is selected by rotating the 5
position rotary switch to the desired tap.
Make sure to select the correct power tap
position before connecting the loudspeaker
to a 70/100V line amplifier. If the low
impedance position (8Ω) is selected, the
loudspeaker could be damaged!
The connection is made through Binding Post terminals.
Ensure the correct polarity is observed.
(*) Power Taps (70V) .................................
Power Taps (100V).................................
Low Impedance position..........................
Sensitivity (1W/1m) ..................................
Max. SPL .....................................................
Frequency Response ..............................
Elements....................................................
Dimensions ..............................................
Material (enclosure) .................................
Material (grille) .........................................
Weight .......................................................
1W(4k9Ω)/2W(2k45Ω)/4W(1k22Ω)8W(612Ω)
2W(5kΩ)/4W(2k5Ω)/8W(1k25Ω)/16W(625Ω)
8Ω (30W)
73 dB
89 dB
80Hz - 18kHz
4" Woofer + 1" Tweeter
160 x 212 x 142 mm
ABS plastic
Aluminium
1,55 Kg
(*) The power taps indicated on the selector switch are calculated for 100V line. In the case of 70V line installation, each power
tap will correspond to half the value
Specifications are subject to change without notice
2
User Manual/Manual de Uso
STUDIO Series
EN
STUDIO 30 LINE
160
240
A STUDIO 30 LINE carton contains two loudspeakers (black or white) and two metallic
wall-mount brackets.
180
The power tap is selected by rotating the 5
position rotary switch to the desired tap.
Make sure to select the correct power tap
position before connecting the loudspeaker
to a 70/100V line amplifier. If the low
impedance position (8Ω) is selected, the
loudspeaker could be damaged!
The connection is made through Binding Post terminals.
Ensure the correct polarity is observed.
(*) Power Taps (70V) .................................
Power Taps (100V).................................
Low Impedance position..........................
Sensitivity (1W/1m) ..................................
Max. SPL .....................................................
Frequency Response ..............................
Elements....................................................
Dimensions ..............................................
Material (enclosure) .................................
Material (grille) .........................................
Weight .......................................................
1W(4k9Ω)/2W(2k45Ω)/4W(1k22Ω)8W(612Ω)
2W(5kΩ)/4W(2k5Ω)/8W(1k25Ω)/16W(625Ω)
8Ω (40W)
74 dB
90 dB
70Hz - 20kHz
5" Woofer + 1" Tweeter
180 x 240 x 160 mm
ABS plastic
Aluminium
2,7 Kg
(*) The power taps indicated on the selector switch are calculated for 100V line. In the case of 70V line installation, each power
tap will correspond to half the value
Specifications are subject to change without notice
3
User Manual/Manual de Uso
STUDIO Series
STUDIO 40 LINE
EN
200
300
A STUDIO 40 LINE carton contains two loudspeakers (black or white) and two metallic
wall-mount brackets.
225
The power tap is selected by rotating the 5
position rotary switch to the desired tap.
Make sure to select the correct power tap
position before connecting the loudspeaker
to a 70/100V line amplifier. If the low
impedance position (8Ω) is selected, the
loudspeaker could be damaged!
The connection is made through Binding Post terminals.
Ensure the correct polarity is observed.
(*) Power Taps (70V) .................................
Power Taps (100V).................................
Low Impedance position..........................
Sensitivity (1W/1m) ..................................
Max. SPL .....................................................
Frequency Response ..............................
Elements....................................................
Dimensions ..............................................
Material (enclosure) .................................
Material (grille) .........................................
Weight .......................................................
2W(2k45Ω)/4W(1k22Ω)8W(612Ω)/16W(306Ω)
4W(2k5Ω)/8W(1k25Ω)/16W(625Ω)/32W(312Ω)
8Ω (60W)
73 dB
90 dB
70Hz - 20kHz
6.5" Woofer + 1" Tweeter
225 x 300 x 200 mm
ABS plastic
Aluminium
4,8 Kg
(*) The power taps indicated on the selector switch are calculated for 100V line. In the case of 70V line installation, each power
tap will correspond to half the value
Specifications are subject to change without notice
4
User Manual/Manual de Uso
STUDIO Series
EN
STUDIO 50 LINE
240
366
A STUDIO 50 LINE carton contains two loudspeakers (black or white) and two metallic
wall-mount brackets.
276
The power tap is selected by rotating the 5
position rotary switch to the desired tap.
Make sure to select the correct power tap
position before connecting the loudspeaker
to a 70/100V line amplifier. If the low
impedance position (8Ω) is selected, the
loudspeaker could be damaged!
The connection is made through Binding Post terminals.
Ensure the correct polarity is observed.
(*) Power Taps (70V) .................................
Power Taps (100V).................................
Low Impedance position..........................
Sensitivity (1W/1m) ..................................
Max. SPL .....................................................
Frequency Response ..............................
Elements....................................................
Dimensions ..............................................
Material (enclosure) .................................
Material (grille) .........................................
Weight .......................................................
2W(2k45Ω)/4W(1k22Ω)8W(612Ω)/16W(306Ω)
4W(2k5Ω)/8W(1k25Ω)/16W(625Ω)/32W(312Ω)
8Ω (70W)
72 dB
90 dB
40Hz - 20kHz
8" Woofer + 1" Tweeter
276 x 366 x 240 mm
ABS plastic
Aluminium
6,3 Kg
(*) The power taps indicated on the selector switch are calculated for 100V line. In the case of 70V line installation, each power
tap will correspond to half the value
Specifications are subject to change without notice
5
User Manual/Manual de Uso
STUDIO Series
STUDIO LINE
ES
ALTAVOZ DE 2 VIAS PARA INTERIOR/EXTERIOR
Felicidades por su adquisición. Esperamos
que disfrute del rendimiento y calidad de su
altavoz STUDIO.
Por favor, tómese unos minutos para leer este
manual antes de comenzar a utilizarlo.
Asimismo, asegúrese de conservar este
documentos por si lo necesita para futuras
referencias
COLOCACION DEL ALTAVOZ
Las cajas acústicas STUDIO están fabricadas para resistir una gran variedad de condiciones
meteorológicas. De todas formas, no son resistentes al agua, así, si decide situarlas en exterior, no
deben estar expuestas a los elementos.
UNAS BREVES PALABRAS ACERCA DE LA SERIE STUDIO
Las cajas acústicas STUDIO están diseñadas para reproducir música de alta fidelidad en una gran
variedad de aplicaciones incluyendo home theater. Además de su uso en exteriores, estos altavoces
incorporan un soporte del mismo color para su montaje en cualquier lugar.
MONTAJE DE LA CAJA ACUSTICA
Si su aplicación requiere que los STUDIO deban se montados, por favor, siga esta directrices. Usando l
a pletina, fije el soporte a la pared. Fije el altavoz utilizando las tapas de plásticos suministradas.
Nunca monte los altavoces en una pared sin refuerzo o paneles. Si no está seguro, consulte a un
albañil profesional.
CONEXIONADO
Los terminales binding post speaker terminal en los altavoces STUDIO permiten acomodar un cable
de hasta 2 mm. Cuando conecte los altavoces, es importante observar la correcta polaridad. Esto
significa que el cable marcado como (+), rojo o, positivo eb un componente debe conectarse al
terminal (+),. rojo o positivo del correspondiente terminal . De manera análoga, el terminal (-), negro,
negativo o masa, debe conectarse al respectivo terminal (-), negro, negativo o masa.
Seleccione la potencia adecuada con el conmutador situados en el panel trasero
6
User Manual/Manual de Uso
STUDIO Series
ES
STUDIO 20 LINE
142
212
Un set de STUDIO 20 LINE contiene 2 cajas acústicas (blancas o negras) y 2 soportes
para pared metálicos.
160
La potencia se selecciona girando el conmutador
rotativo de 5 posiciones hasta la potencia deseada.
Asegúrese de seleccionar la correcta posición
de potencia antes de conectar el altavoz a un
amplificador de línea 70/100V. Si se selecciona
la posición de baja impedancia (8Ω), el altavoz
puede dañarse.
El conexionado se realiza mediante conectores Binding Post.
Asegúrese de observar la correcta polaridad.
(*) Potencia (70V) ......................................
Potencia (100V)......................................
Posición a baja impedancia ....................
Sensibilidad (1W/1m) ..............................
Max. SPL .....................................................
Respuesta en frecuencia ........................
Elementos .................................................
Dimensiones ............................................
Material (recinto) ......................................
Material (rejilla) ........................................
Peso ..........................................................
1W(4k9Ω)/2W(2k45Ω)/4W(1k22Ω)8W(612Ω)
2W(5kΩ)/4W(2k5Ω)/8W(1k25Ω)/16W(625Ω)
8Ω (30W)
73 dB
89 dB
80Hz - 18kHz
4" Woofer + 1" Tweeter
160 x 212 x 142 mm
Plastico ABS
Aluminio
1,55 Kg
(*) Las posiciones indicadas en el selector están calculadas para línea de 100V. En el caso de una instalación de línea 70V, cada
posición de potencia corresponderá a la mitad del valor.
Las especificaciones están sujetas a cambio sin previo aviso.
7
User Manual/Manual de Uso
STUDIO Series
STUDIO 30 LINE
ES
160
240
Un set de STUDIO 30 LINE contiene 2 cajas acústicas (blancas o negras) y 2 soportes
para pared metálicos.
180
La potencia se selecciona girando el conmutador
rotativo de 5 posiciones hasta la potencia deseada.
Asegúrese de seleccionar la correcta posición
de potencia antes de conectar el altavoz a un
amplificador de línea 70/100V. Si se selecciona
la posición de baja impedancia (8Ω), el altavoz
puede dañarse.
El conexionado se realiza mediante conectores Binding Post.
Asegúrese de observar la correcta polaridad.
(*) Potencia (70V) ......................................
Potencia (100V)......................................
Posición a baja impedancia ....................
Sensibilidad (1W/1m) ..............................
Max. SPL .....................................................
Respuesta en frecuencia ........................
Elementos .................................................
Dimensiones ............................................
Material (recinto) ......................................
Material (rejilla) ........................................
Peso ..........................................................
1W(4k9Ω)/2W(2k45Ω)/4W(1k22Ω)8W(612Ω)
2W(5kΩ)/4W(2k5Ω)/8W(1k25Ω)/16W(625Ω)
8Ω (40W)
74 dB
90 dB
70Hz - 18kHz
5" Woofer + 1" Tweeter
180 x 240 x 160 mm
Plastico ABS
Aluminio
12,7 Kg
(*) Las posiciones indicadas en el selector están calculadas para línea de 100V. En el caso de una instalación de línea 70V, cada
posición de potencia corresponderá a la mitad del valor.
Las especificaciones están sujetas a cambio sin previo aviso.
8
User Manual/Manual de Uso
STUDIO Series
ES
STUDIO 40 LINE
200
300
Un set de STUDIO 40 LINE contiene 2 cajas acústicas (blancas o negras) y 2 soportes
para pared metálicos.
225
La potencia se selecciona girando el conmutador
rotativo de 5 posiciones hasta la potencia deseada.
Asegúrese de seleccionar la correcta posición
de potencia antes de conectar el altavoz a un
amplificador de línea 70/100V. Si se selecciona
la posición de baja impedancia (8Ω), el altavoz
puede dañarse.
El conexionado se realiza mediante conectores Binding Post.
Asegúrese de observar la correcta polaridad.
(*) Potencia (70V) ......................................
Potencia(100V).......................................
Potencia a baja impedancia.....................
Sensibilidad (1W/1m) ..............................
Max. SPL .....................................................
Respuesta en frecuencia ........................
Elementos .................................................
Dimensiones ............................................
Material (recinto) ......................................
Material (rejilla) ........................................
Peso ..........................................................
2W(2k45Ω)/4W(1k22Ω)8W(612Ω)/16W(306Ω)
4W(2k5Ω)/8W(1k25Ω)/16W(625Ω)/32W(312Ω)
8Ω (60W)
73 dB
90 dB
70Hz - 20kHz
6.5" Woofer + 1" Tweeter
225 x 300 x 200 mm
Plástico ABS
Aluminio
4,8 Kg
(*) Las posiciones indicadas en el selector están calculadas para línea de 100V. En el caso de una instalación de línea 70V, cada
posición de potencia corresponderá a la mitad del valor.
Las especificaciones están sujetas a cambio sin previo aviso
9
User Manual/Manual de Uso
STUDIO Series
STUDIO 50 LINE
ES
240
366
Un set de STUDIO 50 LINE contiene 2 cajas acústicas (blancas o negras) y 2 soportes
para pared metálicos.
276
La potencia se selecciona girando el conmutador
rotativo de 5 posiciones hasta la potencia deseada.
Asegúrese de seleccionar la correcta posición
de potencia antes de conectar el altavoz a un
amplificador de línea 70/100V. Si se selecciona
la posición de baja impedancia (8Ω), el altavoz
puede dañarse.
(*) Potencia (70V) ......................................
Potencia(100V).......................................
Potencia a baja impedancia.....................
Sensibilidad (1W/1m) ..............................
Max. SPL .....................................................
Respuesta en frecuencia ........................
Elementos .................................................
Dimensiones ............................................
Material (recinto) ......................................
Material (rejilla) ........................................
Peso ..........................................................
2W(2k45Ω)/4W(1k22Ω)8W(612Ω)/16W(306Ω)
4W(2k5Ω)/8W(1k25Ω)/16W(625Ω)/32W(312Ω)
8Ω (70W)
72 dB
90 dB
40Hz - 20kHz
8" Woofer + 1" Tweeter
276 x 366 x 240 mm
Plástico ABS
Aluminio
6,3 Kg
(*) Las posiciones indicadas en el selector están calculadas para línea de 100V. En el caso de una instalación de línea 70V, cada
posición de potencia corresponderá a la mitad del valor.
Las especificaciones están sujetas a cambio sin previo aviso
10
User Manual/Manual de Uso
STUDIO Series
This symbol on the product or on its packaging indicates that this product
shall not be treated as household waste. Instead it shall be handed over to
the applicable collection point for the recycling of electrical an electronic
equipment. By ensuring this product is disposed of correctly, you will help
prevent potential negative consequences for the environment and human
health, which could otherwise be caused by inappropriate waste handling
of this product. The recycling of materials will help to conserve natural
resources. For more detailed information about recycling of this product,
please contact your local city office, your household waste disposal service
or the shop where you purchased the product.
Manufactured by
EQUIPSON, S.A.
http://www.equipson.es