1
Salesware Layouts
Version 4.4
accesso
302 Camino de la Placita
Taos, NM 87571
575.751.0633
www.accesso.com
Copyright
Copyright 2015 accesso Technology Group, plc. All rights reserved.
NOTICE: All information contained herein is the property of accesso Technology Group, plc. No part of this
publication (whether in hardcopy or electronic form) may be reproduced or transmitted, in any form or by any
means, electronic, mechanical, photocopying, recording, or otherwise, without the prior written consent of
accesso Technology Group, plc. The software, which includes information contained in any databases,
described in this document is furnished under a license agreement and may be used or copied only in
accordance with the terms of that agreement.
This publication and the information herein is furnished AS IS, is subject to change without notice, and should
not be construed as a commitment by accesso Technology Group, plc. accesso Technology Group, plc. assumes
no responsibility or liability for any errors or inaccuracies, makes no warranty of any kind (express, implied, or
statutory) with respect to this publication, and expressly disclaims any and all warranties of merchantability,
fitness for particular purposes, and non-infringement of third party rights.
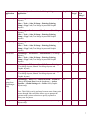
TYPES OF LAYOUTS ................................................................................................................................ 4
Graphic layouts ...................................................................................................................................................................................... 4
Text Merge layouts ................................................................................................................................................................................. 5
Shared Text Merge layouts .................................................................................................................................................................... 6
Layout applications ................................................................................................................................................................................ 6
Specific layout applications.................................................................................................................................................................. 6
Associating layouts with their individual applications ........................................................................................................................... 8
Tickets and Vouchers ...................................................................................................................................................................... 8
Receipts, Invoices, Summaries, Charge Cards, saved Sales, Remote Receipts and Z-Tape Reports.................................................... 9
Example: .................................................................................................................................................................................. 12
Example: .................................................................................................................................................................................. 13
In order to take advantage of Group Level layouts, you must do the following: .......................................................................... 13
Consolidating the Sales and CC Receipt ............................................................................................................................................. 14
Passes ........................................................................................................................................................................................... 16
Purchase Order (PO) layouts (Retail module) ..................................................................................................................................... 17
TEXT LAYOUTS TEST TOOL ................................................................................................................. 17
DIAGNOSTIC TOOL ANALYZEFRX ....................................................................................................... 18
LAYOUT FUNCTIONS AND COMMANDS .............................................................................................. 18
Installing printers and drivers for use with layouts ............................................................................................................................. 19
Connecting printers to salespoints ...................................................................................................................................................... 19
Types of drivers for use with Salesware.............................................................................................................................................. 19
Example: .................................................................................................................................................................................. 20
Associating the driver and printer with your layout ............................................................................................................................. 21
How to install a printer and driver ...................................................................................................................................................... 22
Example: .................................................................................................................................................................................. 22
To install a manufacturer-supplied driver: ................................................................................................................................. 22
To install the Generic/Text Only driver: .................................................................................................................................... 25
Example of installing a receipt printer (Star TSP) with a Receipt layout: .................................................................................... 26
Edit Layout Printer Option missing in Windows 7.......................................................................................................................... 27
When editing the layout, perform these steps: ............................................................................................................................ 27
Functions and commands ..................................................................................................................................................................... 27
Printer commands .............................................................................................................................................................................. 28
Salesware-specific Visual FoxPro (VFP) functions for Graphic layouts............................................................................................... 28
Custom Salesware layout functions .................................................................................................................................................... 28
Supported specialized printers ............................................................................................................................................................. 28
REFERENCE ........................................................................................................................................... 28
1
Sample layouts provided with Salesware ............................................................................................................................................. 28
Printer commands ................................................................................................................................................................................ 30
Cognitive printer commands .............................................................................................................................................................. 30
Header line.................................................................................................................................................................................... 30
Text justification for Cognitive layouts .......................................................................................................................................... 31
Font styles and sizes ...................................................................................................................................................................... 31
UltraFonts ................................................................................................................................................................................ 31
TextFonts ................................................................................................................................................................................. 31
Boldness, spacing and rotation ....................................................................................................................................................... 32
Columns and rows .................................................................................................................................................................... 32
Printing text .................................................................................................................................................................................. 33
Printing barcodes........................................................................................................................................................................... 33
The END command....................................................................................................................................................................... 34
Boca printer commands...................................................................................................................................................................... 34
Text rotation.................................................................................................................................................................................. 34
Rows and columns ........................................................................................................................................................................ 35
Font styles ..................................................................................................................................................................................... 35
Font height and width .................................................................................................................................................................... 36
Printing text .................................................................................................................................................................................. 36
Example: .................................................................................................................................................................................. 36
Printing barcodes........................................................................................................................................................................... 36
Specifying the end of a Boca printer layout .................................................................................................................................... 37
Dot matrix printer layouts .................................................................................................................................................................. 38
Example: .................................................................................................................................................................................. 38
Sample ticket Printer layouts .............................................................................................................................................................. 39
Cognitive printer Ticket layout ...................................................................................................................................................... 39
Boca printer Ticket layout ............................................................................................................................................................. 39
Tables and fields available for use from layouts .................................................................................................................................. 39
Tables and fields available from Graphic layouts ................................................................................................................................ 41
Graphic Ticket and Voucher layouts .............................................................................................................................................. 41
Graphic Receipts and Invoice layouts ............................................................................................................................................ 43
Graphic Saved Sale layouts ........................................................................................................................................................... 45
Graphic Z-tape layouts .................................................................................................................................................................. 45
Graphic Tee Sheet layouts ............................................................................................................................................................. 46
Confirmation letters....................................................................................................................................................................... 46
Multi-page Confirmation layouts............................................................................................................................................... 48
To create the layout, follow these steps: .................................................................................................................................... 48
Fields for Text Ticket layouts ............................................................................................................................................................... 48
Example: .................................................................................................................................................................................. 54
Common fields on Graphic Pass layouts .............................................................................................................................................. 54
Function reference................................................................................................................................................................................ 55
Character functions ............................................................................................................................................................................ 56
Examples:................................................................................................................................................................................. 56
Logic functions .................................................................................................................................................................................. 57
Examples:................................................................................................................................................................................. 57
Date functions.................................................................................................................................................................................... 57
Examples:................................................................................................................................................................................. 57
Date/character conversion functions ................................................................................................................................................... 58
Examples:................................................................................................................................................................................. 58
Number/character conversion functions .............................................................................................................................................. 58
Examples:................................................................................................................................................................................. 59
2
Database functions ............................................................................................................................................................................. 59
Example: .................................................................................................................................................................................. 59
Receipt layout functions..................................................................................................................................................................... 60
Examples:................................................................................................................................................................................. 62
Ticket layout functions....................................................................................................................................................................... 63
Example: .................................................................................................................................................................................. 63
Example: .................................................................................................................................................................................. 64
Example: .................................................................................................................................................................................. 64
Example: .................................................................................................................................................................................. 64
Example: .................................................................................................................................................................................. 65
Example: .................................................................................................................................................................................. 65
Examples:................................................................................................................................................................................. 65
Example: .................................................................................................................................................................................. 66
Example: .................................................................................................................................................................................. 66
Example: .................................................................................................................................................................................. 66
Example: .................................................................................................................................................................................. 67
Example: .................................................................................................................................................................................. 68
Examples:................................................................................................................................................................................. 69
Guest Card layout functions ............................................................................................................................................................... 70
Axess Smart Printer layout functions .................................................................................................................................................. 70
Axess Smart Printer encoding ............................................................................................................................................................ 70
PEZ functionality ................................................................................................................................................................................. 71
Example product:...................................................................................................................................................................... 72
Example: .................................................................................................................................................................................. 72
Example: .................................................................................................................................................................................. 73
Example: .................................................................................................................................................................................. 73
APPENDIX A: PACKING AND UNPACKING LAYOUTS........................................................................ 74
Layouts table revealed.......................................................................................................................................................................... 74
Working with the local layouts table from Sales.................................................................................................................................. 75
What does pack up all layouts do? ....................................................................................................................................................... 75
Maintenance recommendations ........................................................................................................................................................... 77
APPENDIX B: HOW TO INCREASE THE HEIGHT OF A BARCODE ON A GRAPHIC LAYOUT ......... 77
To increase the height of a barcode on a Graphic Layout: .......................................................................................................... 77
APPENDIX C: USING THE PRINTERS TABLE TO HANDLE CONTROL CODES FOR PRINTERS .... 79
3
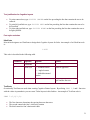
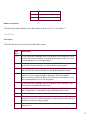
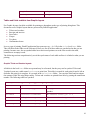
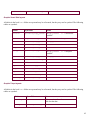
Types of layouts
Layouts are used to specify the format of output from Salesware (passes, receipts, invoices, etc.). The following
table lists and describes the types of layouts available in Salesware.
Type of layout
Description
Graphic
Used for passes and other output where graphic richness is more important than speed.
Designed using the Salesware Layout Designer (SysManager > Activities > Edit
Layouts. PrintEZ application is used invoked to print Graphic layouts.
Text Merge
Used for output that needs to print fast and often from specialized output devices.
Designed using a text editor. Unlike Graphic and Shared Text Merge layouts, Text Merge
layouts are stored along with the item. For more information on how layouts are stored,
see Appendix A: Packing and unpacking layouts.
Shared Text Merge
Same as Text Merge, except that a Shared Text Merge layout can be shared by multiple
items. Designed using a text editor. Used only for Ticket and Voucher layouts.
Receipt layouts are either short or long. Short layouts print to a forty column printer. Long layouts print to standard
8.5” x 11” paper. Ticket and Voucher layouts can be whatever size you want based on ticket and voucher stock and
your printer.
The following sections describe the pros and cons of each type of layout and how each is created and used in
SysManager.
Graphic layouts
The following are the pros and cons of Graphic layouts:
•
•
•
•
Can have graphic images (e.g., logos, photos, etc.)
Easy to create (use the Salesware Layout Designer)
Much slower than raw text
Cannot be printed to many types of specialized printers
Graphic layouts are created using the Salesware Layout Designer (SysManager > Activities > Edit Layouts or
SysManager > Activities > Create New Layouts). See the Salesware Memberships and Passes document for a
tutorial showing how to create a pass using a Graphic layout. A Graphic layout is created, saved and used as sets of
files, as described in the following table:
Graphic layout filename extension
Description
.FRX
Equivalent to a .dbf file. Seen when navigating from Salesware
Layout Designer. Holds graphic data.
4
Equivalent to a .fxp file.
.FRT
Graphic layouts for receipts, invoices, Z-Tape Reports and saved sales must be named according to the conventions
specified in the following table. Also, they must be saved in the Siriusware\Layouts\Graphic Layouts
directory (Graphic layouts without required names do not need to be saved in this directory.)
Layout type
Required filenames
40-column receipt
RECEIPT40.FRX, RECEIPT40.FRT
8.5” x 11” receipt
RECEIPT80.FRX, RECEIPT80.FRT
40-column invoice
INVOICE40.FRX, INVOICE40.FRT
8.5” x 11” invoice
INVOICE80.FRX, INVOICE80.FRT
40-column Z-Tape Report
ZTAPE40.FRX, ZTAPE40.FRT
40-column saved sale
SAVEDSALE40.FRX, SAVEDSALE40.FRT
8.5” x 11” saved sale
SAVEDSALE80.FRX, SAVEDSALE80.FRT
Confirmation layouts are Graphic layouts (used with the Salesware Reservations module) that are saved in a special
directory: Siriusware\Layouts\CONFIRMS. This is done for ease of selection by the Sales operator.
See the Salesware Memberships and Passes document for information on how to make a pass using a Graphic
layout.
Text Merge layouts
The following are the pros and cons of Text Merge layouts.
•
•
•
•
•
Fast
Flexible
Receipts can be different for each salespoint
Require custom coding of printer commands
Not graphically rich
Text Merge layouts and Shared Text Merge layouts are the most common forms of layouts. Text Merge layouts are
widely used for receipts, tickets and vouchers. Text Merge layouts can be output to a wide variety of specialized
printers. Most commonly, Ticket and Voucher layouts are used with Cognitive (known for many years as Barcode
Blaster) and Boca printers (see Printer commands for more information on creating layouts for Cognitive and Boca
printers). Star or Epson model printers are used for saved sale, remote and receipt printing. They are created as
.txt files using a text editor, and then are copied into a large text field in SysManager, where the text is used by
5
the printing application. The .txt file doesn’t need to be retained after the text has been pasted into the text field.
For Voucher and Ticket layouts, the layout is stored along with the item in the DCI that is to be printed.
If retained, Text Merge layouts are stored in Siriusware\Layouts. For more information on how layouts are
stored, see Appendix A: Packing and unpacking layouts.
Shared Text Merge layouts
The following are the pros and cons of Shared Text Merge layouts.
•
•
•
•
•
•
Fast
Flexible
Can be shared among items
Ticket/Voucher layouts only
Require custom coding of printer commands
Not graphically rich
Unlike Text Merge layouts, Shared Text Merge layouts are used only for tickets and vouchers. Like Text Merge
layouts, they too can be output to a wide variety of specialized printers. Most commonly they are used with
Cognitive and Boca printers (see Printer commands for more information on creating layouts for Cognitive and
Boca printers). They are also created as .txt files using a text editor, but are then shared by several printing
applications or items, so must be saved.
Shared Text Merge layouts are stored in Siriusware\Layouts. For more information on how layouts are
stored, see Appendix A: Packing and unpacking layouts.
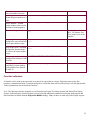
Layout applications
This section describes the layout applications that are used in Salesware. For some applications, you can use more
than one layout type. For others, you must use a specific layout type. The methods by which you associate a layout
with its printing application (using SysManager and Sales) are also described.
Specific layout applications
The following table lists and describes the layout applications used in Salesware and where the layout is associated
with its printing application from SysManager and Sales. See Associating layouts with their individual applications
for screen captures showing the interfaces in SysManager and Sales where these associations are made.
6
Layout
application
Where the layout is associated with its printing
application
Graphic? Text
Shared
Merge? Text
Merge?
Sales receipt
SysManager > Preferences > Miscellaneous (Text Merge
layouts)
Sales > Tools > Sales Pt Setup > Printing (Printing
Setup) > Page 2 tab (Text Merge layouts and Graphic
layouts)
Yes
Yes
No
Invoice
SysManager > Preferences > Miscellaneous (Text Merge
layouts)
Sales > Tools > Sales Pt Setup > Printing (Printing
Setup) > Page 2 tab (Text Merge layouts and Graphic
layouts)
Yes
Yes
No
Z-Tape Report
SysManager > Preferences > Miscellaneous (Text Merge
layouts)
Sales > Tools > Sales Pt Setup > Printing (Printing
Setup) > Page 2 tab (Text Merge layouts and Graphic
layouts)
Yes
Yes
No
Saved sales
SysManager > Preferences > Miscellaneous (Text Merge
layouts)
Sales > Tools > Sales Pt Setup > Printing (Printing
Setup) > Page 2 tab (Text Merge layouts and Graphic
layouts)
Yes
Yes
No
Tickets
SysManager > DCIs icon > Item Edit Form > Printing tab Yes
(Text Merge layouts, Shared Text Merge layouts and
Graphic layouts)
Yes
Yes
Vouchers
SysManager > DCIs icon > Item Edit Form > Printing tab Yes
(Text Merge layouts, Shared Text Merge layouts and
Graphic layouts)
Yes
Yes
Passes
SysManager > DCIs icon > Item Edit Form > Action tab
(choose the Create Pass from the dropdown) > Action
Specifics > Global Settings tab > Prefer field (Graphic
layouts only)
Yes
No
No
No
Yes
No
(print from
SysManager
only)
Note: This field is rarely used now because most clients print
passes through Sales and Sales allows you to prompt the
operator with a printer selection or specify a printer to
always use for passes.
Charge Cards
SysManager > Preferences > Miscellaneous (Text Merge
layouts only)
7
Remote
printing
receipt
SysManager > Preferences > Miscellaneous (Text Merge
layouts only)
No
Yes
No
Sales
summary
SysManager > Preferences > Miscellaneous (Text Merge
layouts only)
No
Yes
No
Associating layouts with their individual applications
This section presents screen captures showing where layouts are associated with their applications in SysManager
and Sales, as already described by the navigation descriptions in the previous table.
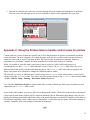
Tickets and Vouchers
Ticket and Voucher layouts can be whatever size you want based on ticket and voucher stock and your printer.
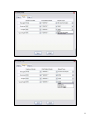
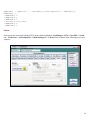
Tickets and Voucher layouts are associated with their DCIs from within SysManager: SysManager > DCIs > Item
Edit Form > Printing tab, as shown in the following screen capture:
8
Receipts, Invoices, Summaries, Charge Cards, saved Sales, Remote Receipts and Z-Tape Reports
Receipt layouts are either short or long. Short layouts print to a forty column printer. Long layouts print to standard
8.5” x 11” paper.
Text Merge layouts are associated with their applications for receipts, invoices, summaries, credit cards, saved
sales, remote receipts and Z-Tape Reports from SysManager > Preferences > Miscellaneous > Salespoint
Layouts tab, as shown in the following screen capture:
Graphic layouts and Text Merge layouts are associated with their applications for receipts, invoices, Z-Tape
Reports and saved sales from Sales > Tools > Sales Pt Setup > Printing (Printing Setup) > Page 2 tab, as
showing in the following four screen captures:
9
10
11
The SysManager > Preferences > Miscellaneous dialog (see screen capture, above, at the beginning of this
section) is also used for kitchen printing. Kitchen printing refers to the sending of information at save or finalize to
a receipt printer. The Remote tabs allow up to eight various Remote Receipt layouts to be configured. Thus, based
on what kitchen printer is being used, the layout can vary.
Example:
Remote printer #1 is used for the bar and remote printer #2 is used for the grill. Based on a bartender needing a
different layout than a cook, the Remote Receipt layouts for #1 and #2 are customized. The remote printer that is
used is associated with the DCI from SysManager: SysManager > DCIs icon > Item Edit Form > Printing tab >
Print Remote On check boxes. (See screen capture in the Tickets and vouchers section, above.) The actual printer
association for the remote configuration is made from Sales > Tools > Sales Pt Setup > Printing (Printing Setup)
> Page 3 tab, as showing in the following screen capture:
You can also override any layout specified on SysManager > Preferences > Miscellaneous. This allows you to
fully customize any salespoint. This functionality is useful if you want to customize a single salespoint using a
layout different from any of the resort-wide layout choices.
You have the option of overriding the resort-wide credit card, invoice, receipt and all eight remote layouts.
To implement this functionality, create a set of custom layouts and store them in a folder locally. Then, in the
Sales32c.INI file, specify the path to the new layouts folder:
1. In the [Data] section of the .INI file, the setting is LayoutPath=
12
•
Default is usually LayoutPath=C:\ProgramFiles\Siriusware\Sales\Layouts\
2. In [Layouts] section of the Sales32c.INI file, specify layout type (see following table) and layout
name:
Example:
Receipt=thermal40.txt
Note: The Sales32c.INI file is used to specify locally defined non-graphic layouts only. Use of local graphic
layouts is determined by the Printez.INI file locally, using a method similar to that described above.
Additionally, you have the option to set up Group Level layouts, as defined by the groups listed under SysManager
> Preferences > Misc> Global INI.
In order to take advantage of Group Level layouts, you must do the following:
1. Create appropriate Text layout for group level receipts (i.e., FBReceipt.txt, FBSavedSale.txt,
FBCCTop.txt, etc.).
2. Create a new item under a miscellaneous DCI (**MISC** Receipts FBReceipt )
Note: This item is to act as a vessel to transport the layouts you created to the appropriate salespoints in the
Group you add the layouts to.
•
•
•
•
On the Printing tab of the item, select Shared Text Merge under Ticket 1 and click on the ellipses
(…).
Select the layout you created, FBReceipt.txt for example.
Do the same for Ticket 2, Voucher 1 and Voucher 2 as needed.
Save the item.
3. Edit the appropriate item tree with which salespoint group(s) are associated. Add the new receipt DCI to the
item tree and inactivate the item.
4. Go to SysManager > Preferences > Misc > Global INI and locate the group under which to place the new
layouts.
5. Under the [Layouts] section of that group, add the appropriate receipt name:
Receipt=FBReceipt.txt
SavedSale=FBSavedSale.txt
Note: Make sure to remove the semicolon ( ; ) from in front of the [Layouts] section and in front of the
receipt type (i.e., Receipt=, SavedSale=). Only remove the semicolon in front of the receipt types
you are using.
13
6. Restart Sales and test your new layout.
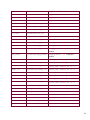
Layout type
Description
CCBottom=
Salespoint specific non-Graphic layout for the bottom CC Receipt
CCTop=
Salespoint specific non-Graphic layout for the top CC Receipt
Invoice=
Salespoint specific non-Graphic layout for Invoices
Receipt=
Salespoint specific non-Graphic layout for Receipts
Remote1All= Salespoint specific remote non-Graphic layout for remote layout #1 for ALL items
Remote1New= Salespoint specific remote non-Graphic layout for remote layout #1 for NEW items
Remote2All= Salespoint specific remote non-Graphic layout for remote layout #2 for ALL items
Remote2New= Salespoint specific remote non-Graphic layout for remote layout #2 for NEW items
Remote3All= Salespoint specific remote non-Graphic layout for remote layout #3 for ALL items
Remote3New= Salespoint specific remote non-Graphic layout for remote layout #3 for NEW items
Remote4All= Salespoint specific remote non-Graphic layout for remote layout #4 for ALL items
Remote4New= Salespoint specific remote non-Graphic layout for remote layout #4 for NEW items
Remote5All= Salespoint specific remote non-Graphic layout for remote layout #5 for ALL items
Remote5New= Salespoint specific remote non-Graphic layout for remote layout #5 for NEW items
Remote6All= Salespoint specific remote non-Graphic layout for remote layout #6 for ALL items
Remote6New= Salespoint specific remote non-Graphic layout for remote layout #6 for NEW items
Remote7All= Salespoint specific remote non-Graphic layout for remote layout #7 for ALL items
Remote7New= Salespoint specific remote non-Graphic layout for remote layout #7 for NEW items
Remote8All= Salespoint specific remote non-Graphic layout for remote layout #8 for ALL items
Remote8New= Salespoint specific remote non-Graphic layout for remote layout #8 for NEW items
Consolidating the Sales and CC Receipt
You can consolidate the Sales and CC Receipt using the following layout code. This is a modified Receipt layout,
and does not work if put within the CC_Top/CC_Bottom layout sections:
<|CENTER('Company Name',40)|>
<|CENTER('Company Address',40)|>
<|CENTER('City State Zip',40)|>
<|CENTER('Company Phone',40)|>
14
<|CENTER('Company Website Address',40)|>
<|NEWLINE()|>
<|CENTER('SALES RECEIPT',40)|>
<|CENTER(alltrim(sales_pt->descrip),40)|>
<|CENTER(alltrim(operator->first_name),40)|>
<|CENTER('Sale Number: '+IIF(sale_hdr->sale_no=sale_hdr>mastersale,ALLTRIM(STR(sale_hdr->mastersale,16,0)),ALLTRIM(STR(sale_hdr>sale_no))),40)|>
<|CENTER(DSTR2(sale_hdr->Date_time),40)|>
<|NEWLINE()|>
<|'Qty Item
Price
'|>
<|'
Special
Discount'|>
<|'----------------------------------------'|>
<|Details(IIF(Item="**TRANS**",'
Account Transaction
'+STR(extension,8,2),IIF(MODIFIER(),'
'+Items->descrip+'
'+STR(extension-tax_amount-tax_amt2+disc_amt,8,2),STR(quantity,3,0)+'
'+Items->descrip+' '+STR(extension-tax_amounttax_amt2+disc_amt,8,2)))+IIF(message=' ',alltrim('
'),NEWLINE()+'
'+message)+IIF(guest_no=0,ALLTRIM('
'),NEWLINE()+'
'+alltrim(guests->first_name)+' '+alltrim(guests>last_name))+IIF(disc_amt=0,NEWLINE()+ALLTRIM('
'),NEWLINE()+'
'+IIF(ALLTRIM(UPPER(special))="CUSTOM","Custom Special
",specials->descrip)+' '+STR(-1*disc_amt,8,2)+NEWLINE()))|>
<|JUSTRIGHT('---------------------------',40)|>
<|JUSTRIGHT('
Sub Total:'+STR(Utility->sale_sub,10,2),40)|>
<|JUSTRIGHT('
Tax:'+STR(Utility->sale_tax,10,2),40)|>
<|JUSTRIGHT('
Total:'+STR(Utility->sale_ext,10,2),40)|>
<|JUSTRIGHT('---------------------------',40)|>
<|JUSTRIGHT('
PAYMENTS:'+STR(Utility->amt_paid,10,2),40)|>
<|JUSTRIGHT('
BALANCE DUE:'+STR(Utility->bal_due,10,2),40)|>
<|JUSTRIGHT('---------------------------',40)|>
<|JUSTRIGHT(iif(Utility->sale_ext>0.00,'Payment Types and Amounts:',''),40)|>
<|JUSTRIGHT(iif(Utility->sale_ext>0.00,FOP(),''),40)|>
<|JUSTRIGHT(iif(sale_hdr->pmt_amt1>0.0000,alltrim(str(sale_hdr>pmt_amt1,8,2))+' ','')+iif(sale_hdr->pmt_amt2>0.0000,alltrim(str(sale_hdr>pmt_amt2,8,2))+' ','')+iif(sale_hdr->pmt_amt3>0.0000,alltrim(str(sale_hdr>pmt_amt3,8,2))+' ','')+iif(sale_hdr->pmt_amt4>0.0000,alltrim(str(sale_hdr>pmt_amt4,8,2)),''),40)|>
<|JUSTRIGHT('CHANGE DUE: '+iif(Utility->change>0.0000,'','')+alltrim(STR(Utility->change,8,2)),40)|>
<|NEWLINE()|>
<|CENTER('Thank You!',40)|>
<|NEWLINE()|>
<|iterate_over(cc_trans, sale_no, sale_hdr->sale_no, IIF(cc_trans>status=3,ALLTRIM('
'),'Card Number:
XXXXXXXXXXXX' + cc_trans->card_id + NEWLINE() + 'Card Type: ' + cc_trans>card_type + NEWLINE() + 'Amount: $' + ALLTRIM(STR(cc_trans->total,16,2)) +
15
NEWLINE() + 'Approval: ' + ALLTRIM(cc_trans->approval) + NEWLINE()),
NEWLINE())|>
<|NEWLINE()|>
<|NEWLINE()|>
<|NEWLINE()|>
<|Printers->cut_code|>
<|NEWLINE()|>
<|NEWLINE()|>
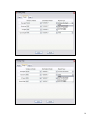
Passes
Pass layouts are associated with their DCIs from within SysManager: SysManager > DCIs > New/Edit > Action
tab > Create Pass > Action Specifics > Global Settings tab > Layout field, as shown in the following two screen
captures:
16
The common fields that are used in Pass layouts are listed in Common fields on graphic Pass layouts.
Purchase Order (PO) layouts (Retail module)
The Purchase Order (PO) creation capability in the Retail module can be configured to use a custom layout. The
layout must be named xinvent_receiver or xinvent_poform and must reside in the Layouts folder on
the server. xinvent_receiver is the purchase order creation/receiving layout and xinvent_poform is the
purchase order/print Purchase Order layout. When one or both of these layouts is stored in the Layouts folder,
SysManager prints PO forms using this external layout instead of the hard-coded one. This layout can be edited in
SysManager > Activities > Edit layouts.
Text layouts test tool
You can test Text layouts in Sales through a Test dialog. The Help section on the Layout Test Dialog provides
more details, but here are some notes on the use of the Test layout functionality:
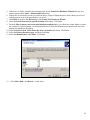
1. Press the Sales > Tools > Diagnostics > Test Layout button (or swipe %PPPP at the main dialog) to bring
up the Layout Test Dialog.
17
2. Click the Select layout to test... dropdown list to select any available Global layout. The layout appears.
Click Evaluate. The layout is rendered.
3. From the Select layout to test..., dropdown list, if Choose file... is selected, the user is able to browse and
open any Text layout to test after checking the appropriate box (Saved Sale, Ticket or Credit Card). The
default directory is the local Layouts folder.
4. The user can paste any Text layout onto the left pane of the Layout Test Dialog, check the appropriate box
(Saved Sale, Ticket or Credit Card) and click Evaluate to test it. Changes can be made to the layout and
the user can keep evaluating it until satisfied.
5. This dialog is designed for testing purposes only. The user must copy the final, corrected layout to another
text editor such as Notepad and save it as a new layout. You cannot save from this pane.
Diagnostic tool AnalyzeFRX
The diagnostic tool AnalyzeFRX was added. If set to YES in the .INI file, it looks at all the expressions in a
layout and evaluate them prior to printing to help isolate where the problems might be with a layout. Any errors
encountered are logged along with the expression. The current default is NO, but consideration for making it YES is
under way.
PrintEZ application now puts all errors received during a print job onto the clipboard for pasting into an email.
Now, remembering what was said on the gray error boxes is not critical.
The text in the gray error message boxes is not truncated at 254 characters to prevent errors. The Clipboard version
of the error is not truncated.
Layout functions and commands
Graphic layouts are designed using the Salesware Layout Designer. Text Merge layouts and Shared Text Merge
layouts are created using a text editor. In all cases, layout functions and commands are used when creating the
layout.
When designing a Graphic layout, the person creating the layout provides the functions that are executed at runtime
to perform operations such as populating the layout with data. In some cases, the person creating the layout starts
with a Graphic layout that already exists, so these functions may have already been added to the layout. See the
Salesware Memberships and Passes document for a tutorial showing how to create a Graphic layout for a pass.
When creating a Text Merge layout or a Shared Text Merge layout, the person creating the layout almost always
starts with a layout provided by accesso and modifies the layout according to the specific requirements of the
application. Many of the functions and commands used are already included in the layout provided. See Printer
commands for a description of how to code some of the more common commands used in Text Merge and Shared
Text Merge layouts.
Layouts are output to a variety of printers. Graphic layouts are output using standard Windows drivers provided by
the manufacturer of the printer. Text Merge layouts and Shared Text Merge layouts are printed using a “generic
text-only” Windows driver and output commands that are specific to the device and that must be coded by the
person creating the layout. In addition, even when using a Windows driver provided by the manufacturer, some
18
output device manufacturers require that certain custom strings be passed to the printer via special code used with
the driver (this is done with, for example, magnetic swipe injection devices).
In general, Graphic layouts work with most printers, while Text Merge layouts and Shared Text Merge layouts
work with specialized printers only and require considerable hand-coding.
See Sample layouts provided with Salesware for the layouts that are provided with Salesware and the printers with
which they work. See Supported specialized printers for a list of specialized printers supported by Salesware.
Layouts that already work with most of these devices are provided with Salesware.
Installing printers and drivers for use with layouts
This section describes how to connect printers to salespoints for use with layouts. In general, the only time you
need to use manufacturer-supplied drivers is when doing Graphic layouts. Most output devices use Text layouts so
you can use the generic driver provided by Microsoft. The same holds true for Boca ticket printers. With Cognitive
ticket printers and pass printers, you have to use the manufacturer-supplied drivers because these devices don’t use
Text layouts. In some cases clients have used the generic text-only drivers for Cognitive printers, but usually you
need to install the Cognitive drivers.
Note: When editing layouts in SysManager, you can use the Preferences > Miscellaneous > Manager tab > Save
Printer Info In Layouts After Editing check box to indicate the layout is not cleaned of printer-specific
information after editing. This check box is only selected checked if you are sure you are using the exact same
printer make/model in the field as you are using at design time. The SysManager > Activities > Remove Printer
Info From Layout selection is used to manually remove printer specific information from a selected layout if you
are using the Save Printer Info In Layouts After Editing option.
Connecting printers to salespoints
Printers are connected to salespoints in one of three ways: over a network, by a direct serial connection (USB,
FireWire, etc.) or by a direct parallel connection. When connected over a network, the driver is installed on the
computer that is used to connect the device to the network and on the computer (salespoint) that is outputting to the
device. When the device is connected directly to the computer (salespoint) that is outputting to the device, the
driver is installed only on the computer (salespoint).
Note: In some cases the device is “network ready,” which means that it connects directly to the network without the
need for an intermediary computer. In these cases the driver is installed only on the computer (salespoint) accessing
the device over the network.
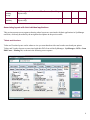
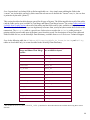
Types of drivers for use with Salesware
There are three types of drivers used with the printers that are used with Salesware:
19
•
•
•
Generic/text-only
Manufacturer-supplied text drivers
Manufacturer-supplied graphics drivers
If you are using a Text layout, you output to a printer using either the generic/text-only driver or the manufacturersupplied text driver. It is easier to install the manufacturer-supplied text driver, but your device does not operate as
fast as it does with the generic/text-only driver. With Salesware, in almost all cases of Text Merge and Shared Text
Merge layouts, you want to use the generic/text-only driver. When you use the generic/text-only driver, you have
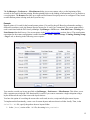
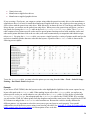
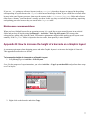
the option of accessing the Printers table in the local Siriusware\Sales\Data folder. The Printers
table contains a list of printer-specific codes used for special printer functions such as bold, underline, italics and
other useful printer functions such as the cut code (code used to automatically cut output into individual receipts,
tickets, etc.). By using the Printers table, you can use a single layout for a variety of printer models and you do
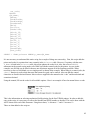
not have to manually put the character codes into the layouts. A portion of the Printers table is shown in the
following screen capture:
To use the Printers table, you must select the printer you are using from the Sales > Tools > Sales Pt Setup >
Printing > Dot Matrix Printer dropdown.
Example:
If you choose STAR TSP400, then the layout uses the codes highlighted in light blue in the screen capture for any
layout calls made to the Printers table. When making layout calls to the Printers table, you replace any
printer-specific codes you would otherwise use with calls to the Printers table. So if the layout is coded with
Printers->doublewide, the salespoint pulls the doublewide code for the STAR TSP400. If by accident
you selected the STAR 40 Column printer from the dropdown and used the same layout, Sales would use the STAR
40 Column row and grab the doublewide code from that row. Because the codes are usually different for
different printers, it is important to select the correct one to get your layout to work properly. You can add
additional devices if the device you are using is not listed in your table. See Appendix C: Using the Printers table to
handle control codes for receipt printers for a description of how to do this.
20
1. Manufacturer-supplied drivers are installed and used like any other Windows driver provided by the
manufacturer of the device.
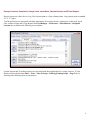
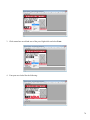
Associating the driver and printer with your layout
1. As already described in Specific layout applications, you must associate a layout with one of the specific
applications listed on the Page 1, Page 2 or Page 3 tabs available from Sales > Tools > Sales Pt Setup >
Printing. The Page 1 tab is shown in the following screen capture.
To associate the layout/application with an output device, select the output device from the Windows Printer
dropdown. If you are using a manufacturer-supplied text or graphics driver, then you also need to select
**GENERIC** from the Dot Matrix Printer dropdown. If you are using a generic/text-only driver, then select
Generic/Text Only from the Windows Printer dropdown and select your particular output device from the Dot
Matrix Printer dropdown, as described previously. If your particular device is not listed under the Dot Matrix
Printer dropdown, you can experiment to see whether any similar devices that are listed work or you can add the
new device. You can also simply select **GENERIC** from the Dot Matrix Printer dropdown instead.
**GENERIC** is simply an entry with no codes at all. See Appendix C: Using the Printers table to handle control
codes for receipt printers for more information.
21
Note: The label Dot Matrix Printer is retained from older versions of Salesware. Other types of printers are now
supported by the Printers table as well.
Note: When utilizing Kiosks, it is by design that tendrretail .dll require a printer to be set whether named
None or HP LaserJet 1020 as in the previous example. Even is no Credit Card receipt is to be printed the printer
must still be set to None. If the printer line is left blank, the following error message occurs, “Printer Error” and the
transaction may be cancelled.
How to install a printer and driver
To install a printer, simply connect it to the network or attach it directly to a salespoint using a serial or parallel port
(depending on the interface(s) available for the printer).
To install a driver, go to Start > Printers and Faxes. Click the Add Printer wizard. Select whether the device is
connected locally or over a network. If it is connected over a network, navigate to the device and select it. If the
device is connected directly to the computer (salespoint), select the port to which it is connected. However, the
majority of printer installs for Salesware are done by plugging in the hardware, and then installing the generic
driver using the Found New Hardware Wizard that automatically pops up. The exception to this is setting up the
CASHDRAWER printer (which is used only to pop the cash drawer); the CASHDRAWER printer is a virtual
printer with no detectable hardware. The CASHDRAWER printer can be connected to a receipt printer or directly
to the salespoint. For more information on the configuration options for the CASHDRAWER printer, see the
documentation for the ports.INI file in the Salesware .INI Settings Reference document and the Sales > Tools >
Sales Pt Setup > Cashdrawers button.
If you are using drivers from the manufacturer, be sure to consult your owner’s manual, because many printers
require a very specific order of installation to get the printer to work at all. For example, many USB printers require
running the install disk with the cord unplugged; you are prompted to plug in the cord at a specific time during the
install or the install fails.
The printer name is important; accesso requests that when printers are installed they are name appropriately for
their functions.
Example:
When installing a ticket printer, rename it to TICKET; when installing a receipt printer, name it RECEIPT; pass
printer, PASS and so on. This way, when you define the printer in the Sales interface it makes sense. Also, there are
many times when more than one Generic/Text Only printer is installed and you cannot have two printers with the
same name.
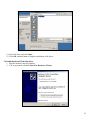
To install a manufacturer-supplied driver:
1. Plug the hardware into the computer.
2. You are presented with the Found New Hardware Wizard.
22
3. If you are installing a manufacturer-supplied driver, first try selecting the Install the software
automatically radio button and click Next.
4. You are presented with a dialog that indicates Windows is searching for the driver for the new hardware.
23
5. If the driver is found, complete the remaining steps for the Found New Hardware Wizard and your new
printer appears on the Start > Printers and Faxes dialog.
6. If the driver is not found, you have to select the driver yourself. Obtain the driver from a disk you received
with the printer or go to the manufacturer’s web site.
7. Click Back to return to the Main dialog of the Found New Hardware Wizard.
8. Select the Install from a list or specific location radio button. Click Next.
9. From the Please choose your search and installation options dialog, you direct the wizard where to search
for your driver. In this example, we downloaded the driver from the manufacturer's Internet web site to the
desktop for installation from there.
10. Select the Don't search. I will choose the driver to install radio button. Click Next.
11. Select the Printers hardware type, and then click Next.
12. Select the Manufacturer and Printer. Click Next.
13.
Select Have Disk... and Browse... to the driver.
24
14. Select the driver and click Open.
15. Click OK, and then Next to complete installation of the driver.
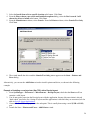
To install the Generic/Text Only driver:
1. Plug the hardware into the computer.
2. You are presented with the Found New Hardware Wizard.
25
3. Select the Install from a list or specific location radio button. Click Next.
4. From the Please choose your search and installation options dialog, select the Don't search. I will
choose the driver to install radio button. Click Next.
5. From the Manufacturer column, select Generic. From the Printers column, select Generic/Text Only.
Click Next.
6. The wizard installs the driver and the Generic/Text Only printer appears on the Start > Printers and
Faxes dialog.
Alternatively, you can use the Add Printer wizard to install a printer and driver, as shown in the following
example.
Example of installing a receipt printer (Star TSP) with a Receipt layout:
1. From SysManager > Preferences > Miscellaneous > Receipt Layout, check that the Short scroll box
contains a valid layout.
2. You do not need to associate the Receipt layout with the application, because this association is already
“hard-coded” into Sales (for a listing of layouts and the applications with which they are associated, see the
table in Specific layout applications).
3. Connect the Star TSP receipt printer to the salespoint. This is usually done using a serial (USB or COM)
port.
4. Launch the Start > Printers and Faxes > Add Printer wizard.
26
5. Select Local printer attached to this computer. Click Next.
6. Select the port (probably COM1). Click Next.
7. Select Generic from the Manufacturer dropdown. Click Next.
8. Retain the Generic/Text Only name under Printer name:. Click Next.
9. Finish the wizard, selecting configuration options as appropriate for your environment.
10. Go to the Sales > Tools > Sales Pt Setup > Printing > Page 2 tab.
11. From the Windows Printer dropdown, select Generic/Text Only.
12. From the Dot Matrix Printer dropdown, select the Star TSP model that you installed.
13. From the Report dropdown, select 40 Column Non-Graphic.
Make a sale and see if the device works. If it does not print, check whether a print job was sent to the device by
going to Start > Printers and Faxes. If no print job was sent (there is nothing in the queue for that device), then
there was a problem when you associated the device with the application from Sales > Tools > Sales Pt Setup >
Printing. If there is a print job in the queue but there was an error, then there is a problem with the device you
selected from the Dot Matrix Printer dropdown or the device was not installed properly to start with.
Note: If receipt printing is not enabled, a receipt does not print. Receipt printing of items can be enabled in two
different places. It can be enabled on an item-by-item basis from the SysManager > Activities > DCIs > New/Edit
> Printing tab > Print On Receipt button. Or you can set the salespoint to print a copy of the receipt for every sale
from Sales > Tools > Sales Pt Setup > Miscellaneous > Print Receipt. You can also press the Reprint button in
Sales to print a receipt on demand.
Edit Layout Printer Option missing in Windows 7
The Page Setup dialog is a printer related dialog provided by the Windows operating system, not our applications.
The removal of the Printers button in Windows Vista and newer operating systems was performed by Microsoft
for various internal reasons, mostly regarding security and memory stability. Unfortunately, accesso, cannot add
this button to a Windows System dialog, but there is a workaround that does not require shutting down
SysManager and changing the default printer.
When editing the layout, perform these steps:
1. On the menu bar, select Report > Run Report...
2. Highlight the printer you wish to use and click the Apply button followed by the Cancel button.
3. Select File > Page Setup. The selected printer will now be active on the Page Setup dialog.
Functions and commands
There are three types of functions and commands used to create layouts: printer commands, a Salesware-specific
subset of Visual FoxPro (VFP) functions and custom Salesware functions. These three types of functions and
commands are described in the following sections.
27
Printer commands
Printer commands are commands that are used to control your output device – they are unique to the printer for
which the layout is designed. In general, they are used only with Text Merge layouts and Shared Text Merge
layouts, because Graphic layouts are generally output to printers that use standard Windows drivers.
A printer command can determine the font, size, style or position in which the text is printed. Currently, layouts
can be printed using the Cognitive printer, the Boca printer, several laser jet printers and several dot matrix printers.
Each of these printers recognizes different printer commands and some do not require commands at all. For specific
information about the commands supported by your output device, see Printer commands and the manufacturer’s
documentation.
Salesware-specific Visual FoxPro (VFP) functions for Graphic layouts
Salesware uses a subset of Microsoft’s Visual FoxPro functions. See Function reference for information about these
functions.
Custom Salesware layout functions
Custom Salesware layout functions are provided with the Salesware product. See Function reference for
information about these functions.
Supported specialized printers
In addition to a wide range of standard printers that run under manufacturer-supplied Windows drivers, Salesware
supports a variety of specialized printers. For a complete listing of hardware supported by accesso, see the
Hardware Compatibility List document.
Reference
Sample layouts provided with Salesware
accesso maintains a set of layouts for client use. These are available for download from the accesso Siriusware
Information Portal (Downloads menu > Layouts). The following table lists some of the layouts you can find here:
Layout description
Type of layout
Account invoices
Text
Cognitive tickets
Text
28
Boca tickets
Text
Credit card receipts
Text
ID cards
Graphic
Kitchen receipts
Text
Mailing labels
Graphic
Passes
Graphic
Rental equipment labels
Graphic
Rental forms
Graphic
Retail labels for matrix items
Graphic
Retail labels for tracking items
Graphic
Sales receipts
Text
Sales summaries
Text
Saved sales receipts
Text
Vouchers
Text
Z tape Reports
Text
Account Summary Report
Graphic
Inventory Receiver Report
Graphic
Purchase order form
Graphic
Confirmation letter
Graphic
Account invoices, 40 columns
Graphic
Account invoices, 80 columns
Graphic
Sales receipt, 40 columns
Graphic
Sales receipt, 80 columns
Graphic
Saved sales receipt, 40 columns
Graphic
Saved sales receipt, 80 columns
Graphic
Tickets
Graphic
Rental contract with modifiers
Graphic
In addition, over the course of the last several releases of Salesware, a variety of layouts have been distributed and
there are also many pre-supplied layouts that can be obtained through the accesso Siriusware Information Portal
under Downloads > Layouts.
29
Printer commands
Printer commands are commands that are used primarily from Text Merge and Shared Text Merge layouts to
control your printer – they are unique to the printer for which the layout is designed. A printer command can
determine the font, size, style or position in which the text is printed. Layouts can be printed using the Cognitive
printer (referred to for many years as the Barcode Blaster printer, based on early models), the Boca printer, several
laser jet printers and several dot matrix printers (see Supported specialized printers). Each of these printers
recognizes different printer commands and some do not require commands at all. For a complete listing of printers
supported by accesso, see the Hardware Compatibility List (HCL) document.
Cognitive printer commands
This section describes the basic commands needed to design a printer layout for the Cognitive printer. This printer
has traditionally been called, somewhat generically, the Barcode Blaster printer and is still sometimes referred to
that way, regardless of which Cognitive model you are using. To design more complex layouts, please refer to the
User’s Guide that was included with the purchase of your Cognitive printer.
Header line
The header line is the first line in a Cognitive layout. Here is an example:
! 0 100 1050 1
Every Cognitive Header line used in Sales begins with an exclamation point (!), which tells the Cognitive that it is
about to print in ASCII mode.
The 0 indicates to the Cognitive the starting position for printing. In this case and almost every other case, the
starting position is 0.
The next parameter, 100, is always 100.
The next parameter, 1050, indicates how many printable rows exist on the ticket stock. In this case, the total
number of rows in this Cognitive layout has to be less than or equal to 1050. If there are more than 1050 rows, the
Cognitive skips to the next ticket to attempt to print that row. If the ticket stock is physically shorter than 1050
rows, the Cognitive may skip to the next label.
The next parameter, 1, indicates how many tickets are printed. In this case, only one ticket is printed. This entry
could also contain an expression, for example:
<|TICKETQTY(tmp_qty)|>
Which prints one or more tickets or vouchers depending on the quantity sold on a particular invoice line item
(TICKETQTY () is a custom function written specifically for this purpose).
30
Text justification for Cognitive layouts
•
•
•
To print centered text, type JUSTIFY CENTER on the line preceding the line that contains the text to be
centered.
To print left-justified text, type JUSTIFY LEFT on the line preceding the line that contains the text to be
left-justified.
To print right-justified text, type JUSTIFY RIGHT on the line preceding the line that contains the text to
be right-justified.
Font styles and sizes
UltraFonts
Most ticket designers use UltraFonts to design their Cognitive layouts for Sales. An example of an UltraFont code
is:
U A20
This code is described in the following table.
Parameter
Specifies
U
Ultrafonts
A
Font style
Options
Syntax
A - rounded corners
Must be uppercase
B - angled corners
C - bolded horizontal
strokes
20
Font size
1 to 65535
No spaces between the font
style and the font size
TextFonts
Occasionally TextFonts are used when creating Cognitive Printer layouts. By utilizing TEXT 1, 2 and 3 font sizes
with the values in parenthesis you can create Ticket layouts in this fashion. An example of TextFont code is:
TEXT 3 (1,0,1,1).
•
•
•
The first character determines the spacing between characters
The second controls the font’s clockwise rotation
The third controls a font’s horizontal width
31
•
The fourth controls a font’s vertical height
Parameter
Options
Additional Details
Spacing
0-255
If a negative sign is placed before a
designated spacing number, the font is
non-proportional and this value sets the
character width.
Rotation
0,90,180,270
Default = 0
Width
Must be used when establishing a Height
value
0-4
Default = 1
Height
0-4
Default = 1
Boldness, spacing and rotation
Level of boldness, spacing and rotation of text can be specified when using Ultrafonts with the following syntax:
U A100(boldness, spacing, rotation)
This code is described in the following table.
Parameter
Options
Default
Use
boldness
1 to 255
2
Indicates the boldness of the printed
character in dots
spacing
0 to 10
1
Indicates number of dot columns between
characters
0
Indicates the degree of clockwise rotation
of the printed character string
N causes characters
to be spaced
disproportionately
rotation
0, 90, 180 or 270
Columns and rows
The following syntax demonstrates the use of columns and rows:
32
U A20 (2, 4, 0) 100 10
According to this line of code, the Cognitive prints text in the hundredth column on the tenth row. Pay special
attention to the rotation entry when specifying the column and row. If a line is specified to rotate 180 degrees or
2670 degrees, the columns and rows start from high to low (900 to 0 and 1050 to 0). If a line is specified to rotate
0 degrees or 90 degrees, the columns and rows start from low to high (0 to 900 and 0 to 1050).
U B40 (2, 4, 180) 800 1000
Using the preceding code, the Cognitive prints text at 180 degrees (upside down) starting in the 800th column on
the 1000th row. This example is useful when the ticket stock comes out of the Cognitive bottom first.
Printing text
To print text using Cognitive commands, type the font style, font size, boldness, character spacing, rotation,
column, row, a space, the beginning delimiter, the VFP expression(s), custom function(s), field(s) and/or literal
string(s), followed by an ending delimiter, as in the example below.
U B40 (2, 4, 0) 100 10 <| alltrim(tmp_oper)+' '+dtoc(date())+' '+alltrim(FOP())+
' '+alltrim(str(tmp_ext/tmp_qty,9,2))|>
The Cognitive prints the end result of the VFP expression, custom function and table fields using the specified
printer commands.
Printing barcodes
All Salesware components use the Code39 or Code128 barcode font. These fonts are installed as part of the
Common Files installation (see the Salesware Installation Guide for more information). Therefore, when designing
tickets that contain a barcode you must print the barcode using either the Code39 or Code128 barcode font. The 128
barcode font encrypts the data, thereby reducing the size of the printed barcode and making the barcode more
readable for larger numbers.
The following line of code prints a Code39 barcode rotated 90 degrees on a Cognitive:
BR code39(2:6)- 705 640 100 <|if(empty(tmp_edate),'*AXX','*A'+
encrypt_date(tmp_edate)) +encrypt_number(tmp_access)+alltrim("*")|>
The following code prints a Code39 barcode with no rotation on a Cognitive:
B Code39(2:6)- 235 400 95
33
<<|if(empty(tmp_edate),'*AXX','*A'+encrypt_date(tmp_edate))+encrypt_number(tm
p_access)+alltrim("*")|>
The following line of code prints a non-rotated Code128 barcode on a Cognitive:
B code128(2:4) 350 500 70 <| if(empty(tmp_edate),'*AXX','*A'+
encrypt_date(tmp_edate)) +encrypt_number(tmp_access)+alltrim("*")|>
Because the above barcode commands do not print subtext, it is necessary to print the following subtext line to
indicate what characters are contained in the barcode:
U B25 (2,1,90) 675 750 <|'A'+alltrim(str(tmp_access,20,0))|>
Note: The 90 in the (2,1,90) is signifying 90 degrees of rotation. For the non-rotation barcodes, this value
must be set to 0.
The END command
Every Cognitive layout must have an END command at the conclusion of the layout. END is on a separate line at
the end of the Cognitive layout and must be followed by a new line character (carriage return). To place a new line
character after END, simply press the Return or Enter key on the keyboard. If END is not at the end of the
Cognitive layout, the tickets or vouchers do not print. If the END command is not followed by a new line character,
the tickets or vouchers print every other time.
Boca printer commands
Boca printers use a language called FGL (Friendly Ghost Language). All Boca printer commands that are written
for printer layouts must be enclosed in the VFP command alltrim(). In the following example, alltrim()
contains all of the Boca printer commands.
<|alltrim("<RR><RC45,1075><F6><HW1,1>")+ DAILYCODE(ctod(tmp_date))|>
Text rotation
The Boca printer can rotate text 0, 90, 180 or 270 degrees. The commands listed in the following table rotate the
text by the degrees indicated. (See the previous line of code for the placement of the text rotation command.)
<NR>
Rotates text 0 degrees
34
<RR>
Rotates text 90 degrees
<RU>
Rotates text 180 degrees
<RL>
Rotates text 270 degrees
Rows and columns
The following example indicates to the Boca printer to print on row 100 in column 50:
<RC100,50>
Font styles
The following font styles can be used with the Boca printer:
Font
Style
Description
<F1>
A self-styled font containing most of the normal ASCII characters. It also
includes the German character set and the British pound symbol. It is not
recommended for use on 200 dpi printers.
<F2>
A self-styled font containing most of the normal ASCII characters. It also
includes the German character set and the British pound symbol.
<F3>
An OCRA-styled font containing most of the normal ASCII characters. It
also includes the German character set and the British pound symbol.
<F4>
An OCRA-styled font containing most of the extended non-rotated
character set (no extended graphics characters). It does not include
lowercase letters in either rotation or the OCRA special character set. It is
not recommended for use on 200 dpi printers.
<F5>
A self-styled font containing most of the normal ASCII characters. This
font is not recommended for general use.
<F6>
An OCRA-styled font containing most of the normal ASCII characters. It
also contains Boca’s condensed German and British character sets.
<F7>
A full OCRA-font when printed on a 200 dpi printer.
<F8>
This font is the same as <F13> except for a smaller box size. This is the
default font size for 8.5-inch wide printers to allow them to easily interface
with most word processing programs.
<F9>
An OCRA-styled font containing Boca’s condensed German and British
character sets.
35
<F10>
A bold Prestige font containing Boca’s condensed German and British
character sets.
<F11>
A script font.
<F12>
An Orator font for tall, bold lettering.
<F13>
A Courier style international character set (223 characters)
Font height and width
To specify the height and width of a font (boldness), use the following command:
<HW1,1>
Increasing or decreasing the numbers controls the height and boldness of the font. Once the height and width have
been changed from normal, a <HW1,1> must be coded for the font to return to the normal size.
Note: Be careful not to build characters into the characters below them by increasing the height too far.
Printing text
To print text using Boca printer commands, simply type the beginning delimiter, the VFP command alltrim(),
followed by an open parenthesis, a double quote, the font rotation, row and column, font style, character height and
width, a closing double quote, a closing parenthesis, a plus symbol (+), the VFP expression(s), custom function(s),
table field(s) and/or literal string(s), followed by an ending delimiter.
Example:
<|alltrim("<RR><RC45,1075><F6><HW1,1>") + DAILYCODE (ctod(tmp_date))|>
The Boca printer prints the end result of the VFP expression, custom function and table fields using the specified
printer commands.
Printing barcodes
All Salesware components either use the Code39 barcode font or the Code128 barcode font. Therefore, when
designing tickets that contain a barcode, you must print the barcode using one of these two barcode fonts.
Here is an example of a line of code that prints a ladder barcode using Code39 barcode on the Boca printer:
36
<|alltrim("<RC50,575><X2><NXL12>")+if(empty(tmp_edate),'*AXX','*A'
+encrypt_date(tmp_edate))+encrypt_number(tmp_access)+alltrim("*")|>
All Code39 data must be bracketed by asterisks (*) on both sides, as shown. Because the example barcode
command does not print subtext, it is necessary to print the following subtext line to indicate what characters are
contained in the barcode:
<|alltrim("<RR><RC150,475><F1><HW3,2>")+'A'+alltrim(str(tmp_access))|>
The following is an example of how to print a picket fence barcode using Code39 barcode on the Boca printer:
<|alltrim("<RC50,575><X2><NXP12>")+if(empty(tmp_edate),'*AXX','*A'+encrypt_da
te(tmp_edate))+encrypt_number(tmp_access)+alltrim("*")|>
Code128 is an alphanumeric bar code. All Code128 data must be bracketed by carets (^). The letter O is used to
select Code128 barcode. A typical ladder Code128 barcode would be sent as follows:
<|alltrim("<RC0,70><X2><OL3>")+if(empty(tmp_edate),'^AXX','^A'+encrypt_date(t
mp_edate))+encrypt_number(tmp_access)+alltrim("^")|>
This would result in a 3-unit wide bar code starting on row 0, column 70. No interpretation is printed.
A typical expanded picket fence Code128 would be as follows:
<|alltrim("<RC0,10><X2><OP5><BI>")+if(empty(tmp_edate),'^AXX','^A'+encrypt_da
te(tmp_edate))+encrypt_number(tmp_access)+alltrim("^")|>
This code starts at row 0, column 10. The interpretation is included. The <BI> in the Boca printer command is
what causes the interpretation or subtext to print.
Specifying the end of a Boca printer layout
The following line specifies the end of a Boca printer layout. If this line does not exist at the end of a Boca printer
layout the ticket or voucher does not print.
<|alltrim(“<p>”)|>
37
Dot matrix printer layouts
All dot matrix printer layouts use the custom function show() to specify font style and size, line size, text
justification and text to be printed. Every show() command indicates a new row in a layout. For more information
on the show() command, see Ticket layout functions. show() uses seven parameters to set characteristics for
the text to be displayed.
Example:
<|show('doublehigh','doublewide','italics','bold','left','20',DAILYCODE(ctod(tmp_date))|>
This generates the valid daily code using text that is twice normal height, italicized, bold and left justified.
Note: that some parameters are not defined; empty single quotes are used as placeholders so that show() receives
the parameters it is looking for in the correct places. The <| and |> are required.
A blank line is generated by including an empty show():
<|show('','','','','','','40')|>
The following line prints the operator’s name in regular type on a twenty character ticket:
<|show('','','','','centered','20',alltrim(tmp_oper))|>
The following line prints the literal string, “Big Fish”:
<|show('bold','','','','centered','40','Big Fish')|>
More than one table field or literal string can be printed on one line. Add the text together with the plus sign (+),
making sure all fields have been converted to character fields. The following prints the location and price rightjustified with titles in condensed type on a forty character ticket:
<|show('condensed','','','','right','40',alltrim(str(extension/quantity,9,2) +
alltrim(tmp_loc)|>
38
Sample ticket Printer layouts
In the following sample Text Merge layouts for tickets, notice that all VFP and Salesware functions are
delimited by <| and |>.
Cognitive printer Ticket layout
! 0 100 1050 <|TICKETQTY(tmp_qty)|>
JUSTIFY CENTER
U C25 (4,5,0) 500 10 <|DAILYCODE(ctod(tmp_date))|>
U C80 (3,5,0) 500 75 <|upper(substr(CMONTH(ctod(tmp_date)),1,3))
+' '+alltrim(str(day(ctod(tmp_date)),3,0))
+' '+substr(alltrim(str(year(ctod(tmp_date)),4,0)),3,2)|>
U C40 (6,5,0) 500 190 <|alltrim(tmp_dept)+'/'+alltrim(tmp_Item)|>
U A25 (2,5,0) 500 235 <|IF(EMPTY(tmp_spct), ' ', alltrim(tmp_spct))|>
U A25 (2,5,0) 500 326 <|time()+' '+alltrim(tmp_spct)+' '+alltrim(str(tmp_disc,9,2))|>
U A25 (2,5,0) 500 352 <|alltrim(tmp_oper)+' '+dtoc(date())+' '+alltrim(FOP())
+' '+alltrim(str(tmp_ext/tmp_qty,9,2))|>
BT 18X23 (0,5)
BR code39(3:7) 710 500 70 <|if(empty(tmp_date),'*A'+'XX',
'*A'+encrypt_date(tmp_date))+encrypt_number(tmp_access)+'*'|>
END
Boca printer Ticket layout
<|alltrim("<RR><RC45,1075><F6><HW1,1>")+ DAILYCODE(ctod(tmp_date))|>
<|alltrim("<RR><RC50,1020><F3><HW1,1>")+ upper(substr(CMONTH(ctod(tmp_date)),1,3))+'
'+alltrim(str(day(ctod(tmp_date)),3,0))+'
'+substr(alltrim(str(year(ctod(tmp_date)),4,0)),3,2)|>
<|alltrim("<RR><RC50,980><F3><HW1,1>")+ alltrim(tmp_dept)+'/'+alltrim(tmp_Item))|>
<|alltrim("<RR><RC50,925><F3><HW1,1>")+time()+'
'+alltrim(tmp_spct)+'/'+alltrim(str(tmp_disc,9,2))|>
<|alltrim("<RR><RC50,830><F3><HW1,1>")+ alltrim(tmp_oper)+' '+dtoc(date())+'
'+alltrim(FOP())+' '+alltrim(str(tmp_ext/tmp_qty,9,2))|>
<|alltrim("<RC50,575><X2><NXL12>")+if(empty(tmp_edate),'*AXX','*A'
+encrypt_date(tmp_edate))+encrypt_number(tmp_access)+alltrim("*")|>
<|alltrim("<RR><RC150,475><F1><HW3,2>")+'A'+alltrim(str(tmp_access))|>
<|alltrim("<p>")|>
Tables and fields available for use from layouts
Layouts can reference any field in any table in the local data, but the data that is fetched is valid only if Sales has
“synced” to the table. Syncing means that Sales sets the table “pointer” to the relevant row; all fields in the row are
then available to the layout.
39
Note: Layouts don’t use lookup fields to find an applicable row – they simply start grabbing the fields in the
“current” row in the table; syncing by Sales causes the relevant row to become the “current” row (i.e., the row that
is pointed to by the table “pointer”).
This section describes the tables that get synced for all types of layouts. The following table shows all of the tables
(and the fields used to sync) available to Text Merge and Shared Text Merge layouts. The section Tables and fields
available from Graphic layouts shows all of the tables (and the fields used to sync) available to Graphic layouts.
The tables listed are all those that you can legitimately reference from your layout (that contain data relevant to the
transaction). The Printing table is a special case: Sales writes a record to the Printing table previous to
printing and the layout fetches most of the data it uses from this record. For descriptions of most of the tables and
fields available for use, see the SiriusSQL Data Dictionary, available from accesso Siriusware Technical Support.
Note: In the following table, the AllAdres, AllTrans, BookInfo, Cc_Trans, Printing and Utility
tables are local tables only, so are not described in the SiriusSQL Data Dictionary.
Local table available to Text
Merge and Shared Text Merge
layouts 1
Field used by Sales to “sync” to
row available to layout
Accounts
acct_name
AllAdres
guest_no
AllTrans
sale_no
BookInfo
sale_no
Cc_Trans
sale_no
Invoices
invoice_no
Operator
op_code
Printers
p_name
Printing
sale_no
Resrvatn
reserv_no
Sale_hdr
sale_no
Sh_info
sale_no
Sh_save
sale_no
Shs_info
sale_no
Tr_info
sale_no
Also see the DETAILS() and ITERATE_OVER()functions for other tables that become available when using those custom
functions.
1
40
Trs_info
sale_no
Utility
sale_no
Tables and fields available from Graphic layouts
For Graphic layouts, the tables available for printing are dependent on the type of printing being done. This
document covers Graphic layouts that are processed by PrintEZ application:
• Tickets and vouchers
• Receipts and invoices
• Saved sales
• Z-tapes
• Tee sheets
• Confirmation letters
In every type of printing, PrintEZ application first opens up every .dbf file in the Sales local Data folder.
Thus, all tables in the folder can be referenced. However, not all of these tables are synched to the data you are
printing. In some cases, the un-synched tables have their record pointers set to the first record in the table,
sometimes to an empty record.
The following sections comprehensively reveal the synch status of each table and how it is linked to what you are
printing.
Graphic Ticket and Voucher layouts
All tables in the local Data folder are open and may be referenced, but they may not be synched. Ticket and
Voucher layouts use a table named csrTrans to print from. This table is created for each print job and is left on
disk after the print job is complete. It is created in the Sales\Data folder. You can close Sales and investigate
the contents of this file using Helper utility. Tickets and vouchers are printed from Sales by passing the transaction
number. The following tables are synched:
Tables synched during normal printing (not using the pass reprint or IDCard feature)
Table
Sync field
Notes
access
printing.tmp_passno
If tmp_passno
product
accomdtn
resrvatn.accommodat
If transact.reserv_no <> 0
accounts
sale_hdr.acct_name
If transact.invoice_no <> 0
alladres
csrSaleTrans.guest_no_a
baselodg
resrvatn.base_lodge
<> 0 and it’s an access
If transact.reserv_no <> 0
41
bookinfo
cc_trans
transact.trans_no and
guests.guest_no
transact.sale_no
csrResDWCards N/A
csrResGuest
guests.guest_no
csrSaleGuest
csrTrans.guest_no
csrSaleHdr
transact.sale_no
csrTrans
transact.trans_no
Single record table
Primary table for printing.
csrTransGuest transact.trans_no
dailycod
today's month/day
defaults
N/A
gst_book
guests.guest_no
gst_pass
printing.tmp_passno
gst_rent
guests.guest_no
guests
printing.tmp_gstno
invoices
transact.invoice_no
items
transact.DCI
mktgcode
resrvatn.mktg_code
operator
transact.op_code
passinfo
printing.tmp_gstno
pkup_loc
resrvatn.pickup_loc
If transact.reserv_no <> 0
prefs
N/A
Single record table
prefs_bk
N/A
Single record table
printing
printing.tmp_formno
This field holds the rental contract number
generated when FormIsTrans=TRUE is set in the
Sales32c.INI file.
Single record table
If transact.invoice_no <> 0
If transact.reserv_no <> 0
Note: The rentinfo.form_no field can also be
used on Graphic layouts:
alltrim(str(rentinfo.form_no,16,0))
rentinfo
resrvatn
transact.trans_no and
guests.guest_no
sale_hdr.reserv_no
sale_hdr
transact.sale_no
42
Single record table
sales_pt
N/A
sh_save
transact.sale_no
specials
transact.special
If transact.special not blank
srcecode
resrvatn.srce_code
If transact.reserv_no <> 0
tmp_inv
N/A
Single record table
tr_save
trans_no from Sales
transact
trans_no from Sales
usercod1
resrvatn.user_code1
If transact.reserv_no <> 0
usercod2
resrvatn.user_code2
If transact.reserv_no <> 0
usercod3
resrvatn.user_code3
If transact.reserv_no <> 0
utility
transact.sale_no
wrapcode
resrvatn.wrap_code
If transact.reserv_no <> 0
Tables synched using the pass reprint or IDCard feature
Table
Sync field
Notes
defaults
N/A
Single record table
prefs
N/A
Single record table
sales_pt
N/A
Single record table
prefs_bk
N/A
Single record table
alladres
guests.guest_no
guests
printing.tmp_gstno
If not an IDCard
guests
gst_pass.guest_no
If it is an IDCard
gst_pass
printing.tmp_passno
items
printing.DCI
Graphic Receipts and Invoice layouts
All tables in the local Data folder are open and may be referenced, but they may not be synched. The following
tables are synched:
Table
Sync field
csrResDWCards N/A
Notes
Single record table
43
defaults
N/A
Single record table
prefs
N/A
Single record table
prefs_bk
N/A
Single record table
tmp_inv
N/A
Single record table
cc_trans
printing.sale_no
sale_hdr
printing.Sale_no
sh_save
printing.Sale_no
tr_save
printing.Sale_no
transact
printing.Sale_no
utility
printing.sale_no
alladres
printing.tmp_gstno
If tmp_gstno <> 0
guests
printing.tmp_gstno
If tmp_gstno <> 0
access
printing.tmp_passno If tmp_passno
product
<> 0 and access
gst_pass
printing.tmp_passno If tmp_passno
product
<> 0 and pass
accomdtn
resrvatn.accommodat If sale_hdr.reserv_no <> 0
baselodg
resrvatn.base_lodge If sale_hdr.reserv_no <> 0
mktgcode
resrvatn.mktg_code
pkup_loc
resrvatn.pickup_loc If sale_hdr.reserv_no <> 0
srcecode
resrvatn.srce_code
usercod1
resrvatn.user_code1 If sale_hdr.reserv_no <> 0
usercod2
resrvatn.user_code2 If sale_hdr.reserv_no <> 0
usercod3
resrvatn.user_code3 If sale_hdr.reserv_no <> 0
wrapcode
resrvatn.wrap_code
If sale_hdr.reserv_no <> 0
accounts
sale_hdr.acct_name
If transact.invoice_no <> 0
resrvatn
sale_hdr.reserv_no
items
transact DCI
invoices
transact.invoice_no
operator
transact.Op_code
specials
transact.special
If sale_hdr.reserv_no <> 0
If sale_hdr.reserv_no <> 0
44
csrTransGuest transact.trans_no
Graphic Saved Sale layouts
All tables in the local Data folder are open and may be referenced, but they may not be synched. The following
tables are synched:
Table
Sync field
Notes
access
printing.tmp_passno If tmp_passno
product
accounts
sh_save.acct_name
If tr_save.invoice_no <> 0
alladres
printing.tmp_gstno
If tmp_gstno <> 0
alltrans
printing.sale_no
cc_trans
printing.sale_no
gst_pass
printing.tmp_passno If tmp_passno
product
guests
printing.tmp_gstno
invoices
alltrans.invoice_no
items
alltrans DCI
operator
alltrans.op_code
sh_save
printing.sale_no
specials
alltrans.special
tr_save
alltrans.trans_no
utility
printing.sale_no
<> 0 and access
<> 0 and pass
If tmp_gstno <> 0
Graphic Z-tape layouts
All tables in the local Data folder are open and may be referenced, but they may not be synched. The following
tables are synched:
Table
Sync field
All transactions from the transact
table for that date
csrZTape
sale_hdr
Notes
csrZTape.sale_no
45
items
csrZTape.DCI
Graphic Tee Sheet layouts
All tables in the local Data folder are open and may be referenced, but they may not be synched. The following
tables are synched:
Table
Sync field
csrTee
Notes
Facilities, times and descriptions for
events
Confirmation letters
Confirmation layouts are Graphic layouts (used with the Salesware Reservations module) that are saved in a special
directory: Siriusware\Layouts\CONFIRMS. This is done for ease of selection by the Sales operator.
All tables in the local Data folder are open and may be referenced, but they may not be synched. To print
confirmation letters, PrintEZ application creates several temporary tables. These tables are actually left on disk after
the confirmation letter has printed, so you can close Sales and use Helper utility to view their contents. They are
created in the Sales\Data folder. csrTrans is the primary (selected) table. The following tables are used.
Table
Sync field
Notes
Table created and left on disk for each
confirmation letter – holds all the
tr_save records for the reservation.
csrTrans
csrSaleHdr
Not synched
Contains sh_save and sale_hdr
records for the reservation.
csrResGuest
N/A
Single record table. Contains guest record
(with address information) for guest
attached to Reservation Header.
csrUtility
Not synched – only top record
Contains utility records for all sales in
csrSaleHdr
csrSaleGuest
Not synched
All guests attached to transactions in the
reservation with address information
resrvatn
reserv_no
utility
printing.sale_no
Has totals for a reservation and is
invaluable in creating
confirmations. Fields include Sale_no,
46
Sale_sub, Sale_disc, Sale_fee,
Sale_ext, Sale_taxa, Sale_taxb,
Sale_tax, Change, Acct_tot,
Inv_tot, Acct_chg, Acct_pay,
Pms_lookup, Pms_select,
Saved_sale, Admissions,
Dw_swipeno, Dw_cr_lim,
Dw_cr_rem, Sp_lim, Sp_rem,
Sp_lim_dy, Sp_rem_dy, Guest_no,
First_name, Last_name, Phone,
Descript1, Descript2,
Salespoint, Operator,
Date_time, Res_total, Bal_due,
Amt_paid
csrResDWCards N/A
accomdtn
resrvatn.accommodat
baselodg
resrvatn.base_lodge
mktgcode
resrvatn.mktg_code
pkup_loc
resrvatn.pickup_loc
srcecode
resrvatn.srce_code
usercod1
resrvatn.user_code1
usercod2
resrvatn.user_code2
usercod3
resrvatn.user_code3
wrapcode
resrvatn.wrap_code
accounts
csrSaleHdr.acct_name
invoices
csrTrans.invoice_no
guests
csrTrans.guest_no
gst_pass
csrTrans.type20num
bookinfo
csrTrans.type40num
res_schd
csrTrans.type60num
access
csrTrans.type70num
meet_loc
csrTrans.meet_locat
template
items.DCI
items
csrTrans.DCI
Single record table with In-House Cards
info
47
alladres
csrSaleGuest.guest_no_a However, csrSaleGuest is not
synched
Multi-page Confirmation layouts
Sometimes you need to get a vast quantity of text on a page but problems may occur when you get to the page
breaks. To mitigate this, you can use “fake groups.” In the Confirmation layout available from
http://portal.siriusware.com/docs/kb-data/multipagefakegroupdemo.zip, fake groups were added to break up the one
or two very large text blocks. Each of the chunks prints entirely on a page or is moved to the next page – they are
not split up. This is the problem with very large blocks of text – they don’t split between pages. If you make the
blocks small enough, though, then they break up in a more desirable way. This trick has the added headache of
maintaining more individual chunks of text, but has the advantage of working better in multi-page layouts.
When you create fake groups you also need fake group variables (this is what the fake groups group on).
To create the layout, follow these steps:
1. From the layout editor, click Report > Data Grouping.
2. Add as many fake groups as you think you might need. Use the expression FakeGroup1, FakeGroup2,
etc.
3. On that same Data Grouping dialog box, change the nesting order of the groups so that the real groups are
at the bottom and the fake ones are at the top.
4. In Reports > Variables create the same number of variables to match the expressions you used in step 2
(FakeGroup1, FakeGroup2, etc.). Leave the Value to store, Initial Value, Reset Value and
Calculation on their defaults.
5. Start filling up the group footers.
You may have some problems if you are using a summary band – but that can usually be solved by moving that
information into one of the FakeGroup footer bands.
Fields for Text Ticket layouts
The table below contains field types and their descriptions used for Text Ticket layouts.
Field type
Description
Character
A string of characters of a defined length (from 1 to 255) – holds
anything that can be typed on the keyboard
Memo
A character field with no size limit (limited by available memory)
Integer
Number with no decimal places; can be positive or negative;
numbers from –2147483647 to 2147483647 can be stored in 4
bytes
48
Currency
Numbers that represent money; are normally displayed with two
decimal places but store as four decimal places for calculation; can
be positive or negative
Logical
Can be true or false – stored in 1 byte
Numeric
A numeric value either integer or decimal
Double
A double-precision floating-point number
The table below contains many of the most common fields used by Text Ticket layouts.
Field name
Field description
Field type and size
Tmp_aAddr
Address for account
Character – 25
Tmp_aArea
Area code for account
Character – 5
Tmp_access
Access number
Double – 8
Tmp_aChk1
Account user def check box 1
Logical – 1
Tmp_aChk2
Account user def check box 2
Logical – 1
Tmp_aChk3
Account user def check box 3
Logical – 1
Tmp_aChk4
Account user def check box 4
Logical – 1
Tmp_aChk5
Account user def check box 5
Logical – 1
Tmp_aCity
Account city
Character – 15
Tmp_aCont
Account contact
Character – 25
Tmp_aDate1
Account user-defined date 1
Character – 10
Tmp_addr
Primary guest address 1
Character – 25
Tmp_addr2
Primary guest address 2
Memo – 4
Tmp_aDesc
Account description
Character – 25
Tmp_admisn
Number of admissions per item
Integer – 4
Tmp_aDtime
Account user-defined date 2
Character – 16
Tmp_aLimit
Account credit limit
Double – 8
Tmp_aMemo1
Account user def memo
Memo – 4
Tmp_aName
Account name
Character – 25
Tmp_aNotes
Account notes
Memo – 4
Tmp_aNum1
Account user def numeric 1
Integer – 4
Tmp_aNum2
Account user def numeric 2
Integer – 4
49
Tmp_aNum3
Account user def numeric 3
Integer – 4
Tmp_aNum4
Account user def numeric 4
Double – 8
Tmp_aNum5
Account user def numeric 5
Double – 8
Tmp_aPhone
Account phone number
Character – 8
Tmp_area
Primary guest area code
Character – 5
Tmp_aState
Account state
Character – 2
Tmp_aTxt1
Account user def text 1
Character – 15
Tmp_aTxt2
Account user def text 2
Character – 15
Tmp_aTxt3
Account user def text 3
Character – 15
Tmp_aTxt4
Account user def text 4
Character – 15
Tmp_aTxt5
Account user def text 5
Character – 15
Tmp_aZip
Account zip code
Character – 10
Tmp_bage
Age of the booked guest
Character – 3
Tmp_bedt
Booking end date
Character – 10
Tmp_betm
Booking end time
Character – 8
Tmp_bifnm
Booking instructor – first name
Character – 10
Tmp_bilnm
Booking instructor – last name
Character – 10
Tmp_birth
Primary guest birth date
Character – 10
Tmp_bloc
Lesson location
Character – 10
Tmp_blvl
Booking level
Character – 1
Tmp_bnum
Booking ID
Double – 8
Tmp_bsdt
Booking start date
Character – 10
Tmp_bstm
Booking start time
Character – 8
Tmp_cat
Category nickname
Character – 10
Tmp_city
Primary guest city
Character – 15
Tmp_copp
Access number and expiration date
Character – 12
Tmp_cprsn
Comp person
Character – 15
Tmp_crsn
Comp reason
Character – 15
Tmp_date
Item start date
Character – 10
Tmp_dept
Department nickname
Character – 10
Tmp_disc
Discount amount
Numeric – 12
50
Tmp_dusesl
Pass - number of uses left today
Integer – 4
Tmp_edate
Item end or expiration date
Character – 10
Tmp_ext
Item price + tax + fees
Numeric – 12
Tmp_fee
Fee amount
Numeric – 12
Tmp_fname
Primary guest first name
Character – 10
Tmp_formno
Rental Contract Number
Numeric - 12
Tmp_glno
Item GL number
Character – 12
Tmp_gNotes
Primary guest notes
Memo – 4
Tmp_group
Primary guest group
Character – 10
Tmp_gstno
Primary guest number
Double – 8
Tmp_idesc
Item description
Character – 25
Tmp_invno
Invoice number
Double – 8
Tmp_item
Item nickname
Character – 10
Tmp_lname
Primary guest last name
Character – 15
Tmp_loc
Location or salespoint name
Character – 6
Tmp_mod1
Modifier 1 description
Memo – 4
Tmp_mod2
Modifier 2 description
Memo – 4
Tmp_mod3
Modifier 3 description
Memo – 4
Tmp_mod4
Modifier 4 description
Memo – 4
Tmp_mod5
Modifier 5 description
Memo – 4
Tmp_mod6
Modifier 6 description
Memo – 4
Tmp_mod7
Modifier 7 description
Memo – 4
Tmp_mod8
Modifier 8 description
Memo – 4
Tmp_mod9
Modifier 9 description
Memo – 4
Tmp_money1
Pass money1 current value
Currency – 8
Tmp_money2
Pass money2 current value
Currency – 8
Tmp_msg
Line item message
Character – 20
Tmp_oper
Operator log-in name
Character – 6
Tmp_otlvl
Other level
Character – 1
Tmp_parent
Description of modifier’s parent item
Character – 25
Tmp_pasacc
Account associated with pass
Character – 10
51
Tmp_pasamt
Amount paid for pass
Currency – 8
Tmp_passno
Pass number (for item)
Double – 8
Tmp_pboe
Pass blackout end date
Character – 10
Tmp_pbos
Pass blackout start date
Character – 10
Tmp_pChk1
Primary guest user def chk box 1
Logical – 1
Tmp_pChk2
Primary guest user def chk box 2
Logical – 1
Tmp_pChk3
Primary guest user def chk box 3
Logical – 1
Tmp_pChk4
Primary guest user def chk box 4
Logical – 1
Tmp_pChk5
Primary guest user def chk box 5
Logical – 1
Tmp_pDate1
Primary guest user def date 1
Character – 10
Tmp_pDtime
Primary guest user def date 2
Character – 16
Tmp_phone
Primary guest phone number
Character – 8
Tmp_pMemo1
Primary guest user def memo
Memo – 4
Tmp_pNum1
Primary guest user def numeric 1
Integer – 4
Tmp_pNum2
Primary guest user def numeric 2
Integer – 4
Tmp_pNum3
Primary guest user def numeric 3
Integer – 4
Tmp_pNum4
Primary guest user def numeric 4
Double – 8
Tmp_pNum5
Primary guest user def numeric 5
Double – 8
Tmp_price
Item price
Numeric – 12
Tmp_prnt1
Ticket 1 layout type
Numeric – 1
Tmp_prnt2
Ticket 2 layout type
Numeric – 1
Tmp_prnv1
Voucher 1 layout type
Numeric – 1
Tmp_prnv2
Voucher 2 layout type
Numeric – 1
Tmp_prtmsg
Print message (DirectNet)
Character – 40
Tmp_ptcomp
Pass total comp tickets given
Integer – 4
Tmp_pts1
Pass points1 current value
Integer – 4
Tmp_pts2
Pass Points2 current value
Integer – 4
Tmp_pTxt1
Primary guest user def text 1
Character – 15
Tmp_pTxt2
Primary guest user def text 2
Character – 15
Tmp_pTxt3
Primary guest user def text 3
Character – 15
Tmp_pTxt4
Primary guest user def text 4
Character – 15
52
Tmp_pTxt5
Primary guest user def text 5
Character – 30
Tmp_pwarn
Number of warnings on pass
Integer – 4
Tmp_qty
Quantity of item sold
Numeric – 4
Tmp_rrsn
Refund reason
Character – 15
Tmp_saleno
Sale number
Double – 8
Tmp_sblvl
Snowboard level
Character – 1
Tmp_sfirst
Saved sale first name
Character – 10
Tmp_slast
Saved sale last name
Character – 15
Tmp_spcd
Special description
Character – 25
Tmp_spct
Special name
Character – 25
Tmp_state
Primary guest state
Character – 2
Tmp_swipe
Swipe number
Character – 22
Tmp_t1gprn
Ticket 1 assigned graphics printer
Character – 32
Tmp_t1lay
Ticket 1 assigned layout
Memo – 4
Tmp_t1prt
Ticket 1 assigned dot matrix printer
Character – 30
Tmp_t1qty
Ticket 1 quantity (for ignore qty)
Integer – 4
Tmp_t1wprn
Ticket 1 Windows printer
Character – 100
Tmp_t2gprn
Ticket 2 assigned graphics printer
Character – 32
Tmp_t2lay
Ticket 2 assigned layout
Memo – 4
Tmp_t2prt
Ticket 2 assigned dot matrix printer
Character – 20
Tmp_t2qty
Ticket 2 quantity (for ignore qty)
Integer – 4
Tmp_t2wprn
Ticket 2 Windows printer
Character – 100
Tmp_tax
Tax amount
Numeric – 12
Tmp_taxa
TaxA amount
Numeric – 12
Tmp_taxb
TaxB amount
Numeric – 12
Tmp_telvl
Telemark level
Character – 1
Tmp_time
Time item was sold
Character – 5
Tmp_totqty
Total quantity sold of the line item
Numeric – 4
Tmp_tranno
Transact number
Double – 8
Tmp_tspan
Number of days an item is good
Integer – 4
Tmp_tuses
Pass - number of total uses left
Integer – 4
53
Tmp_v1lay
Voucher 1 assigned layout
Memo – 4
Tmp_v1prt
Voucher 1 dot matrix printer
Character – 30
Tmp_v1qty
Voucher 1 quantity (for ignore qty)
Integer – 4
Tmp_v1wprn
Voucher 1 Windows printer
Character – 100
Tmp_v2lay
Voucher 2 assigned layout
Memo – 4
Tmp_v2prt
Voucher 2 dot matrix printer
Character – 30
Tmp_v2qty
Voucher 2 quantity (for ignore qty)
Integer – 4
Tmp_v2wprn
Voucher 2 Windows printer
Character – 100
Tmp_valno
Validation number
Double – 8
Tmp_wusesl
Pass - uses per week left
Integer – 4
Tmp_zip
Primary guest zip code
Character – 10
Additionally, you are able to use any field in the guests, alladres, gst_pass, access, alltrans,
transact, accounts, invoices, operator and sale_hdr tables.
Note: To use a field other than the fields listed above (which are in the Printing table), the local table where the
field is located must be determined, the field name must be known and the following format is used:
local_table->local_table_field_name
Example:
SALES_PT->salespoint retrieves the name of the salespoint from the SALES_PT table.
Common fields on Graphic Pass layouts
Field
Function call
Notes
Mug shot – Prints the guest
photo on a pass
esppimg('guests.mug_shot',2)
Print when: .not.
empty(guests.mug
_shot)
First name – Prints the guest
first name on a pass
Last name – Prints the guest
first name on a pass
alltrim(guests.first_name)
Item description – Prints the
item description on a pass
alltrim(items.descrip)
alltrim(guests.last_name)
54
Printed pass number – Prints 'P'+alltrim(str(gst_pass.pass_no,16,0))
the pass number on a pass
'G'+alltrim(str(gst_pass.guest_no))
Printed guest number –
Prints the guest number on a
pass
Swipe number – Printed
swipe number (often used in
In-House Cards programs)
alltrim(gst_pass.swipe_no)
Barcode with pass number
BC_CODE128('PXX'+dec2baseXX(gst_pass.pass_n
o))
Standard barcode font
BC C128 Narrow Size
28 is used in a lot of the
samples
Mag-swipe track 1 encoding "~1%AP"+alltrim(str(gst_pass.pass_no,16,0))
designed to auto-sell an item +"?"
with a pass number swipe
Mag-swipe track 1 encoding
designed to discount items
in a sale with a pass number
swipe
"~1%EP"+alltrim(str(gst_pass.pass_no,16,0))
+"?"
Mag-swipe track 1 encoding "~1%B"+alltrim(gst_pass.swipe_no)+"?"
designed for In-House Cards
item use
Mag-swipe in track 2
encoding of a pass number
(only numbers are allowed
in track 2)
"~2;"+alltrim(str(gst_pass.pass_no,16,0))+"
?"
Function reference
A function can be used as an expression or as part of an expression in a layout. Functions return values like
operators, constants and fields. Functions always have a function name and are followed by a left and right bracket.
Values (parameters) may be inside the brackets.
Note: This function reference primarily covers functions used with Text Merge layouts and Shared Text Merge
layouts. In the Salesware Layout Designer you can also find additional commonly used string, math, logical and
date functions (available from the Expression Builder dialog). Many of these are used only with Graphic layouts.
55
Character functions
Function
Description
Custom or in
VFP subset?
ALLTRIM(CHAR_VALUE)
This function trims all of the blanks from both the
beginning and the end of the expression. This command
accepts only alphanumeric data.
VFP subset
LTRIM(CHAR_VALUE)
This function trims any blanks from the beginning of the
expression. This command accepts only alphanumeric
data.
VFP subset
TRIM(CHAR_VALUE)
This function trims any blanks off the end of the
expression. This command accepts only alphanumeric
data.
VFP subset
LEFT(CHAR_VALUE,
NUM_CHARS)
This function returns a specified number of characters
from a character expression, beginning at the first
character on the left. The parameter NUM_CHARS must
be constant. See also: SUBSTR()
VFP subset
RIGHT(CHAR_VALUE,
NUM_CHARS)
This function returns a specified number of characters
from the end of a character expression. The parameter
NUM_CHARS must be constant.
VFP subset
SUBSTR(CHAR_VALUE,
START_POSITION, NUM_CHARS)
A substring of the character value is returned. The
substring is NUM_CHARS long and starts at the
START_POSITION character of CHAR_VALUE. The
parameters START_POSITION and NUM_CHARS must
be constant.
VFP subset
UPPER(CHAR_VALUE)
A character string is converted to uppercase and the
result is returned.
VFP subset
Examples:
LEFT( ’SEQUITER’, 3) returns SEQ.
The same result could be achieved with SUBSTR(’SEQUITER’, 1, 3)
RIGHT( ’SEQUITER’, 3) returns TER.
SUBSTR( "ABCDE", 2, 3 ) returns BCD
SUBSTR( "Mr. Smith", 5, 1 ) returns S
56
Logic functions
Function
Description
Custom or in
VFP subset?
IIF(LOG_VALUE,
TRUE_RESULT, FALSE_RESULT)
If LOG_VALUE is .TRUE. then IIF() returns the
TRUE_RESULT value. Otherwise, IIF() returns the
FALSE_RESULT value. Both TRUE_RESULT and
FALSE_RESULT must be the same length and type.
Otherwise, an error results.
VFP subset
Examples:
IIF( VALUE < 0, "Less than zero ", "Greater than zero" )
IIF( NAME = "John", "The name is John", "Not John " )
Date functions
Function
Description
Custom or
in VFP
subset?
DATE()
The current system date is returned.
VFP subset
TIME()
The time function returns the system time as a character
representation. It uses the following format: HH:MM:SS.
VFP subset
DAY(DATE_VALUE)
Returns the day of the date parameter as a numeric value
from 1 to 31.
VFP subset
MONTH(DATE_VALUE)
Returns the month of the date parameter as a numeric value
from 1 to 12.
VFP subset
YEAR(DATE_VALUE)
Returns the year of the date parameter as a numeric value.
VFP subset
Examples:
TIME() returns 12:00:00 if it is noon.
TIME() returns 13:30:00 if it is 1:30 PM.
DAY(DATE()) Returns 30 if it is the thirtieth of the month.
MONTH( DT_FIELD ) returns 12 if the date field’s month is December.
YEAR( STOD( '19920830' ) ) returns 1992.
57
Date/character conversion functions
Function
Description
Custom or
in VFP
subset?
CTOD(CHAR_VALUE)
The character to date function converts a character value into
a date value. The character representation is always in the
format “MM/DD/YY”.
VFP subset
DTOC(DATE_VALUE)
DTOC(DATE_VALUE, 1)
The date to character function converts a date value into a
character value. The format of the resulting character value is
MM/DD/YY. If the optional second argument is used, the
result is in the format CCYYMMDD. See also: DTOS()
VFP subset
DTOS(DATE_VALUE)
The date to string function converts a date value into a
character value. The format of the resulting character value is
CCYYMMDD.
VFP subset
STOD(CHAR_VALUE)
The string to date function converts a character value into a
date value: The character representation is in the format
“CCYYMMDD”.
VFP subset
Examples:
CTOD( "11/30/88" )
DTOC(DATE()) returns the character value 05/30/87 if the date is May 30, 1987.
DTOC(DATE(), 1) returns 19940731 if the date is July 31, 1994.
DTOS( DATE() ) returns the character value 19870530 if the date is May 30, 1987.
STOD( "19881130" )
Number/character conversion functions
Function
Description
Custom or in
VFP subset?
CHR(INTEGER_VALUE)
This function returns the character whose numeric ASCII
code is identical to the given integer. The integer must be
between 0 and 255.
VFP subset
58
STR(NUMBER, LENGTH,
DECIMALS)
The string function converts a numeric value into a
character value. LENGTH is the number of characters in
the new string, including the decimal point. DECIMALS is
the number of decimal places desired. The parameters
LENGTH and DECIMALS must be constant. If the number
is too big for the allotted space, *’s are returned.
VFP subset
VAL(CHAR_VALUE)
The value function converts a character value to a numeric
value.
VFP subset
Examples:
CHR(65) returns A.
STR( 5.7, 4, 2) returns 5.70
The number 5.7 is converted to a string of length 4. In addition, there are two decimal places.
STR( 5.7, 3, 2) returns ***
The number 5.7 cannot fit into a string of length 3 if it is to have two decimal places. Consequently, *’s are filled
in.
VAL( '10' ) returns 10.
VAL( '-8.7' ) returns -8.7.
Database functions
Function
Description
Custom
or in VFP
subset?
DELETED()
Returns .TRUE. if the current record is marked for
deletion.
VFP
subset
RECCOUNT()
The record count function returns the total number of
records in the database.
VFP
subset
RECNO()
The record number function returns the record
number of the current record.
VFP
subset
Example:
RECCOUNT() returns 10 if there are ten records in the database.
59
Receipt layout functions
All Text Merge layout receipt lines must be encapsulated by <| |>.
Function
Description
Custom or
in VFP
subset?
DETAILS(CHAR_EXPRESSION)
DETAILS(CHAR_EXPRESSION,
LOGICAL)
Loops through all of the records in the AllTrans table and
converts the expression to readable text.
Custom
Similar to ITERATE_OVER() except it uses only the
AllTrans table (created just for the DETAILS() function) and
sync’s the guests and gst_pass tables as well.
CHAR_EXPRESSION is the same as in ITERATE_OVER(),
only the SEPARATOR is included at the end of the expression.
In the second form, if LOGICAL is set to TRUE, then the function
loops through all of the records in the AllTrans table and only
prints the record if it is a new item added to the receipt.
Note: With the DETAILS() function, you are sure to get all of
the payments (either deposits or account payments) and all
relevant information from both the Transact and Tr_Save
tables. The DETAILS() function is “one-stop shopping” for all
of your Sale_Hdr/Sh_Save Transact/Tr_Save needs.
Inside the DETAILS() function, the following tables get synced,
so are available for use:
ITERATE_OVER(TABLE, INDEX,
FILTER, EXPRESSION,
SEPARATOR)
Table
Sync field
Items
Department+Category+Item
I_Items
invent_id
Guests
guest_no
AllAdres
guest_no
Gst_pass
pass_no
Specials
name
Loops through the specified table for all records that match the
filter expression in the table’s indexed field and converts the
expression to readable text. The separator is placed between
every line – typically NEWLINE().
Custom
60
When iterating over the tr_save or transact table, the
following tables get synced, so are available for use:
Table
Sync field
Items
Department+Category+Item
I_Items
invent_id
When iterating over the tr_info, trs_info, sh_info or
shs_info table, the following table gets synced, so is available
for use:
Table
Sync field
Guests
guest_no
SEEK(TABLE, INDEX, VALUE)
Selects the TABLE, sets the index to the INDEX value and seeks
to the first record that matches the VALUE in the INDEX field.
Custom
NEWLINE()
Returns CHR(13)+CHR(10) (i.e., carriage return + line feed)
Custom
CENTER(EXPRESSION,
NUM_COLS)
Centers the expression on the page based on the number of
character columns you have on the printer – typically 40 or 80.
Custom
JUSTLEFT(EXPRESSION,
NUM_COLS)
Left-justifies the text.
Custom
JUSTRIGHT(EXPRESSION,
NUM_COLS)
Right-justifies the expression on the page based on the number of
character columns you have on the printer – typically 40 or 80.
Custom
FOP()
Displays the form(s) of payment used to pay for the sale.
Custom
Note: This is only valid on Receipt printing. It cannot be used for
Saved Sales. Additionally, this only returns payments made on
finalize and not any previous payments.
DSTR1(TABLEFIELD)
Returns a character representation of the Date/Time field in the
format CCYY/MM/DD.
Custom
DSTR2(TABLEFIELD)
Returns a character representation of the Date/Time field in the
format MM/DD/CCYY HH:MM:SS AM/PM
Custom
TIPS(EXPRESSION)
Evaluates the expression if and only if the salespoint has
Tips=TRUE in the Sales32c.INI file. Mostly used only in
Ticket layouts (e.g., Charge Cards Ticket layout), but is available
for Receipt layouts as well.
Custom
MODIFIER()
Returns .T. (TRUE) if the item in the AllTrans table is a
product modifier. Used only in the DETAILS() function.
Typically used for kitchen printing.
Custom
61
TOTAL(DISCOUNT/PRICE/EXTEN
SION)
Used for Z-Tape Reports in conjunction with
ITERATE_OVER(). Sums the specified quantity for
DISCOUNT, PRICE or EXTENSION fields for all of the records
in the ITERATE_OVER() statement preceding the TOTALS()
call.
Custom
Examples:
The following line is a fairly common details() line for basic sales receipts:
<|Details(STR(admissions*quantity,3,0)+'
' +IIF(transact->Item="**TRANS**","Account
Transaction",Items->descrip)+'
'+ STR(quantity,3,0)+NEWLINE()+Transact>Special+STR(Transact->Disc_amt,6,2)+STR(transact->init_price,9,2)+'
'+STR(transact>extension,10,2)+NEWLINE())|>
The following line is a common details() line for remote receipts (kitchen printing) for new items (items
ordered after the initial order) added to the tab/check/table/sale:
<|Details(IIF(MODIFIER(), alltrim(printers->color_2) + '
ATTN: '+Items->Descrip,
alltrim(printers->color_1) + STR(quantity,3,0) + ' - ' + IIF(Item="**TRANS**","Account
Transaction",Items->descrip) + NEWLINE()) + NEWLINE(), TRUE)|>
The following is a common iterate_over() line for a basic sales receipt. accesso is moving towards using
details() more than iterate_over() because, in general, it has more/better options. details() is often
preferred for listing the transactions because it “sync’s” many of the other tables (guests, gst_pass,
i_items, etc.):
<|iterate_over(transact, Sale_no, Sale_hdr->Sale_no, STR(admissions*quantity,3,0) + '
' + IIF(transact->Item="**TRANS**" , "Account Transaction",Items->descrip) + '
' +
STR(quantity,3,0) + NEWLINE() + Transact->Special + STR(Transact->Disc_amt,6,2) +
STR(transact->init_price,9,2) + '
' + STR(transact->extension,10,2), NEWLINE())|>
The following line is typically one of the first lines on a receipt:
<|CENTER('Sale Number: ' + ALLTRIM(STR(utility->sale_no,16,0)), 40)|>
The following line is typically one of the last lines on a receipt:
<|JUSTRIGHT('SUB TOTAL: '+STR(Utility->sale_sub,10,2),40)|>
FOP()- If Visa and cash were used to pay for the sale, VISA+CASH are displayed.
62
<|CENTER(DSTR2(Utility->Date_time),40)|>
This is a common details() line for a remote printer (kitchen receipt printer) that prints all items on the receipt,
not just those added during the last recall:
<|Details(IIF(MODIFIER(), alltrim(printers->color_2) + '
ATTN: '+Items->Descrip,
alltrim(printers->color_1) + STR(quantity,3,0) + ' - ' + IIF(Item="**TRANS**","Account
Transaction",Items->descrip) + NEWLINE()) + NEWLINE())|>
The following lines print daily codes on a sales receipt:
<|CENTER('DAILYC: ' +Dailycode(date(),1),40)|> (prints dailycode)
<|CENTER('DAILYC: ' +Dailycode(date(),2),40)|> (prints dailycode2)
<|CENTER('DAILYC: ' +Dailycode(date(),3),40)|> (prints dailycode3)
<|CENTER('DAILYC: ' +Dailycode(date(),4),40)|> (prints dailycode4)
<|CENTER('DAILYC: ' +Dailycode(date()),40)|> (prints dailycode1)
Ticket layout functions
Function
Description
Custom
or in
VFP
subset?
TICKETQTY(CHAR_VALUE)
Returns the tmp_inv.quantity and sets the printer to print the
specified quantity.
Custom
Used only when designing a layout for the Cognitive printer. It
extracts the quantity of tickets that the customer purchased on a
single line item and prints that amount of identical tickets. The
ticket designer types the data field name tmp_qty or a number
between the parentheses to let the function know how many tickets
to print.
Example:
If ten tickets or vouchers are sold on a single line item in Sales,
ticketqty(tmp_qty) prints ten identical tickets. The
following is an example of the first line of a Cognitive Ticket
layout:
63
! 0 100 1050 <|TICKETQTY(tmp_qty)|
This code prints one or more tickets or vouchers on a Cognitive
printer, depending on the quantity sold on a particular invoice line
item.
! 0 100 1050 1
This code prints one ticket on a Cognitive printer.
ticketqty(5) returns 5
GETDATESTRING()
Returns the ticket start date and ticket end date as (day of
week) MM/DD as a string.
Custom
Designed to be used in multi-day Ticket layouts and uses the fields
Tmp_date and Tmp_edate to produce the first three letters of the
day of the week, the number of the month and the year. Tmp_date
is the date that the ticket can start being used. Tmp_edate is the
last date the ticket can be used. If the ticket was purchased for one
day only, the start date prints. If the ticket was purchased for more
than one day, the start and end dates print.
Example:
If the ticket was purchased on Monday, April 1,
GETDATESTRING() returns MON 04/01 if the ticket was
purchased for one day. GETDATESTRING() results in MON
04/01 - FRI 04/05 if the ticket was purchased for more than
one day.
FOP_BREAK()
Returns the payment types used and the breakdown of the purchase
as a string.
Custom
Example:
FOP_BREAK()returns:
BREAKDOWN()
CASH
VISA
10.35
200.00
Returns the payment breakdown used at the time of the purchase, as
a string.
Custom
FOP()
Displays the form(s) of payment used to pay for the sale.
Custom
If Visa and cash were used to pay for the sale, VISA+CASH are
displayed.
CMONTH(DATE_VALUE)
Converts a date to the literal name of the month.
Custom
Example:
CMONTH(DATE()) returns April if the current month is 04.
64
CDOW(DATE_VALUE)
Extracts the day of week from the date passed in and returns the day
of week as a literal string.
Custom
Example:
EMPTY(DATABASE_FIELD)
CDOW(DATE()) returns Sunday if the current day of the week is
1.
Tests an argument (depending on the type) for true or false,
zero or non_zero, blank or non_blank and returns a 1 if
empty and 0 if not empty.
Custom
This function can be used only with the if() function or the
iif() VFP function.
DAILYCODE(DATE_VALUE)
Returns the daily code from the dailycode database using the
date that was entered as the parameter.
Custom
Example:
DAILYCODE(CTOD(TMP_DATE)) returns the daily code for the
date that the ticket or voucher was sold. Because TMP_DATE is a
character date field, it must be converted into a date value using the
CTOD() VFP function. DAILYCODE(DATE()) returns the daily
code for the current date.
IF(LOGICAL_VALUE,
TRUE_RESULT, FALSE_RESULT)
Tests argument 1 for true or false; returns argument 2 if true or
argument 3 if false.
Custom
When using this function the ticket designer uses a data field or
logical expression to be tested for the first parameter. The second
and third parameters of this function can contain legal VFP
functions/expressions, other Salesware custom functions or a
combination of legal VFP functions/expressions and Salesware
custom functions.
Examples:
if(tmp_spct =="EMPLOYEE", "Employee Discount"," ")
if(tmp_extx > 100.00, "Free T-Shirt"," ")
ADD_TIME(<expC1>,
<expN1>,
<expN2>,
<expN3>,
<expN4>,
<expC2>,
<expC3>,
<expC4>,
<expC5>,
<expC6>,
<expC7>,
<expC8>,
Returns the time in the form of a character string that has been
altered by having hours or minutes added or subtracted and the time
rounded and limited according to minimums and maximums for
each day of the week. The time is returned in twelve hour clock
form only. This function accepts up to nineteen parameters.
Custom
Note: This function was designed to accommodate time-based
tickets. If an area allows a customer to buy a two or four-hour
65
<expC9>,
<expC10>,
<expC11>,
<expC12>,
<expC13>,
<expC14>,
<expC15>)
ticket, this function allows the ticket designer to specify the hours of
business, provide for time-in-line, putting on skis, etc.
Example:
ADD_TIME(TMP_TIME, 2, 15, 5, 0, 23:00, 23:00,
23:00, 23:00, 23:00, 26:00, 26:00, 09:00,
09:00, 09:00, 09:00, 09:00, 08:00, 08:00)
Assuming today is Friday and the current time is 07:00, 10:00 am
is returned.
Assuming today is Friday and a current time is 10:06, 12:15 pm is
returned.
Assuming today is Friday and the current time is 24:30, 02:00 am
is returned.
<expN1> - Number of hours to add or subtract. To add hours, enter
a positive number. To subtract hours, enter a negative number.
<expN2> - Number of minutes to add or subtract. To add minutes,
enter a positive number. To subtract minutes, enter a negative
number.
<expN3> - Number of minutes to round up to.
<expN4> - Number of minutes at which to start rounding.
<expC2> through <expC8> − Maximum time to be returned for a
day. <expC2> is Sunday’s maximum while <expC8> is
Saturday’s maximum. Enter the string as a time (HH:MM). To set the
maximum for a day to be some time during the following day (i.e.,
after midnight), enter the time as a military time, accounting for
moving beyond midnight.
Example:
To set the maximum for 2:00 AM the following day, enter 26:00
as the maximum. <expC9> through <expC15> follow the same
format but are the minimum times.
ENCRYPT_NUMBER()
Encodes the base 10 number into a base 38 number, primarily for
compression of barcodes.
Custom
Example:
ENCRYPT_NUMBER(TMP_PASSNO) where TMP_PASSNO
=120012005 returns 1JL4UP
66
ENCRYPT_DATE(CHAR DATE
VALUE)
Encodes the base 10 character date into a base 38 number, primarily
for compression of barcodes.
Custom
Example:
ENCRYPT_DATE(TMP_EDATE) where TMP_EDATE =
12/25/2002 returns CP (C=12 and P=25 in base 38).
ENCRYPT_DATE(DTOC(DATE())) encrypts the current date.
SHOW(<style1>, <style2>,
<style3>,
<style4>, <alignment>,
<line_size>,
<VFP expr>)
Parses and formats the specified text for printing on a dot matrix
printer. Used in layouts designed for dot matrix printers only. If the
printer at the salespoint is a dot matrix printer, this function must be
used on every line of the Ticket layout. SHOW() sends the printer
an escape sequence before printing each line of the ticket, which
specifies fonts, font sizes and font styles. The justification of a line
of text (right, center, left) can also be specified.
Custom
<style1> through <style4> − The font styles are available to
the ticket designer when designing tickets for a dot matrix printer.
Availability of specific styles is dependent on the brand of the
printer. Can be any of the following:
doublewide
doublehigh
condensed
bold
italics
underline
pitch_10
pitch_12
pitch_15
color_1
color_2
color_3
color_4
nlq_print (near letter-quality print )
‘ ’ (signifies no style)
cut_code (printer with auto cutter)
<alignment> − can be:
left
right
center
67
<line size> − The number of characters on the line that is
being printed.
<VFP expr> − A VFP expression that specifies what is to be
printed on the line.
Example:
<|Show('bold','condensed',’’,
'','left',’45’,alltrim(tmp_oper)+
alltrim(tmp_loc)+alltrim
(dtoc(date()))+alltrim(time()))|>
In the example,
<style1> = ‘bold’
<style2> = ‘condensed’
<style3> = ‘’ (empty single quotes)
<style4> = ‘’ (empty single quotes)
<alignment> = ‘left’
<line size> = ‘45’
TTOC(TABLE_NAME>FIELD_NAME,’FORMAT’)
<VFP expr> =
alltrim(tmp_oper)+alltrim(tmp_loc)+
alltrim(dtoc(date()))+alltrim(time())
Ticket/Voucher layouts use TTOC() (time to character) followed
by specifications for the desired format.
%a
Abbreviated weekday name
%A
Full weekday name
%b
Abbreviated month name
%B
Full month name
%c
Date and time representation appropriate for
locale
%d
Day of month as decimal number (01 - 31)
%H
Hour in 24-hour format (00 - 23)
%I
Hour in 12-hour format (01 - 12)
%j
Day of year as decimal number (001 - 366)
%m
Month as decimal number (01 - 12)
%M
Minute as decimal number (00 - 59)
Custom
68
%p
Current locale’s A.M./P.M. indicator for 12hour clock
%S
Second as decimal number (00 - 59)
%U
Week of year as decimal number, with
Sunday as first day of week (00 - 53)
%w
Weekday as decimal number (0 - 6; Sunday
is 0)
%W
Week of year as decimal number, with
Monday as first day of week (00 - 53)
%x
Date representation for current locale
%X
Time representation for current locale
%y
Year without century, as decimal number (00
- 99)
%Y
Year with century, as decimal number
%Z
Time-zone name; no characters if time zone
is unknown
%%
Percent sign
Examples:
To print the transaction date & time in DD/MM/YYYY HH:MM:SS
AM/PM format, you would use:
TTOC(alltrans->date_time,'%m/%d/%Y %I:%M:%S
%p') results in 10/24/2005 12:30:45 PM
To print the transaction date and time in DD/MM/YYYY
HH:MM:SS AM/PM format, you would use:
TTOC(alltrans->date_time,'%d/%m/%Y %I:%M:%S
%p') results in 24/10/2005 12:30:45 PM
departme->descrip
Prints the department description on tickets.
category->descrip
Prints the category description on tickets.
mod_accX
The access number of a modifier is now populated in the
mod_accX (where X = 1 - 9) field in the printing and
tmp_inv tables. This allows for the printing of multiple barcodes
on a single ticket so that a separate ticket no longer needs to be
issued for each part of a purchased package.
69
Guest Card layout functions
Function
Description
Custom or in
VFP subset?
%LKUP(GUEST NUMBER)
Used with any item that collects guest information. The guest
number is encoded in a barcode and can be used for three
different functions:
Custom
1. It can be scanned in Sales to look up the guest. When
this is done, the Summary tab for the guest is
displayed.
2. It can be scanned after clicking on the Other button
(rightmost) on a line item in a sale in order to attach
the guest to that item.
3. It can be scanned at a Rentals TechStation to look up
the form history for the guest.
Typical code that uses this function in a layout is the following:
B code128(2:4) 400 400 70
<|'LKUP('+alltrim(str(guests>guest_no,12,0))+')'|>
The % is programmed into the scanner. For more information, see
the Salesware Rentals document.
Axess Smart Printer layout functions
Function
Description
ClearMedia
Correctly cancels all valid segments
Custom or
in VFP
subset?
Axess Smart Printer encoding
It is possible to create an item with an Axess Smart Printer layout that only encodes the accesso Siriusware segment
of the card (no gate validation segments) along with a printed <CardMask> section and guest photo. An activity
type 150 record is NOT generated in this scenario, because there is no Axess data to forward to the Axess database
via the SOAP EDE.
Verification of an available segment for re-encoding during the reload process is more accurate.
70
The <IGNOREONEXCHANGE> sales action tags function the same for Axess items as all other access and
gst_pass items.
PEZ functionality
PEZ functionality is supported by PrintEZ and ResPrint application. The PEZ library is a collection of specialpurpose functions used from Graphic layouts. A PEZ function has the format PEZ ("<Function Name>",
Param1, Param2,…). Many of these functions arose from the need to get server data. Some of the functions
have become of limited use as Sales has been enhanced to gather more data locally – others are still valuable. They
are included here for advanced users.
SysManager also has the PEZ (PrintEZ) functions compiled into the application, making them available when
printing passes through SysManager. This functionality is used primarily to support RFID printing, but all PEZ
functions are available. Caution should be used because some PEZ functions are designed primarily to be run only
from the Sales folder.
Function
Short name
Description
VERSION
none
Returns the version of this library. For example:
PEZ("VERSION")
PAYMENTSFROMRES
PFR
Returns all payments made on a reservation regardless of where
they were made (gets the data from the server). For example:
PEZ("PFR", reserv_no)
GUESTFROMTRANS
GFT
Returns the guest name for a transaction in First, Last order. Can
also pass "LF" to get Last, First. For example: PEZ("GFT",
mastertran, "FL")
MAKETIMESTRING
MTS
Returns a formatted date or time. Similar to Excel formatting - so
for 1/1/2005:
DDDD = "Saturday", DDD = "Sat", DD = "01", D = "1"
MMMM = "January", MMM = "Jan", MM = 01, M = 1
HH or H = Hours, NN or N = Minutes, SS or S = Seconds
AP or AMPM or ap or ampm provides time suffixes
For example: PEZ("MTS", "MMMM D, YYYY", date())
French and Spanish names for months and days can be returned by
adding "@FR" or "@SP" into the format string.
MAKEDATESTRING
MDS
Same as MAKETIMESTRING.
MODROLLUP
MRU
Returns a string of all the modifier descriptions and/or prices. You
can specify a pattern and a delimiter. Default pattern is
"DESCRIP" and default delimiter is ", ". "DESCRIP" and
71
"EXTENSION" are replaced in the patter with the actual item
values.
PEZ("MRU", <Pattern>, <Delimiter>)
Note: This function only works on Confirmation Letter layouts. It
does not work on regular Graphic Tickets and Vouchers.
Example product:
Rental package with a helmet and insurance modifiers. Sample call:
PEZ("MRU") returns "Helmet, Insurance-Yes"
PEZ("MRU", "DESCRIP (EXTENSION)", " - ")
returns "Helmet (5.00) - Insurance-Yes
(1.00)"
There is also a "GRANDTOTALS" option to the ModRollUp
function. It returns XML values for all the totals (Tax1Totals,
Tax2Totals, FeeTotals, DiscountTotal and ExtensionTotal). You
can access these values by using the PARSE function along with
this new one like this:
Sample Call:
VAL(PEZ("PARSE", "EXTENSIONTOTAL", PEZ("MRU",
"GRANDTOTALS")))
This gives you the grand total for the main item with all of the
modifiers. This is useful for printing totals before the detail, as in
the Group Header. If you are printing totals in the Group Footer,
then this isn't very useful.
PARSE
PARSE
Parses an XML value from an XML string. Useful if you want to
use something like items.help_info to store large text blocks
to use on layout.
Example:
PEZ("PARSE", "XMLTAG", items.help_info)
So, for the example above, if the items help_info field had
"<XMLTAG>This is the stuff I want printed on
the layout</XMLTAG><SOMEOTHERTAG>blah blah
72
blah blah</SOMEOTHERTAG>", and then the returned value
would be, "This is the stuff I want printed on the layout."
LINEINFO
LI
Gets information from the server and allows you to limit the
information returned with the last parameter. Include any or all of
the letters.
"G" returns the guest name
"V" returns the lesson level
"T" returns the lesson start time
"L" returns the meeting location
"I" returns the Instructor ID (and notations if it is a request)
"N" returns the Instructor NAME (and notations if it is a request)
For example: PEZ("LI", trans_no, "GTLI")
GETRFIDTAGCODE
GRTC
Returns the codes necessary to program the Tag value of an RFID
chip using the ZBRUHFReader.dll. Ensure the field width is
wide enough or the code does not successfully encode the RFID
tag. (Make the font tiny if necessary.)
Example:
PEZ("GetRFIDTagCode", "PXX" +
transform(gst_pass.pass_no)) PEZ("GRTC",
gst_pass.pass_no)
For more information, see the Salesware Access Control document.
FORMATMODIFIERS
FM
Returns a formatted string of modifier data based on the passed
template. The template can be any text and uses the form
"F:FieldName" to reference any of the following fields:
init_price, trans_no, disc_amt, tax_amount,
tax_amt2, extension, Message, quantity, Special,
time_span, date_time, start_date, expires,
adm_end, end_date, ret_date and all fields in the Items
table.
Example:
GETROOTVALUE
GRV
PEZ("FM", <Format Template>)
PEZ("FM", "F:Descrip at $F:extension, ")
Returns the result of the passed expression from the root item (main
item) of a modifier.
PEZ("GRV", "items.descrip")
73
Returns the item description of the main item. Any valid FoxPro
expression can be used. For instance:
PEZ("GRV", [STREXTRACT(items.help_info, "<div
class=desceng>" + chr(13) + chr(10),
"</div>", 1, 1)])
GETUSERCODE1
GETUSERCODE2
GETUSERCODE3
GUC1
GUC2
Returns the trimmed descrip value of the passed key in user code
tables (for Reservations module).
GUC3
PEZ("GetUserCode3", Resrvatn.user_code3)
PEZ("GetUserCode1", Resrvatn.user_code1)
Appendix A: Packing and unpacking layouts
There are three types of layouts: Text Merge, Shared Text Merge and Graphic. Text Merge layouts, when added to
an item in SysManager, are stored with the item itself (you actually cut and paste the text into the item record using
SysManager.) Text Merge layouts are stored with the item itself in the items table. However, Shared Text Merge
layouts and Graphic layouts are separate files and are accessed as separate files at the salespoint, when they are
used by the item that references them. Graphic layouts are FoxPro Report files (.frx and .frt extensions) and
Shared Text Merge files are text files (.txt extension). Thus, Shared Text Merge layouts and Graphic layouts
appear in two places (on the server in the Siriusware\Layouts folder and on the salespoints in the
Sales\Layouts folder). Sometimes, however, the layouts in the two locations must be “re-synced” so you must
“pack up” the Shared Text Merge layouts and Graphic layouts in the Siriusware\Layouts folder using
SysManager, and then “unpack” them on the salespoint. In SysManager, you “pack up” from Activities > Pack Up
All Layouts, and then when you re-start Sales at each salespoint, the layouts are automatically “unpacked” at the
salespoints. Alternatively, in Sales, you can “unpack” from Tools > Action > Unpack Layouts.
Note: There are also layouts such as Receipt layouts (edited from SysManager > Preferences > Miscellaneous)
that are shared but that are not kept with the items themselves, nor do they exist as separate files. These are stored
in the pref_sl table.
Important: Use caution when unpacking layouts in SysManager. If you have never used this utility in the past,
please contact accesso Siriusware Technical Support for additional information.
Layouts table revealed
SysManager and Sales keep layouts updated using the same method that Sales uses to keep its data files up-to-date.
To accomplish this, SysManager must convert the layout files (the .txt or the .frx and .frt files) into
database columns in the layouts table. Once they are converted, they can be sent to Sales through the normal
update process via Pool/SalesEZ application. PrintEZ application then reconstructs the layouts locally at the
salespoint by converting those columns in the layouts table back into the .txt or the .frx and .frt files. (It
74
does not do a regular file copy from the Siriusware\Layouts directory on the SQL Server.) There are several
ways to get layouts to be listed in the layouts table:
•
•
•
You can assign the layout to an item using SysManager
You can edit the layout in SysManager
You can pack up layouts in SysManager
Note: Layouts are not linked to products in the layouts table. The layouts table is merely used to facilitate
rebuilding Shared Text Merge layouts (.txt files) and Graphic layouts (.frx and .frt files) in the
Sales\Layouts folder at the salespoint. When items reference graphic or shared text merge layouts in a sale,
Sales searches for the reconstructed files in the Sales\Layouts folder.
The layouts table does not know which layouts are in use; it is simply a recorded history of every layout that has
been edited, assigned to a product, etc. (Basically, if you touch a layout in SysManager it gets written to the
layouts table.) When a layout is no longer used, the layouts table is not pruned. (Because layouts are not linked
to items using the layouts table, there is no active tracking of layout usage that can be used to perform
maintenance on the layouts table.) If a layout is changed and that layout’s name exists in the layouts table,
the layout’s record is updated and the lastmod value is tagged to reflect that a change was made (an append was
made).
What does this mean? Every time you assign a layout to an item (even once) or change a layout that was already
assigned to an item, a record is added or updated in the layouts table. Sales “pulls” the layouts table across
the network (copying changes into the local data version of the layouts table) and PrintEZ application
reconstructs local layout files based on the data in layouts table. No files are physically copied.
Working with the local layouts table from Sales
In Sales you have the option to refresh, pack, re-index and unpack layouts. The first three operations are performed
from Sales > Tools > Data Files, where you can select the local layouts table. Refresh pulls a “fresh” copy of
the layouts table from the SQL Server. (In this case, Pack and Re-Index are of no use because this is a “fresh”
copy of the table, so no packing or re-indexing is required.) In Sales you can also “unpack” the layouts in the
layouts table from Tools > Action > Unpack Layouts. This action tells PrintEZ application to unpack the layouts
in the local layouts table and is used if, for example, you accidentally deleted a file or one gets corrupted (if
using this action button doesn’t work, there might be a problem with PrintEZ application.)
Important: Use caution when unpacking layouts in Sales. If you have never used this utility in the past, please
contact accesso Siriusware Technical Support for additional information.
What does pack up all layouts do?
Because the layouts table does not maintain itself, it must be manually “cleaned.” When you use SysManager >
Activities > Pack Up All Layouts, the first result is that you erase the entire contents of the layouts table.
75
SysManager then prompts you to select the Layouts folder and after you select the Layouts folder it then reads
and writes the entire contents of the Layouts folder to the layouts table. At this point you have a layouts table
that contains only entries from what is in the Layouts folder at that moment. Layouts and images that are stored
in sub-directories in the Layouts folder are also packed along with a description of the exact path – if the path
doesn’t exist in the Layouts folder on the salespoint, the appropriate sub-directories are automatically created
when the layouts table is unpacked by PrintEZ application and the corresponding layouts and images are
unpacked into those sub-directories.
Note: Activities > Pack Up All Layouts also packs up the image files that are referenced in the Graphic layouts in
the Siriusware\Layouts folder. If they are not referenced by a layout, they are ignored. Images are always
reference by graphic layouts – they are never copied into the layout itself. If a layout references an image file that is
not in the expected place in the Layouts folder, you get an error message similar to the following and the packing
process completes.
Note: Activities > Pack Up All Layouts ignores any FoxPro labels files (.lbt/.lbx). These are used from
SysManager and ReportManager for creating mailing labels, so are not needed at the salespoints.
Layouts are never edited directly on the salespoint because they are simply overwritten the next time the layouts
table in unpacked. The following subdirectories are in the Siriusware\Layouts folder:
•
•
•
•
•
•
•
•
•
•
•
Confirms
Graphic
Lessons
Mailing Labels
Print at Home
Passes
Retail
Receipts
Rentals
Tickets
Vouchers
76
If you use .INI settings to reference layouts (such as receipt=), then these layouts are ignored in the packing
and unpacking of layouts because the layouts table has no knowledge of them. If you would like to include these
layouts in the usual layouts processes, then store the masters in the Siriusware\Layouts folder and reference
them from a “dummy” item that doesn’t actually use them. In this way they are included in the packing, unpacking
and updating processes because they are stored in the layouts table.
Maintenance recommendations
When you have finished layouts for an upcoming season, it’s a good idea to store unused layouts in an archival
folder and pack up all layouts using SysManager > Activities > Pack Up All Layouts. This ensures that
salespoints are getting only what they need. Preventative maintenance might include packing up all layouts semiannually. If the Layouts folder is exposed to heavier traffic, then quarterly is more suitable.
Appendix B: How to increase the height of a barcode on a Graphic layout
A common requirement when designing passes and other Graphic layouts is to increase the height of a barcode.
This appendix describes how to do that.
To increase the height of a barcode on a Graphic Layout:
1. In SysManager go to Activities > Edit Layouts.
Note: For the purposes of experimentation, you select Activities > Copy Layout then Edit and perform these steps
on a Test layout.
2. Right-click on the barcode and select Copy:
77
3. Click somewhere on a blank area of the pass. Right-click and select Paste.
4. Your pass now looks like the following:
78
5. Drag the new barcode you created to a position slightly below the original and aligning the vertical bars.
You can use the left and right arrows on your keyboard to achieve exact alignment. Save your pass.
Appendix C: Using the Printers table to handle control codes for printers
Control codes are a series of characters (usually one to five) that the printer recognizes as commands to perform
certain functions. The most common is for cutting the paper at the end of a receipt, but they can also be used to
change the color, font or style of text being printed. The control codes for printers are generally found in a
programmer’s or developer’s manual, but some manufacturers include them in the user’s manual.
While it is possible to enter the control codes directly into a receipt or Credit Card Receipt layout, it is
recommended to use the Printers table and make a generic layout. The Printers table allows the use of
different brands and models of printers that share the layout. The Printers table also makes it simpler in the
future if the printer for a salespoint is changed to a different brand or model.
The first step is to verify or add the printer’s control codes to the Printers table. Many printers’ control codes
already exist in the Printers table. You can see all of the printers already in the Printers table from the Sales
> Tools > Sales Pt Setup > Printing > Dot Matrix Printer dropdown.
Note: The label Dot Matrix Printer is retained from older versions of Salesware. Other types of printers are now
supported by the Printers table as well.
If you need to add a printer, you can use SQL Server Management Studio. While this document shows entering the
codes in the decimal format of their ASCII (American Standard Code for Information Interchange) value, they are
displayed in Management Studio and Helper utility as the actual characters (see the ASCII character codes charts at
the end of this appendix). Some of these are not “displayable,” so they show up as a square, while others display as
“normal” characters. Here is an example of what may be displayed:
79
To find out what the characters are that aren’t displayed, they can be copied from Management Studio or Helper
utility and pasted into TextPad (www.textpad.com). This application shows the decimal format of the ASCII
character; for example:
Display this by moving the mouse cursor in front of the character that can’t be displayed.
If the necessary control codes or printer needs to be added, accesso Siriusware has developed a script to be run in
Microsoft SQL Server Management Studio (SQL Server 2008 or 2012). Here is a sample script for a Star TSP600
printer:
DECLARE
@P_Name
VARCHAR(30),
@Reset
VARCHAR(30),
@DoubleWide
VARCHAR(30),
@DoubleHigh
VARCHAR(30),
@Condensed
VARCHAR(30),
@Bold
VARCHAR(30),
@Italics VARCHAR(30),
@Underline
VARCHAR(30),
@Pitch_10 VARCHAR(30),
@Pitch_12 VARCHAR(30),
@Pitch_15 VARCHAR(30),
@NLQ_Print
VARCHAR(30),
@Color_1 VARCHAR(30),
@Color_2 VARCHAR(30),
@Color_3 VARCHAR(30),
@Color_4 VARCHAR(30),
@Landscape
VARCHAR(30),
@Cut_Code VARCHAR(7)
SELECT
SELECT
SELECT
SELECT
SELECT
SELECT
SELECT
SELECT
SELECT
SELECT
SELECT
@P_Name='STAR TSP600'
@Reset=CHAR(27)+CHAR(64)
@DoubleWide=CHAR(14)
@DoubleHigh=CHAR(27)+CHAR(14)
@Condensed=''
@Bold=CHAR(27)+CHAR(69)
@Italics=''
@Underline=CHAR(27)+CHAR(45)+CHAR(1)
@Pitch_10=''
@Pitch_12=CHAR(27)+CHAR(77)
@Pitch_15=CHAR(27)+CHAR(80)
80
SELECT
SELECT
SELECT
SELECT
SELECT
SELECT
SELECT
@NLQ_Print=''
@Color_1=CHAR(27)+CHAR(53)
@Color_2=CHAR(27)+CHAR(52)
@Color_3=''
@Color_4=''
@Landscape=''
@Cut_Code=CHAR(27)+CHAR(100)+CHAR(3)
IF EXISTS (SELECT p_name FROM printers where p_name=@P_Name)
UPDATE printers SET
reset=@Reset,
doublewide=@Doublewide,
doublehigh=@DoubleHigh,
condensed=@Condensed,
bold=@Bold,
italics=@Italics,
underline=@Underline,
pitch_10=@Pitch_10,
pitch_12=@Pitch_12,
pitch_15=@Pitch_15,
nlq_print=@NLQ_Print,
color_1=@Color_1,
color_2=@Color_2,
color_3=@Color_3,
color_4=@Color_4,
landscape=@Landscape,
cut_code=@Cut_Code
WHERE p_name=@P_Name
ELSE
INSERT INTO printers
(p_name,
reset,
doublewide,
doublehigh,
condensed,
bold,
italics,
underline,
pitch_10,
pitch_12,
pitch_15,
nlq_print,
color_1,
color_2,
color_3,
color_4,
landscape,
81
cut_code)
VALUES
(@P_Name,
@Reset,
@Doublewide,
@DoubleHigh,
@Condensed,
@Bold,
@Italics,
@Underline,
@Pitch_10,
@Pitch_12,
@Pitch_15,
@NLQ_Print,
@Color_1,
@Color_2,
@Color_3,
@Color_4,
@Landscape,
@Cut_Code)
SELECT * FROM printers WHERE p_name=@P_Name
It is not necessary to understand this entire script, but a couple of things are noteworthy. First, this script adds the
printer and codes for a printer that is not currently in the Printers table. However, if a printer with the same
P_Name is listed in the Printers table, this script updates the codes for it. Also, the series of SELECT
statements in the second section needs to be filled out with the control codes for the printer. As seen in this
example, not all fields can be filled in because not all printers support all of the functions available. When
necessary to leave a field blank, use two single quotes as shown in the example. When filling in a control code, the
char() function is used so that characters that cannot be typed can be entered. Also note that the control
characters are listed in decimal format. Most codes are supplied in the manual as the “code” and hexadecimal and
sometimes decimal.
Using the manual, fill out the codes for all available options. Here is an example of how the manual shows a code:
This is the information on selecting emphasized (bold) printing for the Star TSP600 printers. In order to add this
entry to the script, it is necessary to convert the hexadecimal (HEX) number to decimal. This can be done with the
ASCII charts at the end of this document. Using these charts, 1B becomes 27 and 45 becomes 69.
These are then added to the script as:
82
SELECT @Bold=CHAR(27)+CHAR(69)
Some printer functions have variables that give an option for that function. For example:
With functions like this, it is necessary to choose what option is to be used, and then add that to the script. For
example, if it is desired to have the paper partially cut without feeding paper first, this code would be used:
1B
64
01
Converted to decimal and added to the script, it appears as:
SELECT @Cut_Code=CHAR(27)+CHAR(100)+CHAR(1)
Once this script is completed, use Query Analyzer or Management Studio to run it on the SiriusSQL database. This
adds (or updates, if the printer name is already in the Printers table) the controls for the printer.
After the Printers table has been updated, modify the layouts to use the new entries in the Printers table.
For example, to add the cut_code function to a standard sales receipt, the following line would be added to the
end of the layout:
<|printers->cut_code|>
83
This references the Printers table and the field named cut_code. To use another function, reference the field
in the table, such as color_1, bold, underline, etc.
The final step (aside from testing) is at the salespoint. After making changes to the Printers table on the server,
it is recommended to delete the local Printers table from the Sales\Data folder. This causes the table to be
rebuilt from the server when Sales is launched. Launch Sales and log in. Go to Tools > Sales Pt Setup > Printing
and select the Dot Matrix Printer from the list for the printer connected to the salespoint. Do this for all layouts
that use this printer.
Now test. If the printer does not seem to respond to the control codes, verify that they are being sent to the printer.
This can be done by changing the port for the printer driver to FILE: and printing. See the documentation for the
PrintToFilePath .INI setting in the Salesware .INI Settings Reference document for information on where
the file prints. Open the file in Notepad and verify that the characters that were added to the Printers table
appear in the file. If not, this indicates an issue with Sales. It’s possible that the wrong Dot Matrix Printer is
selected in the Printing setup. Verify that there is not more than one printer with the same name. It’s also
possible that the modified layout was not updated at the salespoint. Finalizing a sale causes it to update. For more
information on updating layouts, see Appendix A: Packing and unpacking layouts.
If the characters do appear in the text file, verify that they are correct by checking the
programmer’s/developer’s/user’s manual. If they are correct, it’s possible to test them out within the printer driver.
For example, to test the cut code for a Star TSP600 in the printer driver, open the printer driver properties and
switch to the Printer Commands. Two fields here can be used for testing control codes: Begin Print Job and End
Print Job. When testing font formatting changes, it is recommended to use the Begin Print Job field; for cut
codes, use the End Print Job field.
Enter the control code in hexadecimal form. This can be pulled from the printer’s manual as before or converted
from decimal using the ASCII chart at the end of this document.
In our example, the characters 27, 86 and 1 are converted to 1B, 56 and 01 and entered into the End Print Job
field as shown:
84
Click Apply and it changes to:
<1B>V<01>
It is recommended to close the Properties window, reopen it and verify that the characters are still listed. Often
Windows does not save these settings, so be certain they are there before continuing.
After verifying that the change was made, print a test page from the driver and the receipt is cut at the end.
Note: Character 0, the first character in the ASCII chart, is the NULL character. This character has a decimal form
of 0. Some printers do use this character in the control codes for some functions. Unfortunately, this character does
not pass through from Sales to the printer. With some functions, this can be corrected by using the actual 0
character (with decimal value of 48). For other functions, it may be possible to use the ASCII character with
decimal value of 1 (SOH) or another character instead of 0.
85
86
87