1
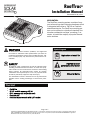
RoofTrac®
Installation Manual
Date Modified: 08/13/07
Installation steps overview
1)
2)
3)
4)
Utilizing the Splice Kit
Attaching Support rails to the TileTrac®/FastJack®
Installing modules
Clean up and safety
Step 1: Utilizing the Splice Kit
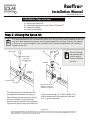
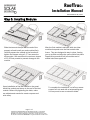
It is recommended that you pre-install the splice kit on the ground for easier handling of the support rails. After installing the splices, set the lengths against the building. Typically, the installer
on the roof can pull the lengths to the roof without any mechanical equipment and handle the
lengths as one unit.
Felt Tip Pen
Drill
Splice holes—
mark with
permanent ink
pen
Use of a Unibit®
will decrease drill
time to approximately 3 seconds
per hole
Uni-Bit®
V-groove
drill guide
Lower Support
1/8” Gap
SU
P
PO
RT
R
SU
P
AIL
Intersections of the
reference mark and
extended “V” groove.
Turn the support rails upside down (as
illustrated) so the bottom is facing up.
Place the lower support over the rails to
use as a template. Center the lower
support over the rails and mark along the
V-groove drill guide using a small felt pen.
PO
RT
R
AIL
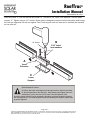
Drill two holes using a 1/2” #10 UniBit®. Drill
at the intersection of the reference mark and
the “V” groove drill guide.
Page 2 of 7
COPYRIGHT PROFESSIONAL SOLAR PRODUCTS 2007: All information contained in this manual is property of Professional Solar Products
(PSP). TileTrac® is a registered trademark for PSP and is covered under U.S. patent #5,746,029. RoofTrac® and FastJack® is a registered
trademark for PSP and is covered under U.S. patent #6,360,491.