1
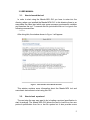
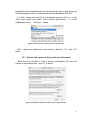
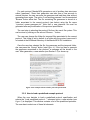
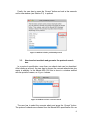
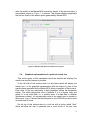
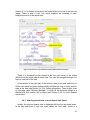
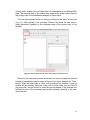
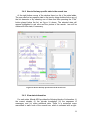
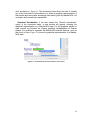
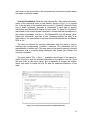
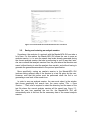
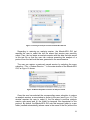
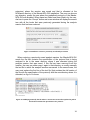
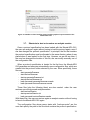
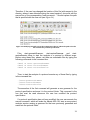
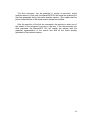
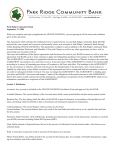
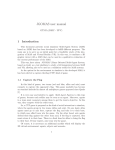
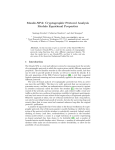
The Maude-NPA GUI:
Installation and user manual
January 2012
Sonia Santiago
Carolyn L. Talcott
Santiago Escobar
Catherine Meadows
José Meseguer
INDEX
1. INTRODUCTION ........................................................................................................... 3
2. INSTALLATION ............................................................................................................ 4
3. USER MANUAL ............................................................................................................ 5
3.1. How to launch the tool ........................................................................................ 5
3.2. How to load a protocol....................................................................................... 5
3.2.1. How to load a protocol file from the user file system .................................. 6
3.2.2. How to load a predefined example protocol ............................................... 7
3.3. How to select an attack and generate the protocol search tree .................... 8
3.4. Graphical representation of a protocol search tree ......................................... 9
3.4.1. How to generate one or more search tree levels ..................................... 10
3.4.2. How to find any specific state in the search tree ...................................... 11
3.4.3. View state information .............................................................................. 12
3.4.4. The window manager ............................................................................... 15
3.4.5. Export a search tree as an image............................................................. 16
3.4.6. Saving the search tree information as a text file ....................................... 17
3.5 Saving and restoring an analysis session ....................................................... 17
3.6. Loading the specification of a Maude-NPA state ........................................... 20
3.7. Shortcuts to launch the Maude-NPA GUI........................................................ 21
4. FURTHER INFORMATION ......................................................................................... 24
1. INTRODUCTION
This document describes the prototype version of the Graphical User
Interface (GUI) of the Maude-NRL Protocol Analyzer (Maude-NPA) and gives
instructions for its installation and use.
The aim of this graphical user interface is to give the user a complete
animation of the Maude-NPA search tree generation process which she can
control at will.
This document is organized as follows. In Section 2 we provide the
instructions to install the Maude-NPA GUI package. Section 3 describes all
the features of the Maude-NPA GUI, explaining step by step how the GUI can
be used. Finally, in Section 4 you will find some further information and useful
links.
Throughout this manual, we assume a minimum acquaintance with the
Maude-NPA tool. The Maude-NPA GUI uses Maude-NPA version 2.0. We
refer the user to the Maude-NPA manual that is available online at
http://maude.cs.uiuc.edu/tools/Maude-NPA
2. INSTALLATION
The Maude-NPA requires the Graphviz library to be installed on your
computer. We have succesfully tested the Maude-NPA GUI on Graphviz
versions 2.20.2 and 2.24.0. For Mac OS X 10.5 or Mac OS X 10.6, please,
download and install the Graphviz library from the following web site:
www.graphviz.org/Download.php
Note that there is no binary installation package for Mac OS X 10.4.
Instead, you should download the source files from the following link:
www.graphviz.org/Download_source.php
and build the library manually.
The current version of the Maude-NPA GUI works on Mac OS X 10.4, Mac
OS X 10.5 and Mac OS X 10.6, and is available online at:
www.dsic.upv.es/grupos/elp/Maude-NPA_GUI
For installation, just unpack the package at the desired directory. The
Maude-NPA tool is already included into this package.
3. USER MANUAL
3.1.
How to launch the tool
In order to start using the Maude-NPA GUI you have to enter into the
directory where you installed the Maude-NPA GUI. In this directory there is an
executable file called start which sets some necessary environment variables
and launches the tool. To execute this file just double click on it or type in the
following command line:
./start
After doing this, the window shown in will appear:
This window contains some information about the Maude-NPA tool and
some basic instructions to start using this GUI.
3.2.
How to load a protocol
The next step the user may want to do is loading a protocol specification to
start its analysis. The Maude-NPA GUI allows the user to load his or her own
protocol specification from his or her file system but it also provides some
predefined protocol specifications. We recommend the user to start using one
of these example protocols to become familiar with the Maude-NPA GUI.
For both, loading her protocol or a predefined protocol, click on on the
“File” menu option and select “Load protocol specification…” or “Load
predefined protocol…”, as shows.
Both options are explained in more detail in Sections 3.2.1 and 3.2.2
below.
3.2.1. How to load a protocol file from the user file system
When the user chooses to load a protocol specification file from her
system, a new window (see ), is shown:
For each protocol, Maude-NPA generates a set of auxiliary data structures
called “grammars”. Since their generation can take from a few seconds to
several minutes, the user can save the grammars and load them later without
generating them again. The option “Load existing grammar” and its associated
“Browse” button allow that. The file containing the grammars is stored at a
folder associated to the current protocol (see below) using the file name
“<protocol name>-grammars.txt”. Note that a new grammar file must be
generated after any modification of the protocol specification.
The next step is selecting the protocol file from the user’s file system. This
can be done by clicking on the second “Browse…” button.
The user can change the folder for temporal files associated to the current
protocol. This folder is set by default to a folder with the protocol name and it
is located at the NPAAssist directory of the Maude-NPA GUI installation.
Once the user has selected the file, the grammars and the temporal folder,
she can press the “Accept” button (see ). If the tool has to generate
the grammars associated to the protocol, a message will be shown to the
user. After generation, a new window (see Section 3.3) is shown up.
3.2.2. How to load a predefined example protocol
When the user decides to load a predefined protocol specification and
selects the “Load predefined protocol…” submenu option, a new window (see
) is displayed. This window contains a list of the predefined protocols.
The user has to select one of these list elements.
Finally, the user has to press the “Accept” button and wait a few seconds
until a new window (see Section 3.3) is opened.
3.3.
How to select an attack and generate the protocol search
tree
In a protocol specification, more than one attack state can be described.
After loading a protocol, the user has to choose the concrete attack state she
wants to analyse. In the Maude-NPA GUI this is done in a window entitled
with the protocol’s name, as shows.
The user has to select the concrete attack and press the “Accept” button.
The protocol’s attacks are collected from the Maude-NPA specification file: we
refer the reader to the Maude-NPA manual for details. A few seconds later, a
new window, shown in , is opened. This window displays graphically
the first two levels of the search space generated by Maude-NPA.
3.4.
Graphical representation of a protocol search tree
This section gives a brief explanation about the window that displays the
search tree and the features it provides.
At the left side of the window there is a big frame which will display the
search tree, i.e. the graphical representation with the shape of a tree of the
search space generated by the Maude-NPA during its analysis of the protocol.
Each node of the tree represents a state generated during the backwards
search. The state background color is lavender if it is a regular state and
green if it is an initial state, i.e., a solution state. If a state has no children
(predecessor states), its corresponding node at the search tree is painted in
white color. shows the search space for the XOR-NSL protocol when
an initial state is found.
On the top of this window there is a tool bar with a button called “Next”
which will allow the user to generate one or more levels of the tree (see
Section 3.4.1 for further information) and some buttons to zoom in on the tree
image. There is also a color key which explains the meaning of each
background color of the search tree.
There is a thumbnail picture placed at the top right corner of the frame
which shows the entire search space tree. The user can navigate through it to
focus in one part of the tree.
At the bottom of the right part of the window there is an area with a list of
all the tree states and some buttons which will allow the user to find a specific
state at the tree (see Section 3.4.2 for further information). There is also a tab
on this area called “Window Manager”, in which all the windows related to a
Maude-NPA GUI session will be listed (see Section 3.4.4 for more detailed
information).
3.4.1. How to generate one or more search tree levels
Initially, the protocol search tree is displayed with the first two node levels.
In the first level there is only one node, called the “root node”, which is a
dummy node. Indeed, the root node does not correspond to any Maude-NPA
state. The second level of the search tree contains the attack states that we
are going to use for the backwards analysis of the protocol.
The user can generate more one level by clicking on the “Next” button (see
). After clicking it, the message “Please, wait while the next level is
being generated” appears at the message area in the bottom part of the
window.
Moreover, the user can generate more than one level by typing the desired
number of backwards analysis steps at the text box place besides the “Next”
button. When an initial state is found or the analysis has finished, a pop-up
window will be showed, telling so to the user. In both cases, the user should
only press the “Accept” button to close the pop-up window. If the analysis has
finished the text of the message area is also updated, reporting to the user
about that fact.
3.4.2. How to find any specific state in the search tree
At the right bottom corner of the window there is a list of the state labels.
The user can find any specific state in the tree by doing double-click on any of
the list elements or by selecting one of them and then pressing the “Find”
button placed below the list, as shows. The selected state will
appear highlighted in red color and the picture of the search tree will be
centered on this state, if necessary.
3.4.3. View state information
For each state, Maude-NPA provides the following blocks of information: (i)
the current strands, (ii) the intruder knowledge, (iii) the sequence of
messages, and (iv) some additional data. There is a contextual menu
associated to each node of the search tree, which is activated with a right
click, as shown in . This contextual menu allows the user to consult
any of the four blocks of information or to obtain a graphical representation of
the strands and the intruder knowledge information given by Maude-NPA. Let
us explain both visualization capabilities.
Graphical Visualization. If the user selects the “Strands visualization”
option of the contextual menu, a new window will appear, showing the
graphical representation of a Maude-NPA state. For the graphical display of
state strands we followed the original graphical representation of strands
shapes, but modified to represent the Maude-NPA specific features, such as
the notion of time. shows the graphical representation of a MaudeNPA state.
For the graphical representation of a state, a strand is drawn as a vertical
sequence of dots connected between them by a double vertical line. Each dot
corresponds to an input or output message in the strand and is also called a
node. In the Maude-NPA both, intruder and honest principals behaviors, are
represented with strands and, thus, shown in the graphical representation. To
differentiate between an intruder and an honest strand, we use grey and black
for honest strands and green for intruder strands. The aim of having two
colors for honest strands is to represent the notion of time: grey color for the
past and present, and black color for the future. The vertical bar used in
Maude-NPA for denoting the time position is here represented by a slanting
line.
The intruder knowledge is integrated into the graphical representation by
using different colors for the messages attached to each node. We use red if
the message is known by the intruder and black if the message is not known.
For messages that do not yet belong to a concrete strand, we use a single dot
instead of a vertical sequence of dots.
The menu option “File -> Save picture”, available in the left part of the menu
bar, allows the user to save the picture of the state as an image file. Once the
user clicks on this menu option, she is requested to choose the location where
she wants to save the image.
Textual Visualization. When the user chooses the “View state information”
option of the contextual menu, a new window, shown in , is opened
too. In the top side of this window there is a set of “checkbox” elements. Each
one of these “checkbox” elements is associated to each type of specific
information that Maude-NPA obtains for each state, i.e. there is a “checkbox”
associated to the current strands information, another one that corresponds to
the intruder knowledge, and so on. The Maude-NPA tool will always show,
before this information, two lines of text, indicating whether the state is an
initial state or not, and whether it has been proved unreachable by the MaudeNPA or not.
The user can choose the concrete information that she wants to see by
selecting the corresponding “checkbox” elements. This information will be
represented in a textual way. If the user does not yet want to see any concrete
information that is currently being displayed, she should just unselect the
concrete “checkbox”.
The menu option “File -> Save…”, available in the left part of the menu bar,
allows the user to save the selected information of the state in a text file. Once
the user clicks on this menu option, she is requested to choose the location
where she wants to create the text file with the selected information of the
state.
3.4.4. The window manager
As Section 3.4.3 says, for each stateof the search tree, two windows can
be opened through the contextual menu associated to it. Moreover, the user
may explore different states of the search space tree to compare the
information of several states at the same time. This means that the user may
have many opened windows, so that it is necessary to manage all of them in
some way. In order to solve this problem, the Maude-NPA GUI offers to the
user a window manager, which is available at the area in the right bottom
corner of the window that shows the representation of the search tree. The
user only has to click on the tab with title “Window Manager” to see a list with
all the active windows associated to each state of the search tree, as shows.
Whenever the user wants to bring to the front an active window, she must
click on the corresponding “Window Manager” item.
3.4.5. Exporting a search tree as an image
The search tree displayed by the Maude-NPA GUI can be exported as an
image, more specifically as a file either in the Encapsulated PostScript (.eps)
format or in the Portable Network Graphics (.png) format. This option is
available in the menu option “File -> Export Image”.
To export the tree as an image the user has to select the correponding file
format (.eps or .png), choose the directory where he or she wants to export
the image and write the name of the file (including its extension), as shown
in .
3.4.6. Saving the search tree information as a text file
The Maude-NPA GUI also allows the user to save the information of the
search tree into a text file, in a similar way as the textual information of a
Maude-NPA state is shown to the user but for all the states of each generated
level. This feature is available in the menu option “File -> Save search tree
information …”.
The user simply has to choose where she wants to save the text file. The
tool will automatically generate a “.txt” file containing all the information in the
directory selected by the user. In we provide an example of how this
text file looks like.
3.5.
Saving and restoring an analysis session
Sometimes, the analysis of a protocol with the Maude-NPA GUI can take a
lot of time. For this reason, the Maude-NPA GUI allows the user to save an
analysis session, i.e. to save the search tree levels already generated during
the current analysis session that she is performing in such a way that, later,
she can continue that analysis session from the point where that session was
saved, without having to start the analysis from scratch and without having to
generate the grammars associated to the protocol specification.
More specifically, saving an analysis session in the Maude-NPA GUI
involves writing relevant data of the session in a text file given by the user.
However, note that this action must be performed when the tool is not
generating a new level of the search tree.
In order to save an analysis session, the user must select, in the window
that shows graphically the search tree, the menu option “File -> Save
Session…”. Then, she is required to select the directory and the name of the
text file where the current analysis session will be saved (see ).
Once the user has specified the text file, the Maude-NPA GUI will
automatically write in this text file the necessary data of the current analysis
session.
Regarding to restoring an analysis session, the Maude-NPA GUI just
requires the user to select the text file where that session was previosly
saved. Then, the tool starts an analysis session with the data that was saved
in this text file so that the user can continue executing the analysis of a
protocol from the last level that was generated in the saved session.
The user can restore a previously saved session by selecting the menu
suboption “File -> Restore Session…” in the main window of the Maude-NPA
GUI, as shows.
Once the user has selected the corresponding menu suboption to restore
an analysis session, a new window is shown to the user (see ). This
window requires the user to select (i) the file where a previous analysis
session was saved and (ii) the folder for temporal files associated to this
protocol. By default, the Maude-NPA GUI sets this temporal folder to a new
folder (created automatically) whose name is the name of the file (without the
extension) where the session was saved and that is allocated at the
NPAAssist directory of the Maude-NPA GUI installation. The user can choose
any directory, except the one where the predefined protocols of the MaudeNPA GUI are allocated. When these two fields have been filled in by the user,
she has to press the “Accept” button and a new window will display the search
tree with all the levels that were previously generated during the analysis
session that has been restored.
When restoring a previously saved analysis session, the Maude-NPA GUI
needs the file that contains the specification of the protocol that is being
analyzed to be in the same directory where it was allocated during the
analysis session that was saved. If this file has been removed from this
location, the user can either copy it again in that directory or modify manually
the text file in which the analysis session was saved. In the second case, the
user must replace the first line of the text file (that contains the old location of
the file with the specification of the protocol) with the new directory where it is
allocated, as shows.
3.6.
Loading the specification of a Maude-NPA state
The Maude-NPA GUI allows the user to obtain the graphical and textual
representation of any Maude-NPA state, not only the ones that have been
generated by the GUI. This feature is very useful and allows users to keep
apart textual copies of states and display them as explained in Section 3.4.3.
The user can load a file with the specification of a Maude-NPA state by
selecting the menu suboption “File -> Load a Maude-NPA state
specification…” in the main window of the Maude-NPA GUI, see . As
a result, a new window (see ) will be opened. In this window, the
user has to browse her file system to select the file that contains the state
specification. Once this has been done, the user must click on the “Accept”
button.
After clicking on the “Accept” button, the Maude-NPA GUI will open a new
window (see ). This window allows the user to view both the textual
and the graphical representations of the Maude-NPA state, by clicking on the
buttons “Show Textual Representation” or “Show Graphical Representation”
respectively.
3.7.
Shortcuts to start or to restore an analysis session
Once a protocol specification has been loaded with the Maude-NPA GUI,
the user can analyze it again without having to load the protocol again, even if
she has changed the protocol specification. In principle, the file that contains
the protocol specification must be allocated in the same directory where it was
placed when it was loaded for the first time. However, as we will see later, if
the user has changed the location of this file, she can modify manually one of
the configuration files.
When a protocol specification is loaded for the first time, the Maude-NPA
GUI generates and executes automatically some configuration files, which are
created into the protocol folder selected by the user. More specifically, these
files are:
start-generateGrammar
start-restoreGrammar
startup-generateGrammar.txt
startup-restoreGrammar.txt
load-npa-assist-generateGrammar.maude
load-npa-assist-restoreGrammar.maude
These files (plus the following three) are also created when the user
restores a previously saved analysis session:
start-restoreSession
startup-restoreSession.txt
load-npa-assist-restoreSession.maude
With these files, the user can restore again an analysis session without having
to launch the Maude-NPA GUI again.
The configuration files whose name starts with “load-npa-assist” are the
ones that specify the path to the file which contains the protocol specification.
Therefore, if the user has changed the location of this file (with respect to the
directory where it was allocated during the saved session), she must edit the
second line of the corresponding “load-npa-assist…” file and replace the path
that is specified with the new one (see ).
Files
start-generateGrammar,
start-restoreGrammar
and
startrestoreSession allow to start the analysis of a protocol in different ways.
Before using these files, please, set them as executable files by typing the
following commands in the command line:
chmod +x start-generateGrammar
chmod +x start-restoreGrammar
chmod +x start-restoreSession
Then, to start the analysis of a protocol execute any of these files by typing
in the command line:
./start-generateGrammar
./start-restoreGrammar
./start-restoreSession
The execution of the first command will generate a new grammar for the
protocol specification and save it in the protocol folder. This command is the
one that must be used whenever the user has modified the protocol
specification.
If a protocol specification has not been modified, the user can execute the
second command which will make the Maude-NPA GUI start a new protocol
analysis session reusing a grammar file that was previously generated and
saved into the protocol folder.
The third command can be executed to restore a previously saved
analysis session. In this case, the Maude-NPA GUI will reuse the grammar file
that was generated during the saved analysis session. This means that the
protocol specification of the saved session cannot be modified.
After the execution of the first two commands, the window to select one of
the attacks of the procotocol is shown to the user. If the user executes the
third command, the Maude-NPA GUI will display the window with the
graphical representation of the search tree with all the levels already
generated of the restored session.
4. FURTHER INFORMATION
This document contains the most detailed information about how to install
and use the Maude-NPA GUI. However, if you would like to read some more
specific information about this GUI, please visit the “Documentation” section at
the Maude-NPA GUI homepage at
www.dsic.upv.es/grupos/elp/Maude-NPA_GUI
You can also obtain specific information about the Maude-NPA tool at its
homepage, whose link is maude.cs.uiuc.edu/tools/Maude-NPA/. In this
website, publications and other references about the Maude-NPA are
available. Furthermore, the user can download the latest version of the
Maude-NPA from the “Downloads” section.
If you are interested in implementing graphical interfaces for formal
reasoning tools, you might like to visit the InterOperability Platform Homepage
at:
http://jlambda.com/~iop/
and the Interactive Maude homepage at:
www.csl.sri.com/users/clt/IMaudeWeb/
These two frameworks have been used to implement the Maude-NPA GUI.
In case you have any other question or doubts, or if you would like to report
any bug you experience while using the Maude-NPA GUI, please do not
hesitate to contact Sonia Santiago at [email protected] .