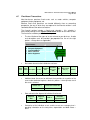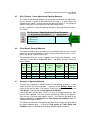
1
FIN-X Solutions – Financial Solution Version 6 User Manual
Page 1 of 58
FIN-X Solutions
User Manual
Financial Spreadsheet
Solution Version.6
FIN-X Solutions – Financial Solution Version 6 User Manual
Page 2 of 58
Thank you for purchasing the FIN-X Solutions Financial
Solution. Please also read the installation instructions
carefully before installing your solution for use.
This user manual has been designed to provide you with
a step-by-step guide to using the financial solution to
ensure that you enter information accurately, and as a
quick reference guide when required.
Use of the FIN-X Solutions Financial Solution is subject
to the standard terms and conditions of use which are
included in the Software Licence Agreement included in
Appendix B.
FIN-X Solutions – Financial Solution Version 6 User Manual
Page 3 of 58
Table of Contents
Pages
SECTION 1 – SOLUTION LOGON................................................................................. 5
1.1
Financial Solution Logon without Validation .................................................... 5
1.2
Financial Solution Logon after Validation ........................................................ 6
1.3
Financial Solution Password Change.............................................................. 7
SECTION 2 – SOLUTION INTRODUCTION................................................................... 8
2.1
Introduction ..................................................................................................... 8
2.2
Entering Data .................................................................................................. 9
2.3
Data Capture Control ...................................................................................... 9
2.4
Validating Data................................................................................................ 9
SECTION 3 – MASTER DATA ..................................................................................... 10
3.1
Introduction ................................................................................................... 10
3.2
Business Data............................................................................................... 10
3.2.1 Basic Business Information ........................................................................... 10
3.2.2 Reporting Month ........................................................................................... 11
3.2.3 Start Date for Financial Year ......................................................................... 12
3.2.4 Bank Account Information ............................................................................. 12
3.2.5 Loan Account Information ............................................................................. 12
3.2.6 Hire Purchase / Lease Agreement Data ........................................................ 13
3.2.7 Opening Balances......................................................................................... 13
3.3
Client Table................................................................................................... 14
3.4
Supplier Table............................................................................................... 16
3.5
Expense Table .............................................................................................. 17
SECTION 4 – DATA INPUT.......................................................................................... 19
4.1
Maintaining Balance within the Solution ........................................................ 19
4.2
Income Related Transactions........................................................................ 22
4.2.1 Capture Invoices ........................................................................................... 22
4.2.2 Print Invoices ................................................................................................ 24
4.2.3 Client Payments............................................................................................ 25
4.2.4 Bad Debts ..................................................................................................... 28
4.2.5 Print Client Statements ................................................................................. 29
4.3
Expense Related Transactions...................................................................... 30
4.3.1 Capture Expenses......................................................................................... 30
4.3.1.1 Examples ...................................................................................................... 33
4.3.1.2 Cost of Sales................................................................................................. 35
4.3.1.3 Drawings by Business Partners..................................................................... 36
4.3.1.4 Drawings for Petty Cash................................................................................ 36
4.3.1.5 Stock Adjustments ........................................................................................ 37
4.3.1.6 VAT Payments (and Refunds)....................................................................... 38
4.3.1.7 Business Tax Payments................................................................................ 39
4.3.1.8 Fixed Asset Purchases ................................................................................. 40
4.3.1.9 Hire Purchase / Lease Agreement Transactions ........................................... 40
4.3.1.10 Accounts Payable Transactions................................................................ 40
4.3.1.11 Dividend Payment Transactions ............................................................... 41
4.3.1.12 Share Capital / Member Interest Transactions.......................................... 41
4.3.1.13 Retained Earnings Transactions............................................................... 42
4.3.2 Petty Cash Expenses.................................................................................... 42
4.4
Hire Purchase Transactions .......................................................................... 44
4.4.1 Current Agreements from Previous Years..................................................... 44
FIN-X Solutions – Financial Solution Version 6 User Manual
Page 4 of 58
4.4.2 New Agreements in the Current Year............................................................ 44
4.4.3 Accounting for Agreement Instalments / Payments ....................................... 45
4.4.4 Entering Agreement Balances in the Current Year ........................................ 45
4.5
Fixed Asset Transactions .............................................................................. 47
4.5.1 Current Fixed Asset Purchases..................................................................... 48
4.5.2 Private Use of Fixed Assets .......................................................................... 49
4.5.3 Fixed Asset Disposal Transactions ............................................................... 49
4.5.4 Prior Year Fixed Asset Purchases................................................................. 49
SECTION 5 – FINANCIAL SOLUTION REPORTS....................................................... 50
5.1
Performance Overview.................................................................................. 50
5.2
Balance Sheet............................................................................................... 50
5.3
Income Statement ......................................................................................... 50
5.4
Divisional Income Statement......................................................................... 50
5.5
Cash Flow Report ......................................................................................... 50
5.5.1 Cash Flow Reconciliation .............................................................................. 51
5.6
VAT Report ................................................................................................... 52
5.7
Petty Cash Report......................................................................................... 52
5.8
Loan Account Report .................................................................................... 53
5.9
Taxation Report ............................................................................................ 53
SECTION 6 – OPENING BALANCES .......................................................................... 54
6.1
Introduction ................................................................................................... 54
6.2
Sundry Accounts Opening Balances ............................................................. 54
6.2.1 Debtors Opening Balances ........................................................................... 54
6.2.2 Inventories Opening Balances ...................................................................... 54
6.2.3 Creditors Opening Balances ......................................................................... 55
6.2.4 VAT Opening Balances ................................................................................. 55
6.3
Bank Account Opening Balances .................................................................. 55
6.4
Loan Account Opening Balances .................................................................. 55
6.5
Hire Purchase / Lease Agreements Opening Balances................................. 56
6.6
Fixed Assets Opening Balances.................................................................... 56
6.7
Accuracy of Opening Balances ..................................................................... 56
APPENDIX A – INSERTING A BUSINESS LOGO ....................................................... 57
APPENDIX B – SOFTWARE LICENCE AGREEMENT................................................ 58
FIN-X Solutions – Financial Solution Version 6 User Manual
Page 5 of 58
SECTION 1 – SOLUTION LOGON
1.1
Financial Solution Logon without Validation
Once the initial username and password have been set up, you can continue to
access the financial solution without having validated the product.
In the initial installation process,
a desktop icon is created that
allows for easy access to the
financial solution. Merely doubleclick on the desktop icon which
appears on the desktop.
Shortcut on
desktop
The financial solution will automatically open in EXCEL after double-clicking the
desktop icon. Before opening, a prompt will appear providing a security warning
for macros, as follows:
As the financial solution depends on macros to run, you must choose the
“Enable Macros” option. The logon screen that appears will include the
username you have already setup, and allow access by entering the password:
Where you enter
the password you
created previously
Indicates the number of
days that remain to
validate the product
Allows you to close
without accessing
the financial
solution
Allows you to log
on to the financial
solution
After entering the password, simply click on the “Logon” option. This will open
the financial solution. If the correct password is not provided, access to the
financial solution will be denied.
FIN-X Solutions – Financial Solution Version 6 User Manual
Page 6 of 58
1.2
Financial Solution Logon after Validation
After completing the validation process, the financial solution logon screen
reflects only your username and password tab when accessing the solution.
After entering the password, simply click on the “Logon” option. This will open
the financial solution. If the correct password is not provided, access to the
financial solution will be denied. If the correct password is provided, the financial
solution will open and reflect the Index page as follows:
FIN-X Solutions – Financial Solution Version 6 User Manual
Page 7 of 58
1.3
Financial Solution Password Change
After initially creating a password to protect your financial solution from
unauthorised access, you may consider it necessary to change this password.
To do this, you simply click on the button provided on the solution logon screen
(to the right of the password tab).
Provides for
changes to your
password
After clicking on the password-change button on the logon screen, a screen will
appear requesting that you confirm that you wish to change your password.
If you want to proceed with changing your password, simply click on the “Yes”
button. This will bring up the next screen where your current password must be
entered.
Type your current
password here and
press “OK”
After entering your current password, click on the “OK” button. This will bring up
the next screen where your new password must be entered.
Type your new
password here and
press “OK”
A confirmation screen will then appear that reflects the password and allows you
to accept it – simply click on the “Yes” option to confirm the password.
FIN-X Solutions – Financial Solution Version 6 User Manual
Page 8 of 58
SECTION 2 – SOLUTION INTRODUCTION
2.1
Introduction
The financial solution consists of three key areas:
Master Data, where information regarding your business, clients, suppliers
and types of expenses is entered. This master data is then used on an
ongoing basis when income and expenses are captured.
Data Input, where income is captured (invoices and customer payments),
expenses are captured (also petty cash), hire purchase transaction data is
captured and fixed asset information is captured.
Reports, allowing for automated reports for a variety of purposes.
After accessing the financial solution, an Index page is displayed. The three key
areas are clearly identifiable on this screen.
At the top of the screen there are four buttons that allow you to:
Exit the financial solution.
Save the file at any stage whilst in the financial solution.
Move to the Next page in the solution (this is an alternative to using the
orange button options).
Access information About the solution (product version).
To access a particular option for data processing, simply click on the orange box
which indicates the item you want to go to.
FIN-X Solutions – Financial Solution Version 6 User Manual
Page 9 of 58
2.2
Entering Data
All the fields in the solution where input is required or can be made are light blue
in colour. Some master data is pre-defined in the tables included in the solution –
these pre-defined fields are dark blue in colour and cannot be altered.
Most of the areas where data is captured contain headings in dark green. These
headings provide you with an indication of the type of data that is captured in
each area / column.
Many of these fields contain notes that assist you in entering information - the
fields that contain assistance notes are easy to identify as they have a red
marking in the upper right-hand corner of the field. The note attached to a field
will become visible simply by moving your mouse pointer towards the red
marking on each field, as in the example below.
2.3
Data Capture Control
During the process of capturing data (specifically income and expense related
data), it is possible that you may make errors that influence the balance within
the solution. These errors will result in erroneous reports. To assist you in
ensuring the accuracy of your data capture, two simplistic control mechanisms
are included in the financial solution. The key control mechanism is explained in
more detail in section 4.1: Maintaining Balance within the Solution on
page 19.
2.4
Validating Data
During the process of capturing data (specifically income and expense related
data), it is possible that you may make errors that may not influence the financial
solution in terms of balancing, but may result in incorrect reports. Examples
include using the incorrect expense code, omitting to include the 14% VAT rate
on expenses that qualify, etc. These errors, although unnoticed, influence the
validity of the data used in drafting financial statements for your business,
processing VAT and other SARS returns, etc.
It is therefore recommended that the financial solution be used in conjunction
with the ad-hoc services of a bookkeeper / accountant. This will provide a basis
for data review to ensure the accuracy of data captured and make processing at
year-end and during the submission of SARS returns easier.
FIN-X Solutions – Financial Solution Version 6 User Manual
Page 10 of 58
SECTION 3 – MASTER DATA
3.1
Introduction
The master data sections allow you to capture basic key information for your
business and data that influences the way in which the financial solution treats
subsequent data capture.
3.2
Business Data
This screen provides for the capture of basic information regarding your
business, for banking and loan account (business partner) details, and for
opening balances on the various accounts in your financial solution.
3.2.1 Basic Business Information
This allows for the simplistic capture of your business’ name, address and
contact details; and for your business banking details as you would like them to
appear on your printed / emailed invoices.
The area that provides for the capture of the business’ name, address, etc. has
been pre-populated with example information. Simply enter the information
relevant to your business over the pre-populated information.
Example Business
VAT Registration Number: 4530199233
P O Box 1234, Weltevreden Park, 1715
Tel: +27 11 791-1234 Fax: +27 11 791-4321
Cellular: 082 576 1234
e-mail: [email protected]
The area that provides for the capture of the business’ banking details has also
been pre-populated with example information. Simply enter the information
relevant to your business over the pre-populated information.
Banking detail for invoices:
Example Business
ABSA Bank
Randburg Branch (505-705)
Account number: 4054 123 456
You also need to distinguish between the type of business (sole trader / close
corporation / company). This is because the way in which the solution deals with
certain financial transactions differs depending on the type of business. But
fortunately the financial side is dealt with for you – you just need to determine the
type of business by providing a “Y” (for Yes) in the appropriate block (note that
only one block must be marked “Y” – the other two must be “N”)
Indicate the
type of
business
N
Sole Trader / Partnership
Y
Close Corporation
N
Company
FIN-X Solutions – Financial Solution Version 6 User Manual
Page 11 of 58
If your business is registered for VAT, you then need to distinguish between
whether your VAT returns are done for two-monthly periods that are “odd” or
“even”. This classification is needed so that the appropriate months are
accounted for in the automated VAT report in the solution.
The difference between “odd” and “even” periods is simple:
If your VAT periods are such that they “overlap” at the end of a financial
year, then your VAT period is “odd”. As an example – your business yearend is end-February; and your VAT periods are Feb/Mar; Apr/May, Jun/Jul,
etc. In this case, the month of February in the Feb/Mar VAT period is in one
financial year whilst the month of March is in the next financial year.
If your VAT periods are such that they do not “overlap” at the end of a
financial year, then your VAT period is “even”. As an example – your
business year-end is end-February; and your VAT periods are Jan/Feb;
Mar/Apr, May/Jun, etc.
Based on whether your business’ VAT period overlaps with the financial year,
enter either an “O” for odd or “E” for even in the appropriate space.
Indicate the
VAT period
O
VAT Period (Odd or Even)
3.2.2 Reporting Month
The “Reporting month” field allows you to determine until which date the
financial reports must account for data that has been entered. Even though you
may have entered data up to some point in December, you may want reports that
only reflect information to the end of say August. By entering “31 Aug” in this
field, the automated reports will only include transactions for the appropriate
periods. This field has been populated with the date of 28 Feb 2010 (the most
widely used date for the last month of the current financial year).
Reporting month
28-Feb-2010
Tip: When you change the “Reporting month” date field to generate
specific reports, remember to change the date back to the last day of
the financial year to include all transactions again.
FIN-X Solutions – Financial Solution Version 6 User Manual
Page 12 of 58
3.2.3 Start Date for Financial Year
The “Financial year start date” field allows you to enter the first date of your
business’ financial year. This field has been populated with the date of
1 Mar 2009 (the most widely used date for the first day and month of the current
financial year). The “Business Tax Rate” field allows you to enter a percentage
– by entering a percentage in this field, the financial solution automatically
calculates the tax liability for the business (at the entered %).
Financial year start date
Business Tax Rate
1-Mar-2009
0.0%
3.2.4 Bank Account Information
The “Bank Account Details” fields allow you to enter descriptive detail for each
of your business’ bank accounts. The financial solution provides for ten business
bank accounts. An example of information populated is as follows:
Bank Account Details
B1
B2
First National Bank - Account No. 6111 345 1234
ABSA Bank Savings - Account No. 766 145 444
3.2.5 Loan Account Information
The “Loan Account Details” fields allow you to enter descriptive detail for each
of the business partners, and their respective shareholding in the business.
Provision for eight partner accounts is made in the financial solution. An example
of information populated is as follows:
Loan Account Details
P1
P2
Joe Brown
Mandy Green
Share
60.00%
40.00%
Tip: When a change in shareholding percentages happens during
a year, you cannot simply change the percentages in this table.
Why not? Because it will change all the proportional calculations that
are done for profit share back to the first date in the financial year.
How do you then deal with a change in shareholding? Well, in essence
you will create a new financial system from the date of the change in
shareholding.
FIN-X Solutions – Financial Solution Version 6 User Manual
Page 13 of 58
3.2.6 Hire Purchase / Lease Agreement Data
The “HP/Lease Loan Account Details” fields allow you to enter descriptive
detail for each of the business’ HP/Lease agreements, the rates of interest
charged on each respective loan (these rates are used for the automated
calculation of interest by the financial solution), and the division in the business
that utilises the asset on which the loan has been taken. The financial solution
provides for four HP/Lease loan accounts. An example of information populated
is as follows:
H1
H2
HP / Lease Loan Account Details
Interest Rate
Division
Standard Bank - Vito Bus finance - Acc 545 666 789
Standard Bank - equipment finance - Acc 545 777 890
12.00%
B
10.25%
B
Tip: Refer to the loan agreement documentation that you have to
determine what the interest rate is that is charged. To make sure you
have the right interest rate, contact the bank and inquire.
3.2.7 Opening Balances
Provision is made for entering various opening balances. These opening
balances relate to the figures that would have been reported in the previous
financial year’s financial statements. The accuracy of these values is of extreme
importance. Due to the importance and complexity of this, a separate section
addresses the requirements in more detail – refer to SECTION 6 – OPENING
BALANCES.
FIN-X Solutions – Financial Solution Version 6 User Manual
Page 14 of 58
3.3
Client Table
The Client Table is a simplistic table that allows you to capture certain key and
relevant information about your clients. The Client Table forms the basis for
issuing invoices – this means that you need to create a client before you can
issue an invoice.
Tip: Where you regularly sell products / services to people on a
once-off basis (i.e. repeat business is unlikely) – instead of creating
each one as a separate client, create one “Sundry Cash Sales” client
that you can repeatedly use for the once-off sales transactions.
The fields that you complete to create clients in the Client Table are as follows:
Field
Code
Required
What to do
YES
Here you simply enter a code of your choice that you
can associate with each client. The codes you
decide on can have letters or numbers or a
combination of letters and numbers – you decide!
It is important to remember that you cannot duplicate
a code – i.e. you cannot have two clients that both
have the same client code.
YES
Enter the clients name here. Remember that this is
the name that will appear on the invoice – so add all
the relevant details such as CC or (Pty) Ltd where it
is relevant.
NO
Enter a contact persons name here. This name also
appears on the invoice, which can help ensure that
the invoice is forwarded to the right person in larger
client businesses’.
YES
Here you simply enter the address details that apply
to where the invoice will be sent to. Three fields are
available to enter POBox or street detail, suburb and
city information, etc.
Code
YES
Simply enter the postal code applicable to the
address entered to ensure appropriate delivery via
the postal system.
Telephone
number
NO
This is an information field – simply enter a contact
telephone number.
Fax
number
NO
This is an information field – simply enter a fax
number for the client.
Cellular
number
NO
This is an information field – simply enter a contact
cellular telephone number.
Name
Contact
Address
(3 fields)
FIN-X Solutions – Financial Solution Version 6 User Manual
Page 15 of 58
Field
Email
address
VAT
number
Required
NO
YES
What to do
This is an information field – simply enter a contact
email address here.
This field creates hyperlinks that allow you to send
email messages directly from the client table.
Here you enter your client’s VAT registration
number. This is an important field – SARS requires
that your client’s VAT number must appear on your
invoice so that VAT can be claimed. If you do not
include your client VAT registration number, you
could have unnecessary payment delays.
The Client Table also has seven columns that contain information which is
automatically updated based on the data you capture. These seven columns are
as follows:
Outstanding – this shows you which clients owe you money. The amount
reflected is determined based on invoices you have issued and payments
that you have processed. This column serves as a “quick reference” point
when you want to follow up on outstanding amounts.
Ageing columns (Current, 30 days, 60 days and 90 days+) – these
columns reflect the periods for which amounts are outstanding. If an invoice
is raised in March and remains unpaid – it will reflect as “Current” in March,
as “30 days” in April, as “60 days” in May, etc. The amounts reflected are
determined based on invoices you have issued for which payment has not
been received. These columns serve as an additional “quick reference”
point when you want to follow up on outstanding amounts.
YTD Sales – this shows the total amount that each client has spent with
you in the current financial year.
% of Total – this shows the percentage of each clients’ spend relative to
the total of all the invoices. This field serves as a quick reference to
determine who the clients are that spend more – this helps with focussing
your client relationship management and client marketing efforts.
Tip: Update your client table with all the contact information that you
Tip: Regularly review your clients’ outstanding balances by browsing
have available. When you then use the client table to follow up on
outstanding amounts the contact details are readily available.
through the outstanding amounts on the Client Table. Where you identify
small amounts (a few cents) resulting from short-payments, consider entering
these as discount by identifying the invoices on which the short-payments
were made.
Processing discounts – refer to page 25
FIN-X Solutions – Financial Solution Version 6 User Manual
Page 16 of 58
3.4
Supplier Table
The Supplier Table is a simplistic table that allows you to capture limited
information about your suppliers. The Supplier Table does not have to be used
as it does not influence processing in the financial solution in any way – but it
does assist with data sorting when you are searching for historic expense related
information.
The fields that you complete to create suppliers in the Supplier Table are as
follows:
Field
Code
Required
What to do
NO
Here you simply enter a code of your choice that you
can associate with each supplier. The codes you
decide on can have letters or numbers or a
combination of letters and numbers – you decide!
It is important to remember that you cannot duplicate
a code – i.e. you cannot have two suppliers that both
have the same supplier code.
Name
NO
Enter the supplier’s name here.
Tip: Try and decide on a standard for the codes you give to your
suppliers (e.g. three letters followed by a number). This makes it easier
to remember the codes when you enter expense data – and you don’t
have to keep referring back to the supplier table to find the code.
Tip: Where you have different expenses that you account against
one supplier, create separate supplier codes. This will make it easier to
sort through data later. An example is ABBC and ABHP for Absa Bank
bank charges and Absa Bank Hire Purchase payments respectively.
The Supplier Table includes a column reflecting the amount due to each of the
listed suppliers – i.e. suppliers that you owe money to. The amount reflected is
determined based on expenses you have captured but not accounted as paid by
having entered a payment date. This column serves as a “quick reference” point
when you want to follow up amounts that are due to your suppliers.
FIN-X Solutions – Financial Solution Version 6 User Manual
Page 17 of 58
3.5
Expense Table
The Expense Table allows you to classify the types of income and expenses that
you have in your business. The Expense Table forms the basis for the accurate
allocation of expenses, the proportional calculation of amounts where only a
portion can be claimed, and the accurate calculation of taxation payable.
The Expense Table contains two types of entries:
Fields where input is required or can be made are light blue in colour.
Pre-defined fields – they are dark blue in colour and cannot be altered.
The Expense Table has been pre-populated with a number of standard expense
classifications that are used in most businesses. These can be used if
appropriate or changed based on your requirements. The percentages can also
be changed as appropriate for your business.
The fields that you can complete in the Expense Table are as follows:
Field
Code
Required
What to do
YES
Here you simply enter a code of your choice that you
can associate with each income / expense. The
codes you decide on can have letters or numbers or
a combination of letters and numbers – you decide!
It is important to remember that you cannot duplicate
a code – i.e. you cannot have two identical codes.
Name
YES
Enter a description of your choice here. Remember
that this is the name that will appear on the
automated financial solution reports.
Enter the percentage of the item that is accounted
for business purposes here.
Percentage
YES
This unique functionality allows you to create codes
for items such as municipal bills – where you only
want to account a portion because you use a portion
of the property for business.
Type
YES
This field cannot be altered – it is pre-defined.
YES
Here you simply enter a “Y” (Yes) or “N” (No) to
indicate whether the item is taken into account in
calculating the business’ tax liability. As an example
– although fines paid are shown as an expense,
SARS does not allow fines to be accounted for in
calculating tax.
Accounted
for
Taxation?
Tip: Where you are unsure whether an item is accounted for in
calculating tax or not – contact your accountant / auditor, or contact
your nearest SARS office and ask.
FIN-X Solutions – Financial Solution Version 6 User Manual
Page 18 of 58
Tip: Consolidate expenses into a single code where possible. As
an example – create one expense code called Utilities to cover rates
and taxes, lights and water, refuse removal, etc. To distinguish between
the different expenses you can then rather create separate suppliers in
the Supplier Table and then, when needed, search for the data based
on the supplier.
The fields that you cannot change in the Expense Table are as follows:
Example Business : Expense Codes
Code
IR
AP
SCMI
RET
CS
FA
DIV
DL1 to DL8
(8 codes)
HP1 to HP4
(4 codes)
ST
PC
BT
VT
Name
Interest received (income)
Accounts Payable (Creditors)
Share Capital / Member's Interest
Retained Earnings
Cost of Sales
Fixed Asset Purchases
Dividends Paid
Drawings Loan Account - Partner 1, 2, 3, etc.
HP / Lease Payment – HP/Lease Account 1, 2, 3, 4
Stock Adjustments
Drawing to Petty Cash
Business Tax Payment
VAT Payment
These pre-defined fields are important as they ensure that the financial solution
creates the “magic” that you need when dealing with certain types of financial
transactions. But again, the financial solution has been designed to ensure that
you need not worry about the accounting details – the debits and the credits –
you need just enter the data and use the appropriate codes.
The use of these codes is described in more detail in Section 4.3.
Tip: Consider checking the pre-defined codes before you create
your own expense codes – to make sure you do not use an identical
code in error. For example – if you had an expense that you referred to
as Consumable Stationery and created a code CS – you would
duplicate the pre-defined code for Cost of Sales – and subsequently
have errors in the output on the financial solution.
FIN-X Solutions – Financial Solution Version 6 User Manual
Page 19 of 58
SECTION 4 – DATA INPUT
4.1
Maintaining Balance within the Solution
During the process of capturing data (specifically income and expense related
data), it is possible that you may make errors that influence the balance within
the solution. These errors will result in erroneous reports. To assist you in
ensuring the accuracy of your data capture, a simplistic control mechanism is
included in the financial solution. This key control mechanism is simply a field on
the screens where income and expense data is captured that reflects possible
errors.
The field is included on three sheets accessed from the Index page:
Client Payments
Example Business : Invoice Detail Input Sheet
Inv.
No.
Invoice
Date
Client
Code
Client Name
Invoice
Amount
Payment
Date
-
Check
Capture Expenses
Example Business : Expense Detail Input Sheet
Through
Paymnt
Bank a/c
Method
Y/N
D/C
Description
Amount
-
Enter additional info
VAT
Bank
Ind.
Acc.
B/P
(with
number
%
Petty Cash Expenses
Example Business : Petty Cash Detail Input Sheet
Date
Petty Cash
Paid to
Description
Amount
VAT
Voucher No
Check
As filed
Ind.
Enter supplier name
Enter additional info
-
%
These fields are all linked to the same source – so if one is not zero, the other
two will not be zero either. And if one of these three fields contains something
other than a zero (shown by a “-“) – then there is an imbalance due to an input
error somewhere.
Any imbalance must be identified and corrected –
if not, the financial reports generated by the
financial solution will have the error in them.
Errors are caused by excluding information that is necessary, entering spaces in
a field that cannot have spaces, using client or expense codes that are not set up
in the Client Table or Expense Table, etc.
FIN-X Solutions – Financial Solution Version 6 User Manual
Page 20 of 58
The following table identifies some of the more common errors that result in an
imbalance in the financial solution.
Error
The “invoice
amount” field on
the Client
Payments screen
contains a
#VALUE!
Possible reason
A quantity field on
the Capture Invoice
screen contains
spaces
A unit value field
on the Capture
Invoice screen
contains spaces
What to do
On the Client Payments screen –
identify the invoice number/s that
reflect a #VALUE!
Go to the Capture Invoice screen –
for the identified invoice number/s,
check the quantity and unit value
fields and remove spaces (simply
use the Delete key)
The “balance”
fields on any of
the three screens
contain a
#VALUE!
An entry has been
made where the
value field has
been entered
incorrectly
Check any value field where data
has been entered to identify errors
in data entry – an example is where
a value has been entered with a “,”
rather than a “.” Between the Rands
and cents
The bank account
balance on the
Cash Flow Report
does not agree
with the Balance
Sheet balance on
the same bank
account
A client payment
has been entered
and one of the four
payment types has
not been used
Go to the Client Payments screen –
make sure that all the client
payments reflect one of the four
options (Cheque, Cash, Credit Card
or EFT). Also check for spaces
entered after an entry
An expense has
been entered and
not all the fields
entered
Go to the Capture Expenses screen
and check where information may
be missing. The Expense Sheet
includes a column on the far right
that is populated with a “N” or “###”
for lines that cause imbalance –
check this column to quickly identify
the line/s on which detail may be
missing
A petty cash
expense has been
entered and not all
the fields entered
Go to the Petty Cash Expenses
screen and check where information
may be missing
An incorrect bank
account or
business partner
code (e.g. B33 or
P10) has been
entered
Go to the Capture Expenses or
Petty Cash Expenses screen and
check where an incorrect bank
account or business partner code
may have been entered
The “balance”
fields on any of
the three screens
contain a value
FIN-X Solutions – Financial Solution Version 6 User Manual
Page 21 of 58
Error
The “balance”
fields on any of
the three screens
contain a value
Possible reason
What to do
A fixed asset
expense (“FA”) has
been entered and
the fixed asset
schedule has not
been updated
Check the fixed asset schedule
against the fixed asset purchases
included in the Expense and Petty
Cash Expense screens to identify
asset purchases that have not been
updated in the fixed asset schedule
The opening
balances have not
been captured
accurately
Check the Balance Sheet – if the
previous year values do not balance
then there is an error in the opening
balance values.
Refer to SECTION 6 – OPENING
BALANCES in this regard
The “balance”
fields on any of
the three screens
contain a #DIV/0!
A fixed asset has
been captured on
the fixed asset
schedule without
entering a
depreciation rate
Go to the Capture Fixed Asset
screen and check where
depreciation rate information may
be missing
The “balance”
fields on any of
the three screens
contain a
#VALUE!
A petty cash
expense has been
entered and not all
the fields entered
Go to the Petty Cash Expenses
screen and check where information
may be missing
An incorrect
expense code has
been used for an
expense
Go to the Capture Expenses screen
– make sure that all the expense
codes are correct – this can be
checked by looking at the name
column to the right of the expense
code
An incorrect
expense code has
been used for a
petty cash expense
Go to the Petty Cash Expenses
screen – make sure that all the
expense codes are correct – this
can be checked by looking at the
name column to the right of the
expense code
A client code has
been used that
does not exist on
the Client Table
Check the client code used on the
invoice – use the correct code or
create a new client if necessary
The “balance”
fields on any of
the three screens
contain a #REF!
The “name” field
on the Invoice
Capture screens
contain a #N/A!
FIN-X Solutions – Financial Solution Version 6 User Manual
Page 22 of 58
4.2
Income Related Transactions
Income transactions are processed using four key screens:
A screen that allows you to capture the content for your invoices that are
issued to clients.
A screen that displays the invoice and allows for the printing and emailing
of invoices.
A screen that allows you to capture payments that you receive from clients
based on the invoices that you have issued.
A screen that displays client statements and allows for the printing and
emailing of client statements.
4.2.1 Capture Invoices
This screen allows you to capture the content for your invoices that are issued to
clients. The invoice provides for five individual lines of data – i.e. you can enter
five items on each invoice.
Tip: Where you have more than five items, consider combining
items and providing the detail of the individual items in the description
fields. This may be better than issuing multiple invoices to a client.
The fields that you complete to capture an invoice are as follows:
Field
Invoice
number
Date
Client
Required
What to do
YES
This column has been pre-populated with sequential
numbers starting at 1. These can be changed to suit
your current numbering system (note that SARS
favour a sequential invoice numbering system as it
allows for easy tracking).
YES
YES
Here you simply enter the date on which you are
issuing the invoice (this date must fall in the current
financial year to be accounted correctly).
The date field can be entered as “1 Mar 09”,
“10 Jul 09”, etc – you do not have to type out the full
month or year.
Here you enter the client code applicable to the client
for whom the invoice is being created. The client
code is the code that you established in the client
table. The client name will be pulled through to the
next column to allow you to check that you have
entered the correct client code.
FIN-X Solutions – Financial Solution Version 6 User Manual
Page 23 of 58
Field
Client
order
Payment
terms
Due on
Required
What to do
NO
This is a free text field and can be left blank where
the customer has not issued an official order.
Alternatively you may enter “Verbal” or a person’s
name here to provide the client with a reference.
YES
This is a free text field. Examples of terms you can
enter include “COD” , “7 days net”, “30 days”, “On
presentation”, etc. This provides your client with a
clear indication of when payment is expected.
YES
Here you enter the date on which payment is due
based on the payment terms and the date of issuing
the invoice. As an example – if the invoice is issued
on 12 March 2009 and the terms are 7 days net, the
due date will be 19 March 2009.
The date field can be entered as “1 Mar 09”,
“10 Jul 09”, etc – you do not have to type out the full
month or year.
Here you enter the number of products / services
that are being provided to the client.
Quantity
(5 columns)
YES
Quantity includes hours, days and different units of
measure (kg’s, metres, litres, etc.). Only the quantity
must be entered here – do not include the unit of
measure as this will provide an error.
Decimals of quantity are simply entered by including
a point (.) in the quantity value, for example 2½ days
is entered as 2.5. Do not enter decimals using a
comma (,) in the value as this will provide an error.
This is a free text field.
Description
(5 columns)
YES
You may enter anything you consider relevant here.
The line length on the invoice allows for a meaningful
amount of text in each description field.
Here you enter the VAT-exclusive price applicable to
the products / services being provided.
Unit price
(5 columns)
YES
Decimals of price are simply entered by including a
point (.) in the unit price, for example R275,40 is
entered as 275.40. Do not enter decimals using a
comma (,) in the value as this will provide an error.
FIN-X Solutions – Financial Solution Version 6 User Manual
Page 24 of 58
Field
Required
Item VAT
%
YES
(5 columns)
Division
(5 columns)
What to do
Here you enter the VAT % that is applicable to the
invoice line item. Where a 14% VAT rate is
applicable, the VAT amount will be calculated
automatically.
This field is formatted for percentages – simply enter
a “0” or “14” depending on which is applicable.
YES
Here you enter the division in the business that is
applicable to the invoice line item. These divisions
are established in the Business Data screen.
Tip: Where you want to include a separate line of text on an invoice
that does not relate to a quantity and price, use a description line
without completing the quantity and price fields.
4.2.2 Print Invoices
The printing and emailing of invoices is done through accessing the “Print
Invoices“ screen. On this screen you will see a note that indicates where you
must enter the invoice number of the invoice you want to view / print / email.
Simply place the relevant invoice number in this field and hit the enter key – the
relevant data will automatically be pulled through to the pre-formatted invoice.
To print or email the invoice, click on the “Print” button. The invoice will be
displayed on the screen. Click on the “print” button again. The print pop-up box
will appear as follows:
To print the invoice, choose a printer that is connected to your computer and
click on the “OK” button.
FIN-X Solutions – Financial Solution Version 6 User Manual
Page 25 of 58
To email the invoice, choose the CutePDF Writer as the printer and click on the
“OK” button. This allows you to save the invoice as a PDF-file which you can
then email to your client using your email software (such as Outlook).
Tip: If you do not have CutePDF Writer on your computer,
download it for free from www.CutePDF.com. The software costs you
nothing and makes emailing invoices a lot simpler.
4.2.3 Client Payments
This screen allows you to capture payments that you receive from clients based
on the invoices that you have issued.
The fields that you complete to capture client payments are as follows:
Field
Payment
date
(2 columns)
Required
YES
What to do
Here you simply enter the date on which the client
makes payment against the invoice (this date must
fall in the current financial year to be accounted
correctly). The invoices that have been issued are
reflected on the left – find the invoice relevant to the
payment received and enter the date in the line on
which the invoice is listed.
The date field can be entered as “1 Mar 09”,
“10 Jul 09”, etc – you do not have to type out the full
month or year.
FIN-X Solutions – Financial Solution Version 6 User Manual
Page 26 of 58
Field
Required
What to do
Here you enter the manner of payment against the
relevant invoice.
It is important to note that you must use one of the
following four options:
Payment
type
YES
(2 columns)
-
Cheque
-
Cash
-
Credit Card
-
EFT
The solution requires one of these four options to
ensure the correct allocation of the payments to the
cash flow report.
Using a payment type other than the four listed
above will provide an error.
Here you enter the amount that you have received
from the client for the relevant invoice.
Amount
paid
YES
(2 columns)
Decimals of value are simply entered by including a
point (.) in the amount field, for example R275,40 is
entered as 275.40. Do not enter decimals using a
comma (,) in the amount field as this will provide an
error.
Here you enter the amount that you allow the client
as a discount on payment. An example may be
where the invoice is raised for R2100.00 and the
client pays R2000.00 earlier to receive a R100.00
discount. The R100.00 discount will be entered here.
Tip: Where an invoice has been issued for
Discount
allowed
(2 columns)
NO
R257.43 and the client inadvertently pays you
only R257.40, consider the R0.03 as discount
and enter it here. This ensures that you do not
have petty amounts reflecting as outstanding
against client accounts.
Decimals of value are simply entered by including a
point (.) in the amount field, for example R275,40 is
entered as 275.40. Do not enter decimals using a
comma (,) in the amount field as this will provide an
error.
FIN-X Solutions – Financial Solution Version 6 User Manual
Page 27 of 58
Field
Required
What to do
Here you provide an indication of where the money
received from the client was deposited.
If the amount was deposited into a business bank
account, simply indicate which bank account by
entering a “B1”, “B2”, etc (as per the bank accounts
you set up in the business data sheet).
Bank
account
YES
(2 columns)
If the amount was received in cash and retained for
cash expenses, simply indicate that it was deposited
to Petty Cash by entering a “P”.
Tip: Where a payment has been received
and is deposited into one of the business
partner’s bank accounts for some reason, enter
a “P” and then process a partner drawing
separately in the Petty Cash Expense sheet.
Tip: Regularly review your clients’ outstanding balances by
browsing through the outstanding amounts on the Client Table. Where
you identify small amounts (a few cents) resulting from short-payments,
consider entering these as discount by identifying the invoices on which
the short-payments were made.
FIN-X Solutions – Financial Solution Version 6 User Manual
Page 28 of 58
4.2.4 Bad Debts
Unfortunately the potential for clients not being able to pay where products /
services have been provided on credit terms always exists in business. In
instances where an invoice needs to be considered as a bad debt, two fields are
provided on the Client Payment sheet:
Field
Required
What to do
Here you enter the amount that you are writing off as
a bad debt. The amount of the bad debt must not
exceed the amount that is outstanding on an invoice.
Tip: Where an invoice has been issued for
Bad debt
NO
say R2500.00 and the client has paid you
R2200.00 in previous months, do not be
tempted to account the R300.00 in the discount
column in a subsequent period. Doing this will
result in automated calculations that relate to
the payment date rather than the current date –
rather consider the R300.00 as a bad debt and
enter it accordingly.
Decimals of value are simply entered by including a
point (.) in the bad debt field, for example R275,40 is
entered as 275.40. Do not enter decimals using a
comma (,) in the bad debt field as this will provide an
error.
Here you simply enter the date on which the bad
debt is accounted for. The invoices that have been
issued are reflected on the left – find the invoice
relevant to the bad debt and enter the date in the line
on which the invoice is listed.
Date of
bad debt
YES
The date field can be entered as “1 Mar 09”,
“10 Jul 09”, etc – you do not have to type out the full
month or year
Tip: Where an amount is being written off
as a bad debt, be careful to ensure that you
enter a date in the current period – i.e. do not
use a date in previous months – as automated
calculations are done that influence items such
as the VAT report.
FIN-X Solutions – Financial Solution Version 6 User Manual
Page 29 of 58
4.2.5 Print Client Statements
The printing and emailing of statements is done through accessing the “Print
Client Statements“ screen. On this screen you will see notes that indicate where
you must enter the client code and the month for which statements that you want
to view / print / email. Simply place the relevant client code and date in these
fields and hit the enter key – the relevant data will automatically be pulled
through to the pre-formatted client statement.
To print or email the client statement, click on the “Print” button. The client
statement will be displayed on the screen. Click on the “print” button again. The
print pop-up box will appear as follows:
To print the client statement, choose a printer that is connected to your computer
and click on the “OK” button.
To email the client statement, choose the CutePDF Writer as the printer and
click on the “OK” button. This allows you to save the client statement as a PDFfile which you can then email to your client using your email software (such as
Outlook).
Tip: If you do not have CutePDF Writer on your computer,
download it for free from www.CutePDF.com. The software costs you
nothing and makes emailing client statements a lot simpler.
FIN-X Solutions – Financial Solution Version 6 User Manual
Page 30 of 58
4.3
Expense Related Transactions
Expense transactions are processed using two key screens:
A screen that allows you to capture expenses that are processed through a
business banking account or paid for from the personal funds of one of the
business partners.
A screen that allows you to capture expenses that are processed through
the business’ petty cash. Should your business not maintain a petty cash
float that allows for cash expenses, this screen will not be used.
4.3.1 Capture Expenses
This screen allows you to capture the content for expenses that are processed
through a business banking account or paid for from the personal funds of one of
the business partners.
The fields that you complete to capture transactions are as follows:
Field
Supplier
code
Required
NO
What to do
Here you enter the supplier code – established in the
supplier table. The supplier name will be pulled
through to the left-hand column to allow you to check
that you have entered the correct supplier code.
This field can be left blank.
Expense
date
YES
Here you enter the date on which the expense entry
you are making needs to be accounted for (this date
must fall in the current financial year to be accounted
correctly). This field allows for the entry to be
captured in a specific period (month) and VAT
accounted for. Until the “Date paid” field (see below)
is entered, the entry will also be accounted for as an
amount due (i.e. a creditor).
The date field can be entered as “1 Mar 09”,
“10 Jul 09”, etc – you do not have to type out the full
month or year.
Voucher
number
NO
Here you can enter a voucher number that refers to
your paper-based filing system. This will allow for
easier reference to a source document when you
need it in the future.
This field is optional and can be left blank.
Additional
information
NO
Here you can enter any additional information that
you feel is appropriate to identify with the entry and
possibly facilitate future search functionality. This is a
free-formatted field.
This field is optional and can be left blank.
FIN-X Solutions – Financial Solution Version 6 User Manual
Page 31 of 58
Field
Date paid
Cheque
number
Through
bank
account?
Payment
method
Required
YES
What to do
Here you enter the date on which payment is made
for the line entry (this date must fall in the current
financial year to be accounted correctly).
The date field can be entered as “1 Mar 09”,
“10 Jul 09”, etc – you do not have to type out the full
month or year.
YES
Here you enter the cheque number in cases where
you have paid for an expense with a business
cheque. Note that this field works in conjunction with
the “payment method” field.
YES
Here you simply enter a “Y” or a “N” – a “Y” for
amounts that have been processed through the bank
account and “N” for those that have not yet been
processed – this can be identified by referring to the
bank statements for the relevant bank account.
YES
Here you simply enter a “D” or a “C” – a “D” for
amounts that are processed through the bank
account by way of direct debit – and “C” for those
that are processed by cheque payments (this works
in conjunction with the Cheque Number field).
Examples of direct debits (includes direct credits) are
bank charges, debit orders, interest received, etc.
Description
NO
This is a free-formatted field. You can enter any
description that suitably describes the transaction
you are entering.
Here you enter the amount (total including VAT) that
applies to the transaction you are entering.
Amount
YES
Decimals of value are simply entered by including a
point (.) in the amount field, for example R275,40 is
entered as 275.40. Do not enter decimals using a
comma (,) in the amount field as this will provide an
error.
Here you enter the VAT% applicable to the
transaction you are entering.
VAT %
YES
Remember that to claim the VAT your business must
be registered for VAT as well. You also need to
ensure that you are in possession of a tax invoice (or
voucher that contains the suppliers VAT registration
number) to substantiate the claim for VAT.
FIN-X Solutions – Financial Solution Version 6 User Manual
Page 32 of 58
Field
Required
What to do
Here you indicate where the transaction is being paid
from or to. The funds can apply to a business bank
account or a partner’s personal funds.
Bank
account
YES
Funds applicable to the business bank accounts are
indicated by a “B1”, “B2”, etc – the code for the
relevant bank account as established on the
Business Data sheet.
Funds from business partners personal funds are
indicated by a “P1”, “P2”, etc.
Business /
private
Division
code
Expense
code
YES
This reflects whether the transaction is for business
purposes or personal to a business partner.
For business transactions enter a “B” – for personal
transactions enter a “P1”, “P2”, etc.
YES
Here you enter the division code – established in the
business data sheet. This allows for expenses to be
accounted against a division and thus reported on
separately.
YES
Here you enter the expense code – established in
the expense table. The expense name will be pulled
through to the right-hand column to allow you to
check that you have entered the correct code.
Tip: When you need to decide what input is required in the “Bank
Account” field – ask the question – is the business paying or is a partner
paying?
Tip: When you need to decide what input is required in the
“Business / Private” field – ask the question – is this a business
expense that can be claimed or is it a partner’s personal expense?
FIN-X Solutions – Financial Solution Version 6 User Manual
Page 33 of 58
4.3.1.1
Examples
To provide an indication of how transactions are processed in the financial solution, a
few examples are provided (note that not all the fields in the expense sheet have been
included in the examples in this manual).
On 12 March 2009 (this is the expense date) you purchase stationary of R228,00
inclusive of VAT (this is the “amount” value) from a supplier where the business has
credit facilities. The supplier provides you with an invoice but you do not pay for the
goods supplied because you have credit facilities. The initial entry on 12 March 2009 will
look like this:
Expense
Date
Cheque
Date
Paid
No.
Through
Bank
a/c
Payment
Amount
Method
12-Mar-2009
228.00
VAT
Bank
Acc.
Bus/
or
Pvt
Ind.
14%
Exp
Code
B3
B
SP
Note: In the example above, the payment date and payment method data has been
left blank as payment has not yet been made. By leaving the payment date field blank, a
creditor (liability) is automatically established in the financial solution.
On 25 April 2009 you now pay the supplier for the goods provided in March (this is the
payment date). Payment is made by way of a cheque (number 12) from the business
bank account set up as B3. Now all that needs to be captured is the payment data –
refer back to the original entry and add the relevant data. The entry will now look like
this:
Expense
Date
Cheque
Payment
No.
Through
Bank
a/c
Date
Paid
12-Mar-2009
25-Apr-2009
12
N
C
Amount
Method
228.00
VAT
Bank
Acc.
Bus/
or
Pvt
Ind.
14%
Exp
Code
B3
B
SP
On 18 March 2009 one of the business partners (set up as P4) makes a payment of
R228,00 inclusive of VAT (this is the “amount” value) from personal funds (which is a
direct debit). The expense and payment dates are identical in this case. The expense is
for stationary bought for the business for printing, etc. The entry will look like this:
Expense
Date
Cheque
Date
Paid
No.
18-Mar-2009
18-Mar-2009
Through
Bank
a/c
Payment
Amount
Method
D
228.00
VAT
Bank
Acc.
Bus/
or
Pvt
Ind.
14%
Exp
Code
P4
B
SP
FIN-X Solutions – Financial Solution Version 6 User Manual
Page 34 of 58
On 22 April 2009 a direct debit of R11,40 is made against one of the business’ bank
accounts (say B1) in respect of bank charges. The expense and payment dates are
identical in this case. The entry will look like this:
Expense
Date
Cheque
Date
Paid
No.
22-Apr-2009
22-Apr-2009
Through
Bank
a/c
Payment
Amount
Method
D
11.40
VAT
Bank
Acc.
Bus/
or
Pvt
Ind.
14%
Exp
Code
B1
B
BC
Tip: When you account for bank charges, you will not receive a tax invoice as such.
Look carefully on your bank statement to determine whether the bank charge includes
VAT (may be indicated by a # or similar note).
A payment of R228,00 inclusive of VAT (this is the “amount” value) is made on
12 March 2009 by way of an EFT (which is a direct debit) from the business bank
account set up as B4. The expense and payment dates are identical in this case. The
payment is for personal computer consumables that are on behalf of a business partner
(that was set up as P3). The entry will look like this:
Expense
Date
Cheque
Date
Paid
No.
12-Mar-2009
12-Mar-2009
Through
Bank
a/c
Payment
Y
D
Amount
Method
228.00
VAT
Bank
Acc.
Bus/
or
Pvt
Ind.
14%
Exp
Code
B4
P3
CE
On 25 June 2009 a direct credit of R22,42 is made to one of the business’ bank
accounts (say B3) in respect of interest earned on the positive bank balance. The
expense and payment dates are identical in this case. The entry will look like this:
Expense
Date
Cheque
Date
Paid
No.
25-Jun-2009
25-Jun-2009
Through
Bank
a/c
Payment
Y
D
Amount
Method
22.42
VAT
Bank
Acc.
Bus/
or
Pvt
Ind.
0%
Exp
Code
B3
B
IR
Note: In the example above, a pre-defined code in the Expense Table has been
used – namely “IR”. As interest received does not carry VAT, a 0% VAT rate has been
entered.
FIN-X Solutions – Financial Solution Version 6 User Manual
Page 35 of 58
4.3.1.2
Cost of Sales
Cost of Sales relates to expenses that are incurred directly to earn revenue in a
business. For example – you buy products and sell them on; or you buy various parts to
make up your product offering, etc.
For each business, a decision needs to be taken on which expenditure items will be
considered as “cost of sales” so that the appropriate expense code allocation can be
made when processing transactions.
Examples of Cost of Sales transactions are as follows:
A payment of R1140,00 inclusive of VAT (this is the “amount” value) is made on
12 March 2009 by way of an EFT (which is a direct debit) from the business bank
account set up as B4. The expense and payment dates are identical in this case. The
payment is for goods bought for resale. The entry will look like this:
Expense
Date
Cheque
Date
Paid
No.
12-Mar-2009
12-Mar-2009
Through
Bank
a/c
Payment
Y
D
Amount
Method
1140.00
VAT
Bank
Acc.
Bus/
or
Pvt
Ind.
14%
Exp
Code
B4
B
CS
Note: In the example above, the expense date and payment date are the same. If
the goods were bought from a supplier on credit, the payment date and payment method
data would have been left blank with the initial entry – and then filled in later when the
actual payment was made.
On 15 June 2009, one of the business partners (say P3) uses personal funds to buy
goods (for resale) on behalf of the business. The total value of the purchase amounts to
R570,00 inclusive of VAT (this is the “amount” value). The entry will look like this:
Expense
Date
Cheque
Date
Paid
No.
15-Jun-2009
15-Jun-2009
Through
Bank
a/c
Payment
Amount
Method
D
570.00
VAT
Bank
Acc.
Bus/
or
Pvt
Ind.
14%
Exp
Code
P3
B
CS
Note: In the example above, the funds for the expense came from partner 3 (not the
business). You will note that although the payment method is shown (as a D), the
through bank account field has been left blank (as it is not relevant in cases where
personal funds have been used).
FIN-X Solutions – Financial Solution Version 6 User Manual
Page 36 of 58
4.3.1.3
Drawings by Business Partners
In many businesses, partners withdraw funds from the business on an ad-hoc basis
based on funds being available. These withdrawals are not made as structured salary
payments – where structured salary payments are made (including the deduction of
PAYE, etc.) the payments will be entered using a standard expense code (such as SW –
Salaries and Wages).
On the other hand, it is sometimes necessary for the business partners to deposit funds
into the business to cover temporary cash shortfalls.
Examples of Drawings transactions are as follows:
On 12 March 2009 partner 2 (P2) withdraws R5000,00 by way of an EFT from the
business bank account set up as B4.
On the same date, partner 1 (P1) deposits R6000,00 of his personal funds by way of an
EFT into the business bank account set up as B2.
The entries will look like this:
Expense
Date
Cheque
Through
Bank
a/c
Payment
Date
Paid
No.
12-Mar-2009
12-Mar-2009
12-Mar-2009
Y
D
12-Mar-2009
Y
D
Amount
VAT
Bank
Ind.
5000.00
-6000.00
Method
Acc.
Bus/
or
Pvt
Exp
Code
0%
B4
P2
DL2
0%
B4
P1
DL1
Note: In the example above, the funds deposited by partner 1 into the business are
distinguished from those drawn simply by placing a minus-sign in front of the value
when entering it.
4.3.1.4
Drawings for Petty Cash
Where a petty cash float is maintained in the business and cash is drawn from a bank
account to replenish the petty cash float – a pre-defined code has been created to
account these withdrawals.
An example of a transaction for a petty cash replenishment is as follows:
On 18 May 2009 an amount of R2000,00 is withdrawn from the business bank account
set up as B2 to replenish the business’ petty cash float. The expense and payment dates
are identical in this case. The entry will look like this:
Expense
Date
Cheque
Date
Paid
No.
18-May-2009
18-May-2009
Through
Bank
a/c
Payment
Y
D
Amount
Method
2000.00
VAT
Bank
Acc.
Bus/
or
Pvt
Ind.
0%
Exp
Code
B2
B
PC
FIN-X Solutions – Financial Solution Version 6 User Manual
Page 37 of 58
4.3.1.5
Stock Adjustments
Because the financial solution does not include full accounting for stock (purchase items
into stock and then issue them as they are sold), this pre-defined code allows you to
capture the value of stock on hand in your business so that your financial reports
accurately reflect stock on hand.
The code is basically used in two ways:
To capture the value of stock on hand at a given point in time (e.g. at the end of
each month or at the end of the financial year).
To reverse the value of stock on hand that was captured in the financial solutions
in previous periods.
Examples of stock related transactions are as follows:
On 31 May 2009 you do a physical stock-take and identify R12640,00 (exclusive of VAT)
worth of stock where the purchases of the items has been accounted for already. The
entry to account for this stock will look like this:
Expense
Date
Cheque
Date
Paid
No.
Through
Bank
a/c
Payment
Amount
Method
31-May-2009
12 640.00
VAT
Bank
Acc.
Bus/
or
Pvt
Ind.
0%
Exp
Code
B1
B
ST
On 28 February 2010 you do a physical stock-take and identify R10318,40 (exclusive of
VAT) worth of stock where the purchases of the items has been accounted for already.
At the beginning of the financial year you also had stock on hand (valued at R9347.55)
that was entered as an opening balance. The entries to account for this stock (both the
current on-hand stock and the reversal of the opening balance stock) will look like this:
Expense
Date
Cheque
Date
Paid
No.
Through
Bank
a/c
Payment
Amount
Method
VAT
Bank
Acc.
Bus/
or
Pvt
Ind.
Exp
Code
28-Feb-2010
10 318.40
0%
B1
B
ST
28-Feb-2010
-9 347.55
0%
B1
B
ST
Note: In the example above, the reversal of the initial opening stock value is
distinguished from current stock values being captured simply by placing a minus-sign
in front of the value when entering it.
Note: In the examples above, the date paid field has not been filled in. This field is
not important for this pre-defined code.
FIN-X Solutions – Financial Solution Version 6 User Manual
Page 38 of 58
4.3.1.6
VAT Payments (and Refunds)
Where your business is registered for VAT, the transactions you account (invoices for
income and supplier vouchers for expenses) will automatically update the VAT report.
Based on this report the business will complete a VAT return every two months and
submit a payment (or request a refund where the input VAT exceeds the output VAT).
Examples of VAT payment and refund transactions are as follows:
On 24 May 2009 an amount of R12653,26 is paid to SARS for the Mar/Apr 2009 VATperiod. The funds are withdrawn by cheque from the business bank account set up as
B1. The expense and payment dates are identical in this case. The entry will look like
this:
Expense
Date
Cheque
Payment
No.
Through
Bank
a/c
Date
Paid
24-May-2009
24-May-2009
17
N
C
Amount
Method
12653.26
VAT
Bank
Acc.
Bus/
or
Pvt
Ind.
0%
Exp
Code
B1
B
VT
On 24 May 2009 you submit your VAT-return and an amount of R2423,90 is claimed
from SARS for the Mar/Apr 2009 VAT-period (as the input VAT amounts exceeded the
output VAT for the period). The entry will look like this:
Expense
Date
Cheque
Date
Paid
No.
Through
Bank
a/c
Payment
Amount
Method
24-May-2009
-2423.90
VAT
Bank
Acc.
Bus/
or
Pvt
Ind.
0%
Exp
Code
B1
B
VT
After processing your return, SARS refunds your business via a direct deposit to your
bank account (B1) on 16 June 2009. Now all that needs to be captured is the payment
data – refer back to the original entry and add the relevant data. The entry will now look
like this:
Expense
Date
Cheque
Date
Paid
No.
24-May-2009
16-Jun-2009
Through
Bank
a/c
Payment
Y
D
Amount
Method
-2423.90
VAT
Bank
Acc.
Bus/
or
Pvt
Ind.
0%
Exp
Code
B1
B
VT
Note: In the example above, the claim from SARS is distinguished from a VAT
payment to SARS simply by placing a minus-sign in front of the value when entering it.
FIN-X Solutions – Financial Solution Version 6 User Manual
Page 39 of 58
An example of a VAT refund transaction that includes interest paid by SARS is as
follows:
On 24 May 2009 (this is the expense date) an amount of R2423,90 is claimed from
SARS for the Mar/Apr 2009 VAT-period (as the input VAT amounts exceeded the output
VAT for the period). SARS only refunds this amount on 3 August 2009, and the refund
includes R87,72 interest (total received R2511,62). The entries will look like this:
Expense
Date
Cheque
Date
Paid
No.
24-May-2009
3-Aug-2009
Through
Bank
a/c
Payment
3-Aug-2009
Y
D
3-Aug-2009
Y
D
Amount
VAT
Bank
Ind.
-2423.90
87.72
Method
Acc.
Bus/
or
Pvt
Exp
Code
0%
B1
B
VT
0%
B1
B
IR
Note: In the example above, the date paid for the first entry is shown as at
3 August 2009 – up to this date the date paid, the through bank account indicator and
payment method field would have been left blank.
4.3.1.7
Business Tax Payments
Businesses that are registered as CC’s or companies need to register for business tax
with SARS. The business will then submit provisional and final tax returns, and STC
returns for tax on dividend payments.
A pre-defined code has been created to account for these payments. This code should
be used in conjunction with the tax-rate functionality included in the Business Data sheet
(refer 3.2.1).
Examples of business tax transactions are as follows:
On 24 August 2009 the business makes two payments to SARS – one in respect of
provisional tax for the business of R12000.00, and another in respect of secondary tax
(STC) on dividends declared and paid by the business of R3000.00. The payments are
made by way of cheques from the business bank account set up as B1. The entries will
look like this:
Expense
Date
Cheque
Payment
No.
Through
Bank
a/c
Date
Paid
24-Aug-2009
24-Aug-2009
24-Aug-2009
34
N
C
24-Aug-2009
35
N
C
Amount
VAT
Bank
Ind.
12000.00
3000.00
Method
Acc.
Bus/
or
Pvt
Exp
Code
0%
B1
B
BT
0%
B1
B
BT
FIN-X Solutions – Financial Solution Version 6 User Manual
Page 40 of 58
4.3.1.8
Fixed Asset Purchases
Most businesses purchase fixed assets such as motor vehicles, computer equipment,
factory equipment, etc.
Because fixed asset purchases are treated differently from an accounting perspective,
the way in which they are captured in the financial solution is also somewhat different
from other transactions. For more detail on how to account for fixed asset purchases,
refer to section 4.4.2 on page 44.
4.3.1.9
Hire Purchase / Lease Agreement Transactions
Fixed assets purchased by a business may be funded by way of bank finance – through
hire purchase or lease agreements.
For more detail on how to account for hire purchase or lease agreements transactions,
refer to section 4.4.3 on page 44.
4.3.1.10 Accounts Payable Transactions
This pre-defined code is basically used in the following way:
Where transactions are entered that actually relate to items accounted for in the
previous year. As an example – a business has its year-end at the end of
February. At the end of February an amount is accounted for audit fees as an
expense but is not paid. The amount is therefore outstanding at the end of
February. When the amount then gets paid in April, it cannot be accounted for as
an expense again – it must be accounted against the amount that was outstanding
at the end of February – and then also at the beginning of the current financial
year. These expenses should be entered in conjunction with the Creditors opening
balance figure included in the Business Data sheet (also refer 6.2.3).
An example of an accounts payable transaction is as follows:
On 24 March 2009 the business makes a payment in respect of audit fees that were
accounted for in the previous financial year (on 28 February 2009). The payment
amounts to R2280.00 (inclusive of VAT) and is made by way of a cheque payment from
the business bank account set up as B4. The entry will look like this:
Expense
Date
Cheque
Payment
No.
Through
Bank
a/c
Date
Paid
29-Feb-2009
24-Mar-2009
17
N
C
Amount
Method
2280.00
VAT
Bank
Acc.
Bus/
or
Pvt
Ind.
0%
Exp
Code
B4
B
AP
FIN-X Solutions – Financial Solution Version 6 User Manual
Page 41 of 58
4.3.1.11 Dividend Payment Transactions
This pre-defined code is applicable to CC’s and companies – but not sole traders /
partnerships. It simply allows for the capture of transactions where a dividend is declared
from business profits. The reason why a pre-defined code is used is because these
payments need to be reflected in a specific place in the business’ Income Statement
(shown after profit and not as part of the normal expenses).
An example of a Dividend payment transaction is as follows:
At the end of a financial year the business declares a dividend for the shareholders /
members. The dividend, totalling R20000,00 is paid from the business’ bank account
(B3) on 25 February 2010. The entry will look like this:
Expense
Date
Cheque
Date
Paid
No.
25-Feb-2010
25-Feb-2010
Through
Bank
a/c
Payment
Y
D
Amount
Method
20 000.00
VAT
Bank
Acc.
Bus/
or
Pvt
Ind.
0%
Exp
Code
B3
B
DIV
4.3.1.12 Share Capital / Member Interest Transactions
This pre-defined code is applicable to CC’s and companies – but not sole traders /
partnerships. It simply allows for the capture of transactions where amounts are received
for share capital or members’ interest contributions to the business. The reason why a
pre-defined code is used is because these transactions need to be accounted for in the
business’ Balance Sheet (and not as part of the normal expenses).
An example of a Share Capital / Member Interest transaction is as follows:
On starting a business, R100,00 is invested as share capital by the directors.
Where the funds (the R100,00) are actually paid into the business’ bank account, the
transaction may look as follows:
Expense
Date
Cheque
Date
Paid
No.
10-Apr-2009
10-Apr-2009
Through
Bank
a/c
Payment
Y
D
Amount
Method
100.00
VAT
Bank
Acc.
Bus/
or
Pvt
Ind.
0%
Exp
Code
B1
B
SCMI
Where the funds (the R100,00) are not paid into the business’ bank account, but the
directors pay for the shares from their own funds (say two directors that each pay
R50,00), the transaction may look as follows:
Expense
Date
Cheque
Through
Bank
a/c
Payment
Date
Paid
No.
10-Apr-2009
10-Apr-2009
Y
D
10-Apr-2009
10-Apr-2009
Y
D
Amount
VAT
Bank
Ind.
50.00
50.00
Method
Acc.
Bus/
or
Pvt
Exp
Code
0%
P1
B
SCMI
0%
P2
B
SCMI
FIN-X Solutions – Financial Solution Version 6 User Manual
Page 42 of 58
4.3.1.13 Retained Earnings Transactions
This pre-defined code is applicable to CC’s and companies – but not sole traders /
partnerships.
Profit that is made in a sole proprietor / partnership is automatically accounted in the
individuals’ name/s for tax purposes. CC’s and companies on the other hand can
accumulate profits that are not paid out – these accumulated profits are known as
Retained Earnings.
This code simply allows for the capture of transactions where amounts need to be
accounted in respect of changes to the Retained Earnings.
An example is where you do not make use of the functionality that automatically
calculates the tax liability – at the end of the year you then account the tax liability as
follows:
Expense
Date
Cheque
Through
Bank
a/c
Payment
Date
Paid
No.
28-Feb-2010
28-Feb-2010
28-Feb-2010
Y
D
28-Feb-2010
Y
D
Amount
VAT
Bank
Ind.
Acc.
Bus/
or
Pvt
21 234.00
0%
B1
B
BT
-21 234.00
0%
B1
B
RET
Method
Exp
Code
4.3.2 Petty Cash Expenses
This screen allows you to capture the content for expenses that are processed
through a business petty cash float.
The fields that you complete to capture transactions are as follows:
Field
Expense
date
Voucher
number
Required
YES
NO
What to do
Here you simply enter the date applicable to the
entry you are making (this date must fall in the
current financial year to be accounted correctly).
The date field can be entered as “1 Mar 09”,
“10 Jul 09”, etc – you do not have to type out the full
month or year.
Here you can enter a voucher number that refers to
your paper-based filing system. This will allow for
easier reference to a source document when you
need it in the future.
This field is optional and can be left blank.
Paid to
NO
This is a free-formatted field that provides for a
supplier name.
Description
NO
This is a free-formatted field. You can enter any
description that suitably describes the transaction
you are entering.
FIN-X Solutions – Financial Solution Version 6 User Manual
Page 43 of 58
Field
Required
What to do
Here you enter the amount (total including VAT) that
applies to the transaction you are entering.
Amount
YES
Decimals of value are simply entered by including a
point (.) in the amount field, for example R275,40 is
entered as 275.40. Do not enter decimals using a
comma (,) in the amount field as this will provide an
error.
Here you enter the VAT% applicable to the
transaction you are entering.
VAT %
Business /
private
Expense
code
Division
code
YES
YES
Remember that to claim the VAT your business must
be registered for VAT as well. You also need to
ensure that you are in possession of a tax invoice (or
voucher that contains the suppliers VAT registration
number) to substantiate the claim for VAT.
This reflects whether the transaction is for business
purposes or personal to a business partner.
For business transactions enter a “B” – for personal
transactions enter a “P1”, “P2”, etc.
YES
Here you enter the expense code – established in
the expense table. The expense name will be pulled
through to the right-hand column to allow you to
check that you have entered the correct code.
YES
Here you enter the division code – established in the
business data sheet. This allows for expenses to be
accounted against a division and thus reported on
separately.
FIN-X Solutions – Financial Solution Version 6 User Manual
Page 44 of 58
4.4
Hire Purchase Transactions
The complexity of entries normally associated with hire purchase and lease agreements
is related to the fact that you normally need to distinguish between the portions of
HP/lease payments that constitute capital and the portions that constitute interest
payment. And interest as a percentage of the payment fluctuates – at the beginning of
the agreement more of the payment is interest and less is capital – toward the end of the
agreement it’s the other way around!
The financial solution incorporates functionality that simplifies these accounting entries.
By capturing simple key pieces of information, the financial solution automatically
creates the split between capital redemption and interest paid – and updates the
relevant reports seamlessly.
The following sections explain how to capture data relevant to the hire purchase and
lease agreements in your business.
4.4.1 Current Agreements from Previous Years
This relates to hire purchase and lease agreements that are already in place at the
beginning of the year – in other words, the agreement was made in a prior financial year
but the business is still paying the monthly instalments on the hire purchase and lease
agreements.
All that is required is to enter the opening balances at the beginning of the year. This is
explained in section 6.5.
4.4.2 New Agreements in the Current Year
Where a hire purchase or lease agreement is entered into in the current year, the initial
loan is processed simply by entering the following:
The capital loan amount (excluding interest) in the Expense Sheet. An example
where a loan of R117350,00 is made to purchase a vehicle will be entered as
follows:
Expense
Date
Cheque
Date
Paid
No.
12-May-2009
12-May-2009
Through
Bank
a/c
Payment
Y
D
Amount
Method
-117 350.00
VAT
Bank
Acc.
Bus/
or
Pvt
Ind.
0%
Exp
Code
B1
B
HP1
Note: In the example above, the value is entered with a minus-sign in front of the
amount – this is because it is money coming in and not going out.
Note: A loan will normally be associated with the purchase of a fixed asset – refer to
the section on fixed assets in conjunction with this section.
A description and the interest rate applicable to the loan in the Business Data
sheet (refer also section 3.2.6). An example of this is as follows:
HP / Lease Loan Account Details
H1
Standard Bank - Vito Bus finance - Acc 545 666 789
Interest Rate
Division
12.00%
B
FIN-X Solutions – Financial Solution Version 6 User Manual
Page 45 of 58
4.4.3 Accounting for Agreement Instalments / Payments
Entering the instalments for a hire purchase or lease agreement is simple – and is best
explained by the following example.
Where a payment of R3562,18 is made on a HP agreement (set up as say H3) on
2 May 2009 by way of a debit order processes on a business bank account (B2) – the
entry will look as follows:
Expense
Date
Cheque
Date
Paid
No.
2-May-2009
2-May-2009
Through
Bank
a/c
Payment
Y
D
Amount
Method
3 562.18
VAT
Bank
Acc.
Bus/
or
Pvt
Ind.
0%
Exp
Code
B2
B
HP3
As another example – if the same payment as above was made from a business
partner’s private account (say partner P1) rather than a business bank account – the
same entry would look as follows:
Expense
Date
Cheque
Date
Paid
No.
2-May-2009
2-May-2009
Through
Bank
a/c
Payment
Amount
Method
D
3 562.18
VAT
Bank
Acc.
Bus/
or
Pvt
Ind.
0%
Exp
Code
P1
B
HP3
Note: In the example above, the “through bank account” field does not need to be
filled in as the funds did not come from a business bank account.
4.4.4 Entering Agreement Balances in the Current Year
The purpose behind entering agreement balances is to provide the financial solution with
exact balances – this supports the automated calculation of interest expenses in the
solution. If you do not enter the agreement balances, the financial solution will calculate
the interest based on the interest rate for the loan that was captured in the Business
Data screen.
The agreement balances are entered by clicking on the “Hire Purchases” button on the
Index screen.
Balances on loan agreements can be obtained by referring to the loan statements that
are sent to you by the finance provider. Alternatively you can contact the finance
provider to obtain the balances (may be necessary at least at the end of each year – to
ensure the accuracy of your financial reports).
It is not mandatory that you enter the balances on a monthly basis – as long as you have
captured the interest rate the financial solution will automatically calculate the balance.
It is preferable to capture the loan account balances at the end of each financial year as
the business’ accounting officer / auditor would want the financial reports to be in line
with the loan balances that the finance providers reflect in their records.
FIN-X Solutions – Financial Solution Version 6 User Manual
Page 46 of 58
An example of the difference between the automated calculation of interest based on
having entered the loan balance vs. not having entered a loan balance is as follows:
Balance entered for Month 5:
Month 2
Month 3
Month 4
Month 5
April-09
May-09
June-09
July-09
HP Agreement 1
Opening balance
Payments made
Closing balance (per loan statements)
Closing balance (for reporting)
Interest Paid
-
100 000.00
95 716.23
(100 000.00)
5 000.00
5 000.00
95 716.23
91 394.00
5 000.00
87 237.55
100 000.00
95 716.23
91 394.00
87 237.55
-
716.23
677.77
843.55
No balance entered for Month 5:
Month 2
Month 3
Month 4
Month 5
April-09
May-09
June-09
July-09
HP Agreement 1
Opening balance
Payments made
Closing balance (per loan statements)
Closing balance (for reporting)
Interest Paid
-
100 000.00
95 716.23
91 394.00
(100 000.00)
5 000.00
5 000.00
5 000.00
95 716.23
100 000.00
95 716.23
91 394.00
87 041.00
-
716.23
677.77
647.00
Note: In the examples above, the capital balance obtained by referring to the bank
loan statement for month 3 was entered in both cases.
The interest calculations are the same for months 2, 3 and 4.
However, in month 5, the examples reflect different interest paid values (R843,55 vs.
R647,00). The first example is more accurate because it uses the loan balance provided
by the finance provider – in the second example the result is a calculation only. This
reflects the value of entering the loan balances as provided by the finance providers on
HP / lease agreements.
Note: The data capture involved is simple and minimal – only the closing balances
are entered – the rest is calculated automatically based on functionality within the
financial solution.
FIN-X Solutions – Financial Solution Version 6 User Manual
Page 47 of 58
4.5
Fixed Asset Transactions
Most businesses purchase fixed assets such as motor vehicles, computer
equipment, factory equipment, etc.
Because fixed asset purchases are treated differently from an accounting
perspective, the way in which they are captured in the financial solution is also
somewhat different from other transactions.
The financial solution includes a fixed asset schedule – this schedule is
accessed by clicking on the “Capture Fixed Assets” button on the Index screen.
The fixed asset schedule provides for five key areas:
The classification of the types of assets relevant to your business. A code
and description must be provided (pre-populated for five of the eight
options – change these as applicable).
Asset classes:
M Motor Vehicles
C Computer Equipment
L Land & Buildings
F Office Furniture
E Office Equipment
Basic data relevant to the individual asset items.
Asset Asset
Description Voucher
class number
Enter asset
codes and
descriptions
of choice
Purchase
date
Division
Private Use Partner No.
Data relevant to the disposal of individual fixed assets.
Disposal
date
Depreciation
rate (%)
Additional data (these can be left blank) that provides for a portion of the
asset to be accounted against a business partner – where private use of
the asset is relevant.
Private use %
Purchase
VAT
price (incl.
%
VAT)
Disposal
value
VAT %
Proceeds
deposited to?
Summaries of the individual assets, and the assets on a category level –
providing information on the cost prices, depreciation and book values –
these
FIN-X Solutions – Financial Solution Version 6 User Manual
Page 48 of 58
4.5.1 Current Fixed Asset Purchases
A pre-defined code (“FA”) has been created to account for fixed asset purchases. This
code is used when entering a fixed asset purchase in the Capture Expense or Petty
Cash Expenses sheet.
An example of a fixed asset purchase transaction is as follows:
On 24 August 2009 the business purchases a motor vehicle for R117350,00 (including
14% VAT). Payment is made by way of a cheque from the business bank account set up
as B1. The entries will look like this:
Expense
Date
Cheque
Payment
No.
Through
Bank
a/c
Date
Paid
24-Aug-2009
24-Aug-2009
34
N
C
Amount
Method
117 350.00
VAT
Bank
Acc.
Bus/
or
Pvt
Ind.
14%
Exp
Code
B1
B
FA
Once entered, the “balance” fields on any of the three data capture screens will contain
a value – the value will be equal to the VAT exclusive amount entered in the row where
the FA transaction is captured. The reason for this is that fixed assets – unlike all other
transactions – require a second level of input – an entry into the fixed asset schedule.
Based on the above example, the entry in the fixed asset schedule will look as follows:
Asset
class
M
Asset
Description Voucher
number
1
VW Polo
235
Purchase
date
Purchase
Depreciation
price (incl. VAT %
Division
rate (%)
VAT)
24-Aug-2009 117 350.00 14%
20.00%
B
By entering this data into the fixed asset schedule, the financial solution is able to
automatically calculate the depreciation that is accounted as an expense; and the value
of the assets that is reported on the business’ Balance Sheet.
Tip: SARS has pre-determined depreciation rates that they allow in determining
tax. Consult with your accountant when you purchase an asset to ensure that you
use a depreciation rate that agrees with the SARS rates.
Tip: Where assets are depreciated over 3 year the rate is 33.333333%.
Similarly, the rate for a 6-year period is 16.66666667%. To ensure that the solution
calculates depreciation accurately, enter the depreciation rate as follows – “=1/3” or
“=1/6”, etc. This ensures that the rate in the solution is not rounded off in error.
FIN-X Solutions – Financial Solution Version 6 User Manual
Page 49 of 58
4.5.2 Private Use of Fixed Assets
There are cases where a business purchases an asset and the asset is used by
a business partner for private use. A common example of this is a motor vehicle.
Your auditor / accountant / tax advisor can easily advise you if it is suitable to
allocate a portion of an asset as private use.
Where private use is applicable, you simply indicate in the fixed asset schedule –
against the relevant asset item – what the percentage of private use is and to
which business partner the private use applies.
As an example – business partner P3 uses 20% of an asset for private purposes
– the asset schedule will be updated as follows:
Private use %
Private Use Partner No.
P3
20.00%
4.5.3 Fixed Asset Disposal Transactions
Most fixed assets have a limited life-span and so businesses invariably dispose
of fixed assets over time. A good example is where one vehicle is traded-in
(disposed of) when a new vehicle is purchased.
When an asset is disposed you simply enter the required information against the
relevant asset item to ensure that:
The asset is no longer accounted for in the solution after the disposal date.
Depreciation calculations are ceased for the asset after disposal.
The profit or loss can be calculated on disposal – this is done automatically.
An example of a disposal entry may look like this:
Disposal
date
Disposal
value
VAT %
Proceeds
deposited to?
17-May-2009
12 000.00
14%
B3
4.5.4 Prior Year Fixed Asset Purchases
This relates to fixed assets that already exist at the beginning of the year – in
other words, the assets were acquired in a prior financial year but the business is
still in possession of and using the fixed assets.
Although the information is captured in the same way as described above, these
assets influence the opening balances in the financial solution. For this reason,
the capture of these assets is explained in section 6.6.
FIN-X Solutions – Financial Solution Version 6 User Manual
Page 50 of 58
SECTION 5 – FINANCIAL SOLUTION REPORTS
This section describes briefly the automated reports that are contained within the
financial solution.
5.1
Performance Overview
This report provides a brief summary of income, expenses, taxation (provided the
automated tax calculation functionality has been used) and the net profit.
A graphical overview with key trend lines is also provided that reflects increases
and decreases in the key figures simplistically.
No user input is required on this report.
5.2
Balance Sheet
This provides the assets, liabilities and capital employed by the owners in a
format that meets the requirements of the accounting profession.
No user input is required on this report.
5.3
Income Statement
The Income Statement provides a detailed view of income and expenditure
accounted on a monthly, six-monthly and yearly basis.
No user input is required on this report.
5.4
Divisional Income Statement
The Divisional Income Statement provides a detailed view of income and
expenditure accounted on a monthly, six-monthly and yearly basis for the division
chosen. Simply provide the division code to access the management information
relevant to the division.
5.5
Cash Flow Report
The Cash Flow report provides an overview of the cash inflow and outflow in the
business bank account/s. This report also serves as a basis for reconciling
(agreeing) to the bank statement balance – if this is agreed you have assurance
that you have captured expenses related to the bank accounts accurately.
The financial solution provides for ten user-defined bank accounts (B1 – B10). All
that needs to be entered on the Cash Flow Report screen is the number
applicable to the bank account for which you want to view the cash flow – after
entering a number the detail will automatically be pulled through to all the
relevant fields.
FIN-X Solutions – Financial Solution Version 6 User Manual
Page 51 of 58
5.5.1 Cash Flow Reconciliation
Reconciling your cash flows to your individual business bank accounts is a very
important control – if the reconciliation agrees, it means that the data you have
captured against these bank accounts has been done accurately. Inversely,
where you do not reconcile, it may provide the “clue” to where you have omitted
to enter information (such as bank charges you did not capture) or entered
information erroneously (incorrect amount, incorrect account code used, etc.).
Reconciling your cash flow to your bank account involves the following simplistic
steps:
Obtain a bank statement for the relevant bank account.
Check to ensure that all the debit orders and cheques that reflect on the
bank statement are marked as a “Y” in the “through the bank” column on
the Capture Expenses screen – and ensure that there are none marked as
a “Y” that are not on the bank statement. You can tick these off on the bank
statement as you check them. The items that you have captured but have
not yet gone through the bank account (those marked with a “N” in the
“through the bank” column on the Capture Expenses screen) are
automatically accounted as outstanding reconciling items on the cash flow
reports.
Check that all the direct debits and credits (bank charges, interest, etc.) that
reflect on the bank statement have been captured in the Capture Expenses
screen – again, you can tick these off on the bank statement as you check
them.
When complete, you can check to see which items still appear on the bank
statement that have not been “ticked off” – and decide what needs to be
done to account for these:
o
Create further entries in the financial solution.
o
Account them as errors on the bank’s side. These need to be
followed up with the bank to get them corrected. Where you identify
items that need to be shown as reconciling items separately, the
financial solution Cash Flow Report page provides an area (at the
bottom of the page) where these can be captured. Simplistic
examples of such items are as follows:
OTHER RECONCILING ITEMS
Detail
Bank error – debit duplicated
Bank error – debit duplicated
Acc
B1
B2
March-09
April-09
127.33
34.67
34.67
Note: In the above example, the first item was identified as an error
when the March bank statement was reconciled with bank account B1. This
error was corrected in April – does not reflect in the April column again.
The second item was identified as an error when the March bank statement
was reconciled with bank account B2. This error was not yet corrected in
April and so it reflects in the April column again.
FIN-X Solutions – Financial Solution Version 6 User Manual
Page 52 of 58
5.6
VAT Report
The VAT Report forms the basis for completing your VAT returns. The report has
been structured in line with the SARS return – each code on the SARS return is
reflected on the VAT Report. It’s simple – take the values on the report against
each code and enter them against the same codes on the SARS return.
The financial solution provides for differentiation between “odd” and “even” VAT
periods (refer section 3.2.1). Based on this, and you entering the period you
want a VAT Report for by filling in the appropriate number (1 to 6) on the VAT
Report screen – the detail will automatically be pulled through to all the relevant
fields.
The amounts reflecting in the Total column at the far right can then be used to
populate the SARS VAT return.
Tip: SARS e-filing automatically calculates the output VAT amount
(code 4A) when you enter the code 1 value. Rounding may result in the
SARS amount differing with your report amount by a few cents – in these
cases, overwrite the value on the e-filing return to agree with the value
reflecting on the VAT Report generated by the financial solution.
Where your business has “odd” VAT accounting periods, it is important that the
blue fields in the “Opening balance” column (codes 1, 2, 4, 14, 15, 17 and
payments made) are updated – these values form the first month in period 1 – if
excluded, the period 1 values will be incorrect when you draw a report for that
period.
Tip: The values for the opening balance column can be obtained from
your financial reporting system for the previous financial year.
Tip: If they were involved in preparing your financial reports for the
previous financial year, simply ask your auditor / accountant to provide you
with the values for the opening balance column.
5.7
Petty Cash Report
The Petty Cash Report provides a detailed view of the petty cash transactions,
accounted on a monthly, six-monthly and yearly basis.
No user input is required on this report.
FIN-X Solutions – Financial Solution Version 6 User Manual
Page 53 of 58
5.8
Loan Account Report
The Loan Account Report provides an overview of the transactions processed
against the business partner’s loan account/s.
The financial solution provides for eight user-defined loan accounts (P1 – P8). All
that needs to be entered on the Loan Account Report screen is the number
applicable to the loan account that you want to view – after entering a number
the detail will automatically be pulled through to all the relevant fields.
5.9
Taxation Report
The Taxation Report is not a business-related report – but is a simplistic valueadding tool that allows you to estimate the taxation payable by each business
partner.
The calculation is done on a six-month and year-basis to accommodate the
completion of provisional tax returns.
The financial solution allocates the profit to each partner based on their share in
the business (as set up in the partner table in the Business Data sheet).
Various fields are provided where values can be input – other income can be
added – deductions for items such as medical aid and retirement annuity
contributions can be accounted.
The net resulting taxable income that is calculated is used to automatically
determine the tax payable – based on the current tax tables being stored within
the financial solution.
FIN-X Solutions – Financial Solution Version 6 User Manual
Page 54 of 58
SECTION 6 – OPENING BALANCES
6.1
Introduction
This section describes how the opening balances relevant at the beginning of a
financial year are entered in the financial solution.
Tip: The opening balances can be obtained with reference to the
financial reports for the business for the prior year. In many cases these are
not available immediately as they need to be completed by the business’
auditor / accountant. It is recommended that you consult with the business’
auditor / accountant to obtain the correct data – this will ensure the
accuracy of your current year’s financial reports.
Except for the data relevant to fixed assets, all opening balances are captured on
the “Business Data” screen.
6.2
Sundry Accounts Opening Balances
This is the first section in which opening balances are entered:
Opening balances:
Sundry Accounts:
Petty Cash balance at start 2009
Debtors balance at start 2009
Creditors balance at start 2009
Provision for Taxation at start 2009
Accumulated tax loss at start 2009
VAT balance at start 2009
Member's interest at start 2009
Retained earnings at start 2009
-
Enter
opening
balance
values here
-
6.2.1 Debtors Opening Balances
This opening balance relates to amounts that are due to the business by clients
based on invoices that were issued. Because the invoices relate to the previous
year but the payments will be received in the current year, the invoices need to be
captured on the “Capture Invoices” screen as well. When you capture them ensure
that the date is the date in the previous year when the invoice was issued.
Capturing this data in the Capture Invoices screen ensures that the invoice data is
drawn through to the screen where the payments are captured – as these
payments will be in the current year.
6.2.2 Inventories Opening Balances
This opening balance relates to the value of stock that is on hand at the beginning
of the current year.
It is important to remember that this code is affected by allocations using the “ST”
code – refer section 4.3.1.5.
FIN-X Solutions – Financial Solution Version 6 User Manual
Page 55 of 58
6.2.3 Creditors Opening Balances
This opening balance relates to amounts that are due by the business to suppliers
where the expenditure relates to the previous year but the payments will be made
in the current year.
It is important to remember that these payments must be allocated using the “AP”
code – refer section 4.3.1.10.
6.2.4 VAT Opening Balances
This reflects the amount due to SARS for VAT at the beginning of the current year.
Where your business has “odd” VAT accounting periods, it is important that the
blue fields in the “Opening balance” column on the VAT Report are also updated to
ensure the accuracy of the report – refer section 5.6.
6.3
Bank Account Opening Balances
This section simply provides for the opening balances on each of the business’
bank accounts.
Bank Accounts:
Bank Account Details
B1
B2
B3
B4
B5
B6
B7
B8
B9
B10
6.4
Opening balance
-
-
-
Enter
opening
balance
values here
-
Loan Account Opening Balances
This section simply provides for the opening balances on each of the business
partners’ loan accounts.
Loan Accounts:
Loan Account Details
P1
P2
P3
P4
P5
P6
P7
P8
-
Opening balance
-
Enter
opening
balance
values here
FIN-X Solutions – Financial Solution Version 6 User Manual
Page 56 of 58
6.5
Hire Purchase / Lease Agreements Opening Balances
This relates to the opening balances on hire purchase and lease loan agreements
that are already in place at the beginning of the year – in other words, the
agreement was made in a prior financial year but the business is still paying the
monthly instalments on the hire purchase and lease agreements.
All that is required is to enter the opening balances at the beginning of the year in
this section.
Hire Purchase / Capitalised Lease Rental Accounts:
HP / Lease Loan Account Details
H1
H2
H3
H4
6.6
Opening balance
HP Agreement 1
HP Agreement 2
HP Agreement 3
HP Agreement 4
-
Enter
opening
balance
values here
Fixed Assets Opening Balances
This relates to fixed assets that already exist at the beginning of the year – in other
words, the assets were acquired in a prior financial year but the business is still in
possession of and using the fixed assets.
The information for these assets is captured in the Fixed Asset Schedule – in the
same way as described in section 4.5 above – individually for each fixed asset
item as follows:
Asset Asset
Description Voucher
class number
M
C
…..
6.7
1
2
VW Polo
Computer
235
376
Purchase
date
Purchase
price (incl.
VAT)
VAT %
Depreciation
rate (%)
24-May-2007
6-Aug-2008
117 350.00
4 675.00
14%
14%
20.00%
33.33%
Accuracy of Opening Balances
Once you have captured all the data relevant to the opening balances it is quite
simple to check the accuracy thereof – simply go to the “Balance Sheet” and
check to see that the totals in the column showing the prior year’s balances for
Total Assets is equal to that for Total Equity and Liabilities.
If these two totals do not agree – there is an error in the opening balances data
that has been captured. This error will also automatically reflect in the “balance”
fields on any of the three data capture screens – the value will be equal to the
difference between the Total Assets and Total Equity and Liabilities values as
reflected on the Balance Sheet.
This difference needs to be evaluated to determine what changes must be made to
the opening balance data – so that the Total Assets and Total Equity and
Liabilities values as reflected on the Balance Sheet do equal each other.
FIN-X Solutions – Financial Solution Version 6 User Manual
Page 57 of 58
APPENDIX A – INSERTING A BUSINESS LOGO
The financial solution provides for your business logo to automatically be
incorporated and be printed on invoices and client statements.
To provide for your own logo to be included on invoices and/or client statements
that are printed or emailed from your financial solution, follow these steps:
1. Obtain a file that contains your logo. This could be a JPEG file, BITMAP file, or
other form of picture file. If you do not have this available inquire from the
service provider that created your logo.
2. Open this file containing your logo using an application such as Microsoft
Picture Manager. At the same time open a blank MS WORD document. Copy
the logo from the picture application (such as Microsoft Picture Manager) and
paste it into the blank MS WORD document. This allows for the logo to be
created as a picture in the format that it can be used by the financial solution
(note that you will not be able to copy the logo as a JPEG, BITMAP, or other
picture directly into the financial solution).
3. Open the financial solution. On the Index – choose the “Print Invoices” option
and/or the “Print Client Statements” option.
4. At the top of the sheets you will notice some buttons – the button on the right
has “Logo” on it. Click on this button.
5. Click in the area where the comment is included that says “Insert logo here”.
This should show you a large boxed area.
6. Go to the MS WORD document where you pasted your logo, click on the
picture (of the logo), right-click on your mouse and choose the “copy” option.
7. In the boxed area on the invoice / statement page (in the financial solution),
right-click on your mouse and choose the “paste” option. This will paste your
logo into the boxed area.
8. Resize the pasted logo by dragging it and/or resizing it until it fits the area in
the way you prefer.
9. Click on the “Index” button at the top left of the sheet to return to the Index
page.
10. Click of the “Save” button to ensure that your logo changes are saved before
exiting the solution.
When you now access the financial solution your business’ logo will be
incorporated on your invoices and/or client statements and will be included on
emailed invoices and/or client statements.
FIN-X Solutions – Financial Solution Version 6 User Manual
Page 58 of 58
APPENDIX B – SOFTWARE LICENCE AGREEMENT
IMPORTANT – READ THESE TERMS CAREFULLY
1.
Software Licence Agreement
This is a legal agreement between you, the end user, and Simplex Business Product Solutions (Pty) Ltd (“FINX”). It is a condition of your purchase of the FIN-X Solutions software (“the Software”) that you will use the
Software subject to the terms of this agreement.
In order to operate the Software, you are required to have a lawful copy of Microsoft Excel. FIN-X may at any
time request written proof that you have a licensed copy of the said programme.
2.
Copyright
FIN-X is the owner of all copyright in the Software which is protected by the Copyright Act No 98 of 1978,
Republic of South Africa and International Copyright Treaty provisions. You must treat the Software like any
other copyright material except that you may:
(a) make one copy of the Software solely for a back-up or archival purposes; or
(b) transfer the Software to a single hard disk provided you keep the original solely for back-up and archival
purposes; and
(c) you may not copy the written materials accompanying the Software.
3. Licence Terms
3.1. FIN-X grants to you the right to use one copy of the Software, or such other quantity indicated on the Certificate
of Licence provided to you by FIN-X, on a single computer.
3.2. You may not rent or lease the Software, but you may transfer the Software and accompanying written material
on a permanent basis if you obtain FIN-X’s written consent, and provided that you retain no copies, and the
recipient agrees to be bound by the terms of this agreement.
3.3. This licence shall not permit the installation of the Software on a network server for the sole purpose of
distribution to one or more other computer(s), for which a separate licence is required.
3.4. You may not reverse engineer, decompile or disassemble the Software.
3.5. The effective date of this agreement is the day that you install the Software.
3.6. The agreement shall remain in force until terminated in writing by FIN-X.
3.7. You may terminate this agreement by returning to FIN-X the original Software and any back-up copies and the
written materials accompanying the Software.
3.8. If you breach this agreement, FIN-X can terminate the licence upon written notification to you, whereupon all
original disks, any back-up copies and written materials accompanying the Software shall be returned to FIN-X.
4. Limited Warranty
4.1. FIN-X warrants that the medium on which the Software is recorded to be free from defective materials and
workmanship under normal use for a period of 30 days from the date of purchase / delivery, and no claims
submitted after such period shall be entertained.
4.2. The Software and related documentation are provided as is. FIN-X disclaims all other warranties, either express
or implied including but not limited to implied warranties as to merchantability and fitness for a particular purpose
with respect to the Software and the accompanying written material.
4.3. FIN-X’s entire liability and your exclusive remedy shall be the replacement of the Software that does not meet
FIN-X‘s limited warranty and which is returned to FIN-X with a copy of your receipt / proof of payment. This
limited warranty is void if failure of the Software has resulted from accident, abuse or misapplication.
4.4. In no event shall FIN-X or its suppliers be liable for any damages whatsoever (including without limitation,
damages or loss of business profits, business interruptions, loss of business information, or other pecuniary
loss) arising out of use of or inability to use this product, even if you have been advised of the possibility of such
damages.
5.
Governing Law
This agreement shall be governed and construed in accordance with the laws of the Republic of South Africa.