1
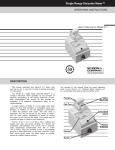
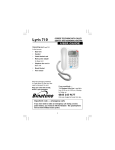
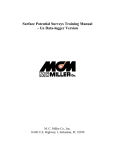
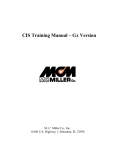
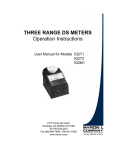
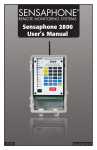
AGRI-METERS
Operation Instructions
User Manual for Models AG-5
AG6/PH
2450 Impala Drive
Carlsbad, CA 92010-7226 USA
Tel 760-438-2021
Fax 800-869-7668 / 760-931-9189
www.myronl.com
pH/Conductivity Instrumentation
Accuracy • Reliability • Simplicity
DESCRIPTION
This manual describes your Myron L Agri-Meter, tells you how to
use it, and how to keep it working accurately for many years.
Myron L AG-5 and AG6/pH Agri-Meters are compact, light-weight,
self-contained conductivity and conductivity/pH meters. They contain
a built-in sample cell cup and, in the case of the AG6/pH, a replaceable
pH sensor. Both Agri-Meters have dials cailibrated in millimhos. The
AG6/pH dial is also calibrated in pH units. It will quickly determine
the conductivity and pH of almost any solution.
Both are 3.4" x 4.5" x 4.0" (85 x 129 x 126mm) and weigh less
than one pound (.45kg). Agri-Meters are completely self-contained.
pH and conductivity readings are automatically temperature
compensated from 50° to 160°F ( 10° to 71° C). They are powered
by a 9 volt transistor battery good for at least 2000 tests, or one year
shelf life.
MODEL
CONDUCTIVITY
pH
RANGE
RANGE
AG-5
0-5 millimhos
AG6/pH
0-5 millimhos
2-12 pH
ACCURACY: (Both Models)
CONDUCTIVITY:
±2% of full scale
pH:
±0.2 pH units (AG6/pH only)
REPEATABILITY: (Both Models) ±1%
The pictures in this manual show the major operating parts of
your Myron L Agri-Meter. Handle your Agri-Meter and identify these
parts to become familiar with it.
IMPORTANT: The pH sensor in your AG6/pH Agri-Meter has a limited
life much like a battery. Sensor longevity is affected both by the types
of solution tested and care given your meter. pH sensors are user
replaceable. See MAINTENANCE for additional information.
USING YOUR METER
SOIL TESTING
CONDUCTIVITY MEASUREMENT
1. Rinse the celI cup three times with the sample you want to test.
(For very hot or very cold samples see TEMPERATURE
COMPENSATION below.)
NEVER FILL THE CELL BY DIPPING THE METER INTO WATER!
2. Fill the cell with another sample to at least 1/4" (6mm) above the
upper electrode.
3. Press the black button.
4. Read the conductivity in millimhos indicated by the pointer on
the dial's black scale.
5. (AG-50NLY) If the pointer goes off the scale to the right try RANGE
DOUBLING (see FIELD CALIBRATION).
NOTE: When you are finished with the meter, RINSE THE CELL
CUP with clean water, preferably distilled or deionized.
CONDUCTIVITY AND pH
1. Collect samples which are representative of the area you are
testing. Avoid the upper half inch or so, as salts accumulate there
because of the surface evaporation.
2. If you have the time, dry the sample. Place it on a paper towel or
clean surface and allow it to dry. Rapid drying such as in an oven
is not recommended since some nutrients may be vaporized.
3. When using tap water to dilute soil, test the conductivity of the
water alone. This figure will be subtracted from the conductivity
value of the soil/water mixture solution. It is not necessary to
measure the conductivity of deionized or distilled water as it is
not high enough to affect the mixture's final conductivity reading.
4. If using the Myron L Soil Test Kit, place the dried soil sample in
the smaller vial to either the 2:1 or 5:1 soil line. A 2:1 water-tosoil ratio is usually sufficient. However, organic media such as
peat moss need a 5:1 water-to-soil test solution.
NOTE: If you are not using the Myron L Soil Test Kit, mix 3 oz. (by
volume not weight) of dried soil and 6 oz. water in a container. Organic
media use a 5:1 water-to-soil ratio.
5. Pour the measured soil sample into the larger vial.
6. Twice fill the smaller vial with water to the upper line and pour it
into the vial containing soil.
IMPORTANT: MUST BE DONE TWICE.
7. Cover the large vial with the cap provided and shake vigorously
to dissolve all soluble salts.
8. Let stand at least 45 minutes to 1 hour. If possible, let stand
overnight to allow complete settling out of suspended particles.
9. Decant off the water into another container or directly into the
Agri-Meter cell cup. Filter paper or cloth may be used for additional
filtration. Paper towels can alter both the conductivity and pH of
the sample, and should not be used as filters.
10. Rinse the cell cup with this sample twice. If using Model AG6/pH
be sure to sharply shake out samples to clear the pH sensor
chamber.
NOTE: If you are also planning to perform the Alkalinity test (see
below), save the rinse samples for that test.
11. Fill the cell cup a third time. Press the black button for conductivity
(salinity) reading on the black scale. If tap water was mixed with
soil, remember to subtract the conductivity reading taken before
mixing. The difference is the soil conductivity. If you need
assistance in determining correct salinity limits or concentrations
contact your fertilizer supplier consultant, or university.
12. For model AG6/pH, press the red button and read pH on the red
scale.
pH MEASUREMENT (AG6/pH ONLY)
1. Obtain sample to be tested, if necessary, heat or cool it to between
50° and 160°F (10° - 71°C).
2. Remove the pH compartment cap and sharply shake out any
liquid.
3. Pour or squirt the sample into the built-in cell cup, especially the
small pH compartment. Shake out and repeat three times with
the sample to be tested. These may be the same rinsings used
to condition the cell forthe conductivity measurement.
4. Press the red button. The pointer immediately indicates the pH
of the sample on the red scale. If the pointer drifts wait
approximately 30 seconds and press the button again to obtain
a stable reading of pH. If drifting continues, the electrode may be
coated with a film. Use a liquid cleanersuch as Windex™ or
Fantastic™ to clean the pH sensor bulb.
5. Rinse both pH and conductivity parts of the cell with clean water.
LEAVE SOME LIQUID IN AND RECAP THE pH
COMPARTMENT.
TEMPERATURE COMPENSATION:
For very hot or very cold solutions let the three rinse samples
each remain in the cell for several seconds, then immediately fill the
cell with the sample you want to test. This allows the automatic
temperature compensation feature time to work properly.
CAUTION
ALWAYS rinse the cell cup with pure water immediately after use or
cleaning. This will prevent the build-up of unwanted deposits and
possible contamination of the sample.
DO NOT use with samples hotter than 160°F (71°C). The readings
WILL NOT be accurate.
DO NOT splash solvents such as lacquer thinner, acetone, benzene
or chlorinated solvents on the plastic case.
DO NOT fix or modify the meter. That will void your warranty. See
SERVICE for details or consult Myron L Company.
DO NOT DIP THE INSTRUMENT INTO WATER. If water does get
inside the instrument, see MAINTENANCE for instructions on drying
it.
ALWAYS store your pH sensor wet and with the cap on (AG6/pH
ONLY).
DO NOT test solutions which could damage the pH sensor. See
MAINTENANCE (AG6/pH ONLY).
DO NOT store meter in direct sunlight.
TESTING ALKALINITY
1. Pour a few drops of the sample water and one of the Alkalinity
Test Tablets into the Alkalinity Test Vial.
2. Cap the vial and swirl the sample until the tablet completely
dissolves. The solution should turn a deep violet color.
3. Uncap the vial and gradually add sample water, agitating to keep
the solution well mixed. Continue this until the sample suddenly
turns green.
4. Read the alkalinity in ppm by comparing the solution level to the
scale on the side of the vial.
NOTE: Thoroughly rinse the Alkalinity Test Vial with clean
water after each test.
CALIBRATION/FIELD CALIBRATION
MAINTENANCE/ACCESSORIES
CONDUCTIVITY STANDARD SOLUTIONS: A Standard Solution
has a known conductivity value. Your meter was calibrated at the
factory using Myron LCompany 442-3000 Standard Solution. You
can keep your meter accurate by using the same Standard Solution.
How often you calibrate your meter depends on how much you
use it. For once a day use, recalibrate it every three months.
CHECKING CONDUCTIVITY CALIBRATION
1. Test a sample of Myron L 442-3000 Standard Solution.
CAUTION: Throw away the Standard Solution as you use it. Don't
put the used samples back in the bottle.
2. If the Agri-Meter does not indicate 3.9 millimhos (equivalent to
3900 micromhos), first clean the cell. For directions on how to do
this see CELL CUP inside. Rinse the cell thoroughly and test the
Standard Solution again. If the Agri-Meter still does not indicate
the correct value, recalibrate it as described below.
TO RECALIBRATE CONDUCTIVITY
1. Remove the bottom cover using fingernails or a small screwdriver
to loosen the front or rear edge. Identify the Conductivity
Calibration Control so you can find it by touch while calibrating.
Model AG6/pH also has two pH Calibration Controls. See photo
below for details.
2. Test another sample of the 442-3000 Standard Solution (be
careful to not splash solution inside the meter).
3. Adjust the Conductivity Calibration Control until the meter
indicates 3.9 millimhos (3900 micromhos).
NOTE: Agri-Meters may not be calibrated to read parts per million.
4. (AG-5 ONLY) Press the red button.
5. (AG-5 ONLY) Compare the meter reading to the INTERNAL
STANDARD value on the meter's bottom label. If they are
noticeably different, mark the new value in place of the old one.
BATTERY CHECK (AG-5): Press the red "S" button. Adjust the
Calibration Control to maximum (see FIELD CALIBRATION). If the
pointer reads less than full scale (5 millimhos) the battery should be
replaced.
BATTERY CHECK (AG6/pH): The AG6/pH has a battery indicator
glow light visible through the small hole on the lower right-hand corner
of the meter face plate. If this light fails to glow when the black button
is pressed, replace both batteries.
BATTERY REPLACEMENT: To replace each battery detach the
battery connector. Pull on the plastic strap to remove the battery.
Replace with fresh zinc carbon or alkaline 9 volt battery. Reinsert
the plastic strap to secure battery.
CELL CUP: Self-conditioning of the built-in electrodes occurs each
time the button is pressed with a sample in the cell cup. This ensures
consistent results each time. With some samples a small downward
swing of the pointer is a result of this conditioning action. This action
is powerful and removes normal films of oil and dirt. However, if very
dirty samples - particularly scaling types - are allowed to dry in the
cell cup, a film will build up. This film reduces accuracy. When there
are visible films of oil, dirt, or scale in the cell cup or on the electrodes,
scrub them lightly with a small brush and household cleanser. Rinse
out the cleanser and the meter is ready for accurate measurements.
pH SENSOR: The unique pH electrode in your AG6/pH is a nonrefillable combination type which features a porous liquid
junction (covered by U.S. Patent No. 4128468). It should not be
allowed to dry out (see pH MEASUREMENT). If it does, the sensor
can sometimes be renewed by soaking in a saturated potassium
chloride (KCI) solution for several days.
"Drifting" can be caused by a film on the sensor bulb. Use a liquid
cleaner such as Windex™ or Fantastic™ to clean it. The sensor bulb
is very thin and delicate. Excessive pressure during cleaning may
break it.
Leaving high pH (alkaline) solutions, such as 10 buffer, in contact
with the pH sensor for long periods of time can damage it. Rinsing
such liquids from the pH compartment and moistening it with 4 buffer
or tap water will extend its useful life.
Samples containing chlorine, sulphur, or ammonia can "poison"
any pH electrode. If it is necessary to measure the pH of any such
sample, thoroughly rinse the pH sensor with clean water immediately
after taking the measurement. Any sample element which will reduce
(add an electron to) silver, such as cyanide, will attack the reference
electrode.
Replacement sensors are available only from the Myron L
Company or our authorized distributors (see ACCESSORIES).
WATER INSIDE THE METER
Your Myron L meter is a rugged instrument and will withstand
water exposure around its cell, meter movement, and switches.
However, care shouId be taken to keep water from leaking in around
the bottom cover. It is not sealed (to prevent condensation from
forming).
If the water is relatively clean (i.e., tap water or better), and there
are only a few drops inside the meter, dry it as described below.
Large amounts of water, or corrosive or very dirty solutions will almost
certainly damage meter movement or electronics. Such meters
should be returned to the Myron L Company for repair.
To dry your meter:
1. Shake excess water out of the inside of the meter.
2. Dab the exposed surfaces dry with an absorbent cloth or tissue.
Avoid pushing any water into the Calibration Controls or the
switches.
3. Air dry the meter in a warm area with the bottom cover off. Allow
several hours for thorough drying.
If the water entered through a leak in the case or cell, or if the
instrument shows erratic readings or other unusual behavior, return
it to the Myron L Company for servicing.
FIELD CALIBRATION
NOTE: The feature described below is on the AG-5 only. It is intended
as a quick field calibration check, or for using the range doubling
technique. It is not replacement for calibration with Standard Solution.
INTERNAL STANDARD: Your AG-5 has an INTERNAL STANDARD
value on the bottom cover of each meter. Use it between normal
calibrations as a field check of your meter's accuracy. To verify your
meter's calibration:
1. Press the red button.
2. If the reading matches the lNTERNAL STANDARD value on the
bottom label, yourAG-5 is in calibration. If not, see FIELD
CALIBRATION next.
FIELD CALIBRATION (AG-5 only)
1. Remove the bottom cover using fingernails or a small screwdriver
to loosen the front or rear edge.
2. Press the red button and adjust the Conductivity Calibration
Control until the meter reading is the same as the INTERNAL
STANDARD value.
NOTE: If the meter will not adjust to the INTERNAL STANDARD
value the battery should be replaced. See MAINTENANCE below.
3. Replace the bottom cover.
RANGE DOUBLING (AG-5 only)
1. Remove the bottom cover.
2. While pressing the red button, adjust the Conductivity Calibration
Control until the meter reads one-half the INTERNAL STANDARD
value shown on the bottom label. For example:
If the INTERNAL STANDARD value is 4.2. adjust the Conductivity
Calibration Control until the reading is 2.1.
3. Test your sample (take care to keep the inside of the meter dry).
Multiply by two the reading of the sample tested. For example:
If the indicated conductivity is 3.2 millimhos, the actual value of
the sample tested is 6.4 millimhos (3.2 x 2).
NOTE: After completing tests requiring range doubling reset the
Conductivity Calibration Control to its INTERNAL STANDARD value
and replace bottom cover.
STANDARD BUFFER SOLUTIONS (AG6/pH only)
All pH sensors "drift" and decrease in strength as they age. pH
meters have two Calibration Controls to compensate for those effects.
ZERO adjust corrects for "drift" of the pH sensor's response to neutral
pH solutions. GAIN adjust amplifies the signal from the pH sensor
for accurate readings of other pH values.
Use pH standard buffer solutions to calibrate the pH function
onyourAG6/pH. The recommended values are 4, 7, and 10. For
greatest accuracy, adjust with the buffer closest in pH to the samples
to be tested.
pH ZERO ADJUST (Frequency: weekly)
Test by rinsing and refilling the AG6/pH cell cup with 7 buffer and
pressing the red button. The meter should indicate 7 on the red
scale. If it is necessary to calibrate Zero, perform the following steps:
1. Remove the bottom cover using fingernails or a small screwdriver
to loosen the front or rear edge.
2. Refill cell cup with 7 buffer (see pH MEASUREMENT for proper
procedure).
3. Press the red button and turn the pH Zero control until the needle
indicates 7.
4. Recap the pH compartment and replace the bottom cover.
pH GAIN (SLOPE) ADJUST (Frequency: bi-monthly)
The Gain should be calibrated approximately once every eight
weeks. The Gain control is used with 4 and 10 buffers.
NOTE: Never adjust the Gain control without first adjusting Zero
Test by rinsing and refilling the AG6/pH cell cup with 4 or 10 buffer
and pressing the red button. The meter should indicate the
buffer value on the red scale. If it is necessary to calibrate the Gain,
perform the following steps:
1. Remove the bottom cover.
2. Rinse and fill the pH compartment with 4 buffer and press the
red button. Adjust the Gain control until the needle indicates 4.
3. Rinse three times and test with 10 buffer. If adjustment is
necessary, adjust to only half way between the initial 10 buffer
reading and 10.
4. Retest the 4 and 10 buffers. If, after this, the 4 and 10 buffer
readings are not less than one division from 4 and 10, the sensor
is deteriorating and should be replaced. The sensor should also
be replaced if the Gain control cannot make the pointer reach
either 4 or 10. DO NOT store the meter with 10 buffer still in it
(see MAINTENANCE).
ACCESSORIES
CONDUCTIVITY STANDARD SOLUTIONS
YourAgri-Meter has been factory calibrated with a Standard
Solution of 3.9 millimhos (3900 micromhos) conductivity. You can
keep your meter accurate by using this same Standard Solution. All
Myron L Company Conductivity Standard Solutions are within 1.0%
of Potassium Chloride reference solutions. The concentrations of
the reference solutions are calculated from data in the International
Critical Tables, Vol. 6.
pH STANDARD BUFFER SOLUTIONS: Ready to use, Myron L
Company pH buffer solutions are mold inhibited and accurate to
within +0.06 pH units @ 25°C. They are traceable to National Bureau
of Standards certified pH references and are color-coded for instant
identification.
RECOMMENDED STANDARD SOLUTIONS
MODEL/FUNCTION
AG6/pH
CONDUCTIVITY
pH ZERO
pH GAI N
AG-5
CONDUCTIVITY
SOLUTION NUMBER
WARRANTY & SERVICE
Myron L Agri-Meters, excluding the pH sensor,
have a two-year warranty. The pH sensor has a 6
month limited warranty. If an instrument fails to
operate properly, check the batteries, calibrations,
and cleanliness of the pH sensor bulb. If it still fails
to properly function, return it prepaid to the Myron
L Company.
If in the opinion of the factory, failure was due to
materials or workmanship, repair or replacement
will be made without charge. A reasonable service
charge will be made for diagnosis or repairs due to
normal wear, abuse or tampering. This warranty is
limited to the repair or replacement of the Myron L
Agri-Meter only. The Myron L Company assumes
no other responsibility or Liability.
442-3000 (3.9 millimhos)
7 buffer
4 buffer
10 buffer
442-3000 (3.9 millimhos)
PORTA PAK
Carrying Case for use with all
Myron L portable meters is
foam-lined and molded of
sturdy ABS plastic.
REPLACEMENT pH SENSORS
Order Model RPY for AG6/pH Agri-Meters. When ordering, be
sure to include the model and serial number of your meter to ensure
receiving the proper type. Complete installation instructions are
provided with each replacement sensor.
ORDERING
To order accessories contact your nearest stocking distributor, or
the Myron L Company.
pH Conductivity Instrumentation
Accuracy • Reliability • Simplicity
Printed in U.S.A.
Specifications subject to change without notice
2450 Impala Drive
Carlsbad, CA 92010-7226 USA
Tel 760-438-2021
Fax 800-869-7668 / 760-931-9189
www.myronl.com
© Myron L Company 2001 (W)