1
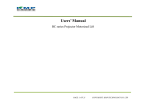
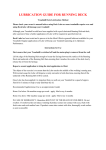
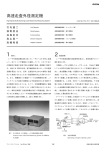
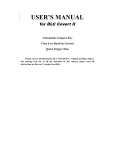
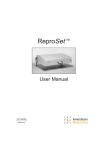
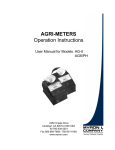
USER MANUAL
PORTABLE AIR CONDITIONER
AP14000
Thank you for selecting super quality air conditioner. Please be sure to
read this manual carefully before using it. Any question, please contact
the professional service for help.
CONTENTS
CONTENTS……………………………………………………..1
IMPORTANT SAFETY INSTRUCTIONS…………………..2-4
INSTALLATION……………………………………………….5,6
PARTS NAME……………………………………………………7
CONTROL PANEL……………………………………………...8
REMOTE CONTROL………………………………………….9
OPERATING METHOD………………………………….…10,11
WATER DRAINAGE…………………………………………...12
MAINTENANCE………………………………………………..13
TROUBLE SHOOTING………………………………………..14
1
IMPORTANT SAFETY INSTRUCTIONS
PLEASE READ
APPLIANCE.
ALL INSTRUCTIONS
BEFORE
USING
THIS
BASIC SAFETY PRECAUTIONS
WARNING To reduce the risk of fire, electric shock, or
injury to persons when using this appliance, follow basic precautions,
including the following:
•Do not attempt to repair or replace any part of your air conditioner unless it is
specifically in this manual. All other services should be referred to a qualified
technician.
•If the power cord becomes worn or damaged, the cord should only be
replaced by a qualified service technician using genuine replacement parts.
•The air conditioner should be plugged into its own grounded 15A, 60 Hz., 120
VAC circuit.
•Do not plug other appliances into the same outlet; it can overload the circuit
and cause a fire or electric shock.
•Do not remove the round grounding prong from the plug. It can result in the
risk of electric shock.
•This air conditioner is not designed for use by young children. Young children
should be supervised to ensure that they do not play with or climb on the air
conditioner.
•Be sure all packaging materials are removed from the air conditioner before
use. It can result in personal injury.
•Do not disassemble or modify the air conditioner or the power cord. It can
result in the risk of electric shock or fire.
•Do not place the power cord or air conditioner near a heater, radiator, or other
heat source. It can result in the risk of electric shock or fire.
•Do not use this or any appliance near flammable gasoline, benzene, thinner,
etc. It can result in the risk of electric shock or fire.
•Make sure the power cord is plugged firmly and completely into the outlet. It
can result in the risk of electric shock or fire.
•Do not start or stop operation by plugging in or unplugging the power cord. It
can result in the risk of electric shock.
•If the air conditioner is making unusual sounds or is emitting smoke or an
unusual odor, unplug it immediately. It can result in the risk of electric shock
or fire.
•Do not use if the electrical socket is loose or damaged. It can result in the risk
of electric shock or fire.
•Do not operate with wet hands or in a damp environment. It can result in the
risk of electric shock.
•Do not use this or any electrical appliance if you smell gas. It can result in the
2
risk of fire or explosion.
•Turn off and unplug the air conditioner before cleaning to avoid the risk of
electric shock.
•Do not clean the unit with water. Water can enter the unit and damage the
insulation, creating a shock hazard. If water enters the unit, unplug it
immediately and contact Customer Service. It can result in the risk of electric
shock.
•Use two or more people to lift and install the unit. Failure to do so can cause
back injury or other injuries.
CAUTION To reduce the risk of fire, electric shock, or
injury to persons when using this appliance, follow basic precautions,
including the following:
•To avoid possible cuts, avoid contacting the metal parts of the air conditioner
when removing or reinstalling the filter. It can result in the risk of personal
injury.
•Do not block the air inlet or outlet of the air conditioner. Reduced air flow will
result in poor performance and could damage the unit.
•Always grasp the plug when plugging in or unplugging the air conditioner.
Never unplug by pulling on the cord. It can result in the risk of electrical shock
and damage.
•Always turn off and unplug the air conditioner when it will not be used for
extended period of time. This conserves energy and reduces the chance of
accidents.
•Secure the wheels with blocks to prevent the air conditioner from rolling on
smooth floors.
•Install the air conditioner on a sturdy, level floor capable of supporting up to
110 lbs (50 kg). Installation on a weak or unlevel floor can result in the risk of
property damage and personal injury.
•Make sure the air conditioner is the correct size for the area you wish to cool.
Using an air conditioner that is the wrong size can waste energy and damage
the air conditioner.
•Close all doors and windows to the room for most efficient operation.
•To prevent damage to the surface finish, use only a soft cloth to clean the air
conditioner. Do not use wax, thinner, or a strong detergent.
•To prevent spills and property damage, be sure to drain the air conditioner
properly.
•To prevent the coils from freezing, do not operate the air conditioner if the
room temperature is below 62°F (17°C).
•Do not position the air conditioner so that pets or house plants are exposed to
the direct air flow. It can result in the risk of injury to pets or house plants.
•This air conditioner is designed for normal household use. Do not use for
cooling pets, foods, precision machinery, or art objects.
3
•Do not drink the water from the drain pan. Dispose of it properly outdoors or
down the drain.
•Do not operate air conditioner without the filter securely in place. Operation
without the filter could damage the unit.
•Clean the filter every two weeks, or more often if needed.
ELECTRICAL SAFETY
WARNING
Electrical Shock Hazard Failure to follow these instructions can result in
death, fire, or electrical shock.
•This unit must be properly grounded.
•Do not, under any circumstances, cut or remove the ground prong.
•If you do not have a properly grounded outlet, or if there is any doubt
that the outlet is not properly grounded, a qualified electrician should
check the outlet and circuit, and, if necessary, install a properly
grounded outlet.
•This air conditioner must be plugged into a grounded 60 Hz, 120 VAC
outlet protected by a 15 amp time delay fuse or circuit breaker.
•This air conditioner must be installed in accordance with national wiring
codes.
•Do not alter or modify the plug or cord of this air conditioner. If the power
cord becomes worn or damaged, the cord should only be replaced by a
qualified service technician using genuine replacement parts.
•Do not use an extension cord.
Due to potential safety hazards, the use of an adapter plug is strongly
discouraged. For temporary connections, use only a UL-listed adapter.
Ensure that the large slot in the adapter is aligned with the large slot in
the outlet.
To prevent damage to the adapter’s Ground terminal, hold the adapter in place
while plugging in or unplugging the air conditioner.
SAVE THESE INSTRUCTIONS
4
INSTALLATION
Selection of installation location
· Install the unit on a flat and dry place.
Leave at least 50cm space all around the unit.
· Fix the end of the exhaust duct to the exhaust terminal of the unit.
· Half-open the window and let the air outlet duct get through.
The window slider kit has been designed to fit most standard vertical and
horizontal windows. It is adjustable.
Wrong mounting
· The bend of the exhaust pipe is very important.
Wrong mounting can occur wrong working of the unit.
Take care to prevent any sharp bow or bend in the
exhaust hose, the exhaust air must flow freely.
5
WARNING
The length of the exhaust pipe is specially designed according to the
specification of this product.
Do not replace or prolong it with your own private hose as this could cause
mal-function.
BE CAREFUL: Use the shortest possible length. When mounting, we advise to
keep the exhaust pipe in a horizontal position. When the hole is not in use, use
the cap to cover the hole.
6
PARTS NAME
Front
1.
2.
3.
4.
5.
Control panel
Air outlet
Signal receiver
Adjustable air flow
Handle
Back
6. Castor
7. Evaporator air inlet
8. Up drain port( used when Continuous Drainage
or in dry mode)
9. Power cord
10. Down drain port(when water tank is full or not
use any longer in winter season)
Check all the accessories included in the package and please refer to the
installation instructions for their usage.
Accessories
7
CONTROL PANEL
1. ON/OFF button: press this button to turn on/off the unit.
2. MODE button: press this button to select automatic adjusting, Cool, Dry or Fan
mode.
3. FAN button: press this button to select high, middle or low fan speed.
4. TIME button: press this button to set timer-on, timer-off or no-timer.
5. UP & DOWN button: press these buttons to set room temperature or time
when in Time On/Off mode.
6. LCD display: display different signals accordingly.
Note: To vary from Fahrenheit to Celsius, press both UP and DOWN button
at the same time.
8
REMOTE CONTROL
1. High fan speed
2. Middle fan speed
3. Low fan speed
4. Swing
5. Timer
6. Up
7. Down
8. Cool mode
9. Dry mode
10. Fan mode
11. Celsius and Fahrenheit exchange
12. Power (same as ON/OFF)
9
OPERATING METHOD
Auto mode
·The appliance will operate in auto mode directly once it is turned on. Press
MODE button also could choose this mode.
·Under Auto mode, the running mode of air conditioner depends on the room
temperature, here under is called Ta.
If Ta ≥80°F(27℃),
it will enter cool mode.
If 66°F(19℃)<Ta<80°F(27℃), it will enter dehumidifying mode with default
low speed fan, and the fan speed can not be changed higher.
If Ta≤66°F(19℃),it will enter fan mode with default high speed on the
condition that the machine is cool only model.
·Once the working mode is selected, the mode will not change as ambient
temperature changes.
Cool mode
·Press MODE button (or Cool button, use remote control only) to choose Cool
mode, the LCD will display
.
·Press UP or DOWN button to set room temperature between 62°F(17℃)to
88°F(30℃).
·Press FAN button (or Low/Med/High button) to select low, middle or high fan
or
accordingly.
speed. The LCD will display ,
·Press Swing button to make the wind swing (use remote control only). The LCD
.
will display
Dehumidifying mode
·Press MODE button (or Dry button, use remote control only) to choose Dry
mode, the LCD will display .
·In Dry mode fan speed is preset. Speed button is not available. The
temperature can’t be set either.
·Press Swing button to make the wind swing (use remote control only). The LCD
will display
.
·Do not use air outlet duct. Connect the up drain port with one end of a drain pipe
and let the other end to a vessel or to sanitary sewer
·Dry mode can not be used to cool the room.
Fan mode
·Press MODE button (or Fan button, use remote control only) to choose Fan
mode, the LCD will display .
10
·Select the fan speed by press FAN button or press High/Mid/Low button directly.
·Press Swing button to make the fins swing (use remote control only). The LCD
will display
.
·The temperature can not be set.
·Do not use the air outlet duct.
Timer-on
·When the appliance is switch off, press Timer button to set timer-on. Press Up
or Down button to adjust time (0~24 hour) The Time on light indicator will
illuminate.
Timer-off
·When the appliance is operating, press Time Off button to set timer-off. Press
Up or Down button to adjust time. The Time off light indicator will illuminate.
Note: The Swing function is only available on remote control.
11
WATER DRAINAGE
This product has a self-evaporative system. The condensing water will be
recycled to cool the condenser. This can not only improve cooling efficiency, but
also save energy for you.
·When in Cool or Fan mode, there’s no need of water drainage.
·During dehumidifying mode, remove the drain plug from the back of the unit,
then install a drain pipe (φ10mm inner dimension) and place the open end of
the hose into any vessel such as bucket.
·If the internal water container is full, the LCD-display will flash “P2” and the unit
will stop automatically.
Note: If the water full alarm is often on, there may be some malfunction about
the unit. Contact the professional service for help.
12
MAINTENANCE
Note: Turn off the unit and unplug it before any maintenance or repair
begins to avoid electric shock.
Cleaning
·Unplug the unit before any cleaning.
·Clean the housing with a soft half-wet cloth. Do not use chemical solvent (such
as benzene, alcohol, gasoline). The surface may be damaged or even the
whole case may be deformed.
·Do not sprinkle water on the unit.
Air filter
·Clean the air filter every 2 weeks. If the air filter is
blocked with dust, the efficiency will reduce.
·Open the air filter cover upwards, and then take out the air
filter.
·Wash the air filter by immersing it gently into warm
(about 40℃/104°F) water with a neutral detergent, rinse it and
dry it thoroughly in a shaded place.
End of season
·Uncap the lid; remove the rubber plug on the drainage to drain the water.
·Keep the unit running in Fan mode for several hours
until the inside of the unit is dry.
·Turn off the unit and unplug it, screw the lid up and
switch it on. Take out the batteries of the remote control
and keep them well.
·Clean the air filter and reinstall it.
·Remove the air hoses and keep them carefully.
·Wrap the unit with the plastic bag and keep it in a dry
place.
13
TROUBLE SHOOTING
Before contacting professional service, check it first yourself referring to
the followings:
Problem
The air
conditioner
does not
function.
The air
conditioner
does not
seem to
perform.
The unit is
noisy.
The
compressor
does not
work.
The remote
control does
not function.
Cause
Solution
Connect to a functioning outlet
No power supply.
and switch on.
Is the unit plugged?
Plug the unit.
The fuse is burned or the unit Change a new fuse and power
is power off?
on the unit.
Unplug the unit, drain the
Is the LCD flashing P2?
water, and then power on it
again.
Timer function is active.
Deactivate Timer function.
In direct sunlight.
Close curtains.
Windows or doors open,
Close doors and windows,
many people or a heat
remove the heat source.
source in the room.
Dirty filter.
Clean or replace the filter(s).
Air inlet or air outlet blocked. Remove the blockage.
Room temperature lower Change
temperature
than the selected value.
selection.
Fan speed is low?
Choose suitable fan speed.
The
distance
between
machine and wall is less Re-place the machine.
than 50cm?
Place on an even, solid
Unit stands uneven.
surface (less vibration).
Wait 3 minutes until the
The overheat protection is
temperature has decreased,
probably activated.
then turn on the unit again.
Distance too great.
Remote control signal not
detected by the control
panel.
The batteries are drained.
Make sure the remote control
is correctly aimed at the
control panel.
Replace the batteries.
CAUTIONS: Switch off the unit and unplug it immediately if
anything abnormal happens. Then contact a qualified electrician.
14