1
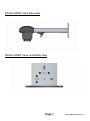
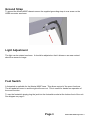
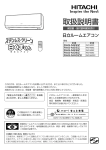
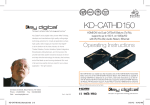
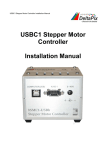
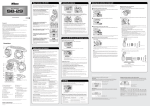
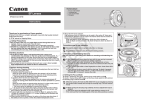
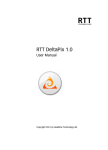
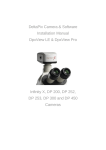
Modus M28Z VESA version User Manual Revision 1 Table of Contents Package Contents ..................................................................... 3 Installation ................................................................................. 4 VESA Mount .......................................................................... 4 Cabling .................................................................................. 4 Ground Strap ......................................................................... 6 Light Adjustment .................................................................... 6 Foot Switch ............................................................................ 6 Controls ..................................................................................... 7 Power ................................................................................... 7 Capture ................................................................................. 7 Magnification ......................................................................... 7 Magnification level OSD ........................................................ 7 Overview................................................................................ 7 Brightness ............................................................................. 7 Factory defaults ..................................................................... 8 Main Menu Controls .................................................................. 9 The following menu options are available. ................................ 9 External Keypad control of Main Menu ................................ 11 Changing the Output Frame Rate ........................................ 12 Taking Care of your Modus M28Z ........................................... 12 Firmware Upgrade ................................................................. 13 Specifications .......................................................................... 14 Declaration of Conformity ........................................................ 14 Warranty.................................................................................. 15 Page 2 Modus M28Z VESA English Rev 1 Package Contents Your Modus M28Z package contains: Modus M28Z Vesa Power supply HDMI to HDMI cable Operation Manual Grounding Cable USB Memory Stick Optional External Keypad KP1 Foot Switch Please retain the packaging in case there is a need to return the unit for service or repair. Page 3 Modus M28Z VESA English Rev 1 Installation VESA Mount The Modus M28Z comes with a VESA plate which is compatible with both 75 mm x 75 mm and 100 mm x 100mm standards. The Modus M28Z can be mounted to a VESA compatible stand using the M4 screws and nuts supplied. A VESA compatible TV/Monitor may also be mounted on the same stand above the Modus M28Z for ergonomic viewing. Cabling Plug the power supply into a mains socket. Plug the power lead from the power supply into the Modus M28Z on the underside of the unit (see diagram over). Plug the HDMI cable into the Modus M28Z and the other end into your HDMI compatible monitor or TV. Plug the external keypad (optional) into the Mini-Din socket. Page 4 Modus M28Z VESA English Rev 1 Modus M28Z Vesa side-view Modus M28Z Vesa underside view Page 5 Modus M28Z VESA English Rev 1 Ground Strap To ground the Modus M28Z chassis secure the supplied grounding strap to one screw on the HDMI connector as shown. Light Adjustment The light can be rotated as shown. It should be adjusted so that it shines on an area centred about the camera’s image. Foot Switch A footswitch is available for the Modus M28Z Vesa. This allows control of the zoom functions. The left pedal will zoom in and the right will zoom out. This is useful for hands free operation of the zoom function. To use the footswitch simply plug the jack into the footswitch socket at the bottom front of the unit. See diagram on page 5. Page 6 Modus M28Z VESA English Rev 1 Controls Power Push the power button to turn the unit on. A blue image will appear on your screen and after a few seconds the picture from the camera will appear. If not, use your monitor’s remote control or control panel to switch to the appropriate input used for the Modus M28Z. Pushing the Power button again will power off the Modus M28Z. Capture To use this feature, insert a USB Key into the USB port. When the system has detected the key it will report “USB Key Ready” When you have an image you want to capture, simply press the capture button. The system will indicate the image is being saved to the drive and when done. The image is saved as a 1920 x 1080 bitmap ( BMP ) format. The image name is Date and Time stamped and saved in this format “IMG-DateTime.bmp” Remove the USB Key and use a PC to view the saved images. NB: The USB Key must be in FAT File System Format. It will not work with any other format. Magnification Press the Zoom-Up button to enlarge the image and Zoom-Down to reduce the image size. The unit will make a sound to indicate when it has reached maximum or minimum zoom limits. Magnification level OSD The current magnification level is displayed for example “x30“ to show a magnification level of 30. When the magnification changes from optical to digital zoom a ‘d’ is also displayed “x60d” to indicate a magnification level of 60 and in digital zoom.. Overview Overview allows you to easily locate a point of interest on the object you are viewing. Press and release the Overview button to make the camera zoom out fully and revert to full-colour mode. A cross is displayed in the centre of the screen as an aid to location. Place the point of interest under the cross and press any key to restore the magnification to the previous level. Brightness The image brightness can be adjusted to suit your preference. Brightness adjustment is available by pressing and holding the Capture button (you should hear a beep). Next use the Zoom Up and Zoom Down buttons to adjust the image brightness as desired. Press the Capture button again Page 7 Modus M28Z VESA English Rev 1 to save the setting and exit edit mode. The setting you choose will be saved and used subsequently for that mode of operation. Factory defaults Press Capture while powering-on the Modus M28Z to restore factory settings for sound, lighting, brightness settings and video frame rate. The factory default settings are lights on, sound on and the frame rate that was set for your country before shipping. Page 8 Modus M28Z VESA English Rev 1 Main Menu Controls To access the Main Menu press and hold the Overview button for 3 seconds. The Menu will appear on the top of the screen including the menu navigational controls. To Exit the menu at any time simply press the capture button. The following menu options are available. Sound : On / Off Enable or disable the system sound. Light : On / Off Enable or disable the LED Lighting. Crosshair : On / Off Enable or Disable the two artificially generated lines that appear on the screen in both the horizontal and vertical directions which intersect at the centre of the screen. Crosshair : Long / Short Select the Crosshair size – Short or Long. Cross Col : White / Green / Blue / Red/ Yellow / Purple / Cyan Select the crosshair color. Bright : Levels 0 – 14 The image brightness can be adjusted to suit your preference. White Bal : On / Off White balance refers to the process of making sure whites appear as white in your images. This will help eliminate colour casts that come from various light sources -- the sun, incandescent bulbs and florescent bulbs. Put a white object under the camera (Half the image minimum ) and turn the white balance on. To re-balance later – turn the white balance off and on again * Note :- The White Balance Data is lost when the unit is powered down. Page 9 Modus M28Z VESA English Rev 1 Focus Lock : On / Off Turning the Focus Lock On will turn off the autofocus facility and lock the focus at the current setting. Turning the Focus Lock Off will re-enable autofocus. InfraRed : On / Off Normally the system filters out Infrared light. Turning the Infrared On allows this spectrum of light to pass through to the camera. When the Infrared mode is turned on the image becomes black and white. Cam WDR : Off / WD / VE The Wide Dynamic Range mode is a function for dividing an image into several blocks and correcting blocked-up shadows and blown-out highlights in accordance with the intensity difference. It enables you to view images with large intensity differences. WD – Images with Wide Dynamic Range are re-produced by combining long- exposure signals with high-intensity signals obtained with short exposure. VE – Using the Visibility Enhancer function will make the darker part of a camera image brighter as well as automatically correct brightness and contrast to show parts clearly without overexposure. Pick the option which shows the best results in your application. Noise R : 0 – 5 The Noise Reduction function removes noise to provide clearer images. Screen Size : 7 – 100 Enter the size of your display in inches (Measured Diagonally ) . This size is used to calculate the magnification levels. Lense Diopter : 1 – 15 Enter the Lense Diopter number of the lense used. Show OSD : On / Off Turning the OSD Screen Display ( OSD ) off removes all the static messages from the screen. Units : Metric / Imperial Display the measurement units in millimetres or inches. Page 10 Modus M28Z VESA English Rev 1 Time : xx:xx Enter the current time starting with minutes and then hours. Note:- Time and Date are only used to Date Stamp the captured images. Date : xx/xx/xxxx Enter the current date starting with day, month and then the year. Note:- Time and Date are only used to Date Stamp the captured images. Rev : xxxxxxxxxx Displays the revision of the system. This may be required for support issues. External Keypad control of Main Menu If you are using the optional external keypad KP1, it’s Zoom Up and Zoom Down buttons can be used instead of the Up and Down arrow on the front keypad. The external keypad Capture key can be used instead of the Select Item button. The Focus button can be used to Exit the menu. Changing the Camera Macro Lens The Modus M28Z is shipped with a Ø52mm lens with a focal length of 200 mm (+5 Dioptre). It is threaded into the camera using an adaptor which has a 46mm thread size on one side and a 52mm on the other side. The lens can be replaced by a Ø52mm lens using the existing adaptor or by a 46mm lens which requires removing the adaptor and threading directly to the camera. Note that a lens with a decreased focal length may require the Modus M28Z to be adjusted lower to remain within focal range and vice versa for a higher focal length lens. Page 11 Modus M28Z VESA English Rev 1 Troubleshooting Changing the Output Frame Rate Most monitors and HD televisions can display all the many different standards of HD signals, however some cannot. If your monitor/TV does not display the image from the Modus M28Z you should try the following: power-off the Modus M28Z, press and hold the Overview button and power on the unit. This will change the unit from 50 Hz mode to 60 Hz or vice versa. You will hear a sequence of three beeps confirming the frequency change. Taking Care of your Modus M28Z Do not touch the lens. Dirt on the lens will appear as a blurred or dim image or as fuzzy spots on the screen. If you believe the lens is dirty, it can be cleaned with a soft, dry cloth applying minimal pressure. As the lens is polished and coated, do not use a wet or coarse cloth, avoid detergents and abrasive substances or solvents to clean it. WARNING: Never look directly at the LED light source for any prolonged period of time. Use only the supplied power supply and inspect the cabling regularly for damage. Page 12 Modus M28Z VESA English Rev 1 Firmware Upgrade The Modus M28Z includes a Firmware Upgrade Function allowing end users to install new versions of the firmware which includes new feature additions and bug fixes. 1. Make a directory called “Upgrade” in the USB Flash Drive. If the directory already exists then delete all the files from that directory. 2. Copy the two upgrade files to this “Upgrade” directory. The files should be in the format “ARMxxxx.Bin” and “FPGAxxxx.Bin”. The “xxxx” shows the version number. 3. To enter the Firmware Upgrade Function, power up the system with the front panel Zoom Up and Zoom Down arrow keys pressed. 4. The system will make a long sound upon entry to the Firmware Upgrade Function. 5. The light will flash on and off and a beeping sound will be emitted until a USB Flash Drive is detected. If no drove is detected the system will timeout after approx. 30 seconds and boot normally. 6. If you want to exit the Firmware Upgrade function, simply power cycle the system by pressing the Power Button. 7. When the USB Flash Drive is detected a. The Firmware Upgrade Function searches the “Upgrade” directory for the 1st file with the name format “ARMxxxx.Bin” and upgrades the ARM processor. b. The Firmware Upgrade Function then searches for the 1st file with the name format “FPGAxxxx.Bin” and upgrades the FPGA Firmware. 8. NB:- The Firmware Upgrade Function will use the 1st file with the correct name format it finds. Therefore it is recommended that you only have the firmware version that you want to install in the “Upgrade” directory and not multiple versions. 9. During the upgrade process beeping sounds will be emitted indicating progress. 10. When the upgrade is complete the system will automatically restart with the new version. Important If the USB Flash drive is removed during the upgrade process or has a corrupt file the system will not start and the upgrade process will have to be repeated. Page 13 Modus M28Z VESA English Rev 1 Specifications Camera Resolution: Monitor Connections: Monitor Requirements: Outputs: Magnification: Image Capture: Dimensions: Power: Weight HD 1080p, 1980x1080 at 50/60 Hz HDMI/DVI HD Ready or Full HD (Recommended) DVI/HDMI, TMDS +5 Lens, 2.5x – 105x (24” Monitor) USB 2.0 High-speed 37cm x 12cm x 14cm 8 Watts 1.2Kg Operating Temperature: Storage: -10°C to +60°C. Operating: +5°C to +40°C As we strive to constantly improve our products, this information is subject to change without notice. Declaration of Conformity We, DeltaPix, declare under our sole responsibility that this product Modus M28Z, of the brand DeltaPix to which this declaration relates, is in conformity with the following standards or other normative documents: EN 60601-1-2:2007 Medical Electrical Equipment – Electromagnetic Compatibility. Classification: Residential Following the provisions of EMC directive 2004/108/EC. Signed, for and on behalf of DeltaPix, Alan Johnston, Naas, Ireland. Page 14 Modus M28Z VESA English Rev 1 December 2011. Warranty DeltaPix warrants the equipment, when purchased new, to be free from defects in material and workmanship and will repair or replace at DeltaPix' discretion, any equipment which exhibits such defects; provided that the equipment has been operated under the proper conditions of installation and has not been tampered with by any persons not authorised by DeltaPix or its agents and that it is solely serviced by DeltaPix or its agents. In no event shall DeltaPix or its agents be liable for special, indirect, incidental or consequential damages; the original user's remedies being limited to repair or replacement. This warranty is valid only when serviced in the country of original purchase. DeltaPix makes no other or further warranty, express or implied, including and warranty of fitness for a specific purpose or warranty of merchantability. This warranty is valid for a period of 12 Months effective from the date of delivery. For warranty claims or service during or after warranty period please contact your distributor. DeltaPix Aps, Maalov Byvej 229, DK-2760 Maalov, Denmark, Phone +45 46760205, Fax +45 44643429 Page 15 Modus M28Z VESA English Rev 1